Greg O's Posts (3)

Sort by

Frsky Taranis "hands off" auto tune guide

IMG_2769-MOTION.gif
Hands off auto tune

In this post I will outline the steps I took to automate the auto tune process. This guide will outline a Logical Switch setup that alternates every 1 second and configure a switch to disable normal stick input and enable the Logical switch to control either the ailerons or elevator.   This guide adds onto my previous post regarding Flight Modes.


In this setup I use my flight mode switches SA and SB to control main flight controls. I will be using SE to select which control to auto tune (Aile or Elev). We also want some logic to not trigger this function outside of AUTO TUNE Flight Mode, and to announce which mode is selected (IE: Arm Auto Tune Elevator).


Logical Switches

First we need to make a Logical Switch that toggles every 2 seconds, since you are looking for an Automated Auto Tune. I moved down a few spaces in my Logical Switch list, and started at L11, enter two switches as follows:

blogger-image--47587577.jpg


L11:
Function: Timer
V1/V2: Leave at 1.0
AND Switch: Leave blank for now
Duration: 2.0

L12:
Function: Timer
V1/V2: Leave at 1.0
AND Switch: !L11 (Note the !)


Go back and EDIT L11 and edit AND Switch to read: !L12 (Note the !)
(This third step is needed because you cant define the L12 AND Switch when L12 has not been created)

So we have defined two Logical Switches that trigger off each other every 2 seconds. If you watch the L11/L12 Indicators on the main screen they should alternate back and forth every 2 seconds..

Mixer Settings

Now take one of those Logical Switches and tie it to a Mix. We are going to have a little bit of logic to make sure this mix does not get enabled outside of AUTO TUNE mode.
blogger-image--952533157.jpgFirst steps will be to COPY your Aileron MIX to a second line (See photo), now edit the second Aileron Mix and setup as follows:
Source: L11
Modes: 4 (Make sure and TURN OFF other Flight Modes)
Switch: SE-
Warning: 3 (Make it beep when this is enabled**)
Multpx: Replace
blogger-image-1575374466.jpg


Then COPY the ELEVATOR MIX to a second line (See above photo), now edit the second Elevator Mix  and setup as follows:
Source: L11
Modes: 4 (Make sure and TURN OFF other Flight Modes)
Switch: SE
Warning: 3 (Make it beep when this is enabled**)
Multpx: Replace

Final notes

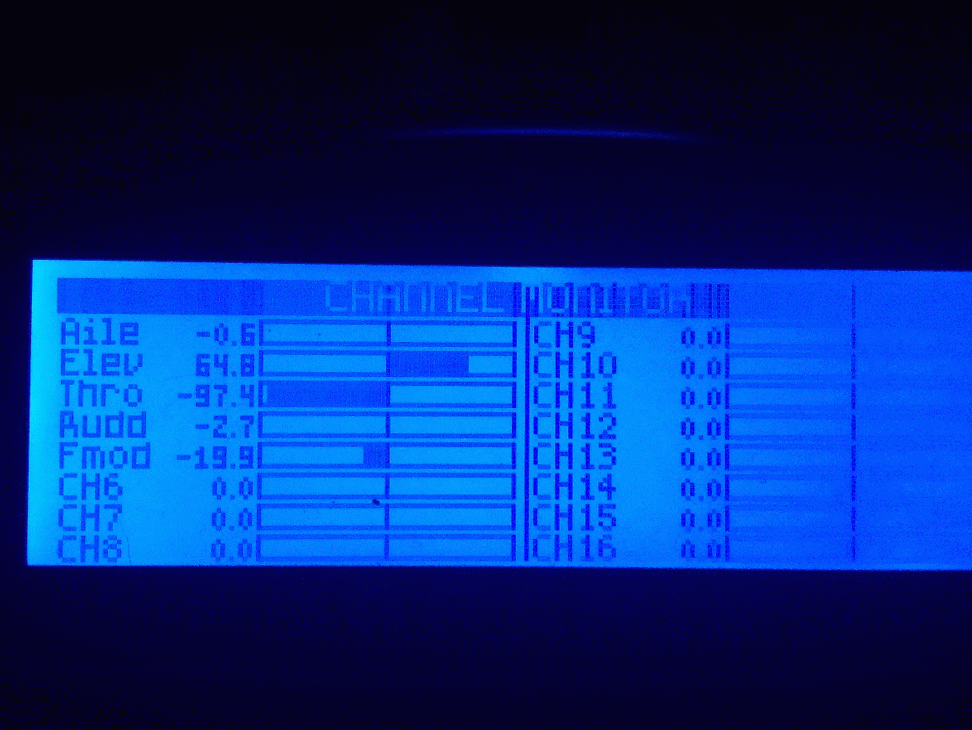
Use the channel monitor to confirm servo movement. When FMod Switches are in any position OTHER then AUTO TUNE, the SE Switch should do nothing. When FMod Switches are in the AUTO TUNE position, the SE switch is active with the following settings:
  • SE+ - Automatic AUTOTUNE Disabled, you have control of the process
  • SE   - Automatic AUTOTUNE Enabled for Ailerons (Elevator is still under your control)
  • SE-  - Automatic AUTOTUNE Enabled for Elevator (Aileron is still under your control)
** I ran out of time when I first set this up and didn't tie them to a special function to announce the mode, instead used the frsky "warning beep" to indicate it was on.  
Read more…

Frsky Tarais spoken flight mode guide

blogger-image-1990895090.jpg

I've been away from the diydrones scene for a while, but I'm still around. Here is something that I can contribute to the community.

My Original Blog post here

This is my tutorial on how I configure my FrSky Taranis to allow flight mode changes to be displayed on the Taranis screen as well as spoken out loud.

 
I use the following switch settings for my flight modes:
  • SB+ Manual Mode
  • SB FBWA
  • SB- AUTO MODES Selected by SA
  • SA+ LOITER
  • SA   AUTO TUNE
  • SA- AUTO
For this we will be using Logical Switches, Special Functions, Flight Modes and the Mixer. This setup allows me to select a normal flight mode (Either Manual or FBWA) and also announce which AUTO mode is armed.
 
Flight Mode setup:
First we need to define each of the 5 flight modes. Flight mode 0 is a default mode that is active when no other modes are, so we will skip it and start on flight mode 1.  The flight mode name is what is shown on your transmitter display. 
** YOU WILL ALSO WANT TO CHANGE FM2-5 TRIM SETTINGS TO READ 1, THIS WILL MAKE EACH FLIGHT MODE USE FM1 TRIM SETTINGS..

Setup as listed
blogger-image-1990895090.jpg
Fm1
Name: Normal
Switch: SB+
 
Fm2
Name: F B W
Switch: SB
 
Fm3
Name: Loiter
Switch: SA+
 
Fm4
Name: AUTO TUNE
Switch: SA
 
Fm5
Name: Auto
Switch: SA-


Next configure the Logical Switches.  
Logical switches are used for secondary actions such as playing the voice for current / armed flight mode. This step depends on the Flight Modes being defined. L1-L5 are used to activate on Flight Mode selection, L6-L8 are used to activate AUTO Mode selection and announce when not in AUTO Mode (IE Arm AUTO, Arm AUTO TUNE).

 
Setup as listed
L1
Function: a=x
V1: SB
V2: -100
AND Switch: FM1
blogger-image-771660445.jpg
Logical Switches 1 - 7
Delay: .2
L2
Function: a=x
V1: SB
V2: 0
AND Switch: FM2
Delay: .2
L3
Function: a=x
V1: SB
V2: 100
AND Switch: FM3
Delay: .2
L4
Function: a=x
V1: SA
V2: 0
AND Switch: FM4
Delay: .2
L5
Function: a=x
V1: SA
V2: 100
AND Switch: FM5
Delay: .2

L6
Function: a=x
V1: SA
blogger-image-2137944261.jpg
Logical Switches 4-8
V2: -100
AND Switch: !SB- (NOTE THE !)
Delay: 1.0

L7
Function: a=x
V1: SA
V2: 0
AND Switch: !SB- (NOTE THE !)
Delay: 1.0

L8
Function: a=x
V1: SA
V2: 100
AND Switch: !SB-
Delay: 1.0


Special functions
This is where you define what to do with all those Logical Switches you just defined in the previous step, as before, you MUST setup the Logical Switches before doing this. I used the OpenTX Speaker program to define some additional voices as follows:

autotune (Auto Tune)
loiter (Loiter)
fbw (Fly By Wire)
armlo (Arm Loiter)
armauto (Arm Auto)
armat (Arm Auto Tune)


When using the OpenTX Speaker app, make sure the file names are under 8 characters, and with out spaces. The phrases can be spaced out how ever you like it to speak.


SF1
Switch: L1
Function: Play Track
Value: normal
Repeat 1x

blogger-image-782816303.jpg
SF2
Switch: L2
Function: Play Track
Value: fbw
Repeat 1x
SF3
Switch: L3
Function: Play Track
Value: loiter
Repeat 1x
SF4
Switch: L4
Function: Play Track
Value: autotune
Repeat 1x
SF5
Switch: L5
Function: Play Track
Value: auto
Repeat 1x
blogger-image--548391837.jpg
SF6
Switch: L6
Function: Play Track
Value: armlo
Repeat 1x
SF7
Switch: L7
Function: Play Track
Value: armat
Repeat 1x
SF8
Switch: L8
Function: Play Track
Value: armauto
Repeat 1x


Your FrSky Taranis should now be talking and displaying flight modes on its display. Next it's time to setup the MIXER, which will control the output of your Flight Mode channel (I use CH5, but this could be any CH)


Mixer settings
The setup for the mixer takes the current Flight Mode and uses it to drive CH5 to a specific PWM value.


First start out with CH5 MIX. Edit this and use the following:


CH5 (FM1 MIX)

blogger-image--1021153962.jpg
Yes the names are all "nor", this is why COPY is dangerous
Name: FM1 MIX
Source: MAX
Weight: 100
Modes: 1 (MAKE SURE ONLY FM1)

Then add one for FM2

CH5 (FM2 MIX)
Name: FM2 Mix
Source: MAX
Weight: 40
Modes: 2

and FM3

CH5 (FM3 MIX)
Name: FM3 Mix
Source: Max
Weight: 10
Modes: 3

FM4

CH5 (FM4 MIX)
Name: FM4 Mix
Source: MAX
Weight: -20
Modes: 4

FM5

CH5 (FM5 MIX)
Name: FM5 Mix
Source: MAX
Weight: -40
Modes: 5


Final Steps are to open APM Mission Planner and setup each flight mode, if you use a different mode, dont forget to change the names in used in this guide, as well as the OpenTX Speaker files.

 
Read more…

First flight using APM2 + PZ T-28


First flight went well. Was able to test Manual (Works! :D), Stabilize and RTL modes. 

The plane is a semi-stock Parkzone T-28 Trojan. The servos are all stock. ESC and Motor are upgraded to E-Flite 80AMP ESC and Power15 Motor. Generic 5v BEC powers APM and Radio equipment and nav lights. RC Radio gear is JR 2.4Ghz. Telemetry provided by 3d Robotics Telemetry Radio


2012-06-24%2011-03-22.tlog

2012-06-24%2011-03-22.rlog


This was using older firmware (Stock as of when the board was hand made by the awesome folks at 3dRobotics, not updated to new MAV1.0 FW). I have recently updated to current firmware (Using Mav1.0), and I am in the process of testing all settings and preparing for my second flight. I would like to add a Amp/volt meter, and AirSpeed sensor before my next flight, as more data = good thing..


Read more…