John C.'s Posts (21)

Sort by

Cheap Fixed Wing Mapping

3689714400?profile=original

"Ten thousand dollars?!?! It's just a piece of foam!"

If you've uttered those words, this post is for you.

We will not debate the value of quality or workflow simplicity contained in that $10,000. What we will do is demonstrate how to make a "cheap" consumer fixed-wing drone generate high resolution orthomosaics with a simple, repeatable workflow.

Tiny violins from here on out.

giphy.gif

If you are starting with nothing, it will cost a little over $1800 to assemble all of the required hardware.

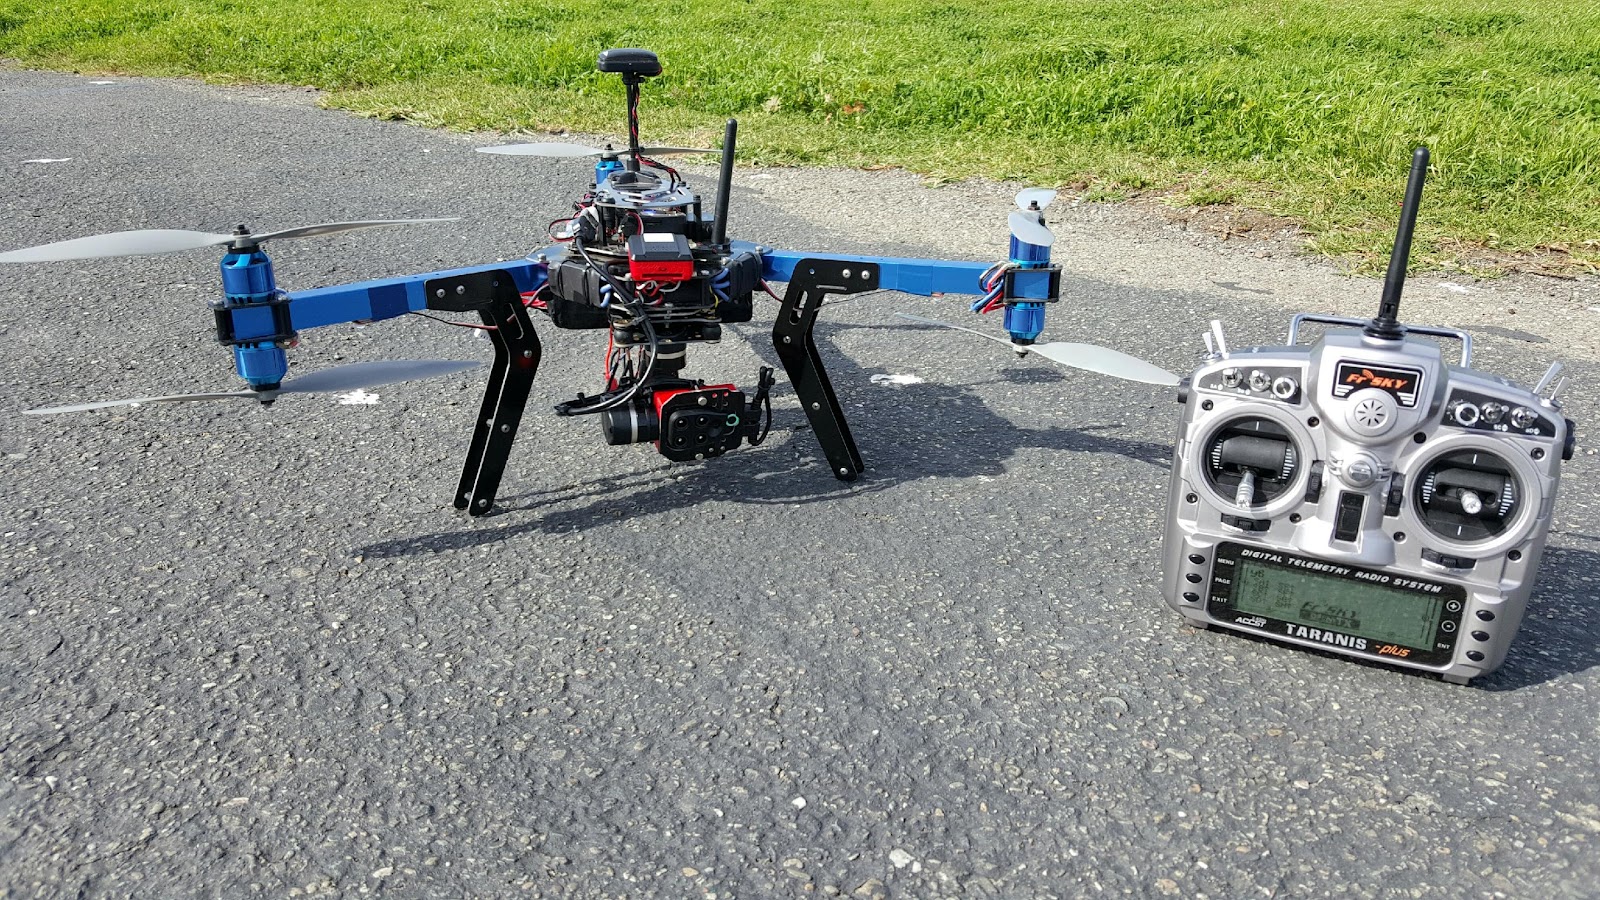
The finished hardware setup.

3689714438?profile=original

Required Components:

Parrot Disco: $1,199

Hero5 Black: $390

Taranis w/ Rx: $237

Once you get the Disco and power it up for the first time, remember that it is just a WiFi access point running Linux. You can telnet and ftp to it like a normal network device.


3689714478?profile=original

When you're connected via WiFi, the Disco will be at 192.168.42.1


3689714506?profile=original

The goal here is to replace the brains of CHUCK with APM:Plane firmware. The primary advantage is increased flexibility in autonomous flight control and planning.

Let's take a look at the directory structure inside CHUCK.

3689714500?profile=originalI used this guide to get this plane up and running with APM:plane.

In short, there are only three things you need to do to make Disco run the APM flight code. (double check your file permissions when you write these files!):

1) Upload the latest stable arduplane kernel to the /data/ftp/internal_000/APM directory. I used FTP to upload the file.

2) Create the start_ardupilot.sh script. I used vi to create mine in the same APM directory.

3) Modify the existing /etc/init.d/rcS_mode_default boot script to support the APM kernel. 

3689714345?profile=original

Your Disco is now ready for persistent boots into the APM:plane firmware. Let's finish setting up the hardware.

Connect the Taranis receiver and GoPro. The receiver plugs in via the servo connector wire (see above image), and you'll need to dig out some foam to fit the Hero5. There is nothing to damage in this section of the plane so be careful, but don't worry about hitting anything.

3689714525?profile=original

Some extra foam was removed on this installation to accommodate other sensors.

We chose the Hero5 Black for three reasons:

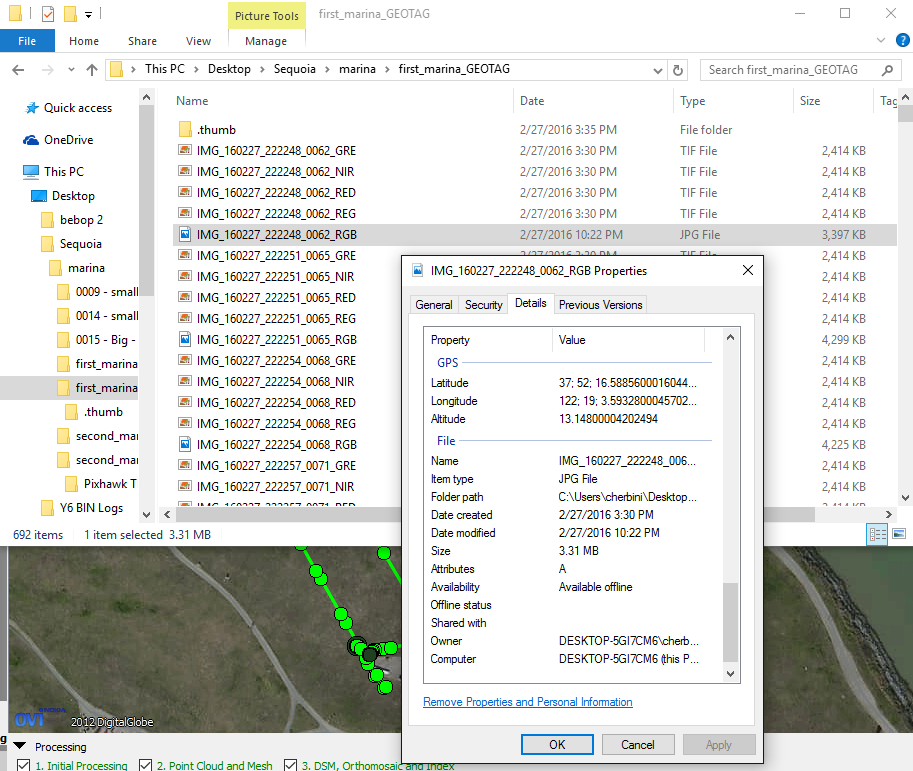
1) Self contained power system

2) Internal geo-referencing of images

3) Internal intervalometer

When considering other sensors, remember that losing any one of those features can significantly increase the complexity of the installation.

Once connected via Wifi, open a UDP connection in Mission Planner to verify correct operation of the vehicle.

3689714616?profile=original

The mavlink connection will open, and you will get live updates in mission planner.

3689714541?profile=original

Next you should compare your parameters with this known good parameter file.

3689714630?profile=original

Once you write those parameters to the vehicle, you are ready to check all of your surface responses. Here's how I normally do it:

1) In manual mode, check for normal control surface response in pitch and roll.

2) Switch to Fly-By-Wire A and check for proper surface corrections to roll and pitch attitude of the vehicle.

3) Still in Fly-By-Wire A mode, check for proper control surface output to transmitter input.

If you are not seeing proper control surface response, I would start by looking at the ELEVON_OUTPUT parameter. I use setting number 2. (Here's a great video from Mark Harrison if you need elevon help! https://www.youtube.com/watch?v=yvlCbs1NeC4)

When your control surfaces check out, you're ready to go for a maiden flight.

My typical maiden:

giphy.gif

Everyone handles maiden flights differently, but here are a few tips for this Disco configuration with APM:

1) I use 3 modes; Manual, Fly-By-Wire A (FBWA) and Return-To-Launch (RTL).

2) Launch in FBWA mode at 3/4 throttle. Any of the normal wing launching methods will work.

3) Get "three mistakes high" and try manual mode. You will need to trim the vehicle

4) Once those two modes are working, try RTL.

With a successful RTL, you're ready for an AUTO mission.

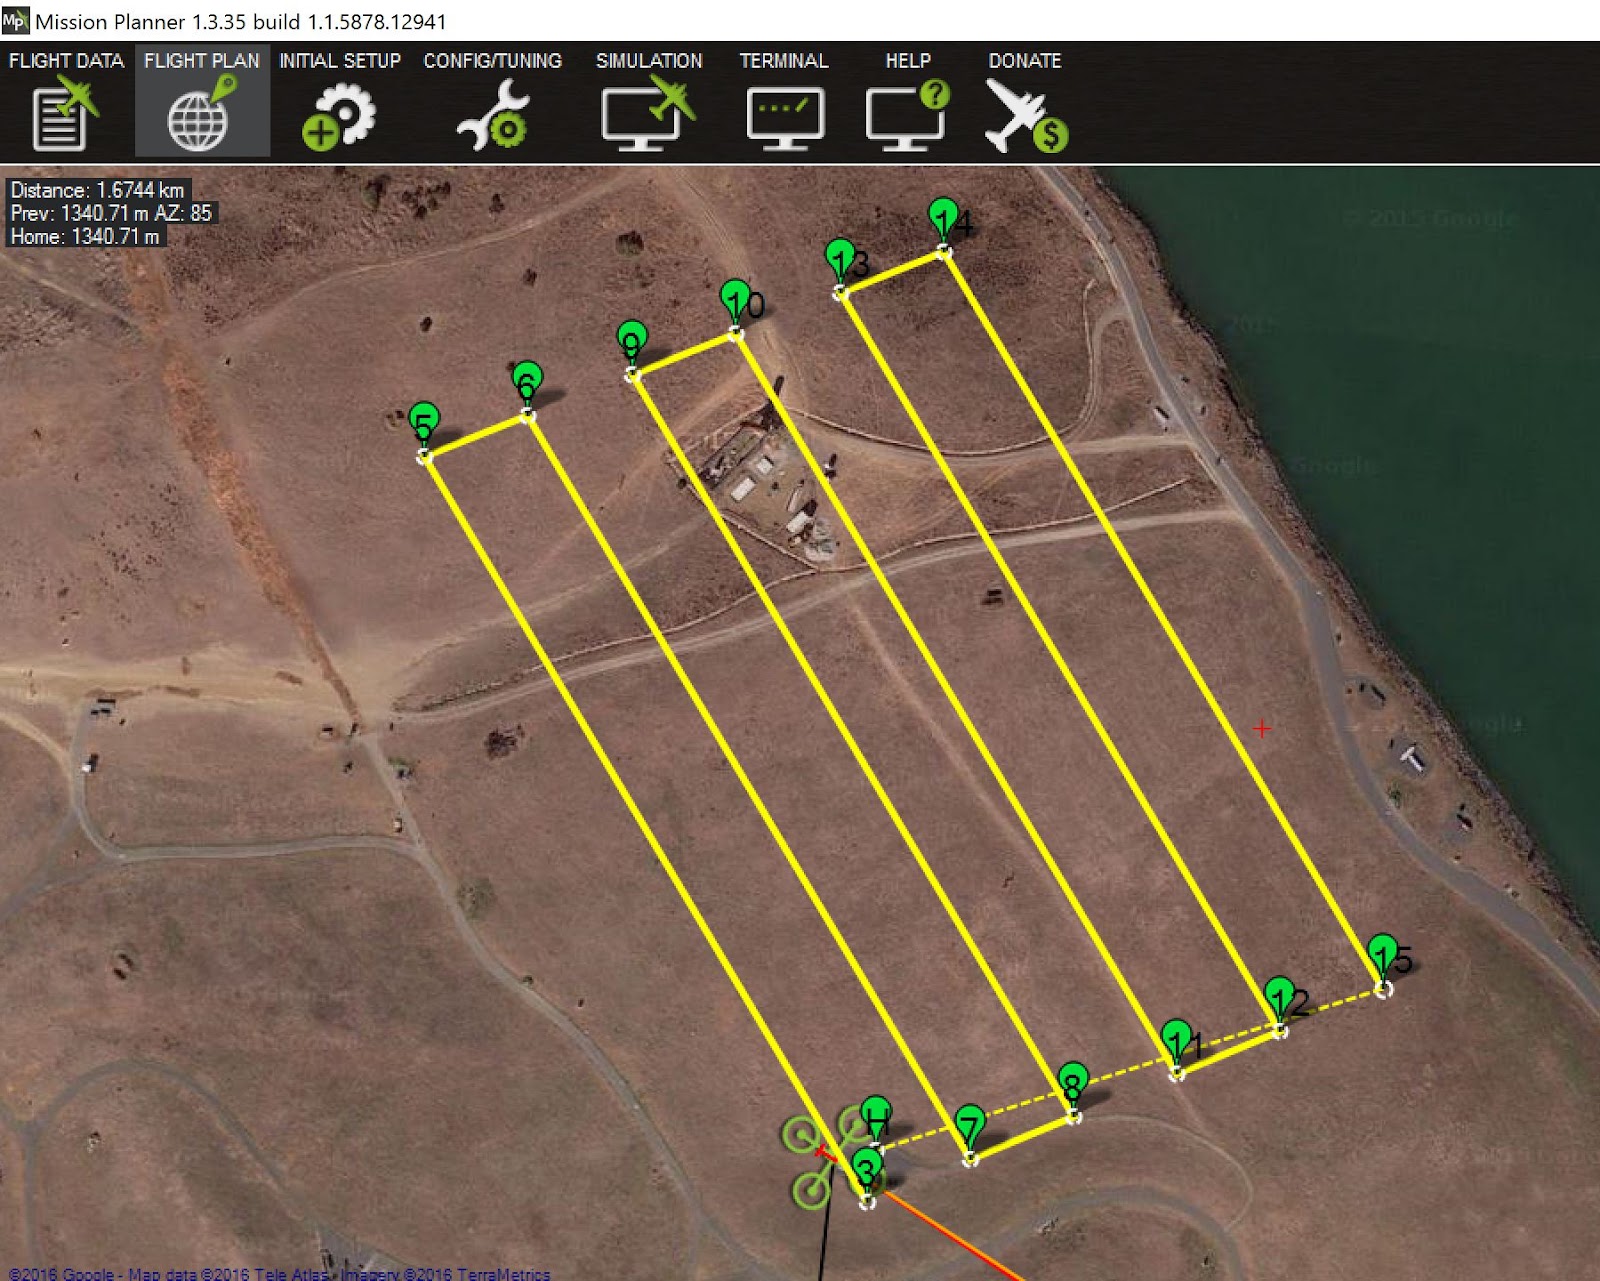
Create your polygon in Mission Planner, right click inside the polygon and go to AutoWP -> Survey Grid.

3689714668?profile=original

I used the Hero4 camera model, and increased the sidelap to 80% to generate my pattern.

3689714563?profile=original

The AUTO takeoff and landing works very well with this configuration. Do not be afraid to try it. Landing only requires two additional waypoints. LAND at 0 altitude where you want the plane to stop, and one waypoint before it about 200m away at 30m altitude.

3689714648?profile=original

Upload your mission to the vehicle, and then download it back to your ground-station to confirm accuracy.

When you're ready for your first AUTO flight, here are a few things to keep in mind:

1) Don't forget to turn on the camera! I used a 2 second timelapse, and it was way too many pictures. 700 images that were culled to 150 to produce the final orthomosaic. The GoPro WiFi was on and did not seem to affect my range checks. The voice activation is actually useful, "GoPro start a timelapse" was all it took to get going.

2) If you want telemetry throughout the flight, you'll need a WiFi adapter with an external antenna. Your laptop wifi antenna will not stay connected throughout the flight.

3) I keep the same three modes on the transmitter and put the vehicle into AUTO from the groundstation.

4) Once armed and in AUTO, you shake the vehicle to activate the motor and AUTO launch. Throw it into the wind and it will be on its way.

5) The vehicle is extremely well tuned. This mission was flown in 10-12mph winds on the ground.

6) It takes practice to nail AUTO landings.  Be ready to take over control on long or short landings.

3689714400?profile=original

Ok, you've got your vehicle back after your successful mapping run. What next?

Remember that this is not a "smart" distance based capture. You need to go through your images, and cull the ones where the vehicle is turning, or has a lot of water in it, etc....

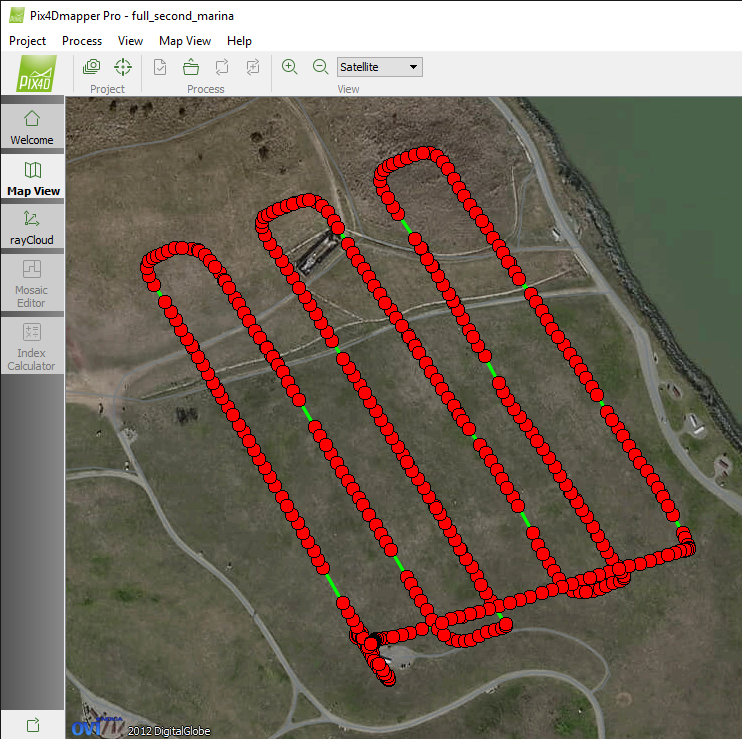
Then send it to your favorite orthomosaic tool!

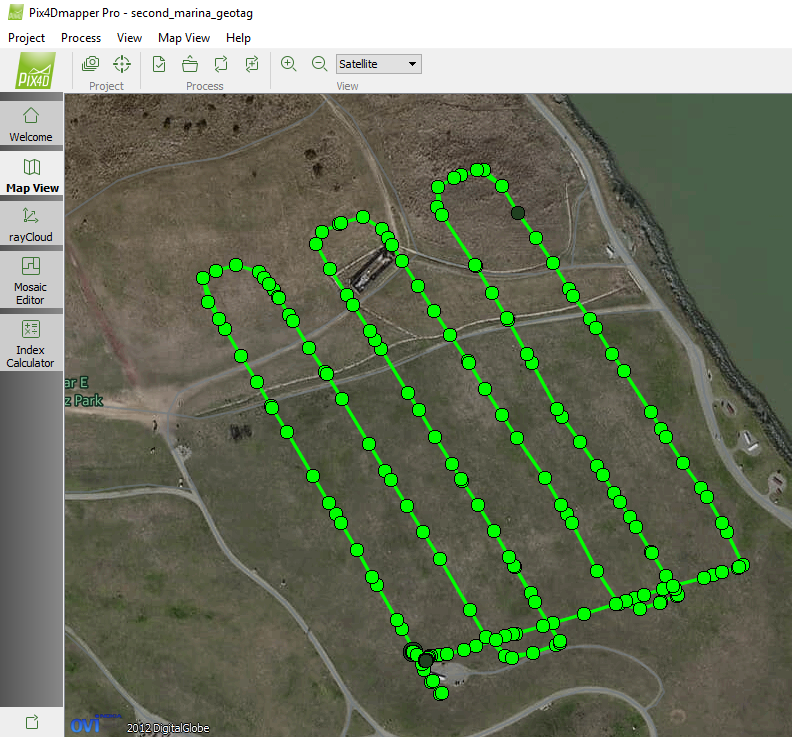
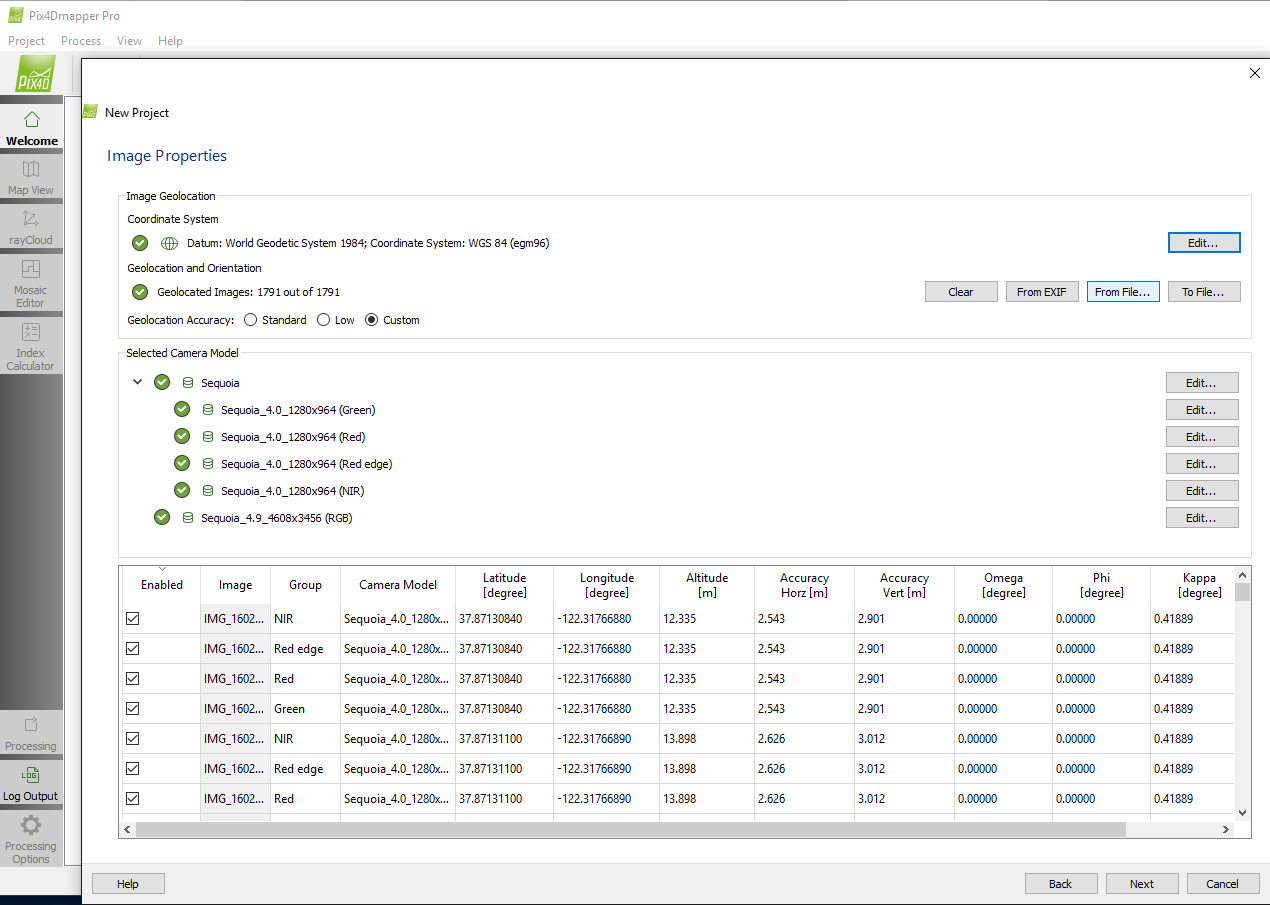
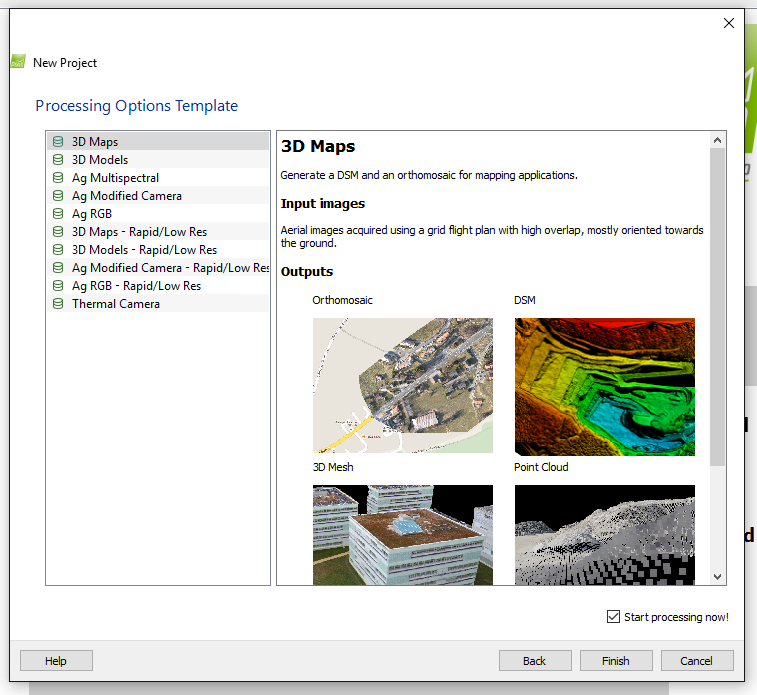
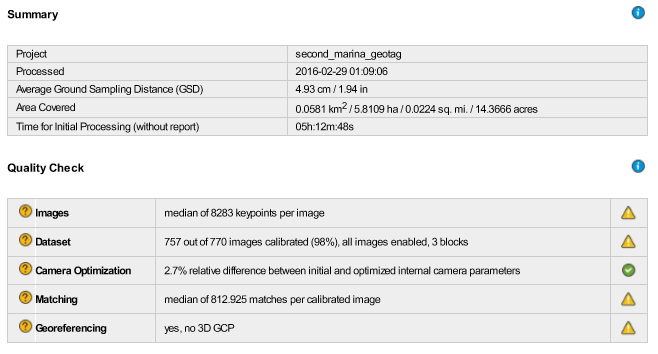
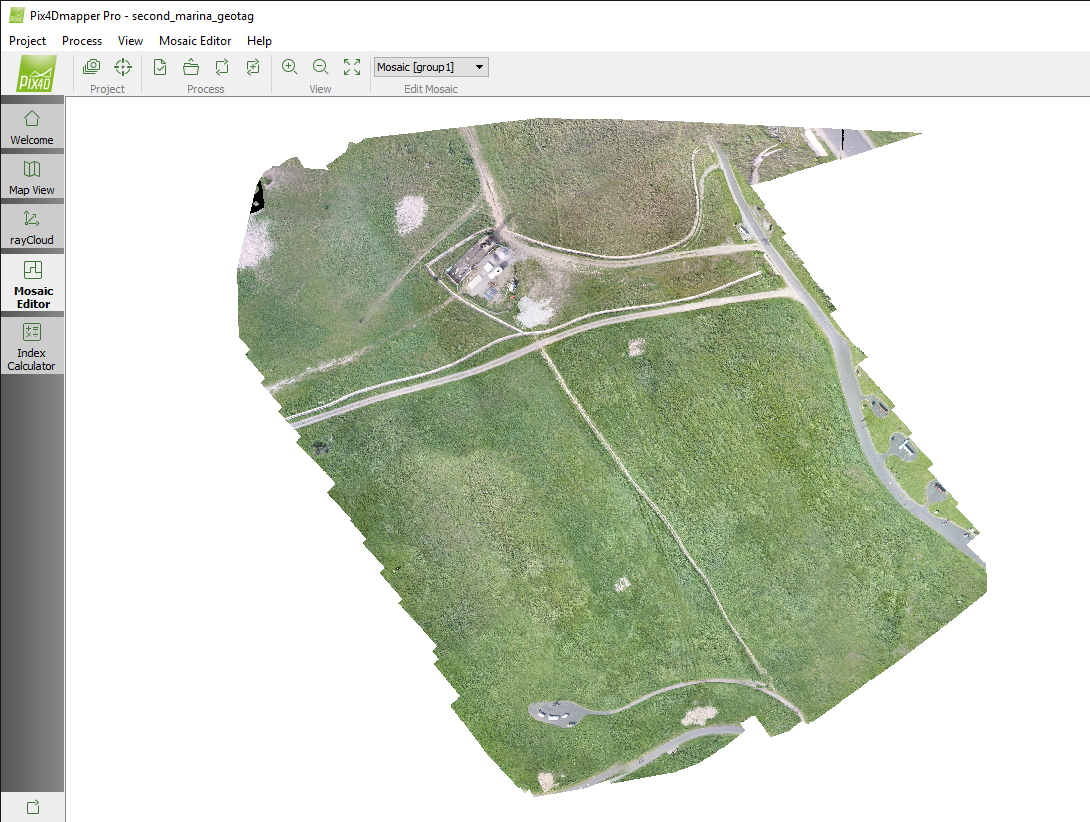
For this example, I used Pix4D Desktop. I used 100% default settings on the 3D Maps profile. Full processing took about 2 hours, and it came out great for this sensor!

3689714697?profile=original
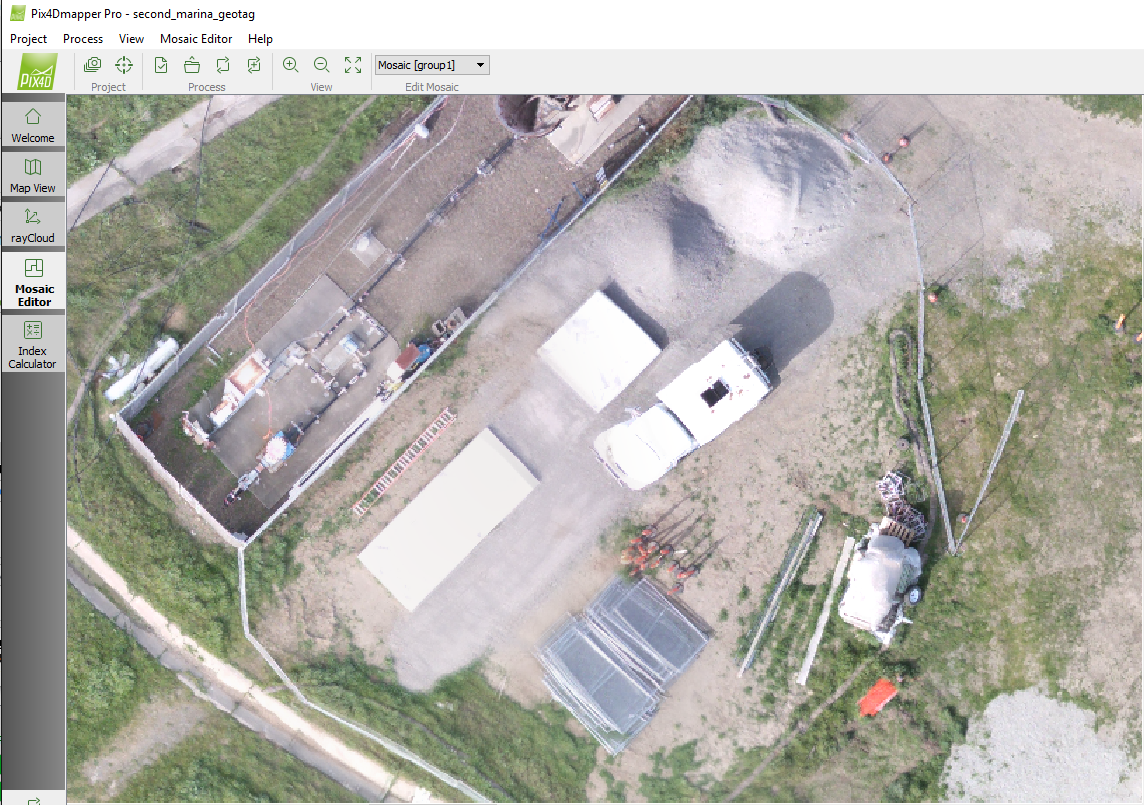
And a closer in view of the ortho.

3689714723?profile=original 

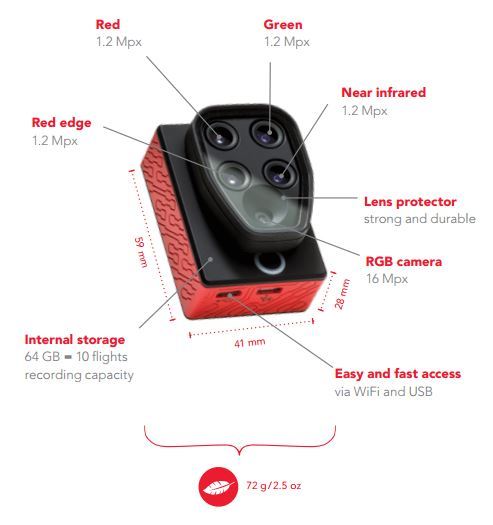
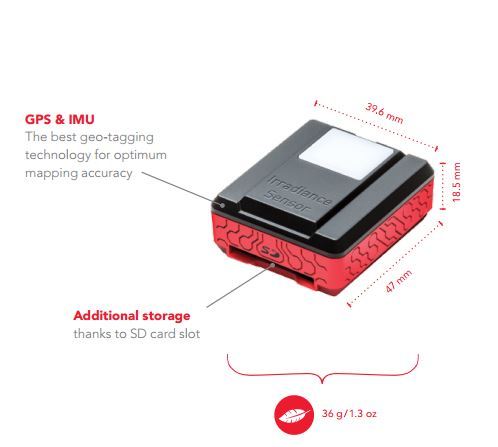
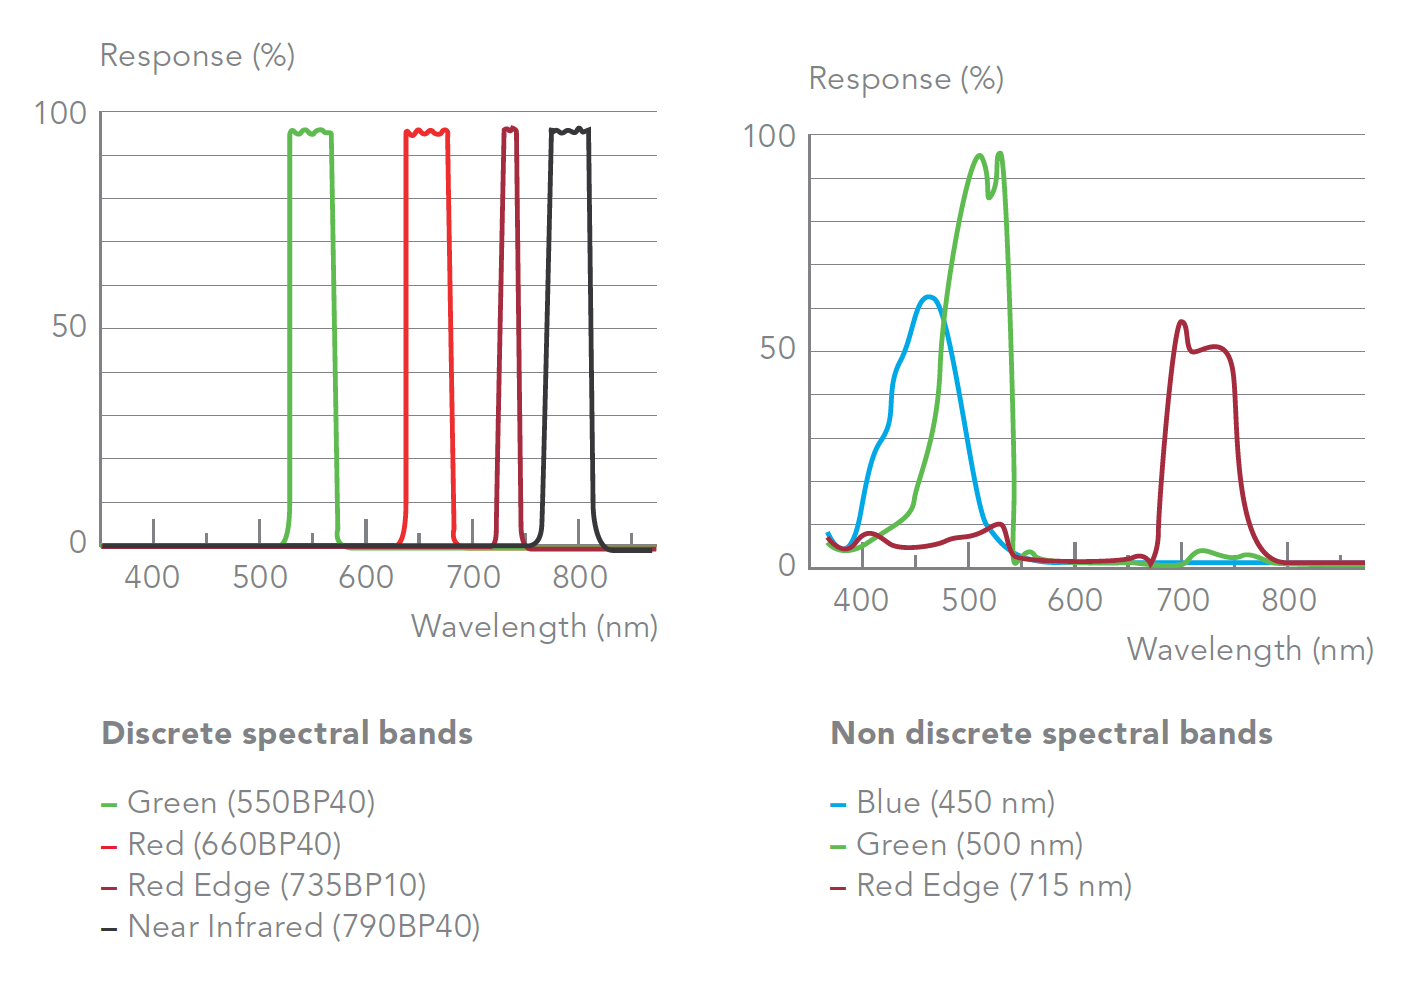
From here, there's a lot of room to explore. Larger capacity batteries, higher quality RGB imaging sensors, multispectral imaging sensors, atmospheric sensors, extended telemetry range or leveraging the on-board OEM RGB sensor would all be great extensions to this platform.

We will see how long the airframe holds up; but Disco is a consumer product with readily available and inexpensive spare parts. You will not break the bank with, "Two is one and one is none."

In summary, you don't need $10,000 to create large area, high spatial resolution maps with a fixed wing drone. A relatively small amount of money and basic maker skills can get you a cutting edge mapping platform from three boxes of consumer products.

Please let me know if anyone else tries this! Good luck!

Read more…

Parrot/Pix4D announce 2017 Climate Innovation Grant

3689706105?profile=originalhttps://www.youtube.com/watch?v=UJw9KC7ut0A

It is amazing to see how fast our industry is advancing. Reliable, repeatable data collection is no longer the challenge it once was. Through the efforts of many of you on this site, organizations are now able to start focusing on how to leverage reliable data collection with advanced sensors in new ways.

Two dimensional vegetation indices have now moved into the third dimension.

Please take a moment to review the Parrot/Pix4D Climate Innovation Grant. We are looking for leading edge climate researchers to start thinking about how to apply autonomous vehicles, advanced sensors and best of breed processing software to difficult challenges related to the climate that we all share.

The best part is FREE Sequoia sensors with Pix4D licenses!!

--------Links and more information below----------

To help foster further innovation surrounding the impact of climate change, Parrot and Pix4d are announcing a Climate Innovation Grant. This grant program consists of a hardware and software award. Successful proposals will receive a  Parrot Sequoia multispectral sensor, a Pix4D software license, and training.

With climate innovation as the underlying theme, grant proposals should include a geographical/mapping component using UAVs and Pix4D mapping software, as well as multispectral imagery related to the technical capabilities of the  Parrot Sequoia sensor.

This competitive grant program is open to students and researchers across the globe and across a range of disciplines, from archaeology to zoology.

Deadline for submissions is January 31st, 2016. You can apply at edu.parrot.com/climate


Read more…

Sequoia In The Wild!

bGHFbn5EdHTQGYGzUJbjZT-2ZpnFzjqX3MuYM40tw-eAQO-8pKc7A9d_gNSanBtwPAcsl9HBS5fx2l_fnlfxVcz7JuwwODdG-Hdwra2G2K3UnNB98tj_5L7wQ8AxQjrqOFjehSN_TUMAKJ3g1w

Well, not the wild, perhaps the most mapped place on the planet; the Berkeley Marina.

(Disclaimer: I work for Parrot. I did this on my own time, and for my own knowledge and confidence in the product. I was excited by the results, and thought this group would be as well.)

I know many of you here are like me, exploring the capabilities of sUAS vehicles, sensors and processing workflows. It is a quickly changing and dramatic landscape. The business side of drones is equitable to the “Wild West” with dramatic story-lines and pricing shoot-outs happening in the streets. Similarly, the technology side of drones is equitable to the steam engines of the same era. Modern engineers are quickly iterating and surpassing “legacy” technology whose life-span was measured in months, not years.

Enabled by this rapid pace of sensor innovation, Sequoia is a multi-spectral sensor with four discreet-bands, a separate RGB sensor and a fully integrated light incidence sensor including GPS and IMU packaged in a common physical form factor. When Parrot announced the Sequoia sensor at the World Ag Expo a few weeks ago, I still had many questions. “The consumer-product company, Parrot, really made this sensor?” was quickly followed by more useful questions like, “Does it really do what I think it does? What’s the processing workflow? How do I explain this to people?”

As part of my job at Parrot, I have early access to these sensors. While I’m generally a very optimistic person, I’m also a skeptic at heart. I know how difficult it is to engineer, manufacture, test and ship hardware/software products at volume. When a Sequoia came across my desk last week, I couldn’t pass on the opportunity to put it in the air and perform my own, fairly un-scientific, end-to-end validation test. I had very little to do with bringing this product to life, but I am excited by the quality and capabilities. Next time you see a Parrot engineer, give them a high-five.

W49AScNJxEj-r9tCRugj_mwgp5GJH4tZXObfcsSYtDR0--CzVQQG143REhpF8nCsiZhyKe8oj52QX73ovqFdEwTk07y2jK9x448EszxtpKqxP4nEIKId4SqeC5J9A9sy_k-Pvq_d7eAkUEVytGu0C-y6b9QKxjg2qvBsFHafulOjcqa9BFqvuEaGtfFZU-B2fUOfYcSO7_9_2aROOUHpkwDH3Ir13H7T7UpuQXJ72kYM1cDQL4OQ5cfy_Dw_Y9MKas0dHnNM6nyiEuhb

Sequoia was designed to be extremely easy to integrate into existing hardware configurations. The only connection the system needs is 5v3A. I added an appropriate BEC to my 3DR Y6, spliced in a female USB connector and the sensor was fully functional. I took a FR4 plate and cut it to fit around the lens array and the camera fit perfectly into the gimbal. The USB cables that the sensor comes with are a little bulky and stiff for this kind of installation, but with some cable routing the package was quickly ready to be put in the air.

Sequoia has an IMU in both the irradiance sensor and the camera itself. What does that mean? The compass dance. Fortunately, it’s painless and very similar to a BeBop2 in duration and complexity. It took about 20 seconds to get through yaw, pitch and roll for both sensors.

There is an SD Card expansion slot in the irradiance sensor. I put a 16GB card in there to make the image transfer super easy. With the amount of data this thing is collecting, it seems that the fastest SD cards you can buy would be a good choice.

In addition to USB PTP control, there is also a WiFi connection available in Sequoia. This allows you to access a browser based camera configuration tool where among many other things you can set time or distance based triggering, or telnet into a root prompt on the camera. Since you can also do this with many other Parrot products, I’m assuming it will also be available on the production version of the sensor. I’m going to keep checking back on http://developer.parrot.com/ to see when they post more information on the API.

Once powered up in the field, a green light on both the camera and irradiance sensor means that it’s ready to produce fully geo-tagged images. Below is a screenshot of what that means. I did zero configuration to this camera. After initialization, I pressed the shutter button twice to start time based capture at one second intervals (more on this later). As you can see, every time the sensor is triggered, it takes five pictures that are all geo-referenced.

qY1ttdDQnCnkXnhTnZDOAcrJVWf3XsQLOVF2TfvK9WD3vqyANTX0gh2f1dERtKVSHKLCOJ-5HZwLkC2wrsD5RzOnZtuYyO5qFKeLCEtpF4N5hv8bq-tfrpT2mT1wu-MI9lNgndCZ

One of the unique things about this sensor is the discrete bands that it captures simultaneously. The advantage is that the sensor can more precisely measure specific wavelengths than standard RGB sensors. When processing these wavelengths on the back-end, users are able to combine the discrete bands in different indices that best match their specific requirements.

wL9ZmFCvcsAnDxvOusguxRIiifDkAzbUz37Qzbvn7CjM03H9JCzOJhVo_4G360CybUIU9vwBm7HlQ5KSUxL4Gy4kpVL7T8qw-zLIIhj8FbGylxJ6lmgWngI_hFTBZ1DtIMdzTZLEdvbA5nDrhw

After validating that the sensor was working properly on the ground, I started up Mission Planner. I wasn’t sure of Field Of View of the sensor, so I took a guess and used the S110 camera model in the grid planning tool. At 50m planned altitude, this reasonable flight plan is what was generated. After preflight checks and starting the sensor, I sent the Y6 off on its mission.

mojUU0o8H-7Y6WtTUv17vXBJeeCjfVn9eGEwhZ7jxv5RViTk2JirzMURapowv-U3JqEZ9M9jVuYa6k0Nv-xFTBbhsNye8y8Gr_U2MlNjBFlH6ET_4tfDHPZxqmEsRRtLdCMBcKBV

The flight went smoothly, and the data was easy to validate in the field. I pulled the SD card from the irradiance sensor, put it in my laptop and made sure there were enough geo-tagged images. I was pleasantly surprised at the quality of the RGB images. Multi-rotors are an inherently bad place to be if you are trying to be precise. I was a little worried about rolling shutter or noise, but those worries were unfounded.

RGB: https://www.dropbox.com/s/pb16jzu5dbltz3y/IMG_160227_224926_0238_RGB.JPG?dl=0

Green: https://www.dropbox.com/s/lxbwa6xm9wz0tsv/IMG_160227_224926_0238_GRE.TIF?dl=0

Red Edge: https://www.dropbox.com/s/nd2rcuyshx924ip/IMG_160227_224926_0238_REG.TIF?dl=0

Red: https://www.dropbox.com/s/tpdcaxc9jxcapjl/IMG_160227_224926_0238_RED.TIF?dl=0

NIR: https://www.dropbox.com/s/17zx8k93srs7ujv/IMG_160227_224926_0238_NIR.TIF?dl=0

Speaking of enough images, a one second interval is clearly too frequent. On this flight, with 5 images taken every second, there are 1791 images for Pix4D to process. 90%+ overlap is unnecessary for this type of processing.

9ig2FwvF-9_res-gJ3a4Gh1Fcnx3kk31NFU9wup8DnhV6rZBDBbExIWqcd4-ezm2oqVvNJudxFCd_DSnSwxCOBghpChnrKBrr9Soe2x1OsKpACiePQLb56wxMn6QgwG35k62c84Y

The next flight will use distance based triggering to test proper overlap, but for now, I manually culled two out of three picture sets to get to a more reasonable 771 pictures. Keep in mind that this is total pictures including all discrete bands and RGB.

bwmqoG7COIzbIaNKxM-dTafsepF7HTBqrXBzf8ZioMUftg31Kjq451mpcjARRO8VYuXTElqYg6uuDZa8YaJcbE2RkPz9SIsozJLOhYCUPSNg78MYBZATYvQqKosuvcUsc55jbXUp

It’s still not pretty spacing, but we will see what Pix4D thinks of it. Using a beta Pix4D version 2.1.34, the Sequoia images are seamlessly identified and put into an appropriate Camera Rig. https://goo.gl/2Y3Epz

SFHob_01vA9F-rbZwlPGQnCx5cuau3fyloTjx59rnEhTgGi_pRuyXLP05YUJNadLoAohyiGgHuAWVtPTDNGrL8fv6RUvFrSJkWIbYUYWiw6qZhm07IsEPz3psrf9hEoXRSNNpdAo

I am not a Pix4D expert, and I wanted to see how the default configurations worked, so I selected the 3D Maps template and “Start Processing Now!”. Again, I’m more interested in the workflow and time required than fine tuning the knobs available in Pix4D.

iPkuiYDBDPNrGoeThc8eA312kd_P15Z5cM3p7GM9fXqvC837HXmWRqp6y_gyap49J0nv7IJrlP-fWY9iCS6xxp6RGW_oAtt9LzC_VGu2jFxEm4zGV1tbGB2UhpshUei9kHr19CSW

First things first, the quality report. https://db.tt/4kZm0mYA

SGEGHCEsh1ulUHA-wgDw634lkD2U2MjNlUDEmAWom1_IB2MNcvoij7tigh-l_KiCKmkvERcPWTxCjKEq5qGtfENtHezg5Mm9_JlwuFyJWVZeo3l7p9Hrq58ku6v_WvLrt3CnDrfd

Well, not the best looking quality report I’ve ever seen. I assume it’s primarily due to the “shotgun” style triggering and image culling. I like to see the first four checks be green here. The GSD is 5cm at 50M, which seems pretty good to me. Full initial processing took 5 hours, not too bad on a 8GB RAM machine with an Nvidia 970 GPU. I think we should see closer to ten thousand keypoints and I’m not sure why there are three image blocks, I know we want one. It seems to me we’re fairly close on all of these checks though, how did the results come out?

PRsdWLE1UAZeNSbGRNKRWn-UaGZemSdDJEw0JADmvOk76ouqJIVptK5LAtqNgxkdnkq21hqzklPhk5eJjHX9KmN4jpIvg6zw_k4P7PaTuZnaANYJGmsU3Q_M98gV0ziYe1IlIlfe

Coverage area is OK, the top right hand point is not accurate, but sidelap was apparently sufficient. Not a bad result for poor image collection technique and providing nearly zero input into the processing! I’m sure someone who has more experience in Pix4D could clean this up nicely.

Wfl-pl_nXCn1bPQkfudmZnSWyQP9gKbXSMzY_hE98DMxSweJ8hhOtjBlum6StFZ81tIctRZPe6INpdmEoMtpEKirkA-0jQm79ZWQOOLFfpWjCBlphwIT7hwd-ticH_SBIRGEeRFo

Zoom quality of the ortho also looks pretty good. Nice straight lines, good level of detail, not much ghosting. Here’s a link to the full ortho. https://www.dropbox.com/s/zx1ax2mc30b13fl/second_marina_geotag_transparent_mosaic_group1.tif?dl=0

Let’s do a quick sanity check on those aggregate piles.

TQIYzYoloYhJ6w75AKksltTGE-V43DAPJQrbgTUD4W1Uww2RAh_Vs732ZwA0vBkqG76m2vpRlKPd9WCMY5as9JTpfz9kqnElgpeX1eQCHd0l4f4n09cflMqBxm-WE4q-mRYh9vO9

The larger pile is around six cubic meters and the smaller around five. These smaller piles are a little easier to estimate by eye, and by my expert eye measurements, six and five seems pretty close!

Finally, it’s time to check out what Sequoia was designed to do, produce accurate multi-spectral imagery. Pix4D has done a great job on their Index Calculator, and the changes for Sequoia in this latest beta really help simplify the process of producing vegetative indices.

HcipO3hvQBZFB39nl54dha_QXEqpNkcEbB33QTE2DvVOYc6xVoLtoCa0Hv7US2zf7BHk5HyAgBNc0Da27r7M_c2ABOEt1Rx0Gez7Z0dIIOs0jNm1oLwqG1YfKtsZM98y3fPXc92f

After first generating the reflectance map, you then define the region to analyze, and then the index you want to process. In this case, we have the NDVI index. I think the data in the top right corner (red shading) is questionable, and should ideally be removed from the analysis. The region tool is helpful for excluding information that doesn’t need to be processed. There are many of you here who understand this better than I do, so I will not pretend to be able to interpret this map.

Finally, you can generate and export variable rate prescription shapefiles to import into your precision farming applicator of choice. For example, Ag Leader.

http://www.agleader.com/blog/loading-prescription-files-into-ag-leader-integra-and-versa-displays/

hDr5LK-KromwtaoeK3C5OqTHBXpUellNJNWol1BmMuMBPsO2eVJCe-_CpWDEeq5fIHpYUcuv8XjBiI_PRCUbCRbrCYj9fcg-dZsV34Sfa4tc6Peu6oTRScVrQRVPhzWooA-08eIu

An agronomist or other expert eye is still required to make sense of these vegetative indices in relation to individual crops, but there are companies like Airinov http://airinov.fr working to automate the analysis based on crop specific phenology.

We’ve come a long way in the past few years. While much of this work has been done for decades using satellites and manned aircraft, we are just now able to begin discussing viable end-to-end workflows for drones in the agricultural space.

It is a fact that this multi-spectral and aerial technology are merging in a way that can quickly and accurately produce vast amounts of data for one of the largest industries on the planet. Sequoia takes a great step in commoditizing complex data acquisition for agriculture. Gathering cost-effective, timely, high-resolution data is no longer the challenge it once was.

The challenge we must now overcome is listening to farmer and agronomist requirements on ease-of-use, interoperability and data life-cycle so we as a drone industry provide products and services that can build trust at scale in an industry that is far more experienced, confident in its roots, and wary of newcomers.


Read more…

DroneDeploy Co-Pilot

3689620737?profile=original

I recently had the opportunity to set up a vehicle with the DroneDeploy Co-Pilot.  https://www.dronedeploy.com/

The integration was two very simple connections to the Pixhawk.  1) A 6pin to 6pin DF13 cable from the Co-Pilot to Telem2 on the Pixhawk.  2) A 5v lead from the Co-Pilot to a 5v BEC on the vehicle.

The benefit of this integration is two fold.  1) Fully autonomous control of different cameras over Wifi.  2) LTE cellular connectivity to transfer data from the payload to the cloud with low latency while in flight.  This enables mission planning, execution, real-time monitoring and post-flight analytics over a 4G cellular link to a web browser anywhere on the Internet.

There must be a safely pilot present to power up and push the arming button.  All other functions can be controlled from a remote browser.  The local safety pilot can override modes with the RC transmitter.  (tested!)
Here's the main dashboard where you start your missions.  Because of the high-bandwidth link, everything is updated in real-time.  For each completed mission, you can see how many pictures were taken and uploaded to the cloud, date, camera type...this data upload happens automatically while in flight.  Then you click on the blue maps button about 25 minutes after the flight to go to the map page.
3689620794?profile=original
The map page displays all 4 data outputs, including an embedded SketchFab view.  This is from a GoPro.  The camera control is done from the companion computer via WiFi to the GoPro Wifi App.  You only need to turn on the WiFi on the GoPro.  The WiFi did not produce any range issues with the redundant RC link.  Our next step is to begin resolution and quality comparisons with other cameras and other software tools.
3689620695?profile=original
3689620805?profile=original
3689620746?profile=original
There is also a very nice post flight analytics tool.
3689620858?profile=original

I must say that I'm impressed with the work from the team at DroneDeploy, and I look forward to their progress!

JC

Read more…

Where are the autonomous hovercraft?

ku-xlarge.jpgSomething about this hits all of the nerd buttons for me.  From the article:

In the mid-1960s, the Soviets were testing something they called an ekranoplan, which is essentially a hovercraft. It's a hybrid of a boat and an airplane (which is more generally called a ground effects vehicle), floating on water but with wings to provide lift. At speed, it skims along up to 20 meters above the ocean's surface. The idea was that it would act as a high-speed transport, hauling equipment long distances at airplane speed, but with far greater capacity and fuel efficiency than any cargo plane.

I've seen some awesome tiny turbines lately, one could probably do something like this with EDF as well.  

Full Article

Read more…

Photosynthesis Assessments

3689526841?profile=original

NDVI Result

I recently modified an A2300 by taking out the IR filter and finding a gel filter that blocks red light, and lets IR pass.  I took two pictures, one with the rosco 2007 gel filter, and one without.  NEITHER image has the built-in glass IR filter.

I used this tutorial to do the image manipulation.  I hear there are processing tools out there, I'm going to give them a try, and perhaps create a macro for photoshop to make it quicker.

Visible base

3689526797?profile=original

NIR base - with gel filter

3689526883?profile=original

I then processed the image in Photoshop using two methods.  First Normalized Differential Vegetative Index (NDVI) in the image at the top, and then NRG (below) where Near-Infrared, Red, and Green are used to compose a picture instead of the usual Red, Green, and Blue.  (Thanks for the great site publiclab!  http://publiclab.org/wiki/ndvi)

NRG result

3689526916?profile=original

I'm obviously itching to do this with aerial images, but I wanted to throw this out there, and see where I'm falling short.  I think the NDVI image begins to show me valuable information (where less IR is reflected) but any tips on improving results is greatly appreciated.  Comments on importance of custom white balance are appreciated.

If you have any questions, please don't hesitate to ask!  Thanks!

Read more…

Big Product News

3689522368?profile=original


3DR Hexacopter to Y6 conversion kits are now available for less than $50.

A Y6 design is able to withstand a single motor out scenario (see above), provides a more open and stable view for cameras, and doesn't weigh as much as a traditional Hex because it uses less parts.  We've come a long way in the last couple of years...

3689522461?profile=original

Those of you who have been with us for a while will remember our original ArduCopter kits.


I bought one, as I know many of you did.  Mine is now hanging on the wall; a reminder of something that fueled obsessions, and made me think of new possibilities in life.  That spirit is in many of us here at 3D Robotics, and is clearly evident in this latest offering that we are able to provide our customers.

Joe, our primary flight-ops engineer in San Diego came to us one day with a Y6 that was converted from one of our existing Hexacopters.  Within a few weeks the amazing design and production team at 3D Robotics had created an inexpensive, custom tailored kit to convert our existing Hexa into a Y6.

I've personally done the conversion, and it takes about an hour.  It's very straightforward.

This is fantastic news, but it gets even better.  Throughout our ongoing expansion we are highly focused on quality documentation and improving ease-of-use.  In that vein, Alex--our new technical writer-- created an AWESOME set of instructions for the new Y6 conversion kit. 

Not only do we have the kit, and instructions, but we also have a tuned parameter file to get you up and navigating smoothly to over 150 waypoints that APM supports out of the box.

This is a huge step forward for us as a company, and demonstrates our commitment to provide our customers with high-quality, easy-to-use universal autopilots and aircraft.

We hope all of you Hex fliers out there appreciate this kit as much as we do.  All of our traditional hex aircraft have been or will shortly be converted to the Y6.  It flies like a dream.

High-fives for Joe and Alex!


Read more…

The New 3DR Store Has Landed!

3689516797?profile=original

You've likely already received a message in your inbox to set up your new store account at http://store.3drobotics.com

We're moving to a new, open source, more flexible platform called Spree.

All of the old DIY Drones store customer data has been migrated to the new site.  For security, we just need you to set a new password using the link in the e-mail sent to you.

Both old and new stores will be open and accepting orders for the next 2 weeks.  We'll then shut down the old DIY Drones store to new orders, and leave it open for reference only for another 2-4 weeks.  We'll then turn the old store off, and have the data backed up for historical purposes.

We've spent a lot of time reviewing and testing the new store, but there will inevitably be issues.  We'll do our best to monitor this thread, but feedback is best received at feedback@3drobotics.com.  Additional enhancements to the ordering experience will be rolling out as well in the next few weeks.

We appreciate your business here at 3D Robotics, and look forward to providing you with the most innovative and affordable open source UAV products for a long time to come.

Keep on flying!

John C.

Read more…

Scripted Fixed-Wing Acrobatics

Hello Everyone,

I've recently had the chance to get some basic acrobatic moves scripted for fixed-wing airplanes.  They are far from perfect, but I wanted to share.

In the (slightly choppy) video, you'll see a left roll, a right roll and most of a loop.

Let's talk a bit about how to set this up:

1) You need a Hardware In Loop (HIL) setup.  I use X-plane.  There's a good tutorial on setting up a X-plane HIL configuration here.

2) All of your regular controls and modes should work properly in the simulator.

3) You need a python based script.  You can start with the one I've put together.  It's attached here. "simple_script.txt"

4) With X-plane, the APM Mission Planner (MP) and the script open, get your plane in the air and press "p" for pause.  "a" will put you in chase view ("w" to go back in the plane) and "-" and "=" will zoom your view of the plane in and out.

5) In the MP click on the "Flight Data" button, then select the "Actions" tab underneath the Heads-Up-Display.

6) Click on the "Script" button.  This will bring up another window with a preloaded script (for arducopter).  Switch to the already open "simple_script.txt" and select-all then copy.

7) Go to the python script window and paste "simple_script.txt" in the python script window.  DO NOT close it yet.

8) Go to X-plane, and press "p" again to un-pause the plane.

9) Go back to your python script window and close it.  This will trigger the execution of the script when you click "yes" in the pop-up.

10) Watch your plane do some rolls, and most of a loop.

Let's also talk a bit about issues and my thoughts for the future.

1) I do not seem to get RC control back after the script has run.  I'm not sure what's going on here.

2) (IANAP) I am not a programmer, but I feel like we should be able to create python classes (objects?) that take pertinent arguments.  For the roll class it could include (direction, rate, duration) and the class would handle the slight down elevator when inverted, etc...

3) It also seems like we could effectively have another PID type of structure in the scripts that would give us smooth loops.  I'd like to see us just pass two arguments to a loop class, size of loop, and what direction.  0 is perpendicular to the ground up, 90 would be a flat loop parallel to the ground going to the right, 270 to the left.

4) Is there a way to temporarily make stabilize a negative value?  This would seem to give us solid inverted flight.

5) Eventually I envision an "Acrobatic Move Repository" where we can keep moves for different vehicles.  At some point, I see a set of macros that you can just string together an entire acrobatic show.

I'm looking forward to your comments, and seeing what others come up with!  Thanks!

John C.

Read more…

Congratulations to Tom Coyle!

3689507721?profile=original

Please take a moment to congratulate Tom Coyle on his new position as Senior Administrator for the diydrones.com site.


Tom has been a community member for almost four years now, and has been a great asset to the site.  He founded the ArduRover user group, and has been a long-time moderator.  In short, Tom is a great example of a positive contributor to the diydrones.com site.


Here's a bit more about Tom from the man himself:


"I guess that you could say that I have engineering in my blood as I have always had to be tinkering with some technical project since I was a child. Both my grandfather and father were engineers and I followed suit, after a six year stint in the US Navy as an electronic technician, earning my BS in Electrical Engineering from CSUN while working for Hughes Aircraft Co.

Except for about a five year period where I worked in the Motion Picture Industry, I have been involved with the Aerospace Industry like my father before me. During the last 15 years, before my recent retirement, I worked for the Raytheon Co as a Senior Principal Engineer providing reliability, testing, and system engineering expertise for the F/A 18 Advanced Targeting FLIR (ATFLIR) Program, the F-16 Modular Mission Computer (MMC) Program, and the Space Tracking and Surveillance System (STSS) Missile Defense Program.

Presently I am enjoying my retirement in sunny Florida, however  I have found additional enjoyment participating as a developer/moderator on the DIY Drones website. I am the founder of the ArduRover User Group on DIY Drones and am presently working with Tridgell and Linus on updating the ArduRover2 operating firmware."


Tom, we appreciate your efforts to date and look forward to your continued success with diydrones.com.


Thank you!


John C.

Read more…

25% Discount at Our New Store (Now Offline)

3689506564?profile=original

EDIT March 4th, 2013: Thank you very much for your feedback and patience!  We've got a good to-do list now, and rather than keep two stores up and running, we're going to take the beta site down until we're ready with all of the great feedback you provided.  It will be back again soon, but if you'd like to place an order now, please visit our current site at:  http://store.diydrones.com

In conjunction with updates to the documentation, we are also rolling out a new store! It's now in beta, so we're rewarding the brave folks who are willing to help us wring out the bugs. Only a small number of product categories are currently enabled; if what you want isn't among them, please use the regular store, which will continue to be the main way to buy gear until we take the new store out of beta.

From now through the rest of this weekend, you can order a select set of 3D Robotics hardware at an incredible 25% discount!

You can get to the new store at: http://store.3drobotics.com

While you're taking advantage of this offer, please be sure to take some notes on the experience and send us some feedback at: feedback@3drobotics.com

We appreciate your business and look forward to seeing what the community does with even more cutting-edge products in 2013!

Thank you!

Read more…

Big Site-Wide Changes are Coming!

3689506229?profile=original

We are in the process of making some significant changes to our site layout and content to improve the overall ease-of-use experience here at DIY Drones.

As part of that effort, we wanted to put out the first section of the site that is ready for community-wide peer review.  You can see the updates at:

http://copter.ardupilot.com

We need to add the footer, and a few other small things, but we want your input!

Please take a look through the site and the wiki, and submit your feedback to:

feedback@3drobotics.com

We'll do our best to keep up with the comments here, but using the address above will definitely get noticed.

Thank you!

Read more…

More FPV from a quad

I'm just getting all my equipment sorted out for FPV on the quad, but made some good progress today that I thought I'd share.

P1010670.jpg


I got the idea for a standalone FPV pod from flitetest.  Just wanted to get things working quick and dirty for both the quad and the EZ*


Wrapped up in there I have the following:


1)  Camera is 420TVL from here for $32 (free shipping when you order 2!)  The cameras are easily removed, and seem to be good enough to start with.

2)  Tx/Rx is 5.8Ghz from HK for $63

3)  Bluebeam antennas from here $65 for the pair unless you are capable of making them yourself

4)  Don't forget the adapters for this antenna VTx/Rx combination from here $10 for two

5)  It also has a 3S 500mAh battery like this $12 - I plan on dropping this and creating a single battery setup


Strange, I just hit "save as draft" didn't mean to post this yet, but here's the video anyway!


Read more…

Successful "Twofer" Day


I recently picked up a dragonlink Tx and two Rx.  One for the EasyStar and one for the ACM.


Had a great maiden a couple of days ago with the DragonLink on the ACM, so I decided to hurry up and get the other Rx in the ez*.  I also knew that I always faired better with 2.4Ghz reception on the ez* than the ACM, so I decided to go ahead and mount the GoPro up, and put it on the line.  The ez* is the old style AP with thermopiles.  It was *really nice* to have failsafe on the 9x now.  The RTL works as expected.


Even caught some lightning.


The DragonLink is a big confidence booster for me for the regular old close in flying, and was an easy install into the Turnigy 9x.  I used these pictures.


DragonLink on Turnigy 9xV2


Here's what the Tx and 12 channel PPM Rx looks like.  I'm obviously a big fan so far.


TXLabel.jpg?width=480


Just missing the FPV goggle part of the equation.  Going to be a while!


JC

Read more…

HELI-MOUNT.jpg

FPV Tilt Camera Mount with Landing Gear


I saw one of these a few weeks back, and got to thinking...

How can I easily mount this to a stock AC without making any drastic mods, getting the CG close, and having tilt and roll stabilization possible?

This is what I came up with...going to see if it will take off in the morning.


P1010058.jpg?width=750


Mechanically, the pieces are in the right places. It moves well. It's probably not super robust, but we'll see if it gets the job done.

Three metal pieces bent for the roll hinge with nylon washers.

Easystar rudder horn, control rod and clamp.

Random thumbscrew from Ace that clamps into an alum. bar underneath the two plys of balsa and squeezes the fiber frame. Pretty secure actually.

The kit was $20.  I got it as a weight filler with a 9x from Hobby King. The rest is scrap.

It at least gets the concept going cheaply, we'll see how long it lasts.

Here's the battery outrigger from previous static camera setup.

P1010059.jpg?width=750
Ideas for improvements are always appreciated...


JC

Read more…

Proposing a type of configuration tracker

Hello All,

I've mentioned this before briefly in a couple of posts, but I'd like to pose it in a bit more formal way.

I also ride off-road motorcycles. A 2005 CRF450x to be exact. Fun bike, but it's a hobby, and there's a lot to learn and tinker with.

On my 450x community, we have a very detailed thread on people's setups. Year, mods, carb jetting, suspension settings, type of rider, weight, location, etc...

This helps enormously to answer newbie questions on what is the "cherry" setup for a given persons weight and bike year. There are some fundamental changes that make these bikes haul (and reliable), and it's great to see how people with similar goals (and bellies) set up their bikes.

I'd like to recommend a similar resource for this community. I know there are a couple of recommended setups. But I think real world success and details really speaks volumes. I'll leave the formal vehicle (sticky?) up to the site experts, but perhaps I can suggest a draft of the contents.

(Name and location are already covered)

Radio Tx/Rx: HK T6A
Airframe: Easystar, rudder only
Motor: HXT 2200kv brushless
ESC?: Turnigy 30A plush
Battery: 2200mAh 3S 20C Lipo
Prop: 5.5 x 4.5 Prop
COG: ~55mm back from leading edge
Common Modifications: CF support in boom, magnets in canopy/wing joint, larger rudder
Autopilot: Std. Ardupilot with blue shield
Airspeed: Connected
Throttle: Connected
Manetometer: No
GPS: uBlox5
IMU or Thermopile: Thermopile
AP Code level: 2.6.1
Telemetry: xBee Pro
Groundstation: Std. Labview / Putty log conversion to KML
Advanced Antenna Systems: none
Advanced Vision Systems: none
Open Items: Flyable, Still tuning PIDs
Attach header file: AP_2_6_header.h


The thought is basically people take a couple minutes of their time to copy/paste/replace their current successes, and post new ones as they hit new highs.

What do you guys think? I think it would not only spark interest and conversation with people who have similar or desired setups, but theoretically it would minimize the basic questions from people new to the hobby.

Let me know...thanks!

JC

Read more…