Chris Anderson's Posts (2718)

Sort by
3D Robotics

3689721813?profile=original

This is the cheapest good computer vision autonomous car you can make — less than $85! It uses the fantastic OpenMV camera, with its easy-to-use software and IDE, as well as a low-cost chassis that is fast enough for student use. It can follow lanes of any color, objects, faces and even other cars. It's as close to a self-driving Tesla as you’re going to get for less than $100 ;-)

It’s perfect for student competitions, where a number of cars can be built and raced against each in an afternoon.

Instructions and code are here

Read more…
3D Robotics

Eagles vs Drones (spoiler: Eagles win)

3689721585?profile=originalFrom the Wall Street Journal:

SYDNEY— Daniel Parfitt thought he’d found the perfect drone for a two-day mapping job in a remote patch of the Australian Outback. The roughly $80,000 machine had a wingspan of 7 feet and resembled a stealth bomber.

There was just one problem. His machine raised the hackles of one prominent local resident: a wedge-tailed eagle.

Wedge-tailed eagle

Swooping down from above, the eagle used its talons to punch a hole in the carbon fiber and Kevlar fuselage of Mr. Parfitt’s drone, which lost control and plummeted to the ground.

“I had 15 minutes to go on my last flight on my last day, and one of these wedge-tailed eagles just dive-bombed the drone and punched it out of the sky,” said Mr. Parfitt, who believed the drone was too big for a bird to damage. “It ended up being a pile of splinters.”

Weighing up to nine pounds with a wingspan that can approach eight feet, the wedge-tailed eagle is Australia’s largest bird of prey. Once vilified for killing sheep and targeted by bounty hunters, it is now legally protected. Though a subspecies is still endangered in Tasmania, it is again dominating the skies across much of the continent.

These highly territorial raptors, which eat kangaroos, have no interest in yielding their apex-predator status to the increasing number of drones flying around the bush. They’ve even been known to harass the occasional human in a hang glider.

A picture of a wedge-tailed eagle taken by an Australian UAV drone.
A picture of a wedge-tailed eagle taken by an Australian UAV drone. PHOTO: AUSTRALIAN UAV

Birds all over the world have attacked drones, but the wedge-tailed eagle is particularly eager to engage in dogfights, operators say. Some try to evade these avian enemies by sending their drones into loops or steep climbs, or just mashing the throttle to outrun them.

A long-term solution remains up in the air. Camouflage techniques, like putting fake eyes on the drones, don’t appear to be fully effective, and some pilots have even considered arming drones with pepper spray or noise devices to ward off eagles.

They are the “ultimate angry birds,” said James Rennie, who started a drone-mapping and inspection business in Melbourne called Australian UAV. He figures that 20% of drone flights in rural areas get attacked by the eagles. On one occasion, he was forced to evade nine birds all gunning for his machine.

The birds are considered bigger bullies than their more-docile relatives, such as the bald and golden eagles in the U.S. Wedge-tailed eagles are the undisputed alpha birds in parts of Australia’s interior but it’s not entirely clear why they’re so unusually aggressive towards drones. Scientists say they go after drones probably because they view them as potential prey or a new competitor.

“They’re really the kings of the air in Australia,” said Todd Katzner, a biologist and eagle expert at the U.S. Geological Survey in Boise, Idaho. “There’s nothing out there that can compete with them.”

Nick Baranov holds a drone camouflaged with ‘eagle-eyes.’
Nick Baranov holds a drone camouflaged with ‘eagle-eyes.’ PHOTO: AUSTRALIAN UAV

The problem is growing more acute as Australia makes a push to become a hot spot for drones. One state, Queensland, recently hosted the “World of Drones Congress” and last year gave about $780,000 to Boeing Co. for drone testing. Amazon.com is expanding in Australia and could try using drones for deliveries, and the machines are increasingly favored by big landowners such as miners and cattle ranchers.

The eagles will often attack in male-female pairs, and they aren’t always deterred if their first foray fails. Sometimes they will come from behind, attack in tandem from above, or even stagger their assault. A drone operator may evade one diving eagle with an upward climb, but the second eagle can then snatch it, Mr. Rennie said.

“If you take your eye off that aircraft even for a couple of minutes, the likelihood is it will end up in pieces on the ground,” he said.​

In late 2015, Andrew Chapman, a co-owner at Australian UAV, was mapping a quarry and landfill site near Melbourne, and figured it was close enough to the city that an eagle attack was unlikely. But when the drone was about half a mile away, an eagle “materialized out of thin air and knocked out the drone,” Mr. Chapman said. He spent two days looking for the machine, worth about $35,000 at today’s retail price, and had to ship it to the manufacturer in Switzerland for repairs.

Another view of a wedge-tailed eagle taken by a drone.
Another view of a wedge-tailed eagle taken by a drone. PHOTO: AUSTRALIAN UAV

More exotic defenses have been considered. Mr. Chapman said arming drones with pepper spray was discussed but quickly discarded, out of concern it could harm the birds.

“It’s a relief to be planning for jobs overseas because we know the wedgies aren’t there,” said Mr. Chapman, using the local nickname for the bird.

Rick Steven, a survey superintendent at the St. Ives gold mine in Western Australia, who uses drones to survey the pits, debated using something like a ShuRoo—a device mounted on cars that makes noise, which humans can’t hear, to keep kangaroos off the road. But he was concerned it would be cumbersome on the drone and may not ward off eagles anyway.

Instead, Mr. Steven and other drone operators make use of another weapon: time. The eagles are less active in the early morning, because the thermals—columns of rising air—they use to fly don’t develop until later in the day after the sun has warmed the ground.

In his first 2½ years flying drones at the mine, Mr. Steven said he lost 12 drones to eagle attacks, which cost his employer, South Africa-based Gold Fields Ltd. , some $210,000. During the past year, when he focused his flying in the morning, he has lost two—with two more close calls.

​​Any successes at deterring wedge-tailed eagle attacks in Australia could provide clues in how to minimize avian obstacles in other regions.

“Every time I go to a conference on birds and they’re having a workshop on drones, somebody tells me about this problem in Australia, about these wedge-tailed eagles,” said David Bird, a retired wildlife biology professor in Canada and founding editor of the Journal of Unmanned Vehicle Systems.

Daniel Parfitt poses with a drone.
Daniel Parfitt poses with a drone. PHOTO: DANIEL PARFITT

Mr. Parfitt, who began his drone business Aerial Image Works about three years ago, remains vigilant. Each of his last three jobs attracted an eagle attack.

Other birds will “fly at the drone and they’ll act in a very aggressive manner, but they don’t actually touch you,” he said. “I’m not scared of anything else attacking my drone except the wedge-tailed eagle.”

Write to Mike Cherney at mike.cherney@wsj.com

Read more…
3D Robotics

3689720675?profile=originalAt this weels Interdrone conference Yuneec and Dronecode announced the new DroneCore SDK, which is now shipping on the new Dronecode-based Yuneec H520 commercial hexacopter. The above slide shows how the architecture works, but basically Dronecore replaces the old DroneKit SDK, and provides an easy-to use mobile (Android and iOS) and onboard (C++ and Python) interface to Dronecode/PX4-based vehicles. Of which there are many!

3689720756?profile=original

The library provides a simple core API for managing one or more vehicles, providing programmatic access to vehicle information and telemetry, and control over missions, movement and other operations.

Developers can extend the library using plugins in order to add any other required MAVLink API (for example, to integrate PX4 with custom cameras, gimbals, or other hardware over MAVLink).

DroneCore can run on a vehicle-based companion computer or on a ground-based GCS or mobile device. These devices have significantly more processing power that an ordinary flight controller, enabling tasks like computer vision, obstacle avoidance, and route planning.

The full reference is here.

Read more…
3D Robotics

In this episode, the Roswell Flight Test Crew speaks with John Leipper, the Solutions Architecture Manager for drone manufacturer Insitu. At the Future Farm Drone Rodeo in Pendleton, Oregon, Insitu conducted a drone swarm demonstration using three 3DR Solos – all controlled by a single pilot using a computer. Of course, to stay in compliance with FAA regulations, an individual pilot for each aircraft was on standby should immediate human intervention be required. The long-term goal is to make drones more efficient through automation, requiring less direct human input to gather data more quickly than would be possible with a single drone. Such a control system would also allow the drones to be operated remotely via the Internet or other networks.

Read more…
3D Robotics

Introducing OpenSolo!

3689719471?profile=original

Big news! Reposting from the 3DR blog. Also see the ArduPilot Team announcement here

When we launched Solo back in 2015, one of its selling points was that it was based on the open source ArduPilot software, the project that Jordi Munoz and I launched as a side-project way back in 2007 and then grew beyond our imagination in the able hands of the community.  The point of Solo was to package up this open stack in a polished, easy-to-use consumer product (like the DJI Phantom), treating the ArduPilot stack as an “open core” and extending its functionality with proprietary features much as companies do with Linux-based devices.

This worked very well as a product (Solo had some really innovative features, some of which are still unequaled) but less well as a business (we couldn’t make it cheaply enough to keep up with the rapid price declines in the consumer market, so we stopped making them at the end of 2015).  Now, two years later, 3DR has shifted its focus to the commercial market that exploded after the FAA launched its Part 107 commercial operator licensing program last year. But there are lots of Solos still out there, with great untapped potential — it’s just not our core business anymore.

So what to do? Open source the rest of it! We’ve heard loud and clear that the community wants a tried-and-true Ardupilot platform that can be extended without limit. The Ardupilot team has already embraced Solo and ported the latest flight code to it. But the custom 3DR WiFi control, telemetry, and video streaming technology, the “Artoo” controller and the “Shot Manager” mission control stack that runs on the onboard Linux processor were not open source, so the full potential of the drone remained locked.

No more. I’m delighted to announce that we’re now open sourcing almost all of the remaining code, including the SoloLink wireless stack, ShotManager, the high-level onboard mission scripting layer that gave Solo all of its “smart shots”, and a range of other packages include the code for the controller and the build tools.

The code has now been released in a new OpenSolo organization on Github, licenced under the permissive Apache 2.0 licence.

More details about what’s been released here:

solo-builder – scripts for configuring a virtual machine to build the Solo software

meta-3dr – the build recipes that assemble the complete Linux system for the Solo and Controller i.MX6 processors.

shotmanager – implementation of Solo’s Smart Shots.

sololink – 3DR software that runs on the i.MX6 processors, implementing things like video streaming, control, telemetry, pairing, logging, etc.

artoo – firmware for the STM32 microcontroller in the controller responsible for the inputs and screen.

solo-gimbal (coming soon) – firmware for the microcontrollers in the Solo Gimbal

Read more…
3D Robotics

Lots of news and updates from the Dronecode team this month: 

1) The Aerotenna OcPoC autopilot (video above) now supports the Dronecode/PX4 software stack!

● FPGA and dual-core ARM processors in OcPoC allow for real-time signal processing and for executing complicated algorithms, enabling exciting new possibilities for artificial intelligence, deep learning, and a truly autonomous and intelligent UAV

● With more than 30 programmable I/Os supporting most standard interfaces, OcPoC is
incredibly flexible, allowing free reign for your creativity

● OcPoC features industrial-grade redundancy, ensuring you can always count on your key
systems such as GPS, IMU, and more

● Flawless integration with Aerotenna microwave radar sensors, including uLanding radar altimeter and uSharp collision-avoidance sensor.

2) QGroundControl 3.2 is out!

3689718748?profile=original

Many inprovements and new features:

  • Settings
    • File Save path - Specify a save path for all files used by QGC.
    • Telemetry log auto-save - Telemetry logs are now automatically saved without prompting.
    • AutoLoad Plans - Used to automatically load a Plan onto a vehicle when it first connects.
    • RTK GPS - Specify the Survey in accuracy and Minimum observation duration.
  • Setup

    • ArduPilot only
      • Pre-Flight Barometer and Airspeed calibration - Now supported
      • Copy RC Trims - Now supported
  • Plan View

    • Plan files - Missions are now saved as .plan files which include the mission, geo-fence and rally points.
    • Plan Toolbar - New toolbar which shows you mission statistics and Upload button.
    • Mission Start - Allows you to specify values such as flight speed and camera settings to start the mission with.
    • New Waypoint features - Adjust heading and flight speed for each waypoint as well as camera settings.
    • Visual Gimbal direction - Gimbal direction is shown on waypoint indicators.
    • Pattern tool - Allows you to add complex patterns to a mission.
      • Fixed Wing Landing (new)
      • Survey (many new features)
    • Fixed Wing Landing Pattern - Adds a landing pattern for fixed wings to your mission.
    • Survey - New features
      • Take Images in Turnarounds - Specify whether to take images through entire survey or just within each transect segment.
      • Hover and Capture - Stop vehicle at each image location and take photo.
      • Refly at 90 degree offset - Add additional pattern at 90 degree offset to original so get better image coverage.
      • Entry location - Specify entry point for survey.
      • Polygon editing - Simple on screen mechanism to drag, resize, add/remove points. Much better touch support.
  • Fly View

    • Arm/Disarm - Available from toolbar.
    • Guided Actions - New action toolbar on the left. Supports:
      • Takeoff
      • Land
      • RTL
      • Pause
      • Start Mission
      • Resume Mission - after battery change
      • Change Altitude
      • Land Abort
      • Set Waypoint
      • Goto Location
    • Remove mission after vehicle lands - Prompt to remove mission from vehicle after landing.
    • Flight Time - Flight time is shown in instrument panel.
    • Multi-Vehicle View - Better control of multiple vehicles.
  • Analyze View - New

    • Log Download - Moved to Analyze view from menu
    • Mavlink Console - NSH shell access
  • Support for third-party customized QGroundControl

    • Standard QGC supports multiple firmware types and multiple vehicle types. There is now support in QGC which allows a third-party to create their own custom version of QGC which is targeted specifically to their custom vehicle. They can then release their own version of QGC with their vehicle.

3) Other Dronecode updates from our monthly newsletter:

DOCUMENTATION UPDATES.

Since our last newsletter we’ve added high level sidebar links between all our documentation libraries so, for example, it is much easier to find QGroundControl documentation when you’re in the PX4 User Guide (see the documentation update blog!)

We’ve also made some other significant additions, including:

WORKING GROUP UPDATES.

UX Working Group
Last month the UX WG started classifying members according to clusters (in order to guide the evolution of our platform roadmap):

  • Our initial classification document is here. This is a work in progress, but we would love your feedback (please comment within the document).
  • The UX WG created a survey to help understand what Dronecode members and the community are looking for from the project. The survey closed Friday, June 30. Results are being analyzed and will be presented next UXWG meeting in the end of July.
  • The WG is also looking at​ adding Google Analytics for the website and integrating with the PX4 analytics
  • We also intend to present a proposal for DC and projects branding.

Camera API Working Group

SDK Working Group

  • The SDK WG is loo​king at a Cloud SDK and an on device SDK for building applications that run on the target device or on a mobile device.
  • The ​WG wiki is now updated at https://wiki.dronecode.org/workgroup/dronecodesdk/start, and includes the first step of a comparative evaluation of our requirements and options.

Messaging Working Group

  • Collaboration between eProsima and Dronecode member companies, and PX4 community is working well
  • The UART bridge and UDP bridge are working so PX4 ORB topics can now be shared with external processes:
    • If PX4 is running on Linux, then the UDP bridge can be used to advertise topics via RTPS
    • If PX4 is running on a separate flight controller, the companion computer can get ORB topics over USB that are advertised via RTPS
  • 1st release of code scheduled for July 13, 2017
  • Code is at: https://github.com/eProsima/Firmware​

Safety Working Group

  • Dronecode has been asked to join the FAA’s Greetings UAS Safety Team and has accepted
  • Progress continues on an Intel BVLOS application using Dronecode with Airmap extensions

Code Quality Working Group

  • Lots of progress on improving the quality of the code via tools and scanning
  • New investigations into ways to improve code and reduce unit mismatch errors such as https://github.com/nholthaus/units
  • Current goals of the Cod​e Quality WG are:
    • Get improved code coverage in real missions
    • Add ROS tests
    • Add comprehensive tests that can be run for each PR but that are not merge gating
    • HIL
      • Mission tests should also work in HIL (may need restructuring)
    • Improve awareness of the testing already being done
    • Add summary page to tests being uploaded
    • Measure test coverage of the code base
      • Consider code restructuring to provide more clarity about what code is in a particular build and the level of coverage of that code​


CONTRIBUTIONS.

This month two new point release were made to the new PX4 v1.6 release. The project pulse shows we’ve merged 49 PRs (+4) and closed 57 issues (-170). More than 5110 lines were added and 2431 deleted.

l8t-U0i0rIfQutlZb-ppyshDnvXhNqku3RtzQ9Epbn3abHMQBWiRY3Bp-Bj7tB5OSV5BFvy6LBRClf-L3LBBirEl_Vc1Ad8tE2qiFrw7gBUA3DlUYZq6bxb5vba7WDcwFXjSonE2g_H0We_6OFHyNS2OikC_f8OIG28N_QI=s0-d-e1-ft#%3Ca%20href=https://gallery.mailchimp.com/24be540c6d064661ffb2cbe53/images/f9355eea-6fb1-4614-b940-6d18061bbc99.png" alt="" width="564" align="center" />


FLIGHT TESTING.

Flight Testing Stats (Jun 07 – Jul 04)

We built a QAV250 with Snapdragon board and PWM based ESC’s


DRONECODE PLATFORM IN THE REAL WORLD.

The following posts from the PX4 blog show new Dronecode Platform builds, features and uses.

Read more…
3D Robotics

3689718121?profile=original

It's customary and traditional that we celebrate the addition of every 1,000 new members here and share the traffic stats. We've now passed 85,000 members! We're also more than ten years old!

Rather than simply give the usual monthly traffic snapshot, I thought I'd give the data for the whole decade, which tells quite a story. 

  • First, some amazing totals:
    • More than 20 million users and 117 million pageviews over the decade. 
    • 13,400 blog posts
    • More than 60,000 discussion threads
    • Nearly a million comments
  • Second, the ups and downs of this industry. Over the ten years, we've gone from one of the few drone communities around to today, when there are hundreds of sites, most of them commercial, and drone users and developers are scattered amongst them. In the early 2010s, DIY Drones was in the top three results on Google for "drones". Now there are pages and pages of commercial sites before it. That's a natural thing and demonstrates classic maturing of an industry. The amateurs have given way to the pros.
  • Third, the related rise and fall of "DIY" in the drone industry. With the triumph of DJI and its Phantom (and now Mavic and Spark) lines, it's no longer necessary to build your own drone. This is a good thing (the same happened with PCs and all sorts of electronics before it), and many people still choose to do so anyway for fun (as they still do with PCs), but it's clearly gone back to a niche activity or one for developers, much as it was in the early days. 

Today, we're still a big community with healthy traffic (about 20,000 visitors and 35,000 page views a day). And we'll continue just as we are for many years to come. We won't be the biggest site in this space, but we'll continue to be one of the most interesting and a friendly, high-quality place to talk about ideas and projects that extend of potential of drones to change the world. And have fun doing it!

Read more…
3D Robotics

3689718007?profile=originalWhen we got started ten years ago, the annual AUVSI student drone competition was dominated by commercial autopilots, such as Piccolo. Now it's almost entirely open source autopilots, led by ArduPilot (14 of top 20) and Dronecode/PX4 (3 of top twenty). I'm super proud of this having co-founded ArduPilot and now leading Dronecode. Only one commercial autopilot in top twenty -- next year they will be gone entirely!

From sUAS News

3689718024?profile=original

Read more…
3D Robotics

3689717640?profile=original

I noticed that Digikey is now selling Honeywell's newest aerospace-grade IMUs, which cost $1,328 each (note that's just for the IMU; it's not a full autopilot). How do the specs of these aerospace IMUs compare to those we use here? Are they worth the extra money? 

In terms of overall approach, the Honeywell IMU seem very similar to modern autopilots such as Pixhawk 2.x and 3.3: they both have MEMS sensors with internal environmental isolation and temperature compensation.

As for the sensors themselves, I'm no expert on specs, so I'll just post the basics here, comparing the Honeywell sensor to the Pixhawk 3

3689717770?profile=original

On the face of it, the Invensense and ST sensors in the Pixhawk 3 appear at least as good, if not better. But I imagine that there are some other factors that may be more important, such as gyro drift and vibration filtering. The Honeywell specs in drift are shown here: 

3689717807?profile=original

Meanwhile the Invensense ICM-20602 sensor in the Pixhawk 3 gives its drift in different units: ±4mdps/√Hz. I really don't know how to compare those.

Finally, I'm sure that a lot of the performance depends on the software running on the Pixhawk boards, be it PX4 or APM, both of which use GPS to augment the raw IMU data to compensate for drift, along with a lot of other smart filtering. 

So for those IMU experts out there: how do you think these two approaches compare? Are aerospace-grade IMUs worth the extra money?

Read more…
3D Robotics

Intel cancels Edison, Joule boards

3689717677?profile=original

It was well known that Edison was going to be discontinued this year, but Joule, which was just released, is a surprise. This is bad news for any autopilot board that uses Edison, such as Pixhawk 2.1, which will now have to move to another companion computer. (I'd suggest Raspberry Pi). From Hackaday:

Sometimes the end of a product’s production run is surrounded by publicity, a mix of a party atmosphere celebrating its impact either good or bad, and perhaps a tinge of regret at its passing. Think of the last rear-engined Volkswagens rolling off their South American production lines for an example.

Then again, there are the products that die with a whimper, their passing marked only by a barely visible press release in an obscure corner of the Internet. Such as this week’s discontinuances from Intel, in a series of PDFs lodged on a document management server announcing the end of their Galileo (PDF), Joule (PDF), and Edison(PDF) lines. The documents in turn set out a timetable for each of the boards, for now they are still available but the last will have shipped by the end of 2017.

It’s important to remember that this does not mark the end of the semiconductor giant’s forray into the world of IoT development boards, there is no announcement of the demise of their Curie chip, as found in the Arduino 101. But it does mark an ignominious end to their efforts over the past few years in bringing the full power of their x86 platforms to this particular market, the Curie is an extremely limited device in comparison to those being discontinued.

Will the departure of these products affect our community, other than those who have already invested in them? It’s true to say that they haven’t made the impression Intel might have hoped, over the years only a sprinkling of projects featuring them have come our way compared to the flood featuring an Arduino or a Raspberry Pi. They do seem to have found a niche though where there is a necessity for raw computing power rather than a simple microcontroller, so perhaps some of the legion of similarly powerful ARM boards will plug that gap.

So where did Intel get it wrong, how did what were on the face of it such promising products fizzle out in such a disappointing manner? Was the software support not up to scratch, were they too difficult to code for, or were they simply not competitively priced in a world of dirt-cheap boards from China? 

Read more…
3D Robotics

Is it flattering that NASA uses a 3DR Y6 to teach "crash management" techniques? I'm going with yes! Register here

ASA’s Langley Research Center is offering a free informational webinar on its  autonomous crash management system for small UAVs that enables landing a malfunctioning unit to a safe and clear ditch site. The webinar will take place on July 25th @ 2PM (EDT).

The mission of the system, called Safe2Ditch, is emergency management to get the vehicle safely to the ground in the event of an unexpected critical flight issue. For example, a drone delivery flight that loses battery power before reaching desitnation.

Safe2Ditch uses intelligent algorithms, knowledge of the local area, the remaining control authority and battery life to select the safest landing location for a crippled UAV and steer it to the ground. The system helps minimize the risk of UAVs to people and property. This mission is performed autonomously, without any assistance from a safety pilot or ground station and all while residing on a small processor onboard.

During this free webinar, lead inventors Patricia Glaab and Louis Glaab will discuss this technology and its potential uses, followed by an open Q&A session.

Read more…
3D Robotics

From Nvidia: Here's the full paper.

Most drones would be lost without GPS. Not this one.

A drone developed by NVIDIA researchers navigates even the most far-flung, unmapped places using only deep learning and computer vision powered by NVIDIA Jetson TX1 embedded AI supercomputers.

Although initially designed to follow forest trails to rescue lost hikers or spot fallen trees, the low-flying autonomous drone could work far beyond the forest — in canyons between skyscrapers or inside buildings, for example — where GPS is inaccurate or unavailable.

“This works when GPS doesn’t,” said Nikolai Smolyanskiy, the NVIDIA team’s technical lead. “All you need is a path the drone can recognize visually.”

To keep costs low, researchers built their drone with off-the-shelf components. The drone navigates without GPS and relies instead on deep learning
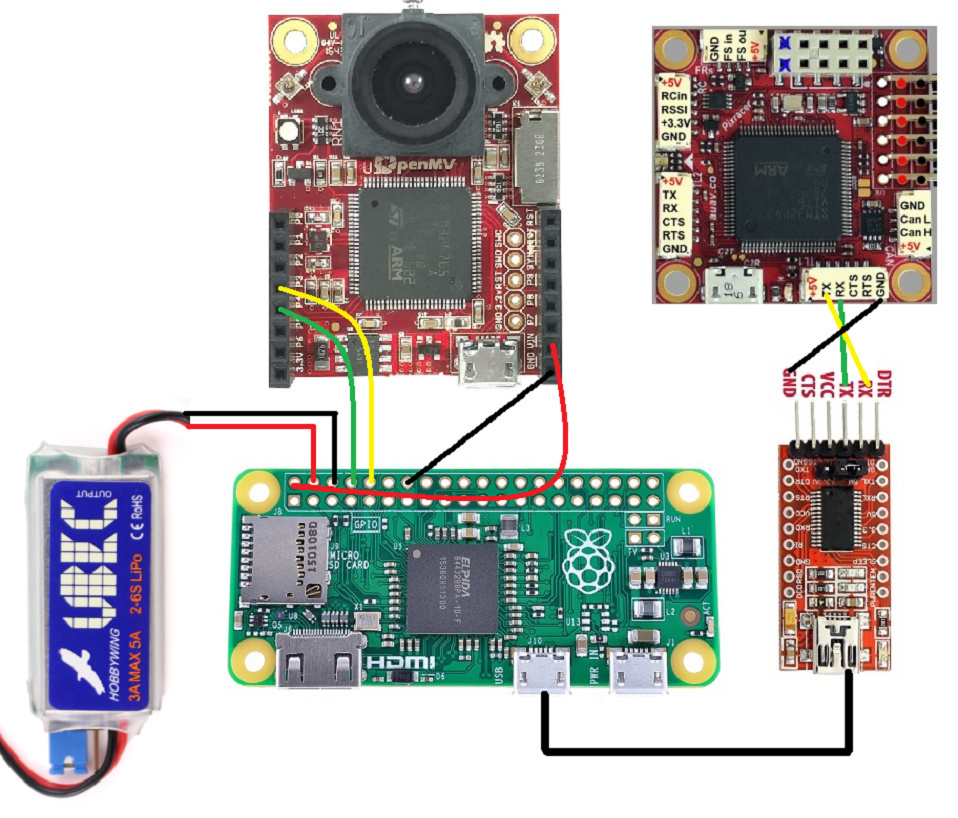
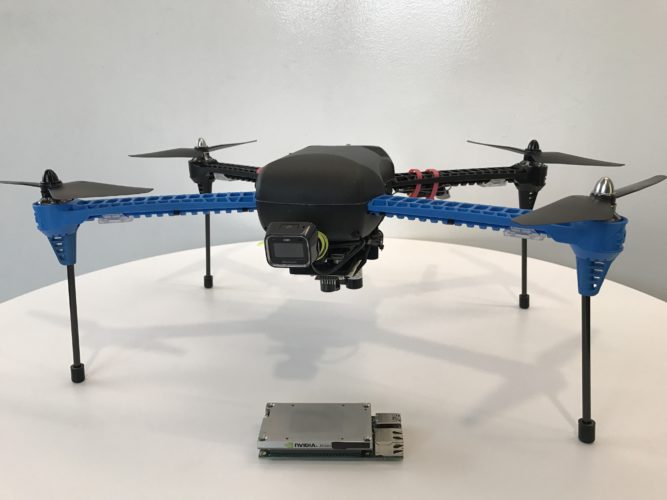
Researchers built their drone with off-the-shelf components to reduce costs.

No GPS? No Problem

Although the technology is still experimental, it could eventually search for survivors in damaged buildings, inspect railroad tracks in tunnels, check stock on store shelves, or adapted to examine communications cables underwater, Smolyanskiy said.

The team’s already trained it to follow train tracks and ported the system to a robot-on-wheels to traverse hallways. The drone also avoids obstacles like people, pets or poles.

“We chose forests as a proving ground because they’re possibly the most difficult places to navigate,” he said. “We figured if we could use deep learning to navigate in that environment, we could navigate anywhere.”

Unlike a more urban environment, where there’s generally uniformity to, for example, the height of curbs, shape of mailboxes and width of sidewalks, the forest is relatively chaotic. Trails in the woods often contain no markings. Light can be filtered through leaves; it also varies from bright sunlight to dark shadows. And trees vary in height, width, angle and branches.

Flight Record

To keep costs low, the researchers built their device using an off-the-shelf drone equipped with the NVIDIA Jetson TX1 and two cameras.

“Our whole idea is to use cameras to understand and navigate the environment,” Smolyanskiy said. “Jetson gives us the computing power to do advanced AI onboard the drone, which is a requirement for operating in remote environments.”

The NVIDIA team isn’t the first to pursue a drone that navigates without GPS, but the researchers achieved what they believe is the longest and most stable flight of its kind. Their fully autonomous drone flies along the trail for a kilometer (about six-tenths of a mile), avoiding obstacles and maintaining a steady position in the center of the trail.

Team member Alexey Kamenev played a big role in making this happen. He developed deep learning techniques that allowed the drone to smoothly fly along trails without sudden movements that would make it wobble. He also reduced the need for massive amounts of data typically needed to train a deep learning system.

In the video above, the drone follows a trail in the forest near the researchers’ Redmond, Wash., office. The areas in green are where the robot decided to fly and the red areas are those it rejected.

No Breadcrumbs Needed

The drone learned to find its way by watching video that Smolyanskiy shot along eight miles of trails in the Pacific Northwest. He took the video in different lighting conditions with three wide-angle GoPro cameras mounted on the left, center and right of a metal bar on a mini Segway.

In addition to their own footage, researchers trained their neural network — called TrailNet — on video recorded on trails in the Swiss Alps by AI researchers at Istituto Dalle Molle di Studi sull’Intelligenza Artificiale (IDSIA) in Zurich.

In fact, IDSIA’s work on drone forest navigation was one inspiration for NVIDIA’s autonomous drone team. The other inspiration was NVIDIA’s self-driving car, BB8.

Next Steps

The team now plans to create downloadable software for Jetson TX1 and Jetson TX2 so others can build robots that navigate based on visual information alone.

Long term, the idea is to tell the robot to travel between two points on any map — whether it’s a Google map or a building plan — and have it successfully make the trip, avoiding obstacles along the way.

For more information about the team’s work, see “Toward Low-Flying Autonomous MAV Trail Navigation using Deep Neural Networks for Environmental Awareness” or watch their talk at the GPU Technology conference.


Read more…
3D Robotics

New two-motor VTOL from Horizon

This kind of 2-motor vertical take-off plane was a PhD thesis 2 years ago, a TED talk 1 year ago & now it's a $150 toy. From Horizon Hobby:

Key Features

  • Multirotor versatility and sport plane agility
  • Takes off and lands vertically in small areas
  • Fly slow or fast and perform aerobatics in airplane mode
  • Can be hand launched and belly-landed like a conventional wing
  • Simple tail-sitter design and SAFE technology makes VTOL flying easy
  • Stability and Acro modes that provide a wide range of flight performance
  • Optional and patent-pending FPV camera and servo-driven mechanism (sold separately)
  • 280-size brushless motors compatible with 2S 450-800mAh LiPo batteries
  • Outstanding speed and climb performance
  • Lightweight and extremely durable EPO airframe
  • Colorful decal sheet with multiple trim scheme options
  • Ready to fly within minutes of opening the box
  • Propeller guards and vertical fins that are easy to install or remove
Needed to Complete
  • Full-range, 6+ Channel DSMX®/DSM2® transmitter
  • 450-800mAh 2S LiPo flight battery
  • 2S compatible LiPo charger
What's in the box?
  • (1) X-VERT VTOL Airplane
  • (1) 3-in-1 Receiver/ESC/Flight Controller Unit
  • (2) BL280 2600Kv Brushless Outrunner Motor
  • (4) Decal Sheets
  • (1) User Manual

Overview

The X-VERT™ VTOL gives you all the fun and versatility of a Vertical Take Off and Landing aircraft without the need for complex mechanics or fancy programming. It also makes the transition between multirotor and airplane flight as easy as flipping a switch. You can also take your flight experience to a whole different level using the optional and patent-pending FPV camera and servo-driven mechanism that transition automatically when the X-VERT does (FPV gear sold separately).

Sleek and Simple Design

A lot of VTOL aircraft require complex mechanisms like tilting wings and motors to achieve vertical and forward flight. The X-VERT park flyer's simple, tail-sitter design and SAFE® stabilization technology allow it to fly like an airplane or a multirotor using nothing more than differential thrust and its elevons. The simplicity of this design also makes the lightweight, EPO airframe remarkably durable.

Wide, Pilot-Friendly Flight Envelope

The light wing loading and efficient aerodynamics inherent in the aircraft's design play a big role in making it easy to fly, especially in airplane mode. Fast or slow, pilots will enjoy smooth, predictable response at any speed.

SAFE® Flight Control Software Makes it Easy

At the heart of it all is exclusive SAFE (Sensor Assisted Flight Envelope) flight control software that has been expertly tuned so almost any RC pilot can experience the fun of VTOL flight.

Automated Transition

Making the transition between multirotor and airplane flight is as simple as flipping a switch. The flight controller will automatically transition the aircraft from one to the other using SAFE technology to stabilize everything so you can relax and have fun.

3 Flight Modes

The advanced flight control software features three flight modes that, along with the model's light wing loading and efficient aerodynamics, give you a wide range of performance.

-   Multirotor Stability Mode

This mode allows you to take off and land vertically like a multirotor aircraft. It's also great for indoor flight. In this mode the aircraft's tail remains pointed at the ground while the flight controller uses a combination of differential thrust and elevons to control pitch, bank and rotation. Pitch and bank angles are limited, and SAFE technology will work to keep the model in a stable hover whenever you release the sticks.

-   Airplane Stability Mode

In this mode the aircraft responds to pitch, roll and yaw commands like a typical airplane. SAFE technology limits pitch and bank angles so new pilots can experience airplane flight without accidentally rolling upside down or losing control. It will also return the wings to level whenever the sticks are released.

-   Airplane Acro Mode with AS3X® Technology

In Airplane Acro Mode the model becomes an agile, fully aerobatic flying wing. There are no angle limits or self-leveling. The large, long-throw elevons will allow you to perform incredibly tight turns as well as a wide range of aggressive aerobatic maneuvers. And because you have the forward thrust of two brushless motors working for you, there is plenty of speed and power to spare. You can even use the differential thrust of the motors for yaw control to perform wild spinning and tumbling maneuvers.

As you fly, AS3X technology works behind the scenes to smooth out the effects of wind and turbulence. It feels completely natural, too. It won't interfere with or limit your control in any way. You simply enjoy a sense of stability and precision that makes you feel like you're flying a much bigger aircraft.

Customize Your Trim Scheme

The included decal sheet gives you multiple trim scheme themes to choose from - a military theme with bomb and rocket decals, and different sport themes with vibrant colors. You can even personalize your trim scheme by mixing and matching decals from different themes.

FPV Ready

You can also take your flight experience to a whole different level using the optional and patent-pending FPV camera and servo-driven mechanism that transition automatically when the X-VERT does (FPV gear sold separately).

Super-Simple Transmitter Setup

The model comes equipped with a Spektrum receiver that is built into the flight controller. It can be flown with any full-range, 6+ channel DSMX/DSM2 aircraft transmitter. No complex programming or setup is required. All you have to do is assign switches for the flight mode/transition changes and throttle arming.

Read more…
3D Robotics

Dronecode/PX4 1.6 code released!

3689717365?profile=original

From the Dronecode release post:

We’re very excited to announce the release of PX4 v1.6, the latest version of the Dronecode Flight Stack (PX4 Pro). This firmware represents a huge increase in both usability, functionality, and stability/robustness since our last significant delivery back in August 2016 (PX4 v1.5.0).

Just a few of the new features and enhancements in this release are:

  • New flight modes for Fixed Wing – Acro and Rattitude
  • New uLog logging format that directly logs uORB topics for more accurate time stamping. This is already supported for review and analysis here: http://review.px4.io
  • Improvements to camera triggering to make it easier to use and and provide better real-time feedback
  • Support for survey flights in multicopter and fixed wing with an intuitive UI
  • Temperature calibration and compensation
  • Support for MAVLink and PWM controlled gimbals
  • Support for generic helicopters and Blade 130 mixer
  • Improved robustness in EKA2 and hardening against marginal GPS reception.
  • Significant improvements to user experience for both the Qualcomm Snapdragon Flight and the Intel® Aero Ready to Fly Drone
  • Support for STM32F7 and NuttX Update to a recent release
  • New hardware support including the Crazyflie v2, FMUv4 PRO and FMUv5 (Special thanks to Drotek and Team Blacksheep for donating the FMUv4 and FMUv5 hardware!)

This is also the most tested and hardened PX4 release to date. The dedicated test team that have done hundreds of hours of testing, on all the major vehicle platforms and using all the main reference flight controller hardware.

A breakdown of the testing since the last stable release (1.5.5) is listed below:

  • 2257 commits tested.
  • 847 total flights on 12 different vehicles and 6 different flight controllers:
    • Pixhawk mini (DJI F450): 554
    • Pixhawk mini (Generic Quad): 11
    • Pixhawk 1 (DJI F450): 15
    • Pixhawk mini (Hexa): 11
    • Pixhawk mini (Phantom FW): 17
    • Pixhawk mini (QAV 250): 28
    • Pixracer (DJI F450): 34
    • Pixracer (Flipsport): 140
    • Pixhawk 3 Pro (DJI F450): 27
    • Dropix (VTOL): 1
    • Intel® Aero Ready to Fly Drone: 6
    • Snapdragon (200qx): 3
  • 6 releases tested: 1.6.0-rc11.6.0-rc21.6.0-rc31.6.0-rc41.6.01.6.1
  • 22 PR’s tested: 6362643864406505663367566777686268636920700370097017703670957260726572687274728172877346

The firmware is already available in QGroundControl (for access to the best UI you may choose to use the “daily build” here). We owe a huge debt of gratitude to the whole PX4 Development Team for this outstanding work.

Check out the release notes for more information

Read more…
3D Robotics

3689717122?profile=original
Awesome post from Patrick Poirier in the OpenMV forums (OpenMV is my favorite computer vision board, and what I use on our DIY Robocars autonomous racers).

--------

This project is a variation of the original Rand'ys Red Balloon Finder implementation.
Based on this blog : http://diydrones.com/profiles/blogs/red-balloon-finder , I modified the Python scripts making now possible to test on any ArduPilot based Quadcopter on a low budget , relatively easy to implement controller.

Code: Select all

     > #This is the configuration script, allowing usage the configuration file       > import balloon_config      > #We need these modules (installed with dronekit ) to control vehicle>     > from pymavlink import mavutil      > from dronekit import connect, VehicleMode, LocationGlobal        > # connect to vehicle with dronekit      > #MAIN      >             # only process images once home has been initialised      >             if self.check_home():       >                 # check if we are controlling the vehicle      >                 self.check_status()       >                 # look for balloon in image      >                 self.analyze_image()       >                 # search or move towards balloon      >                 if self.search_state > 0:      >                     # search for balloon      >                     self.search_for_balloon()      >                 else:      >                     # move towards balloon      >              self.move_to_balloon()# move towards balloon      > # move_to_balloon - velocity controller to drive vehicle to balloon      > # calculate change in yaw since we began the search      > # get speed towards balloon based on balloon distance      > # apply min and max speed limit      > # apply acceleration limit      > # calculate yaw correction and final yaw movement      > # calculate pitch correction and final pitch movemen      > # calculate velocity vector we wish to move in      > # send velocity vector to flight controller      >       send_nav_velocity(pitch_final, yaw_final, speed)       >     # complete - balloon strategy has somehow completed so return control to the autopilot                >      # stop the vehicle and give up control      >        # if in GUIDED mode switch back to LOITER  

OpenMV Script
The Red Balloon Finder is a typical colored BLOB Detector/Tracker. 
We are adding a serial output to PORT 3 so the x-y location and blob width & height can be transmitted to the RPI Zero.
uart_baudrate = 9600
uart = pyb.UART(3, uart_baudrate, timeout_char = 1000)
uart.write("%d ; %d ; %d ; %d \r\n " % (blob.cx(), blob.cy(),blob.w(),blob.h()))

Image

Some theory
In vision based systems, there are many types of hardware/software configuration tailored for sp[/img]ecific applications: Visual Servoing, Visual Odometry and Visual Simultaneous Localization And Mapping (SLAM). In this project we are using the former type of system: Visual Servoing that is designed to:
• Take off and Landing
• Obstacle Avoidance/Tracking
• Position and Attitude control
• Stabilization over a target

The main idea of Visual Servoing is to regulate the pose {Cξ,T } (position and orientation) of a robotic
platform relative to a target, using a set of visual features {f } extracted from the sensors.

Image
Source: Survey on Computer Vision for UAVs: Current Developments and Trends 

Randy's Target Tracking is an Image Based Visual Servoing (IVBS), where the 2D image features are used for the calculation and control values. We exploit a hybrid method where the size of the object is known -a priori- making the estimation of distance along the Z axis possible. In the example below, were the system is following a moving target at a fixed distance, we can relate the target position to the camera projected plane

Image
Source: 3D Object following based on visual information for Unmanned Aerial Vehicles

In this Tracker, we apply a color and shape (blob) filtering in order to extract a location on the camera plane.
We need to extract position and and estimate the distance by computing the knowned object size with the camera parameters: 
lens_mm = 2.8
lens_to_camera_mm = 22
sensor_w_mm = 3.984
sensor_h_mm = 2.952
x_res = 320
y_res = 240

The field of view derives both from the focal length of the lens and the size of the image sensor.
h_fov = 2 * math.atan((sensor_w_mm / 2) / lens_mm)
v_fov = 2 * math.atan((sensor_h_mm / 2) / lens_mm)
In degrees : h_fov = 70.85 , v_fov 55.60

Image
http://chrisjones.id.au/FOV/fovtext.htm


The values coresponding to the object positions and size are transmitted from OpenMV to RPI Zero using serial communication. The python scripting module OpenMV.py reads these values and pass them the Analyze_image() process within Balloon_Strategy_2.py in order to transform position and distance. Here is how we compute the distance:

Code: Select all

    # get distance     self.balloon_distance = get_distance_from_pixels(size, balloon_finder.balloon_radius_expected)        ====FROM find_balloon.py====      # define expected balloon radius in meters      self.balloon_radius_expected = balloon_config.config.get_float('balloon','radius_m',0.3)     # get_distance_from_pixels - returns distance to balloon in meters given number of pixels in image      #    size_in_pizels : diameter or radius of the object on the image (in pixels)     #    actual_size : diameter or radius of the object in meters (0.3)     def get_distance_from_pixels(size_in_pixels, actual_size):     # avoid divide by zero by returning 9999.9 meters for zero sized object      if (size_in_pixels == 0):         return 9999.9     # convert num_pixels to angular size     return actual_size / balloon_video.pixels_to_angle_x(size_in_pixels)           ====FROM Balloon_video.py====     # get image resolution     self.img_width = balloon_config.config.get_integer('camera','width', 320)     # define field of view     self.cam_hfov = balloon_config.config.get_float('camera','horizontal-fov', 70.85 )     # pixels_to_angle_x - converts a number of pixels into an angle in radians      def pixels_to_angle_x(self, num_pixels):         return num_pixels * math.radians(self.cam_hfov) / self.img_width


Building the Tracker System
Depending on the type and size of UAV you are planning to use, the implementation may vary. This build is for a Quadcopter 330 mm size, with a pixracer Flight Controler and a single 5Volts 3 Amps BEC. It is assumed that the UAV is completely functionnal, tested and tuned to be ''rock solid '' in Loiter & Guided mode.

Image


Loading the code, setting parameters & testing 
Test&Development environment:
⦁ RPI Zero to a powered USB hub, keyboard, mouse, WIFI, FTDI serial and HDMI monitor
⦁ Window based PC for OpenMV & Mission Planner
⦁ Linux (or VM) based PC for SITL


OpenMV script
Open IDE
Load the Script
Adjust the color filter using Tools/Machine Vision/ Threshold editor
Make sure you are using LAB color space
Cut the Values & Paste them in the OpenMV script. These values must be inserted in the appropriate thresholds filter code (generic red thresholds for our example):
Image
Run the test and confirm that it is tracking steadily
When satisfied, Tools/Save Open script to OpenMV 

Python Script
On your RPI, open a terminal window and clone the program
git clone https://github.com/patrickpoirier51/OpenTracker

_The code is still a WIP , sorry for the mess ;-)_

Move to the OpenTracker/script and with an editor (simply open the file with the file manager), adjust the parameters of ballloon_finder.cnf , if required. You can test if the OpenMV to RPI Zero connection is working correctly by launching OpenMV.py using command line : sudo python openmv.py or using IDLE2 editor and running script. Remove the # before print command in order to see the values on console. You can run commands without sudo but it might happen sometimes that you dont have all the priviledge to access codes and devices; its up to each users to test with or without sudo.

Hint: 
Ckeck for activity light on FTDI (Show / Hide object) == Knowing the pattern will be helpfull once you are testing live

Once satisfied, comment out the print command, save and you are ready for test.


Testing in SITL
Practice makes good and using SITL may save your day ;-)
Leaving the
You can connect the RPI Zero Ftdi Usb to Serial converter to a second FTDI USB to serial on a Linux based computer (dont forget to cross the XMIT to RX(
Launch SITL:
/home/Ardupilot\ArduCopter/$ sim_vehicle.py --console --map --aircraft=balloon --out udp:missopn.planner.pc.adress:14550 --out /dev/ttyUSB0,115200

On the RPI start the Tracker on within a terminal session with sudo python balloon_strategy.py or using IDLE2 editor and running script. Make shure that we connect using Mavlink Serial- USB
connect ( '/dev/ttyUSB0' , baud=115200)

You should see on the RPI console the connection to vehicle, the parameters initialisation sequence and the tracker waiting for command.

On SITL you can initiate this sequence:
⦁ mode loiter
⦁ arm Throttle
⦁ rc 3 1800
⦁ takeoff 30 (wait until it reach this altitude)
⦁ rc 3 1500 (keep altitude in LOITER)
⦁ mode guided

Once in guided, the RPI takes command and you will see the quadcopter start turning, serching for the object.
You can test by ''showing'' the object to the camera for a brief period of time, and you should see the " "Found Balloon at heading:%f Alt:%f Dist:%f" " message appearing. Hide the object and wait until the message "Balloon was near expected heading, finalizing yaw to %f" message appears , starting the final alignment to object , and then you can ''show'' the object and start chasing when you see "Finalized yaw to %f, beginning run"

Now, the simulated vehicle will follow the object on the camera, Looking at the OpenMV IDE you will be able to judge if the simulator react accordingly to the target position on the camera screen. Basically the vehicle will move left-right and up-down (altitude) according to where the object is located in reference to the center of the camera, if its dead center, the simulated quadcopter should go straight with no altitude change.

If you hide the object:

Code: Select all

     # if we lose sight of a balloon for this many seconds we will consider it lost and give up on the search      self.lost_sight_timeout = 3      the tracker will give up : "Lost Balloon, Giving up"     and will go through this sequence:     # complete - balloon strategy has somehow completed so return control to the autopilot               # stop the vehicle and give up control     # if in GUIDED mode switch back to LOITER

Once in LOITER you can run another test just by switching back to GUIDED.


Quadcopter Integration
Here is a picture showing the typical installation:


ArduPilot
Adjust the parameter of the Serial (UART - SPEED - MODE) corresponding to the actual speed (115200) and for MavLink protocol.

Configure the flight modes so its easy for you to switch from LOITER to Guided on the Transmitter.


Headless configuration on the RPI Zero
In order to get maximum speed and power, disable the desktop mode (configuration menu or raspi-config)
There are many ways to get the script running automatically, the simplest being launching it within /etc/rc.local
edit file sudo nano /etc/rc.local, and add this:
python /home/pi/OpenTracker/blob/scripts/balloon_strategy_2.py &

"&" is used to make run python in background
Save and reboot 
Check for activity light on FTDI (Show / Hide object) 


Live Testing
Choose best : Field/Wind/Brightness/Mid Day

Choose the appropriate Object for Target == Red Balloon 
Place Target at least 2 Meter from ground 
Final adjustment of Target with OpenMV IDE using Threshold utility
Set the best Color Filter Mask and Blob Size
Scan around and Make sure you dont get "False Positive" 

Start Quad copter
Check for activity light on FTDI (Show / Hide Target)

Arm
TakeOff Loiter
Switch to Guided (Ready to switch back)

Check Sequence, Analyse Results, Repeat.... Have Fun !!!

Read more…
3D Robotics

3689716863?profile=original

This week the Dronecode/PX4 team will release its biggest and best update, version 1.6. You can see a glimpse of the testing that went into it with our public test log server here

Along with all the automated code and flight simulator testing, there are more than 100 hours of real-world flight testing (above and beyond many times that many hours by the beta testers) by the full-time Dronecode Test Team, as show here.

3689716889?profile=original 

Read more…
3D Robotics

Comparing two low-cost scanning Lidars

3689716699?profile=original

Excerpted from a new post at our DIY Robocars sister site

It’s now possible to buy small scanning 2D Lidars for less than $400 these days, which is pretty amazing, since they were as much as $30,000 a few years ago. But how good are they for small autonomous vehicles?

I put two to the test: the RP Lidar A2 (left above) and the Scanse Sweep (right). The RP Lidar A2 is the second lidar from Slamtec, a Chinese company with a good track record. Sweep is the first lidar from Scanse, a US company, and was a Kickstarter project based on the Lidar-Lite 3 1D laser range finder unit that was also a Kickstarter project a few years ago (I was an adviser for that) and is now part of Garmin.

The good news is that both work. But in practice, the difference between them become very stark, with the biggest being the four times higher resolution of the RP Lidar A2 (4,000 points per second, versus Sweep’s 1,000), which makes it actually useful outdoors in a way that Sweep is not. Read on for the details.

First, here are the basic spec comparisons:

3689716763?profile=original

Bottom line: RP Lidar A2 is smaller, much higher resolution, and better range indoors (it’s notable that the real-world RP Lidar performance was above the stated specs, while the Scanse performance was below its stated specs). The Scanse desktop visualization software is better, with lots of cool options such as line detection and point grouping, but in practice you won’t use it since you’ll just be reading the data via Python in your own code. Sadly the Scanse code that does those cool things does not appear to be exposed as libraries or APIs that you can use yourself.

In short, I recommend the RP Lidar A2.

I tested them both in small autonomous cars, as shown below (RP Lidar at left)

3689716820?profile=original

Both have desktop apps that allow you to visualize the data. Here’s a video of the the two head-to-head scanning the same room (RP Lidar is the window on the right)

You can see difference in resolution pretty clearly in that video: the RP Lidar just has four times as many points, and thus four times higher angular resolution. That means it can not only see smaller objects at a distance, but the objects it does see have four times as many data points, making it much easier to differentiate them from background noise.

As far as using them with our RaspberryPi autonomous car software, it’s a pretty straightforward process of plugging them into the RaspberryPi via the USB port (the RP Lidar should be powered separately, see the notes below) and reading the data with Python.  My code for doing this is in my Github repository here.  We haven’t decided how best to integrate this data with our computer vision and neural network code, but we’re working on that now — watch this space

Read the rest here

Read more…
3D Robotics

3689716592?profile=originalAn Australian IT services company combined an Amazon Alexa and a service called "what3words" that translates GPS addresses into three unique words to create a MAVLink-compatible drone that can be commanded entirely by voice. The video can't be embedded, so see it here

DXC Labs has created an experimental voice-activated (Amazon Alexa) and cloud-controlled (AWS IoT) drone that uses three-word identifiers from what3words to provide precise location directions to within three square meters, anywhere in the world. This means the drone operator (such as a first responder or maintenance worker) can easily give a voice command such as “go to location: public warns artist” that will send the drone to a specific place on earth — in this case the historic shipwreck of the HMVS Cerberus, south of Melbourne, Australia. 

DXC Labs: Voice- and Cloud-Controlled Drone

Getting to Hard-to-Reach Places

 
The what3words service allows user-friendly routing of the computer-controlled drone to locations that may not have a conventional street address, such as plant and equipment locations, a missing person in a national park, a fire in a large campus, or any location whose street address is inaccurate or ambiguous. 

This greatly improves activities such as identifying disaster zone locations for first responders, inspecting power lines and oil rigs, making deliveries to hard-to-reach places, and traveling to any point in the world.

Read more…