jDrones News: jD-IOBoard v1.0 update
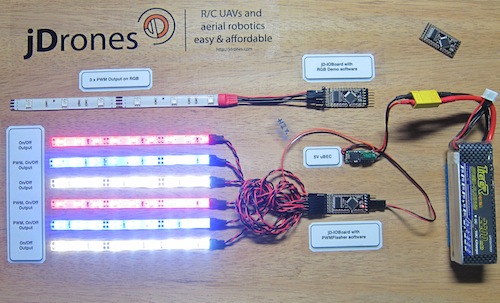
You had some problems on driving LED strips or something else?? Well no problems anymore.... We have seen people making all type of darlington/transistor and similar hacks to drive their LEDs, Sirens and so on but they all need a lot of hacking and they might not be suitable for long term solution.
We answered on this call and made fully Arduino compatible called jD-IOBoard that can run Single LEDs, LED Strips, Loudspeakers, Buzzers, Power switches and so on. It's upto your own imagination on what all you can control with this board.
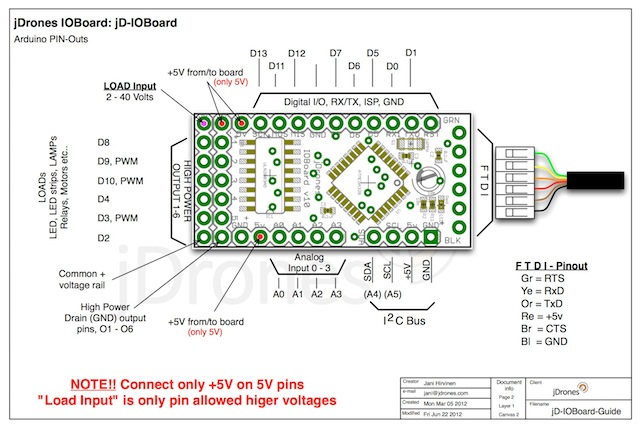
So what does this board actually do?? It has fully Arduino compatible ATMEGA 328 MCU and Darlington array to driver high power outputs. Also I2C pins are exposed and same as many TTL level IO and Analog pins. As you can see from picture above.
Board has:
- 6 x High power outputs, max. 500mAh / 50 Volts
- 4 x Analog inputs (6 if you don't use I2C port)
- I2C port for controlling, listening I2C messages
- 6 x TTL level GPIO pins (8 if you don't use FTDI)
- 1 x FTDI port
3 high power outputs can also be controlled by PWM output while another 3 are just normal "On/Off" outputs
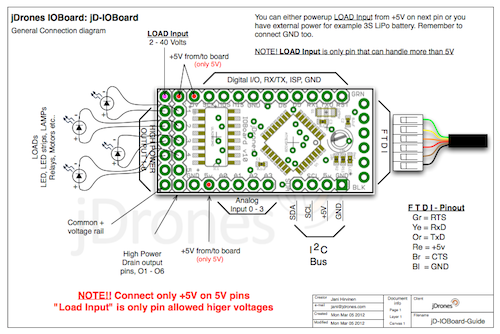
How those Arduino pinouts looks like:
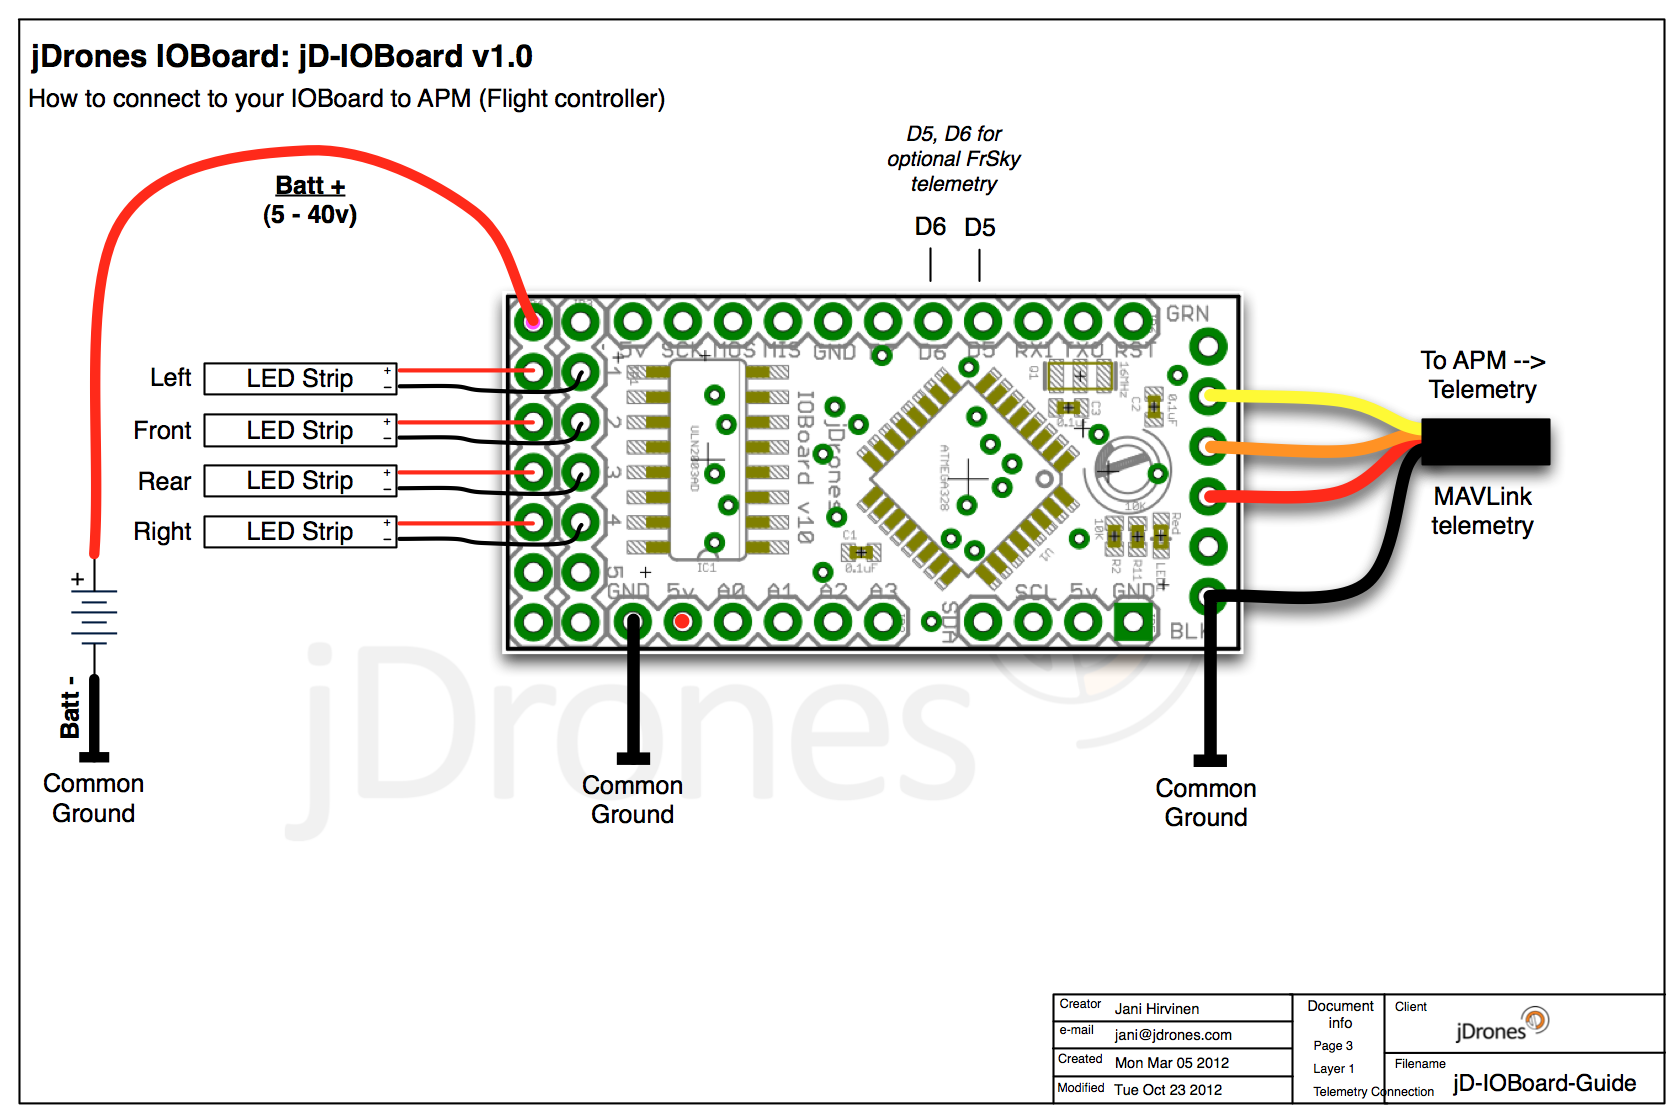
Connecting LED's,Buzzers etc is really simple. Just use one of output pins on end of the board. Below you can see examples on how to connect LEDs or LED Strips on it.
Pictures does not give enough credit for how it works so we made small video to show just few examples on how to use it. There are many other ways to do it but this should give at least some idea what/how to run it. So have fun watching it.
Get yours from jDrones Store: jD-IOBoard and have a blink blink.
Ps. There are some nice features coming to this board shortly...
Comments
Ravi we are still trying to find why some of IOBoards are not accepting HEX file from Configurator. In mean while you can upload all files with Arduino IDE. Just download all needed files from our repository on Google/Arducodes and use them in IDE. Did you have latest IDE already on your computer?
hi jani, how do i upload the mavlink hex files to io board. can i use arduino IDE. my io board does communicates with the configurator. but i understand that i have to first uplaod the mavlink hex file to io board.
Mark, yes you need to use normal 5V FTDI cable to program it. Use IOBoard Configurator from our software bank to program different patterns. With Configurator you can test run patterns to see how they look in real-life.
No need for Arduino IDE. If you don't have drivers for FTDI cable, get one from FTDI website under VCP drivers.
You only need A-IDE if you plan to modify IOBoard softwares by hand.
Ok so I need to get the FTDI to usb cable that Jdrones sells and Install the Arduino IDE, but which Arduino drivers do I install for the IO board? Thanks for the quick reply!
Mark, you have to program the io board using a FTDI cable with the pin sequence similiar to io board. u also have to usea arduino IDE program to compile and upload the program to the board. after programming u can connect it to telemetry port of APM1.
I'm a newbee here, how can I program the LED's? I have the io board connected to my APM1 board to the telemetry terminals tx to rx and rx to tx +5 and ground. Can I now use the usb connector on the APM1 to program the IO board? thanks, Mark
hi jani, thanx the LED strips are working now and the board seems to be fine. now just a dumb question, to upload the jdornes_mavlink.hex file can i use arduino IDE. do i connect Rx and Tx pins from APM telemetry port or just Tx pin to I2C port of i/o board.
thanks jani.
@Ravi, Go and get PWMFlasher from our repository and it will work without any I2C and others. PWMFlasher is same program as on the video we used on this blog post.
Google Arducodes: PWMFlasher
We are doing re-check for all boards to see that they work as expected. Me and Michael.O are looking Configurators ArduinoTK Libraries to see if we can fix several upload issues on there. It looks like Arduino Lib have some problems.
For people who cannot get their boards working we will send new board. So if you have board that gives problems on uploading firmware. Please contact jDrones customer service and our girls will take care of you.
-
19
-
20
-
21
-
22
-
23
of 24 Next