This is the second chapter in my quest to build a flying machine. If this is your first time in joining me in my project of getting a flying machine in the air, I’d encourage you to have a look at Part 1.
In the first installment in this mini series, I spoke about how difficult it’s been to get in to the world of flying copters, due a many acronyms, assumed knowledge and the complexity of the options available.
As I sit here on a return flight to where I am currently living in Brisbane about to down some complimentary coffee and listening to music on the free headphones given to me for the in-flight entertainment, I’m getting the chance to finally reflect on some of the challenges and discoveries I had when building upon my new found hobby.
I had ordered the 3DRobotics hexacopter with the full electronic kit and was super excited when it ordered no more than 5 days later – from the USA. I know that there have been several comments on my last post made about Hobby King as a supplier of equipment. In good faith I had also ordered parts from them too, expecting parts to be delivered within a few weeks of each other at the most. On a side note, I’ve almost given up on expecting the parts from them in time for when I initially needed them – before this week.
I was at my normal job when the box from 3DR arrived. If you are like me, when you go to a shop, usually the box will get opened in the car – this happened again. I’m like a kid who can’t wait to open his presents at Christmas.
On a side note, just beware that if you use a P.O. Box to accept deliveries that some couriers may have trouble with delivery. Fortunately the courier rang me asking for a local physical delivery address.
So, as the box arrived and I open it up, I quickly discovered there were no instructions in the box, or where to directly find them, and no paperwork saying ‘Congratulations on your purchase, we hope you enjoy flying it. You’ll find more information at X etc…”. I was a little surprised at this. The top of the box had the order and contents/packing slip on the top though.
Because this is a community project that I purchased, I’ll let it slide. Even though projects are community based, I know that model designs change and are regularly improved over time.
To the team at 3DR, here’s an idea. When you make and release versions of the hexacopters, are you keeping an archive of the documentation online for each version of the models that are released? I know this happens with the AurdoPilot board, but what about the frames and kits available too, and including basic documentation?
I’m sure it’s not too hard to keep track of the changes and refinements that go along with the manufacturing.
Why the previous suggestion? Well, The first thing I had to do was find the instructions. This took a little searching to do, because even though 3DR are making it and there are “link placeholders” on their site on the actual product pages they are selling, there are actually no links. (This has since changed – well done.) I needed the specific PDF file which laid out quite well the construction of how to build the new frame. There were random links in the forums, and the Wiki but not easily found.
This is the current link of the 3DR hexacopter instructions.
I also found the photos and step by step instructions from the UK Arducopter site very helpful too.
Upon getting these instructions I printed them out in colour was able to set to work.
My coffee table at home was covered in bits of aluminum, cables, plastic, cool little blue motors and some things called ESCs.
As a child I enjoyed playing with Lego and Meccano, so assembling this new contraption wasn’t too hard to do and as a newbie, I was able to easily do it in under a standard movie time.
The manual made it very easy to understand what went where and how all of the hardware joined together. This was the fun and easy part.
I did have one slight problem and that was because I was missing a little screw to keep one of the motors on the arms. I made a note of which one it was and did it up slightly tighter than the others. I searched everywhere and was extremely careful not to lose any part. All I can put it down to is either quality control and someone not counting to 12, or a screw falling out of the bag there were packaged in because of an air hole and they were lost in transport. It certainly wasn’t the end of the world, so I didn’t really worry too much, and up until this time I haven’t raised it with 3DR – I have since bought a packet of m3 6mm screws though as spares for the legs and other parts for (*cough* when) if I break the copter.
The next part after the initial frame construction was the electronics of the copter – this is where having the laptop on hand helped immensely.
Construction
The manual gave step-by-step instructions for the frame and the distribution board (which was thankfully already assembled), but when it came to the electronics, the manual basically said (and I’m paraphrasing here) “Connect the electronics and you are ready to fly”. What the?
I had my AurduPilot controller (which is known as the APM) with lots of plugs available, and also a distribution board available with many wires. Naturally you can see which plugs go where, however because I’m a person that likes to pull things apart to see how they work and put them back together again, it’s taught me a thing or too.
Even when I was working on acid etched circuit boards in my early days in high school I could easily understand how and where power flowed on circuit boards. Even looking at PCBs you can see the copper lines and how circuits join with each other.
The next part threw me. The 3DR distribution power-board totally confused me. It is painted black and has 7 power plugs coming off it. It didn’t make sense to me as to how it was wired up. As I couldn’t see the paths of the electronics, I wasn’t sure of how this thing was truly wired up. I like to ask questions, find out how things work. Taking things at face value sometimes is hard for me until I’ve got a good understanding of a product/item. My old multimeter had died and so I was stuck.
I did however manage to find a schematic of the board online. (http://stuff.storediydrones.com/Hex_Power_Distribution_Board.zip)
Yes! My research was paying off. Next to find an opensource tool read the strange file. Once I could see the wiring of the board on the screen, I was set and good to go. (http://www.cadsoftusa.com/download-eagle/)
As it turns out, according to the schematic diagram of the board, this is how's it's connected under the paint.
http://store.3drobotics.com/products/hexacopter-power-distribution-...
Before I'd seem the schematic diagram, I was VERY tempted to start doing extra soldering of all the pins, but also for the power plugs too. The board itself is painted, and so at the time - it just didn't make sense.
Oddly enough, I still bought a $12 multimeter and double-checked all the plugs.
To most people who have created a copter of some sort, most of this is all second nature, but when you’ve never built anything like this, you want to make sure you get it right before you start powering things up – just in case you short circuit something. I’m sure you’ve blown a fuse, popped a diode or connected batteries the wrong way. When you pay good money for a hexacopter, this is the last thing you want to do.
After studying many images and designs of other people’s copters, I was able to finally connect my system together on the table to see how it would look before it was to be fully installed in the copter itself. Everything looked good. GPS plugged in, ESCs in the right place, loose wires everywhere and so on.
I laid everything out to get a good idea too of how the configuration was going to work as well.
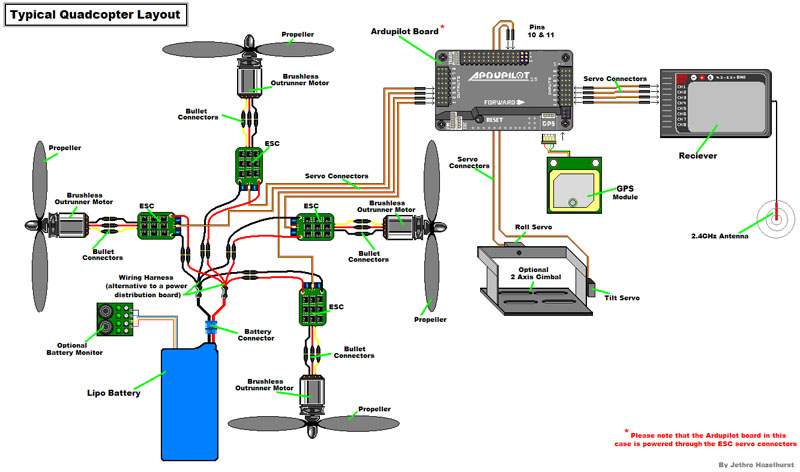
The pictures shown are basically how the cables go together.
In Part 1 of this blog series, you'll remember from the design image how it all goes together. This the actual of how it goes together.
As mentioned before, my order from Hobby King hadn’t arrived and so I had a kit that was half built. I couldn’t do anything else and it was getting to me. I had no battery, or radio system to use the copter. This was really frustrating me – having a half built machine sitting there being unable to progress further because of a lack of parts.
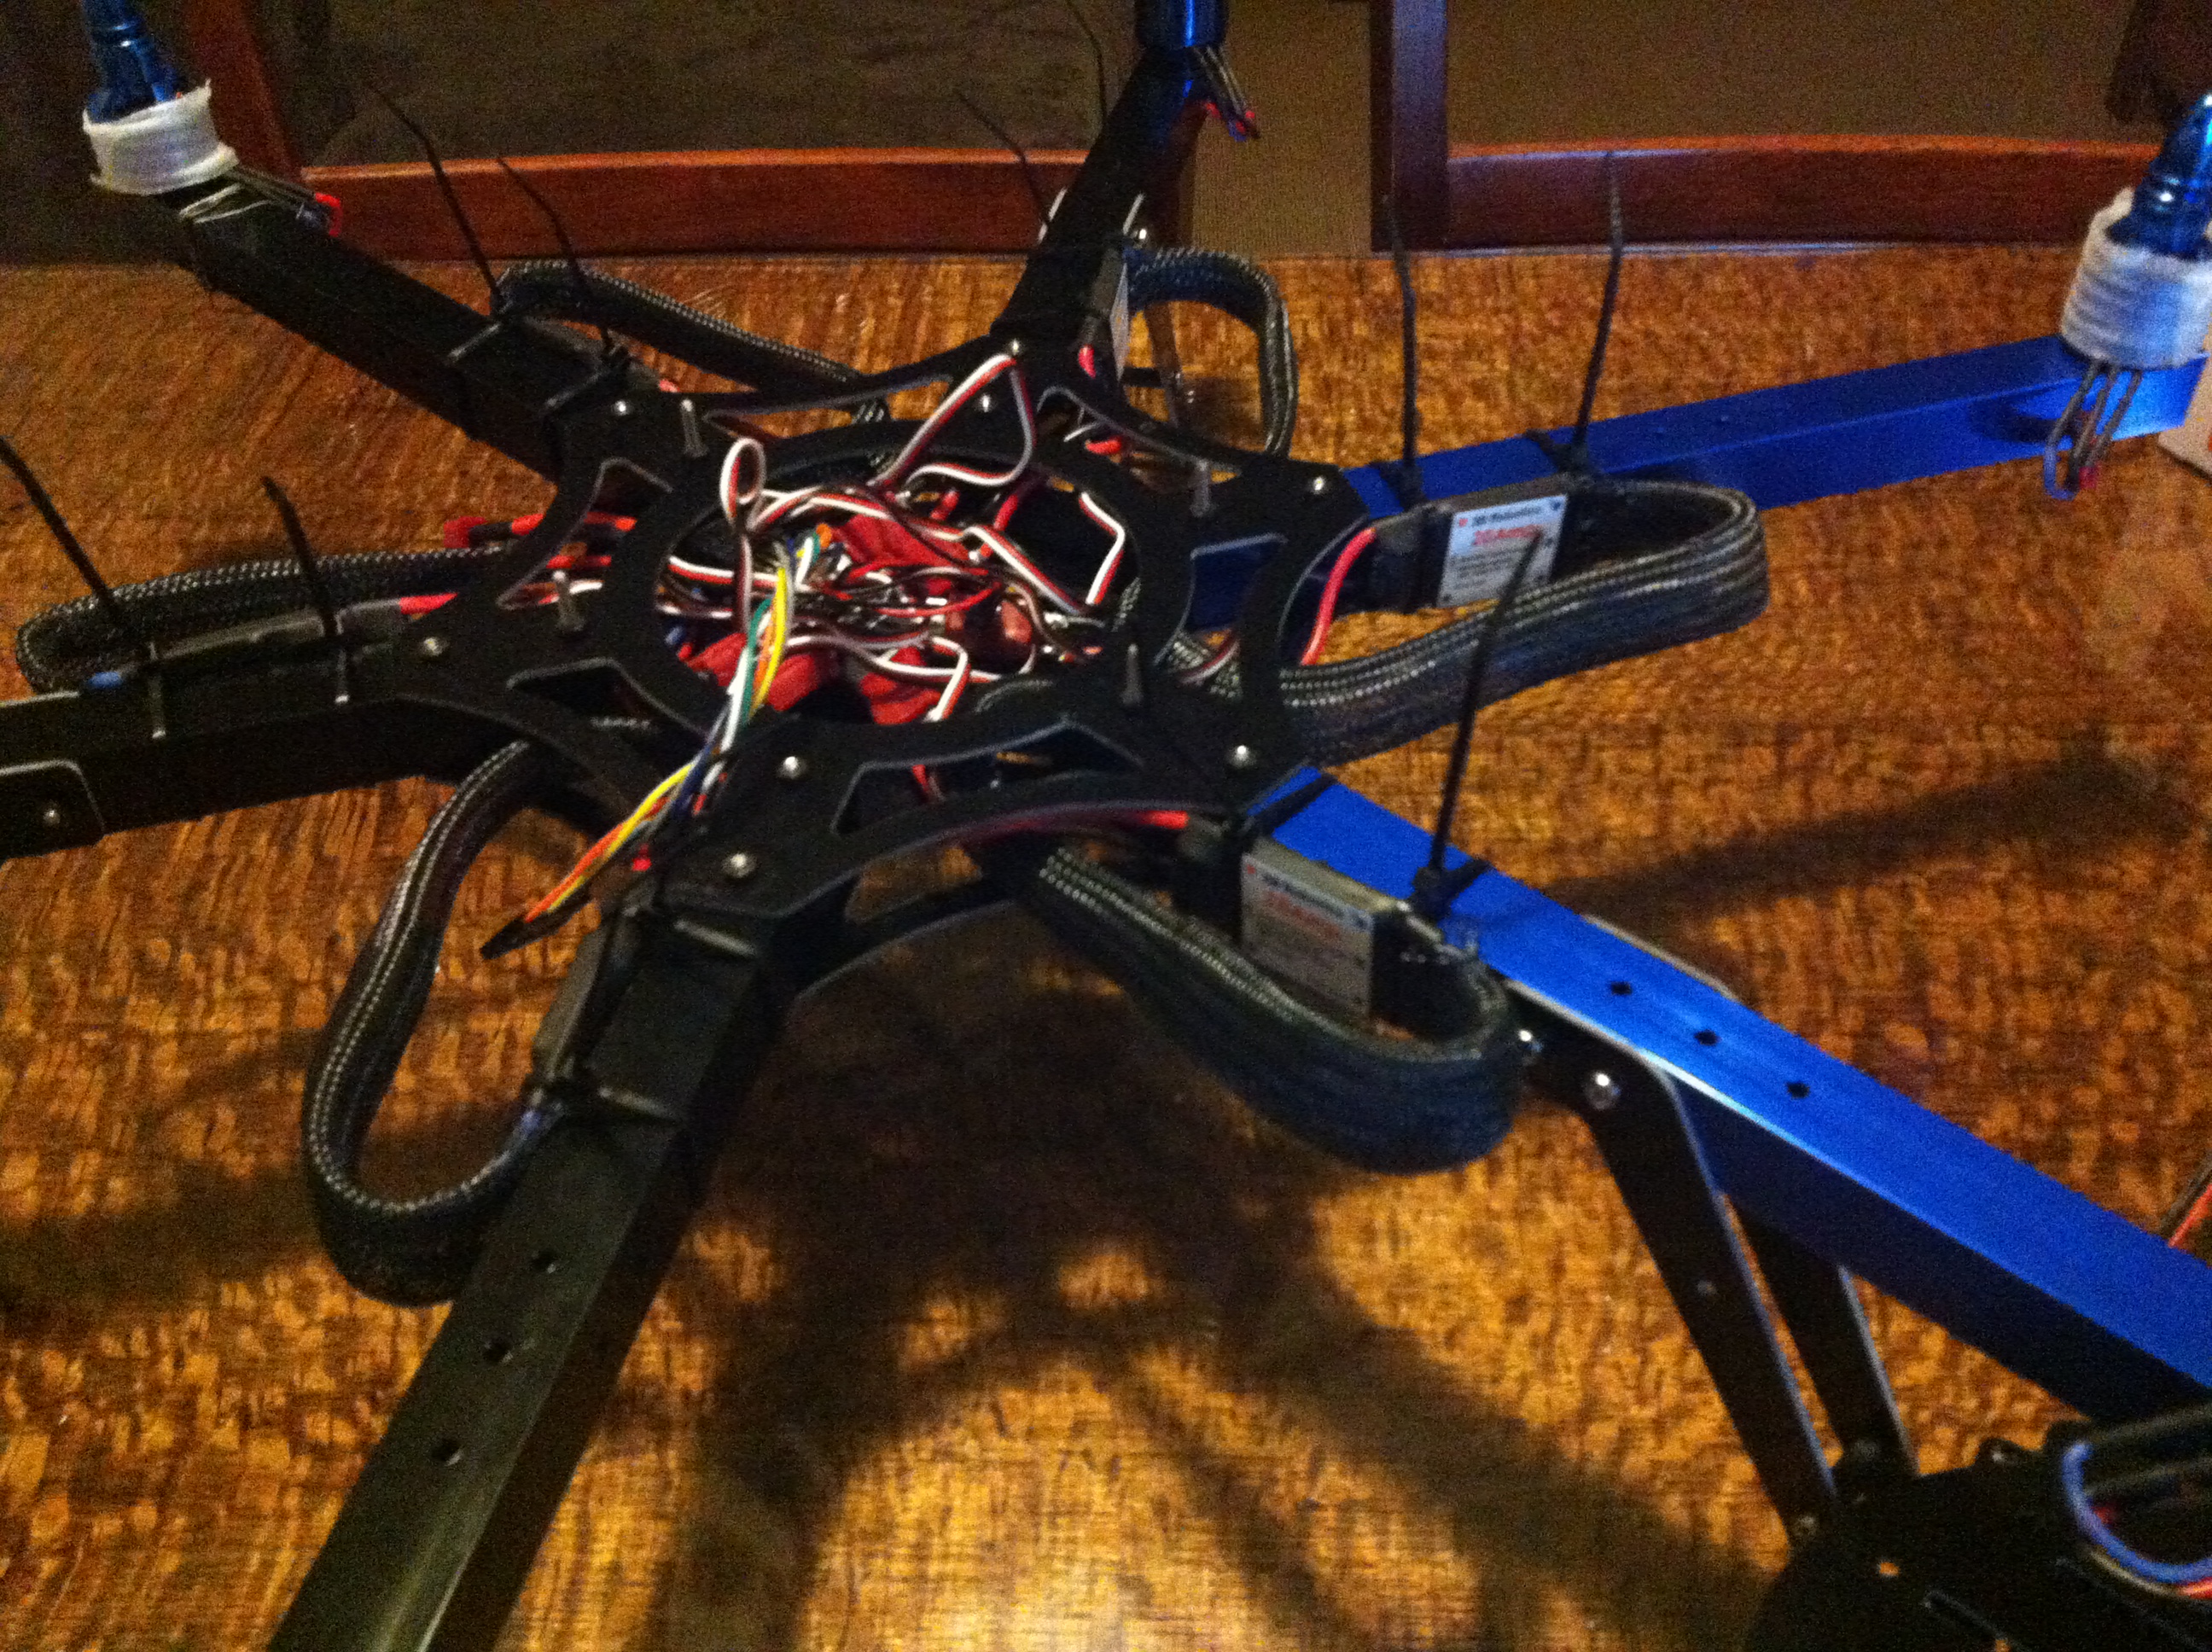 Electronics nearly installed.
It was at that stage that I had it suggested to me to try a local hobby shop and see what was available. In all honesty I hadn’t thought about that option – for two reasons. Firstly, this was a completely new field to me and so I didn’t/don’t know of many/any people doing it as so had assumed it to being a super niche market. Secondly, I often find myself going to shops and asking for items that are considered ‘specialty’ items and so walk out empty handed. This happened a few years ago when I wanted a shoulder mount/frame for my DSLR and went to one of the biggest camera places where I live. They didn’t have any stock or parts. So, what does one do in that instance? You go online and wait weeks… This was where I thought I was.
 As it turns out, radio controlled gear (although as slightly specialist as it is) is reasonably common and not too hard to get hold of. So, off I went to the local R/C hobby shop. I grabbed one of the cheapest but full featured radio control units available a Futaba F8 unit – which includes a receiver, and it also runs on AA batteries; a big bonus. (Some transmitters have interchangeable transmitter packs for various frequencies and things).
When I had these new components with me and a big kid grin on my face and a hole in my wallet (because I’d just paid for a radio and batteries a second time – thanks HK), I was able to continue the build process and get things going properly.
It had taken me at least a few weeks to get to this stage, so I made minor tweaks to the initial and suggested look. I added some black braided plastic to conceal the wires on the six arms.
As soon as I brought the batteries home, I discovered I had a problem. I had initially ordered the wrong part. My battery had a T (Deans) connector on it. My power module unit from 3DR had an XT60 connector on it. Fortunately for me, a gentleman on YouTube has made 4 videos outlining various phases in the configuration of how the APM works and what goes where. It’s a good thing I’d watched them all and remembered about the little jumper pin video, as this was what saved my day. (https://www.youtube.com/watch?v=TFCmUuvcH04)
This basically meant I had to use the little jumper, because instead of using the 3DR power module, I'm now getting power from the ESCs to the APM. It's not a big issue, but just means the APM can't monitor the battery power and do an emergency landing if it runs out of juice.
The other videos in this mini series are also very good to give you enough information as well - Part 1, Part 2, Part 3 and Part 4.
One of the things I also did while waiting for parts and the construction phase was connecting the APM to my computer and loading the firmware required. After downloading the Mission Planner software, it was very easy to put the Hexacopter software on. There are plenty of tutorials out there about how to do this. I did however get excited to see the live telemetry data and the GPS signals coming through on my computer while the GPS module was connected. This was one of the main reasons for going down this OpenSource path.
When trawling through the wiki pages, also note that you are in the ArduCopter pages. The ArduPlane wiki pages are very quickly linked too as well and it's easy to mix up where you are. Most of the information is relevant, but at times it can be slightly conflicting.
For those wondering about how to connect the transmitter and other things, it's very easy.
 The connections on paper.
 Nearly finished.
 What the radio transmitter IN connections look like up close.
 Completed!
One thing you may notice is how I ended up connecting the ESCs to the APM. I went directly from and skipped using the distribution board because a few of the connections had broken and after doing a couple of tests with my multimeter, I wasn't totally satisfied with how it was working. It was easier to remove the soldered cables and go direct.
Thanks for reading. There is still more to come however. Stay tuned...