Aldo Vargas's Posts (14)

Sort by

Drone following a roomba

Hello everyone! It’s been a while since I write a blog post here!

In this post I will explain about a very cool robotics project I did last year. This project is as cool as it sounds: making a drone follow a roomba using computer vision!

This has been done before and for sure someone has posted their on solution here, I will just describe my version.

The idea can be broken down in different sections, one the vehicle, the communications, the control, computer vision and results…

The objective of this project is to make a drone “see” a roomba and try to follow it from the air.

On the vehicle side, I was using the great and cool BigX, which is a great vehicle with very nice performance and big!! Here is a pic of it:

3689725556?profile=original

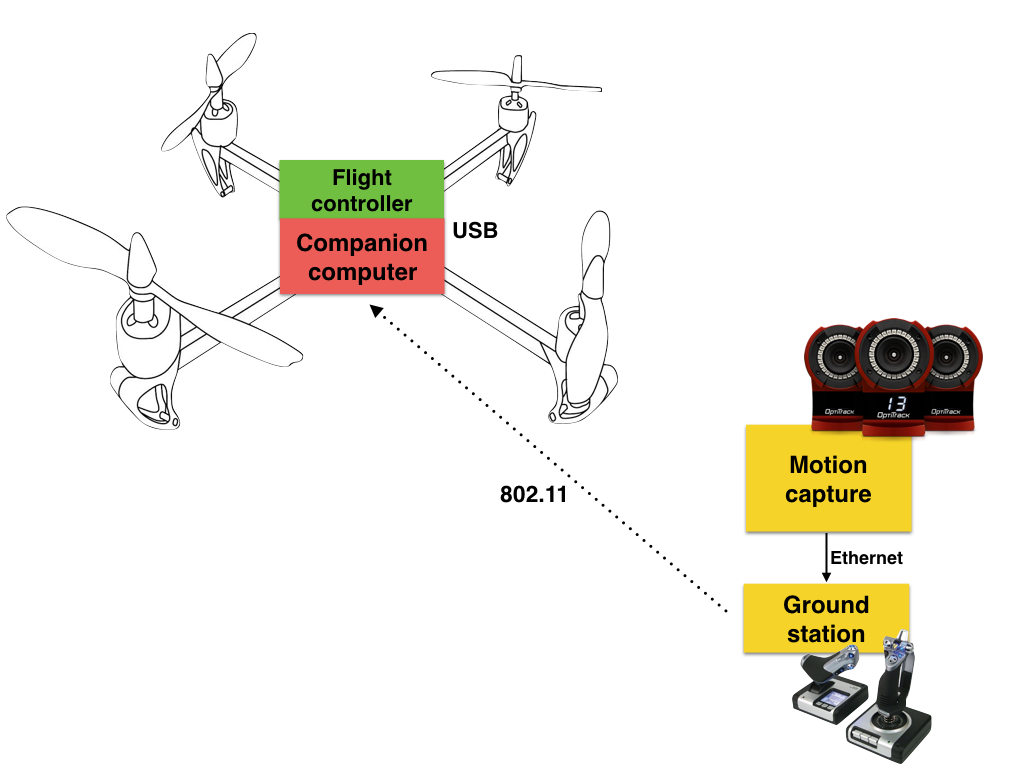
On board I was using the same concept of the Flight Stack, which is the combination of a flight controller (pixhack in this case) and a raspberry pi with extra features.

The RPI was a 3, and its the one in charge of “piloting” the aircraft when I’m not doing it. Also the RPI is the one that runs the computer vision algorithm to be able to “see” the roomba. With that information (position in pixels X and Y) the RPI will compute the necessary velocity commands to steer the vehicle to the center of the target.

The RPI was also in charge of the communications, it created a network and on the ground I was using a ubiquiti AP that was connected via ethernet to my MBPR, I used this configuration because such AP gave me the range of 10km LoS (I just try it up to 3km…)

Also on board, connected to the RPI, a B101 HDMI bridge was used in order to capture the frames from the gopro camera and have them analyzed.

On the ground side as I mention before, I had the Ubiquiti AP and my laptop connected with ethernet to it. My computer logged in to the RPI via SSH in order to activate the scripts that run the main stuff. Also I had QgroundControl opened to be able to see the telemetry of the vehicle in a nice way. I was using mavproxy with udp casts. An image of how my computer screen looked was:

3689725484?profile=original

In the image above you can see the position teleoperation tool from the AltaX ground station program. This module changed the position of the robot by reading the keyboard from the ground station computer, pretty neat…

On the computer vision part, I added blue tape to the top of the roomba in order to be very easy distinguishable from the environment. I also tuned as much as possible my different color tracker algorithms, you can find the code here and a video demonstrating here.

3689725514?profile=original

When you combine all ingredients, plus creating a velocity vector position control, you got a nice result, like the one showed in the video showed at the beginning. 

Let me know what you think, in this case I cannot release the as its protected by my employer but as usual I can guide or make recommendations to anyone doing something similar.

Don't forget to fly safe!

Read more…

Slung load controller

This post is to share a bit of the final experimental work of my PhD, since my doctoral defense is next week... 

Multirotor Unmanned Aerial Vehicles (MRUAV) have become an increasingly interesting area of study in the past decade, becoming tools that allow for positive changes in today’s world. Not having an on-board pilot means that the MRUAV must contain advanced on- board autonomous capabilities and operate with varying degrees of autonomy. One of the most common applications for this type of aircraft is the transport of goods. Such applications require low-altitude flights with hovering and vertical take-off and landing (VTOL) capabilities.

Similar as before in this project we use the AltaX Flight Stack which is compromised by a Raspberry Pi 3 as companion computer and a naze32 as flight controller.

mruav-sl.jpg?resize=601%2C1024&width=400

The slung load controller and the machine learning estimator is running on the RPI3, although of course the training of the recurrent neural network was done offline in a big desktop computer. The RPI calculates the next vehicle position based on the estimation of the position of the slung load, everything is running using our framework DronePilot and guess what? its open source ;). Keep reading for more details.

If the transported load is outside the MRUAV fuselage, it is usually carried beneath the vehicle attached with cables or ropes, this is commonly referred to as an under-slung load. Flying with a suspended load can be a very challenging and sometimes hazardous task because the suspended load significantly alters the flight characteristics of the MRUAV. This prominent pendulous oscillatory movement affects the response in the frequency range of the attitude control of the vehicle. Therefore, a fundamental understanding of the dynamics of slung loads as they relate to the vehicle handling is essential to develop safer automatic pilots to ensure the use of MRUAV in transporting load is feasible. The dynamics of the slung load coupled to a MRUAV are investigated applying Machine Learning techniques.

The learning algorithm selected in this work is the Artificial Neural Network (ANN), a ML algorithm that is inspired by the structure and functional aspects of biological neural networks. Recurrent Neural Network (RNN) is a class of ANN that represents a very powerful system identification generic tool, integrating both large dynamic memory and highly adaptable computational capabilities.

In this post the problem of a MRUAV flying with a slung load (SL) is addressed. Real flight data from the MRUAV/SL system is used as the experience that will allow a computer software to understand the dynamics of the slung in order to propose a swing-free controller that will dampen the oscillations of the slung load when the MRUAV is following a desired flight trajectory.

This is achieved through a two-step approach: First a slung load estimator capable of estimating the relative position of the suspension system. This system was designed using a machine learning recurrent neural network approach. The final step is the development of a feedback cascade control system that can be put on an existing unmanned autonomous multirotor and makes it capable of performing manoeuvres with a slung load without inducing residual oscillations.

The machine learning estimator was designed using a recurrent neural network structure which was then trained in a supervised learning approach using real flight data of the MRUAV/SL system. This data was gathered using a motion capture facility and a software framework (DronePilot) which was created during the development of this work.

rnn.png?resize=768%2C434&width=600

After the slung load estimator was trained, it was verified in subsequent flights to ensure its adequate performance. The machine learning slung load position estimator shows good performance and robustness when non-linearity is significant and varying tasks are given in the flight regime.

control-strategy.png?resize=768%2C406&width=600

machine-learning-estimator.png?resize=768%2C246&width=600

Consequently, a control system was created and tested with the objective to remove the oscillations (swing-free) generated by the slung load during or at the end of transport. The control technique was verified and tested experimentally.

estimator-performance.png?resize=768%2C519&width=600

The overall control concept is a classical tri-cascaded scheme where the slung load controller generates a position reference based on the current vehicle position and the estimated slung load position. The outer loop controller generates references (attitude pseudo- commands) to the inner loop controller (the flight controller).

control-scheme.png?resize=768%2C234&width=600

The performance of the control scheme was evaluated through flight testing and it was found that the control scheme is capable of yielding a significant reduction in slung load swing over the equivalent flight without the controller scheme.

The next figures show the performance when the vehicle is tracking a figure-of-eight trajectory without control and with control.

no-control.png?fit=1470%2C733&width=600

with-control.png?fit=1470%2C733&width=600

The control scheme is able to reduce the control effort of the position control due to efficient damping of the slung load. Hence, less energy is consumed and the available flight time increases.

Regarding power management, flying a MRUAV with a load will reduce the flight times because of two main factors. The first one relates to adding extra weight to the vehicle, consequently the rotors must generate more thrust to keep the desired height of the trajectory controller, hence reducing the flight time. The second factor relates to aggressive oscillations of the load for this reason. The position controller demands faster adjustment to the attitude controller which increases accordingly the trust generated by the rotors. The proposed swing-free controller increases the time of flight of the MRUAV when carrying a load by 38% in comparison with the same flight without swing-free control. This is done by reducing the aggressive oscillations created by the load.

sl-support.gif?resize=640%2C567&width=600

Check the nice quality gif here.

The proposed approach is an important step towards developing the next generation of unmanned autonomous multirotor vehicles. The methods presented in this post enables a quadrotor to perform flight manoeuvres while performing swing-free trajectory tracking.

Look at this beautiful light painting photo comparison:

3689710459?profile=original

Don’t forget to watch the video, it is super fun. Original post in here.

Read more…

I want to show the progression I have done with my DronePilot framework, and in this video I'm showing how to do a trajectory controller.

I want to start by saying what I'm using to make this work:

  • Motion capture laboratory (optitrack)
  • Normal quadcopter 
  • Companion computer (raspberry pis and odroids)
  • Flight controller (I'm using a naze32)
  • Some python code (open source)

In my past blog post, I describe how a hover controller worked, and the video, in case you missed it, is here: https://www.youtube.com/watch?v=oN2S1qJaQNU ;

In this part we are focused on the Guidance (using the GNC argo). This refers to the determination of the desired path of travel (the “trajectory”) from the vehicle’s current location to a designated the target, as well as desired changes in velocity, rotation and acceleration for following that path.

There is several steps before we can achieve this. Mainly the next ones:

  1. Fly the vehicle using the flight stack
  2. Design a controller that will track/hold a specified position
  3. Create a trajectory, based on time and other factors

For the first part, in this blog we will use Altax Flight Stack, that compromises a companion computer and a flight controller. In this particular case I’m using a naze32 as flight controller, and two companion computers: Raspberry Pi 2 and Odroid U3.

713423134_14518519131400997307.jpg?width=750

The naze32 is connected to the Odroid U3 via a usb cable (a very short one). The vehicle is a 330mm rotor to rotor fiber glass frame, with 7×3.8in propellers, 1130kv motors, 15amps ESCs and a 3000mah 10C battery. It will fly for 11-13 minutes.

The Odroid U3 is running Ubuntu 14.04.1 in a eMMC module, which makes it boot and run generally faster. Its being powered by a BEC that is connected to the main battery.

The companion computer will “talk” a special language (multiwii serial protocol) in order to send commands to the vehicle, this one is described here. And the most important part is that it will run the DronePilot framework. This framework is the one in charge of piloting the vehicle. You can check it out here: https://github.com/alduxvm/DronePilot

And now the trajectory part…

We need to generate certain X and Y coordinates that then it will be “fed” to the position controller at a specific time. We are going to create two types of trajectories, circle and a infinity symbol. Why this ones? because this ones are easy to generate and perfect to excite all the multi-rotor modes.

circle.gif

This one is very simple… there is basically two parameters needed… Radius and angle. In our case the angle part we are going to combine it with the step time of the main loop of the controller and pi… basically the angle one will go from 0 to 360 degrees (in radians of course). The code looks like this:

circle.png?zoom=2&resize=640%2C81&width=640

So, if we declare “w” like this: (2*pi)/12 it means that the trajectory will take 12 seconds to complete a full revolution, and then start over. This is the parameter that we will change if we want the vehicle to travel faster. Its better to start with a slow value, and then progress to faster trajectories.

The next step is to “fed” this coordinates to the position controller inside the control loop. That is done in this script.

The infinity trajectory is a special one! this one is called in several ways: Inifity trajectory, figure of eight… And there is several ways of how to calculate the coordinates, you can see in the next gif the posibilites of how to create a figure of eight:

infinity.gif?zoom=2&resize=500%2C463&width=500

The one I like the red dot one! why is this?? that one is called the Lemniscate of Bernoulli, which is constructed as a plane curve defined from two given points F1 and F2, known as foci, at distance 2a from each other as the locus of points P so that PF1·PF2 = a2.

600px-Lemniscate_of_Bernoulli_props.svg_.png?zoom=2&resize=300%2C300&width=300

This lemniscate was first described in 1694 by Jakob Bernoulli as a modification of an ellipse, which is the locus of points for which the sum of the distances to each of two fixed focal points is a constant. We can calculate it as a parametric equation:

infinity.png?zoom=2&resize=300%2C50&width=300

And then the rest is feeding that information to the position controller which will try to follow that trajectory as the dots on the plots. Magic. The next gif is a replay of the flight (DronePilot logs data for further analysis...).

fastest.gif?zoom=2&resize=500%2C260&width=500

The trajectory above is the fastest my vehicle can do (without getting unstable and or very shaky), it can complete a figure of eight in 6 seconds... does anyone know a human pilot that can do this?? I don't think so. hahaha.

Art that can be created using this:

long_exposure.jpeg?width=750

The picture above is a long exposure of the vehicle doing the figure of eight trajectory.

What's next?? I want to change the flight controller, from a simplistic naze32 to a pixhawk! Why?? because the inner loop is faster, therefore I could create faster and more aggressive trajectories. You can check my blog post here: https://altax.net/blog/trajectory-controller/

Read more…

DronePilot - Position hold controller

We all love drones, and we love to just buy one and go outside and make it fly by itself, this is great. But what is actually going on inside the drone?

In this post I'm going to explain a bit how a loiter controller works, with the difference is that I'll show my controller, share the python code and that I'm using a motion capture system inside my lab. The great MAST Lab.

3689681952?profile=original

First things first, you can check the code here.  And secondly, I need to explain our setup. We are using Altax Flight Stack which is a tuple of computers connected with each other and sharing information. The flight controller is a very cheap naze32, running baseflight (but cleanflight will work as well), and the companion computer is a Raspberry Pi (any version will do the work...). The entire script does not consume too much CPU.

diagram.001

The connection diagram is showed above, the motion capture system is connected to a desktop computer and this computer sends the mocap data and the joystick information via a common wireless network (UDP), this information is used by the raspberry pi to know the position and attitude of the vehicle, then the rpi calculates a set of commands (roll angle, pitch angle, yaw rate and throttle) using simplistic PID controllers and then it sends the information to the flight controller.

This outer loop control is working at 100hz, but it can be configured to go slower.

Important to notice that we have crashed lots of times when starting to test/debug this system. Most of the crashes are due to the desktop computer "hanging out"... then the vehicle stops receiving the information and will keep the last command. A auto-landing feature is needed, this feature will be added on version 2.

In the part of the control, we are using angle mode on the inner loop (naze32) and then we calculate the appropriate angle commands (pitch and roll) from desired accelerations (outputs of the controllers) to make the vehicle hold the commanded position in the space. The most important part of the code is when we calculate desired angle commands from the desired accelerations coming from the PID controllers:

desired-angles

And the proper math:

math

The rest of the code is just to deal with data, vehicle and make everything work on threads. One thread for the control and another for receiving the data. The code is extremely easy to understand and to tweak (I hope...). With this setup, the joystick is the one that activates the automatic behavior, if the proper switch is on manual, then you will be able to fly the vehicle using the joystick. This is by no means the same technique used by Pixhawk in loiter mode. But perhaps is a nice way to start learning about flight modes (and controlling aerial vehicles) so that then you can learn how advanced flight modes developed by the team of PX4 and ArduPilot work.

With a couple of changes, this same script and controllers should work with dronekit+pixhawk... I'll try that soon.

You can see the post here: http://altax.net/blog/hover-controller/

3689681844?profile=original

Read more…

Flying from computer

As a by-product of a research I’m working on right now, I’m showing this videos of me controlling a multirotor from a computer. Its done in different multirotor platforms, two flight controllers, Pixhawk and MultiWii.

So, the basic idea is to send data to the companion computer and then the companion computer will use it to several purposes. The purpose of this post is to send roll, pitch, throttle and yaw data to the flight controller. In other words is to fly the multicopter from a computer. Eliminating the need of a standard RC radio, you might ask, why do I want to this?? there is three ways to answer this, one is because I can… the second one is to ensure the communication with the vehicle is working great and its robust, and the third one is to afterwards develop advanced outer-loop position controllers.

3689663872?profile=original

This is by no means new or cutting edge, is just clever use of the libraries I have written (in the case of my multiwii library…) and the one that has been developed by people from 3DR (dronekit). The source code for this joystick example is here.

The companion computer used in this tests is a creditcard-size computer, the popular Raspberry Pi 2, which has four cores clocks at 900mhz and has 1 gb of RAM.

The companion computer is running linux and some python scripts (I’ll explain more later…), the ground station is running Matlab/Simulink in order to read the joystick and motion capture tracking system (not used in this examples…) and then just sent via UDP to the raspberry pi.

For the pixhawk video above, I first want to make a recommendation related to this flight controller, don’t buy the Hobby King clone version. We wanted to “save” money by buying this clone version and now we have 2 controllers that are not working… we might just had bad luck with a bad batch but who knows… Buy the original 3DR one.

The pixhawk is connected to the raspberry pi using serial communication, a tx/rx/gnd cable, we are using serial port 2 on the pixhawk.

3689663920?profile=original

The baudrate on the rpi is limited to 115,200… But for our requirements is still working ok. When we need more speed, we will need to modify the kernel or change from raspbian to ubuntu…

The rest of the multirotor remains the same. GPS is connected, but being inside a building, there is no way to get GPS lock. But no worries we have a very precise indoors GPS system… Which is a motion capture system. In the pictures you can see a GPS stand being used for the optitrack markers, the overall tidiness of the vehicle is truly amazing.

The firmware remains untouched, we are using 3.2 and 3DR flight stack, we might change to PX4 flight stack, but so far, this one is working ok. The only thing that we have changed on the pixhawk is the parameters of the SR2 rates. Apparently the maximum value we can assign is 10hz… we might need more.

3689663895?profile=original

DroneKit makes doing apps/scripts and in general talking to the pixhawk a very easy task. I want to thank Andrew Tridgell and all the developers involved in DroneKit.

On the multiwii side... I have done this one in the past, in several forms and with different boards, but in this test I’m using a naze32 board, which is the great because is 32bit which means is faster and the stabilisation is smoother, and of course the communication is way way faster than my old 8bit versions.

I have actually achieved 300hz of communication using a oDroid U3… Check this video.

This library performs great, is lightweight and extremely easy to use. https://github.com/alduxvm/pyMultiWii

The code for this example is here. The result is here:

Both codes are fairly similar and perform in almost the same way, there is tons of applications we will start doing using motion capture systems, on board cameras etc etc...

Read more…

University of Glasgow MAST Lab entry to the iMechE Unmanned Aerial Systems Grand Challenge 2014/2015.

The Unmanned Aircraft Systems Challenge (UAS Challenge) bridges the gap between academia and industry in developing applied UAS-related activities.

3689658459?profile=original

We designed an H quadrotor that was capable to carry 1 kilogram of flour, do waypoint navigation and drop the payload in a designated area.

This particular vehicle was done using 3D printed parts, and carbon fibre rods, the video explains more about it.

3689658422?profile=original

We used Pixhawk as flight controller and a Raspberry Pi 2 as companion computer. Several scripts in python were done to send commands via serial port to the pixhawk, Drone API was used on the RPI 2.

The vehicle flew perfectly in manual and in autonomous mode, several tests were performed. The rpi2 / pixhawk combo is a great way to do UAS applications like this one, and this is a living proof of it.

We had 3 ways of communicating with the vehicle:

- Standard RC 

- 3DR radios (900mhz) 

- 2.4ghz Wifi high gain antennas using SSH to the RPI 2 and then mavproxy.py to the Pixhawk 

Important to notice that we also had an RTSP video server using the RPI camera with 0.5 seconds delay, HD and 30 fps... It worked great. 

Our payload mechanism was extremely simple yet very practical and useful, 3D printed as well and fully tested, the video will show that ;)

3689658330?profile=original

Tools like the SITL simulator was really helpful to test our scripts before doing them on the actual vehicle, special thanks to the developers that are making this tools easily accesible to us, in Tridge we trust!!! 

3689658447?profile=original

3689658486?profile=original

You might be thinking about how well we did... The vehicle worked great, we passed scrutiny very easily and it was airworthy after just adding some padding for the lipos. The problem was later, a manual test was needed before doing the automatic mission, and it must be flown by a certified pilot...

Currently in the MAST Lab we don't have a certified pilot, so iMechE provided the certified pilot for our vehicle, and as many of you know, every vehicle is different... and being a prototype, even more. The problem is that he did not had chance to practice before doing the actual flight... the vehicle took off, and like at 40 centimeters it pitched super aggressively and the tip of the vehicle touched the ground and it flip, that was it. 

3689658343?profile=original

That particular part was not in our spare list and our 3D printer was 500 miles away in Glasgow (ergo the last song in the video, duhhhh). Oh, by the way, we have a Makerbot Replicator 2.

Anyhow, we had lots of fun, we learned a lot and most of all it was super fun. 

3689658561?profile=original

In the picture above you can the one of the motor mounts (blue one) which is the one that did not endure the flip.

Sorry for the long post and let me know what do you think of our vehicle. Any questions, please do ask.

Thanks!

Read more…

Tilt Rotor Aircraft - The Flying Battenberg

I would like to share this design made by a group of undergraduate students in the course called "Aerospace Systems Design Project". 

Tilt rotor aircraft - The Flying Battenberg 

Summary:

The iMechE set out a competition for undergraduate students across the UK to develop an autonomous UAS (Unmanned Aircraft System) to deliver aid to remote coastal locations. This presented the opportunity to investigate innovative methods of aerospace design for micro systems.

A difficulty in autonomous control of fixed wing aircraft is take off and landing, however they benefit from reduced power consumption, increased range and increased speed over multi rotor designs. As multi-rotors are capable of VTOL (Vertical take-off and landing).

The design pursued was to gain the benefits of VTOL and accurate payload delivery of multi rotors and attempted to also incorporate a fixed wing to increase range and additional forward propulsion for higher speeds.

The UAS constructed featured a meter long body with wings spanning 1.5 m and a chord of 300 mm. The wings hold pylons of 700 mm long on either side of the aircraft with three phase pancake style motors spinning 12" x 6.5" carbon fibre propellers at either end of the pylons. With four motors in total the UAS can operate as a quad rotor.

To take advantage of the large wing the motors are held on mounts that allow them to tilt forward. Once in sufficiently high forward speed the wing will generate lift for the UAS, leaving the propellers responsible for forward thrust only. During forward flight the four motors can no longer compensate for disturbances especially in pitch, as the mathematical model shows. This required the addition of aerodynamic actuators to be used in forward flight - aileron, elevator and rudder. In this flight regime the propellers act as a single thrust unit.

During forward flight the UAS back motors operate as pusher propellers as opposed to puller propellers as a multi rotor would commonly do. As the back motors were pusher they had to be mounted asymmetrically from the front two puller motors, and thus point downwards in multi-rotor flight regime.

The structure of the UAS was composed of rolled carbon fibre tubes, held together with 3D printed PLA clamps. The 3D printed clamps featured inserts for rubber O-rings, intended for plumbing application but research discovered they increased the friction coefficient of the clamps significantly, allowed additional force to be applied as they could be compressed more without fracturing like PLA alone and provided damping to reduce vibrations caused by the propellers.

3D printing was implemented not only for rapid prototyping of design components, but as a means of low cost high quality manufacturing that was very effective for low scale production.

The wing and tail-plane were constructed out of foam used in model aircraft. For the tail-plane a series of ribs were 3D printed and coated in film. The body of the aircraft is composed of a series of foam ribs, again coated in film.

Limited time, skills and budget constraints has resulted in the target of making the proposed aircraft autonomous unreasonable. A few solutions have been theorised but they either require intensive adaptations to readily available flight controllers or multiple flight controllers and a mixer as a work around.

Extensive testing has yet to take place, but initial performance analysis has suggested the UAS will operate at reduced performance in both quad-rotor regime and fixed wing. This is primarily due to the additional weight the UAS must carry. As the UAS essentially has a payload of a fixed wing aircraft in multi-rotor mode and a payload of a multi-rotor in fixed wing mode. 

Further development of these concepts would require further work on possible structures of hybrid aircraft that do not suffer from the added weight incurred in this design.

First hover:

Another hover:

Note: Is not fully autonomous (yet...)

You can follow us and watch more interesting projects here: 

https://www.facebook.com/MASTLab

Read more…

Drone color tracking

This is about some experiments I’m doing using python and openCV and of course one of my drones… In this case the drone used for taking the videos, was my hexacopter (Alduxhexa).

The point is to explore different techniques and algorithms to track colours, objects and the follow them using a multicopterIn the video you will see my hexacopter flying with a GoPro pointing always down (to the ground). I want to be able to identify colours on the ground.

drone-color-tracking.png?width=600

There is now lots of similar examples and big projects already doing computer vision with drones, but I just wanted to show you my experiments, share to everyone my code, get some pointers and of course doing some collaboration with people interested.

I'm using:

  • hexacopter
  • gopro hero 3
  • pixhawk
  • tarot gimbal
  • python
  • opencv

This is a picture of my hexacopter used to get those videos:

P1000626.jpg?width=600

My github with the code is here. It contains several more examples, like face detection and so forth... This code works on raspberry pi, mac.

The next step is to make the hexacopter centre and follow an specific target using a extra onboard computer, perhaps a rpi or similar. 

If questions or suggestions don't hesitate in contacting me.

Check my blog http://aldux.net/blog

Read more…

How a quadcopter is born?

How a quadcopter is born? from Aldo Vargas on Vimeo.

This educative video shows how a quadcopter is born, and of course its maiden flight. 

I had to built a quad with some parts we order from hobbyking, so, I took my camera, put it in a tripod, read some instructions in the internet on recommended settings for stop motion videos, talk with my buddy Murray about cameras and lenses... and then, a quadcopter was born!!!!

Happiness everywhere!!! 

3689623720?profile=original

Read more…

Quadrotor indoor position control

This large video is about the project that Murray and me have being doing in the MAST Lab. It's about doing automatic position control and trajectory tracking of a micro unmanned aerial vehicle, being more specific is our 3D printed quadrotor platform, called TEGO, showed in previous posts here and here.

The video explains almost straightforward what we are doing, but in a simple way, we are replacing the human pilot with a computer controlled one. The "artificial pilot" receives the very precise position of the markers onboard TEGO coming from the motion capture system and it computes the commands necessary to make those markers move to a desired position. Pretty simple and easy right? well... it its not! I'll continue explaining part by part of the system.

  • Motion Capture.

We have a Optitrack system with 18 cameras, we have the Flex 3 ones, so, nothing too fancy, but for now, they are doing the job. The system is tricky to make sure is working perfectly, and usually the cleaning staff knocks one stand and then we have to do the "rain dance" over and over again, kind of stressful, in the pictures you can see using the interface from Natural Point the position of the cameras while tracking markers.

3689615937?profile=original

  • TEGO quadcopter

Our trustworthy platform, 300 grams with battery, 7-8 minutes of hovering, SK3 3100kv 42 watts motors, 10 amps ESC, 5x3 props, Rotite's included on the frame.

3689615783?profile=original

  • Flight controller

Multiwii AIO v2, using MW firmware r1648 with Alex Kroroshko experimental PID algorithm, everything else is standard, rate = 0.9 and expo 0.3 for pitch and roll. I have to mention that I have received lots of help on the MW forums, so, thanks for that guys!!!

  • Wireless link

A pair of good old 3DR radios using a special firmware adjusted for the multiwii serial protocol (Andrew Tridgell's SiK telemetry radio software for MultiWii). Oh and by the way, how cool is Andrew Tridgell!!! he is revolutionising everything, take a look at this awesome video. This radios are working at 115,200 bps, but we think that we might have a bottleneck problem while sending commands, maybe we just need more speed to achieve the trajectory tracking performance that we want...

  • Ground Station

Matlab / Simulink, also you can see some pictures of the diagram and you can see it in action on the video. Why Matlab?? because we have a very convenient block for optitrack that makes our lives easier. We know that simulink is not famous with its performance when doing this kind of stuff, but it kinda does the job. Special thanks to my students Krisjanis and Davide for helping in the implementation of the MW serial protocol in simulink :) you rock guys!!

The system is not perfect, we want to have a perfect performance, rock solid. But we don't have it quite yet, we are closer though. In the making and tuning of this system Murray (my teammate and amigo) and me we have suffered a lot and even bleed lots of times, my thumb especially... Lets say I have less sensibility now :(. We were implementing a simple PID control in simulink because our original state space control was not working correctly, but now that we change from the standard MW PID to the Alex Kroroshko PID one; the state space started to work better, and is the one we are using right now.

In the next picture you can see some of our blackbox plots, especially on that flight we tried to perform a eight trajectory, its actually improving... take a look:

3689615955?profile=original

3689615900?profile=original

I would like to have some feedback from everyone and of course some opinions or ideas of how to make this one better... I have to excuse for the video, because is very large, but this is not a video to just show stuff, I want to demonstrate almost everything about our system.

3689615951?profile=original

Keep on flying!

Read more…

3D printed quadrotor frame using Rotites

total.png?width=600

This is yet another version of a 3D printed quadrotor, pointed to be one of the workhorses of my research... The main characteristic of this frame is that instead of using nut and bolts to join the arms and the base together, like in TEGO v2, I'm using Rotite®s!!!!

1.png?width=600

For those who dont know what rotites are, you can give it a pick here, I was trying to find a solution to reduce weight of my previous TEGO v2 frame, and somehow I found this company, I immediately put in contact with them, and after several e-mail exchanges, phonecalls and even videoconferences with the inventor, I was able to get my hands on some of their designs, there is a picture below where Stuart is giving me a lecture about Rotites.

hand.png?width=600

So, I started playing in Solidworks, and we did this design, usign 90 degrees A and B rotites, 4 B's on the main plate and one B on each arm.

arm.png?width=600

The weight was dramatically reduced, and the endurance dramatically increased!!!

Many thanks to Stuart Burns (inventor of Rotite®) and of course, the Rotite® company to letting me use their designs :)

Don't forget to check the video!

3D printed Quad with rotite elements from Aldo Vargas on Vimeo.

Read more…
Hi!!

How are you??

New problems!!!! big problems!!!!

In our last neural network training, we had a accident, i crashed the helicopter, hehehehe

So, we rebuild it, we just change the blades, and the blades holders, that was all the damage, lucky us...

But with the new blades installed, we had to track them, so we try to do it, failure after failure, so we stopped, and we went to a expert.

The expert balanced all the helicopter, he told us, that our heli has a lot of problems, so the start to correct everything, and at the end he did it...

The start hover the heli, and it appears correct, but we start to see that the ESC was very hot, after several more tests, he told us that the ESC was not the properly ESC for that heli...

My heli is the Artech Falcon 3d 400.

motor:

ESC:


We have a ESC of 18amps, and now its not working, the last flight ended in smoke...

What can we do??

The local Artech retailer have a ESC of 20amps, its just 2amps more than the original...

Its better to buy an Artech ESC or another brand?? what is the recommended ESC for my heli and motor?? and if possible, a cheap ESC... hehehe

And LiPo's??? Artech lipos sucks!! i have 2 of them, and now the 2 are useless.... any cheap recommendation??

in other news...

We you finish improving our software, upgrades:

- PPM channel reading, with timer1
- Servo control with timer2
- lighter and efficient fuzzy control

Once we resolve this issues, we can return to the neural net training and possibly ending the project the next week...

10x in advance!!

Cheers!!!
Read more…

Neurofuzzy helicopter problems

In my last post, i had vibration issues, remember??

So, what did i do to resolve that??

- First, we design a better place for the sensor to be, it uses elastic bands, that improve a lot the readings, but we still had glitches on the angles.

- We change from DCM to Kalman, because the performance of Kalman was better, and faster.

- We use a second filter, we implement a simple digital low-pass filter just after the analog readings, it help us to smooth the sensor jitter.


With this 3 upgrades, the angles were pretty acceptable even in max acceleration, ill post a video in a while.

Now i have a new problem...

I was using the training blades, that reduces power by 30%, and i was needing all the power, so, i change them to the good o normal blades, and i did a flight to test them, the results were bad, the helicopter was uncontrollable, very unstable and veryyyyyy difficult to hover.

I proceed to balance the blades, i follow the instructions from this video: https://www.youtube.com/watch?v=RMer3jIm9pA

We manage to balance "correctly" the blades, so i proceed to test again.

The same result....

And a curious data about this issue is that the motor and the battery were very hot after the test flights, veryyy hot, and thats very strange, it never happen with the training blades, i presume that the motor is requiring to much current, and the battery is getting hot because of that, so i think something is wrong with my heli, but i don't really know whats the problem...

I know that i have to make a tracking balance of my blades, but i don't really know how to do it...

Anyone has an idea??


In this picture we see a NI acquisition usb card, that helps us to find the spectrum of the frequency, for finding the correct parameters for the digital filter.

In control news, we are currently designing the neurofuzzy control, and it will take a couple of more days, its a easy task, because we have nice knowledge in that subject, ill post somethig about that later.

But im very stress because i cant make flight tests!!! hahahaha

Thanks!!

Cheers!!!
Read more…
Hi everybody!!!I'm making a stabilization system for a helicopter, hehehe, another one...First of all i want to show my hardware:- ArtTech Falcon 3DRotor Diameter: 24.8"Tail Rotor Diameter: 5.98"Weight: 19.5 oz.Length: 26.4"Servos: 4 9g servosTransmitter: 6 channel 72MHzReceiver: 6 channel dual conversionBattery: 3S 1300mAhr 10C LiPoMotor: Brushless B20/10TESC: 18A Brushless

- The great Arduino as Avionics- IMU 6DOF Razor ( http://www.sparkfun.com/commerce/product_info.php?products_id=9431 )- Small arduino shield build by me, just with the purpose of holding and connecting the razor to the arduino.Software:- DCM modified by Automatik, 10x a lot man!!! ( i had made some modifications, for making the arduino control servos for pitch and roll)- LabView VI made by Automatik, 10x again man!! ( with a little bit of modifications )What have i done so far:- I've had a lot of problems with vibration!!!! its the thing that had stop everything!!!- We try several configurations, with foam, and other stuff.- The configuration that work the best, its a base with rubbers and velcro, a little hard to explain in english, so ill just paste a picture....

In this picture, the heli is showing the base, and you can see the rubbers.

You can see the shield and the arduino, mounted inside the landing gear.

You can see the usb port, its on the back of the heli.

I just uploaded a video, with the first test with the rubbers and velcro, sorry, its in spanish, because it was for my faculty advisor, hehehehehttp://diydrones.com/video/instrumentation-with-rubbersVibration Issues:In the next pics you can see the problems i had with the excesive vibration produced by the helicopter, and this issue make the stabilization impossible!!!! Because the angles are completly crazy!!!This test was conducted with the DCM filter and half throttle.

This test was conducted with the kalman filter and half throttle.

What do i want right now??In this moment i just want to focus on stabilization, and mainly in pitch and roll, i will not take care of yaw...Any help, comment will be greatly appreciated!!!10x a lot!!Saludos!!
Read more…