Yusuf Pirgali's Posts (5)

Sort by

Scratch Y6 build part I

proxy?url=http%3A%2F%2F4.bp.blogspot.com%2F-bEp-PlrkufI%2FUvlLU53_3WI%2FAAAAAAAABc8%2F5ES9Q7t0exw%2Fs1600%2FDSCN0286.JPG&container=blogger&gadget=a&rewriteMime=image%2F*

I have decided to build a Y6 multirotor as i hear and read they are one of the more resilient form factors, for a multirotor. The idea being if one motor fails there is still another one on the same arm that can compensate, and keep flying until you can land.

So the quest began with gathering all the parts, i had seen this frame on HobbyKing but did not like it enough to think i could modify the frame for a Y6.


proxy?url=http%3A%2F%2F4.bp.blogspot.com%2F-8GRhiAtC0NA%2FUvlJOuPCQbI%2FAAAAAAAABaA%2Fi_KMCCt6cnM%2Fs1600%2FDSCN0261.JPG&container=blogger&gadget=a&rewriteMime=image%2F*


I bought the two halves of the frame, and the hardware pack. I liked the idea of being able to fold the arms, but to engineer this for the Carbon fiber tubing i had would make it too difficult, so i opted for a fixed arm arrangement.


proxy?url=http%3A%2F%2F4.bp.blogspot.com%2F-nb5K_cI4A3E%2FUvlJdk1WgjI%2FAAAAAAAABag%2FoDexZuESNT0%2Fs1600%2FDSCN0265.JPG&container=blogger&gadget=a&rewriteMime=image%2F*


I bought this carbon fiber tubing from here and they give a fast service and a good price.

The motor mounts were the next things i needed, and bought them from here.

The tubing was 20mm so it was a difficult size to find motor mounts for but was not impossible.

proxy?url=http%3A%2F%2F3.bp.blogspot.com%2F-JwF7MCQygVE%2FUvlJZzMDRoI%2FAAAAAAAABaY%2FKIKbg2HiYk8%2Fs1600%2FDSCN0264.JPG&container=blogger&gadget=a&rewriteMime=image%2F*


proxy?url=http%3A%2F%2F2.bp.blogspot.com%2F-R5dr0TvOGG8%2FUvlJnWPHFBI%2FAAAAAAAABaw%2FUwRYS4_faZU%2Fs1600%2FDSCN0268.JPG&container=blogger&gadget=a&rewriteMime=image%2F*


These mounts were OK but needed some semi circular clamp to go onto the round tubing, and they were bought from here.


proxy?url=http%3A%2F%2F2.bp.blogspot.com%2F-608IXGe54-U%2FUvlJPvrG2lI%2FAAAAAAAABaI%2FBoPQM7ZSvmg%2Fs1600%2FDSCN0262.JPG&container=blogger&gadget=a&rewriteMime=image%2F*

proxy?url=http%3A%2F%2F4.bp.blogspot.com%2F-ion7DcnZ9YQ%2FUvlJWXQSXMI%2FAAAAAAAABaQ%2FBuS1NKZW1zo%2Fs1600%2FDSCN0263.JPG&container=blogger&gadget=a&rewriteMime=image%2F*

The clamps and motor mount, mounted onto the arm, if you can see it, there is some silicone tape on the arm thus giving the clamp something to bite into and hopefully giving some vibration isolation.


proxy?url=http%3A%2F%2F1.bp.blogspot.com%2F-RGF6KHSq6JU%2FUvlJimBqP_I%2FAAAAAAAABao%2FGZ_vhiCuijc%2Fs1600%2FDSCN0267.JPG&container=blogger&gadget=a&rewriteMime=image%2F*


proxy?url=http%3A%2F%2F3.bp.blogspot.com%2F-zGUwa1AeP14%2FUvlJsUw7QTI%2FAAAAAAAABa4%2FIxb2W8XHlqI%2Fs1600%2FDSCN0269.JPG&container=blogger&gadget=a&rewriteMime=image%2F*

proxy?url=http%3A%2F%2F4.bp.blogspot.com%2F-MAcD8EC3kUU%2FUvlJxvtB0UI%2FAAAAAAAABbA%2Fm9TlRHSn_6w%2Fs1600%2FDSCN0270.JPG&container=blogger&gadget=a&rewriteMime=image%2F*


Next came the motors and for this i had no hesitation, but to go for the SunnySky 2212 980kv motors, they are so smooth, and powerful i wish i had used them earlier in my flying.


proxy?url=http%3A%2F%2F3.bp.blogspot.com%2F-vUm6xz6mjcE%2FUvlJ3jknZNI%2FAAAAAAAABbI%2FVxcb13coHlE%2Fs1600%2FDSCN0271.JPG&container=blogger&gadget=a&rewriteMime=image%2F*


Then came the propellers i chose and again the experience and knowledge that comes from learning the hard way is that you pay so much for poor quality that you end up paying twice that you would have paid if you had gone for quality in the first place.


 So with that in mind i bought the Graupner props 10x5.


proxy?url=http%3A%2F%2F1.bp.blogspot.com%2F-lHEdWO7RSXM%2FUvlJ9Nuw2aI%2FAAAAAAAABbQ%2F89rr8uABSPM%2Fs1600%2FDSCN0272.JPG&container=blogger&gadget=a&rewriteMime=image%2F*


with all these parts it all went together quite well and looked really good.


proxy?url=http%3A%2F%2F4.bp.blogspot.com%2F-b1GUlT7zJzA%2FUvlKDmJuNYI%2FAAAAAAAABbY%2FpSRwpU4R8tA%2Fs1600%2FDSCN0273.JPG&container=blogger&gadget=a&rewriteMime=image%2F*

proxy?url=http%3A%2F%2F1.bp.blogspot.com%2F-9R1J_xpMLyU%2FUvlKMSWduXI%2FAAAAAAAABbg%2FG0QkWiRWJOM%2Fs1600%2FDSCN0274.JPG&container=blogger&gadget=a&rewriteMime=image%2F*

proxy?url=http%3A%2F%2F2.bp.blogspot.com%2F-GIg9K5g32dg%2FUvlKU69933I%2FAAAAAAAABbo%2F8NQektqLPz4%2Fs1600%2FDSCN0275.JPG&container=blogger&gadget=a&rewriteMime=image%2F*

I also decided to mount the ESC's on the arms right up close to the motors, thus giving then cooling, and weight to stablise the arms.


proxy?url=http%3A%2F%2F3.bp.blogspot.com%2F-W9KuiS-5p2w%2FUvlKj7RHifI%2FAAAAAAAABb4%2F_An7JF_cpp0%2Fs1600%2FDSCN0277.JPG&container=blogger&gadget=a&rewriteMime=image%2F*

proxy?url=http%3A%2F%2F4.bp.blogspot.com%2F--ImgI1D2KMY%2FUvlKqgB8CXI%2FAAAAAAAABcA%2FFETEJJQvSD4%2Fs1600%2FDSCN0278.JPG&container=blogger&gadget=a&rewriteMime=image%2F*

proxy?url=http%3A%2F%2F2.bp.blogspot.com%2F-h_CekoNEPQs%2FUvlKvTx7FgI%2FAAAAAAAABcI%2FQifo70XsWnQ%2Fs1600%2FDSCN0279.JPG&container=blogger&gadget=a&rewriteMime=image%2F*

proxy?url=http%3A%2F%2F1.bp.blogspot.com%2F-MM0DYX9CV5U%2FUvlK1rIFU7I%2FAAAAAAAABcQ%2FKADEdfkS5Mc%2Fs1600%2FDSCN0280.JPG&container=blogger&gadget=a&rewriteMime=image%2F*

proxy?url=http%3A%2F%2F3.bp.blogspot.com%2F-Lh5K1ssJZeY%2FUvlK-Rzh0TI%2FAAAAAAAABcY%2F1NdyeBl-rbM%2Fs1600%2FDSCN0281.JPG&container=blogger&gadget=a&rewriteMime=image%2F*


The ESC's i used were ones from RCTimer 30A SimonK Opto ESC's.


proxy?url=http%3A%2F%2F3.bp.blogspot.com%2F-mtJRVfVvSe4%2FUvlLBdx87eI%2FAAAAAAAABcg%2FurA--3EFJ6A%2Fs1600%2FDSCN0282.JPG&container=blogger&gadget=a&rewriteMime=image%2F*

I cut all the leads off and soldered bullet connectors to it so it can be as close to the motor as possible.

proxy?url=http%3A%2F%2F2.bp.blogspot.com%2F-hi5JM-vD8GM%2FUvlLGzWLZwI%2FAAAAAAAABco%2FXyUW1GzXFbY%2Fs1600%2FDSCN0283.JPG&container=blogger&gadget=a&rewriteMime=image%2F*

Once mounted all the ESC's just plug in and the wiring goes through the arms thus making the whole look better and more Aerodynamic.

proxy?url=http%3A%2F%2F3.bp.blogspot.com%2F-33sgD1eC8h0%2FUvlLM4gfp6I%2FAAAAAAAABcw%2FHP-vwsYVUQ8%2Fs1600%2FDSCN0284.JPG&container=blogger&gadget=a&rewriteMime=image%2F*


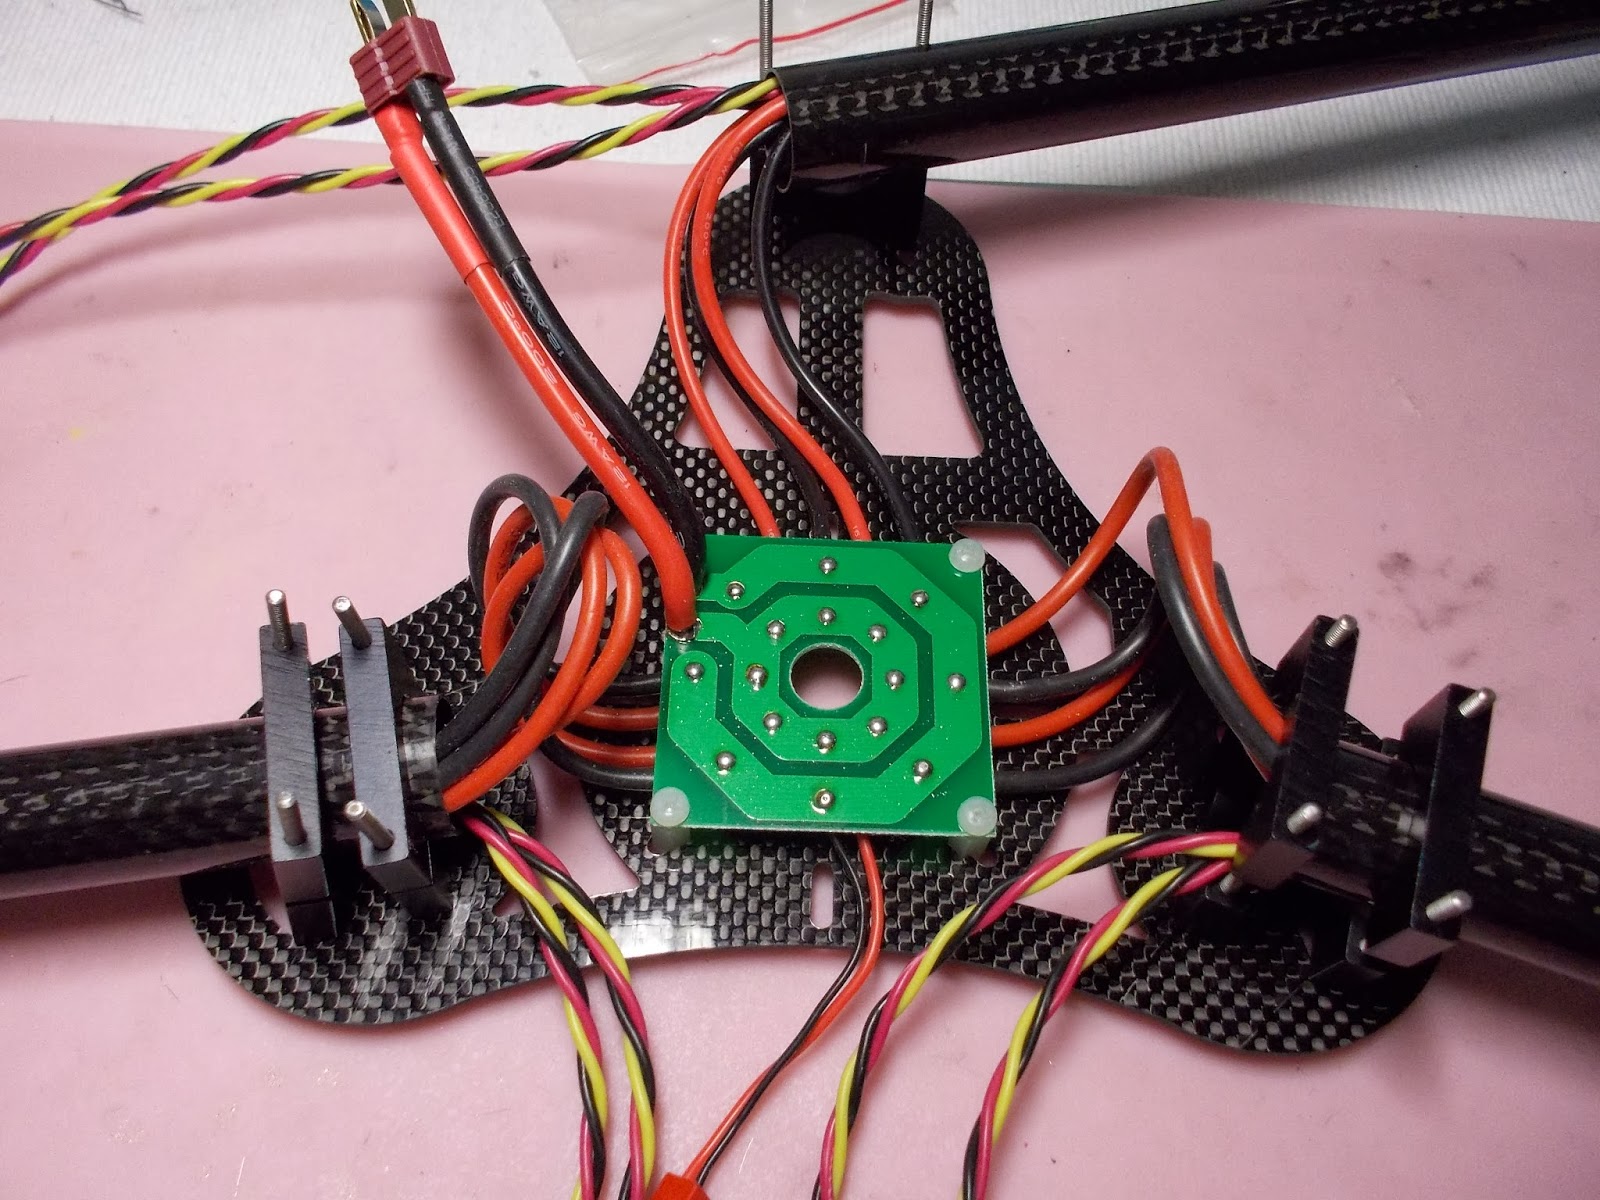
Then the wiring of all the power distribution went through this PCB power distribution board i bought from hobbyking, as shown below.


proxy?url=http%3A%2F%2F4.bp.blogspot.com%2F-L4BN2TEWA4Y%2FUvlLRNLIx2I%2FAAAAAAAABc4%2FU1CRQGMAMdE%2Fs1600%2FDSCN0285.JPG&container=blogger&gadget=a&rewriteMime=image%2F*

Final clamping the two halves together gives a very strong frame and a well balanced Y6.

proxy?url=http%3A%2F%2F2.bp.blogspot.com%2F-bEp-PlrkufI%2FUvlLU53_3WI%2FAAAAAAAABdA%2FDbO8KO_Bapw%2Fs1600%2FDSCN0286.JPG&container=blogger&gadget=a&rewriteMime=image%2F*


End of part 1, next flight controller, landing gear, flying :-)


Read more…

HD video for UAV's

3689522281?profile=originalI keep asking myself why this cannot be done, and so far i have not found an answer i can believe. So i bought a commercial HD Video/Audio sender for home use and plugged in my gopro as a video source, and my flat screen TV as the player, and i connected up these devices and viola..! it worked. So my next thought what is the problem with making this work in a UAV , it is using 5.8Ghz it is cheap to buy, just need to hack it so the antenna is less directional, and we can then have HD in our goggles, or on our screen.

This would be far more preferable to me for a first time FPV flyer as the picture is so poor at 480x240 pixels, you can hardly see if your moving or not.

What do you all think? i know a more elegant solution would be nicer but for now it would work.

sample of what i meant : http://www.maplin.co.uk/wireless-hdmi-video-sender-kit-503801

Read more…

Oblivion - Petrol on the fire film.

3689515863?profile=originalWe went to see the new Tom Cruise film "Oblivion" last night, and it was an intresting story and twist.

The main charachter "Jack" was a Droid engineer repairing the Droids when ever they go broken or shot at etc.

This was an ok scenario but later when you find out they were actually there to kill any human, then this whole current debate about Droids becomes starkly a reality, and will spread the paranoia for our hobby.

The other day i was flying my quad and some people came across and asked is that a Droid, i had to say no even though in German it is the correct word for what it is, and i had to say no a type of Helicopter. They went away happier, but then noticed the camera on board, and looked at me a bit puzzled.

I really think we need a name change from DIY Drones to DIY Aerial Platforms ??

Read more…