All Posts (14049)

Sort by

IR photos with the Boscam HD19, part 1

IR_after.jpg

On my multicopter, I have a Boscam HD19 camera. This camera was explicitely developed for use on UAVs and has some interesting functions, like live video out, full HD recording and taking photos. The recording functions can also be controlled via the UAV's remote control, which makes it especially useful. The stock lens is very wide-angeled and - in my opinion - not of excessively good quality. Fortunately, the HD19 uses a standard 12x0,5mm thread for lenses and good but cheap lenses in various angles are available from the internet.

As of all digital cameras, the sensor of the HD 19 is also sensitive to infrared light. However, the HD19's stock lens has an IR-cut filter because IR light is very prominent in the light spectrum and would otherwise cause the picture's colors to be distorted.

So, to get infrared light, we either have to remove the IR-cut filter from the stock lens or get a lens without filter. As I didn't like the wide angle of the stock lens and I had some problems with unsharp edges, I decided to buy a 6mm lens on eBay for about 6€ incl. shipping. It is noticeable that the HD19 has a 1/2.5" sensor. Most cheap CCD and CMOS cameraswith M12 lenses have 1/3" or 1/4" lenses which leads to a small tunnel effect on photos with the HD19. Thus, only lenses for 1/2.5" sensors should be used. Those lenses are also often called "HD" or "3 Megapixel / 3MP lenses".

thumb IR beforeAfter replacing the lens, the images look like the one to the right (click picture to enlarge). Colors don't seem to match, especially colors of plants, and the whole picture is tinted red/pink. That is pretty much how it is supposed to look like. The automatic white balance function of digital cameras is calibrated for the visible light spectrum only. IR light throws it off very much and generally, the IR part is very strong on the general spectrum. IR light has a longer wavelength and thus penetrates e.g. fog or clouds much better. This photo was taken at 9 in the evening on a cloudy day, but it's still very bright. As for the plants, the foliage of a living plant reflects IR light very well. That's why plants appear very bright in an IR picture. IR reflectivity is also a good indicator of a plant's health.

thumb IR autowhitebalBut of course, we don't want all pink pictures, hence we have to do a bit of postprocessing. I use GIMP for postprocessing of photos. The necessary functions are also available in other programs, like Adobe Photoshop. The easiest way to get reasonably good pictures is to use the automatic white balance function of GIMP (menu Colors -> Auto -> White Balance). This already gives a nice result but it's still very pinkish (see left, click to enlarge). To get better results, we still have to do some corrections and those are best done with color curves (menu Colors -> Curves). Select the Red channel and try to lower the level around 100-120 a bit.

thumb IR afterAfter correcting the Red channel and a tiny little bit also Green and Blue channels, the result is pretty ok (see right, click to enlarge). During the postprocessing, we lose a bit of dynamic range (compare e.g. the door of the black car left of the image's center), but the normal colors are almost totally correct now. Vegetation still is a bit pinkish but that is not easy to correct without losing a big amount of dynamic range and contrast in the process.

To make things easier, I have written a small Scheme script for GIMP which does the correction automatically. You can find it from my download area.

Part 2 will cover postprocessing of images which were taken with an IR-passthrough filter.

Original article URL: http://stefan.gofferje.net/news-blogs/uav/170-ir-photos-with-the-boscam-hd19-part-1

Read more…

Indoor Quad - The Next Steps?

3689541488?profile=originalHey Everyone

I've been messing with making a quad to carry a GoPro for indoor commercial use. I wanted one that was not necessarily 'finger safe' but 'impact safe' and after several iterations including a 'Bucket Copter' (Yep made out of kids toy buckets - Flew for 15 seconds then never stayed up again) I hit on the idea of using 8" PC Fan Guards mounted on Poly Screws to solve the issue.

I started with the super cheap frames from China. The current version has Emax MT2213 motors and 30amp ESCs. The mount for the GoPro is two Carbon Sheets and dampers with ear plugs in them. Its Rock Solid to the frame so needs smooth control but the platform is very stable in itself. APM 2.5 Board of course. LiPo 2200mah 4S 45c Battery. Props are 3 blade 6". Flight time is currently at 8mins to about 25% on the battery

My problem is that I have no fabrication or design experience but have a degree from the university of 'How Hard Can it Be?' Right now its getting pretty hard. The ESCs get pretty hot as do the motors after about 8mins. I'm pretty much tied to the 6" props because the largest Fan Guards I can find are 8". I want to go to bigger motors but am restricted to the props size and weight increase quite a lot with the Turnigy series. The other issue is that bigger motors are making the gap on the guards over 50mm and the screw system is only rigid up to that distance (broke a few)

I moulded some guards out of plastic but they were incredibly brittle and reduced airflow quite a bit. Also they weight benefit was not enough to get worried about.

So...any suggestions as to how to get this thing to have more grunt, not start smoking, have bigger props (with bigger guards) and more. I'd be grateful of any input you guys can have as I've hit a bit of a brick wall. Nothing I try at the moment improves on the current spec. Total cost of the rig was around $250 so I have a little more budget to throw at it but the aim was to come up with a viable rig I can use for work that wasn't the cost of my DSLR Octocopter.

Thanks


Ewen

Read more…
Admin

Robots Podcast #136: Drone Journalism

3689541476?profile=original

ROBOTS.NET

In this episode, we speak with Matthew Schroyer, founder of DroneJournalism.org, co-founder of Drones for Good, and developer of the “Drones for Schools” program which teaches students to design, fabricate and program unmanned aerial systems to monitor the environment.

Matthew Schroyer has a Master’s in journalism from the University of Illinois Urbana-Champaign where he works on the National Science Foundation grant EnLiST, which offers entrepreneurial leadership training and professional development for K-12 STEM teachers. At EnLiST he uses drones to motivate students to pursue STEM careers.

Driven by the maker movement, safety concerns for journalists, and the promise of cutting edge information, Schroyer founded the Professional Society of Drone Journalists (PSDJ). His drones are used for the common good and a clear code of ethics was written to avoid privacy and safety concerns. Along the same lines, Schroyer cofounded Drones for Good, which aims to show the good side of drone technology through public engagement and the advancement of positive drone projects.

http://robohub.org/robots-drone-journalism/

Matthew Schroyer’s Homepage

Read more…

Using your own map data in Mission Planner

So tell me, what is the goal of this post?
The goal is that you, too, see a picture like this:
3689541294?profile=originalAnd... why would anyone want this when we have global satellite coverage via Google Maps?
In some parts of the world, Googles satellite imagery is not very accurate. Custom maps allow you to use a better overview of what your Ardupilot is doing.
Another advantage is that the method detailed in this post works completely offline. That means you don't have to prefetch the region in which you are flying.
A third point is that although not detailed in this post all kinds of overlays over map data can be created by your GIS server before displaying the data on MissionPlanner.
Ok so tell me: What do I have to do?
To follow the first steps of this tutorial you need two things: GeoServer, which is an open source WMS (Web Map Service) server and a GeoTIFF image of the region in which you are flying.
For the purpose of this tutorial, I will be using sample data provided by the USGS.
So, download these things:
GeoServer: http://geoserver.org/display/GEOS/Stable
GeoTIFF: ftp://ftp.remotesensing.org/geotiff/samples/usgs/ (I used c41078a1.tif and c41078a1.lgo)
Create a separate folder, for example "geotiff_examples" somewhere on your computer and put c41078a1.tif and c41078a1.lgo in there.
You said that is for the first steps! What is with the other ones?
Well... the last step currently requires that you download my fork of the MissionPlanner and compile it yourself which is clearly out of scope for this blog post.
If one of the git wizards thinks that my changes are good and helpful this wizard could tell me what to do to get the changes included into the main tree?
The problem currently is that MissionPlanner does not produce completely WMS compliant messages and does not check if the provided WMS server is capable of responding to the MissionPlanner. I fixed that.
My fork is located under https://github.com/korgan/MissionPlanner
tl;dr: That means exactly?
Currently you probably cannot display your image in MissionPlanner.
Okay, lets go; what do I have to do?
Install GeoServer. Installation instructions are located under http://docs.geoserver.org/stable/en/user/installation/index.html
Done. Whats next?
First, you should open your browser and visit the admin homepage, per default it is located at http://localhost:8080/geoserver/web/ . Login and click on "Create Workspaces".

3689541363?profile=originalName the new workspace, in this example I named it "apm_planner_wms" and type in some arbitrary URL. Make it the default workspace. Submit.
Go back to the home screen and click on "Add stores".
Choose the GeoTIFF option. In the next screen, make sure that the workspace is apm_planner_wms, type in a name and a description and browse to the folder where you saved your GeoTIFF from before. Save.
After that, you should see this page:

3689541170?profile=original

Click on the "Publish" action. On the following page only one thing is super important: Scroll until you see the "Coordinate Reference System" options. The Declared SRS must be EPSG:4326! You can just type the number in. Save again.

3689541408?profile=originalNow, we are ready to test. On the left column, click on "Layer Preview". Search for your layer, probably named "apm_planner_wms:c41078a1".
Click on Select one -> PNG and you should see this image.

3689541385?profile=originalIf you do not see it, you have done something wrong (or I failed to mention something...). Please read this part of the tutorial again.

As a last thing to do in GeoServer, you have to go to Workspaces -> apm_planner_wms and make sure, that "WMS" under Services is checked.

Wow, that was alot. I need a nonalcoholic beverage.
Me too.

I have followed every step. Now I want this litte image from the preview in my Mission Planner!
Heres the thing: As I have said, unless you compile the Mission Planner from my fork, the following steps will not work.

That makes me sad.
Me too.

I have compiled your Mission Planner! Tell me what to do now!
In the Flight Plan tab on the far right there is a litte scroll down list where you can choose between different maps. Choose "CustomWMS" and adialog should pop up.

Give it the URL of your server ( http://localhost:8080/geoserver/apm_planner_wms/wms ) and click okay. The following box will tell you to choose a layer. Our newly created WMS server has only one layer so we put 0 into the box or just click okay without typing anything.

And there you have it! Our sample tiff is displayed:

3689541452?profile=original
Liar! Nothing is displayed! I am ruined, RUINED I say!
Relax. Have a snickers, Did you check that you are at the correct coordinates? The map is quite small, so you have to be around Lat 40.77557094048379 Lng 80.0929875534263

I still do not see anything.
Well, then I forgot a step or you did not follow one.

Your screenshot does not look good at all. Why should I use that again?

Download the sample tiff and zoom in. That is what you get in the Mission Planner, too. And I can tell you that allthough it is not of the very best quality, it is not in the slightest comparable to the low-res screenshot above.

Is there anything more I can do now? This one map is pretty boring.
Yes it is (apart from the fact that maps never are boring). But: You could create your own GeoTIFF. Or you could implement a custom OpenStreetMap server on your laptop. Or you can display other WMS sources like a hydrogeography map of your area or one of the hillshaded maps (http://129.206.228.72/cached/hillshade):

3689541183?profile=original

That is Europe if you did not notice.

You convinced me!

Please make sure you say that again in the comments below :-)

Read more…
3D Robotics

Google Glass-controlled AR.Drone

3689541275?profile=originalFrom Hackaday:

For some reason this project makes us think of the Dog Pog Grid from Neal Stephenson’s Diamond Age. It’s not that there’s a ton of drones floating around this guy, it’s that he’s got one which looks like it’s his bodyguard and is controlled by the Google Glass he wears on his head. The future is now!

We find the metamorphosis of this project interesting as well. It started as a Leap motion controlled rover project. We saw a similar hack just the other day that paired a Leap Motion with a Hexapod. But [Blaine] wasn’t satisfied with that. Having had a taste for alternate control inputs he dug in and got to work making Google Glass the control interface. But the problem with moving your head to control a rover is that you can’t actually see it because looking down would cause unwanted motion. His solution was to transition to a quadcopter, which will hover at eye level when he’s looking right at it. Glass is sending raw sensor data to a server, which does the translation to control commands for the quadcopter.

Read more…

184cm supercopter with heli-blades

I have seen this video already a while ago but now, Infinity Hobby has it in their product news. Apparently, some company is making propeller hubs to use heli blades with multirotors.

130809boss_03.jpg

That allows using of ridiculously big propellers, leading to very efficient setups. Additionally, heli blades are dirt cheap, compared to multirotor blades and with the adjustable pitch (!), there's even no searching for pusher-props any more.

Can't wait until this is actually available!

Read more…
3D Robotics

3689541304?profile=original

A great report on the 2013 IARC from Gizmag. Some of the competitors were using APM, such as this team from Mercer University.

Some of the most advanced work in autonomous aerial robotics is not done by DARPA, or by massive corporations. Rather, it is accomplished by teams of university students who participate in the International Aerial Robotics Competition (IARC). For the past 23 years, the IARC has challenged college teams with missions requiring complex autonomous robotic behaviors that are often beyond the capabilities of even the most sophisticated military robots. This year's competition, which was held in China and the United States over the past week, saw the team from Tsinghua University in Beijing successfully complete the current mission – an elaborate espionage operation known as Mission Six.\

First proposed in 2010, the Mission Six scenario is that an enemy has plans for taking control of the Eurasian banking system, a move that could throw the entire world into chaos. This plan is contained in a USB flash drive located in a remote security office of the enemy's intelligence organization.

The IARC Mission Six orders (Photo: AUVSI Foundation)

The target building has a broken window on the same floor as the security office. This building measures roughly 15 x 30 meters, and is equipped with laser intrusion detectors, floor sensors, video surveillance, and periodic patrols. Mission Six calls for covertly capturing the flash drive, and replacing it with another of the same make to postpone discovery of the theft. Recognizing signs directing visitors to the security office is a part of the challenge. The mission must be carried out within ten minutes to avoid security patrols.

The vehicles are required to be completely autonomous, with no external commands accepted during the mission. The vehicles can be of any type (as long as they fly), must weigh less than 1.5 kg (3.3 lb), and be no more than 1 meter (3.28 ft) in the largest dimension. Most competing teams chose to base their vehicles on quadrotor designs. However, some chose other designs, including birotor and more unusual designs, such as the entry below from Pima Community College in Arizona that includes a balloon above a set of rotors to increase stability.

A jellyfish UAV configuration was introduced by the team from Pima Community College in Ar...

All vehicles must contain their own power supplies. The vehicle is required to sense its immediate surroundings, and decide on its own actions, but need not contain its control computer – it can instead be linked to an external computer by radio. While external navigation aids are allowed, GPS locating is not.

That's quite a challenge to say the least, and the Michigan Autonomous Aerial Vehicles team, which is associated with the University of Michigan, had been touted as the most likely entry at the American venue to succeed with Mission Six. Unfortunately, they encountered a perfect storm of equipment malfunctions, and were unable to complete the mission.

An artist's conception of the enemy facility to be burgled during the 2013 IARC (Photo: AU...

The remarkable performance of the Tsinghua University entry in completing Mission Six can be seen in the video below.

Read more…

RTK-Lib ported to Android

JTa-5kqoT3Q2IiViim_MWrMXpSPBMb-eGh42jO-37wv3N2taZKRo1v6F7a9EewxIuYc=h900

There has been some talk here before about the RTK-Lib project, which allows much greater GPS positional accuracy. Now someone has ported RTK-Lib the Android and it's in the Google PlayStore for free:
https://play.google.com/store/apps/details?id=ru0xdc.rtkgps


So apart from an Android device (or Android-x86 image) you need a raw capable GPS (Skytraq S1315F-RAW or something fancier) with decent antenna and a correction feed (or second GPS)... and volia cm level accuracy for your robotics projects.

Don't know for certain whether this can run headless once configured.

There's also a 'report GGA to base' function, which might allow the computation to be done in 'moving base' mode and then the solution's position relayed to the rover.... if you don't want to put extra processing on the drone.

Enjoy, Simon

Read more…
Developer

DroidPlanner is now installed on 3000 devices, it's great to see so many people using it.

Screenshot_from_2013_08_08_18_51_35.png

And here is from where everyone is coming from:Screenshot_from_2013_08_08_19_00_55.png

For more information I suggest the DroidPlanner Wiki page. If you want to help consider donating for the project by joining the development team, reporting a issue/bug/improvement on GitHub or making a donation on the following link:

https://www.paypal.com/cgi-bin/webscr?cmd=_s-xclick&hosted_button_id=UZ86RT2A5RXBL

Also I would like to thanks everyone that started developing besides me, in the last month there has been codding activity by 8 authors.

Read more…
Moderator

In the video I tested Loiter mode

Tested normal manual flight, alt hold, loiter and land - all Works fine

Alt hold and Loiter was impressive

In this test I used PPMSUM from my RX module

3689541205?profile=original
The CTX4 quad used in the test

3689541114?profile=original
T-motor 10" prop used. The motor Mounts/tube clamps have rubber rings to help reduce vibrations form the motors.

3689541139?profile=original
TheVR Brain Controller is separated/vibration isolated from the frame using rubber Mounts (like the ones used on many camera gimbals, but smaller and softer) + soft pads

The motors are iPower MultiMate 2012 1000kv.
When using 4000mAh 3cell LiPo I get 12-14 min before the VR Brain LiPo alarm starts.

I plan to make one more frame CTX4L (large) - that have larger motors and can use up to 12" props. Have ordered the New VR Brain 4.5 + IMU to use on this one.
On that frame I´m going to Mount my VR Gimbal Controller and GoPro gimbal.

Original blog post :

http://www.virtualrobotix.com/profiles/blogs/testing-3-0-4-code-built-using-eclipse-06-aug-13-on-my-ctx4-quad

Read more…

3689541048?profile=original

(Reposted from:  http://www.falcon-uav.com/falcon-uav-news/)

Recently a few residents from a small town named Deer Trail, Colorado decided to write a proposed city ordinance to purchase "Drone Hunting Licenses" from the town for $25.  You can read the specifics of the proposed ordinance below however in a nutshell it would authorize license holders to shoot down drones that resemble a federal drone (i.e. wings, fuselage, propeller) - regardless of the purpose for which it is being used. 

http://www.deertrailcolorado.com/drones.html 

Yesterday, 6 August 2013, the ordinance was put to a vote by the town council and it came to a tie which means it will go to a special election for the more than 500 residents of Deer Trail.  Falcon UAV was out in Deer Trail yesterday to educate the town council and its residents that their ordinance was misguided, at best, given that the use of drones in the civil market are going to be an enormous help for small communities and small businesses such as those in Deer Trail.  For example, Deer Trail is an agriculture and ranching community.  Falcon UAV is currently in use in the US for precision agriculture mapping missions allowing farmers to map their crops throughout the growing season.  If they spot a problem they can take care of it early and at a local level making their crops more effecient and produce more.  Another great example is that the eastern planes of Colorado saw a large storm move through in the last week causing extensive hail damage and high wind damage to a number of farmers crops.  Drones such as Falcon UAV could be deployed to accurately map the acreage lost to the storm so that the farmers can receive a fair reimbursement from the insurance companies.  As a final example ranchers in the Deer Trail area could be using drones to help with cattle counts during calving season or locating lost cattle with thermal infrared in the winter snow conditions.  It is a regular occurence for ranchers to lose a few head of cattle in the winter which costs a rancher thousands of dollars.

The positive uses for unmanned aircraft in the civil market is limitless.  There is no question they will create jobs, generate income, and be an enormous benefit to small businesses and small rural towns more than we can imagine.  Yes, certain people will use the technology for nefarious purposes but that is no reason to hold the entire technology accountable as the Deer Trail ordinance intends to do if it is voted in.

To put this in perspective for the general public please answer the following questions: 

Do you hold the computer or the computer hacker accountable for stealing someone's identity via the internet?

Do you hold the car or the driver accountable for a hit and run?

Then why would you hold the drone accountable for any illegal surveillance rather than the operator?

So to demonstrate the positive uses of unmanned aircraft technology we at Falcon UAV figured that it would be appropriate to use Deer Trail to show how unmanned aircraft may be used to help.  Perhaps a small town like Deer Trail would like to get some great HD shots of their iconic water tower! Falcon to the rescue.......

http://youtu.be/COM9-8zMoeU

Or maybe they are doing a major expansion to the town from the revenue they are generating from a recent town ordinance.  For this major expansion they need to survey the land and to determine the slope of the land to determine water runoff/flood planning as well as determine the area and volume of fill dirt they will need to add or remove for the town projects.  To do this they require a high resolution georectified orthophoto and digital elevation model (DEM) which gives accurate GPS positions for every single pixel in the image.  Doing this from a manned aircraft using aerial photography or LIDAR is just way too expensive for a town like Deer Trail so perhaps they could use a drone such as Falcon UAV to map the area in a single flight to generate both of these image products!

3689540883?profile=original

 click here to download high resolution orthophoto of Deer Trail, Colorado

click here to download lower resolution orthophoto of Deer Trail, Colorado


3689541081?profile=original

click here to download high resolution digital elevation model (DEM) image of Deer Trail, Colorado

click here to download lower resolution digital elevation model (DEM) image of Deer Trail, Colorado

And in this day and age who doesn't know how to use Google Earth.  I mean what if you could overlay the orthophoto and the digital elevation model in Google Earth and provide that information to the whole world so that they can find exactly where Deer Trail Colorado is!

click here to download high resolution orthophoto of Deer Trail, Colorado using Google Earth (.kmz file)

click here to download high resolution digital elevation model of Deer Trail, Colorado using Google Earth (.kmz file)


Read more…

Autonomous Aero-Towed Glider

2-Fahrwerk_zps4398ff25.jpg

Seems like development of unpowered fixed-wing thermal and slope soarers has taken a backseat after the initial enticements posted in other threads here:

http://diydrones.com/video/autonomous-thermal-hunting-with-the-thermopilot-v5

http://diydrones.com/profiles/blog/show?id=705844%3ABlogPost%3A782559&commentId=705844%3AComment%3A784826

http://diydrones.com/photo/thermopilot-project-phase-3-tested-with-apm2560

http://diydrones.com/video/the-thermopilot-project-a-thermal-hunter-glider-drone-by-jean

http://diydrones.com/video/cross-country-soaring-with-the-thermopilot-v5

IMG_0427_zps2c4c6038.jpg

Was really beginning to take a liking to the idea of an APM-equipped glider. An aero-towed configuration seems the easiest autonomous flight regime from the valley to mountain-top and return that is common here in the Eastern Himalayas. View from the airstrip:

tumblr_mnzglt9dto1s6l24yo2_1280_zps394276b6.jpg

The ridges and peaks where we RC and paraglide:

DSCF1137_zpsf3dc6225.jpg

Buddies are doing group/club build of Junkers Ju-52 IC-trimotor with aero-towing capability. To collaborate on the TanteJu's maiden, started work a couple of weeks ago on an individual build of a semi-scale DFS-230 glider that will be lofted above by the tow tug. Work on the 1.64-meter WS glider started a couple of weeks ago, traditional stick and tissue construction with composite spars and reinforcements. 

DFS230-spoilers_zps5d8955b5.jpg

Since the original full-scale DFS-230 carried almost a dozen passengers, there is sufficient volume for a full avionics suite devoid of ESC, motor, etc. Due to its historical significance, am building the DoppelSitzer version with enlarged canopy and tandem cockpit. Of all the gliders from that era, the DFS-230 has the best sailplane qualities and numerous threads in forums from different continents have in-depth build logs.  

IMG_0365_zpsc7bb3605.jpg

IMG_0376_zps2fbc53ba.jpg

IMG_0401_zps5d486951.jpg

IMG_0410_zpsde00a89b.jpg

IMG_0411_zps392c089b.jpg

RC will be UHF LRS either open source or TS. Telemetry is via RFD900 radio modems, the first hardware to be installed onboard.

IMG_0385_zps84569b4d.jpg

IMG_0424_zps760e0550.jpg

IMG_0422_zps4b6e1493.jpg

Fuselage came within design weight so I have more reinforcements to play with in case of inevitable uncontrolled descent into terrain:

IMG_0421_zps670ba4dd.jpg

Integrating individual components of the avionics suite take priority of the servos and other RC hardware. Test-bench through-hole linear regulators being replaced by SMT PSU distribution bus. 900MHz VP and CP patch diversity antennas will be installed in vertical and horizontal stabilators:

IMG_0426_zpse85cf6a6.jpg

IMG_0434_zpsece2c1e7.jpg

The single 30-cm tubing supplied with airspeed sensor is just long enough to connect one pitot tube to the transducer. Guess I'll have to wait for next delivery to arrive from jdrones or scrounge local suppliers for the tubing:

IMG_1283_zpsf6ce3aae.jpg

------------

Read more…

RC Quadcopter X4 UAV FPV Carbon Fiber airframe

3689540798?profile=original

Quadcopter Airframe

Materials: Carbon fiber tube + Glass fiber
Size: <> 600mm diameter.
Net Weight: <> 400g
Flying Weight: <> 1000g
Propellers: 8-11”
Description: Small, lightweight but really sturdy Quadcopter Airframe.

Motors, propellers, battery:


Red Brick C2312 KV900 Brushless Motor Quad-Hexacopter http://www.opensurprise.com/red-brick-c2312-kv900-brushless-motor-quadhexacopter-p-205.html


30A SimonK firmware Brushless ESC w/ 3A 5V UBEC http://www.opensurprise.com/30a-simonk-firmware-brushless-esc-w-3a-5v-ubec-p-204.html


10x4.7 Carbon Fiber Propeller Set CW/CCW http://www.opensurprise.com/10x47-carbon-fiber-propeller-set-cwccw-p-200.html


Arms are long enought for 10” propellers, but 8” propeller with a little faster
motor 2208~2216 (1000~1200kv) are big enought.

Space for LiPo acc is easy fit 2200 LiPo or bigger.
Typical flying time is 10-15min (with 2200mAh LiPo, depending of flying style).
The specifications and designs are subject to be changed without prior notice for futher improvement.

Ships to: Worldwide


3689540853?profile=original

3689540920?profile=original

3689540866?profile=original

3689540941?profile=original

3689540844?profile=original

Read more…

Octocopter - basic to start

3689540726?profile=original

3689540819?profile=original

Have been building up a basic octocopter (already have other quads) based on cost looking to eventually go to a nice frame.

Whilst the Hobby King frame is nasty and cheap it is a start and for under $40 it seems OK (yes it has its problems)

My intention is to figure out best prop motor configuration for longer flights, etc.

Hobby King Octocopter frame - landing gear is woeful!!!

Turnigy 35-36 910kV propdrive motors with prop drive adaptors

12x4.5 props - at present

30 Amp Turnigy plush ESCs (wiring needs tidying)

2 x 3300 Turnigy 4S batteries in parallel

HK antivibration foam (orange) under a range video mount with APM 2.5 on top

Waiting for external compass and to mount GPS at present

Turnigy 9XR radio, FRSky module and receiver

3DR radio link


Intention is to put my brushless gimbal with Sony NEX5 on it for some video just for fun.

Have not done a compassmot or compass calibration to date but did actually fire her up and see what happens.

Jumps in the air alot more aggressively than the quad and the noise is a bit frightening, response to throttle was a bit more sensitive than expected. Was really stable in windy conditions during initial tests. Remarkably more stable than smaller quads I am used to.

Have not looked at tuning so far as only preliminary tests on stabilise.

Anyone looking to do the same thing happy to share experience or any advice or considerations are welcome.

Cheers 

Brian

Read more…

APM 2.5 available from DealExtreme

sku_234619_1.jpgDuring my daily browsing session through the new products on DealExtreme I found that they are selling the APM 2.5 for US$ 75 including shipping.

No sign of a 3DR or other logo and also no mention of open source or open hardware. The price is about half of what they cost from the 3DR store. Wondering about quality, but since I already have one I am sure someone else is going to find out.

Read more…
Developer

External Compass for APM2.5+, APM2.6

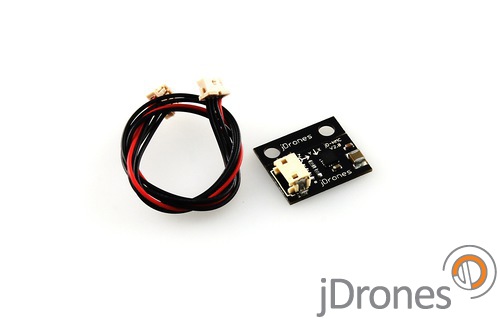
jD-HMCv2_0_APM26_Cable.jpg?width=400

Custom made APM2.5+, APM2.6 specific external compass module


We made easy to use external compass module for APM2.X Flight controllers. If you need to have external compass and you don't want to change your GPSes yet. Here is your best and easiest choice for it.

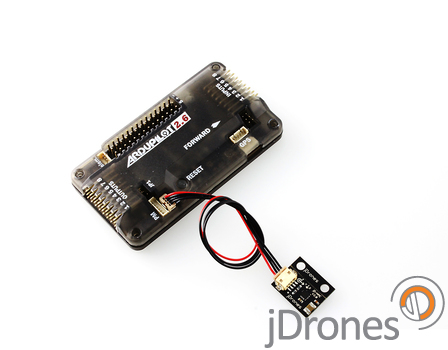
This module fits directly to your APM2.X boards. If you have APM2.5 board, just disconnect internal compass by disconnecting jumper and add this board. 

As board is a standalone board, you can mount it easily places that have least of magnetic interference. 

Board comes with connecting cable and it fits directly to external I2C port on APM2.X boards.

jD_APM26_With_Compass.jpg?width=400

Orientation:

If you put components down, connector forward it is same as in 3DR GPS (Manual: Roll 180)

if you put components up, connector forward it is same as standard APM (Manual: None)

Get your from jDrones store: http://store.jdrones.com/APM2_6_Compass_p/jdmagneto02.htm

Price 14.99 USD

Regards,

Jani

Read more…
Admin

3689540714?profile=original

sUAS News

One of the most exciting recent developments in agriculture is the use of small Unmanned Aircraft Systems to evaluate crop conditions.  Producers, agronomists and the public can view a demonstration of this new technology at the 2013 Agronomy Field Day on Aug. 16 at Kansas State University’s Agronomy North Farm.

The use of these unmanned aircraft systems equipped with aerial optical sensing technology has gained national press attention in recent months.  Kevin Price, K-State, professor of agronomy and geography, and Deon van der Merwe, associate professor of veterinary medicine and head of the diagnostic laboratory toxicology section, are among the leading researchers in the nation on this technology.  They are working to develop systems that can be used by the agricultural community.

“We’ve had an incredible reception among consultants, producers, plant breeders and others when we’ve shown them what this technology can do.  It has the potential to make their jobs much easier and will help them make better recommendations in a more timely manner,” Price said.

“At the field day, I will be showing some of the kinds of things we can accomplish with these small Unmanned Aircraft Systems in field demonstrations,” he added.

This is just one of several new technologies featured at the field day by agronomy researchers.  Other demonstrations will show the work of Dave Mengel, professor and soil fertility specialist on optical sensors for nutrient recommendations; Vara Prasad, associate professor and crop physiologist on stress tolerance research; and Peter Tomlinson, assistant professor and environmental quality specialist and Chuck Rice, university distinguished professor of agronomy on techniques used to measure greenhouse gases.

The field day will begin with registration at 9 a.m. and wrap up at 2 p.m.  There is no charge to attend, and a complimentary lunch will be available.  Preregistration is requested so that a lunch count can be made. Those interested in attending can preregister by calling Troy Lynn Eckart at 785-532-5776. To preregister online, see: http://kstateagron2013.eventbrite.com/.

Sessions include two concurrent one-hour tours in the morning, starting at 9:45 and 11 a.m. After lunch, there will be demonstrations on sUAS flights; analyzing and interpreting images from sUAS technology; and field checking of optical sensing readings for crop nutrient status.

In addition, there will be displays from commercial companies and K-State researchers in the shed near the registration area, along with the crop garden, forage garden, and weed garden for browsing.  Extension specialists will be available to answer questions.

For more information, interested persons can contact Dallas Peterson at 785-532-0405 or dpeterso@ksu.edu.

Read more…