We are delighted to announce the launch of our innovative A series modular power solutions for the drone industry. (https://uav-en.tmotor.com/html/UAV/Multirotor/PropulsionSystem/a_series/)
The product page has been meticulously updated to provide customers with comprehensive details on the entire A series lineup, including:
In-depth single-product features, parameters, Downloadable reference documents, product videos, Comprehensive FAQ, Real-life product photography.
The A series modular power systems are engineered not only to excel in agricultural drone applications but also offer a wide spectrum of pulling forces to handle diverse working conditions: only 5 steps of installation, ready-to-use, built-in Monitoring, and cloud Box Analysis. It is a product with a validated service life of up to 2,000 hours of continuous operation.
For more details about the A6 model:https://uav-en.tmotor.com/html/2024/a_series_0711/1213.html
Additionally, We'd like to share that the rest of the A series lineup will be made available in the coming months, so please stay tuned for further updates.
All Posts (14039)
Sort by
During peak farming seasons, frequent battery plugging and unplugging will cause connector wear and oxidation.
High summer temperatures increase the risk of overheating.
Regularly inspect, clean, and maintain battery connectors to prevent flight damages.
Please replace connectors immediately if you notice any signs of melting , ensure stable flight and safety.
Professional cleaning and maintenance steps :
- First, prepare the necessary tools : 75% or 95% alcohol, wooden sticks, tweezers, cotton swabs,lint-free cloth.
- Pour alcohol into a cup. Dip a cotton swab and clean each copper plate on the battery plug until the black stains are removed.
- After using the cotton swab, further clean with lint-free cloth. Soak the cloth in alcohol, then use a flat wooden stick to insert the cloth into the gaps between the copper plates, as shown in the pictures.
- After completing the above steps, check and ensure each copper plate and gap is thoroughly cleaned.
(Note: make sure plug is dry completely before reconnecting the battery.)
- To maintain the battery's plug : soak a cleaning cloth in alcohol. Use the wooden stick to insert the cloth into the gaps and clean each one, Repeat this process until it's clean.As shown in the picture.
- Check whether the copper plates on both sides of the socket (as picture ①) has deformation.If the copper plates are deformed, use tweezers to repair them (as picture ②).
The battery connector is a small part but it is key to ensuring the drone's power supply.
Regular cleaning and maintenance can extend its life and ensure flight safety.
As a drone pilot, learning about maintenance can keep your drone in the best condition.
Let's care for each flight and enjoy a safe, pleasant flying task. View tutorial videos :
TFmini-S can directly be connected with the serial port of PixHawk. TFmini-S can be used in flight controller for the purpose of altitude holding or obstacle avoidance. This document is suitable to PixHawk adopts ArduCopter V3.6.2 or higher firmware (Note: Standard output mode should be used instead of PIX mode by Benewake GUI in firmware V3.6.2 or above).
Example for connecting PixHawk:
Figure 1 Schematic Diagram of Connecting TFmini-S with TELEM 2 Interface (Serial Port 2) of PixHawk
a) Mission Planner configuration description of TFmini-S for the purpose of altitude hold
Connect the flight control board to Mission Planar. Attention: the installation height should be larger than non-detection zone. Select [Full Parameter List] in the left from the below bar- [CONFIG/TUNING]. Find and modify the following parameters:
SERIAL2_PROTOCOL = 9 [Rangefinder option]
SERIAL2_BAUD = 115 [Choose the current LiDAR baud rate, if haven’t been changed, the default baud rate 115200 should be selected, that is 115]
RNGFND1_TYPE = 20 [TFmini-S UART option]
RNGFND1_MIN_CM = 30 [It could be changed according to real demands and should be bigger LiDAR than non-detection zone, unit is cm]
RNGFND1_MAX_CM = 300 [It could be changed according to real demands but should be smaller than effective measure range of LiDAR, unit is cm]
RNGFND1_GNDCLEAR = 15 [expressed in cm, depending upon mounting height of the module and should be bigger LiDAR than non-detection zone]
RNGFND1_ORIENT=25 [face down]
PRX_TYPE=0
Upon setting of these parameters, click [Write Params] on the right of the software to finish.
If the error message “Bad LiDAR Health” appears, please check if the connection is correct and the power supply is normal. Also check it whether you have changed the mode from Standard mode to Pix mode while the firmware is 3.6.2 or higher if yes then the same error will encounter.
How to see the altitude value from LiDAR sensor: double click the area of the Mission Planner, look at the following picture:
Select option sonarrange, see following picture:
The altitude distance from the LiDAR will be displayed in Sonar Range (meters), see the following picture:
B)Mission Planner configuration description of TFmini-S for the purpose of Obstacle Avoidance
It’s only recommended to be used in Loiter mode, the detailed setting is as follows:
Connect the flight control board to MP. Attention: distance between UAV margin and LiDAR should be larger than LiDAR non-detection zone. Select [Full Parameter List] in the left from the below bar- [CONFIG/TUNING]. Find and modify the following parameters:
AVOID_MARGIN=2 [Unit: m, set obstacle avoidance distance as required]
SERIAL2_PROTOCOL = 9 [Rangefinder option]
SERIAL2_BAUD = 115 [Choose the current LiDAR baud rate, if haven’t been changed, the default baud rate 115200 should be selected, that is 115]
RNGFND1_TYPE = 20 [TFmini-S UART option]
RNGFND1_MIN_CM = 30 [It could be changed according to real demands and should be bigger LiDAR than non-detection zone, unit is cm]
RNGFND1_MAX_CM = 300 [It could be changed according to real demands but should be smaller than effective measure range of LiDAR, unit is cm]
RNGFND1_GNDCLEAR = 15 [Unit: cm, depending upon mounting height of the module and should be bigger LiDAR than non-detection zone]
RNGFND1_ORIENT=0 [It depends on the LiDAR’s real installation direction, 0~7, 24=Up and 25=Down (total ten) are supported up to now, see detail in MP]
PRX_TYPE=4 [Rangefinder should be selected for proximity sensor in obstacle avoidance mode]
Upon setting of these parameters, click [Write Params] on the right of the software to finish.
If the error message “Bad LiDAR Health” appears, please check if the connection is correct and the power supply is normal.
How to see the target distance from the LiDAR: (distance from LiDAR in obstacle avoidance can’t be displayed in sonarrange option) press Ctrl+F button in keyboard, the following window will pop out:
Click button Proximity, the following window will appear:
The number in green color means the distance from LiDAR in obstacle avoidance mode(the number only refresh when this window opens, closes, zooms in or zooms out, it doesn’t mean the real time distance from LiDAR and will not be influenced in Mission Planner version under v1.3.48, the problem could be solved by updating Mission Planner)
² Attach: If TELEM 2 port has been used, SERIAL4/5 interface could be used, the other setting are same
Figure 2: Schematic Diagram of Connecting TFmini-S with SERIAL4/5 Interface (Serial Port 4/5) of PixHawk
Configuration Descriptions of Mission Planner:
Connect flight control board to MP, Select [Full Parameter List] in the left from the below bar [CONFIG/TUNING]. Find and modify following parameters:
SERIAL4_PROTOCOL = 9 (LiDAR)
SERIAL4_BAUD = 115
Upon setting of these parameters, the other parameters should be same as Mission Planner configuration description of TFmini-S for the purpose of Obstacle Avoidance or Altitude Holding, then click [Write Params] on the right of the software to finish.
Microsurvey FieldGenius both for Android and Windows is now at 30% OFF only at Aeromao. FieldGenius is a mature, professional and full featured data collection software that also happens to be easy to use.
MicroSurvey FieldGenius has become one of the most powerful and productive data collection software within the surveying industry. It can be partnered with many GPS receivers on a number of data collectors.
FieldGenius is the ideal software/app to go with Emlid Reach GNSS receivers for the advanced user!
Code-free linework, smart points, and live graphics make FieldGenius the choice of organizations that value productivity.
- Code-free linework
- Best-in-class user interface
- Works on more displays/devices
- Productivity tasks
- Calculation tools
- Part of the perfect workflow
FieldGenius works with many GPS receivers and on a multitude of handheld data collectors. We believe you shouldn’t have to buy all new equipment just to upgrade one component.
This promotion won't last long. Until quantities last.
TFmini-S can be used with PixHawk for the purpose of obstacle avoidance.
- TFmini-SSettings:
Note: Frame rate should be set to 250Hz, see the details in chapter 7.4 “frame rate” and changing the communication interface.
The default communication of TFmini-S is TTL, IIC and TTL uses the same cable, so please set TFmini-S to IIC communication first, see detail commands in product manual.
We take two TFmini-S as an example in this passage and set the address 0x10 and 0x11 separately.
- PixHawk Connection:
See the connection details in PixHawk manual and TFmini-S manual, we take example for connecting
PixHawk flight controller:
Figure 1: Schematic Diagram of Connecting TFmini-S to I2C Interface of PixHawk
Note:
- Default cable sequence of TFmini-S and PixHawk are different, please change it accordingly (SDA and SCL wires need to be interchanged). Look at the pinout of controller, pin configurations are starting from left to right:
- IIC connector should be purchased by user
- If TFmini-S faces down, please take care the distance between lens and ground should be larger than TFmini-S’s blind zone (10cm)
- If more TFmini-S need to be connected (10 LiDARs can be connected), the method is same.
- Power source should meet the product manual demands:5V±0.5V, larger than 140mA*number of TFmini-S
- Parameters settings:
Common settings:
AVOID_ENABLE= 2 [if 3 = UseFence and UseProximitySensor doesn’t work in IIC then choose 2 = UseProximitySensor]
AVOID_MARGIN=4
PRX_TYPE=4
Settings for first TFmini-S:
RNGFND1_ADDR=16 [Address of #1 TFmini-S in decimal]
RNGFND1_GNDCLEAR=15 [Unit: cm, depending upon mounting height of the module and should be larger LiDAR than non-detection zone]
RNGFND1_MAX_CM=400 [It could be changed according to real demands but should be smaller than
effective measure range of LiDAR, unit is cm]
RNGFND1_MIN_CM=30 [It could be changed according to real demands and should be larger than
LiDAR non-detection zone, unit is cm]
RNGFND1_ORIENT=0 [#1 TFmini-S real orientation]
RNGFND1_TYPE = 25 [TFmini-S IIC same as TFmini-Plus IIC]
Settings for second TFmini-S:
RNGFND2_ADDR=17 [Address of #2 TFmini-S in decimal]
RNGFND2_GNDCLEAR=15
RNGFND2_MAX_CM=400
RNGFND2_MIN_CM=30
RNGFND2_ORIENT=25 [#2 TFmini-S real orientation]
RNGFND2_TYPE=25 [TFmini-S IIC same as TFmini-Plus IIC]
Upon setting of these parameters, click [Write Params] on the right of the software to finish.
If the error message “Bad LiDAR Health” appears, please check if the connection is correct and the power supply is normal.
How to see the target distance from the LiDAR: press Ctrl+F button in keyboard, the following window will pop out:
Click button Proximity, the following window will appear:
The number in green color means the distance from LiDAR in obstacle avoidance mode(the number only refresh when this window opens, closes, zooms in or zooms out, it doesn’t mean the real time distance from LiDAR and will not be influenced in Mission Planner version under v1.3.48, the problem could be solved by updating Mission Planner
A series drone arm set is better for scorching working conditions.
Model: A6 A8 A10 A12 A14
Thrust: Multiple choices, thrust up to 57.5kg
Application of spraying drone: 5L- 70L
If you would like to know more information about a coming product, email: info@tmotor.com
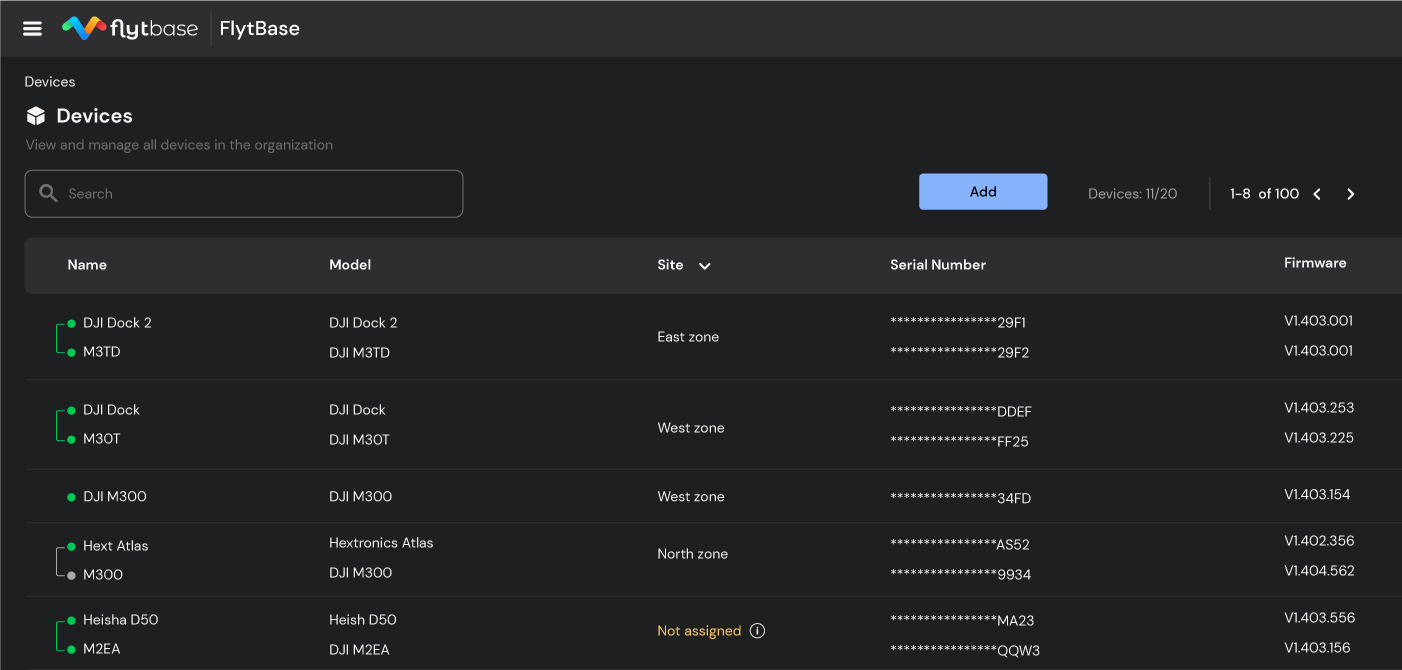
Since the highly anticipated launch of DJI Dock 2 and the advancements it brings, it has captured the attention of enterprise users, DSPs, and system integrators.
Its compact size, easy portability, and improved efficiency, combined with the upgraded abilities of supported drones like the DJI Matrice 3D and Matrice 3TD, are expected to enhance applications like mapping and surveying, among other applications.
While multiple third-party applications and products support the DJI Dock 2, FlytBase stands out by providing a comprehensive platform that leverages its potential and makes it enterprise-ready. In this blog, we will learn how FlytBase now helps you deploy fully automated, secure docked drone operations for enterprise applications with DJI Dock 2.
Top 5 reasons to choose FlytBase for your DJI Dock 2 operations
FlytBase seamlessly integrates with DJI Dock 2, providing an enterprise-grade drone autonomy software solution that includes workflow integration, flight automation, fleet management, flight safety measures, and robust data security features for efficient drone operations. Following are some of the reasons why you should choose
1. Flinks: Flinks, short for FlytBase Links, are connectors that help integrate the FlytBase platform with a wide range of external software apps and hardware devices. Users can fully automate enterprise drone workflows with pre-built Flinks or create custom ones with FlytBase APIs and SDKs.

2. Flight safety and compliance: FlytBase ensures comprehensive drone safety with a range of features, including custom pre-flight checklists, collision avoidance, and configurable failsafes. Users can also create geofences and 2D No Fly Zones (NFZ) to maintain secure operations. Additionally, FlytBase alerts users to potential airspace threats and offers mitigation suggestions to help maintain a safe airspace.

3. Robust data security: With multiple layers of protection that include secure data transfer, encryption, network configuration, application-level controls, and flexible deployment options, the FlytBase platform is designed with security in mind. We also use tools to help us enforce compliance with our internal security policies.
4. Hardware agnostic platform: You can seamlessly integrate and deploy FlytBase with multiple docking stations, drones, and third-party payloads while being able to manage the fleets with a centralized dashboard.
5. Enterprise-grade support: FlytBase provides enterprise-grade support via calls, emails, and chat, with the option to upgrade to custom SLAs. This helps dedicated business and technical account managers enhance customer and partner success, as well as provide on-ground support for extensive or critical deployments.
In addition to numerous other features, FlytBase enhances your DJI Dock 2 operations, making them enterprise-grade and exceptionally efficient. Now, let's take a look at FlytBase's approach to data security and its flexible deployment options for ensuring robust data protection.
Protect your drone data with FlytBase Shield
Large enterprises, government entities, and organizations managing critical operations face a major challenge in keeping their data safe and secure. Why is this so crucial?
Well, they handle vast amounts of sensitive information like proprietary business data, classified government information, and critical infrastructure. The drones capture this data, and any breach could lead to significant consequences, such as financial losses, damaged reputations, or even threats to public safety.
This is where FlytBase Shield comes into the picture to offer a comprehensive suite of security services designed to safeguard drone docks and data with multi-layer protection.
With our robust encryption methods, like AES-256, you can ensure that your sensitive data is protected at rest and in transit. Additionally, we take security measures for our user accounts with the help of:
- User account security with OAuth 2.0, Single Sign-on (SSO)
- Integration with Google and Microsoft accounts
- Adherence to industry cybersecurity standards such as SOC2 Type II, ISO 27001, GDPR, CIS, and NIST
This gives our customers peace of mind that their data and operations are safe.
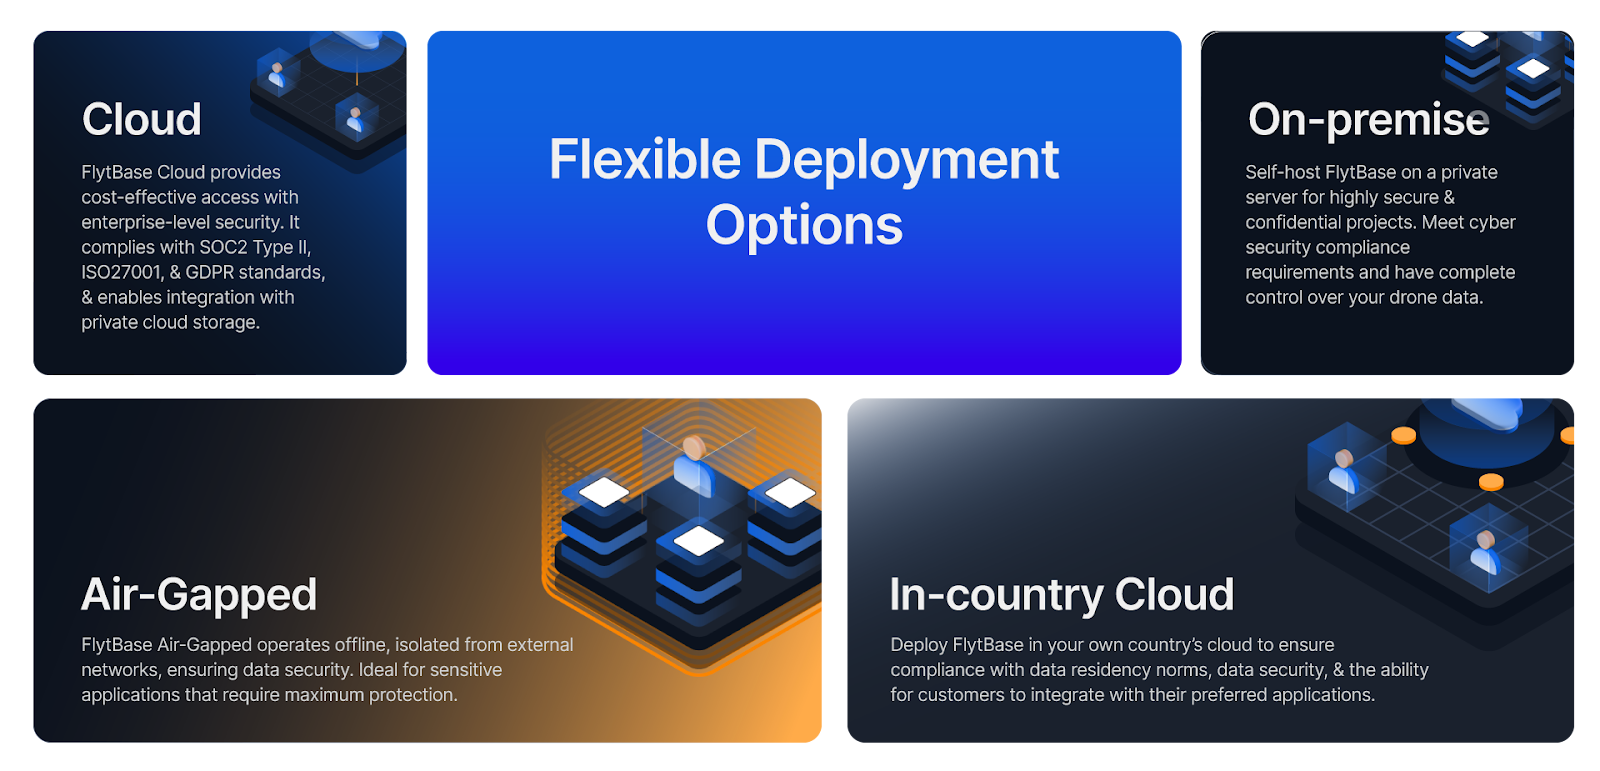
FlytBase provides a range of deployment options for the DJI Dock 2, including the choice to operate within a separately managed AWS environment, offering an additional layer of security and privacy by being physically isolated from our multi-tenant cloud infrastructure.
- Cloud: FlytBase Cloud provides cost-effective access with enterprise-level security. It complies with SOC 2 Type II, ISO 27001, and GDPR standards, and enables integration with private cloud storage.
- In-country Cloud: Deploy FlytBase in your own country’s cloud to ensure compliance with data residency norms, data security, & the ability for customers to integrate with their preferred applications.
- On-premise: Self-host FlytBase on a private server for highly secure & confidential projects. Meet cyber security compliance requirements and have complete control over your drone data.
- Air-Gapped: FlytBase Air-Gapped operates offline, isolated from external networks, ensuring data security. Ideal for sensitive applications that require maximum protection.
Having explored FlytBase's data security measures, let's now learn about BVLOS operations, where FlytBase equips your drone operations with advanced capabilities for safe and efficient Beyond Visual Line of Sight (BVLOS) flights.
Integrate your go-to apps and devices in a single click with Flinks
Using multiple platforms and systems in enterprise drone operations can create inefficiencies and pose safety risks. To solve these issues, FlytBase recently announced the launch of Flinks.
But what is Flinks?
Well, Flinks allow users to effortlessly connect the FlytBase platform with critical business systems such as alarm systems, video management, data processing, and more. By eliminating the need for complex, time-consuming manual interventions, Flinks enables enterprises to incorporate autonomous drones into their existing operations seamlessly.
Flinks includes six different integration types:
- Alarms: To integrate various alarm systems for drone response to incidents like motion sensors, fire alarms, and dispatch systems.
- Data Processing: To integrate data processing applications that help generate high-resolution maps, surface and 3D models, and reports tailored to specific applications.
- Live Streaming: To connect drone & dock video feeds with Video Management Systems (VMS) and other video storage or analytics applications for site security operations and incident response.
- Mission & Logs: To export detailed drone missions and data to apps that help manage resources, batteries, and flight logs.
- Detect & Avoid: To integrate third-party cooperative & uncooperative aircraft detection systems to ensure safety and compliance with airspace regulations.
- UTMs: To integrate uncrewed traffic management systems for real-time airspace awareness.
How FlytBase makes your drone operations BVLOS ready

Flying Beyond Visual Line of Sight (BVLOS) is a significant milestone for various industries. With FlytBase and DJI Dock 2, your drone operations can seamlessly transition to BVLOS operations, with essential features and capabilities that ensure safe and efficient flight beyond visual range.
- Advanced Flight Planning Routines: FlytBase offers advanced flight planning routines tailored for BVLOS operations. Dynamic path planning, corridor fly zones, No Fly Zones (NFZ), Smart Return-to-Home (RTH), and customized flight workflows ensure compliance with regulatory requirements and efficient navigation in complex airspace.
- Geofencing and No Fly Zones: FlytBase enables users to create Geofences and No Fly Zones, ensuring compliance with local regulations and safety protocols. These virtual boundaries restrict drone flight in designated areas, minimizing the risk of unauthorized operations and ensuring airspace integrity.
- Flight Logs: FlytBase provides detailed flight logs that offer a comprehensive overview of each mission. Operators can review vital information such as flight path, altitude, speed, device status, and media captured during the mission. These flight logs enhance operational transparency, facilitate post-flight analysis, and support regulatory compliance efforts.
- BVLOS Documentation Templates: FlytBase simplifies obtaining waivers and approvals for BVLOS operations with pre-built documentation templates. These templates streamline the application process, facilitating regulatory compliance and expediting approval for extended drone flights.
- Third-party integrations for BVLOS flight safety: FlytBase integrates with third-party detect and avoid systems, Uncrewed Traffic Management (UTM) services, external ADS-B, and parachute recovery systems using Flinks. These integrations enhance safety by providing real-time alerts on intrusions, conflicts with nearby aircraft, and automatic parachute deployment in case of system failure.
Find out which BVLOS enablers have partnered with FlytBase to make flights safer. visit: https://www.flytbase.com/flinks
After learning about multiple aspects essential for conducting safe, secure, and reliable autonomous drone flights, let's dive deeper into the applications of the DJI Dock 2 with FlytBase across diverse industries.
Automating drone operations across industries
Applications like mapping and surveying are becoming more efficient and advanced, thanks to the DJI Dock 2, powered by FlytBase. The highly efficient cameras of the Matrice 3D/3TD drones make mapping and surveying more accessible and cost-effective than ever before. FlytBase simplifies creating grids over an area, especially for mapping and surveying. Users can precisely control parameters like Ground Sampling Distance (GSD) and overlap, ensuring accurate data collection.
Additionally, FlytBase's Flinks enable seamless integration of third-party apps and systems, further enhancing the versatility and capabilities of the DJI Dock 2 for various applications beyond mapping and surveying.
- Public Safety: Equipped with autonomous drones, first responders gain rapid situational awareness during emergencies, aiding in law enforcement and Search and Rescue (SAR) missions. With remote control and management features, operators can efficiently oversee operations from remote or mobile command centers, ensuring swift and coordinated responses to public emergencies.
- Construction: FlytBase and DJI Dock 2 can be used as a monitoring system that helps automate data collection, enabling real-time tracking of construction progress. Conducting mapping and site analysis becomes effortless, facilitating effective planning, design, and asset inventory management.
- Mining: Deploying drone fleets for routine missions, such as equipment inspections and progress reporting, becomes easier. Real-time video data capture helps monitor and survey, ensuring efficient stockpile management to prevent mine hazards.
- Security and Surveillance: Deploying drones for aerial monitoring and security patrols becomes seamless and efficient with the DJI Dock 2. In addition, by automating routine missions and scheduling patrols, with FlytBase, operators can ensure 24x7 monitoring of properties, enhance security systems, and easily safeguard assets
What lies ahead?
FlytBase with DJI Dock 2 enables a wide range of applications in sectors like public safety, mining, construction, and more while prioritizing data security with a robust system. In addition to this, the seamless integration with third-party systems via Flinks enhances the capability to automate, streamline, and ensure secure drone operations, offering an enterprise-grade experience.
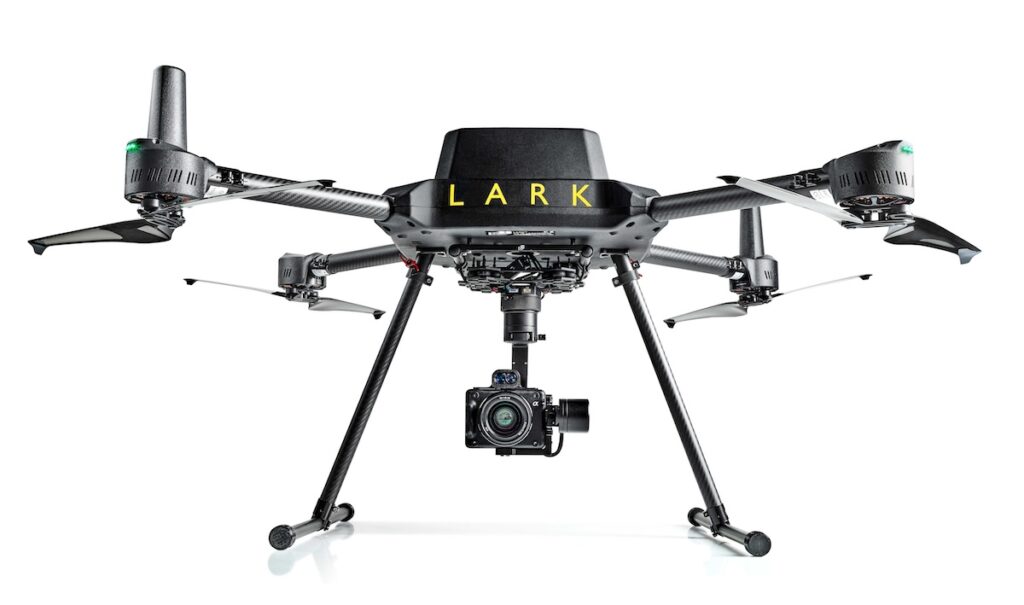
Recognizing the growing importance of data safety and customization, Danish drone company Upteko has entered the market with its flagship product, the LARK drone.
Originally conceived for windmill inspection, the LARK drone has been developed to set a new standard for data security and versatility, and has quickly garnered attention for its data safety features and adaptability.
The LARK drone features robust data encryption mechanisms and a highly customizable design; engineered to meet the unique specifications of each customer, ensuring optimal performance and data safety in any scenario. Whether it’s precision agriculture, infrastructure monitoring, or environmental surveys, Upteko empowers its clients to tailor the LARK drone to their specific needs, without compromising on data security.
Setting new standards for data security & versatility
In the ever-evolving landscape of drone technology, the demand for data safety and customization has become paramount. As regulatory bodies tighten their grip on privacy and security measures, companies are facing unprecedented challenges in ensuring the integrity and safety of the data collected by their drones.
In this shifting paradigm, Upteko offers cutting-edge solutions that prioritize data security and customization.
The drone industry is undergoing a profound transformation, driven by advancements in technology and an increasing need for data-driven insights across various sectors. From agriculture to infrastructure inspection, drones have become indispensable tools, providing real-time data and actionable insights like never before. However, with this proliferation of drone usage comes pressing concerns over data privacy and security.
Regulators worldwide are stepping up efforts to enforce stringent guidelines to protect sensitive information collected by drones. From stringent data encryption protocols to strict limitations on data storage and transmission, compliance with these regulations has become a top priority for companies operating in the drone industry. Failure to adhere to these standards not only poses legal risks, but can also undermine public trust in drone technology.
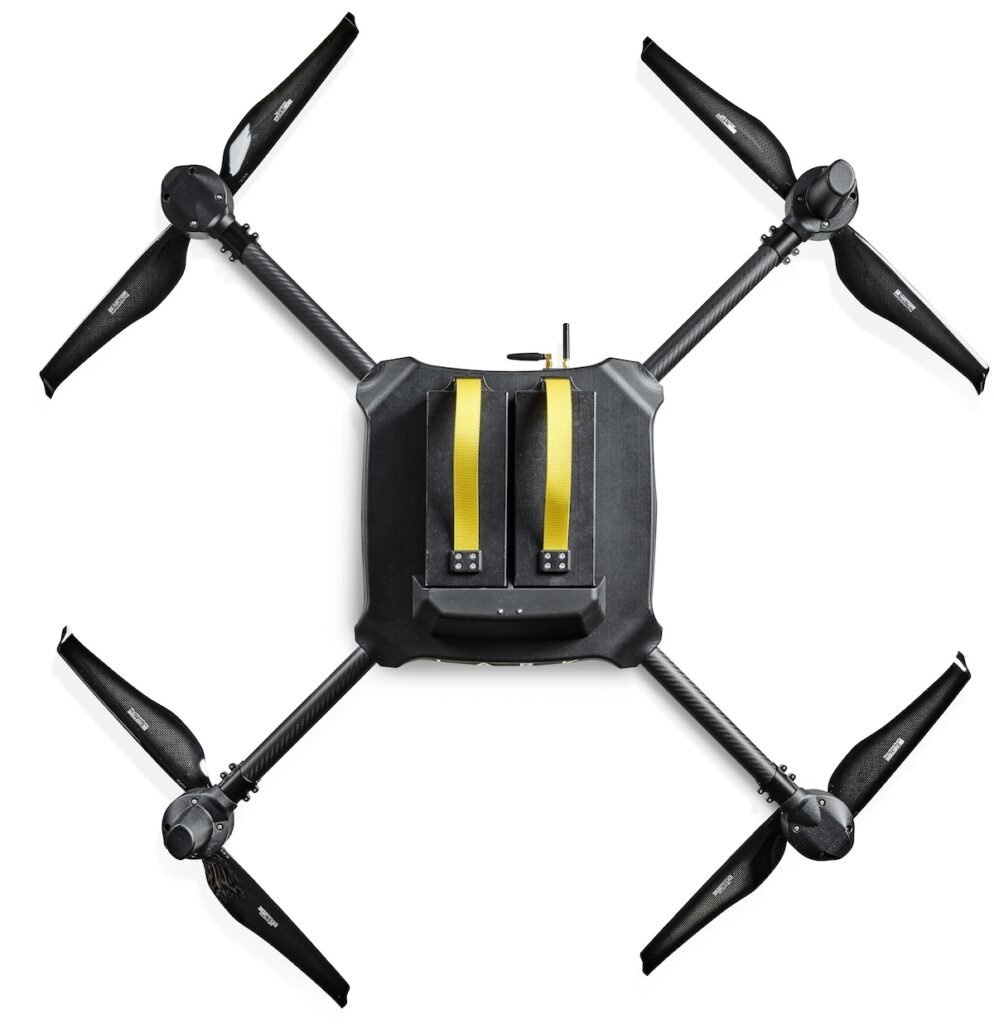
The versatility of the LARK drone has been a game-changer for businesses seeking reliable and secure drone solutions. With its advanced payload options and modular design, the LARK drone can seamlessly adapt to evolving industry requirements, providing unparalleled flexibility and scalability.
Whether it’s integrating specialized sensors for precise data collection or implementing custom software solutions for enhanced analytics, Upteko offers a comprehensive suite of services to meet the most demanding operational needs.
Read more here: Upteko
FMS Cessna 182 1500mm PNP
The Cessna 182 is a popular small single-engine propeller aircraft that first appeared in 1956, with its development rooted in the Cessna 180. The Cessna 182 plays a significant role in general aviation due to its excellent stability, reliability, versatility, flexibility, and ease of operation. It is used in various fields such as private flying, flight training, business cruising, aerial photography, aerial patrols, geographical surveyance, and emergency medical rescue.
Authorized by FMS Model Inc. China, the FMS Cessna 182, with a wingspan of 1500mm, adheres to FMS’s long-standing product philosophy of "perfect appearance, excellent performance."
While painstakingly reproducing the appearance, it also replicates the flight characteristics of the Cessna 182.
Perfect appearance: The FMS 1500mm Cessna 182 breaks the limits of degree of realism that aircraft of the same size and type can achieve, meticulously replicating exterior details, from cockpit windows and cabin interiors to skin lines, antennas, exhaust ports, propellers, navigation lights, and more.
Excellent performance: With high-rigidity lightweight EPO material and a high-wing structure with a large wing area, the aircraft exhibits low wing-loading and high lift-drag ratio.
Activating the flaps, the FMS 1500mm Cessna 182 performs admirably in low-speed control and short takeoff and landing (STOL) —taking off within three meters on the ground and easily flying with half throttle in the air. The aircraft features a tricycle metal shock-absorbing landing gear set and large wear-resistant tires to resist violent landings, eliminating concerns for novice pilots practicing takeoffs and landings.
Following international navigation light standards, high-intensity LED lights are equipped on both wings, the tail of the fuselage, and the top of the vertical stabilizer—allowing worry-free takeoffs and landings in low-light conditions, enhancing realism and adding to the joy of flying. Robust plastic struts give extra strength to the wings during aerobatic maneuvers. In addition, the assembly structure of the Cessna 182 reflects FMS's consistent attitude towards product development—rigorous and meticulous. The model utilizes a convenient snapper assembly structure, integrated servo-connector design, and ball head control surface linkage. These measures, while ensuring the strength and stability of the aircraft, greatly simplify the assembly steps, allowing players to enjoy the fun of flying in the shortest possible time. The PNP configuration includes a 3541-KV840 brushless motor, 40A brushless ESC, and seven 9g digital servos, with high-precision digital servos
controlling ailerons, flaps, nosewheel steering, rudder, and elevator, accurately executing input commands.
Most pleasingly, the 1500mm Cessna 182 can be equipped with the Reflex V3 (sold separately), which can be connected via Bluetooth and unlocks custom tuning functions. After downloading the app, players can choose standard or custom modes based on their preferences and synchronize the desired flight parameters.
| Type of Version: | PNP |
| Wingspan (mm): | 1500mm / 59 in |
| Length (mm): | 1250mm / 49.2 in |
| Flying weight (gr) | 2000 approx |
| Wing Surface Area: | 33.3 dm² / 515.7 sq.in |
| Wing Loading: | 60 g/dm² / 0.12oz/in² |
| CG (Center of Gravity) | Check manual |
| Servos | 7x 9 gr standard gear |
| Servo type: | Digital |
| Blades: | 3 |
| Turbine shroud | Synthetic |
| EDF Rotor | Synthetic |
| Power System | 3541-KV840 Brushless |
| Electronic Speed Control | 40A |
| Battery Capacity (mAh) | 2.200 mAh, 3.200 mAh |
| Required Radio | 6 channels minimum |
| Recommended pilot skill level | Beginner, Intermediate |
Features:
Authorized by Textron Innovations Inc.
High-Performance Power System: Powerful 3541-KV840 brushless motor, 40A brushless ESC.
Rich in realistic details, such as cockpit interior (instrument panel, steering wheel, pilot), antenna, navigation lights, etc.
Metal shock-absorbing landing gear set.
Pre-installed high-intensity LED navigation lights.
Simple assembly structure (snappers+screws).
Superior low-speed maneuverability.
Ultra-short takeoff distance.
Integrated servo connectors.
Large-size battery compartment.
Ball head control surface linkage to reduce surface vibrations and achieve smooth steering.
Tough and efficient nylon and fiber-reinforced three-blade propeller.
Technical data
Scale: 1/7
Wingspan: 1500mm / 59 in
Length: 1250mm / 49.2 in
Flying weight: approx. 2000
Wing area: 33.3 dm² / 515.7 sq.in)
Wing loading: 60 g/dm² / 0.12oz/in²
Motor size: Brushless 3541-KV840
Impeller: 80mm, 12-blade
ESC: 40A
Servos: 9g x 7
Propeller: 11*6,3-blade
Suggested battery: 14.8V2200mAh-3200mAh 25c
Package Box details:
FMS 1500mm Blue Cessna 182 RC Airpane
Motor: Brushless 3541-KV840 Motor system
ECS: 40A
Servos: 4x9g
Propeller: 11*6,3-blade
Fixe landing gear set
https://www.fms-model.com/fms-cessna-182-1500mm-pnp-blue-rc-airplane.html
In recent years, advancements in drone technology have revolutionized various industries, from agriculture to search and rescue operations. Among these innovations, thermal imaging drones have emerged as a game-changer, offering unparalleled capabilities in a wide range of applications. In this article, we delve into the fascinating world of thermal imaging drones, exploring their uses, benefits, and the transformative impact they have on diverse fields.
Understanding Thermal Imaging Technology
At the heart of thermal imaging drones lies sophisticated infrared (IR) sensors capable of detecting and measuring heat emitted by objects. Unlike traditional cameras, which rely on visible light to capture images, thermal cameras detect infrared radiation, allowing them to visualize temperature variations across surfaces. This ability to "see" heat signatures makes thermal imaging drones invaluable tools for a myriad of tasks, especially in environments where visibility is compromised or where traditional methods fall short.

Applications Across Industries
The versatility of thermal imaging drones transcends industry boundaries, finding applications in fields such as:
1. Search and Rescue:
In emergency situations, every second counts. Thermal imaging drones Autel EVO II 640T V3 equipped with infrared cameras can swiftly locate missing persons or detect heat signatures in disaster zones, even in low-light conditions or dense vegetation. Their ability to detect body heat makes them indispensable tools for first responders, significantly expediting search and rescue operations and improving outcomes.

2. Precision Agriculture:
Optimizing crop yield and monitoring plant health are paramount in modern agriculture. Thermal imaging drones provide farmers with invaluable insights into crop vigor, irrigation efficiency, and pest infestations. By detecting temperature differentials across fields, farmers can identify areas requiring intervention, such as irrigation adjustments or pest control measures, thereby maximizing productivity while minimizing resource usage.
3. Building Inspections:
Traditional methods of building inspections often involve manual labor and pose safety risks. Thermal imaging drones offer a safer, more efficient alternative by enabling inspectors to identify structural anomalies, insulation deficiencies, and moisture intrusion remotely. By detecting temperature variations indicative of potential issues, such as water leaks or electrical hotspots, thermal imaging drones facilitate proactive maintenance and prevent costly damage.
4. Wildlife Conservation:
Monitoring wildlife populations and combatting poaching are ongoing challenges for conservationists. At the same time, thermal imaging drones can be used to monitor the number and living habits of wild species and provide assistance for hunting wild boars, elk, coyotes, etc. Thermal imaging drone hunting has also become a pastime for most families in the United States.

5. Security and Surveillance:
Securing critical infrastructure and ensuring public safety require robust surveillance measures. Thermal imaging drones enhance security protocols by offering enhanced visibility during nighttime operations and in challenging environments. From perimeter patrols to monitoring border crossings, these drones provide security personnel with a tactical advantage, enabling proactive threat detection and rapid response.
Advantages of Thermal Imaging Drones
The adoption of thermal imaging drones confers numerous advantages, including:
- Enhanced Visibility: Thermal imaging drones excel in environments with poor visibility, such as dense foliage, smoke, or darkness, thanks to their ability to detect heat signatures.
- Remote Monitoring: By capturing thermal data from a distance, drones eliminate the need for manual inspections in hazardous or hard-to-reach locations, enhancing safety and efficiency.
- Cost-Effectiveness: The use of drones for aerial inspections and surveillance reduces operational costs associated with manned aircraft or ground-based methods, making it a cost-effective solution for various industries.
- Data Accuracy: Thermal imaging drones provide precise temperature measurements and detailed thermal maps, enabling informed decision-making and targeted interventions.
Challenges and Future Outlook
While thermal imaging drones offer tremendous potential, they are not without challenges. Issues such as limited flight time, regulatory constraints, and data interpretation complexities require ongoing innovation and collaboration to address effectively.
However, with advancements in drone technology and continued research, these challenges can be overcome, unlocking even greater possibilities for thermal imaging applications.
Looking ahead, the future of thermal imaging drones is promising. As their capabilities evolve and their adoption becomes more widespread, we can expect to see further integration into diverse industries and novel applications emerging.
From environmental monitoring to infrastructure inspection, thermal imaging drones are poised to redefine how we perceive and interact with the world around us, ushering in a new era of innovation and progress.
In conclusion, Thermal imaging drones for sale have made their way into our surroundings and have great potential to revolutionize multiple fields by harnessing the power of infrared technology and aviation capabilities.
https://www.youtube.com/watch?v=z5iU-KZXR1M
T-MOTOR is well-known as a worldwide manufacturer that provides industrial uav bldc motor, ESC, and carbon fiber propellers with 13+ years of experience. With our principle of the quality-oriented, our products are recognized in a very short time by many famous drone companies, militaries, and governments for their VTOL, logistics, protection projects, etc. BLDC Motor Power Range: 0-40KW+ Propeller Diameter: 0-75inch+ T-MOTOR has the widest range of drone propulsion power in the industry while supporting OEM and ODM
Email: info@tmotor.com
Our knowledge of physics tells us that we do require air (or "fluid" as they say in physics) to fly drones.
But what if it was possible to take a drone's air with it into outer space ? How ? By fitting an air-tight enclosure around the drone.
Ok ... wait ... physics will have something to say about that too! ... it won't fly! ... Net zero force
Newton's 3rd law will prohibit it ... and yes that is true ... if we constrain our minds with current flight machines designs.
... ok explain ...
What if it was possible to come up with a new drone propulsion design ... one that bend (or curve) the ejected propeller air, all the time!
Would that imply that the ejected air will never form a jet stream and will lose it's kinetic energy quickly ?
Ok, say that could work, but how would the re-action forces on the drone be used so that the drone can move in a pre-determined direction ( be controlled ) ?
The answer for that is also given by physics ... vectors with a resultant vector.
Ok, surely you will need more than vectors ?
Yes, add some some Arduino wizardry - 1 or 2 very unique algorithms - together with an IMU ( like a Bosch BNO055), plus a few other parts ...
and you have an outward spinning drone! What is an outward spinning drone ?
The Droverbot
Propelling any vehicle in a pre-determined direction while the entire vehicle continues to rotate (outward spinning) is a groundbreaking innovation in propulsion.
With current mainstream propulsion vehicles, the engines (or motors) provide thrust via the axle in a hub,
e.g. car wheels with an axle at the centre, for propellers with an axle at the centre.
But with the experimental drone above, the thrusters are located on the spokes and rim of the octagon frame.
This propulsion system have distinct characteristics that can be exploited, with huge potential as explored in this post.
Ok, but the droverbot drone is not flying as shown above. Why ?
There are several reasons why I chosed to propel the experimental drone horizontal and not vertical, but it is a story for another time.
But just to indicate how vertical flight might work, please click the link below for another video, it is an early 2D simulation I’ve build a few years
ago which shows just that
Vertical Flight Simulation
The 2D simulator software I used, only had rocket thrusters for propulsion, which would've been a limiting factor if
this simulation had to be build in the real world, with the forces shown in the simulation.
However, it does illustrate how an outward spinning object perform vertical flight.
The Droverbot (shown in the first video) method of propulsion is far more matured, versatile and capable of vertical flight as shown in this early simulation.
(See the Whitepaper in the link, further down below to understand the drone’s method of propulsion.)
Key aspects of this experimental drone (or “droverbot”) that set it apart.
- This drone has the ability to propel in a straight line in a predetermined direction while the entire drone (including its thrusters) is rotating continuously.
- The continuous rotation of the entire drone creates an interesting phenomenon where the air is distributed once it leaves the propeller blades,
resulting from the entire drone's rotating motion. - Powered by 8 brushless motors and propellers, this drone exhibits both linear and rotational motion.
Four motors managing linear motion and four rotational motion. - Modular in design, this drone can be scaled up by adding more drones to a common platform, creating larger drones that can be further scaled,
only limited by practicality.
The central hub of the drone (centroid) allows for an axle to be fitted, providing the flexibility and versatility to scale.
Key Properties
- The reaction forces generated by the motor-propellers on the drone due to ejected air (action forces) are harnessed as vectors in
such a way that they cause a consistent resultant vector. The resultant vector (direction and force) can be chosen and adjusted as needed. - Since air is distributed behind motor-propellers continuously, it is not reinforced with additional ejected air,
leading to quicker weakening of the kinetic energy of the ejected air compared to other propulsion systems
where ejected air is continuously reinforced (e.g. jet streams behind an airplane’s propellers). - This experimental drone, as shown in the video, can propel along a horizontal plane.
With further development, the drone can be orientated vertically and should be able to propel upward into the atmosphere.
Each drone is capable of propelling along one plane, and when multiple drones are combined, they can move in any direction in three-dimensional space.
Individual drones can be connected modularly to a common frame by attaching an axle to each drone hub at its centroid.
Implications
- The drone's resultant vector can be directed to any degree within 360 degrees. Direction and force can be adjusted as needed.
In a multi-drone vehicle, the combined vectors of the drones enable flexible manoeuvring in three-dimensional space. - Since there is no reinforced ejected jet stream (as mentioned earlier) and weak kinetic energy that dissipate rapidly when air molecules collide
with other air molecules at rest, it is feasible to assume that an enclosure (with a sufficient air cushion between propellers and wall) can
be added around the drone.
Adding an enclosure will have several key implications:
- Below follow a few implications when propelling earth-based:
- An enclosure will solve the problem of dust and debris kicking up from propeller-engines at low altitudes.
- Unlike rockets with fixed cylinder shapes, an enclosed vehicle with rapid directional changes and
flexible design shapes will not be limited by high-altitude winds, ensuring flights are not cancelled. - The risk of objects (or debris) colliding with propellers will be eliminated with an enclosure.
- An enclosure will significantly reduce noise pollution caused by conventional airplane propellers.
- The risk of losing parts will also be eliminated by an enclosure.
- Taking all of the above into account, the automotive industry should be able to build "real" – flying cars.
- An air-tight enclosure will enable drones to fly in outer space without requiring an atmosphere.
- An air-tight enclosure will ensure that all propellant (air) is re-used. Since air does not contain energy,
the energy source when earth-based, can be battery powered.
When in outer space, the energy source could be a small nuclear reactor (e.g. “Kilopower” reactor as build by NASA).
This have the potential to reduce the mass to 10% or less of the vehicle's total mass compared to rockets where
propellant (with integrated chemical energy source) is over 90% of the vehicle’s total mass.
With unlimited propellant (re-usable) and long-term energy sources like nuclear re-actors, long-term trips in the solar system and potentially,
even interstellar travel to neighboring stars becomes feasible from a propulsion system point of view.
You might wonder if Newton's third law will be upheld when a drone is enclosed.
With conventional propeller-engine thrusters, this is impossible due to the reinforced ejected jet stream (action force) that is equal
in strength to the reaction force on the vehicle, in the opposite direction. This results in a net zero force.
However, with this experimental drone, there is no reinforced, ejected jet stream in the opposite direction.
Instead, due to its continuous rotation, the ejected air is not reinforced by more air, but is distributed.
So, how does Newton's third law apply then?
At a moment (fraction of a second) of air ejection, Newton's third law is applicable, but since the ejected air is not reinforced by the next moment of air ejection
(which is ejected at a different degree as the drone rotates), no ejected air jet stream is created (in the opposite direction) as with conventional aircraft.
However, the sum of the distributed air (action force) still equals the sum of the reaction force on the vehicle. Newton's third law is upheld.
Since multiple drones can be attached to a large platform, which can take any shape (limited only by practicality), various types of vehicles can be built.
This is not limited to vehicles but could result in large upper atmospheric platforms (even in the atmospheres of other planets) or even platforms in space.
- Below follow a few implications when propelling earth-based:
Resources
Check out the link below for more in-depth technical details on the drone's construction, functionality, experimental results, and potential applications.
Droverbot - Whitepaper
Explore further by accessing the source code for the drone and additional materials through the provided link below.
The-Droverbot at GitHub
To delve deeper into the details of the drone's design, discover the 3D models available at the following link.
FPVWorkBenchV42.zip (Microsoft 3D Builder)
Next steps
This experimental drone is the starting point, marking the transition from zero to one, for a new type of vehicle. Alot of work will still need to be done
to make this a reality.
To unlock its full potential, it will require a collective effort from a community. This could be a revolutionary innovative project if a community decides so.
My hope is that a community will come together around this project to build upon this effort
Please leave a comment below on your thoughts.
Here is a preliminary high-level plan of the next steps that are needed.
High-Level Action Plan
1. Redesign Drone Frame
The current octagon drone frame requires an overhaul, as it was originally designed to host 16 motors for testing various permutations.
The focus should be on creating a lightweight octagon shape frame that is both structurally reinforced and sized appropriately to withstand forces at play.
2. The source code
The source code needs tidying up and rewriting to accommodate improved algorithms for linear and rotational motion,
as well as integrating the list of permutations to control propulsion in different directions.
This also includes expanding the list of permutations on how the 8 motors can be applied together for vertical flight, and multi-vehicle drone configurations.
As development advances, the codebase have the potential to expand to cater for multi-drones, underwater propulsion, space flight, acceleration and
deceleration in different mediums, and much more.
3. Electronic Components
The drone is constructed using consumer-grade electronics on top of the Arduino platform. Each component requires review and replacement if a better component
can be found that will enhance its versatility in creating a more advanced drone.
For example, the current IMU (Bosch BNO055) has limitations with its magnetometer. Additionally, a GPS should be added and better remote-control radio for starters.
4.Multi-drone
Once vertical tests flights are successful, several drones can then be attached to a central frame, and a single flight control computer will manage them all together.
This will enable the vehicle to move in any direction in 3D space.
5. Enclosure
At the same time (or afterward), a super lightweight, air-tight enclosure will be built to fit around individual drones or the multi-drone vehicle.
When this test succeeds, space travel will become a reality for drones. Enclosed air (as a propellant) will be reused with only the energy source that could deplete.
This will result in the ultimate reusable vehicle. This have the potential to revolutionize transportation and spaceflight forever.
6. Undersea Maneuvers
By modifying the existing design for submerged propulsion, trials can be performed below the surface, replacing air (a fluid) with water.
In Conclusion
I've been working on this project in my spare time for a very long time, and it's now at a stage where I believe the fundamental technology has been develop that can be built upon.
With a community involved, progress can be faster and who knows where this effort can go!
I want to thank God Almighty for carrying me over the years to continue, for my family supporting me.
It would have been impossible to get to this point without them.
Please leave your comments below.
How can BVLOS drone operations be conducted in Europe, especially using a drone docking station? When it comes to flying drones in Europe, understanding the regulations and its entire architecture is important. The European Union Aviation Safety Agency (EASA) oversees the regulations across 27 European Union Countries and 4 others including Iceland, Liechtenstein, Norway, and Switzerland to ensure safe and standardized drone operations.
Recently, we conducted a webinar featuring Matteo Natale, Technical Standards Manager at DJI, focusing on breaking down EU drone regulations, right from the fundamentals to dock operations, while shedding light on the key components that drone operators need to understand.
The EU Regulatory Framework
There are two main regulations that guide drone operations in Europe: Delegated Regulation 945 and Implementing Regulation 947.
Delegated Regulation (EU) 945/2019:
Delegated Regulation 945 outlines specifications for the design and manufacturing processes of Uncrewed Aircraft Systems (UAS). It sets requirements to ensure the safety, reliability, and compliance of UAS products within the European Union.
Implementing Regulation (EU) 947/2019:
Implementing Regulation 947 establishes rules and procedures governing the operation of Uncrewed Aircraft Systems (UAS) and personnel such as remote pilots within the EU states. It defines the operational requirements to ensure safe and standardized drone activities across member states.
Classification of drone operations
The European airspace categorizes aerial operations into three main types. The regulation in Europe follows the concept of proportionality. These categories are tailored based on the level of risk associated with different drone operations. This regulatory framework applies to both, commercial and non-commercial operations.
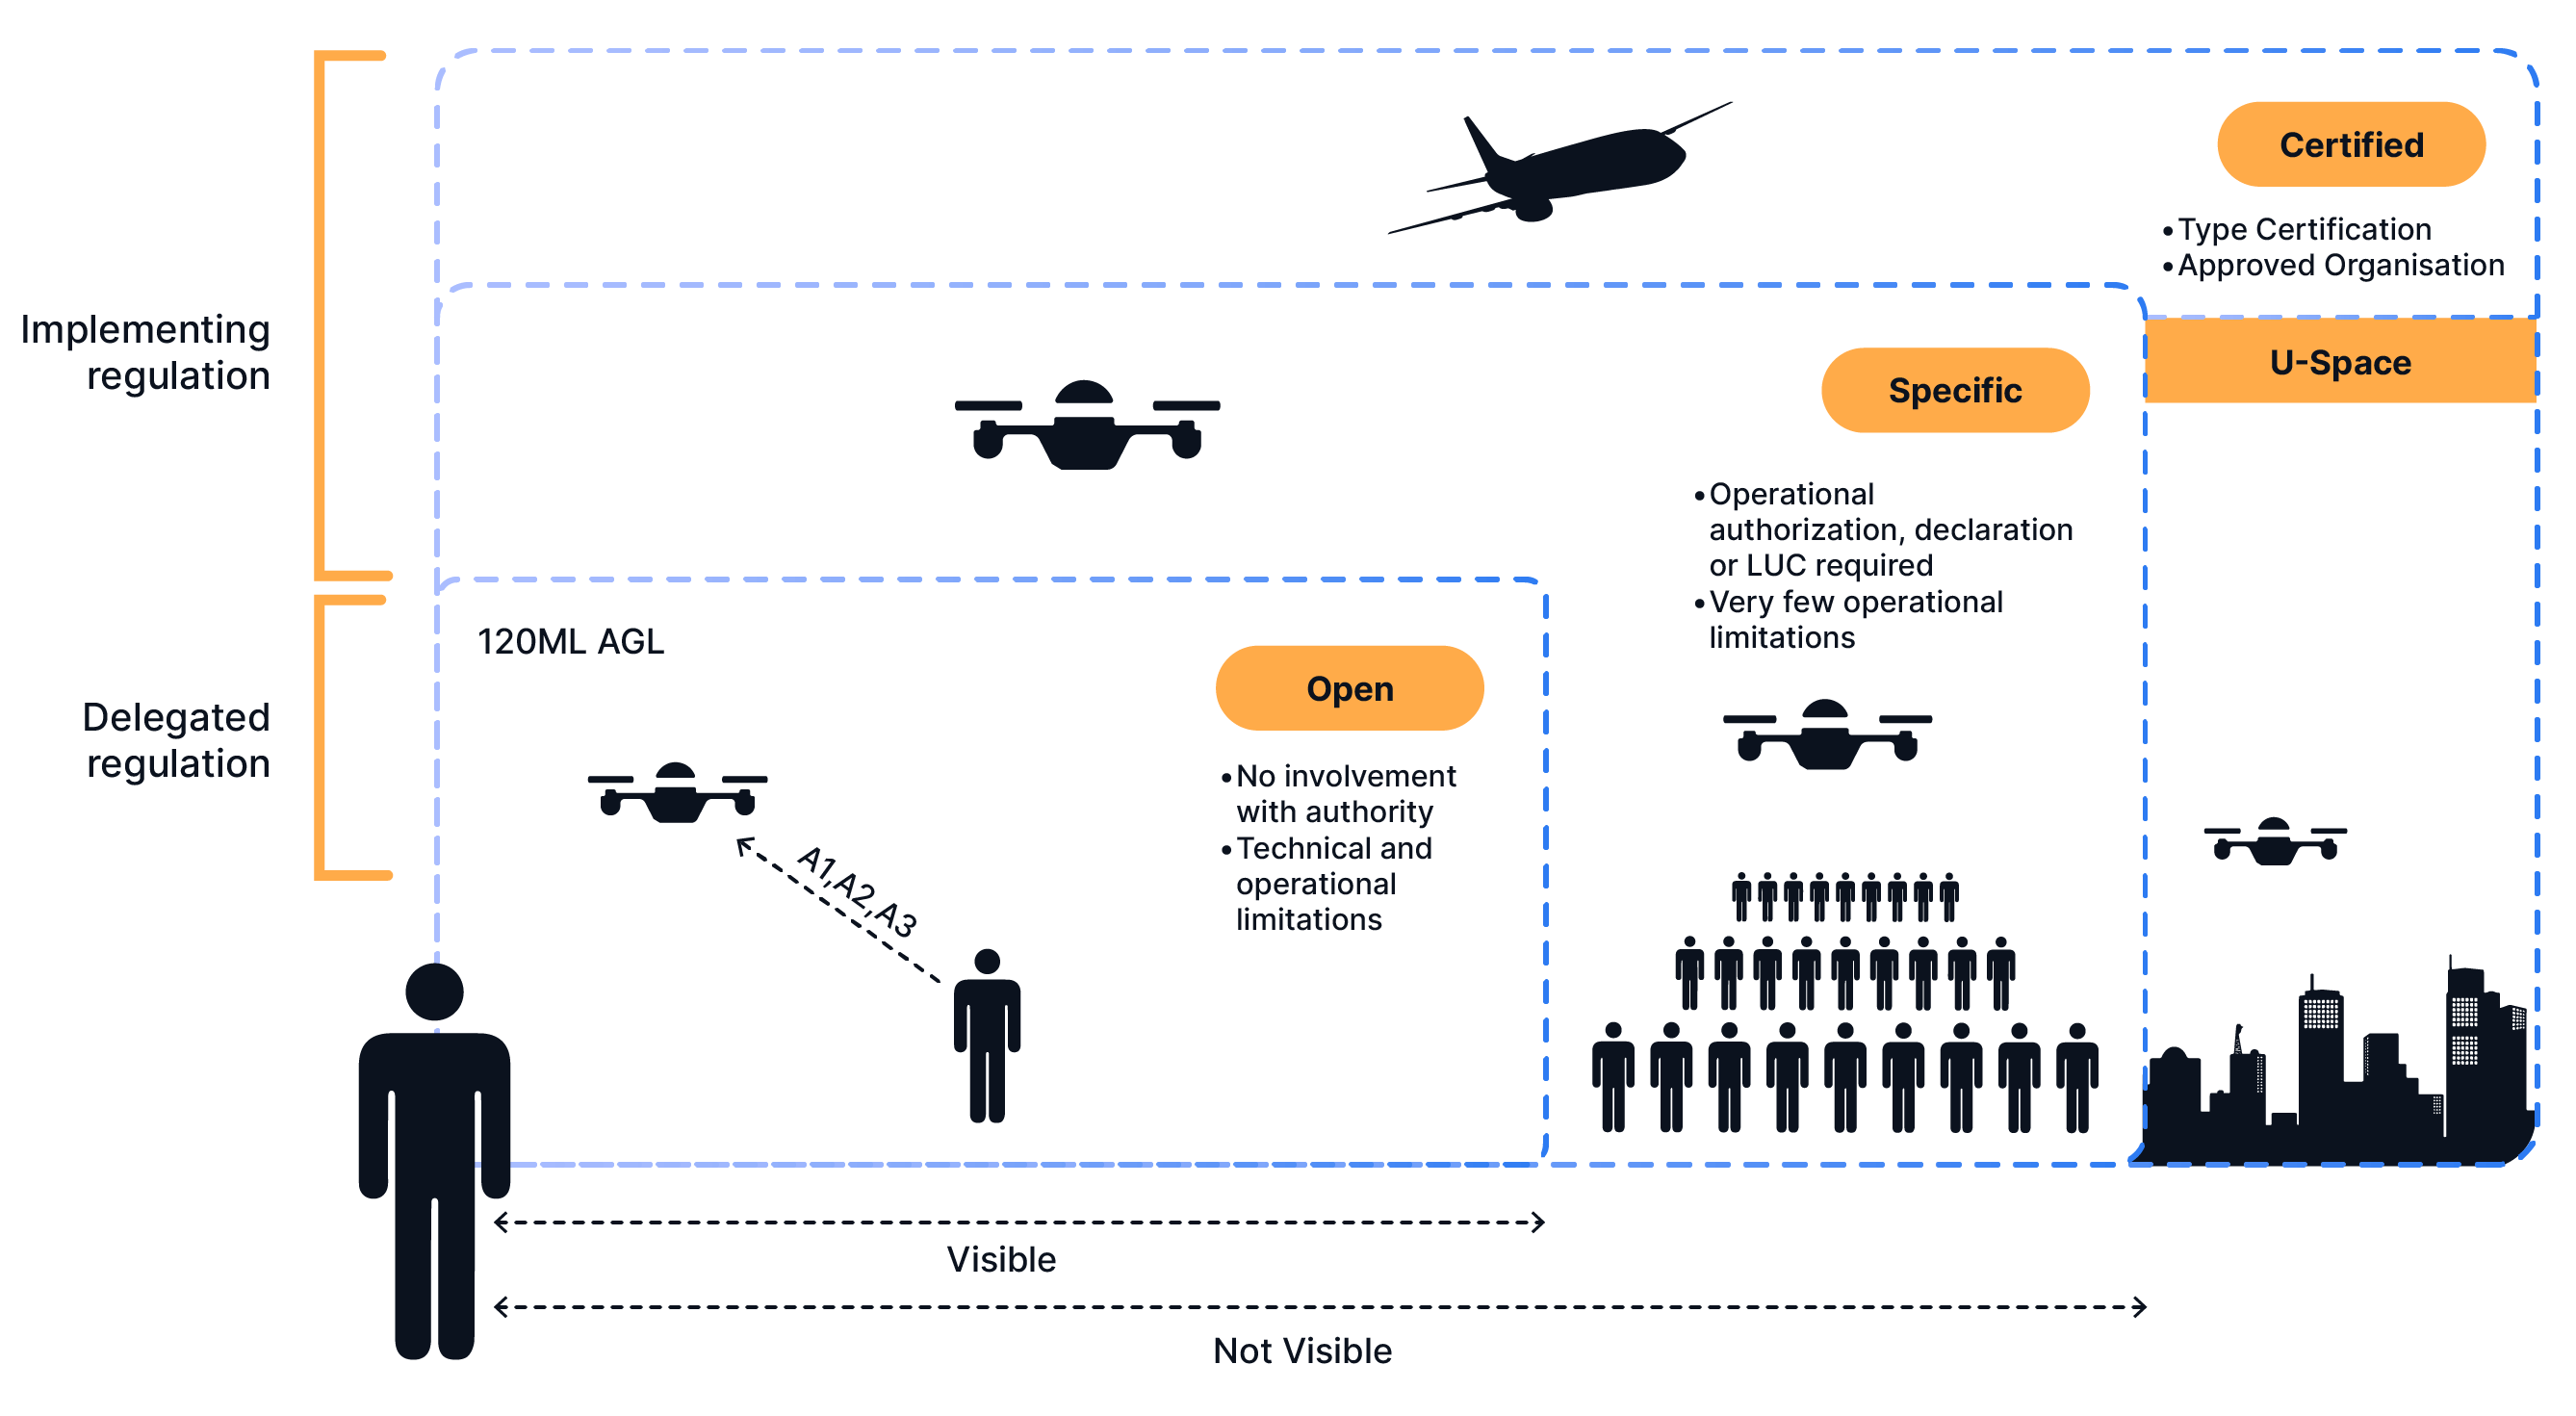
Open category
The Open category pertains to low-risk aerial operations with minimal involvement from authorities. However, there are several technical restrictions and flight limitations to consider. Operators simply need to register their drones, check state insurance requirements, and fly within the operational limits set by the subcategory. The manufacturer, who needs to provide drones with a class identification label, handles any technical restrictions. However, these operations are limited to Visual Line of Sight (VLOS) only and cannot be used for Beyond Visual Line of Sight (BVLOS) flights.
In this category, the drones are restricted to a maximum altitude of 120 meters above ground level and can weigh no more than 25 kilograms. The Open category is further divided into subcategories A1, A2, and A3.-- which may be summarized as follows:
A1: fly over people but not over assemblies of people
A2: fly close to people
A3: fly far from people
.png)
Specific category
The Specific category involves a higher level of involvement from authorities. Unlike the Open category, drones in the Specific category can fly Beyond Visual Line of Sight (BVLOS), above 120 meters in altitude, and weigh more than 25 kilograms. Generally, commercial drone operations utilizing docking stations to automate flight operations fall under this category. Operators need to seek operational authorization from the National Aviation Authority (NAA) through the following approvals:
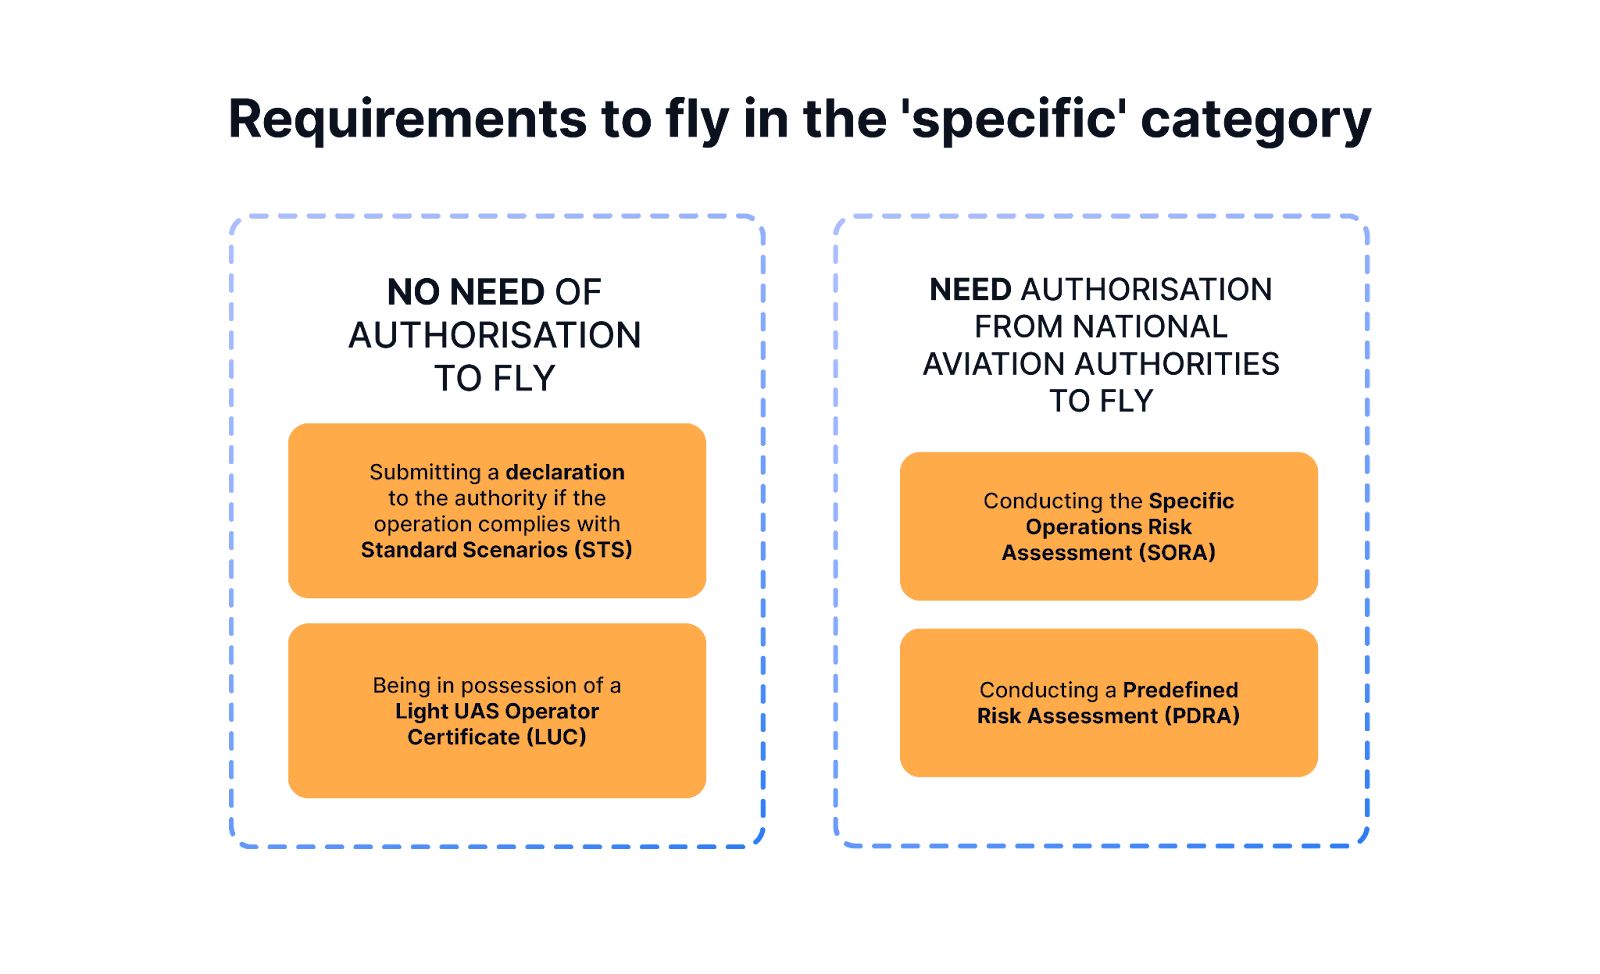
SORA: It is a risk assessment methodology for drone flights in a specific category that aids in classifying risks, identifying mitigations, and setting safety objectives. SORA helps establish operational limitations, training goals, technical requirements, and operational procedures.
PDRA: The Predefined Risk Assessment (PDRA) is an operational scenario for which EASA has already carried out the risk assessment and has been published as an acceptable means of compliance.
STS: STS is a predefined operation described in EU regulations. An operator is not required to obtain operational authorization to conduct an operation covered by a STS. Two STSs have been published so far:
- STS 01 – VLOS over a controlled ground area in a populated environment;
- STS 02 – BVLOS with Airspace Observers over a controlled.
LUC: Light Unmanned Operator Certificate (LUC) is an optional certification that grants privileges, such as starting operations in a specific category without requiring operational authorization. Operators can voluntarily request an assessment from their NAA to evaluate their capability to assess operational risks.
Certified category
The Certified category is designated as high-risk and operates under a regulatory framework akin to crewed aviation. This category applies to operations involving elevated risks such as transporting passengers, carrying dangerous goods, and flying over assemblies of people with drones positioned above three meters.
Understanding Class Identification Label
According to EU regulations, Uncrewed Aircraft Systems (UAS) are classified into seven distinct categories known as Class Identification Labels. The specifications and physical characteristics of the drone are what determine its classification. These labels range from C0 to C6, with drones in the C0 class weighing less than 250 grams and those in the C6 class weighing less than 25 kilograms. They apply to both the open and specific categories.
Following are the technical requirements and limitations for all class-labeled drones:
.png)
These labels provide clarity for drone operators and regulatory authorities alike. They ensure that drones are appropriately matched with the level of risk associated with their operation. By categorizing drones into specific classes, the regulations have been tailored to address the varying levels of risk posed by different types of drones. This approach promotes safety, accountability, and standardization across the drone industry.
The specific category includes class labels C5 and C6. They require the implementation of a geocaging system, enabling remote pilots to establish a virtual perimeter and a programmable boundary for their operations. Additionally, a flight termination system (FTS) must be available for emergencies.
Remote ID requirements
According to EASA, starting from January 1st, operations in the open category require drones with a class label. But, if you have already bought a drone without a label before January 2024, you can still fly it in subcategories A1, A2, and A3, depending upon the weight of the drone. Additionally, from January 1st, 2024, all drones in the specific category and those with class labels 1 and above must have an active remote identification system.
Remote ID allows drones to provide identification and location information while airborne, which can be received through a broadcast signal. This feature is essential for ground safety and security in drone operations. Moreover, Remote IDs help EASA, law enforcement, and regulatory bodies identify whether the drones are operating unsafely or in prohibited areas.
Obtaining operational approvals for the Specific category operations
The Specific category encompasses a wide range of activities, from commercial endeavors to specialized missions that require a higher level of involvement from regulatory authorities. To ensure compliance and safety, operators must undergo a rigorous process of obtaining approvals. By understanding and following these steps, operators can navigate the complexities of the Specific category.

- Concept of Operations (ConOps): In the drone industry, ConOps outlines how drone systems are used in specific operational environments. It details the roles of drones, user responsibilities, various flight and mission scenarios, as well as maintenance and support protocols, guiding stakeholders through the development, implementation, and usage stages.
- Risk Assessment: This assessment helps evaluate potential hazards and assesses the level of risk associated with the proposed drone operation. These assessments could be in the form of Specific Operations Risk Assessment (SORA), Predefined Risk Assessment (PDRA), Standard Scenario (STS), or Light UAS Operator Certificate (LUC), as mentioned above.
- Training: Operators should undergo specific training to demonstrate proficiency in operating drones within the Specific category. These training sessions could cover topics such as flight planning, emergency response, and compliance with regulations. Training ensures that operators have the necessary skills and knowledge to conduct operations safely and effectively.
- Approvals: The national aviation authorities evaluate the proposed ConOps and if all the requirements regarding mitigating potential risks are met, they grant approval for the operation to proceed.
- Flight: Once the approvals are completed one can conduct the drone operations.
Understanding the Specific Operations Risk Assessment (SORA) in detail
According to EASA “SORA is a methodology for the classification of the risk posed by a drone flight in the specific category of operations and for the identification of mitigations and of the safety objectives.” The following 10 steps explain the process of obtaining the SORA approval.

1. Concept of Operations (ConOps): Presenting an organization's system and operations to relevant authorities for approval.
2. Intrinsic Ground Risk Class (GRC): Determining inherent ground risk based on factors like the presence of people or buildings.
3. Final Ground Risk Class (GRC): Assessing ground risk after implementing mitigations to address potential hazards.
4. Initial Air Risk Class (ARC): Evaluating air risk factors before each operation, such as airspace congestion or weather conditions.
5. Strategic Air Risk Mitigations: Applying pre-flight measures to mitigate air risk, like ensuring drones are weather-resistant.
6. Tactical Air Risk Mitigations: Implementing in-flight measures, such as automatic hover or return-home programming.
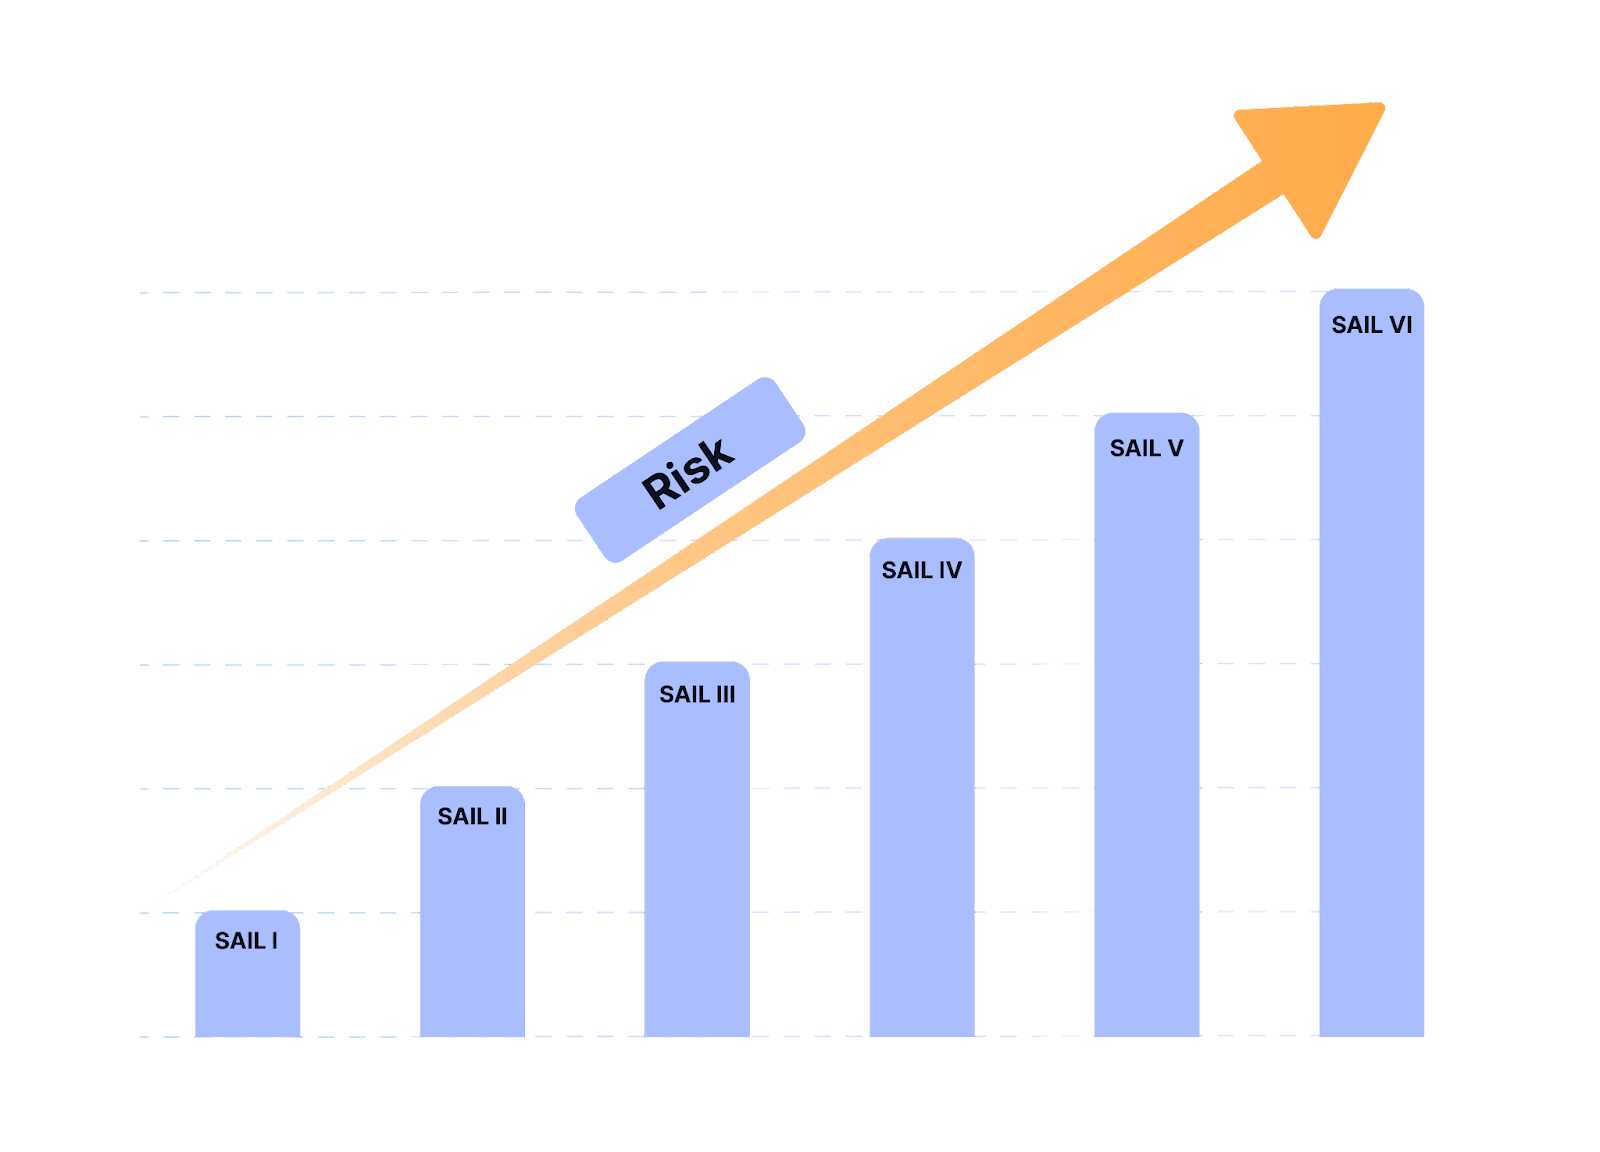
7. Final Specific Assurance and Integrity Level (SAIL): Determining the overall safety level by combining ground and air risk assessments.
8. Operational Safety Objectives (OSOs): Identifying specific safety objectives based on the organization's SAIL.
9. Adjacent Area and Airspace Considerations: Developing strategies to mitigate risks of encroachment on nearby airspace or ground areas during operations.
10. Comprehensive Safety Portfolio: Compiling all assessment results into detailed safety documentation.
SORA categorizes the risk of an operation into six levels, denoted as SAIL levels, ranging from I to VI. This classification is derived from a comprehensive evaluation that combines both Ground Risk and Air Risk factors. Each SAIL level corresponds to specific requirements that operators must adhere to, meticulously tailored to mitigate the identified risks inherent to the operation. By employing SORA, operators can effectively evaluate and manage the risk landscape associated with their drone operations, ensuring safety and regulatory compliance across the board.
SAIL II operations with DJI Dock and FlytBase
DJI Dock operations can be conducted for SAIL II levels, for which it is essential to achieve a Ground Risk level of 3. It depends on factors like drone and dock size, as well as population density. Currently, the Matrice 30, coupled with the DJI Dock can be easily flown Beyond Visual Line of Sight over a sparsely populated area, while the smaller drone Matrice 3D coupled with the recently released, Dock 2 can potentially fly over a populated area.
However, Ground Risk mitigation, such as parachutes should be integrated to lower the Ground Risk down to a level of 3. Additionally, a Flight Termination System (FTS) is a crucial element to be considered, which might be required to operate the drones close to adjacent areas with a particularly higher level of risk.
EASA's SAIL III compliance, issued on December 18, 2023, provides comprehensive guidance regarding Flight Termination Systems (FTS) in drone operations. It says that drones must be protected from human errors, particularly in situations leading to a loss of control. These situations encompass various scenarios such as crashes with ground, infrastructure, or people.
The compliance emphasizes preventing pilots from selecting parameters that could directly result in a loss of control, including actions such as selecting non-active communication links, deactivating safety functions necessary for operation, and activating flight termination systems during normal operations.
The compliance emphasizes preventing pilots from selecting parameters that could directly result in a loss of control, including actions such as selecting non-active communication links, deactivating safety functions necessary for operation, and activating flight termination systems during normal operations.
FlytBase offers an enterprise-grade drone autonomy platform for streamlined aerial data collection enabling automated BVLOS flights using docking stations. Users can establish custom Geofences and manage No Fly Zones (NFZs) to ensure safety and compliance with regulations. The platform integrates advanced technologies like Detect and Avoid (DAA) systems and ADS-B for airspace awareness, alongside onboard connectivity options and parachute recovery systems. Also, one can access detailed flight logs with automatic PDF reports for safety demonstration and regulatory compliance.
Conclusion and way ahead
In conclusion, the EU drone regulations provide a comprehensive framework to ensure the safe and responsible use of uncrewed aircraft systems. From the Open to the Specific category, each level is tailored to the associated risk, fostering innovation while prioritizing safety.
Looking ahead, recent updates from EASA bring promising changes. SAIL 3 operations, previously requiring a design verification report, now become more accessible. Manufacturers can declare compliance through means of compliance (MoCs), providing a pathway to broader Beyond Visual Line of Sight (BVLOS) operations without the need for extensive verification processes.
Large-load agricultural spraying drones have been needed by more and more people.
They can greatly shorten pesticide spraying time. Large-flow atomized spraying ensures the spraying effect of drones.
One-click take-off is safe and labor-saving.
Hereby share a new launched agricultural drone which requires buyers to assemble themselves.
https://youtu.be/VD9hTINikWs?si=G1MLqvAY4UdhoO3w
Embarking on the thrilling adventure of FPV (First-Person View) drone flying is a journey of skill, precision, and aerial exploration. For both novices eager to take their first flight and experienced pilots looking to refine their maneuvers, FPV drone simulators offer a risk-free and immersive platform to practice and perfect flying techniques. This comprehensive guide shines a spotlight on the diverse world of FPV drone simulators, helping you navigate through the options to find the simulator that best matches your flying dreams and proficiency level. In the real fpv drone, you can use meps 2806.5 , meps 2408, meps 1804.
Leading FPV Drone Simulators Breakdown
- Beginner-Friendly Choice: DRL Simulator
- Racing Purists and Users with Legacy Systems: VelociDrone
- For Lovers of Freestyle and Cinematic Flights: Tryp FPV
- A Well-Rounded Pick for Various Styles: Liftoff
- Tiny Whoop Enthusiasts' Go-To: Tiny Whoop GO
- Best Free and Mobile Option (Android): SkyDive
Delve into the specifics of these simulators to identify your ideal partner in FPV flight training.
Understanding FPV Drone Simulators
FPV drone simulators serve as virtual gateways to the world of drone piloting, offering a realistic and engaging experience of flying drones from a first-person perspective no matter what kv you use such as 11000KV brushless motor, 4600KV burshless motor. Far from being mere games, these simulators are sophisticated training environments that mimic the physics and dynamics of real-world drone flight. They provide a safe and controlled setting for pilots to enhance their flying abilities, without the concerns of weather or the potential for costly accidents.
Embarking on Your Simulator Journey
To truly benefit from an FPV simulator, using a radio controller that mirrors real-world drone controls is crucial. This approach ensures skill development that translates directly to actual drone flying, thanks to muscle memory. The simulators highlighted in this guide support most radio controllers with USB connectivity, ensuring a smooth transition to the virtual skies.
If your controller lacks USB support, don't worry—there are solutions involving a flight controller and receiver to bridge this connectivity gap.
The Convenience of Steam
Steam is the primary distribution platform for accessing a wide array of FPV drone simulators. It provides a user-friendly interface for purchasing, playing, and updating your simulation software. Steam’s consumer-friendly return policy also allows you to explore different simulators risk-free, ensuring you find the perfect match for your needs.
Exploring Each Simulator in Detail
Tryp FPV
New to the scene but making waves with its stunning graphics and expansive environments, Tryp FPV appeals to pilots with powerful gaming setups looking for a visually immersive flying experience. Although it may not offer the most comprehensive training tools, its customization options and variety of maps make it a paradise for freestyle and cinematic drone pilots.
Uncrashed
Uncrashed stands out for its exceptional visual fidelity, offering an immersive and smooth flying experience that sets a new standard in aesthetics. While its focus on freestyle over racing might not cater to everyone, its engaging maps and activities promise a rewarding flying adventure.
Liftoff
Striking a balance between features, accessibility, and price, Liftoff caters to a broad spectrum of pilots, from beginners to experts. It may not specialize in any particular niche, but its comprehensive suite of features and strong community support position it as a highly versatile and appealing choice.
VelociDrone
Dedicated to the racing community, VelociDrone excels in delivering realistic flight physics and a competitive racing experience. Its efficient performance on older computers and a vibrant multiplayer community make it a favorite among racers and those looking to push their limits.
The DRL Simulator
With a robust set of features at an accessible price, the DRL Simulator is tailored to a wide audience, offering something for everyone. From comprehensive training modules to competitive multiplayer racing and the chance to participate in real-world DRL competitions, it presents a full-fledged FPV flying experience.
Concluding Thoughts
FPV drone simulators are invaluable assets for drone pilots, offering a practical and enjoyable means to refine flying skills in a risk-free environment. By selecting a simulator that aligns with your flying goals and preferences, you can significantly enrich your FPV journey. Here's to soaring to new heights in your FPV piloting adventure!