All Posts (11086)

Sort by

SurVoyeur mk-II - From the Nampilot..

        Here is the latest addition to our Namibian stable

                            - SurVoyeur mk-II.

3689541667?profile=original

2.7m wing span, Tapered Clark Z

Fitted with IR gimballed camera ( FLIR TAU-2 in own gimbal, around 700grams)

4 Cell Lipo, 10,000m mAH, 500KV motor, 15X12 prop

approx 70minutes flight time at 5kg @ 18m/s airspeed, 92minutes @ 14m/s.

Fully Auto-launch / Auto land, fitted with Nampilot Autopilot

Fully Composite, Carbon Spread Tow wings, with flaps and ailerons.

landing touchdown airspeed 8m/s @ 10deg angle of attack.

3689541734?profile=original

3689541813?profile=original

3689541684?profile=original

You May Remember the mk-I plane--

3689464725?profile=original

Similar to mk-II, but 1.8m wingspan, straight wings, no flaps. See my old blog on the SurVoyeur A/C...

Mk-II wings were made from molds, made from accurate wing plugs. Fuselage is also made from molds.Flies like a dream!

Currently in use by the Namibian Ministry in Night missions in an anti-poaching role in the national parks.

Joe,

The Nampilot.

Read more…

FPV equipment:


Camera “Xtreme HD”

MinimOSD

ImmersionRC 600mW 5.8 GHz

2 Spironets Antennas

ATTITUDE SD V5 - FATSHARK VIDEO GLASSES

Gimbal Servo ALIGN DS410M

Finally I got around installing the FPV gear to my T-Rex600.

I kept it simple, the self-made tilt gimbal is servo driven and suspended by a number of ear plugs. The result is acceptable, very little jelly.

The video shows one of my first FPV flights at a nice New Zealand beach. It felt really weird to fly that heli just with the few through the camera.  I didn’t use the head tracker yet, one step at the time.

Some movements are still a bit uncoordinated at times, but along the beach it was easy to navigate and the heli reached speeds up to 75km/h at an altitude of about 50m.

It was gusty at times; you can easily see the “pine pollen dust cloud” drifting along over the forest and the beach (at 4:30 in the video). At the end everything was covered in a yellowish dust.

I also connected the head tracker via the DX8 Trainer plug, and it works. The only drawback was, you need to hold the Trainer-Button down, and so you would need a third hand. To overcome this inconvenience, I drilled a 1.5mm hole through the housing and the button while pressed.

Now I just press the button and insert a pin in to the hole to keep the button down by it selves, simple. But don’t forget to realise the Trainer-Button before switching on the DX8, otherwise you end up in the binding mode.


In the pictures you see the modified Trainer-Button and the DX8 setup.

I selected only Aux3 as slave for tilt only, if you have pan as well, you need to select Aux2 for example also.

3689541659?profile=original3689541759?profile=original

I still fly ArduCopter 2.9,  the next thing on my list is to upgrade to 3.0.1 first the 450 for testing and then the 600.

Read more…

IR photos with the Boscam HD19, part 1

IR_after.jpg

On my multicopter, I have a Boscam HD19 camera. This camera was explicitely developed for use on UAVs and has some interesting functions, like live video out, full HD recording and taking photos. The recording functions can also be controlled via the UAV's remote control, which makes it especially useful. The stock lens is very wide-angeled and - in my opinion - not of excessively good quality. Fortunately, the HD19 uses a standard 12x0,5mm thread for lenses and good but cheap lenses in various angles are available from the internet.

As of all digital cameras, the sensor of the HD 19 is also sensitive to infrared light. However, the HD19's stock lens has an IR-cut filter because IR light is very prominent in the light spectrum and would otherwise cause the picture's colors to be distorted.

So, to get infrared light, we either have to remove the IR-cut filter from the stock lens or get a lens without filter. As I didn't like the wide angle of the stock lens and I had some problems with unsharp edges, I decided to buy a 6mm lens on eBay for about 6€ incl. shipping. It is noticeable that the HD19 has a 1/2.5" sensor. Most cheap CCD and CMOS cameraswith M12 lenses have 1/3" or 1/4" lenses which leads to a small tunnel effect on photos with the HD19. Thus, only lenses for 1/2.5" sensors should be used. Those lenses are also often called "HD" or "3 Megapixel / 3MP lenses".

thumb IR beforeAfter replacing the lens, the images look like the one to the right (click picture to enlarge). Colors don't seem to match, especially colors of plants, and the whole picture is tinted red/pink. That is pretty much how it is supposed to look like. The automatic white balance function of digital cameras is calibrated for the visible light spectrum only. IR light throws it off very much and generally, the IR part is very strong on the general spectrum. IR light has a longer wavelength and thus penetrates e.g. fog or clouds much better. This photo was taken at 9 in the evening on a cloudy day, but it's still very bright. As for the plants, the foliage of a living plant reflects IR light very well. That's why plants appear very bright in an IR picture. IR reflectivity is also a good indicator of a plant's health.

thumb IR autowhitebalBut of course, we don't want all pink pictures, hence we have to do a bit of postprocessing. I use GIMP for postprocessing of photos. The necessary functions are also available in other programs, like Adobe Photoshop. The easiest way to get reasonably good pictures is to use the automatic white balance function of GIMP (menu Colors -> Auto -> White Balance). This already gives a nice result but it's still very pinkish (see left, click to enlarge). To get better results, we still have to do some corrections and those are best done with color curves (menu Colors -> Curves). Select the Red channel and try to lower the level around 100-120 a bit.

thumb IR afterAfter correcting the Red channel and a tiny little bit also Green and Blue channels, the result is pretty ok (see right, click to enlarge). During the postprocessing, we lose a bit of dynamic range (compare e.g. the door of the black car left of the image's center), but the normal colors are almost totally correct now. Vegetation still is a bit pinkish but that is not easy to correct without losing a big amount of dynamic range and contrast in the process.

To make things easier, I have written a small Scheme script for GIMP which does the correction automatically. You can find it from my download area.

Part 2 will cover postprocessing of images which were taken with an IR-passthrough filter.

Original article URL: http://stefan.gofferje.net/news-blogs/uav/170-ir-photos-with-the-boscam-hd19-part-1

Read more…
3D Robotics

Google Glass-controlled AR.Drone

3689541275?profile=originalFrom Hackaday:

For some reason this project makes us think of the Dog Pog Grid from Neal Stephenson’s Diamond Age. It’s not that there’s a ton of drones floating around this guy, it’s that he’s got one which looks like it’s his bodyguard and is controlled by the Google Glass he wears on his head. The future is now!

We find the metamorphosis of this project interesting as well. It started as a Leap motion controlled rover project. We saw a similar hack just the other day that paired a Leap Motion with a Hexapod. But [Blaine] wasn’t satisfied with that. Having had a taste for alternate control inputs he dug in and got to work making Google Glass the control interface. But the problem with moving your head to control a rover is that you can’t actually see it because looking down would cause unwanted motion. His solution was to transition to a quadcopter, which will hover at eye level when he’s looking right at it. Glass is sending raw sensor data to a server, which does the translation to control commands for the quadcopter.

Read more…

184cm supercopter with heli-blades

I have seen this video already a while ago but now, Infinity Hobby has it in their product news. Apparently, some company is making propeller hubs to use heli blades with multirotors.

130809boss_03.jpg

That allows using of ridiculously big propellers, leading to very efficient setups. Additionally, heli blades are dirt cheap, compared to multirotor blades and with the adjustable pitch (!), there's even no searching for pusher-props any more.

Can't wait until this is actually available!

Read more…
3D Robotics

3689541304?profile=original

A great report on the 2013 IARC from Gizmag. Some of the competitors were using APM, such as this team from Mercer University.

Some of the most advanced work in autonomous aerial robotics is not done by DARPA, or by massive corporations. Rather, it is accomplished by teams of university students who participate in the International Aerial Robotics Competition (IARC). For the past 23 years, the IARC has challenged college teams with missions requiring complex autonomous robotic behaviors that are often beyond the capabilities of even the most sophisticated military robots. This year's competition, which was held in China and the United States over the past week, saw the team from Tsinghua University in Beijing successfully complete the current mission – an elaborate espionage operation known as Mission Six.\

First proposed in 2010, the Mission Six scenario is that an enemy has plans for taking control of the Eurasian banking system, a move that could throw the entire world into chaos. This plan is contained in a USB flash drive located in a remote security office of the enemy's intelligence organization.

The IARC Mission Six orders (Photo: AUVSI Foundation)

The target building has a broken window on the same floor as the security office. This building measures roughly 15 x 30 meters, and is equipped with laser intrusion detectors, floor sensors, video surveillance, and periodic patrols. Mission Six calls for covertly capturing the flash drive, and replacing it with another of the same make to postpone discovery of the theft. Recognizing signs directing visitors to the security office is a part of the challenge. The mission must be carried out within ten minutes to avoid security patrols.

The vehicles are required to be completely autonomous, with no external commands accepted during the mission. The vehicles can be of any type (as long as they fly), must weigh less than 1.5 kg (3.3 lb), and be no more than 1 meter (3.28 ft) in the largest dimension. Most competing teams chose to base their vehicles on quadrotor designs. However, some chose other designs, including birotor and more unusual designs, such as the entry below from Pima Community College in Arizona that includes a balloon above a set of rotors to increase stability.

A jellyfish UAV configuration was introduced by the team from Pima Community College in Ar...

All vehicles must contain their own power supplies. The vehicle is required to sense its immediate surroundings, and decide on its own actions, but need not contain its control computer – it can instead be linked to an external computer by radio. While external navigation aids are allowed, GPS locating is not.

That's quite a challenge to say the least, and the Michigan Autonomous Aerial Vehicles team, which is associated with the University of Michigan, had been touted as the most likely entry at the American venue to succeed with Mission Six. Unfortunately, they encountered a perfect storm of equipment malfunctions, and were unable to complete the mission.

An artist's conception of the enemy facility to be burgled during the 2013 IARC (Photo: AU...

The remarkable performance of the Tsinghua University entry in completing Mission Six can be seen in the video below.

Read more…

RTK-Lib ported to Android

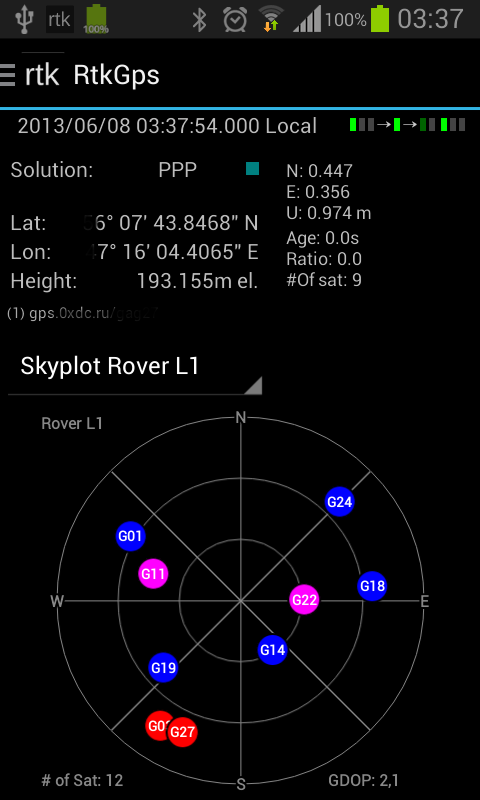
JTa-5kqoT3Q2IiViim_MWrMXpSPBMb-eGh42jO-37wv3N2taZKRo1v6F7a9EewxIuYc=h900

There has been some talk here before about the RTK-Lib project, which allows much greater GPS positional accuracy. Now someone has ported RTK-Lib the Android and it's in the Google PlayStore for free:
https://play.google.com/store/apps/details?id=ru0xdc.rtkgps


So apart from an Android device (or Android-x86 image) you need a raw capable GPS (Skytraq S1315F-RAW or something fancier) with decent antenna and a correction feed (or second GPS)... and volia cm level accuracy for your robotics projects.

Don't know for certain whether this can run headless once configured.

There's also a 'report GGA to base' function, which might allow the computation to be done in 'moving base' mode and then the solution's position relayed to the rover.... if you don't want to put extra processing on the drone.

Enjoy, Simon

Read more…
Moderator

In the video I tested Loiter mode

Tested normal manual flight, alt hold, loiter and land - all Works fine

Alt hold and Loiter was impressive

In this test I used PPMSUM from my RX module

3689541205?profile=original
The CTX4 quad used in the test

3689541114?profile=original
T-motor 10" prop used. The motor Mounts/tube clamps have rubber rings to help reduce vibrations form the motors.

3689541139?profile=original
TheVR Brain Controller is separated/vibration isolated from the frame using rubber Mounts (like the ones used on many camera gimbals, but smaller and softer) + soft pads

The motors are iPower MultiMate 2012 1000kv.
When using 4000mAh 3cell LiPo I get 12-14 min before the VR Brain LiPo alarm starts.

I plan to make one more frame CTX4L (large) - that have larger motors and can use up to 12" props. Have ordered the New VR Brain 4.5 + IMU to use on this one.
On that frame I´m going to Mount my VR Gimbal Controller and GoPro gimbal.

Original blog post :

http://www.virtualrobotix.com/profiles/blogs/testing-3-0-4-code-built-using-eclipse-06-aug-13-on-my-ctx4-quad

Read more…

Octocopter - basic to start

3689540726?profile=original

3689540819?profile=original

Have been building up a basic octocopter (already have other quads) based on cost looking to eventually go to a nice frame.

Whilst the Hobby King frame is nasty and cheap it is a start and for under $40 it seems OK (yes it has its problems)

My intention is to figure out best prop motor configuration for longer flights, etc.

Hobby King Octocopter frame - landing gear is woeful!!!

Turnigy 35-36 910kV propdrive motors with prop drive adaptors

12x4.5 props - at present

30 Amp Turnigy plush ESCs (wiring needs tidying)

2 x 3300 Turnigy 4S batteries in parallel

HK antivibration foam (orange) under a range video mount with APM 2.5 on top

Waiting for external compass and to mount GPS at present

Turnigy 9XR radio, FRSky module and receiver

3DR radio link


Intention is to put my brushless gimbal with Sony NEX5 on it for some video just for fun.

Have not done a compassmot or compass calibration to date but did actually fire her up and see what happens.

Jumps in the air alot more aggressively than the quad and the noise is a bit frightening, response to throttle was a bit more sensitive than expected. Was really stable in windy conditions during initial tests. Remarkably more stable than smaller quads I am used to.

Have not looked at tuning so far as only preliminary tests on stabilise.

Anyone looking to do the same thing happy to share experience or any advice or considerations are welcome.

Cheers 

Brian

Read more…

APM 2.5 available from DealExtreme

sku_234619_1.jpgDuring my daily browsing session through the new products on DealExtreme I found that they are selling the APM 2.5 for US$ 75 including shipping.

No sign of a 3DR or other logo and also no mention of open source or open hardware. The price is about half of what they cost from the 3DR store. Wondering about quality, but since I already have one I am sure someone else is going to find out.

Read more…
Developer

External Compass for APM2.5+, APM2.6

jD-HMCv2_0_APM26_Cable.jpg?width=400

Custom made APM2.5+, APM2.6 specific external compass module


We made easy to use external compass module for APM2.X Flight controllers. If you need to have external compass and you don't want to change your GPSes yet. Here is your best and easiest choice for it.

This module fits directly to your APM2.X boards. If you have APM2.5 board, just disconnect internal compass by disconnecting jumper and add this board. 

As board is a standalone board, you can mount it easily places that have least of magnetic interference. 

Board comes with connecting cable and it fits directly to external I2C port on APM2.X boards.

jD_APM26_With_Compass.jpg?width=400

Orientation:

If you put components down, connector forward it is same as in 3DR GPS (Manual: Roll 180)

if you put components up, connector forward it is same as standard APM (Manual: None)

Get your from jDrones store: http://store.jdrones.com/APM2_6_Compass_p/jdmagneto02.htm

Price 14.99 USD

Regards,

Jani

Read more…

How I got from 148% to 4% on compassmot

3689540693?profile=originalOk, many have followed my tribulations with 3.0.x and its compassmot requirement. My previously smooth flying quad had suddenly become almost unflyable. You can see my efforts to get a sensible compassmot reading in my previous post, but that was in vain - I still had toilet bowl issues, and all the auto modes were off limits.

So here is a summary of all the things I did once I got my external compass. Most will notice that it's the elevation/seperation that's had the most effect, but crucially, none of these involved airframe alteration. The only downside is my compass and GPS are no longer protected by the dome, and are very exposed if this flips....

Ok, the list.

1. Changed all my bolts to have the head at the top.

2. Moved all my components to put as much space between them as possible

3. Twisted my ESC power cables, and resoldered onto a new PDB.

4. External pylons were used for camera, GPS/compass, Video TX and ezOSD. quadframe.com frames only.

5. Some electronic components were moved underneath. eg light controller, ez Current sensor, BEC, 3DR PM.

6. *** I USED A DJI GPS ELEVATOR. I have selected the lowest pole which is about 7cm in height. I was going to test the others (12cm and 16cm respectively), but at 4%, I suspect my gains will be minimal! ***
(http://www.goodluckbuy.com/bracket-holder-set-for-dji-wkm-gps-autopilot-system.html)

7. *** I removed the foam padding on the legs! This prevented z-axis movement throwing off the results ***

8. The alexmos and RCtimer gimbal are now powered off the 3S circuit used for the APM/rx/gps, rather than it's own

9. Some risers replaced with nylon ones.

It should be noted that this was Throttle only; I'm on 6S for the main flight components, so no 3DR PM current sensing :(

Can't wait to go fly now...it's been so long! But it's raining!

Read more…

Hawaii Drone Article

3689540499?profile=original

Just wanted to share this article.

http://m.civilbeat.com/articles/2013/07/19/19508-drones-animal-blood-paris-hilton-and-monitoring-from-above/

I was contacted and asked some questions about drones. None of my answers were used. I guess the article could have been worse... But I just love how the general public assumes all drones are out to get them or that Predator UAVs don't have pilots in command of them...the list goes on.


There are some very legitimate privacy and safety issues of course...but a boyfriend using a uav to spy on his ex girlfriend?....arrrg.

It is just frustrating when UAVs have such great potential to do good, and many DIYdrones members are doing some incredible projects for the greater good, and then the news mostly reports on all of the far fetched negative aspects.

Anyways, I just wanted to share with the community and I hope future contacts with the media can really highlight all of the benefits of UAVs without succumbing to the "every drone is trying to spy on me" mentality. 

Read more…
Developer

FPV at (my) St. Xaviers School on my MultiWii quad


A short video I made using my MultiWii quad flying at my school today morning :) I'm 15, so any opinions are appreciated. Please watch in HD for best effect. Hope you enjoy!!!!!! Shot on a windy day,before a storm so I had fight with the controls a bit.


Setup :

  • DIY frame with alu arms (TBS Disco style)
  • Self-made Multiwii controller
  • MultiStar  30A Opto ESCs
  • 950kV Turnigy motors
  • 10x 4.5 props
  • 3S 4500mah LiPo
  • HackHD camera
  • 400mW 5.8Ghz FPV Tx
  • Turnigy 9x with monitor


Please give your opinions Cheesy I fried my APM 2.5 due to freak BEC failure hence my move towards MultiWii temporarily. If anyone has a spare APM, and is willing to help me out, please let me know. 

Read more…

Octo X8 Coaxial - testing motor redundancy

Testing the octo without 1 of the top motors and then 1 of them bottom motors to check what's happens if a prop/motor/esc gets bad during flight.

Previously I've done the same test with a flat hexacopter and an Y6 but they didn't performed very well.

With a flat octocopter, if it looses 1 motor/esc/prop it's barely affected. I was flying my octo and it lost a blade of a prop but I just noticed after I landed.

Read more…

The perfect UAS TX...

3689540477?profile=original

A few months ago, I started a project for an integrated groundstation. The idea was to combine Arduino, MAVLink, FrSky and a good TX system (Sky9x board) into an integrated system to control any kind of UxV. After making good progress, the project stalled because I'm waiting for documentation and samples from FrSky and after the FrSky Taranis and the Turnigy 9XR came out, both the Sky9X and the gruvin9x boards were discontinued.

Then came school for me and lots of stuff...

Recently I started hacking the external mode switch panel which I just posted about. After reading the comments and feedback on that, I started thinking again and decided to go back to the groundstation project. As I am now a little bit more clever - I know how to generate a PPM stream, which always was the biggest obstacle for me - I decided to start making everything - a real integrated system, based on an Arduino Mega.

Why Arduino? Well, I want the system to be easily hackable. The whole system will be easy to DIY. I will refrain from using special PCBs as much as possible. And of course, everything will be open source.

For the special "cool touch", I am also designing avionics-style panels. I even found a company in Spain which is interested in that project and will make those panels for a good price.

But of course, the most important part is functionality. Here are a few initial points.

  • Modular - as much as possible stuff will be put into modules to easily select what we want
  • Basic control goes via RC TX (JR style modules), simply because there's lots of robust solutions on the market - solutions which also have communication authority approvals!
  • No bells and whistles in the RC part. No expos, wild mixes, etc. The sticks are to tell the APM what to do and the APM does the stuff. There will be a very small number of RC functions, like a switch to put the elevator a few degrees up for hand-launch and similar
  • No touchscreens, no colorful LCDs, etc.! Why? Because those stuff is either not sunlight-readable or idiotically expensive. We will have some modules with 1 or 2 line STN displays, but that's it.
  • Panel will be designed close to avionics standards. The main goal is to keep it intuitive and to help people keep the overview. I might even adapt some mechanical (simulator) gauges or create some myself.

This being said, I kick the ball in the community's corner. What do YOU think would be a useful function / a useful module for the perfect UAS-TX? Please comment, but keep it realistic!

Read more…

APM performs well at demolition

This was the biggest test so far for my 'low vibration' quadcopter. The quarry was surrounded by professional film crews so it was with some trepidation that I took to the air in 15kts of gusty wind.

The intention was to 'park' the copter in the correct position and then concentrate on camera angle but for some reason the well tested loiter didn't hold position and got blown downwind. I suspect it was just the strength of the wind or possibly  the compass getting affected by the towers. There is some indication in the tlog of 30deg shift in compass at that moment. Anyway it was all flown in STAB.

I was using a gopro 3 black on a rctimer BG.

copter build is blogged HERE.

Read more…
Moderator

Skyhooks 1700 uav platform

The new small size UAS Skyhooks 1700 UAV 

It's made in strong white EPO foam just like most hobby models these days.

3689540506?profile=original

3689540450?profile=original

3689540528?profile=original

3689540550?profile=original

Wingspan: 1718mm
Body length: 1100mm
Wing Area: 45.5dm2

Empty Weight: 1050g
Material: EPO Foam design
0.2-0.3:1 Thrust to weight ratio.

Easy to assemble and disassemble.

Easy to transport.

This plane carrying 4s battery the take off weight is only 2.4KG if installing full line of FPV equipment take off weight is roughly 3KG.

When flown properly this plane can have more than one hour of flight time.

SKYhooks 1700 UAV

What you get:

3689540567?profile=original

3689540622?profile=original

3689540458?profile=original

3689540585?profile=original

3689540636?profile=original

3689540598?profile=original

3689540655?profile=original

Read more…