Global Synchronized Autonomy #1 is rapidly approaching and with it, the need to safely manage the flight of multiple autonomous aircraft. Over the past few months, I've been fine tuning a distributed, browser based, UAV control system that I call the Flying Robot Commander, FRC for short. The FRC integrates with PaparazziUAV via the PPRZLink messaging interface and gives me the ability to safely manage multiple autonomous aircraft. Sometimes I remember to setup a tripod and capture a bit of the development process. Case in point, here's a short video clip of a pre-flight system test that I conducted yesterday. Pretty pleased with how well the system works and how easily I can create a diverse set of interfaces for managing the aircraft in a safe manner. Enjoy the video and remember to take part in GSA #1. Plans for GSA #2 are already in the works. Upward and onward.
All Posts (11086)
Sort by
The Exo360 brings together the latest in drone and VR technology for the ultimate immersive experience. With 5 integrated 4K cameras, the Exo360 offers an uninterrupted 360 video for use with your VR headsets. The footage can be viewed in real-time or uploaded to YouTube or Facebook360 upon landing.
The drone can capture video in both linear and spherical modes, and 16MP images. With the use of our 360 video capture you will never need a gimbal again!
To learn more please go to Queen B Robotics
Sky light: Dynamic set lighting from virtually any angle. Just pop it up and hover, or use Solo’s smart technology to track with your subject. The light plugs into Solo's accessory bay, so you can even use it at the same time you use your gimbaled GoPro.....
Now that's Ground Breaking Innovation.
What originally started as a hobby project can now be downloaded for iOS and Android: Our App DroneVR turns an iOS or Android phone into a virtual reality headset for flying drones in FPV cockpit perspective.
Currently the app works with DJI drones such as the Phantom 2 Vision+, the Phantom 3 series, the Phantom 4 and the Inspire 1. With a high resolution phone the app achieves better video quality than expensive dedicated headsets. It is also possible to control the position of the drone's camera via head-tracking.
DroneVR can be downloaded via the Apple AppStore or Google Play.

Looking at the submissions, you will see a nice blend of concepts ranging from pure aircraft design to more user and application focused proposals. You can actually be a part of the selection process by going to the LM platform between June 6th and 16th to vote for your favorite concept!
Here a few of my favorite, non-derivative, original submissions:
Starting with a friendly, approachable, multi-purpose Cargo Drone, POD
look, it even has a pair of cute eyes!


This Crazy, most-probably-invalid-but-still-elegant, Design

Andromeda (disclaimer: totally not a spy drone!)

And finally Airbus Engineers' dream design :) it does remind me of a boring but functional chameleon!
I bet 50K, of my currency of choice, this last one or its equally German sibling is going to win the grand prize :) Let's see! It must have been a fun journey for all the participants and organizers.
P.S.: feel free to build a prototype of any of these designs or others on the challenge page, LM has a very community friendly license for this purpose as long as you don't use the designs commercially.
It's customary and traditional that we celebrate the addition of every 1,000 new members here and share the traffic stats. This time it's a 78,000!
Despite the site being on-and-off down for nearly a week this month as you can see on the right side of the traffic graph above (the fault of Ning, our hosting provider -- you can see the sorry story of their tech issues here), we still had more than a million page views this month. We're eventually going to have to shift off Ning, but hopefully their downtime issues at least are over.
Thanks as always to all the community members who make this growth possible, and especially to the administrators and moderators who approve new members, blog posts and otherwise respond to questions and keep the website running smoothly.
This is an example of risk based planning for a flight across a city in the PX4 SITL. The drone avoids flying too close to buildings or through confined spaces where it might loose GPS reception. PX4's Vilhjálmur Vilhjálmsson is working on bringing this to outdoor flights this summer.
Hello dear readers. I have for many years engaged in unmanned aerial vehicles. In my experience, at the moment, the most urgent type of this helicopter type aircraft.
Pros, very compact size, a little preparation for the flight. The ability to safely take-off and landing into the wind 15 m / s, we have tested up to 20 m / s. Long flight.
I want to share his legacy operating time. Our helicopter that we cease to supply the market, capable in the air up to 5 hours of time when it will be safe in his remaining fuel about 10 percent. About him, and will be discussed in this article.
At the moment, we are building two different helicopter, the first ability to be in the air for about 8-12 hours. The mass does not exceed 30 killogram. A payload weight can be up to 5 kg. The second helicopter is capable of carrying a payload of 20 kg and thus is in the air for about 10 hours.
To build even bigger helicopter does not make sense. Simply convert already have helicopters on the market. We are now retooling helicopter Robinson R22 in the unmanned helicopter for use in agriculture, namely in the pollination of fields.
Now back to our old helicopter.
Its characteristics are familiar to you. Takeoff weight reaches 20kg. The blades on it is used every 850 mm with a s-shaped profile. The engine uses a two-stroke gasoline working volume of about 30 ccm. The basis was taken well-known Zenoah engine, but it had to be good to recycle. Power of the engine is performed via injection. That gives us the opportunity to save up to 30 percent of the fuel in contrast to the carburetor.
Cruise speed - 25m/s Max speed - 36m/s. Max flying distance - 500km The service interval - 500 hours(100hrs check).
On board as well is installed the generator, around 150 watts, this is enough for most payloads. The control system is fully automatic. We do not use a hobby consoles for takeoff and landing. Our control system can continue to fly without GPS signal, using a complexed inertial system. With this, we use conventional MEMS sensors. All plugs used on board the aircraft are, all are water proof housing.
Payload which we use as a rule of its own production. It is based on ready-made photo and video modules. From Sony, Flir and other manufacturers. Can be installed on PC board for video processing. You will have features such as automatic acquisition and tracking (machines, people, animals).
Our company sells both finished products and develops and sells aircraft for customers with all the documentation for their production.
If you have any questions, please contact me by e-mail - cv@uavos.com
Greetings to the DIY Drones community!
My name is Adam Morrison, and I'm one of the co-founders of DroneRafts LLC. I wanted to introduce you all to our new and exciting product called WaterStrider. Since the early fall of last year, our team has been totally dedicated to developing and bringing to market an accessory for drones that allows effortless takeoffs and landings anywhere you want to go with your drone. This includes water, sand, snow, mud, deep grass, sloped surfaces and many other situations where you might find yourself.
As we immersed ourselves over the past few years in the industry, there are several operational issues that we've struggled with and that other drone owners we have interviewed have also struggled with. Many of these issues revolve around easing takeoffs and landings in areas that are absolutely beautiful for filming and photos but are not very friendly for takeoffs and landings. Operating in these situations frequently result in expensive camera damage or at least the inconvenience and expense of tip-overs and propeller breakage. On top of all of this, the frequency of people losing their drones in water while filming above and around water is truly staggering. Then there is the dangerous practice of hand launching and catching, which seems just fine until there is an inevitable mistake.
So, we set out to solve these problems with a fully engineered, lightweight and durable product that has a minimal impact to the actual job of taking aerial photos and video. We believe that the WaterStrider provides an awesome, balanced approach to solving these problems while providing massive added stability and protection to the drone and camera.
Current Status
We have already started low rate production of the WaterStrider. The product design and testing as well as our manufacturing and production processes are all worked out and validated. Our team is really experienced in product development, supply chain, and manufacturing. We didn't 'go live' with this product until we knew everything was ready.
We're currently running a Kickstarter campaign currently to raise the additional funds necessary for the more durable tooling needed for full-rate production. With a successful campaign, deliveries of WaterStrider will start next month (June 2016). You can learn a lot more about the product and our experienced team by reviewing the full campaign page and video at the following link.
WaterStrider: Perfect Footage. Confident Landings. Anywhere.
Our Kickstarter campaign ends on May 30th. It is our intent to deliver WaterStrider to all backers of the campaign before starting deliveries through other channels. It will take through at least July to complete these deliveries depending on the number of backers at the end of the campaign. This is the quickest way to get the product in your hands and onto your drone this summer.
Two weeks ago, we also did a public debut with four WaterStriders at AUVSI XPONENTIAL in New Orleans. This is one of the largest drone and UAS conferences in the world and thousands of people attend. We were able to get the WaterStrider into the hands of real drone users (other than ourselves) and demonstrate the product flying and landing on gravel and sloped surfaces in the demonstration area. The overall response to the product was fantastic. Here is a quick video compilation from the show.
A Few Common Questions
Our website and the Kickstarter page already address a number of common questions, but I'll post just a couple of the most common ones here.
What Drone Models Does It Work With?
Presently, we're fully validated on the DJI Phantom 3 (all variants) and the DJI Phantom 4. We'll be working other models as we see demand, so please let us know what other models you'd like to see.
Flight Time Reduction
In an indoor, side-by-side test we see approximately 30% reduction in flight time. We know how to make this impact less, but it requires a trade-off on the incredible durability and performance of the current product. We believe we've found a really nice balance of protection/durability, effortless takeoffs and landings, and flight time/handling.
With all of this said, in real-life flying situations we've found that in some cases we can increase our useful filming time by landing some distance away to 'rest' and save batteries (instead of hovering) while waiting for the situation to be perfect for filming. This can even be done on water! For example, with the stock drone we would never consider landing 200 yards away where you can't see the landing surface close-up, but its a regular occurrence in our flying with WaterStrider. In addition, we spend less time thinking about and setting up takeoffs and landings. You just set it on the ground or in the water and take off. When you want to land, you just land. This all saves a lot of time finding a landing spot or dragging out a landing pad or flying back and forth for landings.
Stability in Wind
We've recently posted a video on YouTube and our Kickstarter page showing operations with WaterStrider on the Phantom 3 and Phantom 4 in winds gusting to 31 mph. We recommend a wind limitation of 17-23 mph for the Phantom 3 and 23-28 mph for the more powerful Phantom 4. Check out the video!
How do I Know it Will Work?
We're confident that the WaterStrider will do what it was designed to do. To alleviate any concerns about this (we totally understand that we're a new product and company), we've included a guarantee to our Kickstarter campaign backers. If you're not happy with the product, return it to us within 30 days and we'll refund your pledge.
We're working hard to get the word out about the WaterStrider. DIY Drones is an amazing venue with wonderful content from experienced drone pilots. We're excited to be introducing the product to you!
Finally, we're happy to answer any questions and dialog with you on this thread about the product. I understand that this post may not have answered all of your questions. Check out the Kickstarter video and page and then post any questions or comments you have here. And if you're excited about the product, let us know that as well and please consider backing the campaign.
Sincerely and respectfully,
Adam Morrison
Co-Founder; Head of Engineering & Technology
DroneRafts LLC
Kickstarter Campaign Page
DroneRafts Web Site
DroneRafts YouTube Channel
I am reporting how to stream Raspberry pi camera video to Tower video widget.
On the last weekend, I attended a drone meeting. I brought my IRIS which was given from my friend. It flew well and I was very satisfied with my first flight. In the meeting, other people brought their brand new drones like SOLO, Phantom, and Inspire. I had a chance to fly them and I felt something was missing in my old IRIS. It was FPV! I live in Japan and because of a regulation, we can't use a 5.8GHz video transmitter without a licence. Furthermore, SOLO costs twice as in USA. However, I noticed a video widget(small screen) in Android "Tower" app and it was said that it receive custom video streaming. In that article, the author used Ubuntu as the source. Since I had a raspberry pi 2 with pi camera, I had tried to use it as a FPV camera server. The followings are how to set up video streaming. I hope it will work with your environment.
1. Set up raspberry pi for streaming video
From the shell type the commands in the following post or clone a repo. to execute the srcript
Install gstreamer and enable hardware h264 encoding with gstreamer on the Raspberry Pi
2. Enable a camera module
Type
$ sudo raspi-config
From the menu, Select "Enable camera" and then select "Enable".
If you already did it. You can move to the next step.
3. Start streaming
$ raspivid -n -t 0 -w 640 -h 360 -fps 24 -b 6000000 -o - | gst-launch-1.0 -e -vvvv fdsrc ! h264parse ! rtph264pay pt=96 config-interval=5 ! udpsink host=192.168.3.11 port=9000
You should configure an address of the host and port. The address is the clients(an android tablet)' IP address. You can change port number. You can change the resolution of the video -w: wide -h: height. There are so many parameters to control the video format.
4. Show video on Tower widget
Please follow the instruction here.
You need to set the port number as same as the one specified above.
You only have video while connecting to your pixhawk.
Now you can watch a flight data and video footage on a same screen as the latest drones!
On Wifi network, latency was not unbearable. I hope to install a raspi on my IRIS soon.
In a future, I would like to use 4G/LTE network for telemetry and video streaming.
note: The current supply of the usb ports of a raspberry pi is limited. It is better to supply external power to wifi or 4G/LTE usb dongle or the system may hang up soon or later.
You may need to install rpicamsrc
Thanks!
Hey DIY-selfers!
NVIDIA Jetson TX1 is a system-on-module with impressive processing capabilities.
To get a glance of how powerful it is just take a look at the numbers in the description from NVIDIA:
“It's built around the revolutionary NVIDIA Maxwell™ architecture with 256 CUDA cores delivering over 1 TeraFLOPs of performance. 64-bit CPUs, 4K video encode and decode capabilities, and a camera interface capable of 1400 MPix/s make this the best system for embedded deep learning, computer vision, graphics, and GPU computing.”
Jetson TX1 makes a perfect companion computer for those who need to do heavy processing onboard such as video processing or image recognition. But to be used as a companion computer in a drone Jetson TX1 has to be connected to a carrier board. Unfortunately default carrier board for Jetson TX1 from the Developer Kit may be too big for a medium-sized drone. Thankfully there are other alternatives that are more suitable.
As many of diydrones members are already using it I hope this overview will be useful.
Let’s begin with the default carrier board as a starting point for comparison.
Nvidia Jetson TX1 Developer Kit
599$ with Jetson TX1 module ($299) and camera module included
https://www.nvidia.com/object/jetson-tx1-dev-kit.html
Default carrier board has most of the necessary interfaces on standard ports and the kit also includes a camera module. It’s quite big and heavy to fit into the medium-sized drone, but if you are just starting playing around with Jetson TX1 then the default carrier is the best to begin with since most of the documentation and examples in the internet are using it.
Astro Carrier by Connect Tech Inc.
~$489.00
http://www.connecttech.com/sub/products/ASG001.asp
One of the main features of this carrier is that it has 8 coax video inputs - this may be useful for projects that want to work with 360 degree vision. There’s no official price on the manufacturer’s website, but one of their dealers sells it for $489.
Elroy Carrier by Connect Tech Inc.
~$497.00
http://www.connecttech.com/sub/products/ASG002.asp
This carrier is close to the previous one but seems like it’s more hacker-oriented. It has no coax video inputs, only two CSI inputs which is one more than Astro. It also provides access to additional GPIOs and SPI. As with the previous board there’s no official price on the manufacturer’s website, but one of their dealers sells it for $497.
Orbitty Carrier by Connect Tech Inc.
$175
http://www.connecttech.com/sub/products/ASG003.asp
This is the cheapest carrier board available, but it still has most of the main interfaces like Ethernet, USB 3.0, HDMI etc. What it is lacking are the CSI video inputs, but for those using USB 3.0 cameras that should be no problem.
Auvidea J100
€199.00
http://www.auvidea.eu/index.php/2015-11-08-08-01-27/2016-02-03-12-30-02/j100-single-tx1-carrier-lite
Great and affordable board. It’s main features are: four CSI video inputs and two USB 3.0 ports which allows to connect a lot of digital camera sensors. Most interfaces including USB are routed to custom connectors, so you’ll need special cables for that.
Auvidea J120
€219.00
http://www.auvidea.eu/index.php/2015-11-08-08-01-27/2016-02-03-12-30-02/j120-super-mini-computer-with-tx1
J120 is my favorite here. It is little bit easier to use than its predecessor since it has standard Ethernet and USB ports. It also includes M2 slot for connection of SSDs and two CAN ports for connection of industrial equipment.
There’s also Auvidea J200 that is designed to carry two Jetson TX1 modules, but it is quite big so not included in the comparison.
Comparison chart
Here’s a simple comparison chart of the main features, hopefully it will be able to help to determine which board suits your needs better.
If you know any other compact carrier boards or think that something should be included in the comparison chart feel free to post in the comments section, I will be happy to add the info.
Cameras have become an integral part of autonomous drones, helping them navigate as well as providing some application specific insights like an object of interest. Detecting a desired object in the camera view allows the drone to take decisions like following the object or orbiting around it. Such capabilities are useful in several applications from photo/video shoots to surveys and search and rescue missions.
The previous article (Part 1) had glimpse of onboard object tracking module in FlytOS and this article will delve into details on the same. It uses relatively simple OpenCV based algorithms to detect and track an object in the field of view using attributes like color and shape for detection along with Kalman Filter for tracking. It also has support for ROS based OpenTLD library which needs to be separately installed. Along with tracking, there are APIs to make the drone follow the object being tracked. It uses a PD controller and currently assumes a downward looking camera.
FlytVision is an onboard sample web app which provides an interface for ground devices to access onboard video streams and is now extended to include object tracking and following. It also demonstrates how seamlessly onboard image processing fits in the overall framework and allows for data plumbing with ground devices.
First step is to stream the processed images from the object tracking module. Then select the Detect/Track mode in the app. Currently available modes:
Color: Uses HSV color, heuristics like change in distance and area of the object and Kalman Filter for tracking
Circle: Uses HSV color, Hough circle for circle detection and Kalman Filter for tracking
TLD: Uses ros_open_tld_3d library modified for integration with object tracking module
The object of interest can be selected on the video stream itself. Depending on the selected mode, corresponding attributes are detected and tracked in subsequent images. To follow the object, its distance from the image center is projected to ground and position setpoints are generated with a PD controller. The overall workflow:
The onboard modules and web app are first tested in simulation using FlytSim. While the parameters may need to be tuned again for real drone, simulation helps in validating the algorithm and overall functionality before the drone even takes off.
Several params have been exposed from the onboard object tracking module so that they can be tuned from the ground app for a given setup. These include HSV color ranges, Hough circle params, TLD params, controller gains and options to turn attitude compensation, tracking and follow modes On and Off.
Besides params, custom data sharing is required for indicating the region of interest as selected by a user in the video stream. This is achieved by publishing a new topic in the app and subscribing the same in the onboard object tracking module. Whenever a user selects a region by drawing a rectangle in the video stream, the corresponding coordinates are published in this topic.
The Inspect section in the app shows object centroid position, drone’s position and the setpoints being sent. These data streams are obtained by subscribing to them using FlytOS websocket APIs. The object tracking features can be accessed in your own custom app using the object tracking FlytAPIs.
In the demo video above we used a SJCam-4000 camera plugged into a FlytPOD and flew it on a hex-550 frame. The images are captured at 30 fps with 320 x 240 resolution. The onboard object tracking module ran at ~25 fps, had approx 75 % CPU core utilization and used color mode. The camera is rigidly attached to the frame without a gimbal. This requires the onboard attitude compensation for setpoint correction though the onboard video feed is still a bit shaky and smoother operation is possible with a gimbal.
We are exploring more capabilities to add like April tags recognition, gimbal control to keep object in the image center combined with follow and possibility of accelerated vision processing.
We are currently running FlytPOD Beta program. Sign up here - http://flytbase.com/flytpod/#beta
To learn more about the Flyt platform, please visit - www.flytbase.com
Documentation for developers - http://docs.flytbase.com
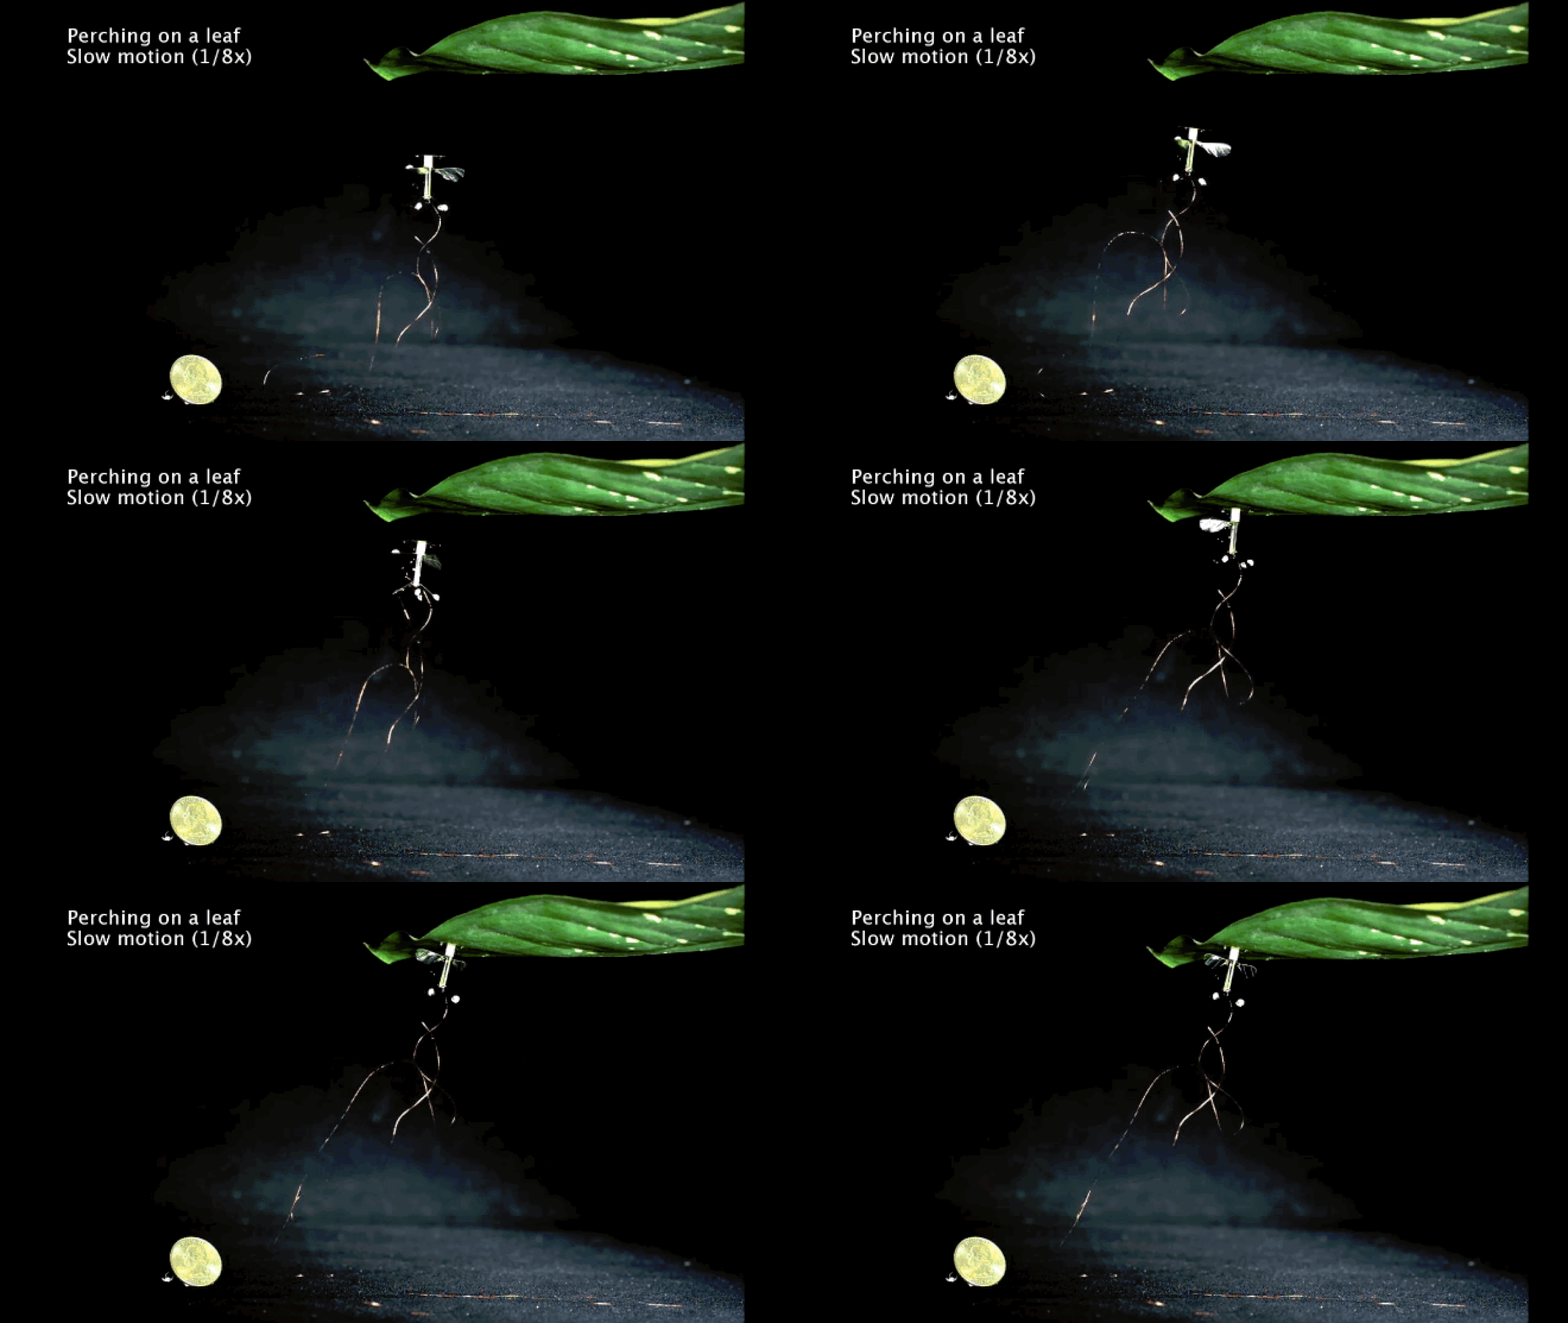 From The Verge:
In a study published in this week’s issue of Science, researchers say this new perching ability could be key to creating insect-sized aerial robots that can help with a long-term observational tasks — traffic
The mechanism was developed by researchers from MIT for the RoboBee: a tiny flying robot first unveiled in 2013. The RoboBee weighs just 0.08 grams (that’s 31 times lighter than a penny), and has a pair of tiny wings that can beat up to 120 times per second. Previously, the bot relied on miniature tripod on its base for landings — but that meant it could only set down on the top of flat surfaces. The new mechanism will instead let it fix onto the underside of pretty much any material, including leaves, glass, wood, and brick.
The electrostatic pad itself sits on the top of the RoboBee, making it look a little like a rubber dart, and is connected to the bot via a polyurethane mount that’s essentially a squidgy ear plug. This allows the circular contact to bend and flex, meaning the microrobot can approach its target surface at an angle, rather than having to line exactly parallel.
The static electricity that is used to stick the bot to its target is the same force that makes a balloon attract your hair after you’ve rubbed it on a sweater. An electric current is run through the circular pad to create the charge, and when it touches the target surface, it induces the opposite charge there, creating electrostatic attraction between the two materials. Voila: the robot sticks in place.
An illustration of how the Robobee attaches to a target surface. The circular pad is the electrostatic mechanism and the yellow cylinder is the polyurethane mount. (Image credit: Science)
This might seem like an unnecessarily complex mechanism to use, but it’s ideal for a bot the size of the RoboBee. Because the electrostatic attraction can be turned on and off, the robot doesn’t need to pull itself away from any surface, as it might with a chemical adhesive. (Just think of flies stuck in fly paper!) Maintaining the charge also takes very little power — 500 to 1,000 times less power than flying.
In his essay, Kovac describes how animals of different sizes use different methods to perch, and how the same lessons can be applied to robot design. Large birds have to use visual feedback and the precise deployment of talons to grip on to something, writes Kovac, while smaller insects like flies, meanwhile, simply run into something and the design of their bodies allows them to stick in place. (In the case of flies, this "stickiness" comes from a huge number of tiny bristles on their feet that work like velcro.)
You can’t scale down mechanical grips to the micro-level, Kovac tells The Verge, so you have to find some sort of passive mechanism. "Nature is very good at this sort of embodied intelligence," says Kovac. "And as you get smaller, you have to rely more and more on this sort of smart design." This also means there’s less computation involved, which means you don’t have to burden the robots with too many sensors or hardware to control them.

[ Peter Barker, Andrew (Tridge) Tridgell and Leonard Hall analyzing flight logs ]
Take three software developers, a bunch of flying robots, a windy day, some
coffee and mix. What you will get is a fun day of exciting flying just as
we did when Arudcopter Developer Leonard Hall visited the Canberra UAV
team at the Canberra Model Aircraft this week.
Leonard dropped in to do some flying with fellow Ardupilot developer
Andrew Tridgell and other CUAV team members to catch up with CUAV progress
on various projects and to demonstrate how to tune aircraft. We even
learned the theory of how heli software uses a virtual leash to control
helicopters.
The highlight of the day was most certainly watching what happens when you
attempt to fly a 15Kg Porter quadplane in the wind when it's been poorly
tuned. I've never seen a plane pitch ninety degrees on landing before and
I hope that I'll never see that again. Other highlights were watching
Leonard tune a racing quad and a very smooth autonomous Gaui GX9
helicopter flying in high wind.
As the sun set on a cold windy day there was only one thing left to do,
dinner at a lovely Thai restaurant. You just couldn't ask for a better
day.
More pics on the Canberra UAV Flickr page.
Very interesting research from Georgia Tech, using a RC truck running ROS and a Nvidia graphics board. From IEEE Spectrum:
Most autonomous vehicle control software is deliberately designed for well-constrained driving that's nice, calm, and under control. Not only is this a little bit boring, it's also potentially less safe: If your car autonomous vehicle has no experience driving aggressively, it won't know how to manage itself if something goes wrong.
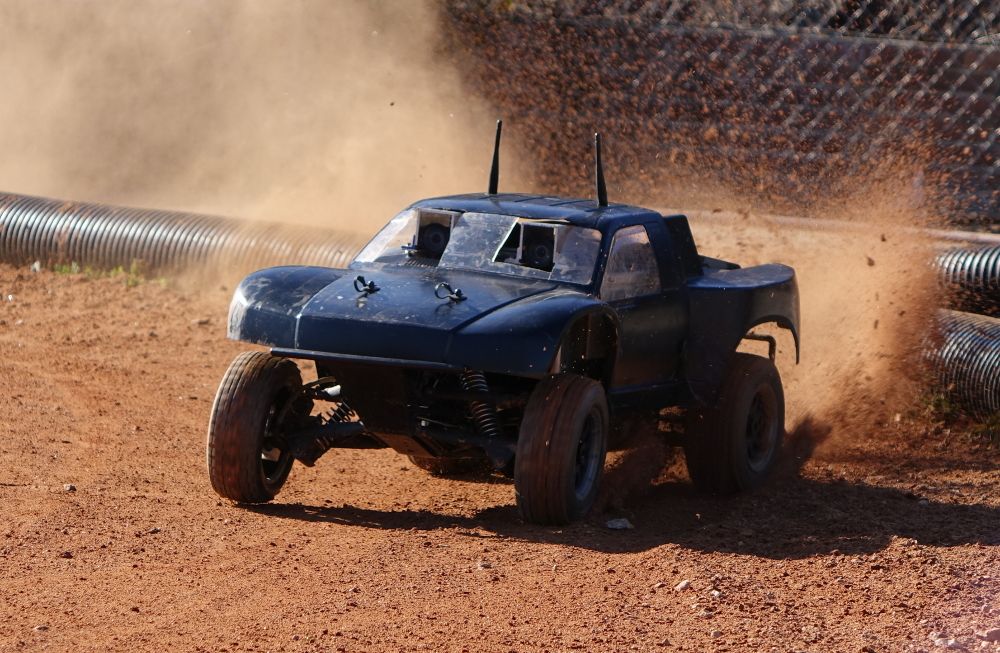
At Georgia Tech, researchers are developing control algorithms that allow small-scale autonomous cars to power around dirt tracks at ludicrous speeds. They presented some this week at the 2016 IEEE International Conference on Robotics and Automation in Stockholm, Sweden. Using real-time onboard sensing and processing, the little cars maximize their speed while keeping themselves stable and under control. Mostly.
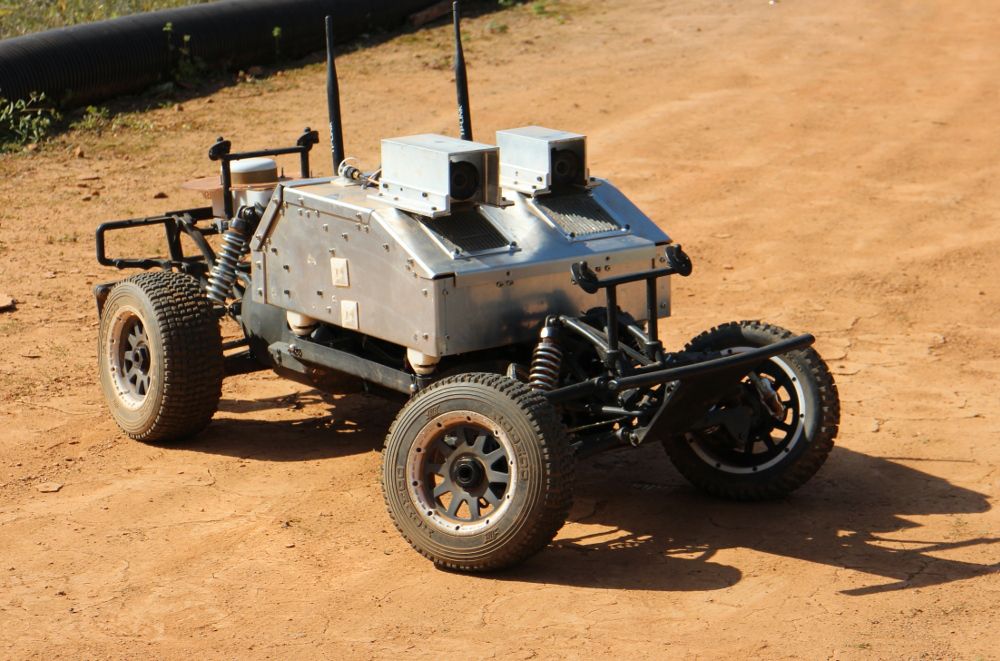
The electrically powered research platform pictured above, which is a scale model one-fifth the size of a vehicle meant for human occupants, is called AutoRally. It's about a meter long, weighs 21kg, and has a top speed of nearly 100 kilometers per hour. It's based on an R/C truck chassis, with some largely 3D-printed modifications to support a payload that includes a GPS, IMU, wheel encoders, a pair of fast video cameras, and a beefy quad-core i7 computer with a Nvidia GTX 750ti GPU and 32 gigs of RAM. All of this stuff is protected inside of an aluminum enclosure that makes crashing (even crashing badly) not that big of a deal.
To test out the hardware and software, AutoRally was unleashed on a dirt track at Georgia Tech and tasked with keeping its speed as close as possible to 8 meters per second while not crashing. The video [below] is a bit long; the racing starts at about 2 minutes in, with some impressive near-crashes (and actual crashes) from 5 minutes onward:
The real magic here is the algorithm that manages AutoRally’s steering and throttle. Rather than hierarchically splitting control and planning into two separate problems, Georgia Tech's algorithm combines them by integrating vehicle dynamics in real-time. Generally, this is a very computationally intensive approach, but AutoRally can calculate an optimized trajectory from the weighted average of 2,560 different trajectory possibilities, all simulated in parallel on to the monster onboard GPU. Each of these trajectories represents the oncoming 2.5 seconds of vehicle motion, and AutoRally recomputes this entire optimization process 60 times every second.
The initial training phase consists of just a few minutes of a non-expert human driving AutoRally around the track in remote-control mode; all of the fancy stuff (like the powersliding) is a product of the algorithm itself. Such aggressive driving is necessary when the speed of the vehicle exceeds its friction limit—a potentially dangerous condition for inexperienced robot drivers and human drivers alike. And this is why research into aggressive driving is not just fun but important. Just as expert human drivers can take advantage of how their vehicles handle at the very limits of control in order to drive fast yet safely in extremely challenging conditions, self-driving cars should be able to use the same techniques to avoid accidents in bad weather.
The researchers told us that most of the crashes in the video happened due to either software crashes (as opposed to failures of the algorithm itself), or the vehicle having trouble adapting to changes in the track surface. Since that video was made, they've upgraded the software to make it able to handle a more realistically dynamic environment. The result: AutoRally is now able to drive continuously on a track that, because of temperature changes, goes from, say, partially frozen to a huge puddle of mud over the course of a couple of hours.
They’ve placed all of AutoRally’s specs online (and made the software available on Github) in the hopes that other vehicle autonomy researchers will be able to take advantage of the platform’s robust, high-performance capabilities. The code is open source and ROS compatible, with an accompanying Gazebo-based simulation.
We're hoping that this algorithm will eventually be mature enough to be tried out on a full-size rally car (maybe in a little friendly competition with a human driver). But if that does ever happen, crashing will be a much bigger deal than it is now.
Aggressive Driving with Model Predictive Path Integral Control, by Grady Williams, Paul Drews, Brian Goldfain, James M. Rehg, and Evangelos A. Theodorou from the Georgia Institute of Technology, was presented this week at ICRA 2016 in Stockholm, Sweden.

[ Walgett, New South Wales - Australia ]
Around here doing mapping with a Skywalker X8 isn't exactly news. Still, it's exciting when you finally figure it all out yourself and get to enjoy the fun of watching the plane fly over while taking hundreds of photos. A big thank you to everyone here that has gone before and to the Canberra UAV team who I fly with on weekends for all the help.
So last week Jack Pittar, CUAV pilot, and I headed out to a rural Australian town to partner with the Dharriwaa Elders Group who are surveying areas of cultural interest. Using a flying wing equipped with a Pixhawk and Sony NEX 7 camera we managed flights up to 29 mins long capturing over 900 photos. We uploaded the photos to MapsMadeEasy and the next day we had orthomosaic maps that were 3.4 pixels/cm resolution for the DEG to merge with their land survey data. We flew at 110 meters high using a 16mm lens on the Sony camera at approximately 17m/s which required the camera to shoot a photo every 1.3 seconds.
The plane had plenty of flight time on board with two 4S 5 amp batteries. The flights we did only required 30% of the battery capacity with an average current draw of only 6 amps. We opted for a bungee launch system which has been working very well. Using Ardupilot we have the plane set to start the motor after it accelerates adding to the safety of the launch. We have been doing traditional landings which we found were difficult to control on dirt tracks so we will be looking at adding VTOL capability to the plane. We found a folding 12x8 prop to work best with our motor. We found that a Mystery ESC caused so much noise in the plane that the camera tripping circuit would not operate so we replaced that with a 40Amp opto ESC. During the take offs the current is spiking to 42 amps so we have a 60 amp ready to replace it with.
Our road trip was great fun and I'm sure we will be doing more of this work in the future. On the way home we stopped in to meet a land owner who has 35,000 sheep and cattle to discuss how UAVs might be useful for monitoring stock. Next month we hope to fly even further to assist a research institute monitoring the water quality of a thirty two kilometre long creek.
Enjoy some photos from our trip at Flickr.

Our world is experiencing an unprecedented shift from manually controlled technologies to increasingly intelligent and autonomous systems powered by artificial intelligence (AI). I believe that this radical shift in both efficiency and productivity can have significant positive social impact when it is channeled responsibly, locally and sustainably.
This is why my team and I founded WeRobotics, the only organization fully dedicated to accelerating and scaling the positive impact of humanitarian, development and environmental projects through the appropriate use of AI-powered robotics solutions. I’m thrilled to announce that the prestigious Rockefeller Foundation shares our vision—indeed, the Foundation has just awarded WeRobotics a start-up grant to take Humanitarian Robotics to the next level. We’re excited to leverage the positive power of robotics to help build a more resilient world in line with Rockefeller’s important vision.

Aerial Robotics (drones/UAVs) represent the first wave of robotics to impact humanitarian sectors by disrupting traditional modes of data collection and cargo delivery. Both timely data and the capacity to act on this data are integral to aid, development and environmental projects. This is why we are co-creating and co-hosting global network of “Flying Labs”; to transfer appropriate aerial robotics solutions and relevant skills to outstanding local partners in developing countries who need these the most.
Our local innovation labs also present unique opportunities for our Technology Partners—robotics companies and institutes. Indeed, our growing network of Flying Labs offer a multitude of geographical, environmental and social conditions for ethical social good projects and responsible field-testing; from high-altitude glaciers and remote archipelagos experiencing rapid climate change to dense urban environments in the tropics subject to intense flooding and endangered ecosystems facing cascading environmental risks.
The Labs also provide our Technology Partners with direct access to local knowledge, talent and markets, and in turn provide local companies and entrepreneurs with facilitated access to novel robotics solutions. In the process, our local partners become experts in different aspects of robotics, enabling them to become service providers and drive new growth through local start-up’s and companies. The Labs thus seek to offer robotics-as-a-service across multiple local sectors. As such, the Labs follow a demand-driven social entrepreneurship model designed to catalyze local businesses while nurturing learning and innovation.
Of course, there’s more to robotics than just aerial robotics. This is why we’re also exploring the use of AI-powered terrestrial and maritime robotics for data collection and cargo delivery. We’ll add these solutions to our portfolio as they become more accessible in the future. In the meantime, sincerest thanks to the Rockefeller Foundation for their trust and invaluable support. Big thanks also to our outstanding Board of Directors and to key colleagues for their essential feed-back and guidance.
We introduced Airstring to this community some weeks ago and we received a lot of feedback which has gone into the campaign and into the project itself.
Today we announce that the Airstring project is live on Kickstarter and you can reserve your own Airstring module to connect your drone to the internet using GSM technology
https://www.kickstarter.com/projects/215849561/airstring-gsm-telemetry-for-your-drone
Let's bring drones online!
Hi all.
I recently updated the runcam2 gimbal for my quadcopter design.
To see the previous design, check here http://diydrones.com/profiles/blogs/mantis280-3d-printed-folding-drone-with-gimbal-in-test
Gimbal mount is compatible with GoPro's slide in and click mount.
Total weight including runcam2 cam is about 150g without battery.
Check out this video
I will continue upload some aerial video footage next time.
Xrotors.net
This is a follow-up to yesterday's post. As promised, I wanted to provide some information about the C++ firmware running on this little quadcopter.
Following in the Baseflight / Cleanflight / Raceflight / Betaflight naming tradition of the 32-bit Multwii lineage, I call this firmware "Hackflight". Hackflight is simple C++ firmware for inexpensive quadcopter flight controllers. It is geared toward people like me who want to tinker with flight-control firmware, and use it to teach students about ideas like inertial measurement and PID tuning.
If you are in the 99% percent of users who just want to get your vehicle flying without getting into firmware hacking, I would stay away from Hackflight. Go with Cleanflight (great for getting started when you're on a budget) or the Ardupilot suite (the gold standard for sophisticated mission planning with waypoint navigation and the like). In addition to big user communities and loads of great features, these platforms have safety mechanisms that Hackflight lacks, which will help avoid injury to you and damage to your vehicle.
Hackflight currently works only on STM32F103 flight-controller boards (Naze32 and clones like Flip32, MultiRC, etc.) The original Hackflight idea was to write firmware for flight controllers built from the Arduino / Teensy hardware. As you'll see, the code follows the Arduino design pattern of a startup() routine that calls the init() method of a few objects (IMU, RC, PID, Board) and a loop routine that calls the update() method and other methods of those objects. But with all the features you can now get onboard an inexpensive STM32F103 board (barometer, magnetometer, flash RAM), there seems little point in building your own board, unless you're interested in hardware hacking. So Hackflight currently supports only the STM32F103 boards, while keeping the Arduino design principles. The code provides abstraction (through the Board class) that should make it easy to use on other boards.
For more info and download, see the github repository.
