All Posts (14030)

Sort by
3D Robotics

Autonomous blimp ("BlimpDuino") demo

This is a short demo of our "BlimpDuino", a toy RC blimp that has been turned into an autonomous aerial robot driven by an Arduino open source embedded processors. It uses an ultrasonic sensor to maintain altitude and IR sensors to detect a ground-based IR beacon. This demo just shows the blimp circling the beacon and maintaining altitude. Eventually this will become a <$70 modkit that you can buy, but we've got a lot of work to do before then.
Read more…
3D Robotics

Using a neural network to fly a heli

Jack Crossfire's daily updates on his autonomous helicopter project are alway fascinating, but today's is even more impressive than most. It describes how he uses a neural network to take the inputs from his acceleromters, gyros, magnetometers and GPS and turns that all into an output to the heli that keeps it stable in any direction. Here are some more diagrams, but check out the full post to also see his analysis of how cheap real-time GPS is getting and the possibility of using cheap optical mouse sensors for position hold.

Read more…
Have beaten the light painting algorithm to death. These are movies of some words being painted by autopilot. The 35mm sensor captures the entire flight from underneath. Then the flight recording is shown in Google Earth.Painting text in this confined space is the hardest thing the computer does. It requires a third entry in our gain schedule for velocity.P=1.0 Vmax=2m/s satisfy radius=2m for painting textP=1.0 Vmax=1m/s satisfy radius=5m for hoveringP=100 Vmax=4m/s satisfy radius=5m for forward flight.
Light painting VIKA from heroine worshipper on Vimeo.
Light painting LION from heroine worshipper on Vimeo.These are the still photos.

3689301302?profile=original

3689301245?profile=original

3689301365?profile=original

Ning is the only game in town for 13megapixel photo downloads. Right click & view image to get the Ning bling.
Read more…
3D Robotics
Jeff Johnson and I are speaking about amateur UAVs and imaging/mapping at the WHERE 2.0 conference in Silicon Valley on May 12-14, and we thought it would be fun to have a UAV fly-in beforehand. [UPDATE: this has been postponed. See this post for more] I've got an airfield available at the former Alameda Naval Air Station nearly Oakland (right across the Bay Bridge from San Francisco) and could fly on the afternoons of Sunday, May 11th or Monday, May 12. Standard safety rules apply, but we'd love to have any DIYDrones friends join us. After-flying drinks are on me! If you're in the Bay Area and would like to fly, watch or just hang out, please leave your name and preferred date in the comments below.
Read more…
3D Robotics

New world record for autonomous soaring

Dan Edwards, a grad student at North Carolina State University, has set a new world's record for an autonomous glider flying without power from thermal to thermal. On April 18th, his 5m glider flew 29.4 miles cross country in a flight that lasted 68 minutes, entirely without power or manual control. The glider uses a Cloudcap Piccolo off-the-shelf autopilot, but the really smart stuff was the thermal seeking algorithm, which you can read more about here. Dan narrates the record-setting flight: "The first flights were quite uneventful and downright disappointing. Perhaps with the low humidity and low wind, the thermals were just not organized. Adam tried valiently to catch just one medium thermal to maintain altitude and break through the low-level stuff. No birds were out flying and the completely blue sky was an ominous omen that the air just wasn't moving up today. But Blipmaps predicted today would be a 400ft/min thermal day at 2pm, so were holding our breath. Finally around 1:30 we had success catching a single good thermal. Almost immediately, we moved over to auto-soaring and Adam watched as the plane climbed out on its own to over 3000ft. At this point, we decided it was time to get in the truck and move out. The first turn is a roughly 2mi flight over a swamp, but 3000ft is about appropriate to safely make it beyond the swamp even if we found no other thermals. I set the aircraft to track waypoint 0, officially starting the flight around the XC course. The plane crossed the start road at 1:47pm. Off we darted in the little pickup. The plane had worked itself now to over 4000ft, so we were quite confident starting down the first leg. Adam coordinated with Craig to drive ~45mph in order to get in front and stay in front of the plane (we like looking backwards to the plane). After moving through waypoint 0, the vario was calling mostly sink and dutifully speed to fly let the plane move out and stretch its speed legs. What seemed very quick, we made the first turn at 1:51pm and the plane was cooking. It cruised downwind East for leg 2 also without stopping, blowing down the course and hitting turn 2 at 1:55pm, completing the first 4.0 miles in 8 minutes. At this point, we were a bit nervous, hoping the plane would be able to find another thermal to gain some of the altitude back. From last flight test, we tweaked values on a curve that defined what strength thermal the plane would stop for at various altitudes. This curve was designed to keep the aircraft over 2500ft and cap out a bit over 4000ft. As the plane descended after turn 2, the minimum strength threshold came down and the ALOFT code saw a small upcoming thermal, then latched into it, and then proceeded to start orbiting. The thermal did get better as the plane got higher, so it stayed above the up-moving minimum threshold as the plane climbed higher. At once again over 4000ft, the thermal finally was mighty strong still, but the moving threshold said it was time to move on, so the plane turned out of the thermal and started along the course again. This is how it went ... stop and watch the plane thermal, see the soaring mode unlatch, hear the plane leave the lift and start hitting sink, watch the plane start picking up speed and moving quickly to the next thermal, hear the lift getting better and check what the current minimum threshold was, stop and watch the plane thermal. After completing lap 1, the plane was way in the sky at over 3000ft, so we decided it was safe to commence another lap. And then we completed another lap and realized we were still carrying 3000ft at the end and decided to go for yet another! Batteries were holding steady. On lap 3 about 1/3 of the way through, the plane went through a monster hole of sink and sped up to between 35 and 45kts airspeed. This was also the downwind leg, so we had to chase forward at 65mph in the truck. The plane lost a whole lot of its altitude and was the lowest yet, around 2300ft. I started having visions of landing out. But then the plane made a little lurch, the vario stopped drooping low tones, and speed to fly slowed up a bit. Almost all of a sudden, we heard the vario start chirping. The plane pulled into an orbit and the vario was happy, very happy. In fact, the energy rate readings I was getting were off-scale high, pegging my meter over 19.7ft/s (6m/s) climb-rate! It only held this rate for several seconds, but now I know I need to up my limit! This thermal put us well back up to 4300ft and we knew we had lap 3 in the bag. It was also about this time we made a call that we knew we had enough altitude to make the field. So, I hit the "soaring off" button, still leaving speed to fly and other stuff active. This allowed the plane to not worry about stopping to orbit, but created a dolphin-soaring type cruise. A few minutes later, we were back to the start/finish line and crossed the threshold at 2:55pm exactly. Whew! I need to clarify and state for the record I did not touch the soaring computer this ENTIRE flight except for two times: 1. activate soaring mode; 2. deactivate soaring mode. The ENTIRE flight was on autopilot control, all 29.4 miles. On the Piccolo Command Center, the most I did was remove the hold waypoints as we approached them, because they were not needed for this version of flying the course. This did not affect the aircraft's flying and certainly would not have helped anyway. For the record, 29.4miles was autonomous and fully computer-controlled soaring. "
Read more…
3D Robotics
This was my first year at the FIRST Robotics Championships, and I was blown away. More than 20,000 kids and coaches from 1,500 teams from around the world came to Atlanta to compete in the Georgia Dome. They brought more than a 1,000 robots and a dizzying array of team costumes, mascots and pit crews. Imagine a cross between the NCAA basketball championships, the Daytona 500 and the Westinghouse Science Fair, all in a huge arena that's was the site of an Olympics and running for three days of frenetic competition. Mind-blowing and incredibly inspiring. I was there at the LEGO booth demoing my new Mindstorms UAV, which was getting a good bit of attention even with so many competing robots around me (aside from our blimps, which we only showed off in private, it was the only flying robot there). The above is my favorite moment, when Kjeld Kirk Kristiansen, the deputy chairman of LEGO (and the reigning member of the family that started it) and Dean Kamen, the founder of FIRST (and the inventor of the Segway), came by for a demo. I told them that the idea came to me when I was looking to do something that had never been done with Mindstorms before. It's a tribute to the creativity of the Mindstorms community that this required leaving the ground! Next stop (for someone else): space ;-) This picture comes from a great photo gallery of shots from the competition that Lego's Maureen Reilly took. The hardware I used for the Mindstorms UAV was a prototype of the gear that will be in next year's FIRST Tech Challenge competition kit, replacing the VEX robotics kit that has been used to date. This has been very controversial, not least because of the investment in time and money people have made in VEX. But it's clearly the right way to ensure that the competition continues to move with the times (adding a 32 bit processor, bluetooth and a suite of powerful sensors). The old VEX kits were designed mostly for remote control ("teleoperated") bots, while the new ones are more better suited for autonomous bots. To my mind, if it's not autonomous, it's not really a robot, so this move is welcome and perhaps even overdue. But autonomous robotics is harder and the Mindstorms-based platform (with aluminum parts and servos and motors) is still new, so in the limited trials I saw people were still struggling to get the bots to complete the challenges. I suspect that LEGO will tweak the kit by adding some more powerful motors and a slightly less difficult course to ensure that next year's proper launch is a success. But for the rest of us, the introduction of servos, motors and the rest of the real robotics world to Mindstorms is a huge gift. You ain't seeing nothing yet!
Read more…
3D Robotics
Wayne Garris passed along this important update on the FAA UAV rulemaking process and what you can do to ensure that we amateurs continue to have a safe and lightly regulated place in the sky. (Short form: contact Robert Blair below and express your support for the creation of a new organization to represent amateur and small commercial UAV operators) "Just giving everyone an update. Scott McKinnie and I had what we believe was a successful trip to DC. We believe that we can achieve an exemption long before the FAA makes rules and that is encouraging. Attached is a summary of the trip, the “Guidelines” for the exemption, FAA certification summary, FAA AC91-57 on model airplanes, FAA UAS rules, an explanation for the exemption, and most importantly a “Call to Action” to create a national organization focused on UAS for Natural Resource Management. Scott and I opened the door and started the ball rolling, but we need your help now. Please forward any or all of the documents to customers or anyone else that you believe would benefit by creating this organization. If you have further questions please contact me. Thank you for your time and I hope to gain your support. Sincerely, Robert Blair ----------- Robert Blair PineCreek Precision 15401 Blair Hollow Lane Kendrick, ID 83537 208-289-4997 precisionag@agristar.net" He also provide several helpful background documents: --Call to Action --FAA Certification Summary --DC Trip Recap --THE NEED FOR AN EXEMPTION FROM FAA RULES GOVERNING UAS OPERATIONS --FAA Notice of Proposed Rulemaking --"UAVs are Coming" (a 2006 article on the problem of UAVs in the US airspace) --GUIDELINES FOR UAS EXEMPTION FOR NATURAL RESOURCE MANAGEMENT --FAA Advisory Circular 91-57 on Model Airplanes (original 1981 FAA rules that grant exemptions for model aircraft)
Read more…
3D Robotics

Lego UAV 2: full details now available!

I'm at the FIRST Robotics Championship in Atlanta and we've just unveiled the first REAL Lego UAV. It's actuallly been working for a few months, but we couldn't talk about it since it's based on the new hardware that was just announced yesterday as the new FIRST Tech Challenge competition kit. Our UAV uses Mindstorms and the new hardware to make a full IMU-based autopilot, which both stabilizes and navigates the plane autonomously. It uses: --Mindstorms NXT controller --Two prototype integrating gyros from HiTechnic. These are not the rate gyros already available. Rate gyros output degrees/sec, which requires a pretty gnarly math process to measure and integrate the results over time to get absolute degrees. The prototype iGyros from HiTechnic do that in hardware, and output absolute degrees, which is very easy for the NXT to deal with with. --A 3-axis accelerometer to calibrate the gyros using a modified Kalman filter. Basically gyros are right in the short term (seconds) but wrong in the long term (minutes; they drift over time). Meanwhile accelerometers are wrong in short term (they're noisy) but right in the long term (they don't drift). So we averge the accelerometer readings over time to correct drift in the gyros. --A prototype servo multiplexer from HiTechnic. This is similar to the servo driver accessory that they're selling as part of the FTC competition kit, but is designed for RC use. It takes I2C output from the NXT and converts it into PWM for the servos. It also has a channel 6 input from the RC receiver that switches it from RC to NXT control (this is our hardware failsafe switch). --A GPS sensor/datalogger (iBlue 747) that communicates with the NXT via bluetooth.

I'll post the RobotC code this weekend, but I wanted to give you a quick look at this. It's really cool, flies, and can now expand into anything else in the robotics world, from cameras to communications. More soon!
Read more…

NexStarEP RTF mini review

This is a mini review of the Hobbico NexStarEP RTF. It currently costs $399 from tower hobbies There is a much more detailed review of the model here at rcgroups.com. That review is from a pure RC perspective. I am writing this to highlight the UAV friendly features of the NexStar.I took the plane for her maiden flight last Sunday at a local field. I had an instructor to help me fly since I am new to RC(keep this in mind as you read this review). This is the only RC plane I have ever flown.The features that make this plane a good platform for a UAV are the following:Size: The plane has a 68" wingspan, and weighs about 7lbs, so the plane is less affected by the wind. The size and weight were beneficial during the maiden flight since the winds were about 10mph with 15mph gusts. The experienced RC pilots were impressed by the stability of the plane in the wind.Stability control: The plane includes speed brake flaps, and airfoil extensions at the wingtips. It also features the Futaba PA-2 stability control system, so a simple GPS and rudder control only UAV can be built..

The PA-2 sensor is visible on the bottom right of the picture.Interior: The plane has ample space inside the fuselage for mounting electronics. It should be no problem to mount a flight computer and sensors inside the fuselage.

Complete package: The plane comes with everything needed to fly except batteries and a charger.Flight duration: The plane will easily fly for 15 minutes with a 5s 5000mAh lipo pack.The package also includes a stripped down version of the RealFlight RC flight simulator, so you can practice flying at home using the actual transmitter. The simulator practice was particularly helpful for me, since once the instructor got the plane into the air, I was able to fly it with ease even with the strong wind(we flew with the PA-2 disabled).Total cost for a flight ready plane with batteries and charger was approximately $650. So with $350 for electronics, you can build a sub $1k UAV with this plane.I am very pleased with this airframe, and I feel that it will make a fine UAV platform.Cory
Read more…
3D Robotics

What am I going to show in Atlanta?

We're still racing to pack up everything for the FIRST Robotics Championship this Thursday, Friday and Saturday in Atlanta. LEGO has me listed as a speaker, in conjunction with the release of a brand new robotics platform. The title is "Taking LEGO MINDSTORMS to the Sky - The LEGO Autopilot' - by Chris Anderson". But that can't be the original LEGO autopilot, which is now more than a year old. So it must be something new! The video above is a hint (sorry about the vague tease!), but I'll be revealing full details on Thursday. In the meantime, if you're wondering how you transport a UAV across the country, the answer is: hard golf case via FedEx! Loads of room and very tough. Here's what it looked like, before I wrapped everything in bubblewrap

Read more…
Hi all,this post is an "how to" for an Arduino pan and tilt camera moved by a Nintendo Wii Nunchuck.Here's the video so you can check how it'll be the result. The most important thing is the precision and responsiveness of the system.
Here it is for all that asked me in the past and for those interested in putting something similar in their UAVs.It's an "old" project I've posted the following video on YouTube more than a 5 months ago but never had the time to post schematics and the code online, even if a lot of people asked for it.I use an Arduino Diecimila board to have a Nintendo Wii Nunchuck control a camera mounted on a pan and tilt mechanism with two servos (Hitech HS-422).Nunchuck's accelerometer (an ADXL330) is used to move the camera.As you can see, if the Nunchuck's "Z" button is pressed, the camera position is locked.Here is picture of the pan&tilt mechanics with servos:
bpt01.jpg
First of all I got to thank a few people that before me putted their experiences online. That simple project is based on the code and infos found on the following pages:Read wii nunchuck data into arduinohttp://www.windmeadow.com/node/42Boarduino, Wii Nunchucks, and Servoshttp://todbot.com/blog/2007/10/25/boarduino-wii-nunchuck-servo/Here's a simple schematics on how to connect the servos and Nunchuck to the Arduino. Servo's pins are 6 and 7.
boarduino-nunchuck-servo-450.png
The code is here.You can find more infos about the code in the two links I mentioned before, but feel free to ask.The only section you should customize to adapt to your servos an need is a list of variables:refreshTime (set to 20) - minimum refresh time for servo pulseminPulse (set to 1000) - minimum pulse value for servo 1minPulse2 (set to 500) - minimum pulse value for servo 2dtime (set to10) - delay (in milliseconds) for each looppwbuffsize (set to 10) - how many values has to be buffered and the averaged (that's the same value for both servos)Next post will be regarding the evolution of that interface: changed camera and servos with a smaller and ligher one (this one) and made the connection between the Nunchuck and the camera, wireless.Hope that can be helpful and feel free to ask anything about that.Thank you and ciao,Andrea
Read more…
3D Robotics

BlimpDuino version 2 now done

We're racing to get ready for the FIRST Robotics Championships in Atlanta next week, and the second version of our Arduino-powered RC blimp mod kit is coming together nicely. We moved to a two-sided board and integrated our custom IR direction sensors into the main board. Above is what it looks like now, in the toy RC blimp gondola that we have lobotimized: And the same side view of our previous version, which had the IR sensors on a separate daughterboard on a stalk:

We saved about 10 grams and a huge amount of fiddle factor by integrating the IR sensors. I moved the electronics to the outside so you can get to the on-off and reset switchs and programming port. But for the next version I may just leave the LEDs, switches and sensors on the bottom side of the board and move everything else inside for neatness. We may be able to save a few more grams by switching to the Maxbotix ultrasonic sensor instead of the Ping ))). Right now the whole blimp gondola, with all electronics and battery, is just over 80 grams. I doubt we can bring that down much more than another 10 grams, even with surface-mount components and a smaller board. But it doesn't really matter much, since we have plenty of extra lifting capacity with the 52" envelope we're using. Here's the latest version of the Arduino code, which now flashes the LED a set number of times to show you which direction the IR sensors see the beacon coming from (useful for debugging).
Read more…

Missouri S&T UAV Team - Autopilot Tuning

On Saturday (April 5th) we flew the airplane for the first time with the autopilot since it got the new wing. But before we went out to the RC airfield we had to physically install the autopilot in the fuselage, which went well. We then performed all of the flights necessary to tune the autopilot in HIL (Hardware In the Loop) simulation mode.

3689300785?profile=original

Using HIL simulation allowed us to all to get a better of idea of what we had to do once we got out to the airfield. In the end performing the HIL simulation in the lab saved us a lot of time and allowed me to get more familiar with tuning the PID control loops for the autopilot. Previously we had not used the PID window in Virtual Cockpit, but after using it in the HIL simulation it proved to be invaluable for properly tuning the autopilot, it allows you to see the actual, desired, and effort of a certain control parameter (i.e. pitch, roll, yaw, altitude, etc.). Previously we had had issues seeing a change in the behavior from the ground after changing a certain PID gain.On the first flight soon after takeoff the aircraft became unstable and began to become uncontrollable and began oscillating wildly, fortunately our pilot Kyle was able to get it back on the ground without any damage. It turns out that our CG was too far aft, but after adjusting the CG we were able to continue with testing. Using the PID window and the having performed the same process of tuning the autopilot in HIL mode, the first few flights went quickly and we were able to quickly tune the level 1 control loops within two 15-minute flights. A graph of the autopilot’s roll performance is shown below, ideally the two lines should match, and they are in fact very close.

3689300827?profile=original

We then moved on to the level 2 control loops (i.e. pitch from airspeed, pitch from altitude, airspeed from throttle, etc.). These were slightly more difficult, and took several passes over the airfield to complete, but we were able to get them tuned to a reasonable level. The ability of the autopilot to maintain a constant altitude is shown below, there are slight oscillations in the altitude (+/- 3 meters), these are reasonable, but might be improved at a later time with more tuning.

3689300696?profile=original

Just as my laptop battery was about to give out we moved on to the final flight of the day. The purpose of the final flight was to verify that the autopilot is able to navigate accurately and safely. The first test was simply placing a loiter waypoint above the center of the RC airfield; although there were some oscillations in altitude, the overall performance was quite good (note the 4 m/s wind speed).

3689300798?profile=original

The final test was to create an oval over the airfield that the UAV would have to navigate. The first time around the circuit the UAV did not adhere to the waypoints too strictly, but after adjusting some of the navigation parameters the performance was significantly improved (see image below). After completing these flights the telemetry was reviewed and we were better able to analyze the performance of the autopilot and its navigation.

3689300844?profile=original

Overall the testing went well and we were able to tune the autopilot control loops better than we had previously been able to with the old wing, this is most likely due to our use the PID window and the HIL simulation which allowed our time at the airfield to be spent much more efficiently.For more information or past posts visit our site: www.aessuav.org
Read more…

Motor Glider UAV project

Hi all,this is my first blog and I wanted to share that experience with you as most of my projects are about UAV and robotics.
First of all I got to thank the whole "DIYDrones" community that gave me a lot of informations and ideas in the past. And continues but... now I think it's my time to share my findings while developing my "ideas".
I usually work with the Arduino open platform but lately I've been working with Gumstix hardware and I have to say that they are both great "technologies" to start you project with.
My actual project is to develop and autopilot for my Omei 2000 motor glider. That's part of a series of projects, all related.
3689300805?profile=original
In my project the authopilot module will: stabilize the flight, follow a GPS programmed path and come back home, send informations to the base station, etc. Nothing particular, nothing that you guy haven't done already. And what about sensing thermal and trying to "follow" them authomatically to increase authonomy and flight times? I've been thinking about putting very light solar panels on the wings to "recharge" batteries while flying. But I'll write more on next posts.
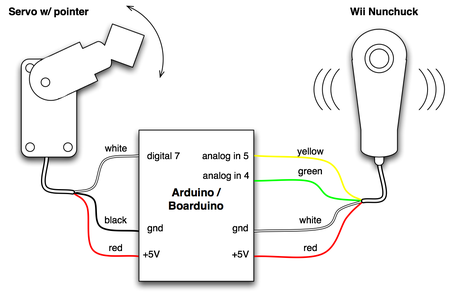
I'd like to add something more like a pan&tilt camera, radio linked to virtual glasses with head tracking, so that has you move your head the camera moves accordingly. About that I've already made some test a few months and probably my next post will be about that. I got a video and Arduino code to share.
Personally I flew with paraglider, and now I fly small and light airplanes and motor hang glider. Can't stay too much away from it. But lately (let's say one year) I don't have much time for flying and that's where it came the idea of starting with RC flight.
That's all for now. I only forgot to say... forgive me for my mistakes in english as it's not my mother language. I'm italian. Thanks.
Thanks. A presto,
Andrea
Read more…
http://www.eetimes.com/news/latest/showArticle.jhtml;jsessionid=GW53B4ZAN3QNAQSNDLSCKHA?articleID=207001827So for UAV booms to become the dot com booms of the future, sensors need to cost under $1. Basically another year, another wave of startups, but no affordable motion sensors. Interestingly, this year they're not making the mistake of attacking gyros like Invensense did. They're focusing on accelerometers, not saying they're accelerometers, and selling the application rather than the measurement.The artificial neural network experts category on Craigslist is still a few decades off.
Read more…
3D Robotics

[UPDATE: after legal advice from LEGO, LatteBox has now changed its case design to remove the LEGO Technics holes, which you can see in these pictures. The new case is shown at the bottom of this post.] What got me into this whole UAV thing a couple years ago was the crazy idea that I could combine my love of LEGO Mindstorms robotics with my interest in RC planes. And thus was born the first Lego UAV. But to be honest it's a bit a kludge, given the constraints of the huge Mindstorms motors, and the gearing apparatus I needed to get it to drive just one control surface, the rudder. (Everything else is controlled by the off-the-shelf FMA Co-Pilot). That's a shame, because the Mindstorms NXT CPU module is a very capable ARM7 processor with Bluetooth, I2C ports, a display screen and a great set of programming tools, ranging from RobotC to LabView. And the available sensors include everything you'd need for a proper UAV, from 3-axis accelerometers to gyros, compasses, even pressure sensors. The only barrier to it being a real-world robotics platform is the motors, which basically only make sense in a Lego context. If only there were a way for NXT to drive regular RC servos.... Now there is. This week I received the new Lattebox NXT servo controller, which was first discussed here on DIYDrones a few weeks ago. It's a brand new product from a Taiwanese company, so it's still a little rough around the edges in terms of documentation (and I've got some doubts about whether the use of the Lego connecting holes is actually legal!), but the hardware build quality is excellent and it looks really powerful. Here's what comes in the box:

That's an I2C multiplexer, which connects to the NXT CPU (and allows other I2C sensors to be connected) and a servo mulitplexer, with ports for up to ten servos. (You can add more of these boxes to a total of 160 servos--all independently driven by one NXT!). The I2C multiplexer costs $140 and the servo driver is $60. Both are quite small, around the size of a standard RC servo or RC receiver. The C code to run them is available here. I haven't had a chance to put it through its paces yet, but I'm pretty jazzed about what I've seen. But at this point I need to disclose that there is a competitor to this product that I've been beta testing for the past few months (but can't yet talk about). Indeed, I've built a whole new UAV around this other NXT-to-servo hardware, which I'll be showing at the FIRST Robotics Championships in Atlanta on April 16-18. The ability to use the Mindstorms controller, sensors and IDEs for proper aerial robotics is nothing short of mindblowing, and I can't wait to unveil my bird then. In the meantime, here are some more shots of the LatteBox device.

I2C mulitplexer

The servo driver board, out of its case.

Back side of the servo driver board

Both together...

[UPDATE: This is the new case, with the LEGO Technics holes removed. The case shown in the previous images are no longer available. If you order the product, you will get the case here, not the ones shown in the images above it!]
Read more…

Hi res daylight

Had enough daylight to get 1/400 ISO 80 out of the A560. It definitely does a better job with those 7 million pixels. 1/400 is probably just below the minimum shutter speed. In dead calm air, the camera was much more stable. With the current yaw program & the instability of 1Hz GPS, only had enough battery power for a 270' turn on autopilot.
Read more…

This is my current Project-Plan:Stabilize nick and roll of my Walkera Dragonfly DF36 with Arduino and provide an easy interface to the RC servo output.(read acceleration data from a Wii Nunchuck and pulse servos to keep horizontal position)First steps:- Hardware setup- Create a starting sketch and develop it based on libraries and functions.Thanks to everybody who is developing nice stuff for Arduino (it helps me a lot when I get stuck)This is my Blog where I post all my findings:http://www.vodkadoctors.at/captFuture/blog/
Read more…

New Wing for Missouri S&T UAV Team

20080320_5359R.jpg

Sorry about the lack of updates, we will be updating more frequently now. The first update being that we completed the new wing and completed the first flight with the new wing and it performed very well even in windy conditions. Unfortunately there are no pictures of the actual flight but here are some pictures of the new wing on the airplane. This new wing is significantly stronger allowing us to carry our large payload, it also has less drag allowing us to fly at greater speeds.Although you can’t see from the picture above the entire trailing edge consists of the control surfaces for the flaps and the ailerons, we plan on using the flaps during landing to allow us to land at slower speeds.We have also been working on the onboard computer for the airplane, below are some pictures of it and the new enclosure that we had rapid prototyped out of polycarbonate using the facilities on campus. The onboard computer is a single-board-computer (SBC) with a 1.8GHz Pentium M processor, 1GB of RAM, and 4GB of flash running Ubuntu Linux. This computer will handle all of the image acquisition and some or all of the image processing.

20080326_5886R.jpg

Since we have the UAV in flying condition again we will be slowly integrating the all of the electronics into the actual airframe and there should be more frequent updates now that we will be back in the testing/development phase.For older posts or information about the project please visit www.aessuav.org
Read more…