Jethro Hazelhurst's Posts (18)

Sort by

image of Olympus AIR A01

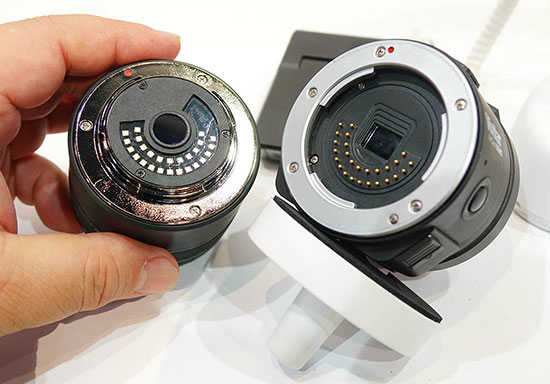
The latest trend in camera products - modular cameras - is good news for us as drone users.

With Sony releasing products such as the QX100 and QX1 it seemed like high quality alternatives to the gopro we're becoming available.

Now with Olympus and soon Vivitar being the latest companies to add their own modular camera to the list, it looks like 2016 will be an interesting year for modular camera technology.

Here is a shot of the new AIR A01

4484-thumb.jpg

And the yet to be released Vivitar IU680 Model

Vivitar-IU680-interchangeable-lens-camera-module-for-smart-phones-2.jpg

Unfortunately two key requirements have still not been met from what information we have available.

1 - The ability to record 4k video

2 - A simple Analogue Video OUT for FPV

In addition it seems there are very few reliable options for stable camera gimbals that have been designed for these cameras.

Hopefully the options will get better in the very near future.

Read more…

3689599241?profile=original

Please check out part one of this blog series here!

There has been a remarkable amount of work to do between receiving all of my parts and getting to this stage of the build. However the Smart-Drone is starting to take formidable shape...

Project Overview

The goal of this project remains the same: To put into practice all of the wonderful techniques and tips that I have acquired during my tenure at DIY Drones. The goal of this build is to not only produce a functional piece of equipment but also a work of art...

The main project criteria are:

  • Easy maintenance (a modular design)
  • Advanced functionality (thanks to Arducopter)
  • Reliable operation
  • long flight times ~ 20min
  • the ability to carry a nex 5/7 camera and Gimbal for aerial videography (800g-1kg)
  • Stable flight even in light winds
  • Low vibrations
  • Low signal and magnetic interference

In terms of wiring and layout, the drone design is largely based on my infographic that I previously created for the community here: Pixhawk Infographic

Some design considerations that have since been improved upon mainly concern the radio system. The fact that I am using the FrSky D4R-II PPM sum receiver and the newer Turnigy 9XR with a DJT module and small lipo battery should reduce points of failure and simplify things.

Considering that this will be my first completely autonomous drone I am erring on the side of caution by carefully following the Arducopter wiki in a linear fashion.

The arducopter wiki is exceptionally clear and well presented so It's hard to go wrong if you follow along and pay attention (an increasingly rare commodity)!

Getting Started

My first priority was to start filling the partially assembled frame with power guts.

I decided to keep the high current components restricted to the center of the carbon fiber frame to prevent any interference. The X650 is a well thought out frame in that respect and the carbon fibers should do a decent job of shielding rogue wavicles.

I made use of a 25 amp 4 in 1 ESC because it removes the need for a power distribution board and mitigates RF interference.

Due to my Motor and Propeller combination (12" props with 710kv 2814 motors on a 4S system) I will be running the ESC a bit on the high end. I therefore decided to mount it facing down and thermally coupled the ESC heatsink plate to the main carbon fiber frame plate.

Initially the four in one ESC motor wires were far too long and, in combination with the motor wires, added unnecessary weight. So I cut them to length and re-soldered them to the ESC board.

3689599320?profile=original

After mounting the ESCs I proceeded to connect the motors and check that their rotations matched the diagram on the motor setup wiki page.

To further shield any interference from reaching the Pixhawk Flight Controller I mounted a carbon fiber plate on top of the upsidedown ESC.

The Pixhawk itself is powered primarily through the Power Module (PM) however the 4 in 1 ESC provides a secondary source of power through the servo connections. This is perfectly safe because the Pixhawk has a clever power management system that selects the most healthy power source (in my case the power coming from the PM).

Then I mounted the PM next to the ESCs, close to one of the holes in the bottom frame plate so that I could attach the Lipo battery.

Finally I soldered up the XT60 connectors to the battery and 4 in1 ESC. In the image below you can see the finished power system in place.

3689599283?profile=original

Since then I have added a cable sheath to the power module wires so as to prevent wear and tear after repeated plugging and unplugging.

After making sure that all my motor spun in the right direction I could finally assemble the main frame using threadlock.

It is always important to check that the arms and motors are perfectly level after assembly. I did this with a bubble level and will check again later using a smart-phone app.

In addition I also balanced 8 Carbon Fiber propellers which you can read more about here.

Adding the smart stuff

Next step was to mount the Flight Controller and receiver plus pixhawk accessories.

3689599378?profile=original

Here you can see the Pixhawk, GPS and D4R-II reciever. In addition I added the I2C splitter in a convenient location, mounted using adhesive foam, for future upgrades.

I mounted the Pixhawk using the provided foam standoffs. Hopefully this will be enough to isolate any unwanted vibrations. This is yet to be fully tested.

I took care to ensure that the flight controller was in the center of gravity of the aircraft.

The GPS and compass module is raised up far away from any magnetic interference. I used the X650 mounting clip system to mount the GPS. I do have concerns about magnetic interference from the GPS case screws and the actual mount itself though.

I also had to extend the GPS cable for it to reach the pixhawk.

I then attached the safety arming switch to the top bug shell for easy arming/disarming and finished the external wiring with heavy duty wire braiding...

3689599345?profile=original

Next step was to power her up for the first time...

I set up the transmitter by first plugging in the DJT Module to the back of the transmitter. Next I plugged in the lipo and performed the binding procedure.

After power-up everything seems to be in working order!

With everything connected I can now use mission planner to begin programming the smart drone for it's first of many flights!

Part three will include more on the software side of things and detail how I have setup my parameters and fine tuned the smart-drone...

Jethro.

Read more…

3689598776?profile=original

Propellers are to a multirotor what tyres are to a car - a key component. Because of this, it pays to get good quality props especially for those who are into aerial video.

That being said, you can't beat carbon fiber props for rigidity, and you can't beat RCTimer propellers for price.

Prop balancing may sound like a simple exercise, however there is a bit of technique involved if you want to ensure a reliable result.

Below details my experiences and lessons learned while balancing and finishing 8 x 12x4.7" carbon fiber propellers.

Here is a picture to help understand terms used below...

3689598701?profile=original

Things you need:

  1. Propellers
  2. A prop balancer
  3. Metal sand paper: 500, 800 and 1000 grit.
  4. Pure Beeswax
  5. Lint free cloth (an old t-shirt works)
  6. Rubber gloves

Safety:

Carbon fiber dust is dangerous and does not break down inside of your body! Take all prautions! Also, the blades can be sharp so please be very careful at all times, not just when they are spinning. 

Things to be aware of:

  • The first thought I had of sanding I my new carbon fiber props was painful. I thought I would ruin the prop completely! However after much research I saw that many professionals were using the sanding method. Sanding is a much more permanent, simple and effective method than using tape or dealing with clear spray paints... so lets get that mental block out of the way!

  • Get a balanced prop balancer, as silly as this may sound there is nothing more frustrating then using an unbalanced prop balancer. A brand I hear recommended more often than most is the DuBro balancer.

  • Check your propellers 'track'. That means checking whether your prop tips follow the same path while they are spinning. You can do this by marking here the blade as it spins and seeing how close the other blade is to that mark. Ideally the two blades should pass at exactly the same mark.

  • Don't bother being a perfectionist. Absolute balance is not critical because static props (such as are used on multirotors) no matter how balanced, all suffer from vibrations in forward flight. That includes maintaining a hover in the wind, perfect balance and near perfect balance will make negligible difference.

Step one:

Take a carbon fiber prop and put it into your balancer of choice. Note the direction that the prop tends toward. The heavy side needs sanding... our aim is to get the prop sitting horizontal.

Note that the faster the prop falls the more it needs to be sanded.

Step two:

Using your roughest grit metal sand paper, sand either the front or back of the blade toward the tip. Taking off material here will have a better effect than near the hub.

Step Three:

Put the blade back on the balancer and see if there has been any improvement.

Step Four:

Depending on how much material needs to be removed, work your way up the grits until you finish at 1000 grit. At this point your props should be perfectly horizontal.

Step Five:

Time to balance the hubs... hold your prop vertical and note which side of the hub the prop falls toward.

There are two ways you can balance the hub...

  1. By adding some weight to the light side of the hub using glue.
  2. By sanding the trailing or leading edges of your prop until a balance is achieved.

Please note when using method two not to change the airfoil too much. You can do this by sanding with the shape of the blade edge.

Step Six:

Wash off any carbon dust from your props under a running tap.

Step Seven:

Take your balanced props and rub beeswax over the entire surface area. Using a lint free cloth, polish the prop to a mirror finish. It may take some effort to get the wax moving under the cloth.

Here is a before shot:

3689598812?profile=original

And After:

3689598913?profile=original

If you have any tips of your own please share them below!

Jethro Hazelhurst.

Read more…

A DIY Magnetic Prop Balancer!

3689592494?profile=original

In my zeal to get started on my first multirotor I forgot to add a prop balancer to my cart! So I set out to make my own out of parts I had laying around...

My first prototype used a wooden drill bit because it fitted my prop perfectly at 6mm in diameter. Unfortunately because of the shape of the drill bit it would tend to one side, rendering any balancing done to the prop useless.

Learning from experience, I decided to go for as little mass as possible. A needle fitted the job description.

Next problem: How do you get a prop with a 6mm central hole to center on a needle? My answer came in the form of heatshrink tubing. Using very short lengths of heatshrink which I cut very carefully using a scalpel to ensure they were consistent I eventually got enough layers to slide the prop on.

Because heatshrink shrinks to the center, the prop is perfectly centered.

3689592609?profile=original

The key is to have as little mass as possible on the spindle. Using longer lengths of heatshrink produced an unbalanced spindle.

Below is a rough guide to making one of your very own using commonly available parts...

Please take not that I am not responsible for anyone's actions, use common sense!

Materials:

    1x Large needle
    2x Strong Magnets
    1x Piece of wood for the base
    2x pieces of wood for the walls
    4x L Brackets
    8x short wood screws
    Lengths of small diameter heatshrink

Tools:

    drill
    dremel
    heatgun
    metal Shears

Step One:

Take your needle and shear off the eye. This can be hard so be careful and make sure no flying bits of metal hurt any one!

Step Two:

Put the needle into the dremel sharp end first. Now grind down the sheared end into a fine point using metal sand paper or on a grinding disk. This too can be a challenge because this stuff is harder than diamond.

Step Three:

Attach the two pieces of wood at 90 degrees to the base piece of wood using the L Brackets and the short wood screws.

Make sure the distance between the walls leaves enough room for the needle and two magnets. Also check that the walls are high enough so that the prop can rotate 360 degrees around.

Step Four:

Hot glue the two magnets to the walls, but be careful because magnets with molten glue on them have a tendency to snap together right onto your thumb leaving a nice burn, ask me how I know... :) .

Make sure that you hot glue the magnets facing each other so that they want to attract (north facing south or visa versa).

Tip: Magnets can be found inside microwaves and old hard drives.

That should be it! As you can see below there is virtually no friction between the needle and the magnets.

3689592662?profile=original

So now I am curious, I have spent the afternoon with my RCTimer Carbon Fiber props on the balancer and have been researching the best way to balance props, so I ask: How do you balance your props? More specifically what is best practice when it comes to balancing carbon fiber propellers?

As you can see in the picture below I have some copper tape strips to work with, but I am afrade that they will corrode plus they are an eyesore.

3689592636?profile=original
The best I have seen comes from U.A.V Advertising: https://www.youtube.com/watch?v=a3Byk8W5P_E

This method involves sanding the trailing edge of the prop.

I am planning on balancing my hubs as well as my brushless motors using lead tape.

So I put it to the community... what methods do you recommend? For those who advocate the tape method, what brands of tape have you found work best? For those who are in the glue/varnish camp, could you provide more detail?

Happy balancing!

Jethro.

Read more…

Graphics for Wiki Documentation

3689580859?profile=originalHere are the individual graphics I have drawn that depict 3DR Gear as well as standard radio control components. They are in PNG format and I hope that you guys can find it a useful resource for your own documentation purposes.

I use Paint.net which is a free program and I have never looked back! Here is an example of what you can do with the graphics below: Pixhawk Infographic

I plan on taking a close look at all of the graphics in the APM wiki to see what can be improved, and hopefully this will help others to make additions to the wiki!

I can provide all of these illustrations by Email upon request as well as the original "Paint.net" files where you can pick apart the image layers.

Starting of course with the wonderful Pixhawk autopilot and LEA-6H GPS and Compass

3689580882?profile=original

This illustration shows the Pixhawk Servo Connections: Please note I can provide the original without wires upon request!

3689580954?profile=original

Where would we be without Telemetry?

3689580903?profile=original

The 3DR power module:

3689580967?profile=original3DR switch (you have to draw your own wires in)

3689580830?profile=originalThe the rest of the illustrations can be found below in the comments!

All the best.

Jethro.

Read more…

Quadcopter Build by Jethro: Part One..

3689580625?profile=original

The other night I went to bed safe in the knowledge that packing teams in Germany, China and America had sprung into life, hurriedly shipping what will soon be my first real world experience with UAV technology.

Just few days later a small package with Chinese airmail written on the side arrived at my door...

The project overview

After reading, lurking and learning here on DIY Drones for the past year and a half, this is my first foray into the real world of autonomy so I am trying to take all the precautions.

My main goal for starting this blog series is to get feedback from the community about my designs and methods of construction, so please fire away!

The design itself is a carbon fiber folding quadcopter that is able to lift a camera (perhaps more than a GoPro) and get good flight times while being armed with the functionality of the Pixhwak.

Parts list:

  • Of course - the Pixhawk Autopilot and GPS!
  • X650 Carbon fiber frame from RCTimer
  • Four 2814 710kr/V High Performance motors with 12" Carbon Fiber Props
  • Hobbywing 25A 4 in 1 ESC
  • Turnigy 9XR transmitter with the FrSky DJT module in the back
  • D4R-II Receiver
  • Turnigy Nanotech 4000mah 4S Battery
  • Chargers and other accessories...

Tools:

  • Hand drill
  • Weller TCP soldering iron and accessories
  • Glue gun
  • Threadlock
  • Superglue
  • Heatshrink
  • Drivers and Pliers

Of the parts listed above, those in bold I have received.

Issues

The first problem that I encountered was that the motors I had ordered did not fit my motor mounts. (motors had holes of 25 and 19mm, the mount had 16 and 19mm).

My solution was to drill an extra two 25mm holes into the carbon plates and mount the motors on locking washers:

3689580669?profile=original

After assembling all of the motor arms I assembled the frame, being careful to make sure everything is in place and thread-locked

Results:

The final result felt sturdy...

3689580698?profile=original

Main Concerns:

My main concern so far is regarding my choice of Motor and ESC.

As you can see in the chart below the 2814 HP motors weight in at 100g each and consume 23A to lift 1660g each.

3689580709?profile=original

My 4 in 1 ESC can only handle 30A for 10 second bursts and runs at 25 amps for continuous power.

Doing some rough calculations:

1660g x 4 equals 6640. Dividing that in half gives 3320g maximum weight for my quad.

Do you guys think this is cutting it a bit fine (risky)?

The hobby-wing ESC does have some interesting protection features, most notably...

...2.8 Full protection: Low voltage cutoff protection / Over-heat protection / Throttle signal loss protection.

Another minor concern is that I could only find 'purple' threadlock' in my local hardware shop... specified for threads that are 1-5mm. So it should be ok...

Other than that there have been a few anomalies with regard to the frame itself (namely one of the screw holes being a 3mm as opposed to 2.5mm), but they were minor issues and I am very impressed with the quality of the equipment so far!

Well, I'm off to replace the battery connector with some XT60's!

Part two will be posted when "goodluckbuy" parts arrive!

Jethro.

Read more…

This worries me because I currently living in France and am nearing the completion of my first quadcopter. French laws are known to be difficult to navigate at best!

It raises an important question: What does the future hold for small UAV technology in Europe?

From the article here: http://www.thelocal.fr/20140214/french-drone-flyer-faces-public-endangerment-charges

Nancy seen from the air” (Nancy vu du ciel) a stunning short film put together by 18-year-old Nans Thomas quickly racked up some 400,000 views in a matter of days after it was posted on the online video sharing site Vimeo.

The beautiful images of spires, churches and plazas of the historic north-eastern French town were captured in a unique way by attaching a go-pro camera to a drone.

At one point the video was reportedly even hosted on the social interactive site of the regional council of Lorraine

But unfortunately for the teenager the success also caught the eye of French civil aviation authorities, who ordered an investigation, TF1 TV reported. It turns out the teenager violated two key provisions of the law according to Nancy’s top prosecutor Thomas Pison.

First, drone operators in a France have to complete a training course similar to the ones pilots must take. Then, a drone flight over an urban area requires specific written approval. Unfortunately for Thomas, he had neither.

“I had no idea you needed permission (to fly it),” Thomas told French paper Est Republican. “Nobody gave me any indication that I needed any special permission when I bought it on the internet.”  

The first bad sign came when he got a letter from aviation authorities (Direction Regionale de l’Aviation Civile) which reminded him of the rules. 

On Monday things got worse. Thomas got a call from the police who wanted to talk to him as soon as possible about the drone flight and the resulting film. He went to police and left with a court summons on charges of “endangering the lives of others.”

Prosecutors didn’t think Thomas’s little stunt was too funny.

“If the aircraft crashed in a densely populated area, the consequences can be tragic,” prosecutors told Est Republican. “The use of drones also raises the question of respect of people’s privacy.”

Here is the video. It's too bad it was filmed illegally, because its pretty spectacular.

Read more…

Quadcopter used by the Piano Guys!

This is one of the finest uses for the quadcopter that I have ever seen, bringing together two great passions in my life! You can see the quadcopter and some if the equipment the filming crew made use of at 10:15 onward in the 'behind the sceens footage below!

Needless to say I am sure everyone here would have jumped at the opportunity to work on a project like this. The filming took place at the 'Midway Ice Castles'.

Read more…

Pixhawk Infographic

3689573342?profile=original

Hi everyone!

I would like to introduce to you the final "Pixhawk Infographic" that I have been working on for a while now... it illustrates some of the tips I have learned over the past few years and shows the components that I would like to use in my own personal quadcopter design.

For the full resolution image please go here (thanks to Gary McCray): http://copter.ardupilot.com/wiki/advanced-pixhawk-quadcopter-wiring-chart/

In my next blog post I would also like to release some of the original individual PNG graphics for anyone who wants to use them in their own diagrams! Hopefully some of this can be used in the wiki!

I would appreciate it if any mistakes in the Infographic could also be pointed out so that I can make adjustments!


Best regards,

Jethro.

Read more…

Pixhawk Graphic for Documentation

3689563807?profile=original

Here is a sample from an "info-graphic" that we are currently working on for the new Pixhawk flight controller.

Knowing how daunting it is to gather enough info on a new flight controller (to be able to get into the air) I want this graphic to give a clear overview of the main components in a typical "quadcopter" system, from the Battery Warning Indicator to Telemetry connections. The purpose is to clearly show how all the components work together and to illustrate and name all of the connectors and plugs necessary.

To that end, I would like to know what specific components you would like to see included in the info-graphic, so please share your ideas! Also please feel free to use any of the Graphic for your own purposes.

Read more…

An interesting solution to flyaways...

I am sure many of us have heard about "fly away" horror stories coming from people who own(ed) a DJI phantom... today I found this video which explains the companies solution to one of the supposed causes of the problem... starting at 5:07:


The premise is that 'flyaways' are caused by a stronger interference signal that overrides the transmitter, jerking the craft in one direction and away from the pilot.

What the code does is detect whether that signal is unchanged for 10 seconds - if it is unchanged the code flags it as possible interference and puts the craft into a hover.

This is because actual pilots don't hold the sticks in one exact position for long periods of time, that is unnatural.

I wonder if it is worth implementing something similar in the Ardupilot code...

Read more…

HD FPV system now being prototyped!

This is what I have been waiting for!

Unfortunately the price might be an issue.

Here is their products page. I am glad to see that this is being considered for multirotor applications. It looks to be a rock solid system and will open up live HD transmission for news and sporting events.

http://boxx.tv/products/zenith/

It is technology like this that will make multirotors attractive to the TV industry.

Read more…

Are Flouride Batteries the Future?

I came across this interesting article and video today. This is the first time I have ever heard of 'Fluoride' batteries. 
 
https://www.youtube.com/watch?v=Itd4V72VvTg 
 
http://www.dailytech.com/Researchers+Create+Fluoride+Battery+Look+to+Replace+Lithiumion+Technology/article23093.htm 
 
Obviously, one of the greatest issues facing the future of drones is flight time. 15 minutes just does not cut it. 
 
Battery technology impacts drones, I think, far more than smart phones. This is simply because drones physically propel themselves in the real world, where as a phone just runs code and lights a screen for the most part. 
 
From what I understand, 'fluoride' is superior over lithium as a battery material in that lithium can store one free electron per atom as opposed to flour ides ability to store 3. 
 
I am wondering what is driving battery research.
Read more…