Brian's Posts (16)

Sort by
Moderator

BFRO Gets UAS Support for Squatchin


Ok, so Big Footing is not exactly "Main Stream", but IMO, this is a great example of how we can enjoy our hobby while helping others explore theirs.  Unfortunately, there's not a lot of details on the drone or UAS Operations but  it's a positive example none the less.  I live in Northern California, and want to take my drones on a BFRO expedition...

Read more…
Moderator

3.3v Power Supply Options - What's recommended?

58tut-1.jpg?width=360

The items shown above are part of a 5.8GHz video transmitter (#5) setup offered by Range Video.  All items are sold as individual items and like a big dummy I forgot to get Santa Clause order their powersupply (#4) when she placed her order for the transmitter. 

So the luck of the Irish kicks in and Mr. Murphy ordered their last Filtered Linear Power Supply and there's no telling when they will be back in stock.  So I'm on the hunt for another suitable power supply that will output the required 3.3v to run the transmitter and camera.  I've poked around and found that a lot of the setups used by fellow DIYDrones members have built in voltage regulators and are just attached to a lipo (typically 7.2v).

I have a few other projects in mind beyond the video transmitter for my Raven so getting a good lead on a good ps would be very nice to have.

I did manage to find several power supplies that may work but I'd like to know what more experienced tinkerers think.

#1

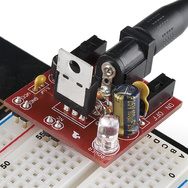
Breadboard Power Supply 5V/3.3V by Sparkfun

00114-05_i_ma.jpg?width=250This one is intended to use a walwart in the recommended 7-9v range.  It outputs a selectable 5v or 3.3v but forgive the newb-ness, I'm not sure if I HAVE to use a walwart.  Wouldn't a 2 or 3 cell lipo do the DC trick just fine?

#2

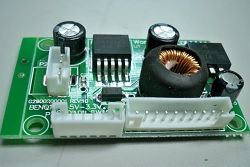
DC-DC 12V to Dual output 5V / 3.3V LED Power module

100_3610_500x334.jpg?width=250This E-Bay special is pretty cheap and has free shipping.  It seems like it would do the job just fine and would not need to be converted to not being a plug in for a breadboard. But would a LED power module work for the above mentioned video transmitter?  Voltage is spot on to what I need but I'm unsure of the LED part of the description...  

#3 

Question_mark_alternate.svg?width=250

You tell Me...  If all these finds are junk and you use something else, please let me know.  Also if you have a design I could build that would work too.


Read more…
Moderator

In Flight Motor Failure

So I finally got to do some testing without crazy winds, then THIS happens!


Oh well, it could have been very bad, but I was lucky and did not have any major issues.


I have some repairs to do, but in reality I was thinking of doing the mod I NEED to do now anyway, so... NBD!


3689404913?profile=original

That dark spot on the red wire is where it melted.

3689404953?profile=original

3689404928?profile=original

3689404971?profile=original

Views of the melted plastic/foam board with blind nuts for the motor mount.

The motor mount actually melted into the plastic/foam board. 

The plastic/foam board is scrap material left over from faux window blinds.

It works well, but can have issues...

Actually I use it often and this is the first time I've had any kind of failure.

Read more…
Moderator

RMB-CM12111_1_b.jpg?width=350

Other than "you get what you paid for" Anyone have a reason Not to buy this pair? 

My personal goal would be to use it as a learning tool, prepairing for adding telemetry to my projects. But it should be usefull too.  Secondary use in some project around the house, ie halloween automation, laser guided water splasher (anti-cat crap in the yard device currently in planning stage) ect.


Here's the Junk:

This package consists of two mini half-duplex wireless data transceiver modules and each such module is highly integrated with an ultra speed MCU and a powerful RF chip. With the introduction of the innovative yet higly-efficient encoding method, its anti-interference ability and sensitivity are significantly improved. Features like various channel options, ultra long transmission distance (1000 meters) or abundant interfaces (UART/TTL, RS-485 & RS-232) helps make the transmission of data of any size possible and eliminate the needs of writing transmission program and running complicated settings. A software application ("RF-Magic") is offered for free so that users can modify the settings of the module. Besides, its slim size and wide power supply range makes itself the most popular selection of many applications in different fields.

Features:

  • Ultra long transmission distance: 800-1000 meters @1200bps
  • Working frequency: 431-478Mhz (1KHz step)
  • +3.3-5.5V wide power supply range
  • -112dBm(9600bps) high sensitivity
  • Over 100 channels
  • GFSK modulation
  • Highly efficient cyclic interleaving error correction encoding
  • Flexible software programme option settings
  • Selectable RFID index
  • UART/TTL, RS-485 & RS-232
  • Large data buffer: 512bytes
  • Suitable for massive data transfer
  • Built-in watchdog ensures long-term operation
  • Length of antenna: 104.32mm

Product Link:

Read more…
Moderator

3689397938?profile=original


My ArduPilot Trials Day 2

I started off the day very excited to see how a new day of testing would go. I'd re-read portions of the manual, searched for ArduPilot tuning posts and contemplated the replies I got from my previous post.

The conditions were great and I was ready to toss that sucker up and get some satisfaction.
Instead, I learned a lesson. You see the picture above? That's what you get when you fly your plane using the wrong configuration on your radio. Notice how the tall grass beacons my plane to follow it's shadow... Well it did! Fortunately for me the grass was tall and I was quickly able to see the problem and cut power so no damage to speak of.

After I double-checked the electronics and hardware I reset the model in the radio to the appropriate configuration I got a GPS lock and tossed it up. I waited to engage the ArduPilot, which was in Stabilize mode until I trimmed out the model. Wow, what a great flight. The Stabilize mode checked out wonderfully. My fellow flyers were impressed with how well it did, especially when I used the stabilizer to bring it in for a landing. It was truly great. I lined it up on the approach I wanted, into a slight breeze and cut the gas and it glided in perfectly.

My ArduPilot Trials Day 3
Like yesterday I started of today very excited to try the next test. After flying yesterday, I took home the plane so I could change it's mode from Stabilize to Fly-By-Wire-A.

I was all set and ready to figure out what the heck "tell it where you want to go and it'll figure it out" was all about (that's a slight synopsis of the description of the FBW modes). I got my lock, put the wing on and gave it a toss.

Again, I learned a lesson. Not a new lesson, but one that should have been very fresh in my mind. You see the pictures below? That's what you get when you fly your plane using the wrong configuration on your radio. Notice how the tall grass beacons my plane to follow it's shadow... This time the grass was shorter and right next to a service road! Fortunately for me it was the grass, which was tall enough so again damage to speak of, just a bruised ego as I had watchers and needed a rubber band to hold on the GPS which had popped off.

So just what was that lesson? No it's not "dont fly your stryker" or even "double-check your model". It's Use Checklists to avoid these type of problems. I could have been sent back to ground zero with either of these crashes. I'm now building some easy grease pencil checklists that I'm going to attach to the plane and complete right on the model prior to flight. That should save me from myself and from having to remember to bring the list!

Todays second attempt went very well. Again once I trimmed out and got the model into the AP mode the FBW worked very well. It is different than the Co-Pilot for sure, but I use the rudder to produce a flat turn. The flatter the turn the better it's keeping itself stable. I did not get the chance to do the tests that are recommended for FBW, that will be next flight. For now I'm very happy with the ArduPilot. I again used the AP to land the plane, which was a little off from yesterdays great landing but I blame that more on me and how nervous I was after drilling the plane into the ground two days in a row. It did remain very stable during the approach and landing the line up was a little off so I had to walk a few yards to retrieve it instead of a few feet like the previous day. No big deal.

Next Test, FlyByWire-B, although I'm not sure what to expect in this mode with the motor? I guess it just keeps it constant? If anyone can explain that I'd appreciate it.

Wish me luck!

3689397977?profile=originalNotice how it's not quite square to the frame of the first picture? That creates visual interest!

3689397821?profile=originalIn the second shot the shadow almost forces your eye to whats outside of the frame.

3689398008?profile=originalThe third shot conveys movement. Notice how the grass in the background is in focus yet the foreground grass is blurred as the plane smashes into it...
3689397832?profile=originalLast but not least a nice shot after the model was corrected.

Read more…
Moderator

ArduPilot - First Flight

 
Ok, I've spent the last few weeks putting together my ArduPilot and plane.  It's running ArduPilot 2.7.1 in "Stabilize" mode.  The first flight was not very stable, possibly due to the fair amount of wind, but also because the ArduPilot is not tuned.  I've read the manual and have some observations/questions for anyone who can answer.
1. I'm running on a plane, Sky Fly Max by Hobbico, that is a boom type plane with ailerons, rudder, and elevator. I've modified the wing so it's about 52" wing span.  I'm using X,Y, & Z sensors from FMA.  My Z sensor is a second thermopile from FMA.  The AP is setup to use the Z sensor and the X,Y is configured to be "Right Side Up" with the connector facing forward.  That is how it was installed, when I tested the AP the roll compensation was the opposite to what it should have done.  As I recall the pitch was correct.  I ended up making the sensor face backward from the setting in the ArduPilot configuration.    Any Ideas?
2. Having read the manual and many posts, I know I can use the second Thermopile as the Z sensor.  I have found no orientation settings for this sensor.  Obviously, it should have a set of thermopiles facing up/down.  How do I know which pair is the one that is being used for the configuration of the AutoPilot?  The main sensor moves the controls when I put my hand in the way for it to read it, but that doesn't seem to happen on the Z sensor?  Anyone know how the FMA XY sensor should be positioned for use as the Y sensor so the thing works correct?
3. There is Roll and Rudder PIDS in the ArduPilot configuration that can be tweaked.  If I'm running Ailerons doe I modify the rudder settings? Are they in use?  When ailerons are in use I'm thinking they are tied to Roll.  Am I incorrect?
3689397082?profile=original
Just a shot of the ArduPilot on my bench.
Read more…
Moderator

DIY Drones Member Projects

3689395321?profile=original

Hello DIY Droners.  

Please allow me to introduce the "DIY Drones Projects" Google docs spreadsheet.

Many DIY Drones members would like a place to lookup the details of successful DIY Drones projects completed by fellow members.  Unfortunately, the structure of the DIY Drones site does not allow us to build any kind of online respository.    That's where the "DIY Drones Projects"spreadsheet comes into view.  It's goal is to provide an additional resource for members to use while planning their next DIY Drones project. 


The concept is simple. Members who have successfully assembled and flown their UAV project craft are asked to share details with the community via an on-line form. At Chris's suggestion, the form will utilize the "KISS" approach and will provide as many drop-down selection choices as possible to minimize the time it takes to complete the questions.


When the form is submitted the results will be available to the community as a planning resource.  Ideally the results will be available as a raw download or filtered using available reports. We'll be able to see trends, determine common configurations base upon project platform type as well as other useful information.

Here's the kicker... I've build the form and spreadsheet, but we need need project details. If you have had success with your project, please take a few minutes and complete the "DIY Drones Member Projects". The results will be assembled and made available to members on the site.

Thanks,
Brian

Read more…
Moderator

DIY Drones Project Blog

Attached file below is the the html code to insert into the blog entry to build a common repository of our communities UAV projects. This is what it should look like.  This is just a start we could have small pictures and places where the member could paste links to existing blogs showing more details than this "quickie" page lists.


DIY Drones Project
Fly-N-Eye1

Air Frame:

Wingspan:

Length:

Payload:

Flight Duration:


Specs:
Radio Control:
Telemetry:
Video:
Auto-Pilot:
Sensors:
Onboard Batteries:
Bat1: Bat2:

Bat3: Bat4:

Bat5:

Project Details Here


blog_template.txt


<iframe src="https://spreadsheets.google.com/embeddedform?formkey=dHpKU2JJUHlsVWVubmFhdmcxNUx1bXc6MQ" width="760" height="609" frameborder="0" marginheight="0" marginwidth="0">Loading...</iframe>

Read more…
Moderator

Turnigy Lipo's from HobbyCity.com

3689391285?profile=originalJust putting this out there...

I recently purchased 6 batts from HobbyCity.com and selected the USA Warehouse for shipping.  That was Wednesday the 23rd, it's Friday the 25th and they are on my desk.  I selected the USPS shipping option 2/3 day for less than $1.50 over the default shipping cost, bringing the cost of shipping to $11.  The package was sound and well protected.

I am very satisfied with the purchase.


I know that others have had bad times with some items from them, but if this is any kind of indication of turn around I'll be shopping HC more often and will purchase if the item is available from their US location.

Read more…
Moderator

I found the Fuse to a Sky Fly Max at a local hobby store and was instantly forced to buy it. It's a great, but simple starter plane which I think will make a great UAV. All of the parts except for the fiberglass boom are EPO type foam, all thick and well made. Like always, I will not buy an RTF so I'll need to part it together, but that should be less than $65. for just the air frame. I have a few ideas to make it more me, but that's for later. Click here for more Sky Fly Max Details.

Below are a few more pics of the fuse as well as a few shots of "Stuff" I've kept for projects and thought I'd share...

Boxes...

Candy/Gum boxes seem to be great for small projects. I like to use them to protect some of the electronic components on my planes when they would otherwise be exposed. You can drill small holes so they are vented or keep lids off and be mostly covered but well protected.

Floaty Key Chain things...

I've not installed it yet but I'm using these for mounting wireless camera (like a helmet cam) on the boom or underside of my wings. These could easily be made articulated and in damp'ish conditions by using a small clear dome to protect the camera and silicone to plug the other end where connections/batteries reside. I plan to power mine seperate from the camera pod, but using smaller lipo you could easily store the bat inside the pod w/the camera and only have the lead running to the camera's transmitter...

Cups...

Jello, Pudding, Tuna & Applesause... These are very handy and can be used from Cowls to Nacelles, to epoxy and everything in between.

Plastic sheets...

I use the thicker sheets for belly skids on my belly landers. It really helps keep the plane in good shape. I use recovered pop-bottle plastic (16oz/1ltr/2ltr) for lighter duty stuff like wing repair and reinforcement for weak designs. You can also use the pop bottle plastic as glue in hinges.

If you got the stuff around, use it...

Anyway, I'm cheap and this post shows it! But, I like to share so...

PS - The orange rectangle thing is one of those lighted magnifying glasses, cause I'm not blind, I just like stuff in bold!

-bcd

Read more…
Moderator

Disposal of Lipo Batteries


Wu61160.jpg


Source: http://www.rctoys.com/pdf/thunder-power-disposal-of-old-damaged-lipo-batteries.pdf

** DISPOSAL OF LIPO BATTERIES **

Unlike NiCd batteries, lithium-polymer batteries are environmentally friendly.

For safety reasons, it’s best that LiPo cells be fully discharged before disposal (however,

if physically damaged it is NOT recommended to discharge LiPo cells before disposal -

see below for details). The batteries must also be cool before proceeding with disposal

instructions. To dispose of LiPo cells and packs:

1. If any LiPo cell in the pack has been physically damaged, resulting

in a swollen cell or a split or tear in a cell’s foil covering, do NOT discharge the battery.

Jump to step 5.

2. Place the LiPo battery in a fireproof container or bucket of sand.

3. Connect the battery to a LiPo discharger. Set the discharge cutoff

voltage to the

lowest possible value. Set the discharge current to a C/10 value, with “C” being the

capacity rating of the pack. For example, the “1C” rating for a 1200mAh battery is 1.2A,

and that battery’s C/10 current value is (1.2A / 10) can be used,

such as a power resistor or set of light bulbs as long as the discharge current doesn’t

exceed the C/10 value and cause an overheating condition.

For LiPo packs rated at 7.4V and 11.1V , connect a 150 ohm resistor with a power rating

of 2 watts (commonly found at Radio Shack)to the pack’s positive and negative terminals

to safely discharge connecting it to an ESC/ motor system and allowing the motor to run

indefinitely until no power remains to further cause the system to function.

4. Discharge the battery until its voltage reaches 1.0V per cell or

lower. For resistive load type discharges, discharge the battery for up to 24 hours.

5. Submerse the battery into bucket or tub of salt water. This container should have a lid,

but it should not need to be air-tight. Prepare a plastic container (do not use metal) of cold

water. And mix in 1/2 cup of salt per gallon of water. Drop the battery into the salt water.

Allow the battery to remain in the tub of salt water for at least 2 weeks.

6. Remove the LiPo battery from the salt water, wrap it in newspaper or paper towels and

place it in the normal trash. They are landfill safe.

Read more…
Moderator

I stumbled upon this and thought others may think it's interesting as well...

Skynavigator

skynav1.jpg

Who knew the SP guys had competitions where they race around a triangle pattern of GPS coordinates? View results on Google Earth, get addional details from the plane to the ground station... Lots more.

Sounds fun but it's a little pricey.

skynav3.jpg

skynavigatorcollage_small.jpg

The equipment seems like it would be very easy to adapt to UAVs...

For additional details check the link below.

http://www.icare-rc.com/skynavigator.htm

Read more…
Moderator
I found this company while searching for homemade plane ideas. I've always the "rugged" look of agri-planes so the planes on this site really caught my eye. The cool part is they are built with foam board and are very stable slow-flyer planes. I've included another link to a guy's vimeo site who's big into FPV. He uses Mud Duck inspired planes and tosses up HD video camera. He's got some really nice video posted.Mud Duck Aviation hereMud Duck video here

DawnPatrol.jpg

Paul Thompson Vimeo FPV "Awsome setup" here

Big Breakthrough with HD Pan and Tilt! from Paul Thompson on Vimeo.

Read more…
Moderator

2.4ghz Device Range Expansion/Improvement

I found a link for building your own 2.4ghz Patch Antenna to extend the range of your remote projects.The details can be found on this page: http://www.rc-cam.com/gp_patch.htmWhich is a sub-project page from (http://www.rc-cam.com) which is included within this post in accordance with the wishes of the the operator of the RC-CAM website.I have also found this antenna listed on the 'Geeks' web (www.geeks.com)Product link: htp://www.geeks.com/details.asp?invtid=Z101-54000059-A&cat=CLR&cpc=CLRAs improving the quality of our 2.4ghz signals is or should always be on the agenda I was wondering what you all think in regards to the pros/cons of one antenna type over the other.Thanks - BCD
Read more…
Moderator

Twin motor setup

I've been contemplating about different platforms that could be used that, to me, seem a little more UAV'ish, but I've noticed that I have not ran across any twin motor setups within this site. I've poked around quite a bit, but certainly have not read every page posted.Is there a reason for not utilizing twin setups? Is it simply a matter of scale and payload to flight-time payoff?It seems to me that a few very good possible setups include:OV-10 Broncohttp://www.nitroplanes.com/yetwenovbr15.htmlCessna SkyMaster 337 Twinhttp://www.nitroplanes.com/newdecesk337.htmlC-119 Flying Boxcarhttp://www.newcreations-rc.com/ProductDetails.aspx?itemnumber=DHD513ELThe Bronco and Boxcar both have a ton of space for electronics and good flyers...Any thoughts?
Read more…