All Posts (11086)

Sort by

Estimate torque and efficiency from Kv

How do you estimate motor torque and efficiency from basic measurements? It is useful to know this information to improve flight time and performance. The video explains the fundamental relationship between Kt and Kv. It turns out you can get a lot of information from the motor Kv.

This video is part of a series. There are more tutorials on the tutorial page of our website. I transcribed the full video, so you can turn on the subtitles.

The following videos are written and will discuss experimental Kv measurement and brushless motor construction. They may take a bit more time to make because I am working on animated graphics. I think those will really help, especially to explain the relationship between Kv and motor/esc timing.

If you have any question about motors, I can answer here, and I will try to include the asnwers in the following videos.

Read more…

3689681458?profile=original

Hi ,

The first time when i connected the OSD system  , i never received some Mavkink messages without the connection with

ground station. For me was important to have EXT_STAT message  ( voltage ,current , sensors..)

I modified the code in MinimOSD to read which message was sent from APM without GCS connection

The rates  (frequency ) are set in the EEPROM , but when arducopter load the parameter some still to be zero

In mission planner the rates for telemetry was to default.

SR1_EXT_STAT  ( HW..)

2

SR1_EXTRA1      (Attitude)

2

SR1_EXTRA2    (Vfr_hud)

2

SR1_EXTRA3  (ahrs,hwstatus,systemtime,ragefinder)

2

SR1_PARAMS

0

SR1_POSITION  (current location)

2

SR1_RAW_CTRL (servo out)

2

SR1_RAW_SENS   (ins,compass,barometro)

2

SR1_RC_CHAN   (radio in, radio out)

2

I patched the code to inject one gcs_send_text_fmt to read the value stored in streamRates[STREAM_EXTENDED_STATUS] and stopped the others message.

3689681342?profile=original

After loaded the firmware ,  I read in serial monitor  the value zero  for Stream Rates[STREAM_EXTENDED_STATUS]

I didn't understand why this value was not set to 2hz.

Anyway , to solve this "problem" i changed the default value for  EXT_STAT message

3689681471?profile=originalNow I can fly without GCS  receiving extended status stream in my OSD system

Read more…
Moderator

The sUAS Guide

3689681418?profile=original

We have published a guide at work, it includes a bit about just how accurate surveys are without ground control points. That should be of interest here. 

This will be released on a six month rotation and include commercial operator lists from around the world (The next one just 333's right now) I would love to know what you would like to read about in the next one, and I will try and find it!

Here's how surveyor Luke Wijnberg summed up his article.

“The uncertainty of the data issued can cause the client to make costly mistakes when doing earthworks or other quantity calculations. It is not sufficient to issue information as accurate and absolute because the processing software says it is. The surveyor needs to remember his training and apply first principles when undertaking this type of survey as there is certainly a potential for exaggerated results.”

Other subjects include:-

  • The Wimberly Floods : Search and Rescue

  • Five skills you need to succeed in the commercial drone market.

  • Developing an Unmanned Aircraft Culture of Safety

  • Five tips for navigating the drone fad

  • Drones 2.0 Drone Traffic Control

  • Super Drones : An interview with the creator of R2D2

  • Project Artemis : Visual Navigation for flying robots.

  • Drones as a service

Read the free guide here http://joom.ag/o6yp

We are already planning our next one due out the end of June so if you have any submissions direct them at Tiaan, contact details at the back of the guide.

Read more…
3D Robotics

Interesting proof-of-concept by DARPA researchers using a Pixhawk-powered drone to autonomously navigate a cluttered warehouse environment at 20 m/s.

DARPA's Fast Lightweight Autonomy (FLA) program recently demonstrated that a commercial quadcopter platform could achieve 20-meters-per-second flight while carrying a full load of sensors and cameras. The FLA program aims to develop and test algorithms that could reduce the amount of processing power, communications, and human intervention needed for unmanned aerial vehicles (UAVs) to accomplish low-level tasks, such as navigation around obstacles in a cluttered environment. If successful, FLA would reduce operator workload and stress and allow humans to focus on higher-level supervision of multiple formations of manned and unmanned platforms as part of a single system. Through this exploration, the program aims to develop and demonstrate the capability for small (i.e., able to fit through windows) autonomous unmanned aerial vehicles to fly at speeds up to 20 m/s with no communication to the operator and without GPS. 

This testing was carried out at Joint Base Cape Cod / Otis Air National Guard Base.

For more information on the FLA program, visit: http://www.darpa.mil/program/fast-lig...

Read more…

New OS image for Erle-Brain 2: "denim"

3689680940?profile=original
Hi all!

Erle Robotics team announces the release of the new version of the Debian OS image for Erle-Brain 2 codenamed "denim". The image includes the following enhancements:

  • New version of kernel PREEMPT_RT 
  • Live video streaming directly into the web-browser for any device.
  • New libraries installed: python-scipy, liblz4.
  • Fixed minor bugs in the selection of the robots making it even easier to switch between vehicles.

The following picture shows how to configure Erle-Brain 2 with only one click:

3689681083?profile=original


Configuring your brain is super easy:

3689681193?profile=original

If you need to change the Erle-Brain 2 configuration, only introduce "erle-reset" in the prompt and everything will be restored to its initial state.

The following video shows some bits about this process:

https://www.youtube.com/watch?v=E0IQh4Rbwcw

Latest OS images can be downloaded from our docs and unmet support, as always in our forum.

Read more…

3689680781?profile=originalHi Everyone,


After 5 months of design and test process, new DroneThermal v022016 thermal camera boards are ready to announce. 
This is probably the smallest analog (PAL/NTSC) thermal camera in the world. 

Dimensions : 20mm x 20mm x 15mm (included Lepton 25 degrees core)
Weight: 3 grams
Resolution: 80x60 pixel.


I'm building a new FPV microquad and a rover for videos. I hope weather will be better in following days for outdoor videos. 
3689680958?profile=originalYou can follow the process and updates from our Instagram account

For more info, please visit the Product Page

T
hank you for reading.

Read more…
3D Robotics

3689680819?profile=originalFrom Fast Company, an interesting application of APM:Copter powered drones:

Distributed energy systems are a good idea for homes that aren't hooked up to the grid. But distributing solar panels to remote areas in the developing world is hard. That's why Mobisol, a German installer, is testing whether drones could do some of the heavy lifting.

"The last mile can be a headache, and, since we have a couple of engineers who can develop drones, we thought maybe there's a leapfrog we can make in how we bring appliances and pieces of kit to a customer," says Thomas Duveau, the company's business development manager.

Every Mobisol customer has a solar home system that can be put to productive use, he says. The company is testing the idea that it could put a little recharging station on every customer's roof—that way drones could move around, say, large areas of Rwanda or Tanzania. In other words, Mobisol's customers would become part of the drone network, offering their rooftop panels as micro-charging stations. In return, customers would get credits on their bills, offsetting their monthly repayment costs. See more in the video here:

Mobisol has a rent-to-own business model, whereby customers pay back the cost of solar panels and household appliances over a three-year period and then own their equipment. So far, the company has signed up about 40,000 families, or 200,0000 people in all.

Duveau believes the cost of solar has declined sufficiently that governments and international agencies should move straight to distributed energy rather than investing in large grid projects.

"The money the World Bank and others have spent has never materialized," he says. "People have been waiting 10 or 20 years for the grid and the grid is not going to come, because it's much too expensive and it's too big an infrastructure for what people really need."

"Most families just want six or seven lamps, a fridge, a TV, a stereo and a charging station. Assuming you could build it, you could never manage to refinance it, simply because the average consumption of electricity is so low. [Generally] they have more efficient appliances than we have."

About 1 billion people still lack electricity, according to World Bank figures, and plenty of other places have grid infrastructure that isn't reliable.

3056336-inline-s-4-could-solar-powered-drones-help-deliver.jpg

Mobisol's systems are bigger than others sold in the developing world. M-KOPA, which has connected 300,000 homes in East Africa, typically sells 8 watt kits. That's enough to power two LED lights, charge five phones and a torch, and run a radio. Mobisol's packages start at 80 watts, complete with a TV, mobile recharger, radio, and five lights.

Its systems cost at least $21 a month over 36 months. But Duveau says it's more useful and allows families to become micro-entrepreneurs, for instance charging phones and laptops for other villagers, and setting up barber shops or small cinemas. "We're the only company that can claim to substitute the grid," he argues.

It's early days for the drones. But one day they could allow Mobisol to extend its reach further while piggybacking on the company's existing solar network.

Read more…

Redundancy for your autopilot

3689680737?profile=original

Hello flight-buddys,

it has been quiet for a while from GIZMOtec and the AP-Manager.

But meanwhile the project is finished and we are happy to present the AP-Manager with even more features and flexibility as a redundancy-board between two parallel running (different) autopilots.

Since, the requirements for the operation of unmanned aircrafts in commercial and semi-professional purposes have become more strict in some regions here in Europe, safety is important.

The AP-Manager allows you to operate your aircraft or vehicle safely by using two independent autopilot systems parallel. The AP-Manager is acting here as an intelligent bridge between the autopilots in your UAV system and switches to the alive autopilot, whenever one of the autopilots quits its operation.

Furthermore, with an onboard-mixer you can even operate your system manual, just in case both autopilots should fail (except for multirotors).


The AP-Manager has implemented electronic switches, which routes the servo outputs from the autopilots to a single servo output rail depending on the desired operation mode of the AP-Manager. The AP-Manager can be operated in “Manual-“ (semiautomatic) or “Automatic”-mode.

In both cases, the AP-Manager is monitoring the health status of the connected autopilots by checking the alive-signal of each autopilot and the servo outputs of the active autopilot.

This improves redundancy and therefore safety in case of malfunction in one of the autopilot systems. The AP-Manager switches to the second autopilot system and the operator is able to perform a safe landing.

On the board there is also integrated a PPM-decoder for manual (non-stabilized) flight.

With this decoder, you can directly feed the remote signals though the AP-Manager to the servos and motors (only possible for planes, delta-wings, helicopters and ground vehicles). This function is activated in case both autopilot systems are not working (Emergency state) to perform an emergency landing.

The AP-Manager is able to control up to 8-output channels. With a second board you can extend the system to use even more channels (NOTE: not implemented yet).

Additional benefits arise when using the AP-Manager in combination with autopilots from the ardupilot-family (by 3D-Robotics) in terms of switching the telemetry-downlink. It allows you to use only one telemetry module to monitor two autopilot systems separately. If the AP-Manager switches (manually or automatically because of a malfunction) between the autopilot systems, it also switches the telemetry automatically, allowing you to monitor the autopilot which is currently in command.

If you performing test-flights (e.g. with a new firmware on the second autopilot) you can easily watch the behaviour of the second autopilot via the telemetry switch, whilst flying on the familiar primary autopilot (with the old firmware).

One single PPM / PWM channel on your radio receiver can operate the different mode-selection solutions for the autopilots and the selection of telemetry’s.

You can use the most features when using a PIXHAWK or APM, but you can also use other autopilot systems. You even can mix the autopilots or stabilization systems, if it makes sense for you or for test purposes.

Dependent on your range of application for your UAV’s, the setups can be very different and various (type of autopilot, telemetry, esc’s, power-redundancy, remote control, vehicle, number of engines…etc.). Therefore, we prepared a configuration tool for doing the setups.

3689680802?profile=original

3689680701?profile=original

Some Features of the AP-Manager:

  • Telemetry switch (for 3DR-family)
  • Manual and/or semi-automatic switch between autopilots
  • On-board mixer for traditional aircraft, delta-wing and helicopter on board (in case both autopilot fail)
  • Wide internal power supply range 3,7-17V
  • Configurable via software
  • Future firmware updates possible
  • Mixable with different autopilots
  • Signal feedback outputs for LED’s or buzzer
  • Digital output for feedback of actual state back to JETI receiver
  • PWM-signals of active autopilot and parallel monitoring of alive-signal
  • … etc.


For more information please check our website on www.GIZMOtec.eu , take part on our NATION CAMPAIGN or contact us if you have questions via office@gizmotec.eu

Thank you,

The GIZMOtec-Team

Read more…

Hello Drone Lovers!
Ivan here from Easy Aerial Inc.

3689680898?profile=original


I am super-excited to invite you to watch my appearance on a Science Channel show called "All American Makers" this Wednesday at 8PM ET. Easy Drone XL Pro was chosen to be featured in the second season and we put it through some rough testing on the show!

Please tune in and join us as we look into the unique design features of Easy Aerial modular approach and explore the future of drones as smart and helpful autonomous machines. I guarantee good entertainment. 

Feel free to share this with other folks who might be interested in checking out a very unique drone design.

Best,

Ivan Stamatovski
Founder, Easy Aerial Inc.
www.easyaerial.com 

Read more…

Autopilot assisted thermalling exploitation

Hello ensemble,

this is a flight done with the Proxima II, using a UAVDevBoard v4 for autopilot assisted thermal exploitation.

Telemetry on screen is done with DashWare. I had to create a profile for UDB to use the telemetry file with that program and had to adapt a few gauges also. The profile is attached, in the case someone needs it.

Plane was flown around sometime to catch a good thermal and put then in autonomous flight. Just a loiter programmed with LOGO. At the top the thermal was so strong that it was a little bit hard to bring the glider down without destroying it in flight.

In a previous thermal I had to reposition the plane to center the thermal again. That simply requires to come off from autonomous mode, reposition and switch autonomous mode again.

Nice to watch GPS speed vs. airspeed as well as pitch.


Additional hardware: ChannelWizard

On screen instruments provided by DashWare.
Instruments from left are:
- GPS speed (SOG)
- IMU computed airspeed
- GPS satellites number
- autopilot mode (110 stabilized, 111 autonomous)
- GPS computed acceleration
- IMU pitch
- vertical wind speed
- altitude from start point
- altitude above sea

Best regards,

Ric

UavDevBoard.zip

Read more…

New Research on Drone Buying Experience

3689680873?profile=original

We just launched a new research survey exploring your drone-buying experiences, where you bought, what seller services matter, and where you intend to buy drones and/or small unmanned aerial systems. As a short 13-question survey, it’s designed for those who have bought or will buy a drone for either hobby, commercial, or public use.

The study is designed to answer the following key questions and more:

  • What’s the best place to purchase a drone (for example online or in a store)?
  • What matters most about your purchase: is it price, availability of accessories, or is service?
  • What was the intended use? Was is for hobby or racing or photography, or was it for work?
  • What are the most popular drone brands by price point?

This research study is being underwritten by BZ Media, the organizer of InterDrone and Drone Dealer Expo, and preliminary results will be presented at the Drone Dealer Expo in Orlando, April 11-13, 2016.

You can take the brief survey here: https://www.surveymonkey.com/r/NMVT9F5

You can read more details about the study here: http://droneanalyst.com/2016/02/09/new-survey-whats-your-drone-purchase-experience-like/

Read more…

Sand Casting Rotor Tip Weights

This is an "exploded" view of my rotor design.  Leading and trailing edge foam cores moved out of position to show internal details.

3689680570?profile=original

This design features a cylindrical bearingless rotor root, with droop stop.  Airfoil shaped pieces on inboard and outboard ends of rotor airfoil provide an equidistant path for fiberglass cloth layup, to minimize wrinkles where fabric goes around end of airfoil.  You can see the (lead) tip weight at the most outboard portion of the leading edge airfoil.  These tip weights were sand casted in the LE shape with a concave groove on the front to help position the weight against the leading edge rod.  Leading edge foam core, tip weight and leading edge rod will be wrapped with fiberglass at +/- 45 deg layup pattern to provide torsional rigidity to transfer torsional moments from the pitch control horn (extension of leading edge rod) along the length of the airfoil.  Will also include at least 2 layers of 0 deg layup to provide rigidity in bending, forming a "spar" out of the leading edge portions of the rotor.

The brownish section is a composite beam which distributes the large centrifugal tension forces from the inboard end cap (which is being pulled outward by the fiberglass fabric that will be wrapped around it - not shown) to the cylindrical flexelement which connects to the rotor hub (not shown)

Trailing edge will get a thin strip of alum inserted into a slot in the foam core to give some durability to the TE.

Below is a timelapse of the rotor tip casting, and a pic of the final product

https://youtu.be/kFUzCT0zQjM

3689680424?profile=original

Read more…

UgCS 2.8 Is Now Live!

2_8whitesketch.png?width=750

We're very excited to announce the release of UgCS 2.8.

Visually the first thing you will notice is that the new version features an improved user interface – you are now able to change the visual theme yourself. By default it now comes with a new black/green theme and you are able to select either the previous blue theme or two other new ones.

Another major improvement is that UgCS windows are now manually resizable! UgCS can now be resized as any ordinary application. This allows for more intuitive control of the UgCS application window and makes UgCS easier to use alongside other programs.

One more visual improvement we have made is that the position of home location of your drone is now displayed on the map in UgCS.

Click & Go functionality is now available for all DJI autopilots through UgCS, including A2, Wookong-M, Naza-M V2 and Ace One in addition to already being available for DJI Phantom 3 and Inspire 1.


We have also made UgCS easier to integrate with ADS-B transponders. Commands can now be sent to the ADS-B transponder through UgCS interface. ICAO ID, Flight ID and SQUAWK Code parameters can be set through UgCS. This feature is available for UgCS Pro users.


Also various bug fixes have been made to make UgCS run better.

See UgCS 2.8 in action here:
Get UgCS here: www.ugcs.com
Read more…

Nowadays, amateur drones have an amazing range of applications. You may wonder: “Can I use my drone for photogrammetry?” and the answer is “Yes”.


Source video (4k / 2160p):


3D Model created using Agisoft PhotoScan:

sketch.PNG?width=715

If you're interested, you can read a tutorial.

Read more…

P9X autopilot, a revised pixhawk

3689680589?profile=original

Pixhawk is a great autopilot, we love its robustness and rich sets of features. Nowadays it is a de-facto to low cost autonomous vehicle application.

There’re always some changes you want to make in an open source design, this rule also applies to Pixhawk. First, I want to make it smaller, to fit it into a f5B glider fuselage, with built-in dampers and a plastic shell could survive a hard crash. Then I want to make the sensors to be replaceable, so I can test new MEMs gyros. And lastly, I want to make the IO completely customizable to my specific application, eliminating 3-pin RC connectors, better fixture to a larger avionic payload motherboard, or an array of Pixhawks without messy wiring.

So in the last winter, we had it done, named it P9X

Some quick facts about P9X: (might subject to change due to its beta phase)

  • 80mm x 50mm x 17.2mm box made of 1.5mm thickness mold injected PC/ABS
  • 43mm x 50mm core PCBA size
  • Tested with Ardupilot
  • Tested with QGC 2.7 version PX4 firmware
  • PX4 master built not yet running (maybe a firmware issue)
  • Total weight: 45g
  • Connectors fully compatible with Pixhawk
  • Integrated silicon rubber damper (need help in axle alignment test)
  • 4 copper nuts embedded for M3 screw mounting (dimension: 38mm x 25mm)
  • IMU sensors swappable (need soldering)

 3689680480?profile=original

3689680431?profile=original

3689680652?profile=original

3689680613?profile=original

We need your Help!

The first 50pcs batch is out, we have invested in inject mold, silicon rubber mold, silk screen printing. We want more testers and a crowd funding campaign, before that, we want to make sure this hardware revision has no serious design issues. If you are experienced user, developer, embedded engineer, please consider purchase one of these beta samples and send us feedback.


How to get one.

Back in the last year, Raspilot project generated no income, Emlid and Erle Robotic has inspired by its design then they have made their similar design products. I don’t want to bankrupt in my hobby, and make it serious to be a self-employed job. So no more free samples.

I want to sell these 50 pcs unit for 150USD each, with Aramex shipping from Shanghai, China. Please give me feedback about the price.

Thanks.

Read more…

3689680408?profile=original

For those following my work, thank you and sorry for the long wait for an update!  I am currently writing up my doctorate so as you can imagine I have been a social hermit recently!

Nevertheless, I have now had a journal paper published which may be of interest to those fellow electronics geeks out there and as a bonus it is open access so no charge to view it!

http://www.sciencedirect.com/science/article/pii/S0360319915308065

The paper focuses around balancing a hydrogen fuel cell with a battery with ideal diodes.  These give a tremendous efficiency advantage over traditional diodes.  The powertrain exploits the ability that a fuel cell has to operate at different voltages in order to create a potential long endurance system which still has all the power of a battery at an instant when needed.

Once again, thank you for your interest and I will do my best to answer any questions you have!  The paper is a creative commons license so feel free to use it and build upon it, giving credit for the original work where due!

Read more…
3D Robotics

3689680536?profile=originalAmazing project from Hackster.io:

ABOUT THIS PROJECT

Voice Controlled Quadcopter Drone

With Amazon Echo, AWS IoT, and 3DR IRIS+
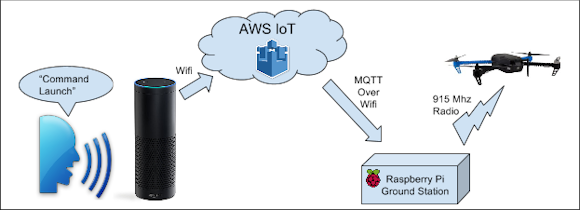
Materials (Shopping List)

  • Raspberry Pi with Raspbian, power supply, wifi adapter, case, etc
  • 3DR IRIS+ (915 Mhz Radio version for U.S.).  Also would work with any Arducopter or Pixhawk based copter.
  • Amazon Echo

Setting up AWS IoT

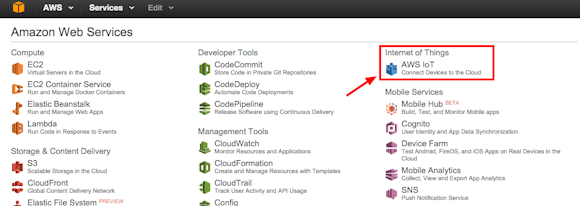
  • Create a “Thing”.  First, from AWS IOT page, create a resource.
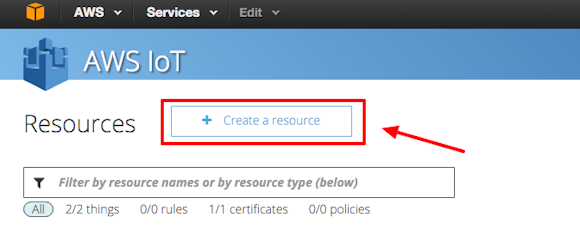
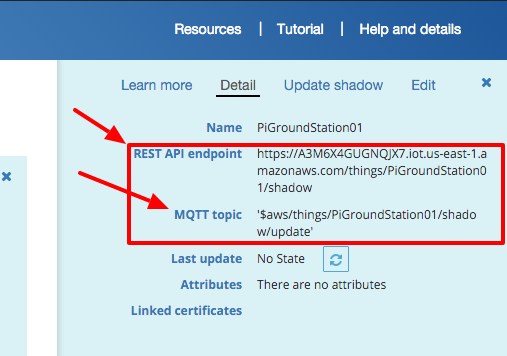
  • Now, “Create a Thing”.  For this demo I am calling mine “PiGroundStation01”.  
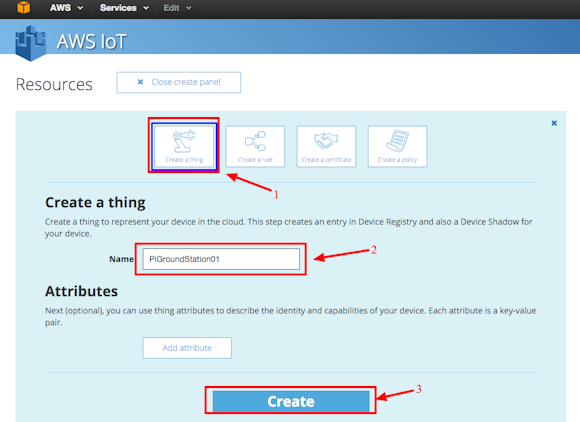
  • Next, we need to create a Certificate so that your device can authenticate to AWS IoT.  Click “Create a Certificate” and use “1 Click Create” (Steps 1 & 2 in the image below). Download the public key, private key, and certificate.  You will need to put these on the Raspberry Pi later.  Put them somewhere safe because Amazon will not issue them again, you would have to start the process over and create a new certificate.
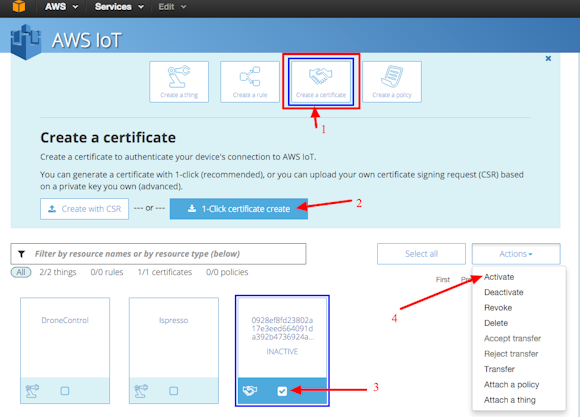
  • Then (steps 3 & 4 in the image above) select the certificate with the checkbox, and under Actions menu, Activate the certificate.
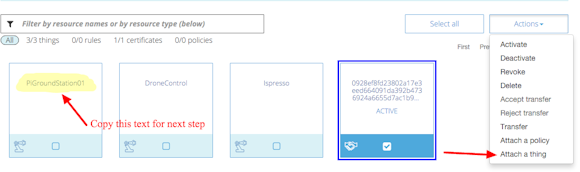
  • Now, with that certificate still selected, copy the name of the “thing” you just created, you will need this on the next step.  Now, go back to Actions menu, and select “Attach a thing”.  
  • Now, on the popup layer / form, paste or type the name of your thing and click Attach.
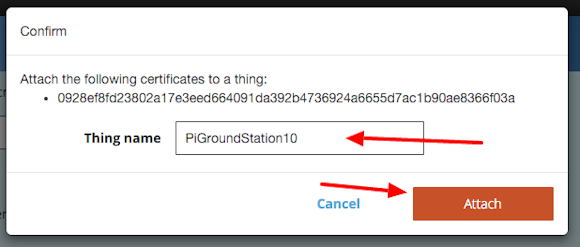
  • You can now see that the certificate detail shows your thing to be attached.
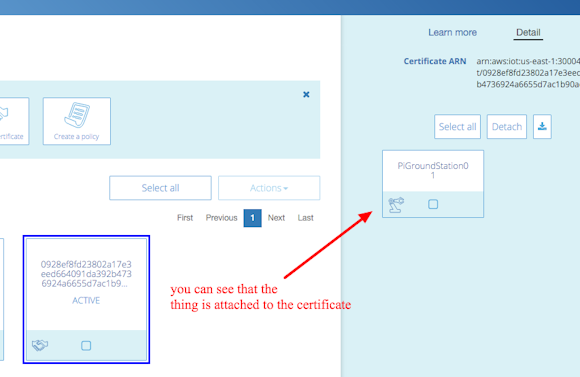
  • Best Practice:  Create two sets of certificates, one for the Lambda function and another for the python ground control.  This is a better security practice and also it will help troubleshooting as you can see in AWS IoT Logs which connection is doing what.  Don’t forget to attach both Certificates to your Thing, using the same process described above.
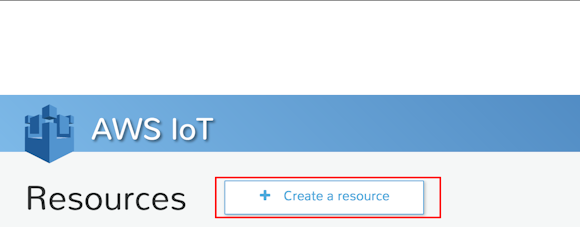
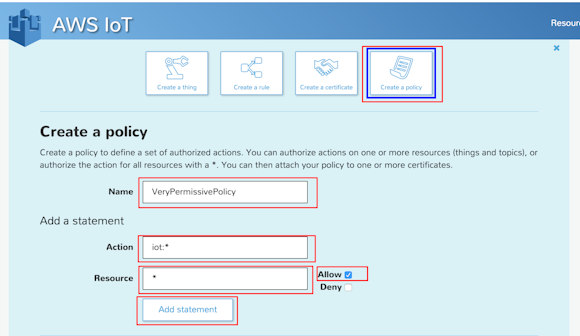
  • Now, we have to Create a Policy so that clients using the certificate will be allowed to connect to the endpoint.  We’re going to create a very wide open (wildcard permissive) policy, to make this easy.  In production environment you will want to create a policy that is narrowly tailored to achieve just what you want to achieve and nothing more.  Click “Create a resource”:
  • Create a Policy and fill it out like the below (you can Name it whatever you want).  Click “Add Statement” when you are done.
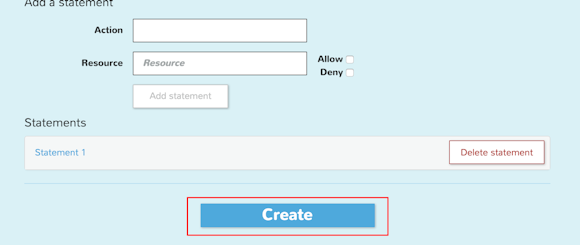
  •  Now, you should be able to see Statement 1.  Scroll down a bit, and click the big “Create” button
  • Look up on the top right panel, and you should be able to see the details of the policy you just created.
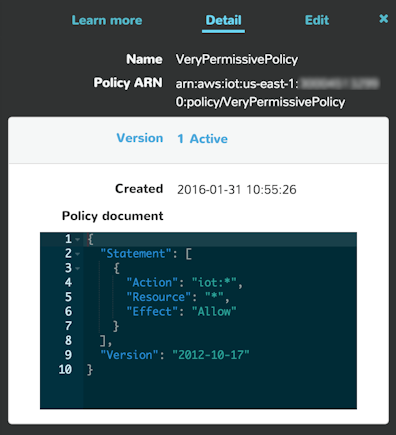
Your thing is ready for use, let’s move on to other parts of the setup.

Set up Raspberry Pi Custom Ground Station

  • This tutorial assumes you already have a functional Raspberry Pi, loaded with latest Raspbian distribution.  There are many tutorials online how to do this.
  • Assemble the Raspberry Pi and include the USB wifi dongle.
  • Connect the USB radio antenna from IRIS into a free USB port on the Raspberry Pi.  You should not need to install any special software.
  • Connect (with keyboard and monitor) to Raspberry Pi and enable SSH.  
  • On Raspberry Pi,  Run the following commands:
cd ~ sudo apt-get install avahi-daemon sudo chown pi /usr/local/ -R sudo apt-get install nodejs npm -y sudo apt-get install zip sudo apt-get install screen pip install awscli pip install droneapi pip install paho-mqtt git clone https://veggiebenz@bitbucket.org/veggiebenz/echodronecontrol.git dronecontrol   cd dronecontrol mkdir certs  

If you have any trouble with any of those commands working (as in, there are errors in the command output), try the following and then pick up where you left off in the first code block above.  You would need to retry any command that did not complete successfully.

#run these only if there were issues with the previous set of commands sudo apt-get remove python-pip easy-install pip hash -r 

To validate that your python environment is now set up correctly, go into python command line interpreter and issue the commands “import droneapi” and then “import paho.mqtt”.  If these do not error out, you are OK.  Enter “exit()” on a new line to leave the interpreter.
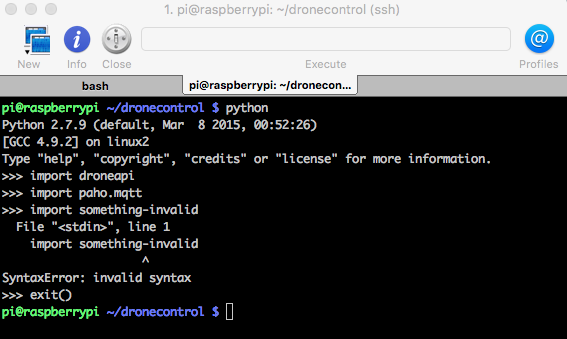
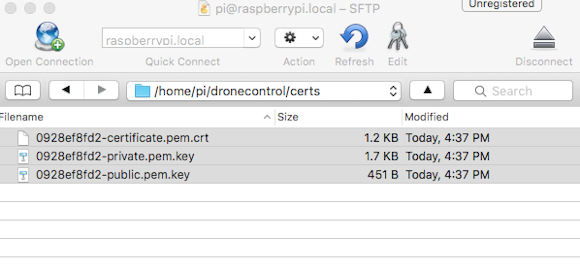
  • Using an SFTP client (I am using Cyberduck for OSX), connect to Raspberry Pi.  Click “Open connection” on top left, and fill out the information for your Raspberry Pi, and click Connect.  
  • In the SFTP client, navigate to /home/pi/dronecontrol/certs/  and upload the 3 certificate files from AWS IoT to the Raspberry Pi.  Move these into dronecontrol/groundstation/awsCerts/.   Take note of the file names because they will likely be different than what you see above, and you’ll need to put the file names into some of the program files later in the process.
Editing files on Raspberry Pi

There are quite a few options for editing files on Raspberry Pi.  There are also people with very strong opinions on which is the best.  Keeping it simple, you can use “nano” to do simple editing in place on the Pi.  If you are going to do serious python coding on Raspberry Pi, you could go for a heavyweight but very functional solution like PyDev with Eclipse.  PyDev lets you remotely mount the Pi filesystem so you can edit files in place and test very easily.  Or you could mount the Pi drive remotely and use something like Atom from your workstation.

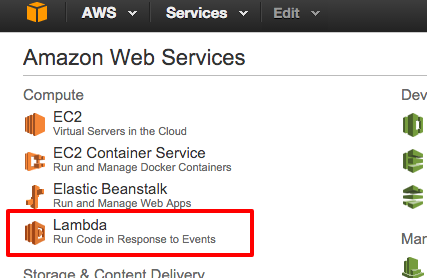
Setting up your Lambda function

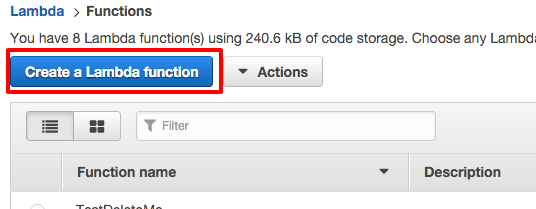
  • Click on “Create a Lambda function”
  • Go down to the bottom of the page, and “Skip” selecting a blueprint.
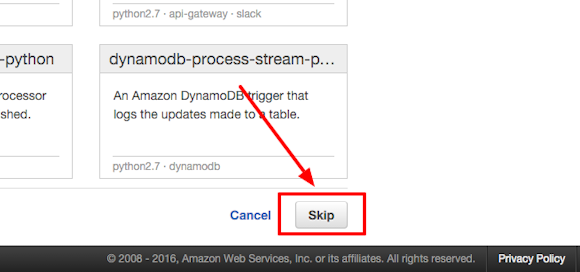
  • Name your lambda function it “EchoDroneControl”.  This is important because this name will have to match with a directory name on RPi for the upload script to work correctly. Leave runtime as Node.js, and select “Edit Code Inline” - we will actually upload our code using a script later.  In the code block, just put a comment like:   // nothing here yet
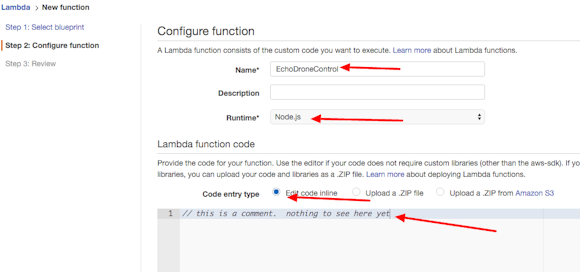
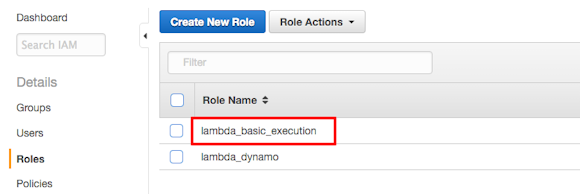
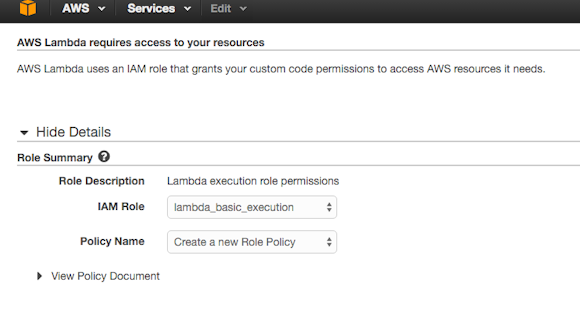
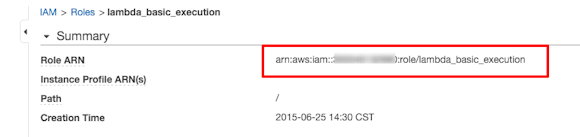
  • Use Basic Execution Role, it will pop up a new window and suggest you create a new IAM role, it may suggest a name like lambda_basic_execution - this is fine.  It doesn’t matter as long as you remember it as you will need the ROLE’s ARN later.  You will have to enable Popups (disable popup blocker) to get to the Lambda Role page.
  • Click “Allow” on bottom of Lambda Role page.
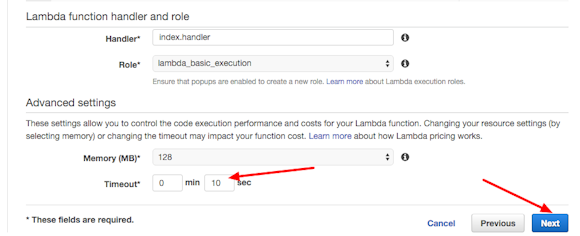
  • Back to Create Function page, Leave other defaults except Timeout, increase to 10 seconds. Then click “Next”.
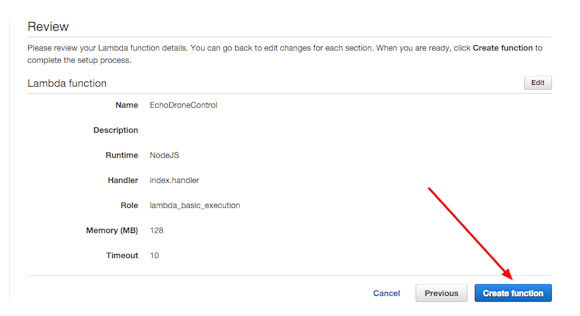
  • “Create Function”.
  • Once your function page comes up, note your Lambda function’s ARN (Amazon Resource Name) on the top right.  It will look like -  arn:aws:lambda:us-east- etc etc etc…  Copy this, because you will need to supply this to Alexa Skill configuration in a later step.

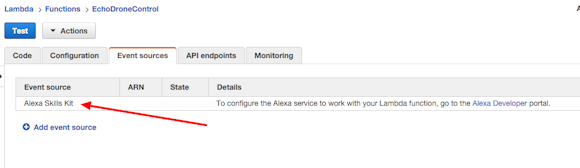
  • Select “Event Sources” tab and “Add event source”.  Select Amazon Skills Kit, and save.
  • Have a look at the top right of the screen, copy the Role ARN value.
  • On Raspberry Pi, navigate to ~/dronecontrol/EchoDroneControl/   -- these are the files you will need for Lambda, and for Alexa Skills Kit (ASK).
  • Edit “upload.sh” and paste the Role ARN value into the variable on Line 3.  Without this you will not be able to upload the source code to Lambda.
  • Edit config.js file and make some changes.  Put your Host, Topic, Alexa Skill App ID (you will get this in the next section).  
  • Find the set of certificates that you created for Lambda, open up the certificate files with a text editor.  You will need to place these into strings inside the “config.js” file.  Looking at the config.js file, this should be self-explanatory.  The reason we have to do this is because Lambda doesn’t like reading files from the file system, so we have to pass the certificates as Buffers into the IoT device initialization routine.

Setting up Alexa Voice Skill

  • Next, select “Alexa”.
  • Click “Get Started >” under Alexa Skills Kit
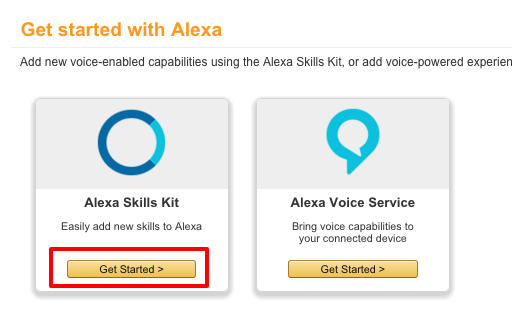
  • Use name = “Drone Control”, invocation name = “Drone” and for Endpoint, select Lambda ARN and use the Lambda Function ARN value you got in the prior step (not the ROLE ARN).
  • Save these values, and next page you will see entry box for Intent Schema and Sample Utterances.  We will get these from our GIT project.
  • On RPi, navigate to ~/dronecontrol/EchoDroneControl/speechAssets/   -- these are the files you will need.  Open up IntentSchema.json and paste the values into the Intent Schema box on the Amazon web page.  Likewise for the SampleUtterances.txt, put the content in the corresponding text box on the web site, and select “Next”.
  • You won’t be able to test this yet, so scoot down to the bottom of the page and click “Next”.
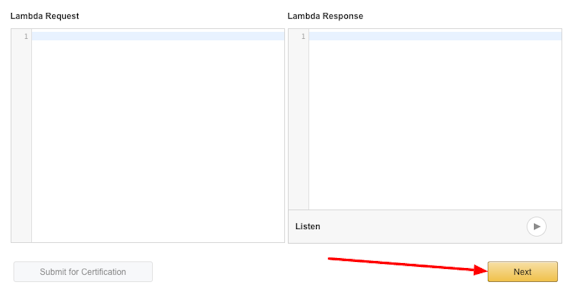
  • On the next page there are some mandatory fields, so let’s fill them out.
  • Example Phrases:  “Alexa talk to Drone”, “Command Launch”, “Go forward 10 feet”
  • It’s not necessary to submit for certification as right now it’s only you who will be using it.  Be sure to save your entries though.
  • Go back to the Skills Information on your Alexa skill, and now you should see an Application ID.  This is what you will need to place in your lambda “config.js” page in the value for app_id.  The point of doing this is that someone else’s Alexa skill can’t execute your lambda function.  The JS code will stop executing if it’s not coming from your Alexa skill.

  • Let’s go back to the Raspberry Pi and finish setting up lambda.  Then we can come back to Alexa Skills Kit site and TEST our Alexa to Lambda integration.

Uploading and testing your Lambda function

  • Before you can upload your file, you’ll have to do a couple of things.  First,install AWS Command Line tools.  
  • You’ll have to run “aws configure” and set up some access parameters.
  • Now that your config.js file is updated with the correct values, you can execute upload.sh to push the file to AWS.

cd ~/dronecontrol/EchoDroneControl ./upload.sh  

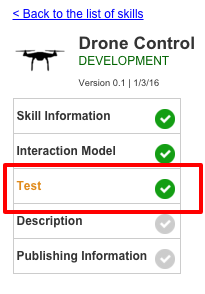
Go back to your Alexa Skill, and click “Test” on the left nav.  
  • Go down to “Enter Utterance” and type “Tell drone Command launch” and view the response from Lambda.  You should see “Executing command launch” somewhere in the Lambda response.  This means Alexa skill is talking successfully to Lambda.  
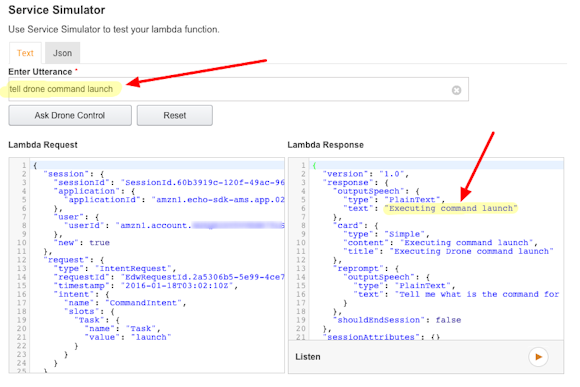
  • You should also be able to go into AWS IoT Logs and see the MQTT Connection and Publish successful messages.
  • Now let’s get the groundstation working.

Customizing the code for your Python Ground Station on Raspberry Pi

  • On RPi, navigate to ~/DroneControl/groundstation/
  • Edit echodronectl.py using your favorite python editor.
  • You need to change the MQTT endpoint name, and the topic name.  
  • You will also need to be sure that the certificate names in the script match the names of your certificates in ~/dronecontrol/certs/
  • You will have to edit a few variables at the top of the python file:  cert_path, host, topic, and the certificate file names.
  • Run the following commands from Raspberry Pi console, this will put two commands into an initialization script file that runs when MavProxy runs.
echo "module load droneapi.module.api" >> ~/.mavinit.scr echo "api start ~/dronecontrol/groundstation/echodronectl.py" >> ~/.mavinit.scr   

If the script complains about file not found, you might need to edit ./mavinit.scr and use absolute paths instead of relative paths.

Up, up, and away!  (Well, hopefully not "away"...)

Tip:  If you are away from home, you can set up your mobile phone’s Hotspot with the same SSID and password as your home wifi network and your devices will not notice the difference.

  • You need to be familiar with controlling your aircraft using the manual controls before you try some automated method like this.  Also you should be very familiar with how to execute “RTL” sequence and know what to expect.  Be very familiar with taking manual control of the craft when things go wrong.
  • Drones are inherently dangerous and could cause great harm, so do not operate near anybody or anything.
  • Place your IRIS+ on the ground.  
  • Power up the drone, also power up the RC controller.
  • Alexa is powered up and is connected to your wifi network.
  • Pi Groundstation is powered up and is connected to your wifi network.  Also, the 3DR 915 Mhz radio is plugged into a USB port.
  • Pi Groundstation is running “mavproxy” program - you can set this to auto start or you can just ssh into the Pi and run it from there.  Put the following into ~/mavproxy.sh, and add ~/mavproxy.sh to /etc/rc.local/ for auto start:
"#!/bin/bash #start a screen session for mavproxy but detach from it screen -dm -S mavproxy.py  #read -p "mavproxy launched in background. Use screen -r mavproxy.py to attach" -n1 -s -t3" 
  • You will have to ARM the drone manually.  This could be automated but has been left in place as a manual step purposely.
  • Say “Alexa, talk to DRONE”.  You should hear “Welcome to Drone Control”.
  • Initiate your flight by speaking “COMMAND LAUNCH”
  • Once the current waypoint is reached (in the case of launch it is by default about 5 meters above ground), you can issue a new command.  Try commands like “GO FORWARD 10 FEET (or METERS)” or “TURN RIGHT”.   You can say other things like “GO RIGHT 15 METERS”, and you can even say “TURN LEFT 45 DEGREES”.  
  • Once you are done with your flight, you can say either “COMMAND LAND” to land wherever the craft currently is, or you can say “COMMAND R T L” or “COMMAND RETURN TO LAUNCH”.  
  • When landed, use the disarm sequence on the RC controller to be sure the craft is stopped, and disable the power to the drone.  Turn off your RC controller.

COMPONENTS AND SUPPLIES

R8326274 01
Raspberry Pi 2 Model B
× 1
3DR IRIS+
× 1
Echo
Alexa Amazon Echo
× 1

APPS AND ONLINE SERVICES

CODE

Read more…