All Posts (11086)

Sort by
3D Robotics

3689601264?profile=originalFrom Politico:

Online retailer Amazon has brought on a major K Street firm to lobby on its proposed drone delivery program.

Amazon Prime Air has hired Akin Gump Strauss Hauer & Feld to work on “federal advocacy with regard to testing and operation of [unmanned aerial vehicles] in the US,” according to a new lobbying registration.

Amazon hopes to be able to deliver products to consumers within 30 minutes of an order using a small UAV.

But there are barriers to the operation of commercial drones in the United States — including a lack of regulatory guidance from the country’s aviation authorities.

The Federal Aviation Administration has yet to come forward with a formal set of rules for commercial drones, although it’s expected to propose a final rule by November.

Congress has directed that the FAA that allow commercial drone use by September 2015.

Lobbyists Michael Drobac, Melanie Goggins, Ed Pagano, Jennifer Richter and Greg Walden will work on the account for Akin Gump.

Read more…

My Copters Have Arrived!

3689576773?profile=original

First of all, I would like to thank everyone on this site that helped me within the past few weeks! Y'all's advice definitely helped me make some decisions in moving forward with these UAVs. With that being said, I wanted to give an update to anyone who is interested in what I finally purchased.

I definitely wanted to get something Arduino-compatible, and first looked into getting a hexacopter. However, I had an overwhelming amount of feedback to start out with a quadcopter instead, which I've learned also tends to be more efficient than a hexa anyway. I was also told to get something cheap and durable to practice flying with, since this is my first experience with copters. So, I purchased two drones, one for beginner's training and one for experimentation.

The copter I purchased for practicing with was recommended to me by a user on DIYD. This is the UDI U818A Quadcopter that I bought from Amazon (http://www.amazon.com/U818A-2-4GHz-Axis-Quadcopter-Camera/dp/B00D3IN11Q/ref=sr_1_1?ie=UTF8&qid=1403121723&sr=8-1&keywords=udi+u818a). It has so far proven to be very durable, and I can get some practice with it inside my office.

The second copter (just came in today) was also recommended by a number of users here, the 3DR IRIS. After opening up the packaging, it seems to be somewhat intimidating, but I'll get started putting everything together tomorrow.

I thank you all again for your help, and I'm looking forward to working with these copters!

Kate

Read more…

Serbia Floods

Hello there
My name is Nikola Lukicic. I am writing to you from Serbia. Just wanted to share a video I made with my discovery pro about 3 weeks ago in order to raise awareness about the tragedy that overwhelmed my country.

Serbia and an entire Balkan region have never seen such catastrophe caused by floods and the final number of casulties is still unknown

Kolubara coal basin lights up every other light bulb in Serbia. Now, along with all the machinery, it is completely submerged under water which is 60 meters deep at some places and energy production is in great crisis. It is considered to be the second largest lake in Serbia, and was formed in just three days. It is estimated that damages to Kolubara coal basin caused by the floods amounts to about 100 million euros. This is nothing compared to numerous cities and villages still being submerged and fighting the ongoing floods

 During these days, my multirotors greatly helped the rescue teams in the relief effort by providing instant aerial insight into developing situations on the ground as villages were getting hit by the flood waves. 

I am trying to raise awareness about the catastrophe that is currently unfolding in my country and trying to gather as much support for Serbia as possible by sharing this video. I kindly ask you to do the same. Thank you !

Read more…

USA Trip Canceled

I just saw on the youtube that Trent has canceled the USA Trip, after a tip stall and bad crash. For me this can show and teach many things who are out there and see this as a simple job to do. When people see a UAS flying, they think they can start a business easily out of it or start flying like a pro. 

When you start flying constantly and frequently, problems start to appear and this is a great example. For me it was a big attempt and a good lecture. I appreciate Trent for his afford and his attempt. I encourage  him to start a blog post about the problems he had and lectures he had taken. Good job Trent. 

Read more…
Moderator

3689601132?profile=original

3689601021?profile=original

3689600948?profile=original

3689601158?profile=original

3689601036?profile=original

Dear Friends,

yesterday we start to delivery the VR Brain Micro 5 pre order. Thanks to all guys that join the preorder in last month . I think that the first user start to receive it in the next days . We are working to update the wiki with the updates for quick start FAQ for use our new board.

The info will be update in the next hours on :

vrbrain.wordpress.com 

This is the repo with bootloader , driver , updated code for vrbrain micro 4.5 and 5.0

https://github.com/virtualrobotix?tab=repositories

this is internal repository where we ask the pull request to diydrone global repo .

On last mission planner we yet propagate the last patch for work with uBrain .

If you need support write down in this blog post or in virtualrobotix original post : 

http://www.virtualrobotix.com/profiles/blogs/vr-brain-micro-5-0-yesterday-start-to-delivery-the-first-vr-brain

best

Roberto 

Read more…
100KM

wpid-20140530_100511.jpg?w=300&h=225

Hey everyone!

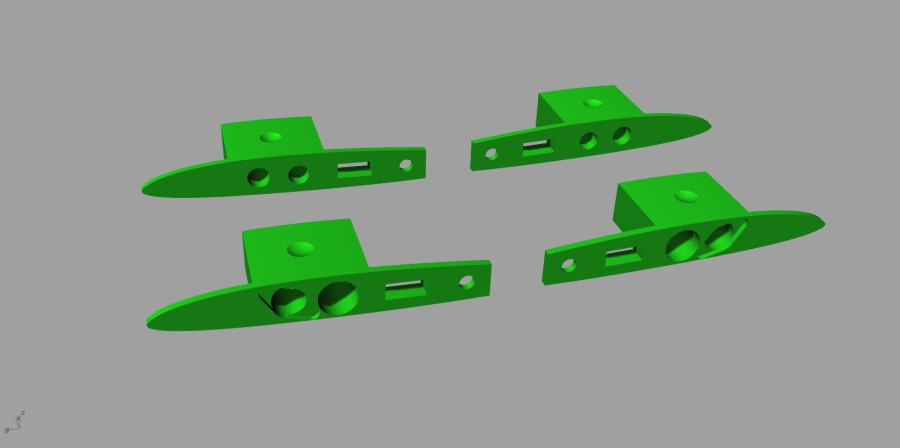
So I have finally emerged from home built CNC machine purgatory. I finally have the new machine running, and it rapids @ 1000 IPM and gets around +- .003 accuracy. But anyway thats not the point of this post. I have been working on upgrades to the basic techpod. Upgrades that make it much easier to transport and assemble at the field.

wpid-20140530_100535.jpg?w=300&h=225


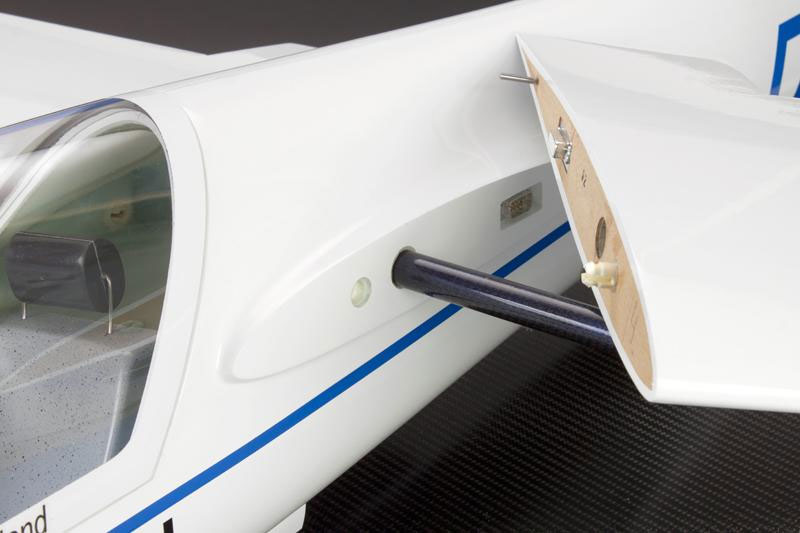
The mod includes a large diameter carbon fiber tube that the wing tubes slide into. You can see its black outline in wing stub.

wing-plates.jpg?w=900&width=600The upgrade includes 6 pin multiplex servo connectors and a wing retainer system from esprit models

wing-retainer-system-lock.jpg

They hold extremely good. Maybe a little too good but with a careful grip you can pull them right off without denting the wing.

img_0801.jpg?w=600

Also, The removable tail modification works well. Its not tool-less but removes quickly with a couple screws. I am finishing the prototype for these mods and should be out testing them tomorrow. If all goes well, my goal is to have these upgrades available for purchase by the end of the week.The files are available over at grabcad if you would like to print out your own.

Read more…

3689601105?profile=original

From an appeal on the Register today: 

If you're a dab hand with X-Plane's Plane-Maker who just happens to fancy eternal internet glory as part of the Low Orbit Helium Assisted Navigator (LOHAN) mission, then today's your lucky* day.

We're inviting any bright spark who can turn our .SLDPRT CAD files into an X-Plane to get in touch.

The reward for this labour is the aforementioned glory, plus beer, quaffing of which TBA. Sadly, the bruised LOHAN budget doesn't allow greater recompense, and indeed our Playmonaut is complaining vociferously that we recently cancelled his hired stretch limo and bought him a second-hand bicycle.

Full story here. 

(*Our particular interpretation of the meaning of the word "lucky")

Read more…
Developer

Red Balloon Finder

As many probably know, this year's Sparkfun Autonomous Vehicle Competition (AVC) is similar to last year's except that a new challenge has been added in which we can gain extra points by finding and popping 1m red balloons.  It's pretty difficult to do (see failed attempts #1, #2, #3) but as you can see from the video above it's finally getting the balloons.

The setup is detailed on this page on the developer wiki (scroll down to the Red Balloon in the Example Projects section) but in any case, it uses a Pixhawk running a modified version of AC3.2 (code here, AC3.2 testing thread here).  The Pixhawk has all the regular ArduCopter functionality but in addition it accepts commands from an external navigation computer, an Odroid U3 when it is in the Guided flight mode, or in AUTO and running a newly created MAVLink NAV_GUIDED mission command.  This NAV_GUIDED command takes some special arguments like a timeout (in seconds), a min and max altitude, and a maximum distance and if the Odroid takes too long to find the balloon, or gives crazy commands that cause the copter to fly away, the Pixhawk retakes control.

So while the Odroid is in control, it first requests the pixhawk to rotate the copter slowly around while it pulls images from the Logitech C920 web cam and uses OpenCV to search for blobs of red in the images.  During the search it keeps track of the largest red blob it saw so after the copter has rotate 360 degrees it sends commands to point the vehicle in the direction of that blob and then sends 3D velocity requests 5 times per second to guide the copter towards the top of the balloon. Leonard Hall helped me greatly in improving the control algorithm both for the new velocity controller that was added to ArduCopter and also with the strategy the Odroid should use to best get to the balloon..

All of the communication between Pixhawk and Odroid uses Kevin Hester's Drone API and Tridge's MavProxy.  It's relatively easy to use and allowed me to write all the code in Python.  That code is all here.

3689600919?profile=original

A couple of extra things that came out of this was I managed to use Python's MultiProcessing to allow the image capture and image processing to run in separate processes (so they run in parallel).  It seems that unless images are pulled from the camera at 15 ~ 30hz, they become extremely laggy.  In one test I measured a 1.3 second lag in the images from the camera!  With MultiProcessing that's down to less than 0.2 seconds and there are 2 more cores still free on the Odroid so there's room for more sophisticated work to be done!

For testing, at Tridge's suggestion, I set-up a balloon simulator that works within SITL.  It used the simulated copter's position and attitude and then created a simulated image of the horizon and the balloon (if it was within the field of view of the simulated camera).  This fake image was then fed into the image recognition python code making it an end-to-end test.  This was all possible because both the Odroid and our Simulator run on Ubuntu.  Having the simulator allowed a lot of bench testing before any real flights happened.

If you want to see a really impressive use of image processing in ArduPlane, check out Michael Darling's video here of one arduplane following another.  Michael's set-up is similar in that he uses the same camera and an external nav computer (a beagle bone black) and OpenCV.  I'm not sure what communication method he used between the BBB and the Pixhawk.

Also I hope that over the next year we will enable more image processing computers to work with ArduCopter (and ArduPlane, ArduRover) and maybe lead to the safe precision landings Jesper Andersen suggested in this blog post.

All feedback welcome!

Read more…

Arducopter3D with SimonK reversible ESCs

This was the maiden flight of my 3D hacks to the Arducopter 2.9.1b code. So while my piloting sucked, I was pretty impressed that it actually worked!

The ESCs are Afro 30s with SimonK configured with COMP_PWM=1, MOTOR_BRAKE=1, BRAKE_SPEED=8 and of course RC_PULS_REVERSE=1 to allow reversing.

The props are actually two sets of carbon fiber props stacked on top of each other with one set upside down - another hack. This is far from ideal, but all I had on hand at the time. Normal props are far too inefficient in reverse and I actually don't have any I can flatten out (yet). I can't wait until 10" 3D props are common!

The code needed quite an overhaul to simply support negative throttle. On top of that, I added some delays when switching direction to make sure the motors stayed in sync when reversing direction. The final cherry was to have the acro mode self leveling mix switch the roll target to upside down when the throttle reversed. What you kind of see in the video is me just reversing thrust and letting the computer flip it over for the inverted hover.

Next up: learning how to fly and tune it!

Read more…
Developer

Crowd Funding Tracker/Update

3689601006?profile=original3689601058?profile=original

After reading the post “Yet Another follow-me copter on Kickstarter” I thought is would be interesting to list the campaigns crowd sourced and get an update of the current status. We have a lot of Kickstarter, Indiegogo and other crowd sourced campaigns disseminate information on DIYD, and it’s a good thing. BUT, I think what would be great to follow up on which delivered and which did not, or quite not yet! and why.
The ones I can think of are (no particular order)
‘B’ The [R/C] Flying Car
Pocket Drone
Game of Drones
Hex
Easy Drone
R10 Quadrotor
Incredible HLQ
Robot Fourbot
AshimaCore
MavBoard (delivered thank you)
The latest being Airdog and Hexo+ who still need to complete their campaigns
Hexo+
Airdog
Also (randomly)
Search and Rescue bot
I think it would be great to have this discussion as it hard to keep track of all these drones options. And if crowd sourcing is really helping connect customers with products that want and work as expected when the get them.
Read more…
3D Robotics

3689600992?profile=originalCongrats to the EasyDrone team, who hit their $20,000 goal on Kickstarter. Now they've offered a stretch goal of upgrading everyone from APM to a Pixhawk autopilot if they hit $30,000 in the next 24 days. I think they can do it!

From the project's Kickstarter page:

I'm thrilled to announce that we have reached our campaign goal over the weekend. This is awesome especially because we have another 24 days to go!

Here is the stretch goal - Pixhawk for everyone

At the next milestone at $30,000 we are going to give everyone our latest and best autopilot regardless of the ready-to-fly reward level. Here is what that means: 

  • FUTURE PROOF DRONE - compatible with new advanced software that will become available in the near future. Just upload update and use. 
  • MORE SOPHISTICATED FLYING MODES - including flying in groups and communicating with other drones and devices. 
  • ADD SENSORS FOR DISTANCE AND SPEED MEASUREMENT - you will be able to add external sensors for more precise flying. 
  • 4X THE PROCESSING SPEED - of the autopilot, means faster response and more stability.


Read more…
3D Robotics

Given that this is the third Follow-Me announcement of the day, AirDog's claim to be the "world's first" auto-follow action sports drone may not be quite accurate ;-) But the tracking bracelet looks very interesting. They're raising $200,000 on Kickstarter.

AirDog: World's First Auto-follow Action Sports Drone

The goal of this Kickstarter is to launch production of the AirDog, It is a simple to use personal drone for every surfer, snow-skate-wake-kite-boarder, MX or BMX rider. The AirDog is a leap forward in personal drone technology, developed by a group of engineers who are passionate about action sports.

With your help, the AirDog will move to production. With it, the world will be introduced to an innovation, an experience, and a device that is truly game changing. 

Imagine this for just a minute.

You’re doing the very thing you were born to do — You’re surfing a mammoth wave, pulling off a flawless cutback. It’s breathtaking. You’re on your snowboard, whooshing over fresh powder in the backcountry. It’s exhilarating. You’re executing a perfect crankflip on the BMX course. It’s mind blowing.

Now imagine that your GoPro is soaring overhead, capturing the entire performance in pro quality video. Every move of your body, every droplet of water, every flake of snow, and every clod of dirt — everything captured in exquisite detail.

The camera matches your pace, flying down the slope at 40 mph. The camera dips and hovers to photograph your movement through the curl of the wave. The GoPro gradually rises as your bike ascends a roller.

You’ve got video proof of your exploits, accomplishments, and achievements. The camera — super stable, incredibly smooth, precisely framed, and perfectly balanced, — is recording with flawless accuracy. It’s your airborne sidekick, flying along wherever you go.

Does the dream sound too good to be true?

It’s called AirDog, and its the world’s first auto-follow action sports drone.

What do you get when you throw aviation experts, entrepreneurs, programmers, developers, and extreme sports fanatics into a box, and shake it up?

You get us. We’re kind of a quirky group.

Our team at all its gloryOur team at all its glory

We love doing something fanatical like MX, wakeboarding, snowboarding, kitesurfing, skating, surfing, or other daredevil stunts. But when we get sort of serious, we’re cooking up technology that’s just as extreme as the action sports we love.

AirDog is the product of years of development, the pinnacle of drone technology, the apex of sports videography. (And it took a heck of a lot of coffee.)

Now, we’re ready to introduce this mind-blowing technology to extreme sports fans all over the world.

This invention is a dream come true.

AirDog is a small, agile, foldable quadcopter, especially designed for video shooting action sports with the GoPro camera.

Like its canine namesake, AirDog automatically follows you wherever you go, whatever you do. It’s not bothered by pelting rain, freezing temps, massive waves, or freaking insane places. AirDog doesn’t say “no.” It just follows, flying right along.

AirDog is your sidekick, just in case you can’t rent a helicopter plus professional photographer to take a video of your black diamond run. AirDog is your personal training assistant, allowing you to review what you’re doing right, and where you need to improve. AirDog can transport you to views that you never thought possible. AirDog can persuade others to join you in your extremes.

AirDog gives proof to your bragging rights.

Just strap the AirLeash on your wrist or helmet, and the AirDog is ready to follow you.

Inside, AirDog is really complex technology. But using and controlling AirDog is really simple.

Here’s the basic idea:

  • AirDog follows a signal from the programmable tracker - AirLeash.

  • The AirLeash is a small waterproof computerized tracker with clever software and sensors inside. It sends signals to the AirDog, indicating exact movement trajectory.

  • The drone performs inflight calculations to correct its flying pattern, and points the camera at the user wearing AirLeash.

Takeoff and landing is completely autonomous, freeing you to focus on your performance. It will land at the end of your track, or return to the takeoff spot when the battery begins to run low. An alarm on the AirLeash tells you when AirDog’s battery is too low to continue.

We spent countless caffeine-fueled hours, hacking intelligent flight code algorithms. The result is functionality that allows AirDog to follow you while you’re riding down the slope or flipping around on a halfpipe. You don’t have to worry about controlling the camera.

Strap it on, cue it up, and do epic things.

AirDog has three main flight modes:

  • “Auto- Follow” mode, with many submodes for different sports

  • Manual remote control flight for first person view (FPV) or indoors. (Manual remote is not included in AirDog kit).

  • Handheld Steadicam mode. When not in the air use it as stedicam.

There are six Follow modes that you can configure and control with your AirLeash and smartphone app. Each one is a great choice and will deliver stunning results, regardless of your sport. You’ll probably want to use all six.

Tracker prototype. Production version is expected to be almost half the size of prototype in picture.Tracker prototype. Production version is expected to be almost half the size of prototype in picture.
  1. Auto-follow. Will work with almost any sports. In this mode AirDog will follow you repeating exactly your movement trajectory while maintaining its position in preset distance and altitude from you.

  2. Relative position - In this mode AirDog will maintain constant offset relative to magnetic north from the rider. For example, you can set it to keep a 10 meter distance at 4 meters high to the east from your position. Even when you change your direction, the AirDog will stay at the same preset angle from you. We suggest this mode for straight line wakeboard cable parks, surfing, and some other sports.

  3. Follow track. This is the safest way to operate AirDog. Simply go for one lap with AirLeash and it will record your track. Then adjust AirDogs trajectory to your liking in smartphone app.  AirDog will repeatedly fly over the exact set trajectory and the camera will be continually adjusted to aim at the rider.This is the most creative mode where you can become a true director of your movie. Adjust AirDog's trajectory to avoid obstacles like buildings or trees. You can even make it to shoot you from different angle on different spots/kickers in the track. It might sound complicated, but its a simple few tap process in AirDog smartphone app.

  4. Hover and Aim. The Hover and Aim setting allows AirDog to stay in one position above the ground, but constantly directing the camera at the AirLeash. This setting is perfect for tight places such as smaller skateparks, narrow forest trails, or for activities such as bungee jumping or base jumping, where clearance from equipment is important. 

  5. Circle. In this setting, AirDog makes circular rotations on a set radius and altitude, keeping the camera aimed at the AirLeash. This for slow speed or static shots to show impressive view around you.

  6. Look down.  The most simple mode but can produce very stunning reasults. Simply "walk" your AirDog above a ramp or kicker where you are about to throw some epic tricks and with push of a button it will freeze its position and aim camera straight down. Now make sure you don't go too high.

Not satisfied with all these amazing options? No worries.

We’ll always be adding new flight modes through firmware and app updates. We depend on user feedback to continually develop Airdog into something that’s jaw-dropping and awe-inspiring.

The AirDog is designed to go farther and higher than you thought possible. If you’ve ever wanted to shoot an edgy music video from off a cliff, the AirDog is your solution. If you’re shooting an indie movie, and want some clutch aerial shots for the car chase scene, the AirDog is happy to oblige.

You can read more about flight modes on AirDog's official website www.airdog.com

If you’re already an experienced remote control (RC) pilot, you’ll love Airdog’s manual flight features. Although AirDog boasts fully autonomous flight modes, you can also use it for FPV (First Person View) or indoor video shooting with your RC transmitter. Simply connect any TX module that supports PPM mode and has more than 6 channels, and fly AirDog completely manually.

But there’s more! You can combine AirDog’s auto-follow feature with manual control. Simply attach the Airmote tracker to the object you want to shoot — car, boat, animal, whatever — and manually turn follow mode on or off whenever you want to switch to or from manual mode. This way, you can use the auto-follow tracker with enhanced RC maneuvers to make circular fly-around moves at the precise radius and speed.

With this amazing combination of auto-follow and manual control, AirDog is a total game changer in aerial video shooting. You won’t believe the creative possibilities.

So you want to make videos that look drop dead awesome, professional, and really top-notch. We get that.

We designed AirDog, while chanting the mantra “stable, stable, stable.” Okay, maybe it wasn’t exactly like that, but you get the idea. We think stability is important, and we obsessed over it.

AirDog uses  2 axis gyro-stabilized gimbal with the following features to make sure that your aerial videos are as stable as a tripod on a granite slab. Here’s what we engineered:

In other words, your GoPro footage is stable as anything, even while airborne, even while flying at 40 mph, and even while tracking your progress on the slalom.

To use AirDog, simply attach your GoPro to the drone’s gimbal and you’re ready for stable action shots.

Early gimbal prototype test demonstrates camera stability. 

AirDog has its own app (iOS & Android), giving you full control of the device.

With the app, you can control the distance, height, and angle. You can create custom flight paths of your favorite tracks and map out shooting presets. 

Smartphone integration means that total flight control is just a tap away.

Extreme sports are about extreme conditions. Even your equipment needs to have extreme designs.

AirDog is all about extremes.

This drone is as tough as they come. If we had to pick what type of dog we modelled it after, we’d have to pick the bulldog. (With wings.)

The AirDog’s design has the following features:

  • Foldable arms

  • Impact-resistant body

  • Collapsible body

  • Fold-down props

  • Weather resistant

  • Lightweight

  • Collision-sensitive motor shutdown

  • Prop guard (will be released later as an accessory)

  • Easy repair

AirDog defies the limits of your expectations.

  • You can stuff it in your backpack and go.

  • You can expect it to perform in subzero temperatures

  • You can force it to follow you through wind, waves, rain, sleet, and snow. 

The AirDog is designed to withstand impact. The prop guard, an optional accessory, provides further protection to the AirDog and bystanders. Replacement parts are available, and can be easily installed using simple tools.

Here is why we developed a dedicated tracker we call AirLeash.

A year ago when we started development of the AirDog we thought it was a good idea to make AirDog follow a smartphone. We abandoned this idea very soon, here’s why:

1. Poor usability in many sportsHow would you use it when surfing? How to operate a smartphone in cold weather when in gloves? How to make it waterproof and still be able to terminate flight and quickly land it in emergency situation? 

2. Missing vital sensors for precision auto-followAverage smartphone GPS accuracy in horizontal plane is about 5-10 meters and error doubles when measuring altitude.
We realised that in order to achieve precision we need much higher level sensors and very complicated sensor fusion algorithms to calculate and predict movement trajectory and keep camera aimed at rider all the time.

3. Poor wi-fi and bluetooth rangeDifferent smartphones are performing differently. But it was clear that ranges above 30-50 meters are not really possible. This again creates a problem when you are surfing out in the ocean 350 meters from drone and want it to launch and come to you. Or you are riding downhill at 30 mph and drone just loses signal… its gone forever unless you climb back on the mountain. So we reassured ourselves that we need a reliable and long range wireless transmission and custom developed tracker - AirLeash.

For too long, the drone has been synonymous with warfare. We’ve designed a drone with a very different purpose.

We think it’s time for a  new generation of drones that inspire creativity, enjoyment of nature, healthy lifestyles, and self expression.

AirDog is on a mission to help us achieve that.

The future of the AirDog project is in your hands. You have the chance to be part of a technological breakthrough.

We’ve had a blast — a year of building, testing, developing, dreaming, creating, toiling, and getting ready.

Now, it’s go time.

Everything is ready. From the final design, to the component suppliers, to the production lines — the final phase we’re waiting on is you. 

You can be part of the first generation of AirDog users, dreamers, and pioneers. You can be the first owner of the AirDog.

All AirDog standard kits come with the following:

You have demands. AirDog meets them:

  • Durable and weather resistant construction

  • 10-20 minutes flight time depending on flight speed

  • Interchangeable 14.8 V, 4000mAh, LiPo batteries

  • Wind resistance up to 28 knots (14 m/s)

  • Top speed, 40 mph (software limited)

  • AirLeash range up to 1000 feet (300m)

  • Operational ceiling, 3000 meters above sea level

  • Weight 3.08 lbs (1.4 kg). 3.96 lbs (1.8 kg) with battery

Read more…
3D Robotics

First Arduino radar shield

3689600871?profile=originalWith a smaller antenna, they seem perfect for small drones.

From Hackaday:

The very first fully operational radar Arduino shield was recently demonstrated at Bay area Maker Faire. It was built by [Daniel] and [David], both undergrads at UC Davis.

Many have talked about doing this, some have even prototyped pieces of it, but these undergrad college students pulled it off. This is the result from Prof. ‘Leo’ Liu’s full-semester senior design course based on the MIT Coffee Can radar short course, which has been going on for 2 years now. Next year this course will have 30 students, showing the world the interest and market-for project based learning.

Check out the high res ranging demo, where a wider band chirp was used to amazing results. 

Read more…
3D Robotics

Just as we launch the Follow Me feature, there's an amazing copter and wrist-tracker combination launching on Kickstarter that uses the feature to astounding effect. It's called Hexo+ and I'm totally getting one:

HEXO+ is an intelligent drone that follows and films you autonomously. Aerial filming for everyone.

We initially began thinking about HEXO+ because we needed a solution that would make aerial filming possible in the most remote places: on mountains, in the snow, and in all sorts of unpredictable situations that were quite a pain to deal with when trying to sync a drone pilot, a cameraman and a rider.

When we started toying with the idea, we realized that it had the potential to change the face of all kinds of aerial filming, making it dead simple. So we combined our expertise in action-sports movie-making, drone design and aeronautic software to create a drone capable of autonomously flying, filming and following, giving you access to amazing aerial shots with the bare minimum: a drone, a camera and an app on your smartphone.

HEXO+ is just that – an intelligent aerial follow camera: no pilot, no cameraman, no headache.

1. Frame your shot with a fingertip

Deciding how you want your aerial camera to frame your shot is ridiculously intuitive. A 3D model of your camera’s point of view lets you pinch to set the distance between your subject and your drone, slide laterally for panning and vertically for height. All you need is your smartphone plus three intuitive gestures and you’re set.

2. Press start to fly in position

F1be58882ab2783535cd94a4cf7f6388 h264 high
 PLAY

When you push your filming settings to your drone, it will automatically take off and fly to its specified position – and hover there until your subject starts moving. No pilot, no camera operator, just ready for action in an instant.

3. Let your drone follow and film you

Your drone is attuned to the slightest of movements, continuously repositioning itself to match the filming parameters you set for it. You now have an intelligent flying camera tracking your exact trajectory and filming your every move.

4. Get stupidly good-looking aerial shots

668585bc7f8f812c2f72047aa7e5926d h264 high
 PLAY

Land your drone, collect your clips and enjoy. Our technology guarantees extra-smooth stabilized camera movements, continuous perfect framing, and creates the possibility for angles that are virtually impossible to achieve with traditional means. Read: you now have the capability to film Hollywood-style aerial shots – and beyond.

  • Action sports lovers who want new angles without complicated logistics.
  • Movie makers looking for creative angles.
  • Anyone with a creative mind and a love for moving images.

Essentially, what we did was take the complexity and costs out of aerial filming to make it available for anyone. The combination of smart technology and considered design make HEXO+ the ideal solution for angles that will leave your viewers in awe.

  • Easy to use: set the framing on your smartphone and lock your target, the drone does the rest; from auto take-off to auto landing.
  • Smart and autonomous: no remote control necessary; HEXO+ automatically follows your movements to maintain the framing you defined.
  • Designed for action: lightweight, foldable frame and legs, removable propellers and gimbal to fit in a backpack.
  • Extra fast flight: up to 70 km/h - 45 mph top speed to track even the fastest subject. Wind tunnel tested for improved aerodynamics.
  • Extra stable: hexacopter design and 2D brushless gimbal to ensure vibration-free, smooth filming. 
  • Safe: Fail-safe software features and six propellers mean a safe landing in case of a problem.
  • GoPro compatible mount: built for the best action camera out there.

General

  • Dimensions: 62 x 52 x 12 cm - 24 x 20 x 5 inches
  • Total weight: 980 g - 2.2 lbs 

Drone

  • Hexacopter design with 30° tilt propellers 
  • Speed range: up to 70 kmh - 45mph
  • Flight time: 15 min with 3S battery, gimbal and GoPro attached

Flight controller

  • Filming distance range: up to 50 meters
  • Auto take-off and auto landing
  • Trajectory anticipation 
  • Video target locking* 
  • GPS + onboard sensor position tracking
  • Processor with MAVLINK protocol

Gimbal

  • High performance 2D brushless gimbal
  • Easy attach/detach from drone body for transportation
  • GoPro mount

Camera

  • GoPro Hero3+ Black Edition or Hero3 White Edition available

App

  • iOS and Android versions 
  • Intuitive 3D framing or intuitive live view framing* 
  • Favorite framing presets
  • Subject framing lock
  • Emergency landing

* Only if stretch goal is reached!

You might think this is borderline magic, but it’s actually all orchestrated by a smart and lean use of technology. Our team has strong roots in critical aeronautic software development and that made HEXO+ possible.

On the smartphone side we have an intuitive interface for you to handle your drone easily, position it where you want in space and potentially (stretch goal!) wifi video live feed. This user interface is backed by trajectory anticipation algorithms that crunch data coming from the sensors on the drone and smartphone to predict the next, most likely position of the subject. This enables a quick, accurate tracking of the subject and is key in achieving great images. Finally, the smartphone and the drone communicate relative position to each other and data over the MAVLINK protocol, developed by the ETH in Zürich.

On the drone side of things, we have combined a drone that’s designed and optimised for aerial filming and action sports: robust construction, payload capacity and high speed and stability, thanks to the six tilted propellers. The onboard software is based on the 3D Robotics open-source code, and we optimised the MAVLINK implementation and the behavior of the drone to improve response time to commands sent from the mobile app. We also integrated over the air gimbal control to obtain the best possible camera angle based on the relative positions of the drone and the subject.

What we’ve done so far is take our initial idea to the stage of a working prototype: we’ve been ramming through hardware and software hurdles until last month, when we managed to consistently make our prototype work in field conditions. The drone is fast and agile, and the flight controller as responsive as we want it to be – from our action sport movie-making people perspective. The shots we obtained are just awesome and that’s what matters.

Our strong historical ties with the action sports community have given us extensive access to athletes and filmmakers and everyone is willing to support HEXO+. Why? Because they would all love to have a tool like HEXO+.

Now, taking the leap to industrial production requires funds that we can’t secure without your help. We need to pay for molds, minimum orders on parts and build. This accounts for $50k, the smallest budget we believe is necessary to make HEXO+ a reality, and starting at $499 apiece, an affordable one.

But that’s not all. We’re putting the project in the hands of the Kickstarter community because it is the best way to be directly in touch with the users of our product and build this together. If we reach our goal it’ll mean that there is a real need for HEXO+ and you’ll be the signal for that, so thanks in advance for your support.

Read more…
MR60

3689600825?profile=originalHi,

Integrating troubleshooting results from quite a few people describing power problems with Pixhawk or Pixhawk getting out of control (linked to ESCs' signal wires connected without a ground reference) I thought the current wiki information should be completed/updated with a synthesized diagram that says it all clearly and explicitly.

This diagram represents optional components that you may have or not but the wiring logic remain the same.

The basic fact to know to start with is that the power port ground is NOT (connected to) the ground of the main output ports on the Pixhawk board, contrarily to what we were used to on the APM board (where the ground was the same on all ports, inputs or outputs).

Acronyms on the diagram: PDB on the diagram means Power Distribution Board. PM block means the power port of Pixhawk. PM/Atto means an optional power module from 3DR or the Attopilot alternative for higher than 4S battery voltages.

Any comments to add eventual useful tips that would be missing are welcome. I'm not the best at drawing stuff, so if Jethro (known for his excellent illustrations) or some other guy here on the forum has graphic design talents, this diagram could be made more sexy.

Hope this will help some folks to do a safe wiring.

cheers,

Hugues

Read more…

So have you seen GRASS?

https://storage.ning.com/topology/rest/1.0/file/get/3689600727?profile=original

(Geographic Resources Analysis Support System)

GRASS is a free Opensource GIS produced by the USG for processing ALL kinds of data including the LIDAR and the NDVI analysis so beloved of the PrecisionAG movement.

Its been in use for at least the past decade and is quite well regarded in certain fields. Extensive documentation and tutorials are available at the website for same.

http://grass.osgeo.org/

              hzl

Read more…
3D Robotics

UAV Systems Association launches

3689600811?profile=originalThis new association just launched. Looks very interesting! Note in particular the Safe Flight system that they're developing, which is much needed. From The UAV Systems Association:

THERE IS A REVOLUTION UNDER WAY IN THE UNITED STATES, UAVS ARE THAT REVOLUTION AND ARE HERE TO STAY. WHAT WAS ONCE THE REALM OF HOBBYISTS IS NOW PART OF OUR NATIONAL SECURITY. JUST AS IN THE EARLY DAYS OF FLIGHT WE ARE AT THE PRESUPPOSES OF A TREMENDOUS SHIFT IN OUR EVERYDAY LIVES AND WE ARE GOING TO USHER IN A NEW ERA.


Why Join

A love for tech and flying is the motivating force behind the UAV Systems Association. This association consists of a diverse group of manufacturers, distributors, retailers, publishing companies, software publishers, professional photographers, and enthusiasts.

The companies and institutions that founded UAVSA—and the entire UAV manufacturing, parts and accessories industry, for that matter—were started by people who love technology and flight and turned their enthusiasm into a career. Most people in the industry today still feel this way. That’s one of the things that makes UAVSA and its members unique.

The UAVSA is in the unique position to be the voice for the collective commercial UAV/Drone community with our membership and participation in the FAA sanctioned Center of Excellence. This CoE will aid in establishing the laws and guidelines for the legal commercial operation of UAV/Drones in the USA with the participation of major universities and research partners of which the UAVSA is partisipating.

The UAVSA will soon be announcing the date and location for the first ever UAVSA Convention. This event will be the largest of it's kind in the world bring the global Commercial UAV/Drone community together. 

 UAVSA offers many Membership Benefits, review "Here"

We are very happy to welcome you to our community and look forward your participation.

Thank you from the UAVSA!

Read more…