5 months before Chris Anderson's LEGO autopilot, Attopilot and Flexipilot prototypes.
Not to mention about Picopilot and RCAP which are much older. Amateur autopilots are old stuff.
5 months before Chris Anderson's LEGO autopilot, Attopilot and Flexipilot prototypes.
Not to mention about Picopilot and RCAP which are much older. Amateur autopilots are old stuff.
Happy new year folks!
DIYdrones hardware development team needs some help, if you think you can contribute in something please PM, our requirements are:
-Any microcontroller capable to handle a little web server can be used.
-The hardware must have WiFi access (behave as an access point).
-The hardware must have SD card slot (where you can store html files).
-Must be cheap (< $100).
The system must be capable to read a HTML file stored on the SD card (including pictures) and create a web server accessible via WiFi (acting as an access point). When the user is connected to the Wifi device-must type any direction like "http://192.168.1.100" and be able to load the HTML files stored on the SD. Something similar to a home router.
The HTML files must be able to read/write to the IO, analog and UART pins of the same microcontroller....
What we need from you are suggestions of the right hardware, software contributions and connections to anybody capable to help us.
Anyone? ;-)
2010 was quite a year at DIY Drones. The community doubled in size and traffic, ArduPilotMega and ArduCopter were announced and shipped, and factories were started in San Diego, Bangkok and Tijuana. Amateur UAVs took off!
Next year is going to be even bigger, with dozens of new products, easier to use versions of current products and cool new platforms I can't tell you about yet ;-) Stay tuned for announcements over the next month, but in the meantime, here are some of the highlights of 2010:
January:
First Ardu quad (Jose Julio's ArduIMU-powered beauty)
DIY Drones hit 7,000 members
February:
White House talks about DIY Drones
ArduPilot 2.5 (first one with super-accurate navigation) released
March:
ArduPilotMega comes off the production line
APM IMU shield enters testing
April:
Sparkfun Autonomous Vehicle Competition: Doug Weibel's ArduPilot comes in second (Team Robota, shown above won)
An iPhone controller for RC aircraft
DIY Drones goes to the FIRST Robotics Competition
May:
Paparazzi co-founder Pascal Brisset dies
DIY Drones goes to Maker Faire
June:
UAV DevBoard Matrixpilot is flying
July:
ArduPilot Hardware-in-the-loop simulation released
August:
September:
DIY Drones factory gets new pick-and-place machine
Willow Garage's ROS now running on quads
October:
ArduCopter Alpha code released
November:
DIY Drones in front page Wall Street Journal article
PixHawk Qgroundcontrol GCS now supports APM
December:
ArduPilotMega 1.0 code released
ArduCopter RC2 released, team announces plans to move to APM-based code
ArduPirates take over ArduCopter NG development
From 0.7.7 to 0.8.0 QGroundControl got many new features and bugfixes, it's impossible to fit all of them into one post. We will therefore run a small blog post series over the next few days to cover them. An experimental release is already available for Windows and Mac OS, so you can try it out on your machine if you like. The application might have still some minor rough spots, the current release is mostly targeted at the different autopilot developers to allow them to give feedback for the "official" release.
Major Improvements and new Features
Windows Google Earth View
The screenshot below shows QGC running on Windows 7, with a custom widget arrangement showing the SF area with Google's new 3D trees.
Linux 3D View
The non-maps 3D view is very handy for robotics applications where the focus is on the trajectory of the vehicle and additional 3D information, like e.g. the occupancy grid, should be displayed. The tool widgets surrounding the view can be freely enabled / disabled and will be loaded on the next startup again.
Live Plotting / Engineer View
The live linechart is very handy for reading out sensor or filter values. The parameter tree widget on the right allows to adjust controller or filter values (e.g. PID gains) in realtime and watch the result on the left. Of course other widgets could be activated as well, but this screenshot is a nice example of a really reduced interface.
Data Analysis View
It is often annoying to import logged data into an external plotting tool for just having a quick look at the data. QGC therefore now switches after finishing a logging session in the line chart (live) view to the data analysis view, where you can plot the data in other formats, plot X vs Y instead of X vs time, etc.
Experimental preview executables: They are stable and can be used to test the new features, but are not intended for flight use! We will test the current release thoroughly over the next days and then release the stable version once it is rock-solid. Please note that runtime performance and stability will improve until the final release.
Please use the Github issue tracker to report back bugs or odd behaviour!
Please feel free to add any feedback or feature requests to the bottom of this post.
Hello people, this is my new airframe to play with my ardupilot equipment!!!!!
It is a modified gentle lady from Carl Goldberg................
1.6 mts wingspan (shortened)
1.35 Kg.
3 channels.
Equipment:
Installation detailed in this picture:
This Airframe works awesome, it has lots of room for equipment and also flies really good.........
This weekend, on 2011 i will be testing the Ardupilot in the field....... will try to make a good video to show it here.....
Hope you like it....
Happy holidays!!!!!!
Hello everyone! This is my first post to the site though I've been following for over a year. I'm finally to the point where I would like to begin purchasing equipment for my first Easy Star Drone.
Background: I have successfully built and flew my Blimpduido kit. I've also been flying around for a a couple months the Hobby Zone Champ (RTF). This has been the extent of my RC/Drone background though I have been playing around with Arduino on other projects for over a year.
I would like to purchase the Easy Star Kit and buy all the components separately due to my lack of knowledge in RC plane hardware. This is where I would like to get suggestions for mid-range servos, controlers, recievers/transmitters, batteries, motors, etc... I'm not familiar enough with rc brands or quality.
I'm pretty sure I'm going to stick with the Easy Star due to the overwhelming positive reviews I've been seeing over the past couple months, however, any and all suggestions for the actual plane kit are welcome. I'm mostly interested in areal photography and possibly video.
As this is going to be my first UAV/Drone other than my Blimpduino I will happily take suggestions for the best way to approach the build, rc hardware, photo/video hardware, etc... I plan on purchasing the plane first and getting familiar with it then after about two weeks (aka payday) I'm planning on purchasing the "drone" hardware.
Thanks for your suggestions and I look forward to hearing from you. Thanks!
Stan
A free tutorial on creating Digital Elevation Models (DEMs) from Photosynth point clouds is now available online. The tutorial focus on using mostly free and Open Source software to create detailed georeferenced 3D models from low altitude aerial photographs that have been processed in Structure from Motion (SfM) software like that found in Photosynth and Bundler. Each step of the process is documented in text and illustrations. All of the datasets used and created during for the tutorual are provided for reference.
The tutorial is available here: palentier.blogspot.com
This program downloads precompiled firmware for the arducopter and automatically uploads it to APM. No need to install arduino, libraries etc.
Hopefully this program will make it easier for those of you who fly the arducopter, but don’t have an interest in programming. Using this program you don’t have to install arduino and build the code yourself.
Right now I only uploaded one version (version RC02) of the code. This is the one I'm flying. Nothing extra (gps, mag +++). If people like it I will upload more. And the user can chose witch one to download right in the software.
Remember this is the alpha version, so there might be some bugs. Please give me feedback (bugs or suggestions)
You can downloade it at http://geir111.blogspot.com
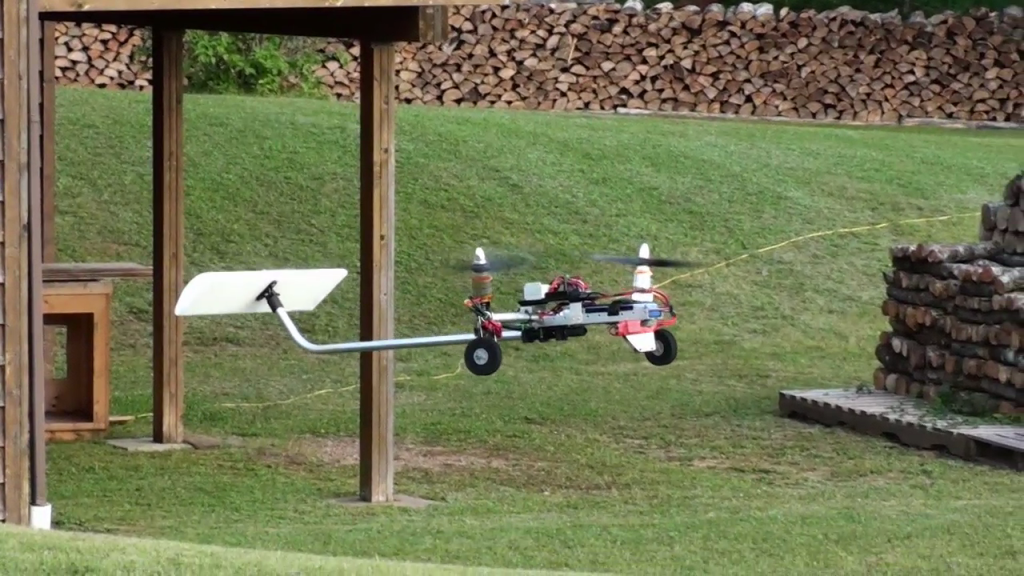
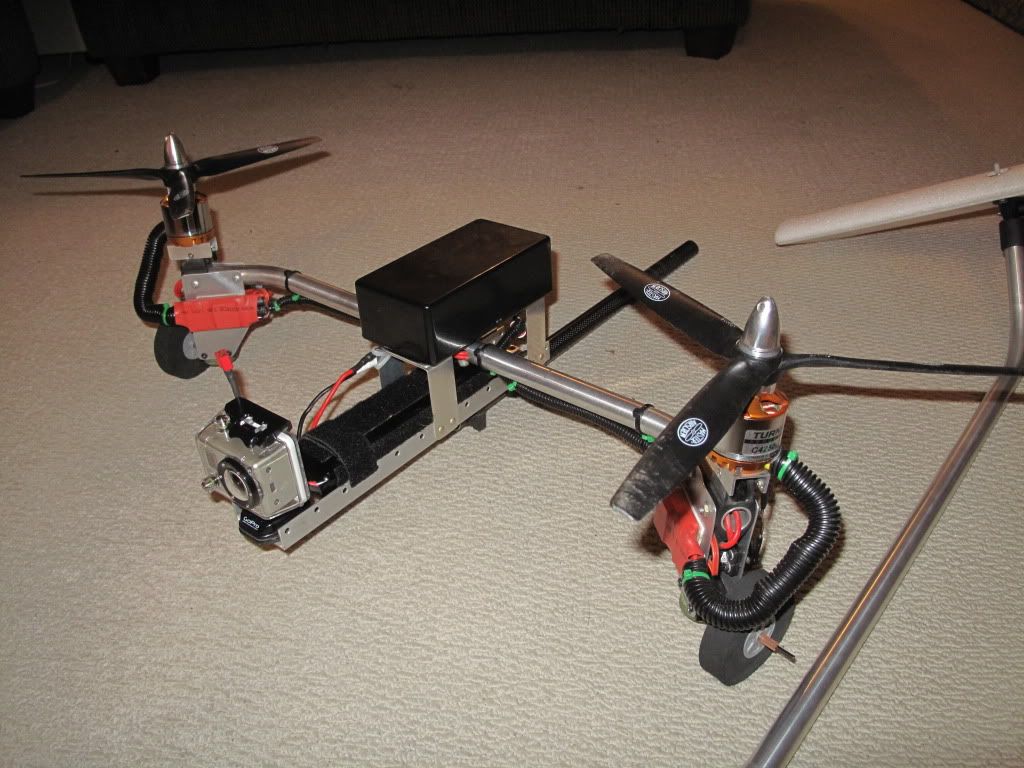
nVader 600 3 S 6000mah 12X6 prop from Jerry Kutra on Vimeo.
nVader 600 Compilation of Test Flights from Jerry Kutra on Vimeo.
nVader 600 Camera Test II from Jerry Kutra on Vimeo.
I received my airspeed shield today along with the pitot tube kit and thermopile cable. So that meant that I had all the bits I needed to get this thing in a flying condition. I also found an old motor, prop and ESC so I've installed that too.
I discovered that the reset problem I was having (mentioned in my first post) turned out to be due to a misconfiguration in the control channel of my transmitter. It turns out that the pulse width it was sending corresponded to the threshold level between Position 2 and Position 3 in the ATTiny45 fail-safe code. This resulted in rapid switching between the two and when this happens, the ATTiny45 sends a reset pulse to the ATMega328 chip. I changed my transmitter setup and problem solved. This was a bit of a gotcha because I didn't realise that the ATTiny45 could reset the main chip and I'd been hunting a power problem.
I'm running the Ardupilot 2_7.1 code and I've included my updated config file is here. I'm running the EM406 GPS and a XBee Pro 900 XSC for telemetry. Note that I had to change the serial interface speed of the XBee to 57600 baud to match the GPS. The radio link rate is only 9600 baud on these, however running the default telemetry seems to be OK so far.
A quick test outside showed that the autopilot appeared to be operating in the correct sense. So now all that's left is to start test flying. The only big question I have left is the orientation of the XY sensor - as it sits, one of the thermopiles is pointing towards the motor (which gets hot!). It would be better to position it so the thermopiles were in their normal (i.e longitudinal and lateral ) positions, however to do this, I think I need to modify the code since it doesn't seem to be a configuration option.
The latest US purchase of Raven UAVs was announced:
"AeroVironment, Inc. (AV) (NASDAQ:AVAV) announced today that it received an order valued at $46,226,984 under an existing contract with the U.S. Army. The order comprises 123 new digital Raven small unmanned aircraft systems (UAS) and initial spares packages as well as 186 digital retrofit kits for the U.S. Marine Corps. The order also includes 339 digital retrofit kits for the U.S. Army."
Assuming that those "digital retrofits" are just switching out the video transmitters to encrypt the signal, which is not a big deal, this sounds like ~$300,000 per plane, which is about the same price as the similarly-sized Wasp.
I know that a Raven clone, APM and some decent video equipment is not quite milspec, but given that it costs about 1/1,000th as much and does more or less the same thing, why aren't the military considering cheaper alternatives?
(Yes, I'm aware the real Raven is much more robust, the onboard optics are much better, the Raven kits include ground stations and all that other stuff. But still: are they one thousand times better?)
Here is the video of the JPO -AMA webinar on FAA sUAS rulemaking.
The Q&A portion of the webinar was not made available.
I have successfully built and tested in flight the Micro Multicopter based on a Minsoo Kim's quadcopter kit.
Tested setup:
- hardware: KKmulticopter flight controller v0.2
- firmware: Quadcontroller v4.5 (asm code version can be downloaded here) by Rolf R Bakke.
- 4 brushless motors 925 KV FlyCam 925
- 4 ESC turnigy PLUSH-6
- 2 propellers CW GWS EP5030Rx3
- 2 propellers CCW GWS EP5030x3
- 1 Lipo battery 2S1P 7.4V 800 mAh
- AVRISP mkII programmer
- compiled with AVR Studio 4
- 1 Micro Multicopter full set ( http://www.kkmulticopter.kr )
Take off weight : 280g
The flight is very stable and fun.
stay tuned at: http://diydrones.com/profile/JeanLouisNaudin
UPDATE: Looks like some bugs snuck in. I've withdrawn this version. Please Dec 13 instead.
I've uploaded a new version of the APM 1.0 code, which has some minor bug fixes.
If altitude hold is not working reliably for you, try adding a few clicks of elevator trim to counteract whichever tendency your aircraft is showing. So if it consistently descends below the target altitude, dial in a few clicks of up elevator and see if that fixes it. We'll have a more robust solution in the next rev.
Too cold to fly this code? Try an Xplane flight simulation!
Well, here's the first photo of my quadcopter.
Weighing in at 590g as it sits, with a span of 25". I plan on adding some litening holes in the body plates and landing gear to reduce the weight a little.
Cutting the bolts will lose a few grams, but this is just a dry fit, so nothing's done as of yet with any permenance.
I plan on powering it with seperate batteries for eletronics and flight, the motors will be 4 Turnigy TR35-48-B, 900Kv motors with Master airscrew 11*7 , 3 blade props. powered by a Zippy flightmax 5000mAh 5S1P 25C battery.
This will have telemetry, video, sonar, gps, magneto, APM with all the bells and whistles. Hopefully I willl be able to get some decent flight time out of it.
Would it be better to go with 2 blade props, or what I have spec'd? I'm not looking for acrobatics, just long stable flight.
I will update with pics of progress as things start to evolve more.
Hi,
We have been working on this copter for about 3 weeks. First one was made out of plywood and broke while maidening. (Actually never get in the air.) So we decided to build one using U shaped aluminum profiles.
Setup as follows :
4 Turnigy SK35-36 910kV with 2 12x6 hobbyking APC's and 2 12x6 reverse real APC's
4 Turnigy 60A ESC ( don't need that much but they can be used for bigger motors :) )
1 5000mAh 3S1P 40C Zippy Battery (will test with 2 of them)
Magnetometer
Arducopter NG Code with a few thing changed ( to allow changing pid's while in the air and view a few key data)
After 5 minutes of short take of and landings to configure PID's we can fly this thing hands off the stick. Actually it flew itself :)
Here is the first battery being drained to the limits. :) Nothing happened to the copter. (Raw footage not edited yet )
My DIYDrones Arducopter survived its first few flights without incident! This is my first quadcopter, and first Ardupilot project, so I'm actually a little surprised it flew so well.
Very stable.
This is the FahPah "all up" kit, with an added XBee Tx and Futaba R6008HS.
Arducopter NG software, untouched except to enable XBee. No magnetometer.
Turnigy 2200 3S batteries.
All bullet connectors soldered shut, which resolved the burning-motor problem.
I'm not sure I mounted the ESCs as intended.. it appears each of the arches has a protrusion that may or may not be useful for ESC mounts.
The in-tube motor wires makes a very clean package, and the "wedding cake" racks make for a compact center.
The GPS Hold mode was the only confusing thing, since it seemed to have a lot of wander and a very aloof and unauthoritative throttle control. It tried to drift down into the weeds and I had to switch out of GPS Hold to recover it.
So far, so good!
GPS altitude hold is good for +-5m, but what if you want more precision than that, closer to the ground. ArduCopter team member Randy Mackay. He explains what it takes (this is also in the manual):
To give it a go do this:1. get yourself one of these Sonars and attach to the bottom of your quadhttp://www.sparkfun.com/products/8504 <-- the cheaper LV ($28)http://www.sparkfun.com/products/9495 <-- the slightly more XL ($50)2. attach it up to AN1 (the Analog2Digital port on the very back
right of the oilpan near the CLI switch. AN5 is the outmost, so count
in from there to AN1).3. comment out this line in ArduCopterNG.pde://#define UseBMP4. make sure this isn't commented out just below in ArduCopterNG.pde#define isRANGEFINDER5. if you're using the LV sonar you will need to change this line in ArduCopterNG.pde:AP_RangeFinder_MaxsonarXL AP_RangeFinder_down;to be like this:AP_RangeFinder_MaxsonarLV AP_RangeFinder_down;6. you'll need to reset your EEPROM values or go into the CLI menu and select 'o' and set your Sonar PIDs to 0.8;0.3;0.7I had to make one change though that affects the existing functionality
... if you're UseBMP (i.e. using baro for altitude hold) it's now
possible to do altitude hold even though you're not doing GPS hold (I.e.
if you don't have a GPS lock). I think this is ok.So the Barometer altitude control and sonar altitude control continue
to be quite separate functionality that can't be used at the same time.
Clearly we need a nice transition from one to the other when you go out
of sonar range. anyway still, thinking about how to do that.