All Posts (14049)

Sort by
3D Robotics

LEGO NXT-based quad!

3689459055?profile=original

Long time readers here will know of my love for LEGO Mindstorms NXT, and my first NXT autopilot many years ago. So I was delighted to see this project, which uses an Arduino IMU plus NXT and the official First Robotics League TETRIX parts to create a LEGO quadcopter!

The NXT reads orientation information from the Arduino, calculates the motor speeds required to maintain stable flight, and sends these motor commands back to the Arduino, which spins the motors via the speed controllers.

So does it fly?  Yep.  Is it graceful?  Nope.  Check out the video of its first (and only) flight.

Read more…
3D Robotics

OpenROV in the New York Times

3689458947?profile=originalFrom Boing Boing:

"In the New York Times today, Brian Lam (formerly of Gizmodo, now the creator of Scuttlefish and Wirecutter) writes about OpenROV, a low-cost submarine designed to be an affordable tool for "curious students and amateurs, as well as provide a highly valuable shallow water tool for explorers and scientists."

This month, NASA engineer Eric Stackpole hiked to a spot in Trinity County, east of California’s rough Bigfoot country. Nestled at the base of a hill of loose rock, peppered by red and purple wildflowers, is Hall City Cave. For part of the winter the cave is infested with large spiders, but is mostly flooded year-round. Locals whisper the cave’s deep pools hold a cache of stolen gold, but Mr. Stackpole isn’t here to look for treasure.

He had, under his arm, what might appear to be a clunky toy blue submarine about the size of a lunchbox. The machine is the latest prototype of the OpenROV–an open-source, remotely operated vehicle that could map the cave in 3D using software from Autodesk and collect water in places too tight for a diver to go. It could change the future of ocean exploration. For now, it is exploring caves because it can only go down 100 meters. But it holds promise because it is cheap, links to a laptop, and is available to a large number of researchers for experimentation. Indeed, the OpenROV team hopes to start taking orders for OpenROV kits on the crowd sourced project site, Kickstarter. Going for $750, the kits include laser cut plastic parts and all the electronics necessary to build an OpenROV. (Users will have to bring their own laptops to view the onboard video feed and control the machine. They’ll also have to supply their own C-cell batteries which power the sub.) The subs are expected to be available by the end of summer.

Read the full story here, and check out the awesome video Brian shot, here."

Read more…

Australian miners send drones to work

3689458843?profile=original

A Slashdot user aesoteric writes "Australia's top miners have opened a new front in their march to automation, flying unmanned aerial vehicles in increasing numbers at remote sites across the country. They've been used to inspect a fire-damaged oil rig, perform aerial photography and stockpile surveys.

There is also a trend towards non U.S.-built UAVs, due to the lag in receiving export approvals for the aircraft and spare parts."

http://www.itnews.com.au/News/302240,australian-miners-send-drones-to-work.aspx

http://tech.slashdot.org/story/12/05/29/003205/autralian-mining-companies-increasing-use-of-uavs

Read more…
Moderator

mza_7829643152360638697.480x480-75.jpg

“Fly a UAV. Learn about robotics. Explore the universe. LM Tomorrow is a science and engineering app that provides insight into some of Lockheed Martin’s most innovative technologies and how they work. From flying a micro-scale Unmanned Aerial Vehicle (UAV) and human exoskeleton design to some of the company’s more well-known products such as air and spacecraft, you’ll learn how sciences such as aerodynamics, electromagnetism and kinetics are translated into a variety of technologies.


http://www.suasnews.com/2012/05/16173/lockheed-martins-tomorrow-for-ipad-fly-a-drone/

Read more…
Moderator

APM-eye's view of News Interview

Here's an interesting bit from a recent news interview with me and Andreas... for my segment, I had parked the quad so that it would be visible in the background over my shoulder as I talked to the interviewer.  While he was recording the quad, the quad was recording him!

If I would have planned ahead a bit I would have framed the shot better, but I was happy with how it turned out. The wind was coming over the hill at about a 45 degree angle which explains the lateral motion.

http://eastbay-rc.blogspot.com/2012/05/aerial-view-of-kgo-interview.html

Read more…

Working on an IMU

Z6dxK.jpg?width=500

I decided to work on a new IMU, and I decided to design my own so I could get a higher update rate, higher processing power, some more noise immunity, and I like designing my own systems as opposed to buying them :)

 Here is what I have on board:

-500 MIPS XMOS L1 Processor

-12bit 1MSPS ADC

-3x ADIS16060 Gyros

-ADXL335 Accelerometer

-HMC5843 Magnetometer

-Ports for Power, GPS, and Comms

 I designed this and fabricated (via Advanced Circuits) much faster than usual, and I still managed to have zero mistakes (well, the footprint for the connectors are a tiny bit off). In the future, In the future I need to remember to make room for both large components, and a means to solder them. With the gyro's blocking my way, This consisted of a lot of injecting solder paste and poking at it with a fine tip soldering iron. I couldn't get the entire aux boards on one layer, so there is one jumper wire from each to ground.

In the next revision, I will actually be using the digital interface to the ADIS16060, and its aux ADC channels. The XMOS processor will be the same but in a smaller package, the board should get quite small (Right now it's 1.5"x1.55"). Eagle files are attached.

IMU_V1.zip

rMtml.jpg?width=500

Read more…

3689458997?profile=original

I've been a DIY drones member since at least 2009. I have a couple of sites I likes to fly at but packing the flight gear and driving down to the park only to find it's too windy to fly can be frustrating. Instead I built this app to drop windsock markers down on a map and get the latest wind readings for a near-by location so I know if it's great weather to fly.

Windsock has the ability to instantly provide current wind forecast information on demand for almost anywhere in the world and can provide a forecast every 3 hours for the next 4 days ahead.

If you have an iPhone or iPod Touch I would love to hear how you use it.

Please check it out - http://windsock-app.com/

Read more…

APM2 conversion to Naza

Morning everyone!

So i decided to try the whole Dji thing. It took all of about 20mins to swop the APM2 with the Naza.

The setup is as simple as it gets. That took no more than 10 mins.

After installing the hardware and software I took it outside and attempted the first flight.

All I have to say is wow! A truly awesome piece of engineering! Dont get me wrong, I love my ardupilot!

But the Naza is just amazing! Im not a very experienced pilot so im still a little wobbly flying the APM2.

The real reason behind buying the Naza, is for videography. I cant fly the APM2 stable enough for videography, obviously its perfectly suited for that, Im just not experience enough to fly it well enough. Duran DeV flies all his copters on APM and his videos are mind blowing. So its not the FC, its the pilot!

For a not so fresh noob, the Naza makes the whole experience a dream. I did a direct swop out of the FC on the standard jDrones Arducopter and it worked like a charm, no tuning or anything.

I only flew it in atti mode. Which I think is awesome for videography, the alt hold is accurate to within a few centimeters.

And when I put my gopro on it, which threw out the COG, the flight dynamics remained exactly the same!

I hope the Ardu boys dont get upset with me for posting this, but one has to have an open mind to all new tech :)

G:)

P.S. I bought a ST Discovery high wing foamy trainer for my APM2 for photogrammetry, so Ill post some vids and or crashes of that soon!

Read more…
100KM

techpod prototype

I finally have a prototype of the molded epo Techpod ! i will have it in my hands in a couple weeks .

3689458773?profile=original

3689458671?profile=original

when i receive it I will test fly it and if everything goes well I will launch my  kickstarter campaign . I need $40,000 for the first run and molds . I have pored my heart and sole into this design for more then 3 years . I did it because I believe the UAV community and society deserves a high performance  no compromise airframe that does not come with a $10,000 price tag . it will go for ~ $225 $180 for the kit including everything in the top picture .please keep me in mind and consider supporting this project . I also have a new home on the web http://hobbyuav.com/featured/uav-kit/

here are some links with more info and background on the project

http://diydrones.com/video/techpod-alfa

http://diydrones.com/video/techpod10-remzibi-osd

http://diydrones.com/video/705844:Video:46848

http://diydrones.com/profiles/blogs/techpod-epo-foam

http://diydrones.com/profiles/blogs/techpod11-1

http://diydrones.com/profiles/blogs/techpod10-ready-to-ship

3689458582?profile=original

3689458796?profile=original

3689458692?profile=original

thank you for your support

Read more…

While adding the AMP to the Shrike, we wanted to understand Flying Wings a little better and explore expos.  We incrementally increased expose to 0%, 30%, and 60%, then flew the Raptor with the existing vertical stabilizer at 100%, 50%, and 0%. We were surprised to find that it flew just fine with 0% stabilizer! This test was in low wind, however, so it will be interesting to try it again in higher wind and to hear from others' experiences.


-Trent & Nick

--Raptor--
Tx: Flyer9x with er9x firmware by ParkeFlyer http://parkeflyer.com/
Battery: 20C 2.2Ah Sky http://www.hobbypartz.com/77p-sl2200-3s1p-20c-3333.html
Servos: T-Pro 9G http://www.hobbypartz.com/topromisesg9.html 
Motor: Optima 450 2220-1800KV http://www.hobbypartz.com/75m55-optima450-2220-1800kv-2.html
ESC: Exceed RC Proton 30A http://www.hobbypartz.com/07e04-proton-30a.html

Produced by Trent & Nick in Arkansas, USA
Main Camera: Panasonic HDC-TM900K
Video Editing: iMovie

Read more…

3689458537?profile=original

Hi pilots,

I'd like to introduce some products comming soon, developed by Nick Arsov with the invaluable assistance of Bill Premerlani, Robert Dickenson, Ben levitt, Peter Hollands, Riccardo Kuebler, Mark Whitehorn and Matthew Coleman.

The new AUAV2 (TINY UDB5) will be ready soon for testing. It has dsPIC33FJxxx MCU, SPI, I2C, UART, CAN,analog inputs, digital I/Os, MPU6000 gyro-accelero, HMC5883 compass, LPS331 altitude sensor, 5V 500mA, 3.3V 500mA LDOs and many many new features.

Here's the schematics - AUAV2_dsPIC33FJ_80pin_R2.pdf

Here are some additional pictures of the IMU board. Please note it holds it's sensors on a separate ultra small daughter boards. I used this approach for easy replacement with newer IC when available.

3689458549?profile=original3689458559?profile=original3689458724?profile=originalThe IMU board has MicroSD card reader, 2x GPS connectors, super cap for GPS and holds 3 micro sensor boards.

Here's the schematics - AUAV2_IMU_MICROMODULES_R1.pdf

Also I'm preparing a new OSD microboard...see the picture attached. This board was developed with the great help of Ben Levitt !

3689458737?profile=originalMore info about the future products you can read on www.arsovtech.com .


Also new lower summer prices are promoted!!!!!!


Have fun !

Read more…

Downward facing camera

marcy2_37.jpg

marcy2_38.jpg

marcy2_39.jpg

marcy2_40.jpg

marcy2_41.jpg


The 1st attempts to point the camera straight down were failures.  It can be pointed straight down & it gets the same target in every frame, but these arrangements screwed up either the starting pin or the center of gravity.

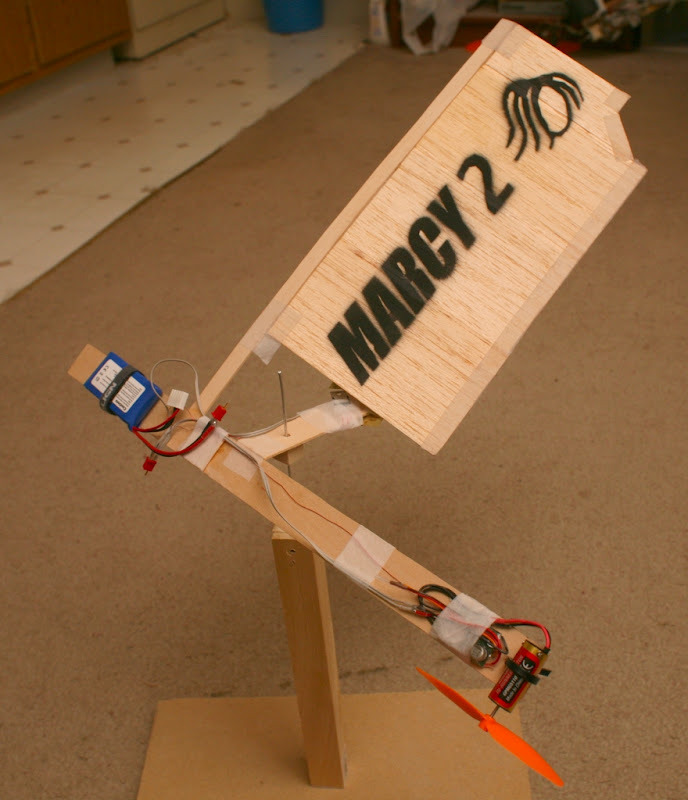
It became obvious that the propeller had to thrust on the plane of the center of gravity for the most stability, so all the electronics had to be in the same plane.


Having the wing below the plane hindered all the Marcy class.  Part of the coning angle would be the center of gravity in the wing lifting into the plane of motor thrust.  At  least this showed a winglet should add more stability than a dead weight, by having more mass in the motor plane.

images09


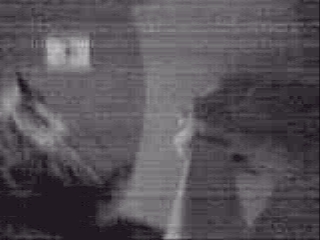
So that was the axial pointing camera revealing new rolling shutter distortion.  Instead of uniform vertical squishing, the top right had stretching & the bottom left had squishing, in both directions.  That is correctable, by knowing the rotation rate & scan rate.

marcy2_42.jpg

marcy2_43.jpg


This was the best arrangement.  Moving it from the wing to the balance beam got the Y axis on the camera to always be parallel with the spin axis.  If the camera was on the opposite side of the spin axis from the wing & on the balance beam, its field of view in its X axis would cover the spin axis instead of looking away from it & its Y axis would always be straight down.

cam85.png


So the camera could look straight down the spin axis just by repositioning it on the plane of rotation instead of building a diagonal harness. 

images10.jpg


Also noticed there was a good chance the attitude could be determined by looking at the takeoff stand's position in the frame.


Anyways, object recognition with SURF was worthless on the 160x240 video.  There seems to be a minimum complexity before SURF detects a feature point.  The resolution isn't high enough to hit that minimum complexity.

images11.jpg

images12.jpg


At flight altitude, the marker is gone.  The AR Drone required much higher resolution just for detecting velocity.

With the camera pointing at the floor, there might be a future in chroma keying.  The floor is more uniform than the ceiling.


Marcy 2 would require covering a large area of the floor in markers.  The field of view is too narrow for a single marker.  A simple grid with different codes in each square would do it.  A flashing laser projected from the aircraft, off axis from the spin axis, might give altitude.  Sonar altitude is too expensive.

 With the camera limitations & frame rates now well known, any kind of object recognition was ruled out.  The only real option was what it was on Marcy 1: color based blob detection.


chroma


Setting the camera to only record chroma reveals it detects RGB.  Yellow doesn't show up at all.  Some fluorescent pink posterboard showed up nicely. 

chroma02.jpg


Even with it pointing down at a featureless floor, chroma keying was still a problem.

chroma03.jpg

chroma04.jpg

The onboard camera didn't work as well as the DSLR.  It was in chroma-only mode to get enough information to do chroma keying at 25fps.  The color resolution was 160x240 & the hardware saturation was at maximum, which still allowed a lot of saturation changes.

Surprising how well the blue came out.  Humans must not see it as well as cameras.  Yet it detected pink better than red.


Saturation & hue were still being captured.  Maybe it would go faster if just the hue was captured.

chroma05.jpg


Plotting all the possible chroma values, a 256x256 lookup table emerged, in which chroma was converted to hue.

chroma06.jpg


The result was such a noisy image, it actually increased the bitrate & sent the framerate down to 15.  Not the intended result.

What looks like more differentiation between green & background, the computer actually didn't notice. It still detected the least differentiation with green & the most differentiation with pink.


Anyways, some tests with OpenCV blob detection didn't work.  That requires some training data, which they don't give an example of.  Camshift showed pretty good results.  Red, yellow, & blue showed good separation from the background.  The camshift algorithm has a good detection step for getting the size of the object.

The mane problem is it takes lots of tweeking.  Manual white balance was a must.  Also, it did best with the full RGB data instead of just the chroma.

Full RGB limits you to 80x120 for the chroma & 160x240 for the luminance.  160x240 with full frames buffered, full chroma resolution, & dropped frames started looking pretty tempting.

Read more…
3D Robotics

3689458630?profile=originalMicroFly, an open source nanoquad, hit its Kickstarter funder target of $5,000 and will be funded. From the project page:

I've been inspired by the crew at bitcraze.se, where they are building a simple quadcopter at a tiny scale; every component is carefully selected to be mounted on the circuit board. The circuit board itself acts as a chassis for the quadcopter, and custom 3D printed components are used to mount the motors. The reason? To make it as small as possible, without redefining the quadcopter. I would like to do the same, but with some important differences.

So what makes my design different than other open source quadcopters?

In my design, I plan on using embedded WiFi, so the quadcopter can be controlled from a computer on a standard wireless network you might have at home. As a result, the quadcopter can go as far as your wifi signal stretches. This quadcopter is small, which inherently makes it excellent for indoor use.

The quadcopter will have redundant IMUs (Inertial Measurement Unit) to ensure a stable flight for the entire battery life. The Microfly will also run on a small lithium-ion battery that can be recharged from the USB port on your computer.

Does anyone understand the appeal of two parallel ("redundant") IMUs? I've never heard of that and don't really get why it's necessary. 

Read more…

Mould Plug CNC Machining for HDwing4

Since the topic of CNC mills has raised its head here, I thought I'd share this with the DIYDrones community.

One of the things those who are considering this need to be aware of is that the toolpathing of complex shapes isn't a trivial exercise.  I would be interested to know if anyone has experience with any open-source surfacing toolpathing packages - please comment below! 

I am fortunate to have access to MasterCAM V9 - old-fashioned as it is - but only in a 2.5D package.  I then butcher my SolidWorks models into such a form that I can generate an IGES wireframe which represents the basis of a toolpath.  I then import this into MasterCAM and labouriously reconstruct it into a contiguous chain which the 2.5D recognises as a contour path.  This generates an absolute monster long .NC file which I drip-feed into the Siemens Sinumerik 820D controller that runs the mill I'm using.

The other critical point to this type of work is the machine envelope is everything.  Once you start using multiple setups to accomodate an oversize workpiece, you are adding hours and hours to the project, not to mention a bunch of risk and the inevitable mis-match of complex surfaces which will need filling and hand finishing.

As far as MDF goes, it's absolutely not a bad material to machine and is an easily hand-worked end-product which can produce a perfect finish but I do worry about the health risks and it does make an unholy mess.  I'd consider using PVC or, if you can afford it, alumnium billet.  At approximately AUD10/kg, it's not cheap though...

So, after going of half-cocked with the making of this plug, I have since revised the design pretty significantly, so now it's only a learning exercise and a lovely desk ornament!  C'est la vie!

Anyway, I hope this is helpful and interesting.

Read more…

Suggestions for a good motor sponsor?

3689458490?profile=original

Almost ready for product launch. 2 yrs of R&D to get to this point, so my fellow DIY Dronerz, You get the sneek peek before it is to be released:) This is the "Lowdown 420mm" from myself and staff at Models By Design USA. We designed around the 2830 bl motor @850kv= testing it worked very well with plenty of power.The 3s 2200 fits perfect.       The Lowdown will come with a  700 tvl Sony color cam, 500mw 5.8ghz tx, Prop balance (by the way every thing about this aircraft is vibration isolation and elimination)... more features  like military hard air tight case (No Folding Chair bags)?. Sensitive electronics and gyros on a $500 aircraft in a Sack?  7" color monitor and the best part=...OPEN SOURCE controller much more as options. Only thing lacking is some landing gear, motors and pre launch feed back as customers opinion/ service is #1 Priority.

So couple concerns are what type/brand of power plant would you like to see if any? Because of start up cost, my options are almost none and the few sets I do have don't match the Quality of the full carbon fiber air frame- even the boom mount are carbon fiber, maybe we should just build to order? I like that option very much as the costumer could have exactly what they want, but then again, "the wait don't fly with most people." So please let me have it...We need your help and want to offer a great product with even better service.

Read more…