All Posts (14049)

Sort by

BDGE7fmCcAA6JWm.jpg_large-640x480.jpg?width=300
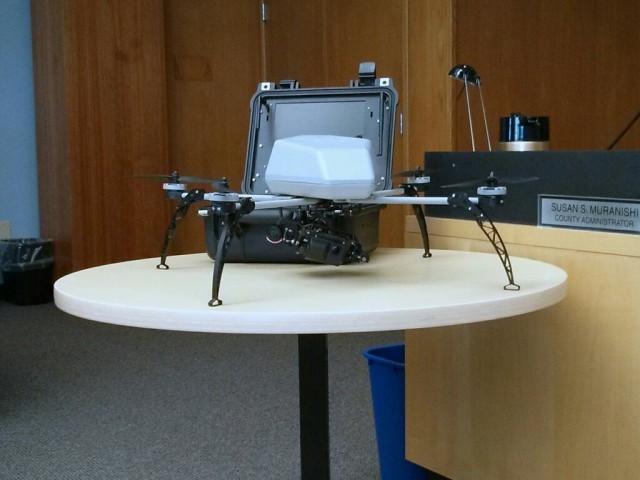
OAKLAND, CA—The Alameda County Sheriff's Department made its first public pitch on Thursday to the county’s Board of Supervisors (PDF) to authorize the purchase of “one to two drones,” coming from a $31,000 state grant.

Read full article at: http://arstechnica.com/tech-policy/2013/02/heres-the-drone-the-county-sheriff-wants-to-fly-over-your-backyard/

Read more…

I made a strange frame, it's not pretty looks, but it really can fly.

It isn't very stable now. I will keep tuning.

My idea is simple, just need one engine take the air into box, then go out from three gas outlet. Three servo control flow rate to make different force. And need a tail blade to control yaw. It's very like CCPM.

%E6%8D%95%E8%8E%B71.JPG

frame: Design by myself 
controller/autopilot: APM or MWC
esc: HobbyWing Platinum-60A-PRO
motors: DUALSKY 3548ca-5 850kv
propellers: gws 1045 3-blade
battery: 6S 3600mAh
total weight: about 2000g
radio: Futaba T8FG

This structure can be use all kind of engine, so it probably to build a real practical flying car.

I am not be good at coding, so I just try all kind of FC, try again and again. Now i often use APM and MWC. I want change the code, because this structure can't use the system as same as CCPM, they was liked each other, but not  exactly same. Hope you can help me, give some advice to change code of Heli. Thanks.

more detail: http://spoflycar.blogspot.com/

If you are interest to the frame, you can found all source file(sketchup) in svn on my code.google.

Read more…
Starting on February 14, the FAA opened a 60 day window to receive public comments on the privacy concerns associated with the civilian use of UAS in the United States. It is a given that those against flying drones here will be very vocal in their opposition to UAS (see the recent hysteria regarding the LAPD's alleged use of a UAS to track cop killer Chris Dorner), so those in favor of domestic UAS use need to make their voices heard. Go to www.regulations.gov to provide your comments in support. Follow this link http://www.faa.gov/about/initiatives/uas/media/UASTS_RFC_FR_notice_2-14-2013.pdf to read the solicitation.
Read more…

Processing power for Drones!

3689503702?profile=originalOk - so the critical sub systems for keeping balance, headings etc, are probably best served by a RISC type processor like the ARM and ATMega processors. But on top of that, you could put something that allows an easy access to image processing, communication, logging etc.. In the USAV project I use an Android phone (ARM 600 mHz) to handle the more high level stuff - such as navigation, telemetry, Twitter integration etc... Even though this system is remarkable fast when doing just that (a distance + heading calculation takes roughly 2 milliseconds), this system will be affected once starting to do image processing etc...

I just stumbled across this little thing, that surely would be more powerful and extendable.It has an 1.6 GHz atom processor and uses only roughly 4 watts. You can run any operating system on it and connect usb devices.

The size is only 3.50 x 2.36 x 0.63 inches (89 x 60 x 16mm) which would make it fit in many UAV's.

http://www.linuxfordevices.com/c/a/News/Toradex-Xiilun-PC-and-Topaz-SBC/

Read more…

Project bureau Park Strijp Beheer in Eindhoven, The Netherlands is looking for a technical partner to support them with a multiple drone project. The installation is part of an innovative public lighting plan being implemented this year in a Living Lab development in Eindhoven, The Netherlands.

The drones must be robust enough to fly outdoors; they should support re-programmable and dynamic formation flying and carry rgbLED lights. The drones are required to provide two-way communication enabling their flight/light patterns to be triggered by commands from a sensor network and the potential for (sensor and) location data to be sent to back to the network.

The drones should also be able to fly to a nearby docking/charging area for automatic recharging and to shelter in bad weather.

For this project we are therefore looking for professional partners able to take full responsibility for the technical development, installation and (on-going) maintenance of a solution; willing to work in collaboration with a creative partner who will guide the requirements for the behavior of the system. This is expected to be an iterative process with design and technology parties working closely together.


If you are interested in this project and you want more information, please get in touch with me, via this blog or via this contact form.

Read more…

My First Quadcopter - Build Update

3689503576?profile=original

A few changes in build plans but still on track. Build parts starting to arrive slowly but surely. A few delivery mishaps that have delayed the build and resulted in going with an Xbee pro S1 rather than the 3DR telemtry. To be honest I flip flopped, decided on Xbee, then 3DR and due to a cancelled order being shipped ended up with the Xbee.

While waiting for parts I have been reading the wiki and forums daily. I can not stress how important this is as a process before and during the build. Reading troubleshooting post and watching videos on calibration of RC controller and setting up of mission planner.

Decided to make my own power distribution harness and forgo the distribution board I bought to save weight and  space on the frame and keep it low profile. Fairly tidy soldering job with heat shrink and testing the connection with a volt meter. Trying to keep weight down by shortening cable lengths to keep things tidy.  Lots of soldering this weekend on ESCs as well as resistor and cap for the sonar sensor.

Purchased two black closed cell (water and fireproof) foam blocks (1 prototype - 1 final) to make a custom canopy. Planning on mounting APM, telemetry, sonar, optical flow, airspeed sensor and receiver to the foam. Going to extend the central mount with the space carbon fibre tubing I have to allow the mounting of two large lipos. This should help vibration and endure spacing between sensors that are affected by magnetic and electrical noise from motors and ESCs. Settled on FrSky TX/Rx with Turnigy 9XR and 2x 5200mah 3s lipos.

Next step is mounting all the above to the frame in anticipation of the final parts Arduino Pilot Mega Flight Computer + GPS + Power module. But before I get ahead of myself I need to refine my setup/ calibration plan as well as flight checklist.

Big thanks to Multirotor.co for the T-Motors parts. Look forward to ordering some MN4014-11 330KV motors for my next build - X8 ;)

Read more…

Want to Fly UAV - Come to Oklahoma

homemainphoto_1.png?1327869842

 Oklahoma Governor Mary Fallin announced a strategic plan for the state's unmanned aerial vehicle industry - A Strategic Plan for the Development of an Unmanned Aerial Systems Enterprise in the State of Oklahoma

From their home page - "USA-OK is a state chapter of the Association for Unmanned Vehicle Systems International (AUVSI). USA-OK members represent Oklahoma industry, academia, and government. The USA-OK was created in February 2009 in order to promote the emerging unmanned systezms industry in Oklahoma. Read More"

Read more…

Students Kickstart A Do-Gooder Drone

3689503488?profile=originalWhen you see this quadcopter drone flying at you, don't run or shoot it down -- it's coming to help. A lot of drones serve as spies, assassins, or toys. But if all goes well, rescue workers and emergency response crews could soon deploy the Incredible HLQ (pronounced "hulk") drone that actually helps humanity by zipping up to 50 pounds of provisions per trip, by itself.

(read article at http://www.popsci.com/diy/article/2013-02/meet-quadcopter-humanitarian-drone)

Read more…

Introducing the Honey Badger!

It's now been five months of development, seven prototype revisions, 10 prototypes in all, and at long last, the Badger is ready for prime time!  Pre-order is up now!


Here's the Promo video made with 2nd prototype, a new Promo will be shot with the production frame, as soon as the weather cooperates, lol.


R7-honey-badger.jpg

The Honey Badger is a lasercut Delrin quad designed as a FPV "fighter jet" quad. The idea for this quad was to have a small, lightweight, "bash 'em up" quad that you could use to refine your flying skills without risking a $200 to $400 Gopro. Sure, I love filming great videos with the Gopro, but it would never of happened if I didn't have a little quad like this to refine my skills... flying around buildings, trees, into tight spaces or small openings... practicing flips, rolls, and other aerobatic craziness. I also like using this to test out new antennas and push my range. Instead of risking $1000 worth of aircraft, I have maybe $300 worth of gear on this quad.


P1040862.jpg


tumblr_mhavemRMTM1row0t5o5_1280.jpg


Why Delrin? Because its very durable! I've crashed my prototypes over and over and they just keep going! On the 2nd prototype I did have an arm plate break. While one arm plate broke, the other flexed like gumby, then straightened back out. I've gotten to the point where if I'm in a hurry I don't even bother with a soft landing, I just come in and bash it into the ground. Honey badger don't care! The trick is to keep the mass low... if the aircraft is lightweight then there's less inertia to cause carnage in a crash. A quad designed to carry a gopro will need to account for the 3.7 ounces (with LayerLens) which means more powerful motors which will need a bigger heavier battery and a heavier frame... at that point you've got 3 to 4 pounds and crashes WILL cause carnage. Remove the gopro from the equation and you only have 2 to 3 ounces worth of fpv gear (camera, vtx, voltage osd) and you end up with a lightweight fighter jet that will have a better chance at surviving crashes.


 The arms tab into the hub plates so tightly that you can hold up the frame by a single hub plate and the arms won't fall off.  Also, one of my beta testers managed to get several flights out of his WITHOUT any screws in the hub plates, lol.  He said that when it came apart it just tumbled down, nothing was broken and he had it back in the air (WITH screws) about 20 minutes later!

P1040802.jpg

Other innovations include the vibration isolated fpv camera mount. By keeping the vibes out your CCD or CMOS camera sensor will also maintain a sharper focus, its also designed to keep vibrations out of your Video Transmitter which extends the life of the vTx and can prevent video interference issues due to vibration affecting the RF circuitry.  The camera by itself isn't heavy enough, doesn't have enough mass to make the system work, so the mass of your vTx is added, which includes the weight of your antenna, plus a simple voltage OSD or TBS Core adds a bit more mass to it.  In my experience, you need almost 3 ounces of weight on the mount to really get the most out of it, but if you intend to use a lightweight mini camera, and lightweight vtx, you may just want to skip the upper plate and Isolators, and simply hard mount everything.


P1040832.jpg


P1040848.jpg


P1040880.jpg


Pricing as follows...


Complete Kit - $120

- Quad frame (4 arms)

- 2 extra arm plates and the standoffs screws to complete it (one whole arm)

- Standoffs

- 4-40 frame screws

- 5 rubber "landing gear" (one spare)

- Bamboo vibration isolation FPV mount

- L Allen wrench for frame screws

- 20 x M3 motor screws, button head black oxide


Replacement Parts

- Arm plates $6 per plate ($12 for an arm)

- Hub plates $15 each (upper or lower, same price - $30 for a set)

- Bamboo Camera Mount $15

Shipping

- Inside of the United States I know I can do USPS Priority with tracking for $7.  As for getting it quicker, via UPS or Fedex or shipping International... I won't know until I try, so please work with me until I get a firm grasp of how expensive shipping is.  So far I've been shipping in boxes, but considering that the kit is mostly flat pieces I think it could all go into a padded envelope just fine, and probably be a lot cheaper to ship.


How to buy?  Head over to fpvmonkey.com or just click this http://www.fpvmonkey.com/the-honey-badger-quad-frame-kit/


Here's a link to the Development thread over at Fpvlab...

http://fpvlab.com/forums/showthread.php?10622-The-Cyno-Quad-A-lasercut-Delrin-frame-from-Flying-Monkey-

Thanks for your interest!

~Flying Monkey

Read more…

3689503558?profile=original

The deadline for the Nemo Drone Prize, which aimed to prove the humanitarian and disaster-relief capabilities of drones, and especially low-cost DIY Drones, passed without submissions. But I'm hardly considering this a failure.

An update on the Nemo Drone Prize, from my website MentalMunition.com:

It hasn't been a good month for domestic drones in the United States. Lawmakers in Texas, Oregon, Missouri, and elsewhere recently introduced anti-drone legislation that could cripple commercial and humanitarian drone use in the United States. Journalism, that stuff that provides the essential flow of information for a democracy, could be hampered.

Couple that with delays in the federally-mandated process to integrate unmanned aerial systems into the national airspace, and you've got a problem that not only threatens a potential economic boost of $90 billion, but also shuts out life-saving technology.

I wanted to do something about it. I was preparing for a business trip to Washington DC by way of Boston, which is how I came to know a historic blizzard could slam the region and derail my travel plans. I had learned that governors in four states were ordering citizens not to use the road.

Travel, even by emergency vehicles, would be hampered severely. Well, perhaps emergency vehicles that drove on roads. But maybe not ones that flew in the sky.

I didn't have enough time to set up a Kickstarter for a drone that would help out during the blizzard. But there are many DIY drone enthusiasts in that part of the country, and surely someone out there could demonstrate that drones can provide essential services. Maybe one of them could program their drone to drop off an "emergency package."

I thought a prize would be a better format. Much like the X-Prize, which gives awards for technological achievements for space travel and oil spill cleanup, this would reward people for trying to make technology work for humanity. But this would reward people for proving that drones can be used for good.

So I did what I could. I withdrew $60 from my own bank account, and fired off a blog post. I copied the post on other online communities.

Then something unexpected happened. Over the next 24 hours, I received emails from other people in the community who believed in this vision and wanted to help.

Walter Volkman of Micro Aerial Projects LLC matched my $60. Then, Adam Sloan of BirdsEyeView threw in $100. Gary Mortimer of sUASNews.com pledged $120. Michael Shimniok of Bot-Thoughts.com contributed $20. Kévin Bouchard, a robotics coordinator and a student in computer science, also contributed $20.

One day after I launched the contest, the prize pot had grown more than six times its original size, to $380.

I'd like to thank the following sponsors for helping make the prize possible:

3689503466?profile=original

As the post reads, many of us involved in the prize are considering re-starting the challenge and making this thing systemic, but with introducing different parameters. The goal will still be centered around humanitarian or disaster-relief via drones or UAS.

If you've got any suggestions as to what the next goal for the Nemo Prize would be, please do comment here or send an email to mschroyer@gmail.com. Also looking for more sponsors, if this is something you'd like to get behind.

Although we didn't get any submissions, I was still able to snap some aerial photos above Massachusets. Visit the post to see more photos.

Read more…

Are Flouride Batteries the Future?

I came across this interesting article and video today. This is the first time I have ever heard of 'Fluoride' batteries. 
 
https://www.youtube.com/watch?v=Itd4V72VvTg 
 
http://www.dailytech.com/Researchers+Create+Fluoride+Battery+Look+to+Replace+Lithiumion+Technology/article23093.htm 
 
Obviously, one of the greatest issues facing the future of drones is flight time. 15 minutes just does not cut it. 
 
Battery technology impacts drones, I think, far more than smart phones. This is simply because drones physically propel themselves in the real world, where as a phone just runs code and lights a screen for the most part. 
 
From what I understand, 'fluoride' is superior over lithium as a battery material in that lithium can store one free electron per atom as opposed to flour ides ability to store 3. 
 
I am wondering what is driving battery research.
Read more…

Drones threaten RC model flying

Bruce from RC Model Reviews has some very interesting points on this topic and he mentions something about him developing something for FPV models to detect full scale aircraft.

If you fly any type of RC model airplane then you ought to be concerned that various politicians around the world are seeking to have "drones" banned. These people aren't talking about the Predator or Reaper drones we see unleashing hellfire missiles at "insurgents", they want to remove your right to fly any RC model with a camera -- or even any model capable of carrying a camera.

We (the RC and especially the FPV community) need to stand up and be heard now, before it's too late.

I'd love to hear from viewers as to how they think the RC community should respond to this threat to the hobby. Is it time to form a global FPV body which can bring the strength of numbers to weigh when challenging this threat?

And please... don't call any FPV model a "drone" -- it's an RC model (whether it has a camera or not).

Read more…
T3

Take a look at asena21.pl

Valentine Heart with dedication has been crafted on the sky using autonomous UAV.

Well beyond visual range, below frost point, in dense fog. Somehow it worked, over wast swamps near Wrocław, Poland (pronounciation: WrocLove).

The webpage looks like a quick mash-up but it's there. 4x3km, at 300m AGL.

A movie will come a few days later.

3689503385?profile=original

Raw flight recording https://vimeo.com/59659590

Read more…

Determining Altitude AGL Using Optical Flow

3689503418?profile=originalYou are probably familiar with optical flow sensors which provide extremely precise measurement of ground speed (and therefore position) for quadcopters and computer mice.  The PX4FLOW is the most-recent example but there are many others.

3689503430?profile=original

How it works

The optical flow sensor provides a 2D measurement of the angular speed of the image that is moving through its field of view, which is perfect for a mouse but by itself not that useful for a free-flying robot. It cannot differentiate between a near thing moving slowly, a far thing moving quickly, or its own camera rotating. Optical flow must be integrated with other kinds of sensor data for it to make sense in 3D space.

For those familiar with trigonometry, the diagram at right provides an intuitively-correct way of understanding how the various sensors are integrated, and how it can be possible to calculate an unknown value from known measurements.

  • Point C represents the center of the optical flow sensor’s view.
  • Length b is the current altitude above ground level (AGL) as reported by sonar.
  • Angle α is the raw optical flow, minus the current pitch rate as reported by the gyro. (Pitching up or down changes the viewpoint of the sensor, adding to the optical flow. We have to subtract this out to get a grounded measurement.)
  • Length a is the ground speed of the craft.

So, given altitude from sonar, pitch rate from the IMU, and optical flow, we can calculate ground speed.

3689503350?profile=originalWhile helpful for visualizing the math, the trigonometric method is only actually correct at α = 0. At α = 90°, a and h hit infinity, which is obviously nonsense. To calculate the actual distance traveled, you must calculate the sum of the movement across point C, which, when you do the calculus, ends up being the exact same formula used to calculate the length of the curved section of a circle segment. I've illustrated this with the second diagram at right.

It might seem that adding that curve to the equation has hopelessly complicated things, but in reality it makes the equation simpler, with no trigonometric functions at all. If I take out the obvious unit conversions, it looks like this:

ground speed = (optical flow - pitch rate) × altitude

A problem, and a solution

In the above formula altitude is a known value directly measured by sonar. Sonar works well in quadcopters and other craft which fly in a hover regime, but tends to be much less reliable in planes, where accurate AGL measurement is probably even more important, especially for landing.

Fortunately, ground speed is not an unknown in planes. GPS and airspeed measurements provide highly-accurate ground speed measurements (there are errors but they’re small compared to the higher speed of the craft). With ground speed solved, we can use basic algebra to move the terms around and solve for a different unknown:

altitude = ground speed / (optical flow - pitch rate)

Thus, we have a reliable and accurate measurement of altitude which works at even greater range than sonar.

Work to be done

The new PX4FLOW has its own sonar altimeter and gyros and performs all sensor integration internally. To add ground speed as an input and altitude as an output, one of the following will need to occur:

  • Autopilot reports ground speed to the PX4FLOW, which then integrates it with its own sensors and sends back the calculated altitude, or
  • PX4FLOW reports raw optical flow rates to autopilot. All other PX4FLOW sensors are turned off. Autopilot integrates optical flow with its own sensor data, providing improved accuracy of altitude, ground speed, position, and winds aloft.

The second option is the winner in my opinion, as it enables drop-in use of less complex optical flow hardware. I really don’t understand why a redundant IMU was placed on the PX4FLOW in the first place.

Please note that I’m not in a position to do this work myself. My own plane does not have any optical flow sensor, and probably won’t for a long time.  I’m OK with hard landings. I’m just offering the math that you’ll need to implement your own.

Caveats

You may find that your optical flow sensor stops sending intelligible data as the ground gets close. This problem is also encountered with sonar, which has a minimum measurable distance due to the sensor deafening itself while generating the same sound that it needs to listen for. Optical flow fails for a different reason. If we solve for a different unknown we can see why:

optical flow = (ground speed / altitude) + pitch rate

As altitude approaches zero, optical flow will approach infinity. I don’t know the limits of the PX4FLOW (and I don’t have one to test) but I assume the limits are lower than you would want. There are several solutions to mix and match:

  • Install flaps, land at slower speeds.
  • Mount the optical flow board higher, perhaps under a wing instead of the belly.
  • Install a wider-angle lens on the optical flow sensor. The PX4FLOW camera has a 16mm focal length. A shorter lens will widen the view and reduce the detected optical flow. Use simple lenses only, not fisheye/GoPro/FPV, as geometric distortion will cause bad results. Do not use any lens which causes vignetting (black corners) as you will then need to digitally reduce the sample area which will defeat the purpose.
  • Solve it in software: Before landing, collect terrain data with a fly by, continue to measure altitude as long as possible on approach, and complete the landing the using the other available sensors.
Read more…

From Wired:

cornelldrone.jpg?width=400

For a day, a sandy-haired Virginian named Jeremy Novara was the hero of the nascent domestic drone industry.

Novara went to the microphone at a ballroom in a Ritz-Carlton outside Washington, D.C. on Wednesday and did something many in his business want to do: tenaciously challenge the drone regulators at the Federal Aviation Administration to loosen restrictions on unmanned planes over the United States.

....

Full Story:

Domestic-Drone Industry Prepares...

Read more…

3689503335?profile=original"Researchers at Universidad Carlos III de Madrid (UC3M) have developed a new system which improves the ability of a GPS to determine a vehicle's position as compared to that of conventional GPS devices by up to 90 percent, and which can be installed in any vehicle at a very low cost.

The system, which is based on sensorial fusion, was jointly designed and developed by the Applied Artificial Intelligence Group (GIAA - Grupo de Inteligencia Aplicada Artificial) and the Systems Intelligence Laboratory (LSI - Laboratorio de Sistemas Inteligentes) at UC3M. The prototype incorporates a conventional GPS signal with those of other sensors (accelerometers and gyroscopes) in order to reduce the margin of error in establishing a location."

Seems like magic, when it's not really and already out on Diydrones! Welcome to arducopter 2.9.2 :)

Full article at http://www.gpsdaily.com/reports/A_system_that_improves_the_precision_of_GPS_in_cities_by_90_percent_999.html

Read more…
Moderator

Shop_12_29_20122-e1358313573274.jpg?width=150I just received a note from Lee Felsenstein that he will be speaking today as detailed below. (note: Pacific time).  For those not familar, Lee was a member of the Homebrew Computer Club and designer of the Osborne I and many other ground-breaking products.

It should be an interesting talk.

Date: 12 Feb 2013 03:16:43 -0800 
From: Lee Felsenstein <lee@fonlyinstitute.com>
Subject: EE380 talk Wednesday 4:15PM - Makers, Hackers and the Personal computer Revolution

I will be giving the EE380 colloquium lecture Wednesday (2/13) at 4:15 PM, on the parallels and divergences between the maker movement and the early personal computer industry (when it, too was still a "movement", propelled by passion and not riches). With about 36 hours to put the slides and the outline together it will be interesting to see the results. They will be streamed live and available for replay later - see http://EE380.Stanford.edu . For more shameless self-promotion I offer my new website www.leefelsenstein.com . I really must put up a notice of the 380 event there...
Read more…

6 Position Mode Selection for APM with LED Feedback

3689503281?profile=originalHi All, This forum has been so helpful so I thought I would give back and contribute...
I was trying to understand how a previous poster on this forum actually did the 6 Position 2 Pole Rotary Switch Mod with LED Feedback. No where is there a write up on the HOW-TO for the LEDs but there is lots of information on the 6 Mode Selection. 

Firstly, these posts below are great and have been very helpful.  I take no credit on the Mode Selection.  I just figured out the LED part is all.  ;)


There is a DIY Post by Max Levine dated March 30,2011 and another on April 1, 2012. This post shows a picture of the LED's but no writeup to be found.
There is a DIY Post by ARHEXA doing the same thing but no information on LED's. (June 2, 2011)
There is a DIY Post by Paul Mather on DIY DRONES showing how to do this minus the LED's. (June 11, 2011)

Well, all that being said, I knew this is a MOD that I had to have and was not giving up on getting it done.

So let me show the Pictures.... and then I will explain some more.


3689503231?profile=original


You might be saying to yourself, why is there only 5 LED's? Good question. If you look closely there is only room on the panel in my desired location for 5 LED's.

So I had two choices : 
First, I could have a 6th Mode with no LED feedback/Indicator/Label
or
Second, just make a 5 Pos Switch and 5 Mode Selection with Labels

I decided to do the latter. I have limited space in my T9x as I have done many mods to it thus far. That being said, that was really the only location that made sense to me to put the LED's and I really don't think I will be using any more than 5 Modes at any given time. And yes, I made a custom Face Plate for the Switch (will explain later).


EDIT: And that when you calibrate your radio sticks/switches/pots, it will mess up your mode selects.  The following configuration will always work and never mess up by a calibration of the radio sticks.

Attached is the How-To-Guide

Here is the Wiring Diagram as well.

3689503244?profile=original

All the best!

LTMNO

Read more…