All Posts (14048)

Sort by
3D Robotics

Tour of the new 3D Robotics factory

3689431399?profile=originalI was in San Diego on Thursday to speak at the AUVSI's Unmanned Systems Interoperability Conference and to do a Bloomberg TV segment on 3D Robotics/DIY Drones. This was a good opportunity to tour the new factory, which is now in its own 10,000 square foot building with 15 full-time employees. (3D Robotics is the company that powers the DIY Drones store). This is what it takes to do high-end electronics at the volume and scale we're now operating at. It's a long way from the garage we started in ;-)


Here are some photos from the new space.


Above: the main PCB production line. From left: the automated stencil printer, the pick-and-place machine with autofeeders and the reflow oven.  This is where the magic happens!


3689431278?profile=original

Carmen, who runs the QA station at the end of the PCB production line. She tests every board that comes out!


3689431457?profile=originalThese are just a few of the test jigs.


3689431472?profile=originalHere's Alan and the cool new 3D printer. You won't believe the new products they're working on ;-)


3689431503?profile=originalShipping


3689431489?profile=originalMore shipping


3689431417?profile=originalEngineering department


3689431562?profile=originalThe CNC machine making ArduCopter frame parts


3689431518?profile=original

Some Bixler and EasyStar APM enclosure parts made by the CNC.


3689431589?profile=originalJordi and software engineer Pat Hickey in front of the pick-and-place machine


3689431436?profile=originalAccounting and office management


3689431544?profile=originalBloomberg host (and former MTV VJ) Tabitha Soren raiding the refrigerator in the kitchen.


3689431615?profile=original3D printer operator


3689431720?profile=originalHere's the other end of the production line, showing the PCB cutter and reflow oven


3689431641?profile=originalComponent reels, waiting for the pick-and-place


3689431745?profile=originalConference room


3689431766?profile=originalThe engineering area has monitors turned sideways to read LOTS of Arduino code ;-)


3689431820?profile=originalHmm..what are these? Could it be a new product? Hint: they're not cameras ;-)


3689431665?profile=originalWe've even got our own forklift!


3689431792?profile=originalElectronics engineering stations look like this


3689431680?profile=originalHere's another one


3689431905?profile=originalJordi being interviewed by Bloomberg. 

Read more…


This week I crashed, repaired and conducted endurance/efficiency testing on the GeekStar. Compared to the Easy Star and it's brushed / NiMh set up, it performed very well.


Each flight I used full throttle on takeoff, and half to less than half throttle to maintain altitude.


5 min. of flight - consumed 231mAh

10 min. of flight - consumed 399 mAh

15 min. of flight - consumed 575 mAh


I then pushed it HARD (3/4 throttle to full throttle) for 12.5 minutes. It landed nice and cool!


12.5 min of hard flight - 1,178 mAh


Now I'm off to make my own wing, and then I'll truly have a scratch built airplane.


Electronics Used:

Motor: http://www.hobbypartz.com/75m42-optima450-2220-950kv.html

ESC: http://www.hobbyking.com/hobbyking/store/uh_viewItem.asp?idProduct=13429

Batt: http://www.hobbyking.com/hobbyking/store/uh_viewItem.asp?idProduct=6306

Prop: http://www.hobbypartz.com/60p-dyp-1001-propeller.html

Read more…
3D Robotics

Open source infrared camera control

3689431389?profile=originalFrom Hackaday(needless to say, this design isn't quite right for UAV use, since the battery wouldn't be needed, but it's close:


Here are the guts of [Lukasz's] infrared camera remote control. He based it off of an existing design, but looked for places where improvements could be made. He felt the ATtiny2313 was a bit wasteful in this case. But further investigation led him to see why it was chosen. If you were to drop down to an ATtiny13 the ability to connect a crystal oscillator is lost (that chip only offers a 1-pin clock signal input) and the internal RC oscillator isn’t quite up to his standards for reliable IR communications.

Instead of driving the IR LED directly from an AVR pin he used a transistor in hopes that it will allow the maximum current to flow through the diode when in use. We’re not sure if it’s necessary, but we can see how it makes sense. Power is received from an unregulated 3 volt coin cell, so maybe as that voltage drops over time this will come into play.


Read more…

Quadcopter - Testing GoPro Film

Hi all,

I just want to share the last video we did in Portugal.

It was our first test with a GoPro camera and I think it was a nice test. We need to improve the Stability and Pilot skill…

In the end of the day we crash the Quadcopter (no battery) and broke the Hobbyking frame :(

New frame is coming (homemade)…


Enjoy!


Filipe Feijão & Herder Cordeiro

Read more…

First video with the ArduBixler

I've been building a Bixler/Sky Surfer for a few months now, and had ardupilot mega and all in hand, yet no pilot experience.  So i've joined a local AMA club and learned to fly.  Last week i flew with the APM for the first time, and this week (after waiting to get the pan/tilt mount in) flew with the camera, so figured I'd show the results of video recorded with the APM planner :)
 

I'm using AirScapeRC's EasyGear (designed for Easy Star's, but easily working on the bixler, i posted a blog on it a month back) for takeoffs/landings, as i don't like hand launching something thats worth $1000 :P

Full APM with xbee900mhz

Turnigy9x with ER9x radio (stock receiver, going to upgrade to UHF tx/rx)

Stock outrunner motor the bixler comes with, with a 6.4e prop

5.8ghz video tx/rx, and DIYDrones Store cheap-o CMOS camera

thinking i need some better wiring, for one (its cramped in there!) and some filters, possibly ferrite ring on the camera feed and/or shielded cables.  Let me know if anyone has suggestions for improving video as i'd /eventually/ like to fly fpv, with the current quality that's a definite no. 

Read more…

My first Blog post on DIY Drones!

So this is my first post and i thought that i would share my FPV video with you guys!


A little bit of information:

Video: 1,2Ghz 800mw and 8 dBi patch antenna.

Radio: Futaba 12FG with 1W WiFi booster and 12 dBi patch antenna

Airplane: My own design and built "Dr.Marten" plane.

OSD: Eagletree 

Battery: 1x4000 mah 

3689431370?profile=original


Read more…

Something New from DJI

Almost all of us know about the famous wookong-M


Something new I had a chance to see yesterday on their mini site


WooKong-M View
WooKong-M Click&Go
wookoong-M-view.jpg  
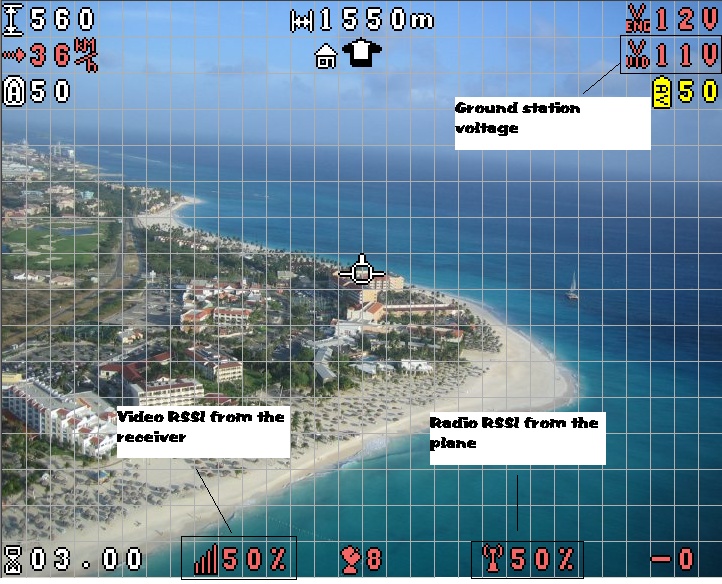
As a Ground Control Station (GCS), WKM View enables DJI autopilot system WKM the ability to monitor real-time flight state. It is an advanced feature of WKM.

WKM View will display 3D map, monitor attitude, coordinate, speed and angle of aircraft, monitor signal quality of wireless data link module and power voltage for you. It is specially designed for high-end WKM users.
wookoong-M-cg.jpg Click Go Mode is an upgrade package of WKM View, which gives you an extra tool for flight operation.

This tool allows pilot to drag single flight route on 3D map, assign altitude and flight speed to a single destination. Altitude, speed and destination point can be changed on-the-fly with flight path tracking.

Click Go Mode strengthen the WKM View, which brings you more exciting flight experience.
Read more…

3689431163?profile=original

Hi guys,

This is not really a post about something new but rather a summary of steps others did before me and a little help to my personal memory (already forgot once how it works). The post is referring to ArduPlane but I don't see what would be different for ArduCopter. Would also like to say thanks to the developers here :-)

The problem: you want to get a HIL simulation running without windows (i.e., on a Mac or linux system) using the latest APM git repo code and QGroundcontrol as the GCS.

Outline of one possible solution:

  1. Install dependencies: ArduPlane (git version), QGroundcontrol 0.9.0, FlightGear V2.4.0, python 2.7, pyserial-2.5, MAVProxy (git version), pymavlink (git version), arduino-0022 and cmake 2.8.6 for building and uploading APM code straight from console
  2. Copy MAVLink.xml to FlighGear protocol directory (for Mac OS: /Applications/FlightGear.app/Contents/Resources/data/Protocol/ )
  3. Start MAVProxy: python2.7 mavproxy.py --master=/dev/tty.usbserial-A600dLKS --fgout=localhost:5010 --fgin=localhost:5000 --out=localhost:14550
  4. Start FlighGear with parameters: --generic=socket,out,40,localhost,5000,udp,MAVLink --generic=socket,in,45,localhost,5010,udp,MAVLink
  5. Start QGroundcontrol
  6. Enjoy :)

More detailed info on dependencies and configuration:

A) APM:

  1. git clone https://code.google.com/p/ardupilot-mega/
  2. cd ardupilot-mega/ArduPlane
  3. Modify APM_Config.h:  "#define HIL_MODE            HIL_MODE_ATTITUDE"
                                          "#define HIL_PORT            0"
  4. cd ..
  5. Follow instructions in README.txt for building and uploading code (essentially, assuming arduino1280: mkdir build && cd build && cmake .. && make ArduPlane-upload )

B) MAVProxy and pymavlink: (note: should be in the same directory(?)):

  1. mkdir APMHIL
  2. git clone git://git.samba.org/tridge/UAV/pymavlink.git
  3. git clone git://git.samba.org/tridge/UAV/MAVProxy.git

C) Setting stuff up (modify paths according to your installation paths):

  1. export PYTHONPATH=/Library/Frameworks/Python.framework/Versions/2.7:/Users/andre/pyserial/lib/python2.7/site-packages
  2. export PATH=/Library/Frameworks/Python.framework/Versions/2.7/bin:$PATH

D) Trouble shooting:

For my EasyStar I had to fix rudder control to 0 and invert the direction of elevator control. This is easily done by the two modifications inside mavproxy.py:

status.rc_elevator = (-1.0) * scale_rc(m.servo2_raw, -1.0, 1.0, param='RC2')
status.rc_rudder   = 0.0;

Also: every time one starts FlightGear one needs to start the engine manually by pressing 'S', which is annoying :)

Read more…
Developer

ArduIMU V3 is finally here!

3689431212?profile=original

Long time since my last post!

I'm glad to announce the new ArduIMU V3 that will take the place of the very successful ArduIMU v2 (flat version). We called it flat version because ArduIMU V2 was created in a time where 3 axis and even 2 axis gyros were not so common and we had to place some of the gyros vertically. Good times... 


ArduIMU v2 was the first low cost IMU that had gyros that allowed me to keep it flat, but they were bulky and expensive. I had to use two gyro chips for the XYZ axis, another for the three axis acceleration and you had to place the magnetometer externally. Another "disadvantage" was that all the sensors (but the mag) were analog, by default limited to 10-bits and required all the analog inputs in order to read them and you were also limited by the default filtering configuration and other noisy issues. 


All the limitation we had with ArduIMU V2 are all gone with the V3. ArduIMU V3 features the new MPU-6000, that includes 3 axis gyros & accells built-in and process everything internally that is some kind of dual core power (24-bits ADC sampling and sensor fusion is handled inside the MPU), the latest 3 axis I2C magnetometer HMC-5883L and the classic but very robust Arduino Atmega328 running at 16Mhz... 

3689431240?profile=original


MPU-6000 uses SPI for max performance. Did I say user configurable low pass filtering and scale range? Hell yeah... and here are some of the other specs:

  • Digital-output of 6 or 9-axis MotionFusion data in rotation matrix, quaternion, Euler Angle, or raw data format
  • Tri-Axis angular rate sensor (gyro) with a sensitivity up to 131 LSBs/dps and a full-scale range of ±250, ±500, ±1000, and ±2000dps
  • Tri-Axis accelerometer with a programmable full scale range of ±2g, ±4g, ±8g and ±16g
  • Reduced settling effects and sensor drift by elimination of board-level cross-axis alignment errors between accelerometers and gyroscopes
  • Digital Motion Processing™ (DMP™) engine offloads complex MotionFusion, sensor timing synchronization and gesture detection
  • MotionApps™ Platform support for Android, Linux, and Windows, with Windows Phone platforms on the roadmap
  • Digital-output temperature sensor
  • Digital input on FSYNC pin to support video Electronic Image Stabilization and GPS
  • Programmable interrupt supports gesture recognition, panning, zooming, scrolling, free fall interrupt, high-G interrupt, zero-motion detection, tap detection, and shake detection
  • Full Chip Idle Mode Supply Current: 5µA
  • On-chip timing generator with ±1% frequency variation over full temperature range
  • User self test
  • 10,000g shock tolerant

3689431141?profile=original

Other ArduIMU V3 features:

  • Pin compatible with ArduIMU V2.
  • Breadboard compatible (ArduIMU V2 was not!).
  • Cheaper price (around $60 $78dlls, not confirmed).. 
  • Smaller size (1.5" x 1.0").
  • Atmega CPU has more % available for other tasks.  
  • The 6 analog pins are now available!
  • Arduino compatible and open source.
  • 3 status LED's (RGB).
  • I2c port with 3.3V translation.   
  • GPS port with FTDI autoswitch. 
  • This device is suitable for ANY application from rockets to simple movement detection.


3689431253?profile=original


The release date is estimated to be in two-three weeks. We are waiting for the final big batch and finish some code. We will take pre-orders soon.   


We also cooking BIG new goodies that will be announced also this month... =) 


[UPDATE 11/15/2011]: You can buy it now check this post: http://diydrones.com/profiles/blogs/arduimu-v3-ready-for-pre-order-and-check-our-new-color


Read more…
3D Robotics

Meet the Developers: "Hazy" (Xiaojiang Huang)

3689431153?profile=original

Here's one of my favorite stories about the power of community. In May this year, it was reported here that Chinese companies were making and selling APM clones, and had even translated the manual into Chinese. People wanted to know what we were going to do to stop this "piracy", but I pointed out that such derivative designs were both allowed and encouraged by our open source hardware model. 


As I wrote in that thread:

Personally, I'm delighted to see this development, for four reasons.

  1. I think it's great that people have translated the wiki into Chinese, which makes it accessible to more people.
  2. It's a sign of success-- you only get cloned if you're making something people want.
  3. Competition is good.
  4. What starts as clones may eventually become real innovation and improvements. Remember that our licence requires that any derivative designs must also be open source. Think how great would it be if a Chinese team created a better design than ours. Then we could turn the tables and produce their design, translating the documentation into English and making them available to a market outside China. Everybody wins! (Hey, a guy can dream ;-) )


Eventually, a user named "Hazy" replied in the thread:

I am the guy who translate the wiki into Chinese. It is also open source, I welcome anyone for copying, distributing and modifying the Chinese pages. I keep the links to official English wiki, diydrones, and sparkfun so that the readers can know who propose the original works. This is usually required by the open source license. I would also like to dedicate translations and merge them into the official wiki repository if it is preferred.


I do not gain any benefit from the sales of Chinese clones of APM,


This was just what I had hoped for. So I gave Hazy edit permission on the wiki, and he did exactly that. Today we have a full Chinese translation of the wiki on the Google Code site that shares images with the English wiki and is thus sync'd with the latest revisions. 


But that's not all. He then did a Chinese UI version of the Mission Planner and in the process made a few bug fixes to the English code, too!  This is exactly what an open source project is designed to encourage, and I'm proud to count Xiaojiang Huang as part of the Dev Team.


Over to him:


Name: Xiaojiang Huang


Home: I currently live in Beijing, China. My family live in XinYu, JiangXi Province, a small city about 1300 kilometers from Beijing.


DIYDrones roles: In this project I mostly worked on localization of documents and resources. I first translated the wiki pages of APM and ACM into Chinese language, and then I added a Chinese UI to the new APM Planner.


Day Job: I am a PhD student in Peking University, China. My research interests include web mining and text mining.


Background: I study computer science in the collage. My experience mostly lies in windows and network application development, such as page crawler system, automatic document summarization system, etc. I learned a bit about AVR programming. Fortunately the localization work requires little beyond my knowledge.


When I was a kid, I was fascinated by all kinds of models, and I wished I could have a RC plane. At several years later, I was able to afford a RC helicopter when I graduated from collage. I also got RC trucks and planes. Sometimes, I am derided as naive for playing "toys", but I'm happy because it's my child dream. I met APM by chance when I was surfing the web, and was attracted by its powerful functions. Some friends of mine were also interested in it, but they felt a little inconvenient because of the English documents. So I tried to translate them into Chinese, hoping to reduce the difficulty of playing APM for the Chinese fans. Thanks to the great work of DiyDrones, and I wish it could help more people make their child dreams come true.


Interest: I’m a fan of all kinds of RC models, and I fly RC helicopter most frequently. I’m also interested in DIY electronic projects and puzzle games.


Read more…

Suicide mission ;-)


The fun stuff starts around 1.30 ..


This is what can easily happen when too confident and not enough prepared, when you get caught in some unexpected altitude windstream, even a little one


To sum it up .. suicide mission ; Had no fpv, no lights, no simple or rtl mode programmed


The panasonic was found split in two, but amazingly , the copter only bent one arm; i repaired since then . Am now waiting for a brand new gopro hero2 and a brand new 5.8gzhvideo rx/tx ; The one i had refused to start (old 1.3ghz ), made me loose patience and take off anyways there up .. will not do again :)


3689431107?profile=originaldCopter just before flight, complete payload

Read more…
Developer

ArduCopter on a short film

Look at minute 9:46 to see the aerial images:
(diydrones logo is on credits also)
And some scenes of the making off (first minute):
Some months ago, Dario Lopez, a local director calls me to take some aerial video for a short film he was developing... Of course I said yes!!
Before the filming, we were talking and he explain me what he wanted. It´s a funny short film (a "crazy" charlie's angels version) and he wanted to use a GoPro camera (at maximun FOV) for some action sequences with a jeep.
I decided to modify a quadcopter frame for this task because we wanted to have a clean images (with no motors, no arms, no props, no landing gear) and achieve this with a GoPro at 720p in a quadcopter is not an easy task. I made an asymmetric frame with the front arms at 115º. With this angle and the camera tilted down slightly we could get "clean" images. I needed to move back the battery to adjust the C.G. and I needed to adjust the PID values with the pitch axis a bit higher than roll for compensate this config. But the overall result is that the quad flys very well...  I used original arducopter parts (plates, short arms, motor mounts and battery mount).
3689431035?profile=original3689431069?profile=original
Thanks to Dario (the director) for call me because it was a nice experience. It was very funny to be the aerial camera following the director instruction :-)
And the work finished in a spanish way with a fantastic launch...
 
Jose.
Read more…

This is a 3D scanner from Faro.  Spec sheet and brochure and videos can be found at the distributor web site ATS.  This is a video of the scanner on a Lego trolley, so how long until we have something this good on a quad for automated object avoidance and landing???  Engadget article can be found here.


How much processing power do we think it would take to use hardware of this calibre??

Read more…

3689431024?profile=original

Saw this on the news, and then read about it today on engadget as well.  Interesting points - 50 pound chopper, to be used primarily for surveillance, but also weapons capable.  Local 2 News has a tendency to blow things out of proportion, and they clearly wanted to sensationalize this, but the technology does raise some interesting privacy issues that may need to be addressed in the long run.  Is an individual invading someones privacy if they capture video of activities that might otherwise be private??

Read more…

Mapping with Ardupilot

I've been playing with ArduPlane for quite a while and have finally got to the point where I can make it do something useful. I've been inspired by others on this site to use it for aerial photography to make 3D maps and the like.


I have an ST Models Discovery as the airframe (awesome platform for Arduplane by the way) and have made my own camera mount out of plywood for the bottom. It has one servo for roll stabilisation using CHAN 8 on the autopilot to keep the camera pointing down. It's basic but works pretty well (see pics)

3689430890?profile=original

3689430908?profile=original

Last weekend I flew over a small island on the river near my house. I managed to get 155 photos in around 10 mins and produce quite a reasonable 3d surface using hypr3d. I gotta say that these guys rock with great personal service and it's all free! They did struggle a bit with that many photos, but you can see the result below

3689430782?profile=original

3D Rotatable version

I'm not in the same league as some of the other makers of aerial maps on this site, and have no idea of the accuracy of this map, but was pretty happy with the early results and would like to work on this more to get better results.


my setup is

Airframe - ST Models Discovery Trainer with stock motor and 30A ESC

Arduplane 2.24 with Magnetometer, airspeed kit and xbee - a few lines of code added to output roll stabilisation

Home made camera mount with roll stabiliser

Canon IXUS 50 camera 5MP (this is a very light P&S camera) running CHDK

Spektrum DX 7 2.4GHz tx/rx

2200 mAh 3s motor battery + 1000 mAh 2s battery to power all other electronics via a UBEC (the stock BEC is too small)


I used Mark Willis's aerial coverage spreadsheet to calculate the waypoints before launch and it seemed to produce a good result.You can see the waypoint in the following screenshot


3689430961?profile=original


Cheers

James


Read more…
Developer

Arducopter 2.0.50 preview

2.0.50 is a work in progress, but this video highlights the Altitude hold progress in the latest code. 


Changes include a faster Baro filter to reduce latency and temperature induced noise. Alt hold control using the throttle has been upgraded to have a faster and proportional response. 


Acro mode has been enhanced and now has it's own duplicate set of Rate PI's for more flexibility.

I'll have this posted in the next two days to GIT and the mission planner.

Jason


Read more…

HK bixler + ARDUPLANE 2.24 + Remzibi OSD

Mission Logimg_0835.jpg?width=300


Hi Guys ,


Few months ago i have bought the HK Bixler and planning to equip this bird with ARDUPILOT Mega and Remzibi OSD.


Regarding the BIXLER is equipped with the following rigs:


-2212-06 28A 2200KV SP Brushless Outrunner Motor

2212 2200KV motor


-6X4 TGS propeller


-3000ma 3S 20C lipo Battery

Please note that the battery is providing power supply to the entire plane (receiver, Camera, ESC, OSD Remzibi, Video TX etc …) I am using the balance plug to power up the OSD, Video TX and camera. Basically on the plane i have only one battery in order to save weight and to minimize the mechanical problems and having a single point of failure.


-Video cam : 600TVL SONY SUPER HAD CCD D-WDR Color Board Camera with OSD Menu DNR

Sony 600TVL


-Video transmitter 900mhz 800mw tuned on 980Mhz


-OSD Remzibi with the ARDUV1_72. firmware  and Flytron current sensor (100A). The radio signal strength is retrieved from the Dragon Link receiver.

ARDUV1_72 Firmware


-ARDUPILOT MEGA with the  ArduPlane2.24+Remzibi+Status_Leds  firmware

ARDUPLANE 2.24 + Remzibi addons


-Video TX antenna : DIY inverted V antenna tuned on 980Mhz

-Remote control JR9303 equipped with Dragon Link Module.

Dragon Link Module for remote control


Currently I am not using the Xbee Telemetry system


GCS :


3689430801?profile=original


-Eagletree Diversity

-DIY biquad Antenna and DIY ¼ wave ground plane antenna

-Lenovo T400 computer equipped with EASYCAP USB dongle for video recording.

-FRAPS and VLC software for the Video recording.

-Remzibi OSD for Video Signal information and GCS Battery level monitoring.


Remzibi OSD wiring and integration


The ARDUPILOT Mega integration with Remzibi OSD is very straight forward. 


Remzibi board GPS RX <--------------- ARDUPILOT MEGA telemetry TX

Remzibi Board GPS Ground <---------ARDUPILOT MEGA telemetry Ground


The stock channel 7 Configuration is triggering On/Off the OSD display.


-The Total plane weight is 1 kg.

-Flight duration : from 17 to 40 minutes and depends of my throttle management.

-Range : More than 10km.


Some Pics :


ARDUPILOT installation with the 980mhz inverted V antenna.


img_0834.jpg

Full plane platform overview and the Dragon Link antenna is located on the plane tail. 

img_0835.jpg

The 1/4 Ground plane antenna 


10032012.jpg

GCS pod with Eagletree diversity and the BIQUAD antenna


19032011.jpgRemzibi OSD 


remzib10.jpg


Regarding the Plane , i have no major comments because simply this plane is flying like a bird. No issue at all and this plane is able to welcome the overall additional payload and rigs.


According the ARDUPLANE firmware (2.24 release) ditto , no issue at all according the tests i have already performed.(well done guys , this release rocks).


I have tried :


-Manual mode

-Stabilize mode

-Circle

-RTL

-Failsafe

-Flight mission with 9 waypoints with circling.


So far no issue and all tested moded worked without any glitch.


The BIXLER configuration files (Many thanks Chris) are from Chris and the only modification I have imported is regarding the Radio Calibration. All other settings are stock setup from Chris and they work like a charm.


http://ardupilot-mega.googlecode.com/files/bixler.param


So far , with the ARDUPLANE 2.24 Firmware , no issues has occurred and I am more than satisfy regarding the current Arduplane Release 2.24 with Remzibi addons.


Cheers


Read more…
Moderator
During this year i'm working hard on Multipilot32 ,

developing the 32 bit revision of Arducopter and use and test it in different kind of application .

My company Laser Navigation srl http://www.lasernavigation.it develop different kind of technology : navigation system , 2d-3d mapping systems , drone :) So in the last year i'm working on a great project in italy .

We are working on the Tourism Web Portal of Bergamo . In this project my company work on Maps , Geo Tagging DB , Open Streetmap Map data improvment , navigation systems. 3D visualization and also introduce for first time in this kind solution the use of Video doing by drone. :)

I'm very happy to present our work on our community.

Many thanks to all the people that contribute every day to improve our best project :)

Thanks to Dev Team ... and also to beta tester of our project.

going to : http://visit.bergamo.it

inside the website in the first page there are 15 video doing by a multicopter that present different beautifull place in italy.

choose where you could going for your holidays in italy :)

If you came here don't forget to contact the FOXTEAM :)

All the video are doing with Multipilot32 based Multicopter.


For more info about MP32 and his option check here :

http://www.virtualrobotix.com/page/multipilot32-1

http://www.virtualrobotix.com/page/vr-imu-10


Some video of different step of our development.


Read more…