All Posts (11086)

Sort by
3D Robotics

Thanks to the good ideas of Gary Mortimer and others, we're now launching a Trust Time Trial contest. The idea is simple: you set up four waywaypoints, spaced 200m apart, on your own field and time your UAV completing the course. Upload the data in the comments here. Best time on Sept 1 wins (I've got a prize this month--a new FunJet kit). In the future, we'll add complexity and stricter standards to the trial, but this first one is easy: 1) Must complete the pattern as shown above, totally autonomously (go into auto mode before waypoint 1 and exit after you hit waypoint 1 again). The four points are arranged in a square, with 200m on a side (obviously the two diagonal paths are longer). Any aircraft/autopilot allowed. It doesn't matter how close to the waypoints you get, as long as you pass on the outside of them. 2) For this first one, altitude is not graded. 3) Fastest time to hit all points and return to 1 wins (one lap). Must provide GPS track with timestamps and on-board video. (If you don't have/can't afford a small onboard videocamera like the FlyCamOne 2, we'll let it go this time. But in the future: video or it didn't happen!) 4) Must also demonstrate that fun was had. Kids, picnics, silly hats, marching bands, something. GPS tracks are best achieved with an onboard GPS datalogger, like the i-Blue 747 or smaller Sanav ML-7. But if you don't have one or don't want to add the weight, you can just capture the GPS track from your telemetry stream, although you'll have to figure out how to convert it to KML format to export to Google Earth (see below). If your Ground Control System has a built-in map+track function, a screen shot of that is fine, but it should be possible for people to check to confirm that your leg lengths are at least 200m. Evidence data should include these four things: 1) Total time, along with aircraft and autopilot used. A photo of the aircraft would be nice. 2) Screen capture of path exported to Google Earth or an equivalent, annotated with waypoints and where autonomy began and ended. Here's a sample from Dean Goedde (waypoints and autonomy not marked): 3) GPS datalog file, any format 4) Onboard video, embedded from YouTube or Vimeo. [Not absolutely required but requested]
Read more…
T3
Note precise track following and functional mission simulator. It helps a lot to confirm on the flying field that everything is set up OK. In the worst case, it will fly to customizable rethome zone and automatically return to takeoff point but the flight would be wasted.

UAV autopilot for aerial photography from Krzysztof Bosak on Vimeo.

kbosak at box43.pl
Read more…

(THIS TOPIC IS BEING DISCUSSED HERE)


I've never introduced myself so I'll take the time now (feel free to skip this paragraph). I have a business background but I am a technology enthusiast. Recently my interest about the business and strategics/social aspects of Open Source (especially Open Hardware) has really grown. In order to better understand the OS movement (and satisfy my geek alterego) I have been tinkering with Arduino, learning some programming languages, etc. And then I learned about DIY Drones....Once upon a time I flew RC Planes (that was during 1995 and 1996, I believe). I've been wanting to restart the hobby for quite some time, but now I believe I have what it takes ($). Unfortunately I live in a city that is not very RC-plane-friendly and I don't have a park or something nearby. For that reason I've been considering a Quadcopter project (for the VTOL and stability characteristics). This project should not only satisfy my flying needs, but also teach me about electronics, programming, etc.I am thinking about using a platform based on Arduino since I have learned some programming on it. Currently I am leaning towards the AeroQuad.In the future (if the thing take-offs) I plan on installing video gear for FPV. Followed by that I plan on programming (or if I get lazy I'll just buy a kit) some OSD. And than I should go into the UAV territory.I have many doubts about the project... here are some that maybe someone can help clarify:
  • Is the AeroQuad the best choice for what I need now and plan on installing in the future?
  • How much thrust do I need for something like this?
  • Does the AeroQuad support X configuration (I've only seen + configuration), and is that a hard thing to change?
  • Is a Quadcopter a good platform for UAVs?
  • Can a Quadcopter develop good forward speed? I imagine it to be slower than a heli. I haven't seen any movies of people flying quad's on long distances (which is something I'd like to do).
Based on my needs I believe this will be a VERY long (and probably expensive) project. I do want to discover the best COSTxBENEFIT solutions, of course.The "foward speed" thing is a factor that will probably take me into a next step that will be to transform the Quadcopter into a mix of Quad/V-22 Osprey/Airplane (that's why I have the question about the X configuration). Does anyone know a project like this?Sorry about the long post, I hope someone has the patience to read it.

(THIS TOPIC IS BEING DISCUSSED HERE)


Read more…
3D Robotics
Gary Mortimer has a good idea: a DIY time trial contest, where you time your UAV flying autonomously over an agreed-upon course. You upload GPS track, time and, onboard video. Fastest time each month wins something cool that I'll donate (like a Funjet kit). What kind of course would work best for this? For starters, how about this: a square, 400m on a side. Must complete three full circuits in fully autonomous mode. Carry an onboard GPS datalogger or datalog from your telemetry stream and upload the file (so people can see timestamps). How does that sound? (pic stolen from Gary's comment below)
Read more…

Ardupilot roll functional flow diagram

I'm installing Ardupilot in the 6 foot wingspan electric Telemaster. As this is a significantly different airplane than the Easy Star I want to proceed slowly and carefully. If I can I am going to adjust and confirm PID settings, etc, one function (roll, climb and speed) at a time, starting with roll. I decided I needed to have a good idea how the roll software is implemented in Jordi's and Chris' marvellous software. So I embarked on developing the functional flow diagram shown here. It is based on V2.2.3roll_flow_chart.pdfI'm a noobie at this so I don't claim it is 100% accurate although I think it is close. Doing this has been a good education for me but I wonder if it is useful to others. I would be interested in Ardupilot enthusiasts' comments, including suggestions for corrections and/or improvements.By the way, the term "heading" is used incorrectly in the software. In navigation parlance, heading is the direction of the airplane's fore and aft axis in relation to a fixed reference. The reference could be magnetic north if the airplane has a compass or true north if it has some kind of gyro-based measurement device (AHARS or IMU). Ardupilot as it is presently configured has no heading measurement device so it does not know what it's heading is. Where heading is referred to, it is really course over the ground that is being talked about. No big isssue now, but will become so when Ardupilot adds a heading reference in the future, which I think is inevitable.
Read more…

UBWuav

Hello everybody! I would like to introduce EasyStar (with a few mods) UAV which uses PIC32 based autopilot that I've been working on for a few months (started a few weeks before Brian Wolfe showed his work on DIYDrones ;-)Right now it's build upon UBW32 board but in the future I plan to desing my own PCB and decrease the size of the autopilot. For attitude estimation I use FMA thermopiles. Xbee is used for telemetry (interestingly 2.4Ghz Pro module which is rated for 1.6km worked easily for me allowing for 4km distance between two transceivers). More details will follow soon.Below short autonomous flight (looping through four waypoints, windy day, gusts up to 20-25kph)
Read more…
3D Robotics
This is just a repost for those who are new to ArduPilot: Here's a very simple Arduino program that will test your XY and Z sensors. Just load it on ArduPilot (make sure the board is powered and the GPS is not connected). With the FTDI cable connected, click on the serial monitor icon in Arduino and make sure the speed is set for 9600. The program will prompt you to tilt the sensor in certain directions and then strike any key and hit return when you're ready to take the X and Y sensor readings. Remember that sensor readings inside and near heat sources (like your hand) are nothing like the real thing outside. But it's still a good way to confirm that your sensor is working right. Once you're finished, reload the ArduPilot code.
Read more…
We have a UAV device that can stay on the air for up to 50 mins, runs on clean energy, and supports a payload of 8 lbs. Talking to some companies that sell video to real estate companies, it seems they would be interested in a device like this because it competes against helicopter. The only concern from the people we've interviewed, is stability. I still think there must be something out there to mitigate this concern, right?
Read more…

RC Plane Prop Saver

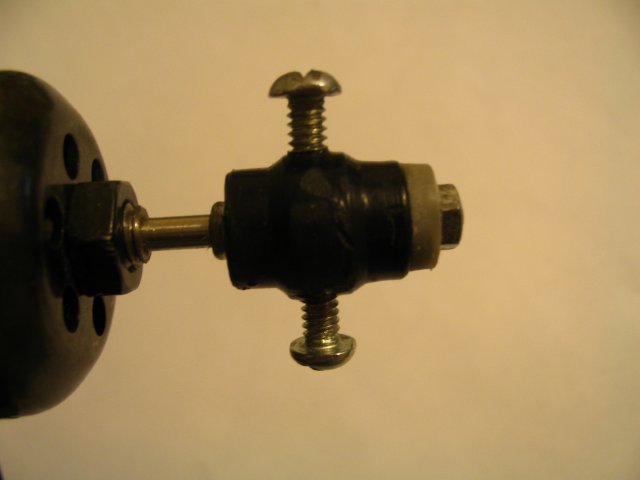
RC Plane Prop Saver: I found this while researching the Super Cub and thought it might be usefull to those of you not flying EasyStars. :From: http://thesmithfam.org/blog/2006/10/17/rc-plane-prop-saver/Direct quote:"Michael Torrie created a really handy tool to save your RC plane’s propellers from a spinning death on impact. It’s called a prop saver and it’s based on the “elastic rules, static drules” principle. Read on for pictures and explanation:The following is a close-up picture of a prop saver:

saver4.jpg

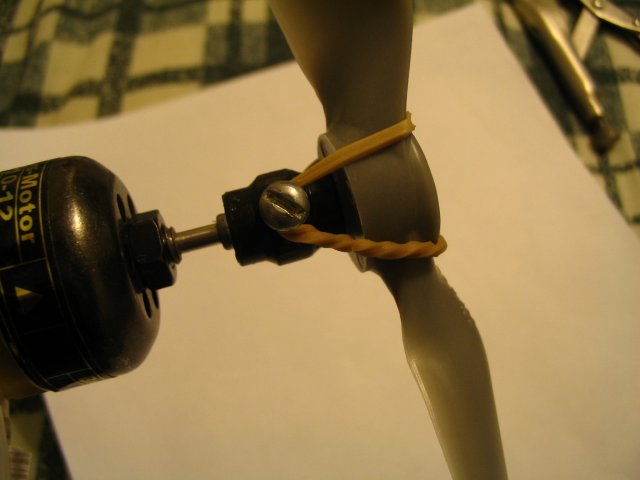
It bolts on to your propeller shaft just like a normal propeller, with two hex nuts (which are barely visible on the left and right of the black plastic yoke). The black plastic yoke is made from an old propeller, with the blades cut off, and two screws drilled into it and, of course, coated with tape for good measure. The tape provides a little bit of friction when you slide the new prop on the top. You then attach your prop onto the tip of the yoke with a rubber band, securing it to the screws like this:

saver6.jpg

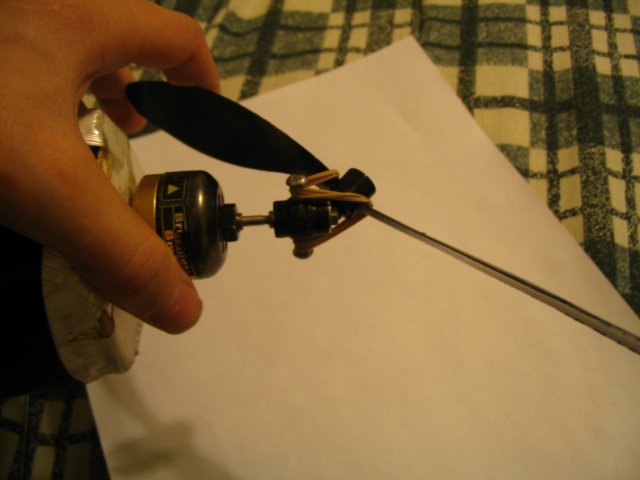
The prop sits on the tip of the yoke, swallowing it slightly. The rubber band holds it to the yoke and delivers the rotational force to the prop like a normal nut would, except with a bit more elasticity. That way, the prop’s blades don’t take the brunt of a crash, but rather the rubber band, as this picture shows:

saver3.jpg

That’s one safe prop! You’d have to crash it pretty hard to break it, in which case the prop will be the cheapest repair you’ll make.This approach observes the “elastic rules, static drules” principle by allowing the prop to give a bit, rather than statically absorbing impact forces. This same principle applies to just about every component that break easily."
Read more…