I would like to hear what applications you suggest for this platform!!!
As some of you already know we can fly between 2 and 3 hours according to the payload with a total of 5 liters of fuel.
Best regards,
Jose Luis Cortes
Quaternium
I would like to hear what applications you suggest for this platform!!!
As some of you already know we can fly between 2 and 3 hours according to the payload with a total of 5 liters of fuel.
Best regards,
Jose Luis Cortes
Quaternium
Order your FlytPi Kit here
We, at FlytBase, are on a mission to empower drone developers and help them accelerate development of drone applications. Over last few months, we have introduced a suite of products, including, FlytOS, FlytSIM, web/mobile SDKs, FlytBase Cloud, FlytConsole. We have been working hard to improve the user experience to further simplify the drone application development process.
Releasing the Internet of Drones platform is a step in that direction. By offering industry’s first Drone-API as a service, we have opened up a new world of exciting possibilities.
One of the key concerns of our users has been the complex process of initial setup. Both, the software installation, and hardware setup, is quite time consuming. Simple things, like, an adapter to power the companion computer on a drone, are not easily available. To address this pain point, we are introducing a ready-to-use companion computer kit for your custom drones, the FlytPi Kit.
FlytPi is a turnkey companion computer that comes pre-loaded with FlytOS Commercial Edition for Pixhawk/ Pixhawk Mini/ Pixhawk 2/ Cube Autopilot. With FlytPi, you can simply connect your drone autopilot with a specially designed cable and enhance the capabilities of your drone.
The kit also comes with a dedicated power module to power up FlytPi, Autopilot and Electronic Speed Controllers (ESC) using a single drone battery. It offers a hassle-free connection with the Autopilot, thus saving time and effort in getting your drone applications built and deployed.
Here is a list of features and specifications of FlytPi:
Features:
Add-on features:
As we continue to roll out exciting products for the drone community, your feedback is extremely critical. It helps ensure that we understand your problems and built the right solutions tailored for your requirements. Please feel free to send us your queries, suggestions, and comments at support@flytbase.com. You may also use our forum for your technical queries.
This is an example of a swarm that only uses OpenCV and AprilTags for Navigation. It was very cleverly executed by Zerotech, the makers of the Dobby drone, which uses the Qualcomm Snapdragon Flight Controller. This swarm uses AprilTags on a mat on the ground and moves around by locating tags on the included mat.
No GPS - Swarm Controlled with OpenCV, AprilTags and Qualcomm Snapdragon Flight
Each drone uses Qualcomm's Snapdragon Flight (note, I am a Developer Advocate for Qualcomm). Using the down facing camera built into Qualcomm Flight, the drones are reading the April Tags from the mat, and using them as a map to move from waypoint to waypoint. Altitude is measured by the size of the AprilTag in the image.
Dobby is available on Amazon and can do similar 'stupid drone tricks' just like other drones, including Follow Me, Orbit, Cable Cam etc., but with a big difference. The Dobby drone uses OpenCV to track objects using it's built in camera. The camera is 4K but produces image stabilized 1080P video from the 4K images.
While there are many pocket drones available today, Dobby offers amazing technology built into a tiny package that costs only $249.00. Dobby Pocket Drone on Amazon
DOBBY AI DRONE - DEEP LEARNING AND OpenCV with Xilinx
Snapdragon Flight
Snapdragon Flight is part of the Qualcomm Drone Development Platform that includes both hardware and advanced software modules for navigation, optical flow, gimbal control, and it utilizes Qualcomm Technologies strong computer vision expertise for features such as object avoidance, following an object or person, and more.
The Snapdragon Flight supports Linaro Linux and OpenCV, and is a flexible platform so companies can easily port existing drone software. It is designed to allow developers to support a broad range of applications for drones ranging from aerial photography to filming live sporting events.
If you’re ready to get started on your own drone project, you can purchase the Snapdragon Flight today from Intrynsyc:
Purchase Snapdragon Flight Development Kit for $399
SNAPDRAGON NAVIGATOR - Vision Supported Flight Controller SDK
Qualcomm® Snapdragon Navigator™ SDK is an autonomous, vision-supported flight controller SDK with related modules and tools. Featuring multiple different flight modes with varying levels of sophistication, Snapdragon Navigator is engineered to provide stable and aggressive flight for a host of applications. It includes several built-in sensor calibration procedures as well as automatic flight logging and real-time introspection tools along with post-processing log parsing capabilities.
It is designed to support the following high-level features:
The Snapdragon Navigator SDK is available at QDN to registered developers on the Qualcomm Developer Network Website. Snapdragon Navigator
If you have a project that may benefit from Qualcomm Snapdragon Flight vision supported flight controller, please contact me here on DIY Drones.
Lots of news and updates from the Dronecode team this month:
1) The Aerotenna OcPoC autopilot (video above) now supports the Dronecode/PX4 software stack!
● FPGA and dual-core ARM processors in OcPoC allow for real-time signal processing and for executing complicated algorithms, enabling exciting new possibilities for artificial intelligence, deep learning, and a truly autonomous and intelligent UAV
● With more than 30 programmable I/Os supporting most standard interfaces, OcPoC is
incredibly flexible, allowing free reign for your creativity● OcPoC features industrial-grade redundancy, ensuring you can always count on your key
systems such as GPS, IMU, and more● Flawless integration with Aerotenna microwave radar sensors, including uLanding radar altimeter and uSharp collision-avoidance sensor.
2) QGroundControl 3.2 is out!
Many inprovements and new features:
Setup
Plan View
Fly View
Analyze View - New
Support for third-party customized QGroundControl
3) Other Dronecode updates from our monthly newsletter:
Since our last newsletter we’ve added high level sidebar links between all our documentation libraries so, for example, it is much easier to find QGroundControl documentation when you’re in the PX4 User Guide (see the documentation update blog!)
We’ve also made some other significant additions, including:
UX Working Group
Last month the UX WG started classifying members according to clusters (in order to guide the evolution of our platform roadmap):
This month two new point release were made to the new PX4 v1.6 release. The project pulse shows we’ve merged 49 PRs (+4) and closed 57 issues (-170). More than 5110 lines were added and 2431 deleted.
https://gallery.mailchimp.com/24be540c6d064661ffb2cbe53/images/f9355eea-6fb1-4614-b940-6d18061bbc99.png" alt="" width="564" align="center" />
Flight Testing Stats (Jun 07 – Jul 04)
We built a QAV250 with Snapdragon board and PWM based ESC’s
The following posts from the PX4 blog show new Dronecode Platform builds, features and uses.
Gens Ace and the Tattu brand has a strong reputation in high-performance batteries. Recently, they expanded into speed controllers with the Tattu 30A BLHeli_S ESC, and sent us a set to review.
An ESC is a basic component, and often sold in nothing more than a static bag. These Tattu ESCs aim for a higher standard and are supplied in a sleek black box. Inside are the ESCs, of course, as well as a printed manual. This was a nice change from many products we've seen recently that should come with documentation, but don't. You might not think an ESC requires a manual, but it actually provides a lot of useful information on what the startup tones actually mean and what the various settings do.

Each ESC appears to be well built with good soldering; components are placed with care and give the ESC a level profile across the top and bottom. Having a level profile prevents extra stress to raised components, which can be especially important in a crash. To connect to the motors, solder pads are provided which can be used from both the top and the bottom of the board. We like solder pads because they're easier to work with than connecting bare wires together and more reliable than bullet connectors. The pads are generously spaced, so accidental bridging is all but impossible. This does leave you with a set of exposed connectors, so it's important to protect them with some kind of sealant, glue, heat shrink, or even electrical tape work fine, if you ever fly in wet conditions. Signal wire and battery leads are soldered on at the factory before shrink wrapping.
Lead wires have silicon insulation and are very generous in length. The power leads appear to be 20-gauge, and the signal wires 26-gauge. The signal wire is wrapped with its own separate ground wire—a plus for electrical noise reduction. It's nice that the power leads are pre-tinned and the signal wire is crimped to a servo header, but on today's tight race builds it's likely that both sets of wires will need trimmed down.
One feature you won't find is a BEC. Many newer builds use a PDB with a regulator included, and many FC boards, cameras, and VTx parts now connect directly to battery voltage. We built these up on a DYS F4 Pro and the BEC would have just added unnecessary weight.
These ESCs run BLHeli_S, which allows easy access to settings through the BLHeli Configurator. According to Tattu, they support regular 1–2ms pulse width input, Oneshot125, Oneshot42, Multshot, DShot150, DShot300 and DShot600; all of which are automatically detected by the ESC at boot.
With Betaflight 3.1, setup is easier than ever. I literally soldered these in without regard for which motor wires should go where. I booted BLHeli Configurator and corrected the motor direction where appropriate. After that, I selected DShot600 in Betaflight Configurator, and then it was props on and ready to fly. There's no need to even calibrate with DShot.
The choice of BLHeli_S is a little curious for what's aiming to be a high-end product. After all, products with BLHeli_32 are already on the market and support DShot1200—a digital communication protocol that finally beats out the best that analog could offer. These Tattu ESCs top out with Multishot or DShot600. After flying them, though, I challenge anyone to tell the difference in a blind test.

While I couldn't get a 5S on them, I did punch out and fly hard on RaceKraft 5051s on 4S, putting in the best lap times for our informal track day. That's a pretty steep current draw, but the ESCs handled it without issue. After the flight they were a little warm, but nothing concerning. The flight itself was smooth, clean, and responsive at all speeds. In short, these ESCs did their job in every possible way.
There's almost nothing to complain about here: performance, cooling, layout, components, software are all solid. You'll miss out on a BEC and DShot1200, but most builds today have separate voltage regulators and the improvement from DShot600 is largely academic—your system almost certainly has greater lag elsewhere. This kind of no-compromise performance and quality means you'll pay a premium at nearly twice the cost of budget ESCs. Tattu appears to have put a lot of thought and effort into this product, and it shows. We expect the Tattu brand's reputation will carry over from their batteries to these ESCs without any hesitation.
Purchase Tattu 30A ESCs at genstattu.com.
Source: http://www.propwashed.com/tattu-30a-blheli_s-esc-review/

Hello everyone !!!
I started three months ago in the realization of a Y4Copter completely modify homemade.
I realized the chassis of my wooden quadcopter of 18mm by 18mm that one finds in the stores of do-it-yourself for the sum of 3 euros, I used aluminum chair seats for assembly and 4mm plywood .


I chose to change the location of the rear engines on my Y4, instead of using the classic layout ie the engines one below the other, I chose to arrange the rear engines One next to the other so as to have a space of 1cm between the helices as shown in the following photos:

Y4COPTER MODIFY
The chassis of my Y4COPTER is made to have a distance between
- 310mm on each side
- 370mm at the front
- 220 mm at the rear
ON-BOARD ELECTRONICS


CLEANFLIGHT CONFIGURATION
Once all the chassis and electronics mounted, I connect my NAZE32 to my computer and I run "cleanflight-configurator" software to install on my computer.
I present a small video Tutorial, showing how to configure cleanflight on a NAZE32.
Once Cleanflight set up on my NAZE32, I test and set the PID to have a steady and steady flight.
PID ADJUSTMENT
All settings must be made in fashion ACCRO
Choice PID CONTROLLER MultiWii (Rewrite)
Adjusting the "P" LEVEL OF CORRECTION
Starting from the base values
Lower the I to 10 in order to observe the oscillations more easily.
Increase the P of the ROLL and of the PITCH until the oscillations the drone becomes uncontrollable. Lower the P gradually so that the oscillations disappear.
ADJUSTMENT OF "I" Integral
The drone slips all alone from right to left or from front to back.
Mount the I gradually until obtaining a nice sliding behavior limit to remove it.
For the aerobatics one will have a I low enough and for the video one will have a rather high I.
Small trick putting weight on one of the arms of the drone, to see well the changes.
The I also influence the P,
it is possible that vibration apparaisser, drop again P. ADJUSTMENT OF DERIVATIVE "D"
The DERIVATIVE "D" defines the response of the drone, will make the most nervous or softer.
Decrease "D" to soften reactions
Increase "D" to make the drone more nervous.
Increasing D also influences P. Changing the P when vibrations occur LACET
SETTING YAW
Generally set to 8.5 by default, this value is correct. Increase or decrease the YAW only if spontaneous rotation. Will make it more nervous or softer. Decrease "D" to soften reactions Increase "D" to make the drone more nervous. Increasing D also influences P. Changing the P when vibrations occur LACET SETTING YAW Generally set to 8.5 by default, this value is correct. Increase or decrease the YAW only if spontaneous rotation. Will make it more nervous or softer. Decrease "D" to soften reactions Increase "D" to make the drone more nervous. Increasing D also influences P. Changing the P when vibrations occur LACET SETTING YAWGenerally set to 8.5 by default, this value is correct.
Increase or decrease the YAW only if spontaneous rotation.

FINAL FLIGHT
I present a small video of a flight realize with my Y4COPTER MODIFIER
Hello everyone !!!
I started three months ago in the realization of a Y4Copter completely modify homemade.
I realized the chassis of my wooden quadcopter of 18mm by 18mm that one finds in the stores of do-it-yourself for the sum of 3 euros, I used aluminum chair seats for assembly and 4mm plywood .


I chose to change the location of the rear engines on my Y4, instead of using the classic layout ie the engines one below the other, I chose to arrange the rear engines One next to the other so as to have a space of 1cm between the helices as shown in the following photos:

Y4COPTER MODIFY
The chassis of my Y4COPTER is made to have a distance between
- 310mm on each side
- 370mm at the front
- 220 mm at the rear
ON-BOARD ELECTRONICS


CLEANFLIGHT CONFIGURATION
Once all the chassis and electronics mounted, I connect my NAZE32 to my computer and I run "cleanflight-configurator" software to install on my computer.
I present a small video Tutorial, showing how to configure cleanflight on a NAZE32.
Once Cleanflight set up on my NAZE32, I test and set the PID to have a steady and steady flight.
PID ADJUSTMENT
All settings must be made in fashion ACCRO
Choice PID CONTROLLER MultiWii (Rewrite)
Adjusting the "P" LEVEL OF CORRECTION
Starting from the base values
Lower the I to 10 in order to observe the oscillations more easily.
Increase the P of the ROLL and of the PITCH until the oscillations the drone becomes uncontrollable. Lower the P gradually so that the oscillations disappear.
ADJUSTMENT OF "I" Integral
The drone slips all alone from right to left or from front to back.
Mount the I gradually until obtaining a nice sliding behavior limit to remove it.
For the aerobatics one will have a I low enough and for the video one will have a rather high I.
Small trick putting weight on one of the arms of the drone, to see well the changes.
The I also influence the P,
it is possible that vibration apparaisser, drop again P. ADJUSTMENT OF DERIVATIVE "D"
The DERIVATIVE "D" defines the response of the drone, will make the most nervous or softer.
Decrease "D" to soften reactions
Increase "D" to make the drone more nervous.
Increasing D also influences P. Changing the P when vibrations occur LACET
SETTING YAW
Generally set to 8.5 by default, this value is correct. Increase or decrease the YAW only if spontaneous rotation. Will make it more nervous or softer. Decrease "D" to soften reactions Increase "D" to make the drone more nervous. Increasing D also influences P. Changing the P when vibrations occur LACET SETTING YAW Generally set to 8.5 by default, this value is correct. Increase or decrease the YAW only if spontaneous rotation. Will make it more nervous or softer. Decrease "D" to soften reactions Increase "D" to make the drone more nervous. Increasing D also influences P. Changing the P when vibrations occur LACET SETTING YAWGenerally set to 8.5 by default, this value is correct.
Increase or decrease the YAW only if spontaneous rotation.

FINAL FLIGHT
I present a small video of a flight realize with my Y4COPTER MODIFIER
Stallion 3D is a 3D aerodynamics analysis software package developed by Dr. Patrick Hanley of Hanley Innovations (a Florida business that develops aerodynamics software for education and small businesses). Starting with only the STL file, Stallion 3D is an all-in-one Windows software tool that rapidly validate conceptual and preliminary aerodynamic designs of aircraft, UAVs, hydrofoil and road vehicles.
Version 5.0 has the following features:
The introductory price of Stallion 3D 5.0 is $3,495 for the yearly subscription or $8,000 for a perpetual license. The software is also available in Lab and Class Packages. For more information, please visit http://www.hanleyinnovations.com/stallion3d.html or call us at (352) 261-3376.
Some pretty awful proposed regulations have reared their ugly head. Should there be a comment period folks from around the world ought to chip in!
When doing custom integration projects with UgCS, sometimes it might not be enough to only have the video stream window displayed in UgCS client. In this article we will explain in a few steps the simple process of accessing the stream.
The Video streamer component is located in UgCS service-manager in system tray.
Video streamer can stream from connected video links or from UgCS for DJI mobile application. All connected streams are .MJPEG over HTTP.
To access a certain video stream do the following:
1. Launch UgCS. In UgCS Service-manager, located in the system tray, ensure that Video service is running.
2. Open a web browser and type in the following address: http://127.0.0.1:8081
3. If video service is OK, a list of available REST services will be displayed. Select GetStreamInfo.
4. JSON structure with a list of streams and according network ports will be displayed, if at least one video source (e.g. web-cam) is connected.
SDK_video_stream_3.png
5.To access a certain stream as MJPEG over HTTP, use URL: http://127.0.0.1:<port>;.
The stream can be used in external software such as VLC Media Player or other.
More in-depth information can be found in UgCS Video Streamer User Guide: https://www.ugcs.com/manuals
Get the newest version of UgCS here: https://www.ugcs.com/en/ugcs_licences
Together, the Dronelab at ENAC in Toulouse and the MAVLab at TU Delft have developed the Cyclone. It is a hybrid drone of the tailsitter type, with just 4 actuators. In the video, we show autonomous flight, ranging from hover to forward flight. Below, we will highlight some of the interesting aspects, but more details can be found in the paper.
Design
The vehicle is designed with efficiency and simplicity in mind. More than anything else, the Cyclone is a fixed wing aircraft capable of hovering. It is equipped with two propellers and two flaps. To spare the beautiful plane in the image below, we made a cheap version to test with. The Cyclone that is starring in the video has a 3D printed fuselage and a foam wing laminated with Kevlar. With the battery we are currently flying with it weighs 1.1 kg, flies most efficient at 16 m/s, and tops out at about 30 m/s (level flight).
Control
To control the Cyclone, we use a method called Incremental Nonlinear Dynamic Inversion (INDI). The benefit of this method is that it is able to compensate for unmodeled effects or disturbances, by considering the angular acceleration. After all, according to Newton, all moments acting on the drone together result in an angular acceleration. This way, it is possible to compensate these moments and disturbances without modeling them.
Pitching
The way we see it, a hybrid, like any rotorcraft needs to be able to keep its position regardless of wind. This means that the drone needs to be able to fly at any constant airspeed (0-30 m/s) without ascending. Therefore, were for a transition to forward flight or back, climbing a bit will make things much easier, we are not doing this. However, that means that we need to deal with high angle of attack flight, which generates a large pitch-down moment. A moment so large, that saturation of the flaps is commonplace (watch the flaps in the video during the back-transition).
Paparazzi
We used the newly designed 'Chimera' autopilot, which is aimed at ease of use and runs the Paparazzi open source autopilot software. Among the many features are an STMF7 processor, an SD card slot, a mount for an XBEE and a differential pressure sensor.
A little laugh with a joke starring my chickens, Penny and Pepsi :)
Oh yes, even chickens may benefit from Arduino tech.
Next step : make ardurover find the path to the chickens house, then recognize if eggs are layed and pick up them up Can DEVs take care of that in a next release ? :)
H2 Hybrid powered multirotor drone flying over sea from Penglai to Chang island in Shandong province, China.
H2 Hybrid powersystem introduction:
core weight:4kg;
output power:1.8kw/continuous,2kw/peak;
payload:3kg, 2hours;
youtube channel:
Hello Dev! great news!
finally after 9 month testing and developing the all Urus ecosystem, we have the first test video using the Urus Protocol - Urus System and running with Ardupilot master scheduler for this time on Arduino board and on Android app.
I'm sorry for the late support the community at the proposed time about 18 month ago, but i'm very happy with you Ardupilot, you show me and redirect me to see a new way tech that is not present on my country. As you know it's not easy for me to speed up in middle about the politician problems here.
So i'm doing it all possible to help and supporting the comunnity with the great ardupilot team, i'm very glad to meet you APM Team.
Now i'm growing up a comunity here teaching and learning a new way to giving to us university a new horizon on the opensource way and technologies.
Now i will have more time to complete my TO-DO list, i know that your in doubt about me, but i'm supporting to ardupilot team with Urus system to do a some great work here and around the comunnity world.
As maybe you know, Urus system is a new interface-vehicle system handling all io hardware with a new HAL called SHAL between the top hal and the urus system target hardware, and basically it's the same that present on the other side hal.
The purpose about the Urus System is giving to us a comunication way to ardupilot api with an easy and realiable system, for example, if you are an owner apm 2.x board then you want to use the last master ardupilot version, then you can use the urus cape io and you can connect it with a Raspberry pi or NuttX board, like PX4 (work in progress for this board).
Ok, you doesn't have an legacy board, but have an trainer board like Nucleo board (stm32f446) then you will can use the urus cape io and the urus system to run on it with the master and with NuttX directly.
Urus team has developed a complete ecosystem for you and ardupilot developer with a new graphical ide called Urus Studio and have a customized "EXOKERNEL" using the linux base kernel for fast and realtime an ARM architecture, it is publishing the source code on the urus team repo. The documentation is work in progress so don't worry, it's will pulished very soon.
Thank you very much!
We just announced the start of its 2017 Drone Market Sector Research, which promises to be our most comprehensive study of drone market trends and usage to date. The online portion of this research seeks to get your opinions about buying and using small unmanned aircraft systems—otherwise known as drones This independent research is being underwritten by Airware and DroneDeploy and is designed to uncover fresh insights on which drone industry sectors are thriving (and which aren’t) and how businesses are using drone-acquired data in their day-to-day operations.
Why are we doing this?
Because we believe the consumer and commercial drone market needs it. Our observations:
The survey will explore:
Who should take the survey?
Take the brief 10-minute survey here: https://www.surveymonkey.com/r/2017_drone_market
As an incentive for your participation in the survey, there will be an opportunity to:
When complete, the research study will provide a complete view of topics like:
The survey will be in market for four weeks, and results will be available in September.
As always, I’m interested in hearing from you. If have questions or comments, feel free comment below or email me at colin@droneanalyst.com.
Image: Shutterstock and Skylogic Research
FlytBase today announced its Drone-API as a Service offering, that allows developers to easily connect their drones with variety of business applications in the cloud. More from sUASNews story:
https://www.suasnews.com/2017/07/flytbase-launches-worlds-first-internet-drones-platform/
FlytBase, Inc., a startup building developer platforms for connected intelligent drones, today announced the release of industry’s first Drone-API as a Service offering. While most modern businesses run on cloud-based applications, connecting drones to the cloud has been quite challenging. FlytBase plans to change that with their FlytBase Cloud platform.
Over last few years, IoT (Internet of Things) industry has designed communication protocols to help “things” connect to the internet. However, requirements for drones are very different from regular “things”. Typical IoT devices are deployed in very large numbers, consume low-power, and send small amounts of data spread over long durations of time. Drones, on the other hand, are deployed in smaller fleets, have large lithium-based batteries, and send large amount of data over short period of time. Drone applications need real-time navigation, telemetry and payload access over a high-bandwidth secure link. Further, drones are often intelligent devices, taking several critical decisions onboard, unlike most IoT devices which rely on cloud for their intelligence. To meet these specific drone requirements, FlytBase has designed a custom protocol, from the ground-up. FlytBase Cloud makes use of this protocol to efficiently connect drones to your cloud-based business applications in real time.
Drones are today being successfully used in a number of industry verticals, such as, agriculture, construction, surveys and inspections. However, most of the applications are restricted to a single operator on the field, and do not directly communicate with the cloud. Several cloud-based drone applications, such as, DroneDeploy, Propeller and Redbird need the data from the drones to be downloaded manually, after the flight. This data is then required to be uploaded to their cloud servers for post processing. With FlytBase Cloud, such applications can be completely automated.
A few vertically integrated solutions, such as those offered by Airware, Precision Hawk, Kespry do offer higher levels of integration and connectivity. However, these are not open for developers to customise and build their own integrations with business apps. For example, if one had to build a drone that is connected over cloud and follows voice commands from Alexa, it would take several days to put it together. With FlytBase Cloud, it can be done in minutes. With FlytBase Cloud, developers can easily build applications like, automating fleet of drones to scan the warehouse and update the inventory in Salesforce every week, with no manual intervention. “We are moving towards an era of Internet of Drones (IoD). FlytBase is excited to offer industry’s first platform to help developers quickly build and deploy customised IoD solutions”, says Founder and CEO of FlytBase, Nitin Gupta.
FlytBase has partnered with Built.io to provide ready integration of drones with hundreds of business apps, such as, Salesforce, Box, Slack, Twilio, Cisco Spark, Zendesk, Dropbox, Nest, YouTube. This allows users to easily build automated workflows, that leverage drones as part of the solution, without writing any code.
With little standardisation in drone hardware and communication protocols, it has been extremely challenging for developers to work with hardware from different manufacturers. The software applications designed for drones from one manufacturer, do not work with others. Dhiraj Dhule, Director of Strategic Projects at FlytBase, summarises the efforts of FlytBase to address this challenge, “FlytBase has been working on building adapters to support a large number of drone manufacturers, and offers an unified set of APIs for developers. This isolates the application developers from the underlying drone hardware, and makes their applications portable across drones”. FlytBase Cloud is built to support these APIs, and is, thus, compatible with all major drone platforms available today.
FlytBase also provides a cloud-based drone simulator, FlytSim, for developers to completely test their applications in simulation, before deploying them on real hardware. “There are a large number of software developers with no prior background in drones. FlytSim helps them build and test their drone applications much faster, cheaper and without any of the risks associated with direct implementation on hardware”, says Sharvashish Das, Director of Engineering at FlytBase.
Internet connectivity is the next frontier for drone technology. With easy access to 4G/LTE networks across the world, Internet of Drones (IoD) is expected to unleash a new wave of innovation and drive further growth in this sector. FlytBase Cloud lowers the entry barrier and provides ready tools for developers to leverage this technology for building innovative products and for offering new services. Besides applications that have already found wide adoption, such as, surveys and inspections, applications that need live connectivity with a large number of drones, such as, use of drones for logistics and smart-cities, would greatly benefit from this technology.
To learn more about the FlytBase Cloud, visit, https://flytbase.com/cloud or write to support@flytbase.com to schedule a call with FlytBase Drone Applications Expert, today.
About FlytBase
FlytBase is a startup based out of Palo Alto, Silicon Valley, building developer tools for connected intelligent drones. Its flagship product, FlytOS, is the world’s first drone operating system that works across the widest range of hardware options, including, those from Intel, Nvidia, Qualcomm, Raspberry Pi and Samsung. FlytBase also offers, FlytSim, a simulator for drone applications, and Drone Software Development Kits for web and mobile platforms. Developers are using FlytBase tools to build drones for various commercial applications, such as, automated agricultural surveys, logistics, industrial inspections and emergency response. FlytBase recently received the TiE50 award at TiEcon Silicon Valley, and was a part of Cisco Launchpad accelerator program.
To learn more about FlytBase Cloud, please visit: https://flytbase.com/cloud
I would like to show you guys my most recent work on conceptual design of a manned drone.
After designing many different kind of mini or micro sized drones myself, I begin to think about making a huge drone as others may already started to make.
I think 200kg payload should be a must for the drone later however, VTOL or anything hybrid system are only making drone more complex and hard to maintain. So quadrotor best fit to KISS (Keep It Simple, Stupid) for any industrial and transportation purpose.
This design is based on 280mm wheel base and about 1/20 or 1/25 size of actual manned drone.
If someone find this project cool and want to participate, please give me a message or send an email to xrotorsnet@gmail.com
Thanks,
Hi Pixhawk Lovers)
After Intel cancelling edisons. Dronee Pilot might be interesting for you.
All-in-One ,Microhard telemetry module, Raspberry Pi Computer Module 3, Ublox GPS and Airspeed Sensor in one super small package . And all is only 45 Gram.
RPI CM3 module has fantastic power and super small size . It has also onboard 4GB eMMC storage. Also to make development easier Dronee Pilot has RPI - UART, I2C, USB GPIO pins and CSI Cam slot.
General Hardware Specifications:
Integrated GNSS receiver UBlox NEO M8N
Integrated Microhard telemetry module (configurable 100mW-1W)
Raspberry Pi Computer module 3 with 1.2GHZ processor ,1Gbyte RAM, and 4Gbytes eMMC flash
microSD card slot
RPI GPIO: UART,I2C,USB and CSI Cam port
FMU connector: 4 x Main PWM, 4x Aux PWM, CAN , UART , Power port
FMU debug /IO Debug port
Compact board size of 90 x 43 mm
Airspeed Senosor
Weight 45 gram
More information about Dronee Pilot and other products can be found on the website: https://pilot.dron.ee/
Hi DIY Drones,
We are a senior design team at Rose-Hulman Institute of Technology and are passionate about demonstrating how unmanned aerial vehicles can be a vital tool for first responders. We have designed N.O.R.M., a UAV intended for emergency response professionals. Our team believes that in the near future, this technology will be helping first responders save more lives than ever before. In order to bring this vision to life we are running an Indiegogo campaign. You can learn more about our vision for this project by watching the short video below.
You can also learn more about our team and our experience with UAV related projects on our team Facebook page. If you are interested in this project please take a moment to check out our Indiegogo campaign and consider contributing. Also feel free to contact us with any questions. We would love to have your input and suggestions for our project.
It's customary and traditional that we celebrate the addition of every 1,000 new members here and share the traffic stats. We've now passed 85,000 members! We're also more than ten years old!
Rather than simply give the usual monthly traffic snapshot, I thought I'd give the data for the whole decade, which tells quite a story.
Today, we're still a big community with healthy traffic (about 20,000 visitors and 35,000 page views a day). And we'll continue just as we are for many years to come. We won't be the biggest site in this space, but we'll continue to be one of the most interesting and a friendly, high-quality place to talk about ideas and projects that extend of potential of drones to change the world. And have fun doing it!
Hey everyone,
I want to share nice project I recently found on Youtube. It’s IR 3D Scanner Robot made by the group of students leaded by Nicolas Douard. It turned out the project has amazing report containing step-by-step building guide, bill of materials, drawings, software and demos.
Here is the short overview:
The goal of the team was to perform 3D reconstruction using mobile embedded systems. The developed solution should be capable to generate the 3D model of indoor spaces.
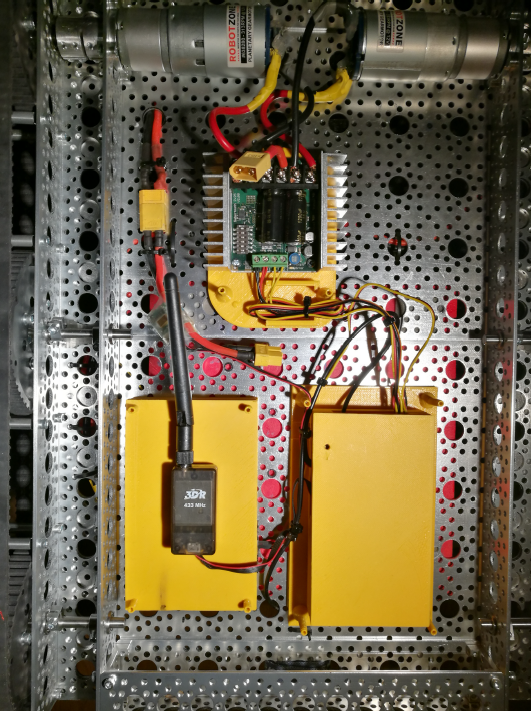
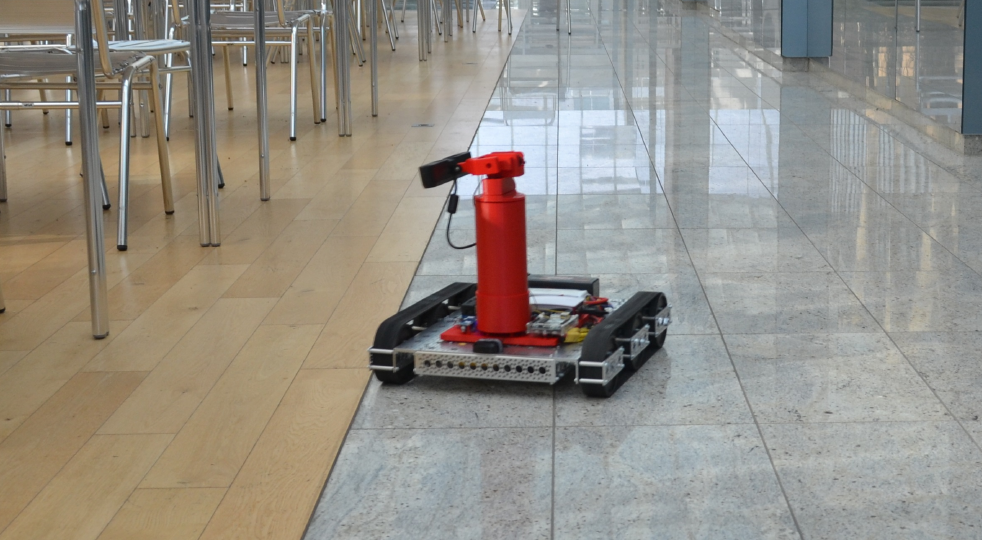
The vehicle uses Actobotics standard platform. This base offers great traction and climbing ability (37°approach angle) and can easily handle heavy loads. Vehicle electronic components are mounted underneath the plate and includes the radios, Raspberry Pi + Navio 2, DC motors and its driver (drawings and 3d models are available in project's report).
A Raspberry Pi board is associated to a Navio 2 shield running ArduPilot for navigation Control. The Navio2 board is connected with Spektrum DSXM receiver and 433 MHz radio, moreover it generates a PWM signal for each motor. This signal goes to the motor controller via servo wires.
The space above is left available for IR 3D scan system (Kinect 360). 3D reconstruction is resource expensive and requires a very powerful GPU/CPU combo. This makes it impossible to run 3D reconstruction on cheap embedded hardware like a Raspberry Pi
board. The data is therefore logged on the vehicle and later transferred to a remote computer that is to perform resource expensive 3D reconstruction (using Nvidia GTX 1080 GPU (8192 MB) and Intel Core i7 6800K CPU (6 cores, 3.40 GHz)).
The IR 3D scan module’s primary goal is to log RGB and depth data which is to be used for 3D reconstruction. RGB-D frames capture is handled by Logger1 modified to run via SSH.
For processing ElasticFusion was used. It’s a real-time dense visual SLAM (Simultaneous Localization And Mapping) system capable of capturing comprehensive dense globally consistent surfel-based maps of room scale environments explored using an RGB-D camera. The capture and the reconstruction processes can be separated thanks to dedicated loggers which collect raw data that is packed into a KLG file. This file can later be processed by ElasticFusion in order to generate a 3D model.
ElasticFusion exports MeshLab compatible data. MeshLab cleans and optimizes meshes and can export reconstructed 3D models to more common formats like STL or 3DS. An optimized model in this format can then be imported into 3D modeling software such as 3ds Max and manually modified to be, for example, suitable for 3D printing.
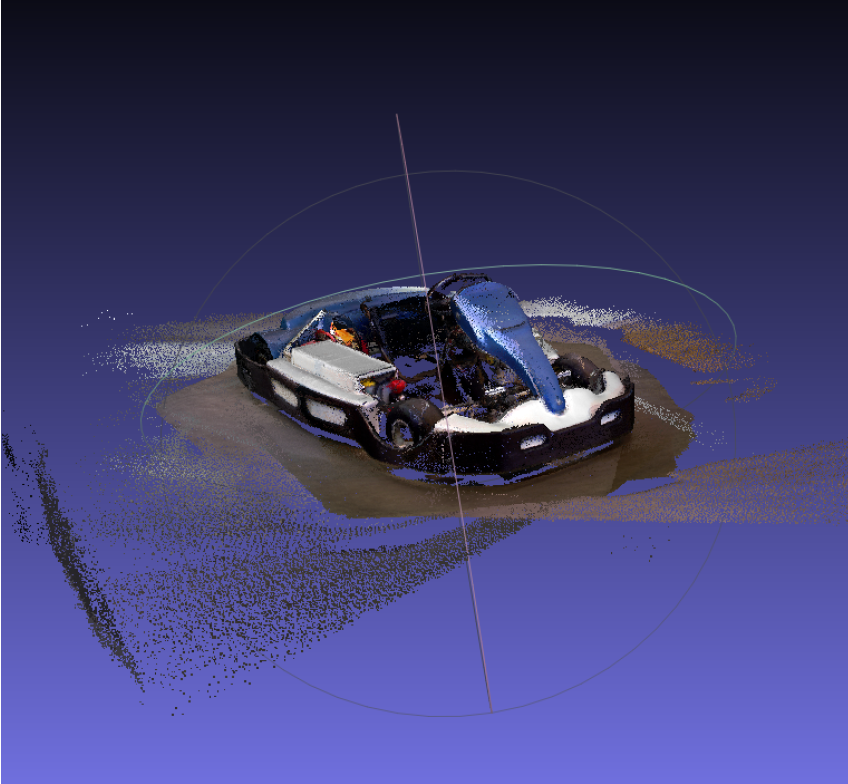
Electric kart reconstructed point cloud opened in MeshLab
ElasticFusion running with GUI
An extensive documentation of the Project and Embedded control system software may be found in the ScanBot 3D repository:
https://github.com/QBitor/ScanBot_ECS