The INS-T-306 is the advanced module that combines GPS L1/L2, GLONASS, BDS navigation and a high-performance strap-down system. It is capable of determining position, velocity and absolute orientation (heading, pitch and roll) for any device on which it is mounted. It aims at facilitating motionless and dynamic applications that need high accuracy, such as vessels, ships, helicopters, unmanned aerial vehicles (UAVs) and unmanned ground vehicles (UGVs).
The INS-T-306 utilizes an advanced GNSS receiver, barometer, magnetometers, MEMS accelerometers and gyroscopes to provide accurate position, velocity, heading, pitch and roll of the device under measure. Besides GPS L1/L2, GLONASS and BDS, the unit supports differential GPS and real-time kinematic (RTK). It is able to integrate into LiDAR (Velodyne, RIEGL and Faro brands). The on-board sensor fusion filter, navigation and guidance algorithms, and calibration software inside all make INS-T-306 a commercially exportable GNSS-aided inertial navigation system.
So yet again the media goes bananas over a completely non evidenced event. Apparently a drone was spotted flying near gatwick airport and the airport has massive disruptions as a result . Does anyone have any evidence......NOPE Does this article refer to other events that were "drone related incidents" yes, but the events it refers to also have NO evidence!
What are your guys opinions on the matter?
#BBC #UFO https://goo.gl/8wFN74 Drone causes disruption at Gatwick, evidence shows..... oh wait there is no evidence! #FakeNews #CNN
As some of you may be aware off, there have been a lot of modding/hacking activity with regard to DJI products lately. In what seems to be an response to this, DJI has just taken the unprecedented step of forcing an app update on all users not running the latest GO 4 v.4.1.3 version.
Personally I find this action worrying on many levels. Especially since the only information currently available regarding the forced update, and official statement from DJI is as follows.
Lipo battery have become an essential part of drone, but if you do not know maintain them, here you come the right place.
How to charge a lipo battery for the first time?
In my experiences, the IR of lipo battery is still coming down after 5 cycles even as many as 10 cycles, therefore you will have more better flights from a battery with 10 cycles on it than with 5 cycles on it for the first time.
As we know, in battery safety instructions is that 1c charge rate is the standard “safe” rate.
Charging amps is depended your lipo battery brand and capacity, therefore it’s very important in chosing the best battery for quadcopter. such as, Gensace lipo battery can be charged at up to 5C but not every brand can to do, as well.
How do I know when it is charged?
Charge times = Charge coefficient * Battery capacity / Charge current
Mostly,For the vast majority of LiPos, the Charge Rate is 1C, therefore the charge coefficient value is 1.1 and charge with 0.2C then coefficient value is 1.5.
Typically, a 1c charge rate is going to charge a lipo in around an hour, no matter the cell count or capacity.
Generally,the charger you bought will stop charging when the voltage hits 4.2 per cell, it can chase the voltage until it reaches the voltage, it is no need to worry about that.
But it is depended the brand of charger. A quality product make out customer confident and convenient.
How to choose the best battery for quadcopter?
Before choosing the battery for your quadcopter, you should know about the flight times, C-rate, Capacity, Average Amp Draw, brands and price of the battery.
For example,
Flight time =(Battery Capacity * Battery Discharge /Average Amp Draw)*60
For calculate your quadcopter flight time, you have to know three factors: Battery Capacity , Battery Discharge and Average Amp Draw
There is actually a ton of ways to extend the battery life of your drone without having to insert a new battery unless that’s your plan. However, if you want some other options to try, we’ve got them.
Knowing when to charge the battery
Keep an extra battery
Check the weather before you go
Remove your camera
Remove the prop guards
Don’t destroy your battery
The proper voltage
Extending your flight time is easy as pie, and there is a ton of ways to do so. Knowing how to extend the flight time to the full extent of your drone is solely based on your drone, so knowing your drone is very important.
How to protect lipo batteries?
The charging current must not exceed the maximum current specification identifies the general should not exceed 2C;
Discharge current may not exceed the maximum current specification logo.
The battery should be done to treat transport filling , crash and other measures to prevent the battery to severe shocks or vibration ;
No over discharging, No over-charging, No fully-charged storage
Today I was came aware of the ESPcopter crowdfunding on Indiegogo. The Espcopter is a unique small size mini drone that is a wirelessly networkable, interactive and programmable drone and what’s more Espcopter is suitable for IoT applications you can develop whatever you want to make.
Specifications:
• Small and lightweight, around 32g and about 90mm motor to motor • Flight time up to 7 minutes with standard 260mAh Li-Po battery • Standard micro-USB connector for charging which takes ~25min for the stock 260mAh Li-Po battery • On-board low-energy radio@1mW based on the ESP8266-12E. • Powerful 32-bit RISC CPU: Tensilica Xtensa LX106 running at 80 MHz (64kb flash, 96kb RAM) • IEEE 802.11 b/g/n Wi-Fi connection • 3-axis high-performance MEMs gyros with 3-axis accelerometer: Invensense MPU-6050 • laser ranging sensor provides 2cm - 200cm non-contact measurement function • BMP180 up to 0.03hPa / 0.25m resolution • Expansion header 2×10 pins 1.27mm (0.05”) pitch including power, I2C and UART. • 2-layer low noise PCB design with separate voltage regulators for digital and analog supply
INDIANAPOLIS - Ocelleye, LLC, a commercial drone operator in North America announced today the release of its UAV Landing Zone for unmanned aerial systems weighing less than twenty-five pounds. The company prides itself for innovative forward thinking and through its own experience operating multi-rotors saw the need for a safe and effective platform from which to operate their aircraft.
Greg Sherwin, President of Ocellye, LLC said “The UAV Landing Zone provides an elevated platform to support the drone during the setup and arming phases and then allows for a safe takeoff away from the dust and debris normally encountered on a construction site.“ Sherwin continued, “During a landing, the mesh surface allows the prop wash to pass below the landing surface, eliminating ground effect and also providing some cushion during quick descent.”
The UAV Landing Zone was developed over the course of a year and tested in conjunction with Ocelleye’s day to day operations. It provides a lightweight and highly portable platform keeping aircraft up and out of dust, debris, and wet conditions. It greatly reduces the risk of debris on camera lens and in sensitive gimbals and keeps your electronics elevated away from potentially wet ground conditions.
When deployed, the UAV Landing Zone measures 32” x 32” x 24” high and collapses to a 36” long by 3.5” diameter roll for transport and storage. Each unit is equipped with a reusable commercial-grade, protective carrying case.
The usage of drones is on the rise not only in the US but all over the world. They are now used in almost every industry, including real estate. As a professional, you need a drone that can take clear and detailed aerial photographs and videos. Here is a roundup of the top six drones you must know about as a professional.
DJI Phantom 4
DJI Phantom 4 is one of the smartest drones currently in the market and an ideal drone for outdoor use. It features a highly sophisticated stereo vision positioning system that gives it precise hovering. The drone is easy to use, as you simply tap it and you are up in the air. The highly accurate sensing system present in the drone keeps the drone free from obstacles. Once you finish recording, you simply tap the control panel again to bring the drone back to the launching point. It has a 6000mAh LiPo battery capable of maintaining 28 minutes of flight time.
DJI Phantom 4 comes with a powerful camera capable of recording 4k videos, creating high-quality and impressive footage. It has a three-axis camera stabilisation system and a GPS position module. The GPS module makes the drone more stable and easy to control. The top speed is 45 mph, which is considerable.
DJI Inspire 2
The DJI Inspire 2 is an upgraded version of Inspire 1. It features a new image processing system capable of recording 5.2k videos in both CinemaDNG and Apple ProRes formats. The drone can attain a maximum speed of 50 mph in just five minutes. It also has a maximum descending speed of 9m/s. The structure of the drone consists of aluminium covers and carbon fiber arms. The dual battery system helps the drone to maintain a flight duration of up to 27 minutes, giving you enough time to record videos and capture images.
Another good thing about DJI Inspire 2 is that it is light. It is nicely packaged in a small suitcase that is easy to carry around. A small fiber cloth and a five-piece cleaning kit accompany the unit. It also comes with a 6 GB MicroSD card to help you store the items recorded. The forward and downward vision systems allow the drone to detect obstacles 30m ahead. This enables it to maintain a protected flight at a controllable angle of 25 degrees.
GoPro Karma
GoPro Karma is designed to help you capture images and videos in the air or on the ground. The drone can capture when perfectly handheld, mounted on the body or flown. It is very portable and has excellent navigation and editing applications. Many photographers prefer it for sporting activities, especially in rough terrains, due to its firm grip and portable nature. Its LiPo batteries can last for 20 minutes during flight.
GoPro Karma is very light when compared to other high-end drones. It only weighs 1006 grams, meaning you can comfortably carry it while on the go. It can be easily folded and transported in a carrying unit. Other items in the unit include grip handle, camera, extension cable, stabilizer and mounting ring. The drone is compatible with Hero5 and Hero4 cameras. The maximum speed it can attain is 35 mph.
DJI Matrice 600
DJI Matrice 600 is exclusively designed for professional aerial photographers who want to obtain detailed pictures and videos of buildings or landscapes. It is easy to set up and configure. The dust proof coating and propulsion system present in the drone protects it from external electrical components and internal motor. This greatly prolongs its life and reduces occasional repairs and maintenance. The frequently cooled motor also provides reliable performance it terms of flight duration.
The drone has a maximum loading capacity of 2.7 pounds that enables it to carry the Ronin-MX and Hero4 cameras. It uses six batteries and weighs about 8.8 pounds. The ultra-light weight makes the drone more portable and easy to transport. The six propellers ensure stability during flight. The drone can attain a maximum speed of 40 mph and can fly for 18 minutes.
Walkera QR X800
Walkera QR X800 makes to the list of the drones you must know as a professional because of its durability and rigidity. The drone is made from 3K weave carbon fiber and glass. It has a 6S 22.2vLiPO battery capable of providing up to 40 minutes flight time. The high level of performance of the drone’s power system enables it to handle different action cameras. It can comfortably operate with the Walkera iLook, Hero 5 and GoPro cameras.
The retractable landing skids make it easier to transport the drone in its aluminum carrying case. Aluminum is very strong and can provide proper storage for the drone. You can also connect the drone to MavLink software. This provides access to a number of programming options. The drone is also easy to set up, allowing you to capture stable images and videos. The GPS feature makes it easy to handle and operate.
Yuneec Drone Tornado
The Yuneec Drone Tornado is designed to fly the Panasonic GH4 camera. For it to work with this camera, the drone must be compatible with the GB603 Gimbal. This helps stabilize the camera, enabling it to move independently. This means that if one of the propellers was to fail, the drone will still land safely. The drone has a landing gear that provides a 360-degree view of the area as the camera pans. It is made of carbon fiber to ensure durability.
The ST24 transmitter allow you to conduct live monitoring using a 7-inch Android device and telemetry display. The unit comes with two batteries capable of maintaining up to 30 minutes flight time. The drone weighs 44.6 pounds. It is slightly heavier than other high-end drones. However, its performance and sophisticated features earn it a stop in this list.
A good drone must have enough flight time, be stable and move at a greater speed. It must also produce quality images and be easy to operate. The list discussed above features some of the best drones you must know about as a professional.
Great day for ArduPilot and CEO of jDrones Mr. Jani Hirvinen.
On last Saturday 24th Jun 2017 on Drone World Congress ArduPilot and Jani was awarded: “In recognition of outstanding contribution to Global UAV Industry” in Shenzhen/China. This is extremely big recognition for the work that we have done under ArduPilot operations in past 7 years.
It was extremely great day for me in many ways. One is that 24th June is a Jani name celebration day in Finnish calendar and then receiving this award. Second is that finally the work we have done as a ArduPilot group and also me personally in Shenzhen area got official recognition.
It all started here many many years ago when we started ArduPilot development and especiallyArduCopter projectin DIYDrones community. Now ArduPilot runs on it’s own organization and is leading the way in global unmanned development. There are no words to express the gratitude and loyalty we have gotten from our users.
On October when I was Leading whole ArduCopter development, we released our firstofficial Alpha version. A lot has changed since that ingroup and intechnology vice. While I do other roles in ArduPilot organization, Randy is nowadays running ArduCopter development and he's been doing a great job.
In total there was 5 people who got awarded, me and 4 others. It has been a great journey and we still continue strong. I am the last one of the original ArduPilot team and still continue strong.
People who got awarded are from left to right:
Mr. Tom Verbruggen, CEO of IDRONECT
Mr. Lan Yubin, Professor of South China Agricultural University
Mr. Jani Hirvinen, CEO of jDrones / ArduPilot Co-Founder
Mr. Brian Wynne, President and CEO of AUVSI
Mr. Paul Xu, Vice President of DJI
Award gala dinner had around 2000 people from 40 countries. And as it was a unmanned event, awards was delivered by humanoidish robot servant.
As side note, Keynote speakers earlier on day talked about robots and that they don’t have their own mind, well this robot had a bit. First she didn’t want to move and then later she didn’t want to stop so our host had to “educate” it slightly via control panel.
Mr. Richard Chase from Global Security Industry Alliance (GSIA) congratulates all award winners and gives that crazy size flower bouquet. (and laughing, have fun with it.. It’s Biiiig). It was really big and beautiful.
Whole even happened at Shenzhen International Exhibition center along with Shenzhen UAV show. On show they had from small to really big Drones, that will be on another post later. But WOW there was some really big multicopters and others.
Biggest quad that I saw was most likely 5 meters from motor to motor.
Organizers SZUAVIA placed all key people on ShenzhenAir International Hotel which is themed fully around aviation. Their lobby bar was named after the famous Wright brothers as Wright Bar.
Wright Bar, where Old meets the New:
Shenzhen UAV Industry Association (SZUAVIA) is few year old association that promotes and helps UAV industry in many ways on Shenzhen area. They have really good contacts on the industry and we will be hearing a lot more in coming years from them.
There are big initiatives to make Shenzhen as a center of global UAV industry.
My deepest gratitude for Mr. Jincai Yang (with mic) who is a President of SZUAVIA. He has been doing great work in rather small period of time and I personally hope all the best for his future plans. They just have one amazing team who organized whole 3 day event with big amount of interesting local and global speakers. I was honored to be one of those speakers on their event.
I am new to drones and recently tried flips and rolls, and did it successfully with some tutorials help, so just share my experience here. Welcome to discuss and share your ideas here. The accessories links are attached at the end.
OK, let’s go straight to the point – how to set up the CC3D quadcopter for flips and rolls. Follow my steps, you can get it too. I use a semi self-stabilization, here is how to do:
Step 1: Set Mode 2 (Stabilized2)
Click Input, Flight Mode Switch Settings, Bank2 of Stabilized2 in Settings Bank. Then set mode to Rattitude/Rattitude/AxisLock in Stabilized2, and Cruise Control in Thrust (Cruise Control will automatic lower the throttle when drone is upside down), then click Save.
Step 2: Advanced Setting
Click Stabilization, Advanced, Bank2, tick UseAdvanced Configuration, then change the value of Rate mode response(deg/s) and Max rate limit (all modes) to 360 in Roll and Pitch (The value is not fixed, you can test and set the most sutiable value yourself, then move to Step 3). Then click Save.
PS:
1. Max rate limit (all modes), same with that in Rate Mode on Basic page, but this one is a global parameter works in any mode, not like Rate Mode only works in Rate, Axislock, Rattitude. The Max rate limit enjoys a top priority: the Max limit value will be taken even if it’s smaller that of Rate mode.
2. Each reconnection to GCS will untick the Use Advanced Configuration box, and return to Basic Page (Use Basic Configuration). Certainly, the corresponding values in Basic and Advanced page are the same, for example, compare Attitude, Rate in Basic with Attitude mode response, Rate mode response in Advanced (the values in basic and advanced seemed to be different are the same actually just because of different unit, i.e. P and I values of Rate Stabilization (Inner loop) in Basic and Advanced), the Advanced page just has more PID values to set.
Step 3: Expert Setting
ClickExpert, setMode Transitionin Rattitude to80as shown below, (Note: Rattitude is semi self-stabilization, which will turn to manual mode if the lever is pulled over Mode Transition’s value), “80” means if lever on transmitterover 80%, turn tomanual mode, ifless than 80%,return to theoriginal mode. (For beginners, please set to90to avoid misoperation in FPV flight)
MaxAngle: the threshold angle where CruiseControl goes into the inverted mode, InvertdThrustRev for direction control, and InvertedPower for the power to flip. The default value is 105, if you want set the drone for fast flips and rolls, set it 90, which will effectively reduce the descending height.
PS:
1. InvertedThrustRev: if yours is a pitch fixed helicopter (or multicopter), set this to Unreversed.
2. InvertedPower: power output setting in inverted mode. If yours is a multicopter, set it to Zero, so that it will automatic retard throttle in flips.
Click Save and disconnect. Let’s start the flight.
Step 4: Trial Flight
① Select Attitude mode (easy to control), keep the drone in 15m height (or a little higher);
② Toggle to Rattitude mode;
③ Pull the Roll and Pitch levers to the bottom;
④ Keep state of step ③, control the drone to flip 360 degrees, then releaseRoll or Pitch, or it will fail to do. Besides, use throttle to control the attitude.
Here is my flight video for flips with four different settings.
the drone flipped in a samller curve compared with that in default mode. It almost hit the ground in initial flips, because I forgot to advance the throttle before flips. Therefore, pull up and down the throttle first, and then control to start flips, so that the drone will get enough power for a perfect flip. After adopting this method, the flips were perfect in later part(1’05’’-1’13’’).
Rate Mode Response / Max Rate Limit (all Mode): 720
Summary:
the height descending reduced to half. Larger the Rate mode response value is set, faster the drone will response. Check the video, the drone was hard to control, but the flips were quite easy to do. I personally think the best setting for flips is to set two parameters to 720.
Rate Mode Response / Max Rate Limit (all Mode): 800
Summary:
the drone responded quite fast for flip commands. You are not recommend to try this setting if you are a newbie, because the drone will be easier to crash in this setting!!!
All in all, the default setting is suitable for beginners to practice, but is not good to realize flips. The second setting is suitable for flip beginners, mind the tips! The third setting is good for skilled pilot to use. While the last one is a nightmare for beginner!
OK, let’s all for the tutorials, welcome to comment or advise. REMEMBER to tighten your battery and battery indicator to avoid being thrown off. Have a good flight!
My Qav250 Accessories:
I assemble this Qav250 myself, using CC3D flight controller, which took me 1 hours. Also tried to mount 190 and 210 drones. They are light in weight, so they are quite difficult for flips and will easily get a crash for beginners. So Qav250 with a good weight is a better choice for abecedarian to try flips.
Because I still have some rest accessories at hand after mounting 190 and 210 drones, I just need to prepare some others to get a Qav250.
Here is my Qav250 and my radio transmitter:
If you don’t know how to assemble,you can check this
.
The accessories I brought to assemble a Qav250:
Frame:
Weight: 138.7g
Diagonal Distance: 250mm
Power System:
Battery Indicator, Li-Po Battery
x 4: (not powerful as Oneshot, but is more suitable for beginners)
CW x 2 / CCW x 2:
3blades-5045BN Propellers CW x 2/ CCW x 2 (3-blade BN propellers are more powerful and stable)
Charging system:
Balance Charger, Power Adapter
Flight Control Board:
: (easy to configure, the self-stabilization is good for beginners)
You will also need those components:
Male / Female Plug Connector, Section Board, Adapter Cable,
Lashing, Allen Wrench, Velcro Tape, USB Cable, 3M glue, Nylon Zip Ties,
Damping pipe, Damping plate, Heat Shrink Tubing
If you like FPV flying, you can
.
Welcome to share your flying experience or your favorite accessories.
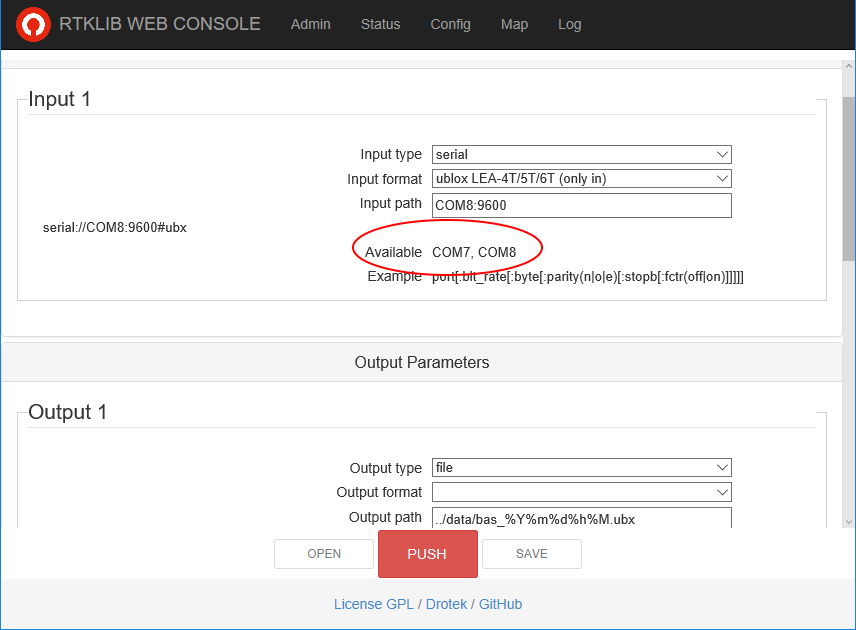
When I first started to mess around with RTKLIB I've wanted to have a nice UI to do that, while researching it I came across a product from drotek.com which already has a nice UI and I was glad to find its an open source (!!).
So I decided to sit down and take a look at it, at first I was a little disappointing to see it worked on Intel Edison Only as I didn't find this board particularly interesting and now after reading that Intel discontinued it I think its even more important to find generic SBCs.
So I started to dig in the source code and I was glad to find out its written in Node Js as Node was one of my primary development environments for the past couple of years. I went over the source code and it seemed simple enough to work on, so I npm install 'ed it and went to work.
First, I've converted the whole project to typescript and cleaned up some Edison specific code, then I went ahead and ported rtkrcv to windows but since windows doesn't have a tty console, I've decided to disable that functionality and worked on making the tcp console work. I also wanted this project to work on M8N so I've had to upgrade rtklib to 2.4.3 as well., I've found a bug or two and went ahead to create an web interface for the services.
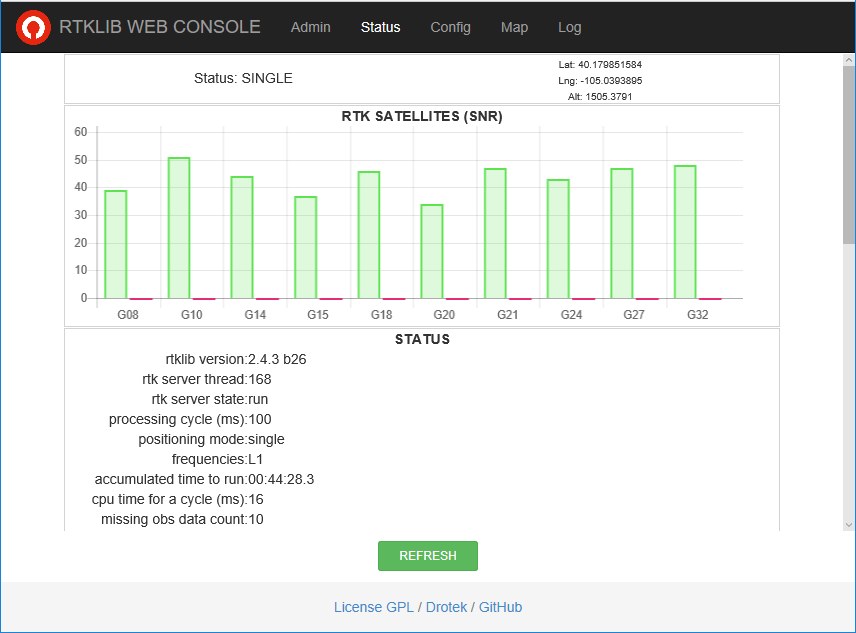
I've added loggers, PM2 and split the str2str and rtkrcv to their own hosted services so I've had better control over the service lifecycle and the ability to monitor it in realtime in any way possible, so monitoring console output for errors, monitoring logs for messages to be exposed as events and monitor rtkrcv monitor port and control port to get even more useful information, such as streams statistics, satellites, observations, navigation data and ofcurse the latest position and SNR and exposed all that information as APIs.
In the UI, I've converted the project to typescript which helped me to clean up a few issues, add a toastr for better error reporting, add socket.io to get realtime notifications and implemented a periodic update of all the statistics I wanted as well as add the ability for the station to work as both base and rover, which in essence means it can start str2str and rtkrcv and have complete control over the inputs and outputs. I've even added a com port detection API for the UI.
I've updated the chart.js version to get better animation for the satellite SNR graphs and added a finer resolution in the Map section.
For the rtkrcv and str2str I've added a gyp build configuration so it can be compiled in almost any environment, so far I've tested it on Windows, Linux x64 and Linux Arm and seems to be working without a hitch even on Orange PI Zero.
Now, I'll probably start testing it in a small scale, originally I wanted it for my Rover project, but this project was a learning experience as well as fun.
I'm looking for someone else to take over this project, I see great potential for it to be used across the navigation hobbyist community.
When we got started ten years ago, the annual AUVSI student drone competition was dominated by commercial autopilots, such as Piccolo. Now it's almost entirely open source autopilots, led by ArduPilot (14 of top 20) and Dronecode/PX4 (3 of top twenty). I'm super proud of this having co-founded ArduPilot and now leading Dronecode. Only one commercial autopilot in top twenty -- next year they will be gone entirely!
Before choosing thebest esc for quadcopteror FPV, you should know some ESC knowledges (Type, Firmware and Key parameters) as below.
ESC type
A Brushed Motor has a rotating set of wound wire coils which acts as an electromagnet with two poles.
A Brushless Motor uses a permanent magnet external rotor, three phases of driving coils, one or more devices to sense the position of the rotor, and the associated drive electronics.
The output of the ESC line, brushed have two lines, brushless have three lines, connected to the motor;
Which type is the best?
As we know, most all of quadcopter esc is brushless, because of High efficiency, Higher speed range, no voltage drop across brushes.
The downside of brushless esc is that they are more expensive than most brushed types, however, the extra price is usually more than worthwhile as they will last MUCH longer.
Esc firmware
For base on open source firmware, there are 3 main types of firmwares, which can be divided into blheli, simonk and kiss firmware.
I would personally go for Blheli. Why is it so? Well, considering how fast Blheli has undergone improvements, it has been able to beat simonk on the performance. However, Kiss beats them hand-down on performance!
Between simonk and Blheli, I previously would go for simonk but not anymore. Currently, I think Blheli is really undergoing revolutionary improvements on its features.
Although the difference in size between Blheli and kiss might not be that big, the difference is still a front leap for kiss firmware.
Key parameters of esc
Max Amp Rating
The maximum amperage an ESC can handle needs to be greater than the motor/prop combination will draw. If the amperage rating is not high enough, it could overheat and die.In terms of ESC, suggesting 20%-50% extra Amps is good rule to ensure your ESC do not burn out.
Voltage from battery
Make sure your ESCs the ability to withstand the voltage from the chosen battery. We assume that as we know our battery atleast 88A current. So here we will take ESC current is less 88A, maybe 60A is ok.
Although above is a personal opinion based on my experience, I believe that it is an opinion that is shared by a majority of quadcopter owners!
Please leave your message if have any questions about any thing.
For RC/UAV uses, a balsa core laminated with carbon fiber makes an ultra light construction panel with very high stiffness. While you can buy ready made panels (usually expensive), this video shows how easily you can make it yourself with no special tools.
This video does not pretend to show the best way of doing these panels. It is merely one quick and cheap way of doing it (like using a vacuum system , use rollers to spread and squeeze the excess resin out, etc)
We have reached the long-awaited episode in our autopilot precision series in which we finally test Pixhawk. All drones are tested by flying them on a simple photogrammetry route created in UgCS mission planning software. In this video Pixhawk was mounted on 3DR IRIS platform, the same one used in our PX4 test. Pixhawk was running ArduCopter 3.4.6 firmware.
Should drone owners be able to fly their drones wherever and however they want to? This is the question increasingly asked by the consumer drone community as drone giant DJI tightens flying restrictions on its customers.
A spokesman of Coptersafe, the company that sells these modifications, explains to Motherboard that is understandable that DJI takes safety measures, but those measures do not always comply with local laws. The idea for software modifications was created because the founder of Coptersafe was unable to film with his DJI in certain areas, although he had been authorized by the local authorities.