All Posts (14056)

Sort by

I will start doing some radio range tests across the valley (line of sight) with this "test-board" today. As you can see this is test board #1, and it looks ... well ...The tests will be carried out by car at first. If the tests are sucessfull, the INU will possible become airborne within a few days. First some out of the loop tests, then I will start integrating the DevBoard into the airframe and test some RTL etc.UFO_MAN
Read more…

Telemetry


I have now written some initial telemetry code that extracts data from the internal data structures of the r,p,y code running on the UAV DevBoard. The code generates ASCII telemetry frames.

I will later make a binary telemetry frame format for better efficiency. If you have suggestions to the format, let me know. It would be nice to be compatible with the Ardustation.

What I would like to integrate in my UAV system in the future is an accurate height measurement unit (laser, radio, ultrasonic or pressure) as well as an airspeed indicator.

I will carry out some initial RF range testing later today or tonight.


This is fun!

Read more…

I have now sucessfully sent rmat data from William Premierlanis green UAV dev board to the PC and displayed it with the pyton code developed by Brian Wolfe. I tailored the datagrams from the UAV Dev board to fit Brians format so I didnt have to recode the Python code.

Video:


I use a FTDI board attached to the spare serial port of the UAV Dev board. I send data as ints and the python code parses the data and converts to floats by dividing the modified Q15 format by 16384

The yaw axis drifts since the GPS is stationary, however its difficult to see that on this video. The accelleration compensated axes are stable due to the correction from the accellerometers.I have another video that I will post son that shows the drift of the yaw axis better. The yaw drift is no supprise by the way, as this system isn't supposed to give correct yaw information if the plane is stationary as it uses GPS for yaw correction. (The plane may drop to the ground if the groundspeed is zero unless the course is into headwind with airspeed over stall speed).

For a helicopter a three axis magnetic compass may be used for yaw correction. In fact I have a three axis electronic compass intended for use on my four rotor helicopter laying ready for some possible later testing if I get to dig deeper into the code.

(By the way look at the bottom board, not the red one hanging down. The red board is the UHF diversity RX for the telecommand link )

I plan on doing some flight testing with telemetry soon.
Read more…

RC Plane Prop Saver

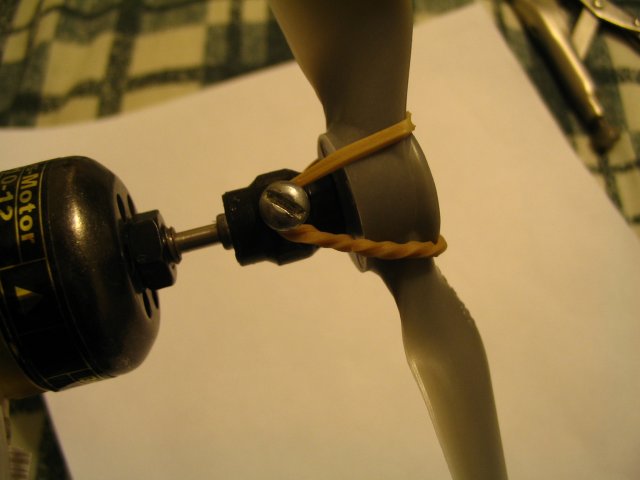
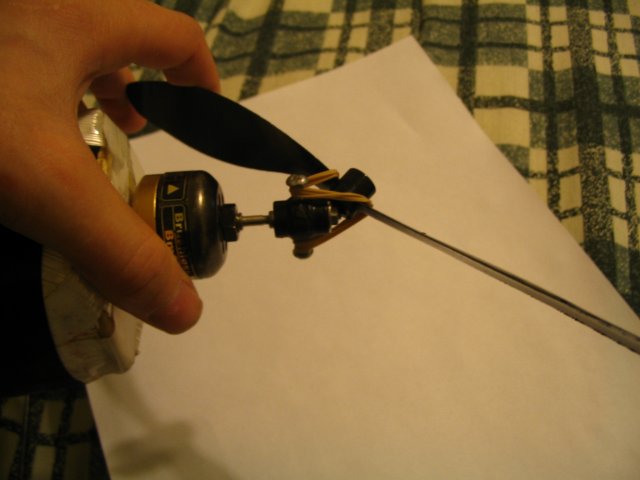
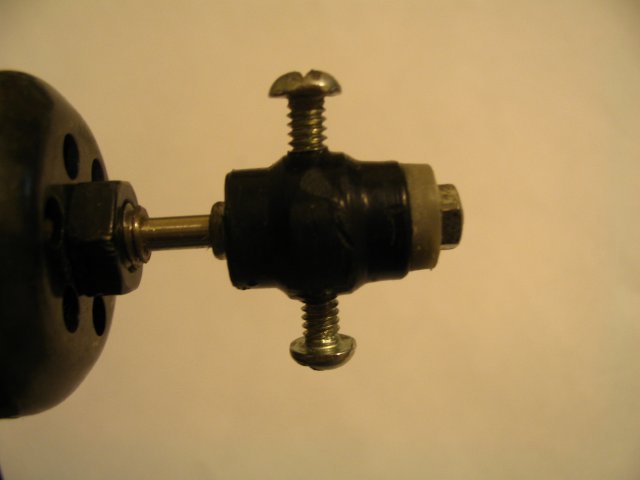
RC Plane Prop Saver: I found this while researching the Super Cub and thought it might be usefull to those of you not flying EasyStars. :From: http://thesmithfam.org/blog/2006/10/17/rc-plane-prop-saver/Direct quote:"Michael Torrie created a really handy tool to save your RC plane’s propellers from a spinning death on impact. It’s called a prop saver and it’s based on the “elastic rules, static drules” principle. Read on for pictures and explanation:The following is a close-up picture of a prop saver:

saver4.jpg

It bolts on to your propeller shaft just like a normal propeller, with two hex nuts (which are barely visible on the left and right of the black plastic yoke). The black plastic yoke is made from an old propeller, with the blades cut off, and two screws drilled into it and, of course, coated with tape for good measure. The tape provides a little bit of friction when you slide the new prop on the top. You then attach your prop onto the tip of the yoke with a rubber band, securing it to the screws like this:

saver6.jpg

The prop sits on the tip of the yoke, swallowing it slightly. The rubber band holds it to the yoke and delivers the rotational force to the prop like a normal nut would, except with a bit more elasticity. That way, the prop’s blades don’t take the brunt of a crash, but rather the rubber band, as this picture shows:

saver3.jpg

That’s one safe prop! You’d have to crash it pretty hard to break it, in which case the prop will be the cheapest repair you’ll make.This approach observes the “elastic rules, static drules” principle by allowing the prop to give a bit, rather than statically absorbing impact forces. This same principle applies to just about every component that break easily."
Read more…

new book: RCadvisor's ModiFly

How does an original model airplane design get created?I've always wanted to read a book that answered that question. A book that takes me by the hand and shows me how it's really done. One that tells me not just the what and the how, but also the all important why. Since nobody had ever written such a book, I decided I had to do it myself. This is that book.Experience firsthand the joys of building and flying your very own model airplane design. Put into practice the lessons from my previous book, RCadvisor's Model Airplane Design Made Easy. Follow along as we design, build, and fly a modern radio-controlled model airplane.DESIGN GOALSIncorporating the latest innovations and research results, the design is deceptively simple in appearance. However, 20 prototypes and 15 hours of flight testing were required before a design finally met all the goals:* Build it in just one day for less than $5.* A joy to fly with no bad habits.* Sturdy enough to survive hard landings.* Build either a park flyer or an indoor slow flyer.* New pilots can fly it without ailerons.* Easy to build for new scratch builders.* Kid-friendly free flight glider version.* Use inexpensive electric power systems and radio gear.* Great starting point for your own unique designs.You can easily find the construction materials for the airplane at local discount or craft stores. So what are you waiting for?DESIGN PROCESSThe book starts by describing the goals and the long prototyping process that led to the final design. Along the way you get to see firsthand the challenges that creating an innovative design presents. Learn the reasoning behind all the decisions that led to this unique design.A stand-alone book, it is complemented nicely by RCadvisor's online model airplane calculator and my first model airplane design book. Picking up where that book left off, it takes a very pragmatic approach to the entire design process.ADVANCE PRAISE"This is absolutely A MUST READ!" - Bob Aberle"I am so excited about the design that I just have to build one to try it out." - Ken Myers"Carlos kicks out another winner with this one." - Jamie Burke"Even if you have some model airplane design experience, you are likely to learn something from this book. I know I did." - Paul Bradley"Carlos Reyes has done it again!" - Richard Kline"Lots of great info!" - Michael "Crash" Hancock"Carlos' latest book is like a well written mystery novel." - Red ScholefieldSPECIAL OFFERThe book is just $19.95. That is a lot less than the price of a new kit! As a bonus, I'm including a *free* six month subscription to the premium features of the calculator. That is a $12 value! This subscription unlocks the optimizer and all the other advanced calculator features. Current subscribers can extend their subscription for another six months with this offer.FLIGHT PACKAs a service to the RCadvisor community, I'm making available flight packs suitable for the model described in the book. These are the same high quality components I used in all my flight testing:* HXT 5 gram micro servos (4 each)* Flightmax 500 mAh 2S1P 20C LiPo battery packs (2 each)* Turnigy 10A speed controller* Turnigy 24 gram brushless outrunner motor* Slow flyer 8x3.8 propeller* Prop saver and other connectorsThe price is just $74.95, a real bargain. Bonus: for a limited time, I'm adding an extra propeller for a total of two.BONUS STICKERSWhile supplies last, I'm throwing in free high quality vinyl stickers with every order. They are three-inch high copies of the RCadvisor logo in full color. The vinyl is only 0.002 inches thick and is self adhesive. They look great!http://www.rcadvisor.com/productsCarlos ReyesRCadvisor.com founder
Read more…

My Ardupilot Project's Status.

G'day all.I thought I'd start contributing more to the community and the best way I could think of was to start a post that shows my current progress and relay any lessons I learn along the way.Right now I'm still getting everything together however, In future, I will add a build log and the results of flight testing (among other things).Hopefully this information helps some of you out there.Cheers,NickHere is my planned UAV/FPV setup:Airframe•EasyStar | OrderedTurnigy 40A Speed Controller | OrderedHXT 2835 2200kv Brushless Inrunner | OrderedProp | Ordered•2S Lipo | Ready•3S Lipo | ReadyRadio system•Futaba 9C | Ready•9CH Reciever | ReadyArdupilot168 Board | Ready328 Board | ReadyArdushield | ReadyXYZ Sensors | ReadyPitot tube | ReadyServo Leads | Ready [More info using these cables soon]•FTDI Cable | Ready•Locosys 5Hz GPS | ReadyFPV/Video downlink2.4GHz 500mW Lawmate TX | Ordered2.4GHZ I.F. RX | OrderedRemzibi OSD | Received•Video Goggles | Ready•Camera | In process of selectingGround Station•MSI Wind | Ready•Xbee Modems | On Hold•Xbee Breakout boards | On Hold•Tracking Antenna | In Development.Additional Components•Foundation HAM radio licence | Passed :D•FMA Cellpro 4S Charger | Ready•Canon A590IS running CHDK | Ready [More info on interfacing this with Ardupilot soon]•Turnigy BESC Programming Card | OrderedWatt Meter | Ordered
Read more…

Easy Cub; Where to get?

Is this plane:

103899d1240343472-esperienza-diretta-con-multiplex-easy-cub-img_0024_3.jpg

Link: http://diydrones.com/profiles/blog/show?id=705844:BlogPost:71763&page=1#comment-705844_Comment_72270[scroll down to Roberto's comment.]The same as this one?:

hbz7100.jpg

Link: http://www.hobby-lobby.com/beginners-super-cub-rtf_21697_prd1.htmOr this one with a different paint job?:

mpx4235.jpg

Link: http://www.hobby-lobby.com/multiplex-easy-cub_21721_prd1.htmI like the first one and think it would make a great airframe but I am confused as to where to find it; roberto calls it a "multiplex Easy Cub (1600mm wingspan)" but google turns up more than one different aircraft. Could someone please clarify for me?-thanks -rd .
Read more…

little help pls.!

hi guys me along with my team have built a uav capable of lifting 16 lbs and can take off within 100 feet. Now the team wants make it automated, may be semi auto or compelet auto .i have got one gps receiver unit , its Garmin 15l but i dont know how to start wit it.the design team wants these parameters to be calculated:1.velocity2.altitude3.location4.differential pressure on wings (top and bottom of wing)and i personally want to fit a cam on it.But i dont know where to find these modules , how much it cost, etcand can my gps unit give altitude??pls help, u can also mail me at shridhar.mb@ projectvyoma.com
Read more…

Odd roll behavior with MatrixNav?

Hi all, I'm new here. I'm trying to get an IMU based UAV up and running to do some research into higher level mission planning. I decided to go with William Premerlani's UAV DevBoard, but I'm having some problems with the MatrixNav firmware. I'm using a Parkzone Radian powered sailplane (3 ch, no ailerons).Right now I'm running without a GPS (it died in the last crash I think), but I mainly want to verify that pitch stabilization works with our airplane. So, the only modifications I've made were to turn on pitch stabilization in all modes (auto and RTL) and skip the GPS initialization.The problem I'm noticing has to do with pitch compensation during roll. My understanding is that a small amount of up elevator is required during turns in order to maintain altitude. When testing on the ground (just holding the airplane in my hand) I can pitch the plane up and down and the elevator moves correctly to compensate. When I roll the airplane to the left (to simulate a left turn) the elevator also compensates correctly by pitching up slightly to maintain altitude. However when I roll to the right, the elevator tries to pitch down, the exact opposite of what it should be doing. This actually caused two pretty bad crashes before I realized what the problem was, oh well.Has anyone else noticed or dealt with this behavior before? any ideas or suggestions would of course be very much appreciated. Thanks!
Read more…

One way to Restore a bricked xBee

I was able to restore my bricked xBee by following these instructions. Hope this helps!!Using the sparkfun USB explorer board.1. Take the module out of the interface board.2. Connect the interface board to the computer.3. Open X-CTU make sure Baud Rate is set to 96004. Go to "Modem Configuration"5. Put a check in the "Always update firmware" box6. Select proper modem from drop down menu,7. Select proper function set and firmware versionfrom drop down menus.8. Click on the "Write" button. After a few seconds oftrying to read the modem, you will get an Info boxthat says Action Needed. At this point, CAREFULLYinsert the module into the interface board.9. You may get the info box again a short while after,just use the reset button on the interface board.This should get you back up and running.It may take more than one try to get it to work, but mine worked the first time.The original problem was that some how a glitch corrupped the xBee so it wouldn't respond to the "AT" commands.Let me know if this works for anyone else.Doug
Read more…

Video showing my problem

ok im having alot of problems.1. The UAV mode is not working2. Manual mode is not working3. so nothing is really workingI have successfully downloaded 2.1 code. And i have put one gps point in using the configuration tool. But if you watch the video you will see i have the right setup (i believe) but its not working.So please watch the video and see if you can help.Thank you.click here to see video on youtube
Read more…