All Posts (11086)

Sort by
3D Robotics

Journalist sues police who grounded his drone

3689575645?profile=originalFrom Motherboard:

A journalist suspended by his news channel for flying a drone near the scene of a car accident in Connecticut is now planning to sue the Hartford City Police Department for lost wages and additional damages. 

Earlier this month, Pedro Rivera made national headlines when he flew his drone above a fatal car accident. He was questioned by Hartford City Police and eventually allowed to leave, but officers with the department called WFSB television, where Rivera works as a photojournalist. WFSB suspended him for a week while police and the station investigated whether he did anything illegal.

Rivera has hired Norm Pattis, a prominent Connecticut lawyer who specializes in civil rights violations, to file the lawsuit, which he said will be filed in Connecticut Monday or Tuesday.

“It’s absolutely ridiculous. I wasn’t charged, I didn’t violate anything. They went after my job,” Rivera said of the police. “I think what happened to me falls in the category of the war on cameras by the police. Whenever the police are videotaped, they try to detain people and confiscate the camera.” 

The Federal Aviation Administration is still investigating the case, but because Rivera was flying his drone as a private citizen, not an employee of WFSB, they’ll likely have no recourse. Flying a drone as a hobbyist has always been legal; flying one for commercial purposes might be as well. Plus Rivera says he’s never sold footage to the station.

Journalists are increasingly looking at using drones to cut the cost of taking aerial photography and video. Rivera says he got permission from WFSB to fly as a hobbyist, and says that in the future, cases like his will become more common. 

“As long as we’re persistent, I hope in five years that this will be common,” Rivera said.

...

Rivera’s case, even if he wins, isn’t likely to spur any sweeping legal changes—the legality of flying drones commercially is still very much up for debate—but it could embolden others who are currently afraid of running afoul of the FAA or law enforcement.

“The act of creating expressive or newsworthy content, including the taking of photographs from public spaces, is protected by the First Amendment regardless of the equipment used,” said Brendan Schulman, a drone lawyer in New York. “Some state legislators who recently have proposed blanket legislation restricting drone photography appear to have overlooked First Amendment considerations. I am surprised that news agencies have not been more proactive about this issue, as important rights are at stake in the regulatory process.”

Read more…

Scratch Y6 build part I

proxy?url=http%3A%2F%2F4.bp.blogspot.com%2F-bEp-PlrkufI%2FUvlLU53_3WI%2FAAAAAAAABc8%2F5ES9Q7t0exw%2Fs1600%2FDSCN0286.JPG&container=blogger&gadget=a&rewriteMime=image%2F*

I have decided to build a Y6 multirotor as i hear and read they are one of the more resilient form factors, for a multirotor. The idea being if one motor fails there is still another one on the same arm that can compensate, and keep flying until you can land.

So the quest began with gathering all the parts, i had seen this frame on HobbyKing but did not like it enough to think i could modify the frame for a Y6.


proxy?url=http%3A%2F%2F4.bp.blogspot.com%2F-8GRhiAtC0NA%2FUvlJOuPCQbI%2FAAAAAAAABaA%2Fi_KMCCt6cnM%2Fs1600%2FDSCN0261.JPG&container=blogger&gadget=a&rewriteMime=image%2F*


I bought the two halves of the frame, and the hardware pack. I liked the idea of being able to fold the arms, but to engineer this for the Carbon fiber tubing i had would make it too difficult, so i opted for a fixed arm arrangement.


proxy?url=http%3A%2F%2F4.bp.blogspot.com%2F-nb5K_cI4A3E%2FUvlJdk1WgjI%2FAAAAAAAABag%2FoDexZuESNT0%2Fs1600%2FDSCN0265.JPG&container=blogger&gadget=a&rewriteMime=image%2F*


I bought this carbon fiber tubing from here and they give a fast service and a good price.

The motor mounts were the next things i needed, and bought them from here.

The tubing was 20mm so it was a difficult size to find motor mounts for but was not impossible.

proxy?url=http%3A%2F%2F3.bp.blogspot.com%2F-JwF7MCQygVE%2FUvlJZzMDRoI%2FAAAAAAAABaY%2FKIKbg2HiYk8%2Fs1600%2FDSCN0264.JPG&container=blogger&gadget=a&rewriteMime=image%2F*


proxy?url=http%3A%2F%2F2.bp.blogspot.com%2F-R5dr0TvOGG8%2FUvlJnWPHFBI%2FAAAAAAAABaw%2FUwRYS4_faZU%2Fs1600%2FDSCN0268.JPG&container=blogger&gadget=a&rewriteMime=image%2F*


These mounts were OK but needed some semi circular clamp to go onto the round tubing, and they were bought from here.


proxy?url=http%3A%2F%2F2.bp.blogspot.com%2F-608IXGe54-U%2FUvlJPvrG2lI%2FAAAAAAAABaI%2FBoPQM7ZSvmg%2Fs1600%2FDSCN0262.JPG&container=blogger&gadget=a&rewriteMime=image%2F*

proxy?url=http%3A%2F%2F4.bp.blogspot.com%2F-ion7DcnZ9YQ%2FUvlJWXQSXMI%2FAAAAAAAABaQ%2FBuS1NKZW1zo%2Fs1600%2FDSCN0263.JPG&container=blogger&gadget=a&rewriteMime=image%2F*

The clamps and motor mount, mounted onto the arm, if you can see it, there is some silicone tape on the arm thus giving the clamp something to bite into and hopefully giving some vibration isolation.


proxy?url=http%3A%2F%2F1.bp.blogspot.com%2F-RGF6KHSq6JU%2FUvlJimBqP_I%2FAAAAAAAABao%2FGZ_vhiCuijc%2Fs1600%2FDSCN0267.JPG&container=blogger&gadget=a&rewriteMime=image%2F*


proxy?url=http%3A%2F%2F3.bp.blogspot.com%2F-zGUwa1AeP14%2FUvlJsUw7QTI%2FAAAAAAAABa4%2FIxb2W8XHlqI%2Fs1600%2FDSCN0269.JPG&container=blogger&gadget=a&rewriteMime=image%2F*

proxy?url=http%3A%2F%2F4.bp.blogspot.com%2F-MAcD8EC3kUU%2FUvlJxvtB0UI%2FAAAAAAAABbA%2Fm9TlRHSn_6w%2Fs1600%2FDSCN0270.JPG&container=blogger&gadget=a&rewriteMime=image%2F*


Next came the motors and for this i had no hesitation, but to go for the SunnySky 2212 980kv motors, they are so smooth, and powerful i wish i had used them earlier in my flying.


proxy?url=http%3A%2F%2F3.bp.blogspot.com%2F-vUm6xz6mjcE%2FUvlJ3jknZNI%2FAAAAAAAABbI%2FVxcb13coHlE%2Fs1600%2FDSCN0271.JPG&container=blogger&gadget=a&rewriteMime=image%2F*


Then came the propellers i chose and again the experience and knowledge that comes from learning the hard way is that you pay so much for poor quality that you end up paying twice that you would have paid if you had gone for quality in the first place.


 So with that in mind i bought the Graupner props 10x5.


proxy?url=http%3A%2F%2F1.bp.blogspot.com%2F-lHEdWO7RSXM%2FUvlJ9Nuw2aI%2FAAAAAAAABbQ%2F89rr8uABSPM%2Fs1600%2FDSCN0272.JPG&container=blogger&gadget=a&rewriteMime=image%2F*


with all these parts it all went together quite well and looked really good.


proxy?url=http%3A%2F%2F4.bp.blogspot.com%2F-b1GUlT7zJzA%2FUvlKDmJuNYI%2FAAAAAAAABbY%2FpSRwpU4R8tA%2Fs1600%2FDSCN0273.JPG&container=blogger&gadget=a&rewriteMime=image%2F*

proxy?url=http%3A%2F%2F1.bp.blogspot.com%2F-9R1J_xpMLyU%2FUvlKMSWduXI%2FAAAAAAAABbg%2FG0QkWiRWJOM%2Fs1600%2FDSCN0274.JPG&container=blogger&gadget=a&rewriteMime=image%2F*

proxy?url=http%3A%2F%2F2.bp.blogspot.com%2F-GIg9K5g32dg%2FUvlKU69933I%2FAAAAAAAABbo%2F8NQektqLPz4%2Fs1600%2FDSCN0275.JPG&container=blogger&gadget=a&rewriteMime=image%2F*

I also decided to mount the ESC's on the arms right up close to the motors, thus giving then cooling, and weight to stablise the arms.


proxy?url=http%3A%2F%2F3.bp.blogspot.com%2F-W9KuiS-5p2w%2FUvlKj7RHifI%2FAAAAAAAABb4%2F_An7JF_cpp0%2Fs1600%2FDSCN0277.JPG&container=blogger&gadget=a&rewriteMime=image%2F*

proxy?url=http%3A%2F%2F4.bp.blogspot.com%2F--ImgI1D2KMY%2FUvlKqgB8CXI%2FAAAAAAAABcA%2FFETEJJQvSD4%2Fs1600%2FDSCN0278.JPG&container=blogger&gadget=a&rewriteMime=image%2F*

proxy?url=http%3A%2F%2F2.bp.blogspot.com%2F-h_CekoNEPQs%2FUvlKvTx7FgI%2FAAAAAAAABcI%2FQifo70XsWnQ%2Fs1600%2FDSCN0279.JPG&container=blogger&gadget=a&rewriteMime=image%2F*

proxy?url=http%3A%2F%2F1.bp.blogspot.com%2F-MM0DYX9CV5U%2FUvlK1rIFU7I%2FAAAAAAAABcQ%2FKADEdfkS5Mc%2Fs1600%2FDSCN0280.JPG&container=blogger&gadget=a&rewriteMime=image%2F*

proxy?url=http%3A%2F%2F3.bp.blogspot.com%2F-Lh5K1ssJZeY%2FUvlK-Rzh0TI%2FAAAAAAAABcY%2F1NdyeBl-rbM%2Fs1600%2FDSCN0281.JPG&container=blogger&gadget=a&rewriteMime=image%2F*


The ESC's i used were ones from RCTimer 30A SimonK Opto ESC's.


proxy?url=http%3A%2F%2F3.bp.blogspot.com%2F-mtJRVfVvSe4%2FUvlLBdx87eI%2FAAAAAAAABcg%2FurA--3EFJ6A%2Fs1600%2FDSCN0282.JPG&container=blogger&gadget=a&rewriteMime=image%2F*

I cut all the leads off and soldered bullet connectors to it so it can be as close to the motor as possible.

proxy?url=http%3A%2F%2F2.bp.blogspot.com%2F-hi5JM-vD8GM%2FUvlLGzWLZwI%2FAAAAAAAABco%2FXyUW1GzXFbY%2Fs1600%2FDSCN0283.JPG&container=blogger&gadget=a&rewriteMime=image%2F*

Once mounted all the ESC's just plug in and the wiring goes through the arms thus making the whole look better and more Aerodynamic.

proxy?url=http%3A%2F%2F3.bp.blogspot.com%2F-33sgD1eC8h0%2FUvlLM4gfp6I%2FAAAAAAAABcw%2FHP-vwsYVUQ8%2Fs1600%2FDSCN0284.JPG&container=blogger&gadget=a&rewriteMime=image%2F*


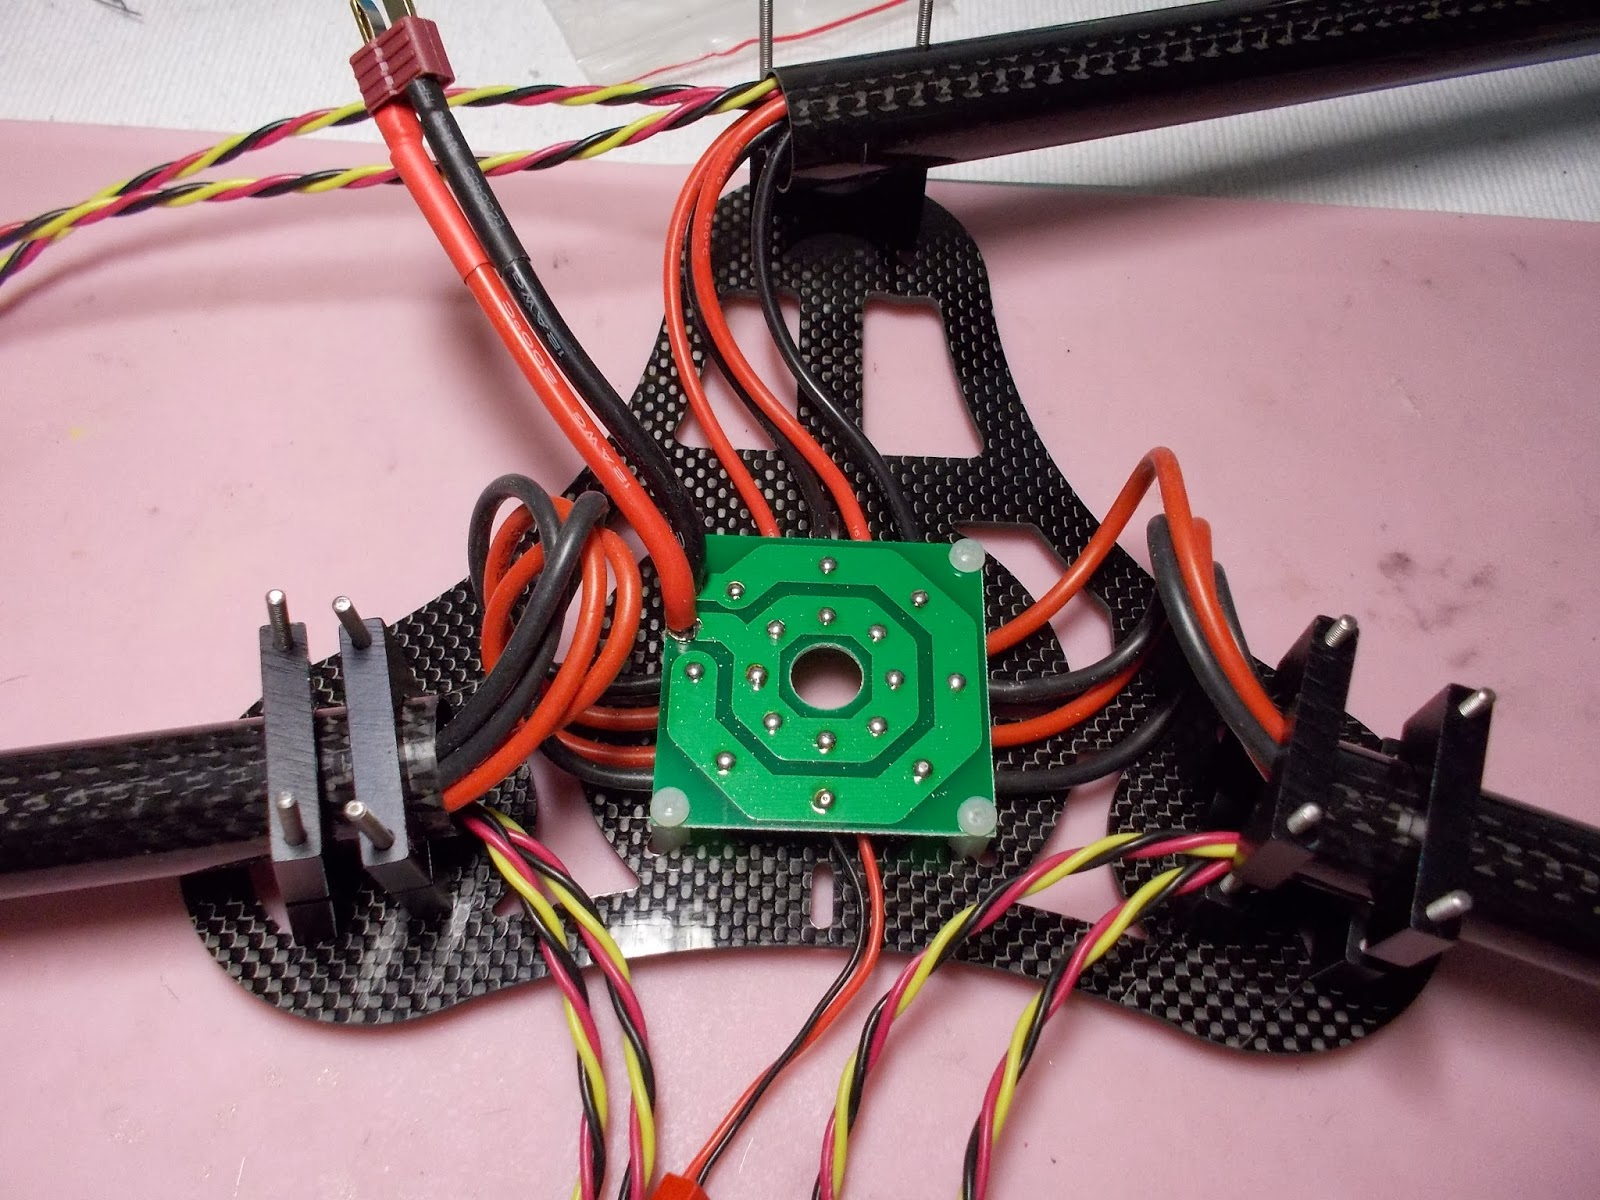
Then the wiring of all the power distribution went through this PCB power distribution board i bought from hobbyking, as shown below.


proxy?url=http%3A%2F%2F4.bp.blogspot.com%2F-L4BN2TEWA4Y%2FUvlLRNLIx2I%2FAAAAAAAABc4%2FU1CRQGMAMdE%2Fs1600%2FDSCN0285.JPG&container=blogger&gadget=a&rewriteMime=image%2F*

Final clamping the two halves together gives a very strong frame and a well balanced Y6.

proxy?url=http%3A%2F%2F2.bp.blogspot.com%2F-bEp-PlrkufI%2FUvlLU53_3WI%2FAAAAAAAABdA%2FDbO8KO_Bapw%2Fs1600%2FDSCN0286.JPG&container=blogger&gadget=a&rewriteMime=image%2F*


End of part 1, next flight controller, landing gear, flying :-)


Read more…

Give All the Robots Eyes to See! OpenMV.

DSC03686.JPG?width=300

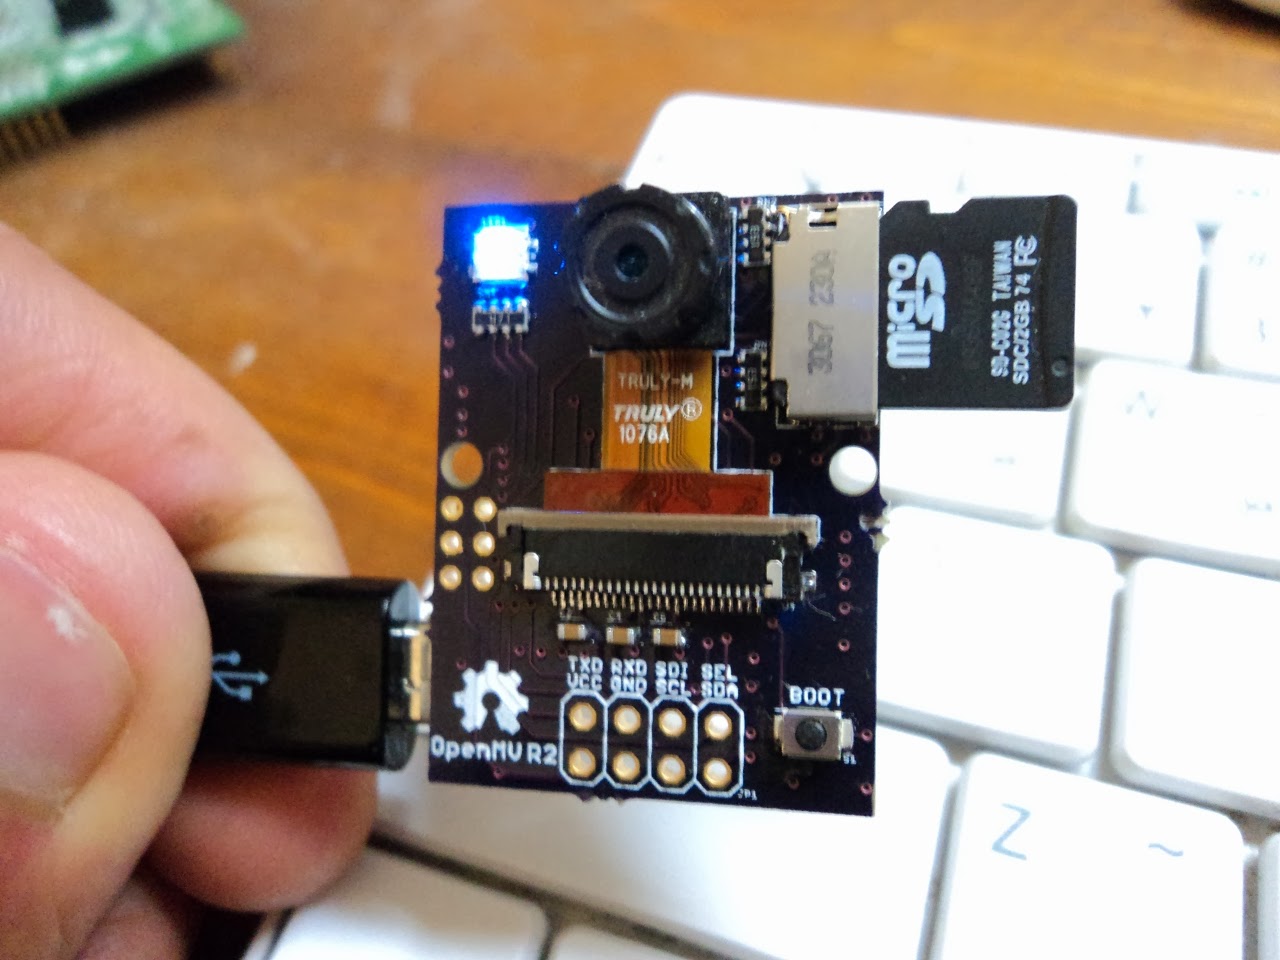
The OpenMV camera module will be the lowest cost, most hackable machine vision platform out there, because Ibrahim, the creator, and I want to change the nature of hobby and educational robotics. We value your feedback and suggestions* as we gear up for a Kickstarter campaign.

  • Possibly as low as half the cost of the Pixy in sufficient volume;
  • Scriptable in Micro Python;
  • 25fps face tracking, 60fps blob tracking;
  • Viola-Jones object detection;
  • Loads OpenCV cascades from microSD;
  • The current version measures only 1.0" x 1.3";
  • Compatible with OmniVision 0.3MP OV7660, 1.3MP OV9650/OV9655, or 2MP JPEG OV2640;
  • STM32F407 MCU now; considering faster STM32F429;
  • Exposes SPI, I2C, and UART pins, can run SPI with I2C or UART;
  • Programming header exposed;
  • Python scripts load off the microSD card;

We want OpenMV to become the Arduino of machine vision, bringing eyes to more robots and simplified tools to more hobbyists and students to easily achieve incredible things with their creations.

Imagine the possibilities. How about a bathroom mirror and light that turns on when you look into the mirror? Or a doorbell that rings itself when someone shows up at the door. Or detect and avoid Sparkfun AVC barrels. Use two OpenMVs for depth perception. What about some kind of sight-based UAV position reference with color ground markers?

Here's a video of the face tracking:

The camera can detect minions. :)

VJ_minion.png?width=150

Here's the Python IDE, with frame buffer capture, tracking a red ball in just a few lines of Python:

NqL9DWw.jpg?width=500

*We'd love to hear your thoughts and feedback on this module. Please post your comments/thoughts here.

Or, if you want to contribute to the think tank, join the google group [here]

Read more…

DIY Micro FPV Quad

FLZORQJHR9V8HUJ.MEDIUM.jpg

I put together an Instructable for a micro FPV quad I designed and built recently, and thought it might be of interest to readers here. I think micros are gaining more popularity, as components are getting smaller. Micros have a number of advantages, I believe, among them being greater scale durability.

But, with this model, I just like how neat and compact the whole thing is. I can just chuck it in the car and don't have to worry about folding arms or putting in a protective case. It's just as stable and responsive as any larger quad I've flown, so is enjoyable to fly FPV.

There are some really nice, professional looking designs coming out, all CAD-ed out, but I did this one old-school, on paper. The nice thing is that it's an easy build. Only took me a day. But the end result is very usable, and enjoyable.

Anyway, here's the link to the Instructable: http://www.instructables.com/id/Micro-FPV-Quad/

Read more…
3D Robotics

An Android-controlled Arduino drone

3689575475?profile=original

From Hackaday:

[Stefan] wrote in to tell us about a project for high school students, where a Styrofoam glider (translated) is converted into an Android (or PC) controlled drone.

...

At the heart of the glider is an Arduino Pro Mini which communicates with either a computer or an Android phone via Bluetooth. It is especially interesting to note that the student’s used Processing to create the Android app, rather than complicating things by using Eclipse and Android Development Tools (ADT). While the more detailed PDF documentation at the end of the project page is in German, all of the Processing and Arduino code needed to build the project is provided. It would be awesome to see more Bluetooth related projects include a simple Android application; after all, many of us carry computers in our pockets these days, so we might as well put them to good use!

Read more…
Developer

Canon DIY External Battery Adapter

3689575538?profile=original

It's been a while that I'm developing a camera control board and its software. That takes me hours sending commands for testing it on long shooting sessions. There was no battery enough here for such amount of tests... until now! ;)

Some time ago I've noticed a small hole on the battery slot of my S95. It is protected under a flexible rubber stopper. Well, then I decided to improvise and build an external battery adapter by hacking an old worn out battery. Two 3D printed plates and a female JST are now replacing the cell. By that way I can use external sources like bigger 1S Lipo batteries. Here go the images. It's quite simple, but very effective.

Battery tear-down:

3689575482?profile=original

The white plastic base was cut to be the female slot. The female cable was soldered on a little embedded circuit which has the contacts of the battery cage. A 3D printed core was build as two identical pieces:

3689575565?profile=originalThat's it! All the parts was glued with CA.

Now I can use external 1S Lipos or even a DC source who will give me hours of work with no interruption. =)

3689575653?profile=original

Note: If you will gonna do that, do it at your own risk. Here is working like a charm.

Here is the STL object. for 3D printing: Adapt_Battery_S95.STL

Cheers,

Sandro Benigno

Read more…

In search of design functionality!

3689575251?profile=original 

   I wanted to share something i was working on for some time and get some feedback on the design.

I was looking how to make a frame for fpv with focus to ease of use and functionality, after quite some thinkering i've got to this point shown in renders, this is just a working model renders, incomplete but the core idea is there.

  Considering it is a mini frame design, it shows small fc, but the synergy yielded by bottom(power system train) and top(control and vision feed bridge) enables mounting of all sort of fully featured flight controllers as APM in between segments while remaining protected and easy to access.

  Canopy is implement for incrised aerodynamics, keeping air moisture away from electronics and wiring in FF, make it easier to train LOS flying, help a spotter in fpv assemble maintain visual and ofc while flying with your mates maintain visual on eachother much easier.

   For its size, the frame construction has amazing fitting capacity, it can take apm with gps, radio reciever and video transciever, camera, osd, bec, 4x 20A afro slims(overpowerd but wise for hot summers and weight allows it), telemetry and stunning battery compartment 12cmx4cm x 2,7cm. Central frame construction bounding box is only 20cm long, 5cm wide and 8cm height!  Nearly everything is "armor tanked" by construction, figures as inspiration for me was the armadillo animal hehe.

  However antennas placement is in revision, altho giving almoste perfect LOS to GCS in model 360degree placing screeming video transciever antenna next to radio reciever is a big fail, for a mini sure no problem but it can be done better. 

   So let me know what you guyz think about the design, thoughts, suggestions?

 Enjoy;)

3689575331?profile=original3689575452?profile=original3689575413?profile=original3689575383?profile=original3689575436?profile=original3689575514?profile=original

latest renders.

3689575265?profile=original

3689575046?profile=original

3689575310?profile=original3689575297?profile=original3689575367?profile=original

Read more…

Payloader prototype 2

3689575161?profile=original

Hot behind CT's announcement of the Electro/magnet v2, my payloader is almost ready for it.

But as usual, there are problems. Some mine...some with the CF supplier.

1. The search light boom is too weak. My fault. It's only 2mm CF, and the light weights 100g. It bounces, way too much, even on the the bench. I dread what it'll be like in the air. And as a result, the camera image will be next to useless. Dammit. Not an easy fit either. Then the measurement of the hole for fitting it, is way off. I'm checked the CAD, and it's right - somehow the supplier got it very wrong.

2. The target plate is too thin. It works, and as you can see it's carrying this 1.4kg 6S no problem - but I'd like it a bit stronger. No biggie. That's why we prototype stuff.

3. The light cable needs to be much, much shorter. Can't wait to try it out at night...pity my quad is in bits, getting upgraded to a Hex.

So...almost there - just a few things to tidy up, then it's out to the beta testers. Volunteers? Preferably someone who can test it with Ardupilot 3.2, and autonomous functions.

Some pics:

3689575007?profile=original

3689575100?profile=original

3689575188?profile=original

3689575225?profile=original

Read more…

3689575077?profile=originalThis large octorotor is developed as part of my master thesis at the University of Southern Denmark where I'm studying a MSc in Robot Systems

The octorotor is part of a system for weed detection in crop rows, where a camera on the platform is taking images of an agricultural field and an on-board embedded computer, running computer vision algorithms, is used to detect the position of the weed and the crop. The system should help reduce the amount of herbicides that is needed to prevent the weed in the field.

I know that a much smaller multirotor could have been used instead, but the platform is meant to be used for other projects afterwards, where heavy professional camera  and sensor equipment could be carried by the drone for research and student's projects. A payload of at least 3 kg should be possible, or maybe even higher!

Until now only the mechanical parts have been assembled; frame and motors, while I'm waiting for the rest to arrive - can't wait to get in in the air and test it!3689575120?profile=originalSpecs:

Frame: Tarot Iron Man 1000

Autopilot: Pixhawk with GPS and telemetry

Motors: 8x Tarot 4114, 320kv

ESC: 8x Maytech MT40A SBEC with SimonK

Propellers: 8x 1555 carbon

Batteries: 2x Turnigy Nano Tech 8000 mAh, 6S

University of Southern Denmark

3689575135?profile=original

Read more…

CAD Drones Live Network

3689574744?profile=originalWhat's up Diy Drones?!  CAD Drones Live Network is now up and running and I will be doing 5-7 LIVE Episodes Each Week that can be watched on the CADDrones.com Homepage or on the CAD Drones Youtube Channel.  I will be covering topics like How to design your own quadcopter using Solidworks where I will do a LIVE mirror of my screen so you folks can follow along.

This Weeks Upcoming Episode Schedule:

Episode 5-10 will be announced during episode 4 on sunday

Take it easy Diy Drones!,

Joshua Johnson - Founder of CADDrones.com

Read more…

Engineers and students from Western Kentucky University used a UAS to document, via video, a sinkhole which opened up under the Corvette Museum in Bowling Green, Kentucky. The engineers were able to get video footage from within the sinkhole, allowing them to provide an initial damage assessment without the need of putting anyone in harms way,

This application reminds me of the first time I realized my two interests of RC aircraft, and emergency response could merge after seeing video taken by engineers in Christchurch, NZ, who used a Parrot AR Drone to do damage assessment inside a cathedral following an earthquake, 

This is one type of use for these systems I have been advocating for within my career field of emergency services.

Read more…

3D printed quadrotor frame using Rotites

total.png?width=600

This is yet another version of a 3D printed quadrotor, pointed to be one of the workhorses of my research... The main characteristic of this frame is that instead of using nut and bolts to join the arms and the base together, like in TEGO v2, I'm using Rotite®s!!!!

1.png?width=600

For those who dont know what rotites are, you can give it a pick here, I was trying to find a solution to reduce weight of my previous TEGO v2 frame, and somehow I found this company, I immediately put in contact with them, and after several e-mail exchanges, phonecalls and even videoconferences with the inventor, I was able to get my hands on some of their designs, there is a picture below where Stuart is giving me a lecture about Rotites.

hand.png?width=600

So, I started playing in Solidworks, and we did this design, usign 90 degrees A and B rotites, 4 B's on the main plate and one B on each arm.

arm.png?width=600

The weight was dramatically reduced, and the endurance dramatically increased!!!

Many thanks to Stuart Burns (inventor of Rotite®) and of course, the Rotite® company to letting me use their designs :)

Don't forget to check the video!

3D printed Quad with rotite elements from Aldo Vargas on Vimeo.

Read more…

PX33 Dureau Wing

px33_dureau_class_wing_by_synersignart-d74c76x.jpgRecent builds ,guess will be doing commission builds on airframes and Some Parts for this year ,just completed 2 sets for a client  with the 2nd one rushed.these wings will be for camera platform so payload capacity is important as of durability.

36inch span and 24inch Chord mid size range wing 

650g AUW & tested on 140g of payload could be more Have not Tried

roughly 6x8x1 inch in the payload bay.

northropping_wip_by_synersignart-d750osa.jpgPX33 Dureau Wing along side the YB49 Northrop Wing.. just for fun photo comparison

macapagal4_by_synersignart-d6gf1ll.jpg

macapagal6_by_synersignart-d6gf1sd.jpgwill be updating more on the Airframes them self.

Read more…
3D Robotics
3689574605?profile=original
[Channelling our fearless T3 leader, Gary Mortimer] The quality of entries for the latest T3 round, "The Model" was nothing short of astounding.
 
It serves to underline just how far low cost autopilots and home made drones have come since the start of the competition in 2009. Back then returning without everything in a garbage bag was an achievement in itself. Telemetry radios were made of pure unobtainium and post-production consisted of lining images up by hand.
 
All the contestants have shown generosity and kindness fielding many, how did you do that?, questions and pointing folks the right way towards achieving similar results.
 
Truly the DIY Drones spirit.
 
All the entries are so good that It was difficult to choose a winner I decided to cast the net of judgement far from the trawler of destiny and seek the opinions of bigger fish. I also asked  the contestants that had just competed.
 
Interestingly it was an almost unanimous conclusion.
 
Thanks to the generosity of 3DR everybody that entered will be receiving  a T-shirt. The winner wins a full Pixhawk autopilot set.
------
The Winner!
The winning entry was original, technical and told a story.
 
Well done Sylvain: The Fallen Blockhouse wins it. Shot with APM-powered ArduCopter quad, it generated 3D imagery that worked on every level. Here are some videos that show the basics, but please see the original post for the full epic details.
 
Everybody has put hundreds of hours of work into this T3 round a job well done.
 
I would be remiss not to mention another band of achievers which grows almost weekly now. I am speaking of the 100km club.
 
Its newest members, Graham Dyer and Joseph Aletky, joined it just today. There are now seven members of this exclusive group. I know of two people trying for 200km, this goal may be scored in the Northern hemisphere summer of 2014.
 
As ever a big thank you to everybody that joins in with the competition, it pushes the boundaries and improves our autopilots and work flows. You risk you equipment for the entire communities benefit playing at the cutting edge of UAS flight.
 
Look out for the next T3 round announce shortly.
Read more…

3689574670?profile=original

I am excited to announce that on Friday, February 7th 2014, 3DR Flight Ops SD flew our modified Skywalker Airplane for over 4 hours (4:00:18 to be exact!) and covered a distance of approximately 134km or 83.5 miles.  This is a new personal record for flight time and distance, all accomplished over a few months of planning, building, and testing. Installed in this skywalker was the new Pixhawk Autopilot along with the new digital airspeed sensor, which performed flawlessly for us.

We have been testing some of the new battery technology in different configurations and we think we found the optimal configuration for the Skywalker. I have attached the KMZ and Screenshot of the flight. The tlog is 20+mb so it isn't attached at this time. We optimized for time aloft vs. distance, but we could imagine that a 100 mile flight would be possible with a slightly different flight profile. Note that this flight was performed in accordance to all DIY rules for safety, including a safety pilot in the loop and remaining within LOS at all times. The figure 8 pattern is exactly 1 mile in length, and also note that the kmz file only counts the mileage for the AUTO portion of the flight, with the remaining 2.5 miles being in FBW, Loiter, etc.


During the 4 hour flight we were able to capture some great air to air shots with our Y6:


Skywalker%204%20hr.kmz

Read more…
Moderator

Another 100km+ flight

3689574379?profile=original

Went for our long distance flight attempt today, flew a test flight with a 6S 2600mAh LiPo and then put in the 18650 batteries in, the log unfortunately shows both flights as I forgot to reconnect so I have calculated the time and total distance from the launch of the second flight to the landing. 

Basically we did a 300m diameter Loiter for most of the flight, biggest problem was the phugoid motion of the plane losing height on every downwind leg and having to regain the lost height on the upwind leg using precious amps to do so. I tried just about every parameter to tune the plane better throughout the first hour but could never get it to behave.

Special thanks to the devs (especially Tridge and Paul Riseborough), to Steve B. for assisting and UAVDS for making it possible


Plane: Super Sky Surfer

AUW: 3078g

Motor: Maytech MTO3548 790Kv

Prop: APC-E 9x6

Batteries: 6S4P NCR18650b 25.2V, 13600mAh

Battery weight: 1172g

AutoPilot: APM2.5, APM:Plane v2.78.

Weather: Calm (0-4km/h), clear blue sky, 26°C. Altitude: 1668m ASL

Time flown: 126m 53s

Total Distance flown: 116.475km

Calculated consumption on nominal capacity: 115mAh per km (will update after recharge).

Estimated current draw: 5.2A average

Lowest voltage on pack 18.0V

Average speed: 55km/h

Droneshare: http://www.droneshare.com/view/bfgodhs

Tlog: https://db.tt/UfVPiyBE  (12MB)

KMZ: https://db.tt/1Tmzim1W  (3MB)

Read more…

APM as a flight data recorder

3689574367?profile=originalWe tried using an APM 2.5 as a flight data recorder in a Cessna 208B. It was built into a 3D printed box with own power supply and recording done on a mobile phone.

There is one problem though: When the aircraft is in a steady bank the APM HUD indicates horizontal attitude as the resultant g-load is downwards relative to the APM. The difference between APM indicated attitude and aircraft artificial horizon is shown below. (Aircraft AH indicates about 30deg LH bank in top right corner)

UPDATE: THE PROBLEM SEEMS TO BE THAT ARDUCOPTER CODE WAS LOADED AND IT WAS FLOWN AS DISARMED, INSTEAD OF USING ARDUPLANE - THANKS DEVELOPERS!

3689574423?profile=original

Read more…