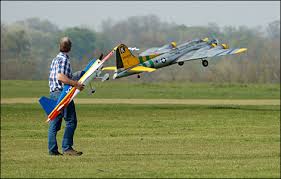
It's simple, put an apm2.5 on a mscomposite swift-II flying wing, launch it on a mission, put video goggles on, launch miniquad and start chasing :-) Actually it wasn't so easy to find the drone in the sky, looking through the videogoggles. I needed some help from a spotter to get the done in my sights. Once locked in I could follow it fairly well though.
Only 1 person in my club attempted to fly 2 planes at once before me. He had each one put on 1 stick of his transmitter. That went ok for a very short while,...
Posted by StamusContra on April 10, 2013 at 1:30pm
Just a taste of a project I'm involved with at Fordham University's Cyber Security and Intelligence Group and the Ferrante Group. Phase one is getting wrapped up, with the second phase pending research funding. A lot of 3DR technology is used in this!
French manufacturers of the worlds most popular UA have plainly run into problems.
They issued a statement yesterday:-
AR.Freeflight 2.2 was removed from iTunes last month due to the need for patents’ clarification on accelerometer and absolute control.In the meantime, we have enriched AR.Race2 App (version 2.2) with a free piloting mode in order for our customers using iOS devices to continue enjoying flying the AR.Drone.We’ll keep you updated.Sincerely,Parrot Team
Its not noted if the patent issue affects the Android version of its software which was behind its iOS version anyway. Back in 2010 I thought that Apples TOS 4.2 changes might push the platform towards Android.
Andropilot
Tablet control and flight following for several Open Source autopilots is now a reality. Openpilot, Tau Labs andArdupilot all have working examples. Last week I started flying with free app, Andropilot created by Kevin Hester of Geeksville Industries.
The simplicity of set up was quite amazing. The app saw my3DR radios immediately, never has getting telemetry to work been so straightforward. Increased situational awareness always welcome. A voice tells me what mode I have selected on my standard RC controller and a HUD and moving map let me see what’s happening.
My sons fly our AR.Drone very well tilting the tablet, but my head is firmly stuck in the dark ages and prefers the position feedback that sticks bring to thumbs. But that’s just me, if you have known no other way then it will not be an issue. In a couple of years time I don’t believe anyone will be left flying UAS with conventional RC gear when the smartphone in their pocket will be able to cope.
Posted by Daniel Allen on April 10, 2013 at 5:15am
Hey DIYDrones community,
This year at NAB 2013 Las Vegas, the RED booth had an incredible display with a beautifully engineered 12-Rotor. It may be the first duodeca-copter of its kind. Its payload was the RED Epic with a custom carbon fiber gimbal and skids.
CROWNSVILLE, Md. - Steve Barnett has been flying unmanned aerial systems for more than 30 years — long before the word “drone” started making global headlines.
But now, the 65-year-old Army veteran and model-airplane enthusiast finds himself answering new questions as his hobby gets dragged into a white-hot national debate.
“At no time has the word ‘surveillance’ ever been used. That’s not the reason for us to be out here,” said Mr. Barnett, an instructor with the 80-member Chesapeake Bay Radio Control Club, as he took a break from flying his craft over the group’s sprawling field near Annapolis.
Even just a few years ago, model pilots such as Mr. Barnett wouldn’t have had to address the issue of drones or the Fourth Amendment. That’s quickly changing because of public distress about anything that flies overhead without a human pilot on board.
Mr. Barnett has kept an eye on the rise of the domestic drone industry; more importantly, he is keenly aware of how the cutting-edge crafts are inspiring new federal legislation, state privacy protection laws and other regulations.
“It’ll eventually impact us,” he said, as one of his students worked on a model plane nearby.
These videos are a bit old, but I wanted to post them anyway. This is my first quadcopter. I had no experience at all in that. I'm more into airplanes than copter things.
Anyway, here's a short description. I'm using 4 380W (1100kV) motors and 6600mAh of energy spread in two 18.5V lipo packs. On the videos I'm flying with 12 inches props (the ones found on diydrones store). Total weight : 4.8 pounds. Bad idea... if you make the calculation and compare to the speed of sound, you'll understand.
Here's the part two of the flight. You can see the quad a bit closer and landing.
The quad you see in the video crashed. I so regret not having it on video... It basically exploded in flight when one prop broke, breaking an arm, and all that before touching the ground on a windy day.
Today, I've upgraded. I now have an aluminium/acrylic frame (this one was a cheap wooden frame from Hobbyking...). And I now use 9 inches tri blades props. Video when temperature gets better in Québec!
Another quad that i found on hobbyking. It caught my eye as it has a monitor inbuilt to the controller. I've seen a few concept controllers maybe this could work?
A nice shortcut to newcomers with a 3-axis gyro stabilization system.
Ladybird V2 FPV
3.5" LCD screen which matches some phones.Range is limited but i suppose some hacking might sort that.
6 mins of flight time with the standard battery.Wonder can this also be extended with a bigger battery?
This is my first blog here and hopefully not my last. The picture is obviously the frame of my DIY Quadrocopter. I'm waiting on a delivery of the electronics to complete it. I got anxious and couldn't wait to share my project with you all so this will be part one of more to come, so long as the final assembly, tuning and maiden voyage are all successful. I've been reading a lot and learning a lot from all of you here. So I wanted to share my project and get your input.
The frame is 3/4" Oak. Each boom measures about 12" from the center. It will be powered by NTM Prop Drive Series 35-30 1100kV (380W) motors, 30 Amp Turnigy Plush ESCs, 11.1v Lipo (of various assorted mAH), KK2 Control Board, I've ordered an assortment of propellers from 8X4.5 to 10X4.7. I think the 10X4.7 will work best given the results from http://www.ecalc.ch/. I could probably push it up to a 14.8v, but I wanted my first quad to be manageable horsepower (Watts). So far I'm really enjoying my new therapy - I mean hobby. I'll have more to share as I progress.
I hope you folks enjoyed my overview of the Brookstone 2.0 Rover. In my next blog (Part 1) I'm going to include tons of video footage from the rover's Camera and Night Vision Camera (Going to use it when it gets dark tonight). If you have any experience with intercepting commands from the Device/Controller to the Rover so I can use the codes/commands to reverse engineer the rover. I'm going to need all the help that I can get!
To Do List:
1. Purchase an Android Tablet
2. Upgrade Telemetry Kit
3. Switch out current power source (6 AA Batteries) to a LiPo Battery System
4. Get Mission Planner Working/Running
5. Integrate an APM 2.5
6. Get it to work with ArduRover
7. Get it to work with AndroRover (Once step 1-6 are complete)
Brookstone Rover 2.0 Specs:
Video Stream Format
.mp4
Video FPS
25 fps
Snapshot Format
JPEG
CMOS
300,000 pixels
WiFi Antenna
802.11 b/g
Microphone
Yes
Movement Motor
6500 revolutions per second, DC 9.0V
Age Grade
14 and up
Compatitbility
iPod touch® (3rd & 4th generation), iPhone® 4S, iPhone® 4, iPhone® 3GS, iPad®, iPad® 2 and iPad® (3rd generation), Android™ 2.2 and later, Apple iOS: 5.1 and later
Batteries
6 AA (included)
Running Time
Approximately 2.5 hours
Maximum Range
Up to 200 ft.
Weight
2.3 lbs
Dimensions with Antenna
10.25"w x 7.75"l x 7.75"h
Distance
Approximately 200 ft. (unobstructed), 100 ft. (obstructed)
As you all know brushless gimbals are the future, and we've just tested our first small BG for our SteadiDrone QU4D, here are some quick clips, much more to come soon. You can check out our facebook pages for more news, photos, videos etc
Regarding ArduCopter and brushless gimbals, would it be possible to impliment a AlexMos type code so that the code/APM can control brushless gimbal motors ??? mmmmmm would be a dream if we could
Virginia Tech College of Engineering researchers have unveiled a large autonomous robotic jellyfish as part of a U.S. Navy-funded project. The prototype robot, nicknamed Cyro, is a larger model of a robotic jellyfish (the RoboJelly) developed by the same team – headed by Shashank Priya, professor of mechanical engineering at Virginia Tech.
“A larger vehicle will allow for more payload, longer duration and longer range of operation,” said Alex Villanueva of St-Jacques, New Brunswick, and a doctoral student in mechanical engineering working under Priya. “Biological and engineering results show that larger vehicles have a lower cost of transport, which is a metric used to determine how much energy is spent for traveling.”
Both robots are part of a multi-university, $5 million project funded by U.S. Naval Undersea Warfare Center and the Office of Naval Research. The goal is to place self-powering machines in waters for the purposes of surveillance, studying aquatic life, mapping ocean floors and monitoring ocean currents.
“Cyro showed its ability to swim autonomously while maintaining a similar physical appearance and kinematics as the natural species,” Priya said, adding that the robot is simultaneously able to collect, store, analyze, and communicate sensory data.
Since Cyro will need to operate on its own for months at a time, the robot is powered by a rechargeable nickel metal hydride battery. Its skin is comprised of a thick layer of silicone, attached to an inverted bowl-shaped device containing the robot’s electronics. For movement, its mechanical arms are powered by DC motors and attached to its support structure. The arms, in conjunction with an artificial mesoglea — the fish’s jelly-like body — create the robot’s hydrodynamic movement.
The researchers say Cyro is still in the prototype stage and years away from deployment. However, a new prototype model already is under construction at Virginia Tech’s Durham Hall, where Priya’s Center for Energy Harvesting Materials and Systems is based. www.vt.edu
The DJI Phantom has some nice air frame features: A sturdy plastic injection molded polycarbonate enclosure that keeps out light rain and resists hard impacts very well; Nice motors with simple, easy to use prop-mounts that are very unlikely to come loose in flight or get bent or broken in a crash; and very light-weight ESCs that have super bright LEDs on them for easy visual orientation at great distance, and superb night flying (Figure 1).
I also wanted a very small, lightweight, and extremely rugged FPV platform that I could carry in my backpack when I go hiking. The DJI Phantom air frame seems perfect for this, as the propellers are extremely easy and fast to remove, and once removed the rest of the aircraft can be stuffed in my backpack as is, and is sturdy enough to not worry about it being damaged during the trip.
But, since I'm a fan of ArduPilot, and like to be able to perform complex auto missions and make modifications to the code, I decided to build a DJI Phantom air frame with an APM flight controller. The result was very successful, and I encourage you to do the same, following the instructions below.
Materials
For this build, you will need the following parts. Fortunately, the DJI replacement parts needed can all be purchased quite cheaply. My budget for this entire project was about $600.
1x DJI Phantom replacement case kit
1x DJI Phantom replacement screw kit
1x DJI Phantom connectors kit
2x DJI Phantom ESCs (green)
2x DJI Phantom ESCs (red)
4x DJI Phantom motors
2x DJI Phantom props (set of 1 CCW and 1 CW)
1x DJI Phantom landing gear
1x APM 2.5
1x 3DR Power Module
1x 3DR GPS module
Power System Wiring
First you'll need to mount the ESCs and motors in the case, and wire up the ESCs to the output side of the power module. When mounting the ESCs, be sure the green ones are at the front end of the aircraft (the battery door end), and the red ESCs in back. If you put the red ESCs in front instead, then the signal leads won't reach, because they are of different lengths.
There is not much space inside the case for a lot of wiring and connectors, so I just cut off the XT60 connector from the output side of the APM power module, and soldered the connection directly, insulating with heat shrink of course. If you plan to use an internal battery, make sure the wiring doesn't cross over the central area where the battery goes, because it will snag on the battery when you take it in or out, and it's already a fairly tight fit for the battery as is.
Also, be sure to keep all the wiring as low in the bottom of the case as possible, so the magnetic fields from high-current wires will not interfere with the autopilot's magnetometer (Figure 2).
Figure 2: Power Module and Power System Wiring
Mounting APM, GPS, and RC Receiver
At first I velcro mounted the autopilot, GPS, and receiver to a thin wood plate which I screwed on to the four screw bosses protruding from the case bottom. This held it high enough above the power wiring below to avoid magnetic interference. However, I found that this piece of wood was basically a sounding board for vibration. Even adding foam between it and the autopilot wasn't enough to reduce the vibration to a reasonable level to get good accelerometer readings (Figure 3).
Figure 3: How NOT to mount your APM
Later I found that a soft plastic cottage cheese lid made of Low-Density Polyethylene (LDPE) is a great way to mount the APM, since the soft flexible material helps to dampen vibrations (Figure 4).
Figure 4: APM mounted on LDPE food lid greatly reduces vibration
Once you get the case on you won't want to remove those 16 screws every time you need to upload the latest version of ArduCopter, or download a flight log. So you should probably make a short USB cable that permanently connects to the APM, as shown connected in figures 3 and 4 above.
LED Connection
You won't be able to see the status of the armed and GPS lock LEDs once the APM is enclosed in the case, so you'll want to connect a couple external LEDs that you can view through the tail light port on the Phantom case. Connect one LED to A4 and one to A6 (you can also connect a buzzer to A5 if you want). Signal goes to the + side of the LED, and ground to the - side. Remember to include resistors in series with each LED to drop the voltage to the proper level for the LEDs you are using (Figure 5).
Figure 5: Armed and GPS fix LEDs visible through tailight port
You'll also need to go into Mission Planner and change the LED_MODE to 11 (the default is 9 for some reason).
Final Assembly
You can now put the top of the case on (attached with the twelve M2.5x5 and four M2.0x8 screws from your screw pack). Once you calibrate and configure everything in Mission Planner then you should be ready to bolt on the props and go fly (Figure 6)DJI phantom
Figure 6: Ready to Fly
Flight Testing
I added a GoPro, a 5.8 GHz video transmitter, and a 3DR telemetry module for some FPV flying during a Sunday hike in the mountains. Here's the results of the first test:
It flies very nicely, even in auto modes. The main issue is shakiness and vibration of the recorded video. Hopefully I can reduce that with some tuning, better camera mounting, and perhaps stiffer props.
After setting a world record for the longest distance traveled on Earth's surface by a robot, Liquid Robotics today unveiled the latest version of its Wave Glider technology.
The updated platform is capable of autonomously prowling the world's seas while analyzing, processing, and transmitting data gathered from a wide variety of on-board sensors.
The new Wave Glider SV3 is essentially a self-powered sea-faring data center, a system that gives users the ability to investigate the world's water ways for months on end. The SV3 features a hybrid propulsion system, Silicon Valley's Liquid Robotics said, that can drive the Wave Glider on either wave or solar power. It also comes with a vectored thruster that lets the robot continue its missions in high seas and dead calms alike.
At its heart, the SV3 is meant to carry a heavy duty load of sensors designed to serve everything from the oil and gas industry to fisheries to coast guards and the military. Its power management systems were designed, the company said, so that its on-board servers can continuously bring in data, and simultaneously analyze the information before transmitting conclusions via satellite communications.
The SV3 was also designed with a data center-like architecture allowing multiple users to each have their own data gathering and crunching take place at the same time, all totally independent of the other. And because the computers are meant to be strong enough to do most of the processing locally, the new Wave Glider can send back conclusions via high-bandwidth, low-power connectivity rather than large amounts of raw data that must then be analyzed once they arrive.
In a sense, Liquid Robotics is hoping that the Wave Glider SV3 can be the Amazon Web Services -- a floating server rack -- of the open oceans, said the company CEO Bill Vass. The system can be dynamically configurable, with multiple ARM-based processors, and can use either solid-sate or spinning disk storage. Customers can choose whatever combination works best for them.
The SV3 is also fully backward compatible with Liquid Robotics' previous generation Wave Glider SV2.
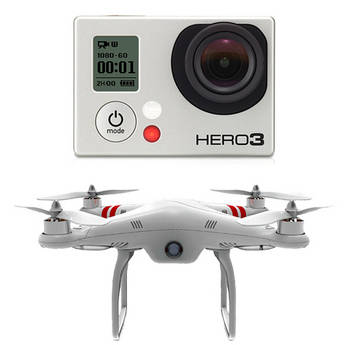
From another group (populated mainly by photographers interested in aerial photography), here's a link to B & H Photo, selling a GoPro and Phantom in one package.
B & H is one of the largest resellers of photo and video equipment in the US, so it's quite a milestone to see them list a quadcopter there. And encouraging that they identify it as a quadcopter and not a drone?
PETA has decided to use a remote-controlled aircraft to collect and publicize footage of hunters shooting animals and allowing them to escape, only to die slowly and in agony, among other common violations. PETA has contacted Australia-based drone manufacturer Aerobot, maker of the state-of-the-art, remote-controlled helicopters that can be outfitted with a video camera, to discuss which of its products would best fit the purpose. The drones can also be used to fly over factory farms and other areas that are hotbeds of abuse.
There's been a lot of random discussion about the Phantom and whether or not it's worth the money, does it fly well, etc. I say yes to all. Here a quick video of my set-up.
I also fly an Arducopter and XAircraft X-650-V8 but for quick and easy set-up and great flying the Phantom is a blast. Won't lift the heavy cameras or fly waypoints but for GoPro shots or just to practice flying you can't beat it.
Here's some notes on fiddling with MAVLink. Andreas and I started at the bottom of the stack (the byte stream) and are working our way up. Along the way I filled in a few possible holes in the documentation.
There's a demo of one process receiving an APM MAVLink stream, decoding packets, and multicasting the packets to other processes, sort of an on-the-cheap message bus. There's a link to the sample code.
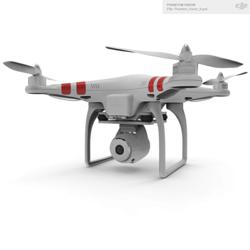
The PHANTOM Vision is the only quadcopter on the market to offer professional-level multi-rotor flight control technology, an intelligent GPS-based autopilot system, an integrated HD camera and an iOS app for full camera control. The PHANTOM Vision also comes with a remote control unit containing pre-programmed autopilot parameters allowing pilots to switch between different flight modes to achieve particular flight experiences. Also incorporated are safety parameters, such as a failsafe feature that will bring the PHANTOM Vision back to its take-off point and land itself if it loses signal from the remote control unit for any reason.


