All Posts (14049)

Sort by

3689486408?profile=originalWhen you're working for a grant to improve K-12 STEM (Science, Technology, Engineering and Mathematics) education, a surprising amount of work must go into presenting your work to the public.

How will you let parents, teachers, administrators and the public know how you're helping education? What kind of hands-on examples can you bring to show the public how it's all supposed to work together? How do you make a big idea fit into a small booth?

I'm the communications guy for a National Science Foundation grant. I'm also leading the effort at the grant to bring flying robots into the classroom. It's sometimes possible to make these drones fly in conventions, given enough space. While that's cool and all, it doesn't really show the educational value in aerial drones.

To do that, it's been very helpful to bring out the actual autopilot and show them the Mission Planner. Even if I can't get a GPS fix, I can show that this board has accelerometers, gyroscopes and a magnetometer to help determine the aircraft's yaw, pitch and roll. I can move the autopilot, and they see the horizon move on the attitude indicator, and it begins to click. They get it.

Just one problem: you don't want to play rough with your microcontroller, and you need to keep all the bits in one neat package that they can hold.

Thanks to the Epilog Helix 350 Laser Engraver, and the extremely helpful folks at the Champaign-Urbana Community Fab Lab, I now have a custom mount for just this purpose.

EpilogLaserEngraver.JPG?width=500Measurements of the APM 2.0 and uBlox GPS were made, the mount was drawn up in SolidWorks, and the design was exported in PDF. Photoshop helped apply the grant's logo to the mount. The final design was sent to the Epilog cutter, which cut out all the vector images and etched all the raster images.

Here's the final product:

3689486520?profile=originalLast, a view from above, with everything mounted:

3689486433?profile=originalBig thanks to the folks at the Fab Lab for helping this one. I hope to be returning with some students in the near future who want to make drone components using 3D printers.

Read more…

The secret of photosynthesis

Two researchers at the ANU have used computer modelling to discover a natural method of producing cheap and limitless hydrogen. The chemists have identified the molecular process by which plants photosynthesise, that is, use light to convert carbon dioxide and water into sugar.


http://www.abc.net.au/news/2012-11-09/scientists-unlock-natures-hydrogen-secrets/4364072

Read more…
3D Robotics

Raspberry Pi in the Sky!

3689486466?profile=originalFrom Makezine, a good use of a RaspberryPi board to capture and stream video from a balloon:

PublicLaboratory is a fantastic citizen scientist organization with really useful projects like DIY spectrometers (for finding out what’s really in stuff) and aerial mapping for monitoring of oil spills, landfills, etc. They’ve done some fantastic work using the continuous shooting mode of consumer cameras, including converting them to near infrared. The problem is that there is little or no control over the camera and you need to process the images later.

Craig Versek of PVOS had the idea to use a Raspberry Pi and a webcam to wirelessly stream images back to earth. The Pi is ideal because it’s lightweight and takes relatively little power.Here is a system description  and a writeup (with video) of their first launch.

Read more…

Yet Another Fully 3D Printed Multicopter.

3689486348?profile=original

Still in the works, but can't resist putting some pictures up.

Key features are:

  1. Fully 3D printed arms.  Using a truss design, it's very stiff vertically, and resistant to twisting.
  2. Arms are printed in sections, so can be extended to allow for almost any sized prop.
  3. Arms are wide, so easy to strap things on them, like I have done with the two ESCs.
  4. Motors mounts are through hole printed, so as to allow tandem motors.

See more pictures in the 3D Printing Drone Parts Group,here.

Read more…
Distributor

Canada Drones, Year 1

3689486146?profile=original
Hi everyone, I am happy to report that Canada Drones store has just completed its first year of business! YEAH!
I must say it was a very nice and fun year.  Lots of things to learn and do but do you know what? 
I would do it again in a flash and that’s all because of you, this great community that we have here.
 
I really want to say a BIG Thank you to the 350+ returning customers.  You make me work hard but I like it a lot!
 
Almost all customers are coming back more than once so that is why I don’t like to count the one timer as I strive to build the best service possible and to me it really show that it works when a customer comes back.  
 
It wasn’t clear if there was a possible way to do business north of the border when the main hardware supplier has its own store in the USA and offer shipping to Canada...
 
But it was a good gamble and overall I am really pleased with the response I got from customers.  With shipping cost, duty fees and brokerage fees in the mix for Canadians buying something from USA having their own store located right beside them proved to be just want they needed.   Adding the super customer service in that mix (so I am told)  and we have a very powerful recipe for success.  
 
The store has grown from an initial 100 products inventory to now offer more than 300 products.
It quickly evolved from helping to source hardware to offer all you need for beginners to get in the air and have fun.  (still work to be done there for sure... need more money to achieve!)
 
It all started with 1 frame (the Amazing Original Arducopter Quad) with its required nuts, bolts, spacers in M3 format that used to be pretty hard to get in Canada.
 
To now selling many different Frames from different vendors, LiPo, chargers, reliable Radio TX/RX systems and a lot more.  I have a list of things I would like to carry but I need to move with the budget at hands and this is driven by the sales.  So I am glad to be where I am now.
 
So how did I manage to differentiate myself from the thousands of other world wide web store offering such hardware?  I think its part chance (right place at the right time), part effort (not always easy to manage 2 full time jobs but I have the best customers that I can wish for) and again the people, YOU guys (not many girls around here... need to change that... Pink products coming soon!)
 
I really want to thank (no particular order, let your ego at the door please)
ALL FORUM MEMBERS, yes YOU!  But specifically Jani (jDrones.com), Martin (buildyourowndrone.co.uk), Chris (DIYDrones.com), Jordi, Lorenzo, Craig, Carmen, Yvett (3DR) and of course all the dev team that has produced such a stable platform for us to build on top.
 
Looking back just a year ago I was stocking APM 1.4 board and we were flying Pirate code while Jason was doing a major overhaul in the code and structure.  Now we are flying with APM 2.5 and a super stable firmware 2.8.1 and from what I can see the future hardware and software evolution will be pretty great, hard to say where we will be in a year from now but I intend to still be here and doing business.
 
So what’s in it for you? Why did I force you to read all that “Oscar winning” type of speech?
Would a promo code be a nice thing?  It sure does sound good right?
How about Free Shipping on Canadian orders above $250?
Use promo code “PROMO502” at checkout and please share with your friends!
 
Read more…

3689486332?profile=original

The solution is a bit of an anti-climax so in short:

I got Loiter to work by re-flashing the firmware.

The longer version:

I built the quad which was a 3DR ArduCopter Quad-B. Everything seemed to work like a charm. It flew like a dream in stabilize and the GPS got a really good signal (over 10 satellites). I had read about how people got at least poor loitering with the B model 3RD quad but every time I turned on any of the auto modes the quad would sit for a while and then shoot of to a random direction. Altitude hold would however work.

I fiddled with the PIDs and examined logs for hours. Thanks you guys here who tried to help me. Nothing worked. Nothing actually made any difference to the auto modes. 

After 3 weeks of this I emptied the EEPROM, re installed the firmware, did the config exactly as before and tried it. It loitered, it returned to launch and flew missions straight away! Not very well but at least it tried! :-) And now after some PID tuning it works significantly better... But the lesson being. If you cant fix it, try re installing it... :-)

Read more…

Check the video first:

So I'm flying up at 120m. What then happens is every RC pilots nightmare! Power cuts off from the APM!

Quad drops to about 90m before it wakes up again, then I take it down crazyfast but controlled to 20m, then at 20m it dies again and drops like a rock... hits pavement...3 broken props, all landing gear, 2 bent arms, cut cables and a broken Hero2. 

Why did this happen?
I had new and fancy LED strips connected directly to the LiPo between the LiPo and PDB. The connections were all with Dean connectors which should be ok. Well as this was a new build I had not yet shortened the cables to proper length. They where short enough to not even go near the props but long enough to have "wiggleroom". My theory is that the propwash made the cables wiggle just enough for the Dean connectors to cutoff enough to disturb the APM. This theory is supported with the fact that when I brought the quad down crazyfast and then stopped the decent by giving if full power the propwash must have been quite a lot. And that is exactly when the cutoff occurred the second time. Then on the ground after the crash the battery connection was still ok but when I wiggle the Dean connectors the power cuts off just enough that the APM boots.

Why no footage of the crash?

The camera is a GoPro Hero2 and it took the hit pretty bad. The case was cracked but the main camera was still in one piece. Battery and memory card had popped out. What I did was I started with powering it up to test if its still alive. It showed some weird picture on the LCD of a guy on a bicycle?? I pressed everything. Got it working again. Later I learn that IF the memory card would have been in when it powers up after a crash it should try to write the 5 sec buffer to the card and usually succeed... Dammit!

Craft:

3DR ArduCopter Quad-B


P.S. I know. I'm an idiot for taking my quad up to 120m with new stuff on it.

Read more…

3689486118?profile=original

Angela Schoellig and the Flying Machine Arena team at ETH Zurich have developed and implemented algorithms that allow their flying robots to race through an obstacle parcours – and learn to improve their performance. The robot (a quadcopter on this example) learns from its mistakes and it improves its perfmormance and accuracy every time it performs a certain task.


You can read the full article and watch the videos on Robohub | Quadrocopter learns from its mistakes, perfects air racing 


Read more…

MAVProxy - Now Windows Compatible

3689486214?profile=original

MAVProxy is a open source minimalist and plugin-based GCS for Mavlink based autopilots (such as the APM). Until recently, it was only able to run on Linux systems. It has since been updated by Tridge and myself to include full compatibility for Windows systems.

MAVProxy can be found at https://github.com/tridge/MAVProxy and an installation and user's guide is available at http://www.qgroundcontrol.org/mavlink/mavproxy_startpage.

And the obligatory screenshot of MAVProxy running in Windows and Linux at the same time (above)

Read more…
3D Robotics

3D Mapping With Your Drone

3689486250?profile=original


Making a 3D model of something with pictures isn't something new to most of us, but there have been a lot of people getting into drones recently and I wanted to show something useful you can do with your drone. Autodesk's 123D Catch has a very useful feature not everyone knows about; Once you have your 3D model ready, you can input a known measurement and 123D Catch will scale your model based on the known measurement. If you're having trouble figuring out how long your Christmas lights need to be, your drone and 123D catch can help. Lets see how long the Christmas lights need to be for the 3DR Building...

Lets start from the beginning. We want to get pictures of all angles of the building with a bit of overlap, if possible we want to get some at different elevations to help the 123D Catch build a better model. I'm going to be using a 3DR ArduCopter Hexa-B and a GoPro Hero2 (A camera without a fisheye lens will probably yield better). Plotting your mission using the Mission Planner is very easy, simply go to the Flight Planner tab and zoom in to where you want your mission to take place and set your Home location.

Planning your mission

  • Set an ROI (Region Of Interest).  We want to circle around the building but we need the camera to always be facing the building rather than the next waypoint. To do this right click on the map and select "Set ROI" and place the ROI in the center of your object of interest.
  • Set a Takeoff command.  Click on the map to set a waypoint, under "Command" select "Takeoff" instead of "Waypoint". Specify a target altitude, in my case I set this to 25m. Also make sure your WP Radius is not a huge number or you will get a large overshoot. Mine is set to 4m.
  • Place Waypoints.  Click around your structure to set your waypoints and specify a desired altitude. In the mission pictured bellow I have two circles, one at 25m and one at 35m of altitude. (Make sure you know what units your Mission Planner is set to. To check this go into Configuration > Planner)
  • Set a Land command. Setting a land command is just like setting a takeoff command, simply set a waypoint and select "Land" from the drop down menu. (Land tends to bounce a lot on the ground at the moment, be ready to take control of the copter or simply land manually. Developers are working on this at the moment.)
  • Upload Mission.  Finally write the mission to the APM by clicking on "Write WPs". You may also save the mission for future use on your computer by right clicking and selecting File Load/Save > Save Waypoint File.
  • WP_Speed .  We want the copter to fly a bit slower to get some overlap in the pictures. I have found that setting WP_Speed to 3m/s and the GoPro to take pictures every 5 seconds is a good combination.

3689486194?profile=original

Flight


Connect to the mission planner and verify everything looks ok. If you cant see the mission waypoints on the Flight Data map go to the Flight Planner tab and click "Read WPs". You can arm and set your copter in Auto mode with your RC Transmitter or via the Mission Planner. Once in Auto,  the copter will take off as soon as you raise the throttle and it will go fly the mission.

123D Catch

Upload the images to 123D catch to be processed, you should receive an email when your model is done. Don't be afraid if your model doesn't look great, we can fix it up a bit. First click on the generate mesh button and have your file be reprocessed with a higher resolution mesh. Maximum resolution is not always the best answer, sometimes your photos don't contain enough information and the model will look better with the extrapolation of a lower quality mesh. My model was made with a "Standard" or medium mesh.

If some of your images were not added to the model you can stitch them manually by double clicking on them and adding reference points to link them to stitched images. 123D Catch isn't very fond of trees and will sometimes not stitch or make odd shapes with photos that have trees in them. Manually stitching these photos in will improve the quality of your model.

You can also delete unwanted parts of the mesh, simply select them with the lazo tool, right click and select "delete". This is a good way to clean up your model.

Now to the fun part, how long is the 3DR Building? First we need to set two reference points that will be used to indicate the known measurement. I have created REF_DIST1 and REF_DIST2 in each of the corners of one of the tan squares on a face of the building. Next select "Define Reference Distance" and enter the value of the known distance. In this case I know the distance between these two points is 10ft. This feature is unit less so just make sure you know what units you are working with.

3689486272?profile=original

To measure any other distance on the model just insert two reference points, select "Create Distance Measure" and click on both points.

3689486289?profile=original

The 3D Robotics building is approximately 119.15ft long. You can verify this using the ruler in Google Earth and in fact we could have just used Google Earth to do this but where is the fun in that? and it wouldn't be very DIY of us.

3689486317?profile=original

At the moment the file for this model is not on the 123D Catch gallery but I will post the link when its available. If not I can just upload it here. Share your models, I would love to see what you guys are making with your drones. Also if anyone needs any help with the post processing in 3D catch or if something isn't clear enough here let me know and I'll try to help.

Here is a video of the 3D Model: 

3D Robotics Building from Alan Sanchez on Vimeo.

And here is the 123D Catch File

Happy Flying

-Alan

Read more…

Finally got around to posting pics

Finally got around to taking pics of my two quads.

3689486088?profile=original


The first is my original unit. The frame is an X525 from a kit from GoodLuckBuy. The kit came with everything including a KK board, but I built it with the APM instead. I have since replaced the motors, landing gear, and ESCs. Current setup:

X-Quad

Exceed 1050KV motors

10 x 4.5 CF props

HobbyKing F20 ESCs flashed with SimonK firmware

APM 2.0 with on-board GPS disabled

External MediaTek GPS with backup battery board (JDrones)

3DR 915MHz telemetry

FrSky receiver with voltage monitor

An extremely classy stack cover from a CD tower

and a Ping pong ball "stinger" for orientation

Generally fly on 3S 2500 mAH battery for about 9 minutes flight, but can double up or go with 5000 for app. 15 minutes flight time.


My second one just got in the air today. Put together out of a broken, second hand CF (maybe fake?) BumbleBee frame which I repaired (handy to know how to work with composites).

Exceed 950KV motors

10 x 4.5 CF props

RCTimer 20A ESCs

APM 2.0 with no on-board GPS

External UBLOX Lea-6 GPS

3DR 915MHz telemetry

FrSky receiver with voltage monitor

Another extremely classy stack cover from a CD tower

and a dual Ping pong ball rear end for orientation

Flight times appear to be comparable with other quad so far.

3689486170?profile=original

Both fly pretty well, but have very different feels. I think the BumbleBee is going to get a gimbal and a GoPro some day as it appears to be the more stable unit.

Read more…

Allegro acs756 current sensor for arducopter

allegro current sensor

allegro.jpg?height=297&width=400


allegro2.jpg?height=254&width=400


The sensor is galvanically isolated from the circuit, but in contrast to the classical current sensor shows not only the battery discharge and charge it (eg energy recovery in airplanes)
but because of this, at zero current output, exactly half the supply voltage (for classical sensors autopilot 0) ie 2.5 volts.

to correct this misunderstanding to change firmware code


defines.h  change

#define CURRENT_AMPS(x) ((x*(g.input_voltage/1024.0))-g.curr_amps_offset)*g.curr_amp_per_volt


parameters.pde add

    // @Param: AMP_OFFSET
    // @DisplayName: current sensor zero calibration
    // @Description: in volts
    GSCALAR(curr_amps_offset,      "AMP_OFFSET", CURR_AMPS_OFFSET),


parameters.h  add
 

      k_param_curr_amps_offset = 193,


      AP_Float        curr_amps_offset;


//#ifndef CURR_AMPS_OFFSET   
 # define CURR_AMPS_OFFSET               0.0
//#endif

allegro4.jpg?height=400&width=340

archive with source and HEX file for quaid "x"  APM2 here

Read more…
3D Robotics

Cool micro UAV on IndieGogo

3689486154?profile=original

Gizmag reports on a cool new IndieGogo project:

Given their impressive flight capabilities, it’s not surprising to see researchers turning to the world of flying insects for inspiration when developing new kinds of micro UAVs. With their ability to both fly at high speeds and hover, the dragonfly would seem an obvious candidate for biomimicry, but we hadn’t seen any attempts to model a micro UAV on the dragonfly’s four wing design – until now. A multi-disciplinary team from Georgia Tech has developed a robotic four-winged ornithopter called the TechJect Dragonfly that fits in the palm of a hand and combines the flight capabilities of a quadricopter, helicopter and fixed wing aircraft in one.

The TechJect Dragonfly is the culmination of four years of research and development at Georgia Tech, assisted by US$1 million in funding from the U.S. Air Force. TechJect is a spinoff out of Georgia Tech’s Robotics & Intelligent Machines (RIM) Department that was created to bring the Dragonfly and other robotic flyers to market. To that end, the TechJect team has turned to crowdfunding site indiegogo to help get the Dragonfly off the ground.

As well as borrowing its wing design from its biological namesake, the Dragonfly is also similar in size, measuring 15 cm (6 in) long. It weighs around 25 g (0.88 oz) and is powered by a 250 mAh lithium polymer battery that provides hover times of 8-10 minutes and a hybrid (hover/flight) time of 25 to 30 minutes.

The Dragonfly features a four-wing design

Designed with a focus on modular customization, the Dragonfly carries up to 20 onboard sensors to suit a variety of applications, from aerial photography, gaming, research and development, civilian security and military reconnaissance. The modular approach results in the availability of various flight control packages.

Alpha model

The Alpha model, which can be secured with a US$99 pledge (provided the funding goal is met) but is estimated to retail at $250 or more, comes with a MARC-Basic flight computer, solenoidal actuators, and flight accessories including a remote controller, battery and charger.

The Alpha model Dragonfly

Delta model

The Delta model has the same MARC-Basic flight computer and flight accessories, but the solenoidal actuators are replaced with a continuously variable transmission (CVT), which improves performance, particularly in terms of hovering. A spare set of wings is also included. The Delta can be had for a pledge of $179, with the retail price estimated to be around $500.

The Delta model Dragonfly

Gamma model

Aimed at R & D, prototyping and programming applications, the Gamma model sees the flight computer upgraded to the MARC-2 and adds a camera and Wi-Fi, so it can be controlled via a computer, iPhone or Android smartphone.

The CVT found on the Delta also features on the Gamma, and the same flight accessories, along with a spare set of wings are also included. A pledge of $249 will secure the Gamma model, which is expected to retail for $750.

The Gamma model Dragonfly

Omega model

The top line model is the Omega, which is powered by a more powerful MARC-3 flight computer that boasts 20 onboard sensors (including two cameras), and features a CVT and Wi-Fi. The familiar flight accessories and an extra set of wings are also included. The Omega requires a pledge of $399, with an expected price of $1,499 at retail.

The Omega model Dragonfly

All models are offered in blue, green, yellow, orange, red, black, white and silver color options and come with a fully customizable software development kit (SDK) for the creation of custom applications. However, TechJect will offer a number of free apps for iOS and Android devices and PCs. There will also be an online forum where users can share their custom apps and get development help from the TechJect team.

The Dragonfly's modular construction also allows the future upgrade of various components, such as the wings, actuators, and onboard electronics. These will be available through the TechJect website.

TechJect is looking to raise $110,000 via indigogo by the time the calendar ticks over to 2013. If it achieves its goal, TechJect aims to be delivering Dragonflies to pledge-makers from July, 2013.

The TechJect team gives an overview of the Dragonfly in the video below.

Read more…
Developer

OpenESC one step closer or reality

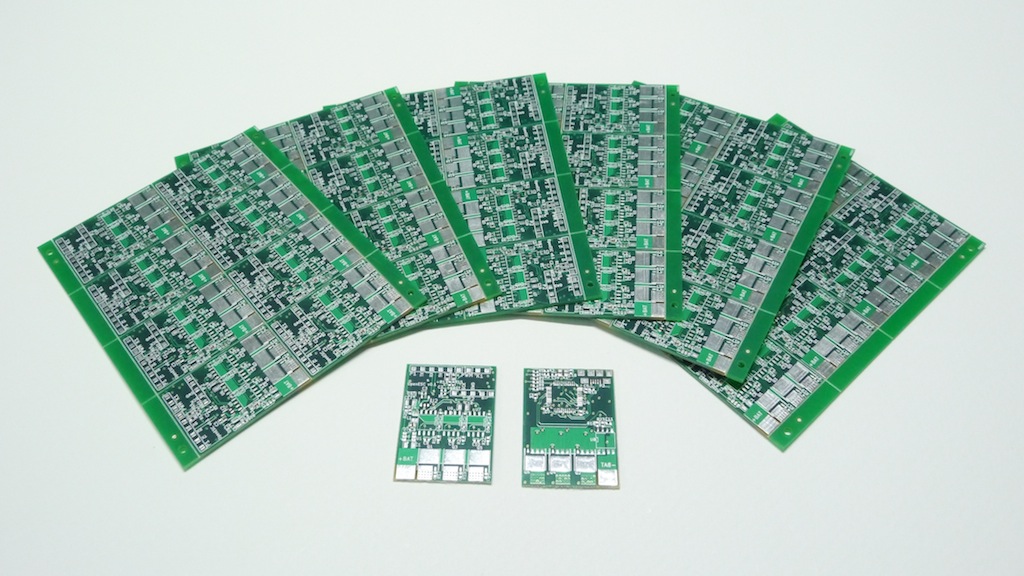
jDrones_OpenESC_Test_PCB_59_sml.JPG?width=500

We have been working lately with Jason.J and few other people to create first real Open Source ESC that is based on STM32 RISC processors. Just moment a go courier delivered first PCBs to my desk here at jDrones and we are thrilled to see how they start perform after assembly has done for these. 

OpenESC pcbs are 35 x 25mm and 4 layers PCBs. Power range will be around 20-30 Amps depending on MosFETs in use. 

Software development has already started for these boards and first flights tests are planned to be in about 1 month or so.

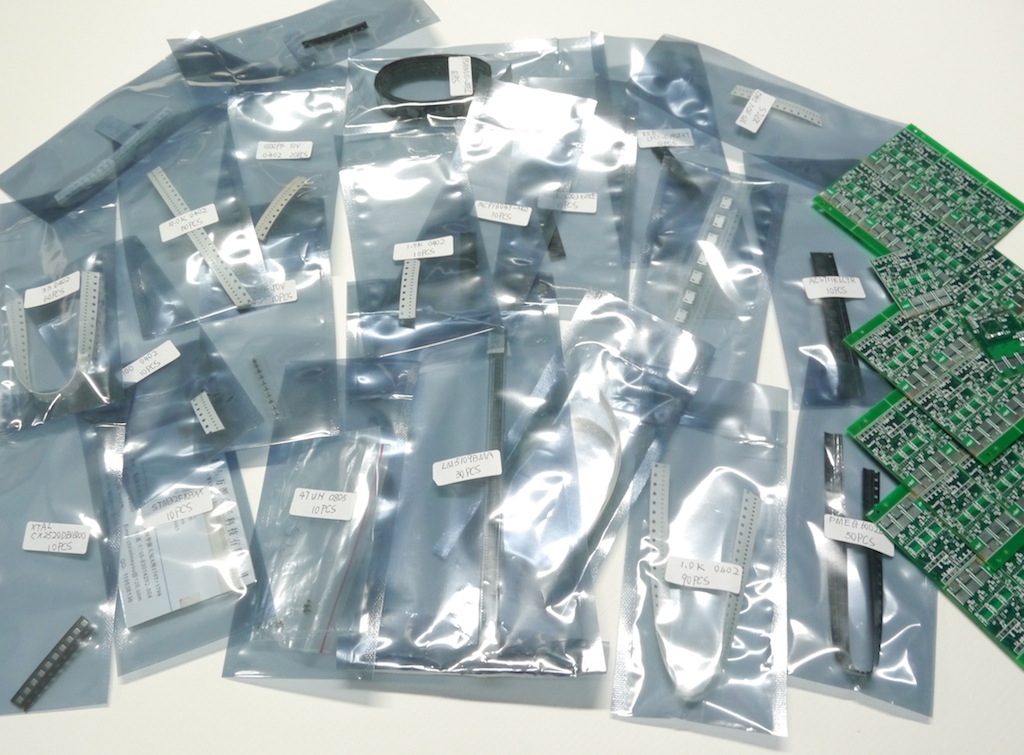
Later these PCB boards will be placed on sale for people want to assemble their own ESCs, we will also have component sets for those or you can buy parts from your local stores. Yes, we will also provide these ESCs as fully assembled for people who are not so good with soldering. 

Speaking of soldering. It's time to take your magnifying glasses and start to assemble first boards.

jDrones_OpenESC_Components_61_sml.JPG?width=500

Jani / jDrones

Read more…

3689486036?profile=originalDear fellow DIYDrones and UAV enthusiasts,

Avetics (Singapore) develops safe and autonomous UAV technology with responsive interface, intuitive software and smart algorithms for providing affordable, on demand, high resolution aerial imagery for non-military purposes.

We are currently in the United States, UC Berkeley  for the Intel Global Challenge 2012. Do help us like the photo at the Intel Global Challenge at UC Berkeley 2012 Facebook page for one of the challenges!

Step 1: Head over to Intel Global Challenge at UC Berkeley 2012 FB page(https://www.facebook.com/pages/Intel-Global-Challenge-at-UC-Berkeley-2012/302903253057575) and like the page 

Step 2: Like our photo!

Thanks!


Khairul Rusydi

Read more…

3689485881?profile=original     I’ve started designing and 3D Printing UAV fuselages for a friend that’s starting out in the hobby.  He uses the “Bixler” type frames with some horizon sensors to get started.  As we all know, there seems to be a greater number of tall obstacles as we start flying and it’s been no different for him. 

    Having crashed several of his foam and foam covered planes, he asked for help.  I’ve now designed about 5 fuselages of different sizes and different shapes, all based on the “Bixler” style he requested.  These are 3D Printed as shown but in 3D Printing Nylon.  They’re printed hollow and 3-4 perimeters.  Due to being printed in a circular pattern, he is extremely pleased with the axial stability of the completed fuselage.  Very little twist in 3 – 4 perimeter components.  He is also very pleased that even with several rough landings and a telephone pole or two, he’s reported no damage at all due to nylon’s pliability and strength.

    Below are the three sections of an early design.  Slightly smaller than a standard frame as he’s building up to go for more electronics with experience.  The sections are printed hollow with 3-4 perimeters and only 4-5 solid layers.  The first solid layers help secure the build to the blank PCB boards on the main X/Y table.  Print time is about 90 min per section.  To hold one section to the next, there are about 20 small holes burned into the small overlapping seam with the tip of a soldering iron, making the finished part, almost one complete unit as nothing bonds to nylon, like more melted nylon.  He also uses the iron to cut out openings for wing spars and battery compartment.
Because he wants too eventually 3D Print his own designs, he’s looking at getting one of the newer 3D Printers.  One that he can scale up the “Z” axis.  He’s mentioned a “BukoBot” or an “Ultimaker” as they seem to have good vertical capability.
   As for 3D Printing in 618 3D Printing Nylon, there are several advantages.
When correctly printed, there is almost no delamination with nylon
Nylon is much lighter than ABS/PLA
Parts 3D Printed with Nylon at 5 plus perimeters are almost as strong as injection molding.
Nylon is very pliable depending on layers and perimeters.  Therefore, it can take crashes that most other plastics won’t survive.
It’s easily connected together by melting with a soldering iron.
The surface is very slippery.
It’s chemical resistance means that even hi octane fuel spills won’t eat into, melt, destroy or even discolor the 3D Printed components.
And best of all, it cost no more than ABS or PLA.

You can get 618 3D Printing Nylon at www.taulman3d.com
618 3D Printing Nylon is now registered on the main RepRap Materials Wiki along with the
3D Printing resources web site http://www.3ders.org/pricecompare

3689485958?profile=original
3689485926?profile=original3689486002?profile=original3689485975?profile=original3689486023?profile=original3689485991?profile=original
    I’ll upload the .stl files to the thingiverse site so look there in a day or so.

    My UAV flying friend now has several more flights under his belt and very pleased with the new fuselages.
The good news is that his current fuselages only have grass stains and some telephone pole tar on the nose and sides.
The bad news is he’s out of wings....!

Read more…

R10 Maiden flights and other videos!

Until this weekend, we have been testing our newer frames with our older Forebrain/Seraphim flight controllers.  But this weekend marks a milestone in R10 development with the first time we were able to fy the full R10 system (the R10 frame with the newer Thalamus flight controller).

Above is a video of a full R10 system flying Thalamus at 800Hz quaternion/attitude update and 140Hz PID loop.  In this video, the old Forebrain/Seraphim units were still attached to allow us to quickly switch over and compare performance.  In the final systems the battery is mounted top-side instead, and the cables are tidied away with the white lycra cable tidies.

And below are videos of the first outdoor test (excellent test flying conditions with no wind) at 800Hz quaternion/attitude update and 400Hz PID and PWM output.  We've not got the tuning just right yet, the yaw is overtuned in this video, and oddly there's some instability during descent which was not observed in the R7 ROFL systems running at much lower rates (possibly something to do with mounting the battery top-side).

At the end of the above video, Henry misjudged the landing and flipped the quad.  He should have trusted the pneumatic landing dampers, which are there specifically for the purpose of allowing safe and smooth landings.


On a side note, we also got the prototype static camera mount frames, and are in the process of testing this.

20121101_110023.jpg?width=400

We also bought one of these FPV pan/tilt mechanisms to play around with, with the idea of turning it into a stabilized gimbal for a very small camera (some of our Kickstarter backers suggested the HackHD)

In any case we're developing a gimbal mount specifically for the R10, here's a quick mock-up of what it would look like,  note that this is a mock-up/proof-of-concept, and it was thrown together in about 20 minutes from scrap aluminium frame parts, and there was no design considerations for vibration.  The one that we do design will of course deal with such issues.

Some people have asked whether side-mounting cameras like this is an issue, I think most people here know that a small I-gain in the PID loop will dynamically re-balance the quad for uneven loads like this.  We weren't going to show this following video until we found a pair of giant scissors so that we didn't have to chase the quad around to cut the string, but here it is anyway for your enjoyment.

Not much else to mention at this point, there's plenty more information on the Kickstarter page which will soon be winding down, and we're nearing the 1000% funding goal, we might just make it!

Read more…
3D Robotics

3689485870?profile=originalOne of finalists of the Gates Foundation Grand Challenge competition is this team, which is working on doing the following:

Optimizing Immunization Systems: Delivering Vaccines with Unmanned Aerial Vehicles

George Barbastathis and collaborators at the Harvard-MIT Division of Health Sciences and Technology in the U.S. are developing unmanned aerial vehicles that can be deployed by health care workers via cell phones to swiftly deliver vaccines to hard-to-reach locations.

Read more…
3D Robotics
3689485855?profile=originalLast week you may have seen the news that I'm going to be leaving Wired to lead 3D Robotics full time as CEO. Now I'm delighted to announce our other exciting news: last week we closed a $5+ million funding round with two premier firms, which will allow us to accelerate the growth of 3DR and expand into new markets.


The round was led by Jon Callaghan at True Ventures and Bryce Roberts of O'Reilly AlphaTech Ventures. Both of them will be joining the 3DR board.  These are two of the most far-seeing VCs in the Valley, and both are part of the "hardware is the new software" trend, including investments in Fitbit, Makerbot, Littlebits and Instructables. And they share our vision of the power of open source, the Maker movement and personal robotics. Chris Michel, an investor and long-time entrepreneur (and former Naval Flight Officer) will also be joining as an investor and board member.


I'll be opening an office in the SF Bay Area ("3DR North"), which will focus on sales/marketing and community development. Our San Diego headquarters will continue to be the R&D and engineering center, while our Tijuana manufacturing is expanding to handle more and more of our production. My co-founder, Jordi Munoz, will take over the role of President, overseeing operations.


With me joining as CEO and the funding round, we'll be growing the company quickly. We're now at 40 people, but will be hiring more hardware and software engineers in San Diego and sales, marketing and community management people in the Bay Area (probably in the Berkeley/Emeryville area).


The aim of this ramp-up is simple: more cool stuff and a great customer and community experience. As part of this, we'll be launching a new 3D Robotics site/store, new product sites, manuals and tech support communities and a expanded customer support team.  And of course a wave of exciting new products, focused on making drones and other aerial robotics technology easier, more powerful and cheaper than ever before.


This is going to be fun ;-)

Read more…