
I want one!!! the link is below.
with the proper sensors we can do this right?
I want one!!! the link is below.
with the proper sensors we can do this right?
A report on a project to inspect a contaminated nuclear power station, from the Guardian. Excerpt:
The university has built a "hexacopter", which has six separate rotary engines. It is also equipped with lidar (light detection and ranging), remote-sensing technology that uses lasers to create detailed three-dimensional images which can be viewed from any angle.
"The hexacopter can scan the interior surface. It is can be autonomous and it will fly for about 20 minutes," said Seager.
"The craft was designed for the mapping of the interiors of buildings. Its USP is mapping inside buildings that may have been contaminated, or are difficult to access by other means. The model has potential military spin-offs. In Afghanistan, you could send it into an building and do a survey so you'd know who and what was inside."
Who goes in and charges the batteries?

Hi Guys,
I had been planning on designing an Arduino Mega based GCS for my new UAV running on an APM 1 donated by Martin (from BuildYourOwnDrone). A while back, I had discovered the ARM-based RaspberryPi and for $25, I had something more powerful and capable than a Mega, not to mention its other functionalites. I began to think of designing a Raspberry Pi based GCS as a replacement for the laptop I have to lug around.
It could have a seven-inch touchscreeen, an Xbee / 3DR Radio connected via USB / directly to the Pi's 3.3v UART. I primarily use an Extreme 3D Pro joystick for flying, so the Pi makes sense as it has a direct USB port (see below) for connecting the joystick, eliminating the laptop.
Some work would have to be done to port over Mission Planner to run natively on Linux and use the hardware UART for telemetry(or we could use a USB hub to multiplex the Xbee and joystick). Another advantage is that we can run the Pi off a Lipo and put the entire GCS into a tablet-sized box for easy use!
At the moment I do not have the adequate funds to get a Pi, and it will have to wait till December, but just sharing my idea so that interested people can give more ideas and generally get work started.
Materials needed for a PiStation (list may be missing some items):
Thats about it. May have missed some things, I'll add to the list if I remember. please comment on what your opinion is. Healthy criticism is welcome!
Kabir
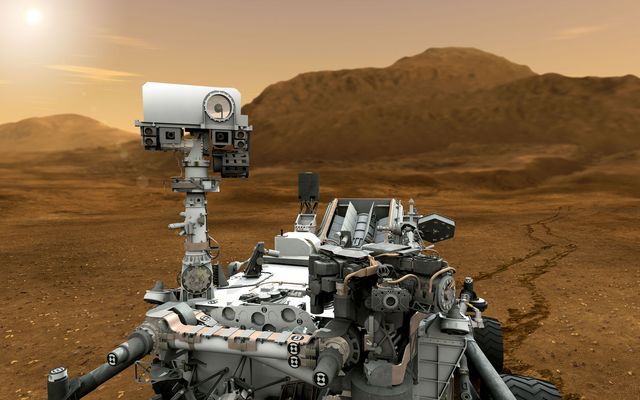 NASA's most expensive "drone" lands successfully.
http://mars.jpl.nasa.gov/msl/multimedia/nasatv/ (Live video)
I'm sitting here in the Pasadena convention center, JPL mission control received telemetry as expected, sensors nominal for landing. Then, after 7 minutes of descent (and a telemetry blackout), the parachute signal was received. Shortly after that, 4 thumbnails from the dust camera and 2 engineering images were sent, one showing the shadow of the vehicle.
Images will be posted on the MSL website as well as news outlets shortly.
RF interference is a big and growing issue with drones. Since we have so many RF devices onboard -- RC, telemetry, wireless video, GPS, to say nothings of accidental RF radiators such PCBs and wiring -- avoiding interference has become something of a necessary black art. The RF Explorer can help. It's open source hardware available from Seeed Studios for as little as $99.
They have a good interview with the creator, Ariel Rocholl, here. Some excerpts:
Interestingly, RF Explorer was born as a diagnose tool for Radio Control airplane pilots. Since a few years now, the RC world is on a big revolution due to all the improvements done in drones, FPV, 2.4GHz spectrum radio link, video links, etc. There is plenty of technology there, in some cases really outstanding achievements.
But something was missing: there were simply no way for a pilot that put $2000 equipment on an RC plane to observe the RF spectrum and detect potential collisions or interferences, most just flied the plane till it started to get control or video link problems, in the hope that not being too late or too far to get it back under control. RF Explorer changed that for good: most pilots just do a careful inspection of the spectrum on different frequencies at the flying field now, as well as the internal plane setup, to proactively detect problems before they put in risk the expensive equipment on board. In many cases, RF Explorer helped to finetune the internal plane in a way that electronics radiate less interference and so the plane get farther distances safer.
Hi, my name is Jordi. I am currently building the first Glowduino prototype, and would like to gauge the interest level in the community. I guess I should tell you what it is.
Glowduino is an Arduino-compatible LED controller board for use on multicopters. It utilizes a TLC5947 to provide constant-current sinks for 8 separate common anode RGB LED strips. In addition, Glowduino can be programmed to react to different sensor inputs or to information from your Ardupilot. For example, you could use this board to control navigation lights on your quadcopter, or control different status lights, etc.
Now here's where I need your help. There are a few things I need to know before I embark on this project. First, are you interested? Second, how much would you be willing to pay for this? Currently I'm thinking maybe in the $40-50 range. Lastly, do I need a USB vendor ID? This will be published as open-source hardware, and uses the FT232RL FTDI chip. If I do need one, is there any way I can get one for a bit less than $2000?
Thanks for reading, now here are some specs and photos.
- Brains: ATMEGA328 running Arduino bootloader (Arduino compatible)
- FT232RL for communication via USB
- TLC5947 for driving the LEDs
- 12V 3A regulated LED power supply
- 24 constant-current sinks
- 6 analog inputs (A0-A5)
- Header for expansion for more outputs (future)
- Prototypes will be from OSH Park, so purple :p (let me know if you know of a better option)
- RoHS Compliant (I think...)
- 4 status LEDs (TX, RX, ON, and L) and 2 buttons (Reset and Mode)
- Comes preprogrammed with several awesome modes!
- Powered from 2S to 6S Lipo
- Small-ish at 2" x 2"
- No mounting holes, sorry (no space...)
- Yeh!
can Ardupilot mega 2.0 incorporate most of the these sensors ?and have a rover as a new drone added on to the list of fascinating things that can be used with your product today or in the near future?

Larry Abramson came out and flew with us one morning, and filed this story. The only downside of it being a radio story is that you can't see Andreas in his bucket-style video goggles!
http://www.npr.org/2012/08/02/157441681/drones-from-war-weapon-to-homemade-toy
Adaptive Flight was contacted by CNN and ask to bring a UAV down to the studio and fly it on live camera while talking about it with the host Don Lemon. So we took a Hornet Micro and headed down to the studio. It was a lot of fun to show off this technology and put in a positive plug for domestic use of UAV's.
William Robinson was the one on camera and I was the one behind the controls of the helicopter. This is a fully functional UAV system that was used in this video, but I was flying it manually because of it being indoors and the hundreds of thousands of dollars of equipment that is all around in the studio. Still, it was a lot of fun and great to see everyone's reaction the first time I took off!
Here is a link to the CNN Video
and here is a link to to Adaptive Flight's website
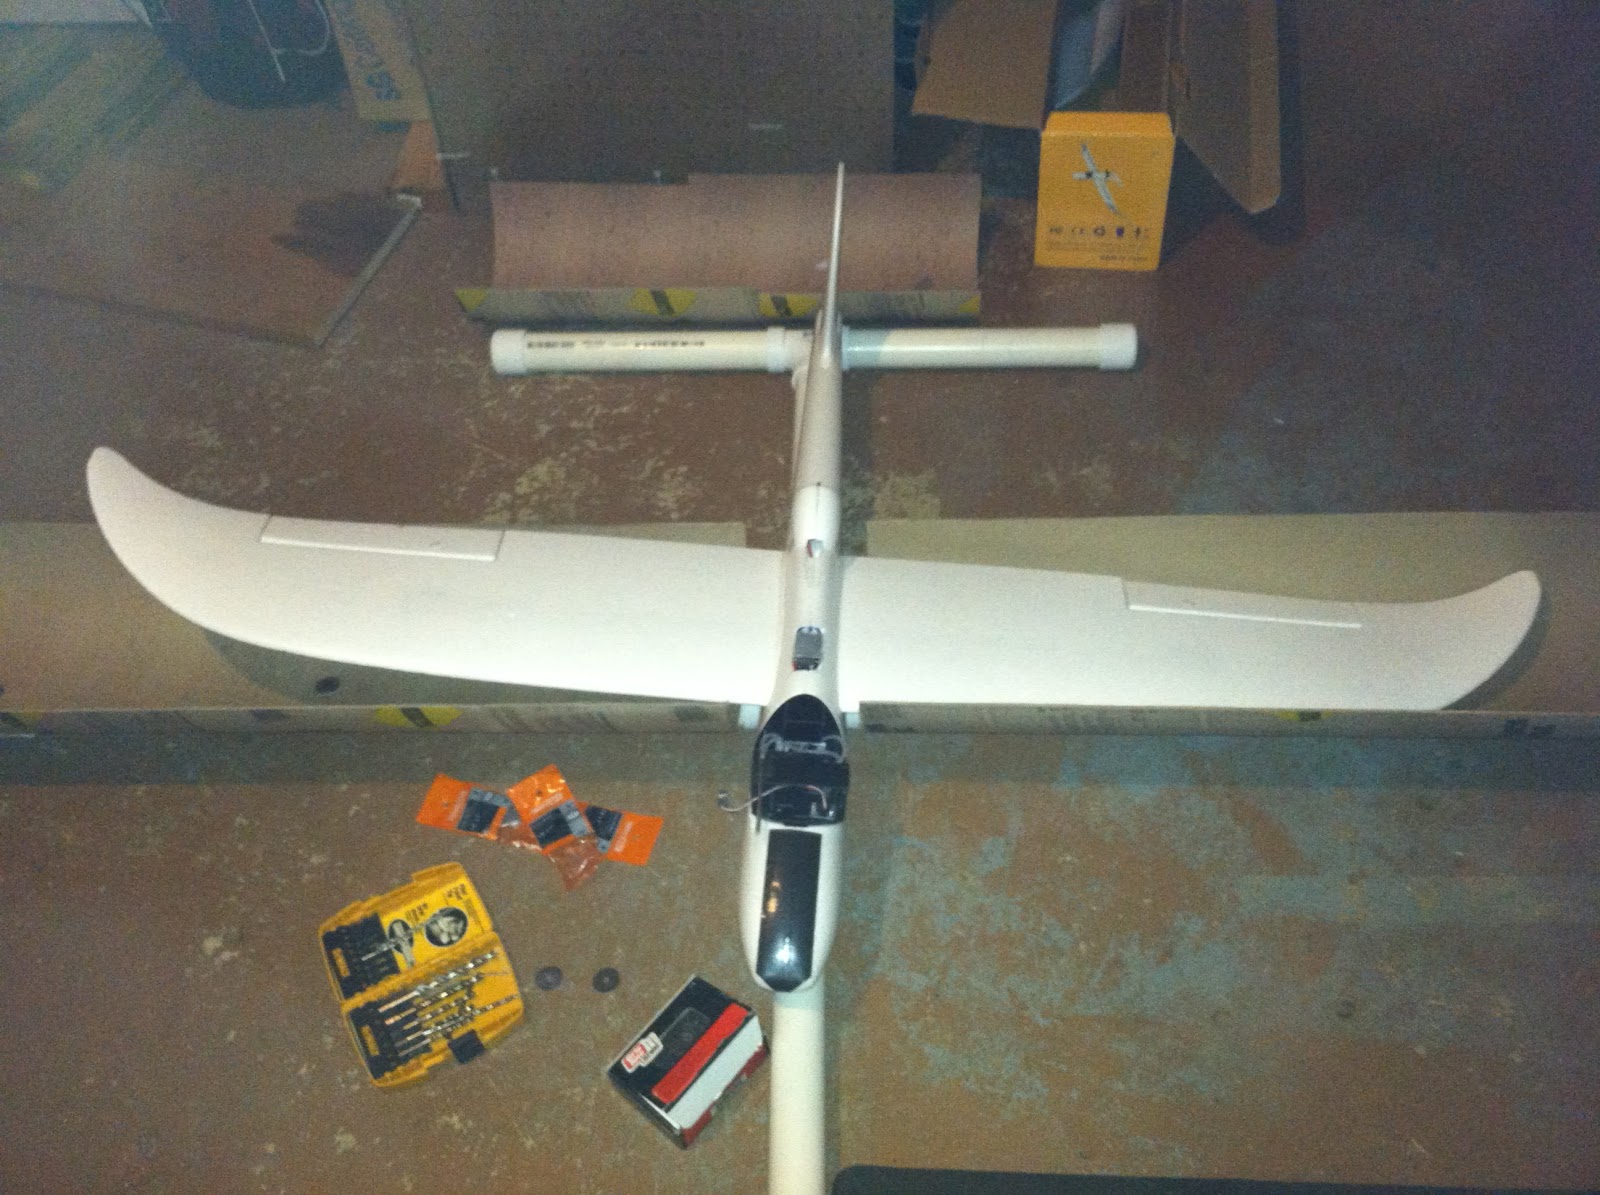
 My original idea for the transportation involved wood, foam, and cement cylinders. After conversing with my father we put our ideas together and came up with an easier, lighter, and more effective design...classic engineering.
The new idea consists of a PVC tube frame with cement cardboard cylinders cut in half, and surrouded with bubble wrap. This blog will give step by step instructions on how to construct the transporter. Enjoy.
1. Buy all the necessary supplies
2. Cut the PVC pipe to size. From left to right. Left Wing = 32", Right Wing = 32", Front Fuselage = 22", Back Fuselage = 18", Left Tail = 14", Right Tail = 14", also pictured are the 4-way and T attachments

3. Attach end caps to all the pipe, EXCEPT FOR THE BACK FUSELAGE!!! Use PVC cleaner and PVC cement to properly attach each cap.

4. Now with the end caps on the other pipes, take the back fuselage pipe, which DOES NOT have an end cap on it, and attach the T and 4 way attachments to it (using the cleaner and cement). Make sure the T and 4 way attachment are straight, to do this I placed it on a flat surface and pushed down on the pipe.

5. Now attach using the cleaner and cement for the PVC, the front fuselage to the top section of the 4 way attachment.

6. After attaching both the back and front fuselage pipe, now using the cleaner and PVC cement, attach the right wing pipe to the 4 way attachment

7. Now attach the left wing pipe the same way you did the right wing pipe. You should notice that the frame is slowly taking the shape of the plane.

8. With the fuselage and wing pipes attached, its now to take care of the tail piping. Clean and cement the right tail PVC to the T attachment

9. Do the same thing to the left tail PVC, it should now look like your plane. NOTE: I purposely over measured the wing and front fuselage piping so that the piping would hit the side of car or truck instead of the plane's fragile parts.

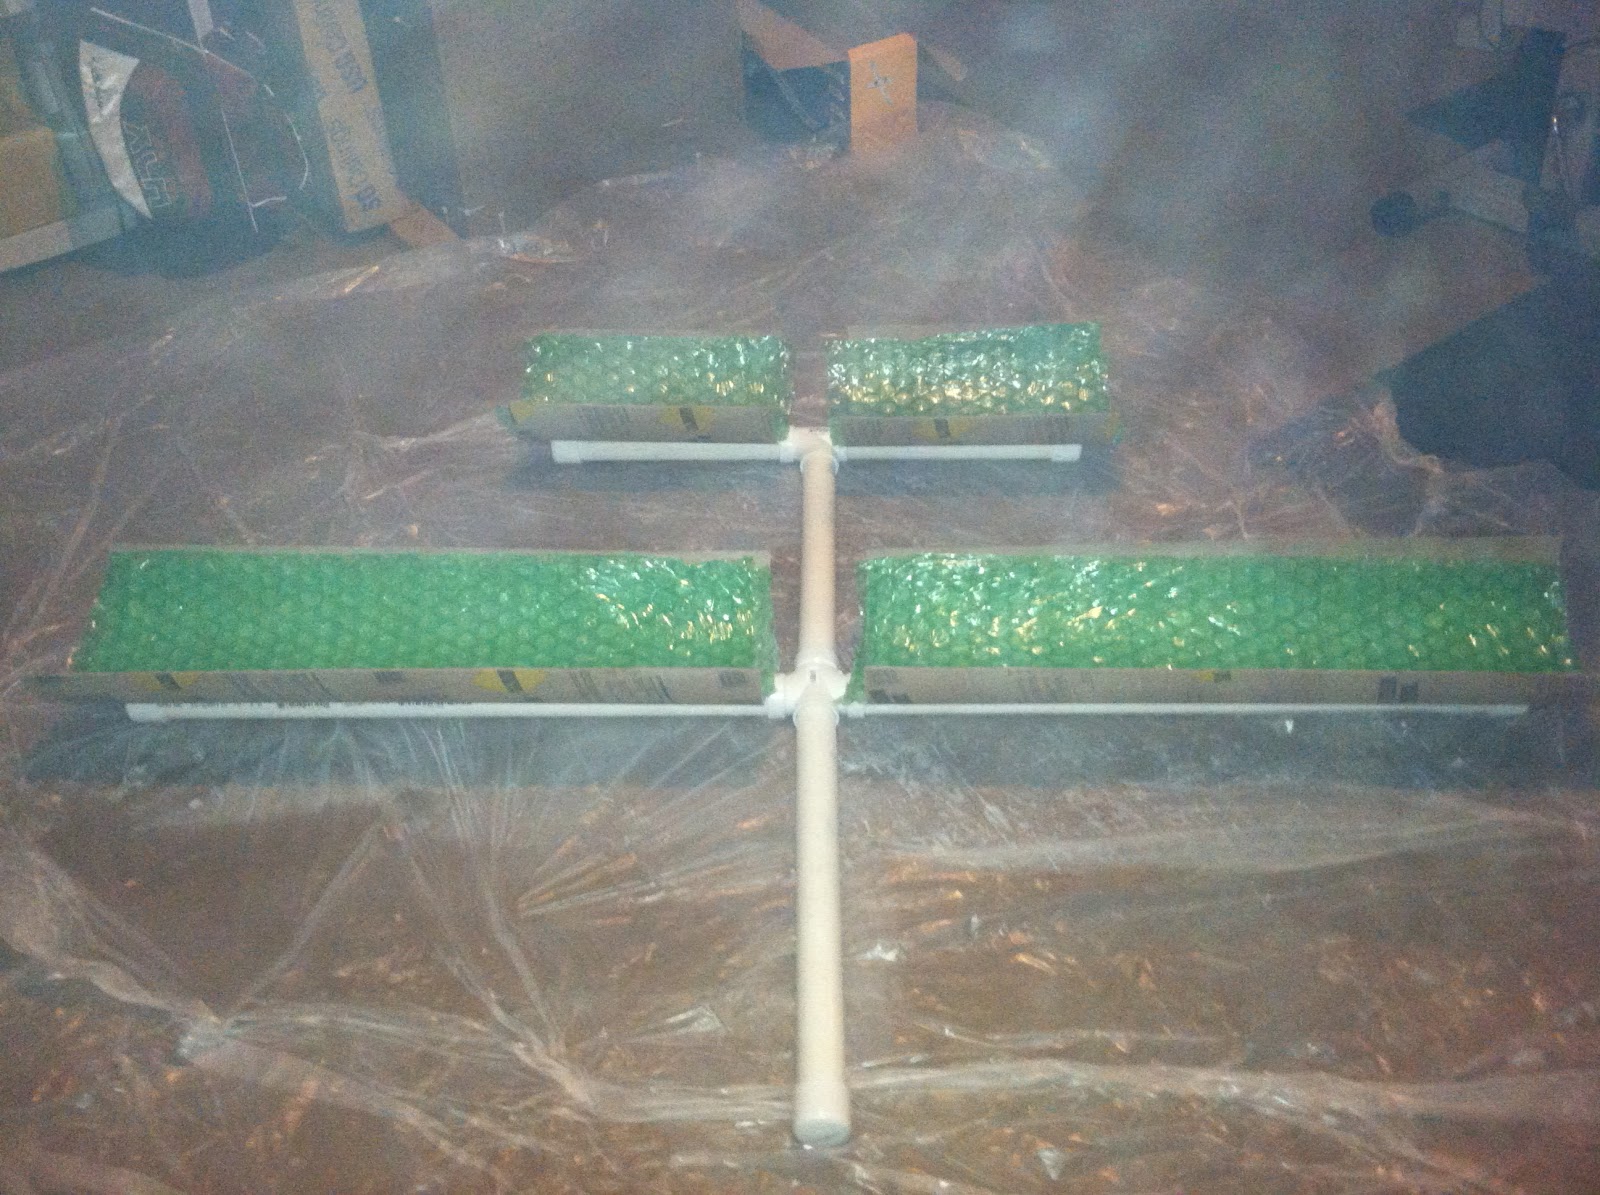
10. Now with the PVC frame all set, its time to cut the cardboard cement forms. You want to cut each one in half long ways, as shown. The way I got a straight line is I taped a straight line within the form before cutting. Came out surprisingly straight.

11. Do the other side of the form so you end up with two halves. Repeat step 10 and this step until all three forms are cut in half and now have 6 half cylinder forms.

12. Now cut each half cylinder to its proper size. NOTE: I later found out that the fuselage cylinder (first one from the left), was a waste...ended up NOT using it in the end. From Left to Right. Fuselage = 48", Right Wing = 33.5", Left Wing = 33.5", Right Tail = 15", and Left Tail = 15".

13. Now its time to attach the cylinders to their proper spot. The first cylinder that went on was the left wing, no reason. I pushed the cylinder up to the lip caused by the 4 way attachment. I then pre-drilled the hole and screwed in the screw, WITH the washer. I then went to the end, where the cap was, made sure the cylinder was straight, and pre-drilled the hole and screwed in the screw with the washer. Then for extra safety I put another screw with washer in the middle (eye balled it)

14. Do the same as step 13 just this time for the right wing. The cylinder will go pass the cap, did that just for more protection for the plane. Also put the plane in it to see how it fit, pretty well if I say so myself.
15. With the wing cylinders finished, do the same for the left and right tail. Notice that I only used two screws and washers this time...didn't think it needed more than that.

16. If you did everything right it should look like this.

17. Now with the frame and cylinders constructed, its time for the bubble wrap and spray glue. Put a painter sheet down onto the floor and under the transporter, or you will have very sticky floors.

18. Before spraying read the directions on the can. For the type I bought you had to spay the two surfaces, wait 15 to 30 seconds and then apply. NOTE: I sprayed the bubble wrap with the BUBBLES UP. After spraying and waiting apply the sheets to the cylinders. NOTE: The tail cylinder only had one sheet of bubble wrap while the wing cylinders will have two. Did this for extra protection.

19. With the first sheets on, spray the surface of the wing cylinders and the second sheet and apply it, just like step 18.
20. Let the glue dry, once dry put the plane inside the transporter. Then take the Velcro straps and sucure the plane in place with it. You can screw the straps to the PVC so you know its completely attached to the frame.
21. Put it in the car and go fly!
We finally made it!
We successfully completed our maiden flight with the 3DR 900 Mhz telemetry module on board our Shrike, it was incredible to see it gathering, transmitting, receiving and displaying live information... we can't wait to use it on future flights.
Thank you DIYDrones and community! This is so much fun...
-Trent
The Mjolnir UAV platform is a great test platform in scale version.
It's made as a test plane with very large fuselage:
The Strong Fiber glass fuselage will take a lot of beating and rough landings.
It's including a strong Twin Gas motor.
Empty plane 11.5kg.
Max loading 20kg
Can loading 8kg
Motor 50-100cc
Wingspan: 2.61m
Twin stroke engine: 55cc
45-150 km/hour
See more about this great Test UAV
Price: 1995 USD + shipping from China
GAUI 330xs, with the Naza controller mounted atop the frame and the battery mounted below with Velcro.
The GoPro is actually affixed to the bottom of the battery. Not pretty, but it worked.
To pretty things up I ordered the GAUI "Payload Mount Set" - a rectangular piece of carbon fiber and four aluminum mounting tubes. I put the new piece below the copter body and moved the Naza controller as well. The GoPro is now affixed to this "mount set' instead of the battery.
The battery is still affixed using Velcro, but I have relocated it tot he top of the copter.
Suggestions on improving flight are welcome :)
Testing the quadcopter in autonomous modes. I normally fly in Stabilize mode but today we tried switching to loiter and then tried to use the mission planner to "fly to here".
I have some work to do on getting it to fly right, yaw seems to react badly to control, yaw right and it gains altitude, yaw left and it looses altitude.
Sonar was useless...i wonder if this was the grass, not sure. Maybe a power cable that runs close to the sonar unit.
There is about a 3 second delay between switching flight modes which caused a crash in the end of the video. After we sent the "fly to here" command it carried it out but i couldn't stop it so when i tried to take manual control it just fell out of the sky.
The first attempt at "fly to here" didn't ask for a target altitude so it flew straight in to the ground.
Also snapped 2 propellers at different times, 1 in flight and the other in a crash. One side of the prop just flies off mid flight, amazingly it compensated and i landed without incident!
All in all a great round of test flights, ended up with 2 slightly bent booms and 2 broken props.
On-board cam battery was flat on arrival at the field...dang, better luck next time.
APM (original) + GPS + Sonar + 3DRradio + battery alarm
Ground control station: laptop + 3DRradio + 4G modem (for Google earth integration)
APM Firmware: AC 2.0.40 Beta
Mission Planner 1.2 Mav 0.9
3cell 2.2A battery, gives ~7-8 minutes flight time.
Motors are 980KV
Props 10x4.5
Thanks go to...
Miky for running the laptop side of flight. Co-Pilots are a must for this stuff!
Dave for manning the camera even though he was sick.
The great team & community at DIYdrones.com for all the information, help & parts.
Also multiwiicopter.com for selling really nice aluminium frames and carbon fiber bits.

Curiosity, the car-size, one-ton rover is bound for arrival on Mars at 1:31 a.m., EDT on Monday, Aug. 6.
The landing will mark the beginning of a two-year prime mission to investigate one of the most intriguing places on Mars.
› Everything You Need to Know About Landing
› What to Expect From The First Pictures
Also check out this link for more interesting information: http://mars.jpl.nasa.gov/msl/
It flew ! For 50 feet off ground. Premature rope cut ! Dang....getting closer
Moment of ground release.
Next Friday...8-10-12...same time ...same place...another launch !
Earl

I love my Canon mark 2 and gopro camera but it's absolutely terrible as a quadcopter camera.
The vibrations coupled with the CMOS sensor wrecks the whole image beyond repair.
Nearly all of today's cameras are made with CMOS sensors rather than the classical CCD sensor because CMOS offers better image quality and at lower power consumption... But there's a heavy cost that comes with this.
Rolling shutter.
Even with my stabilization software i can't really correct rolling shutter because the original image is distorted in the first place, thus yielding me warped stabilization that looks like an acid trip rather than beautiful aerial imagery.
CCD sensors do not have the rolling shutter because the image production process is completely different and the below video is a clear demonstration of the difference.
The only flight I had with the below optimized setting was the long shot of the yellow house.
My optimized setting- Turn autofocus in video mode off, be sure to focus on one far away object before recording... Set to scene mode, and then click on the sunset present.
If using a Mac for the upload, don't format the SD card- simply insert it in the computer and upload via final cut pro/imovie/image browser... if you copied the files over and formatted the card you can still extract the files by showing the package contents of the large avcd file and then you'll find the .mts movie file hidden away in one of the files... I used iVI for the conversion. It's $3.99
I only had to convert the files because I forgot to upload directly from the SD rather than copying the files.
The other neat features of this camera?
Panorama mode. Below is one example I snapped earlier today.
Timelaspe mode. Especially good for aerial photography.
Support for 64gb SD cards. I used my 64gb Sandisk, it took forever to fill up the card.
Now onto the bad news:
This doesn't have live out while recording. There is a supplied AV cable but as of right now the screen goes black when recording. This isn't a big deal for most people but for me I would have loved to use it as my FPV camera as well... the canon DSLR line has this ability to do this but unfortunately am supplied with harsh price tags and rolling shutter. So we'll have to wait a little longer for a new camera or a hack.
There's a ugly sensor flare when exposed directly into the sunlight. You can see the purple line in the very last shot when the sun comes into the shot. It's because of the CCD sensor and how it handles light. At the time of this writing there isn't really a solution. It's just part of the cost for ultra stabilization but to put things in perspective... I would get about 10 usable seconds on a regular flight on my 5d mark 2 and with this camera I get at least 1 minute of usable footage.
Also it claims to have 60i 1080p but I can't find the setting anywhere so if anyone knows about this please notify me but 30fps was good enough to stabilize with the CCD sensor. The original footage looked pretty shaky but since there's no rolling shutter final cut X was able to stabilize everything almost perfectly.
Finally a number of people report it not being truly waterproof... I have used it in the water a few times now and had no issues but I would suggest buying a different camera if looking to use underwater on a regular basis.
I feel like I've only touched on the iceberg of what's possible with this cheap camera.
It can't be a coincidence that this has 'quad' in its name.
I never thought I'd love a point and shoot.
My grade: A-
Pros: CCD sensor allow for crisp stabilization, 24mm leica is perfect for action sports, shockproof, gps, barometer, 1080p 30 fps, timelaspe, panorama mode, and the list goes on.
Cons: No live out during recording, 60fps is no where to be found, horrible sensor flares when exposed directly at sunlight, and the case might not be that waterproof according to some reviews.
This drone 'stuff' seems to have taken over my brain, with FPV thanks to John Arne Birkeland's "Crawler 1" videos. I like how John's thinking process worked, testing the vehicle's drone capabilities via FPV driving made sense to me, and also FPV just looked cool!
So I've resigned myself decided that I'll be buying an autopilot eventually, but there are things with my vehicle I'd like to do first, and make sure they're compatible down the road. (that makes it sound like it's a bad thing, but it's only bad for my wallet!)
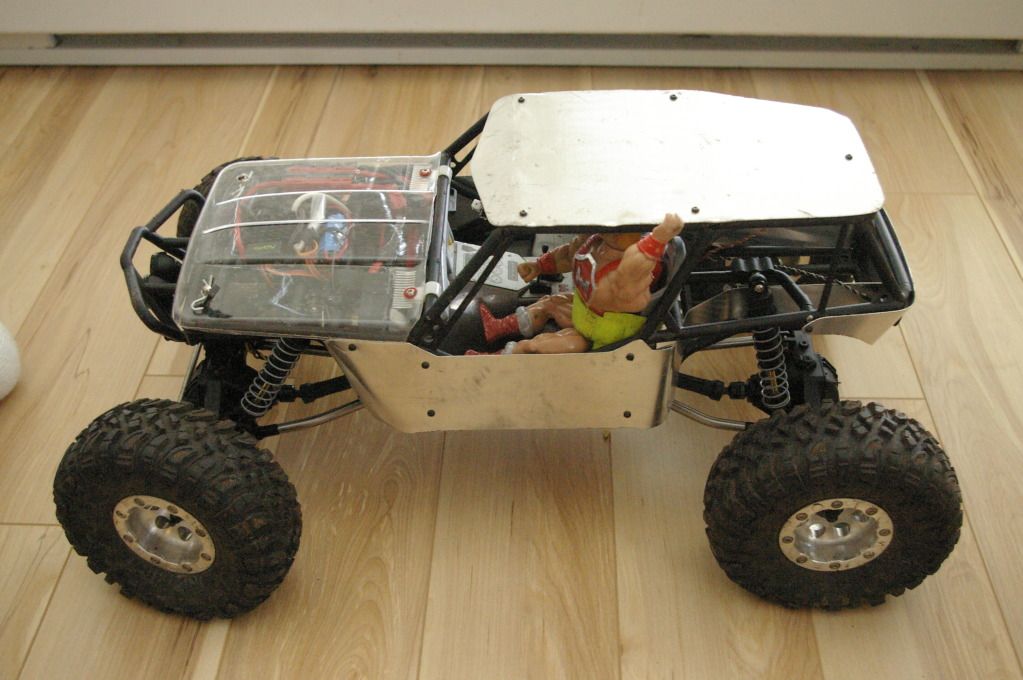
My current 'ride' is an 1/10th RC Truck, the Axial Wraith specifically. I've been playing with it since Feb/March 2012, worked out some of the problems with it, shaken out some of the more-easily-broken parts, and got it to a place where I can compete on the rocks and bash on the trails and have lots of fun in both places (without leaving a trail of parts behind me).
I realise from all the ardurover talk that the Wraith itself probably won't be the Urban Assault Drone of my dreams. Being 1/10th scale it has a problem with stairs and large curbs and other urban-environment things. It is also prone to being top-heavy and rolling over (less so now with my CoG lowering changes), and the environments I drive in can tend towards the muddy/watery, so I'd have to make sure everything's water 'resistant' at the very least. But I think it will be a good vehicle to test the various technological capabilities, so that in the future if I want to upgrade to a 1/8+ size vehicle, I'll have much more experience with a functioning smaller-scale system (as well as some hardware I may just be able to transfer over).
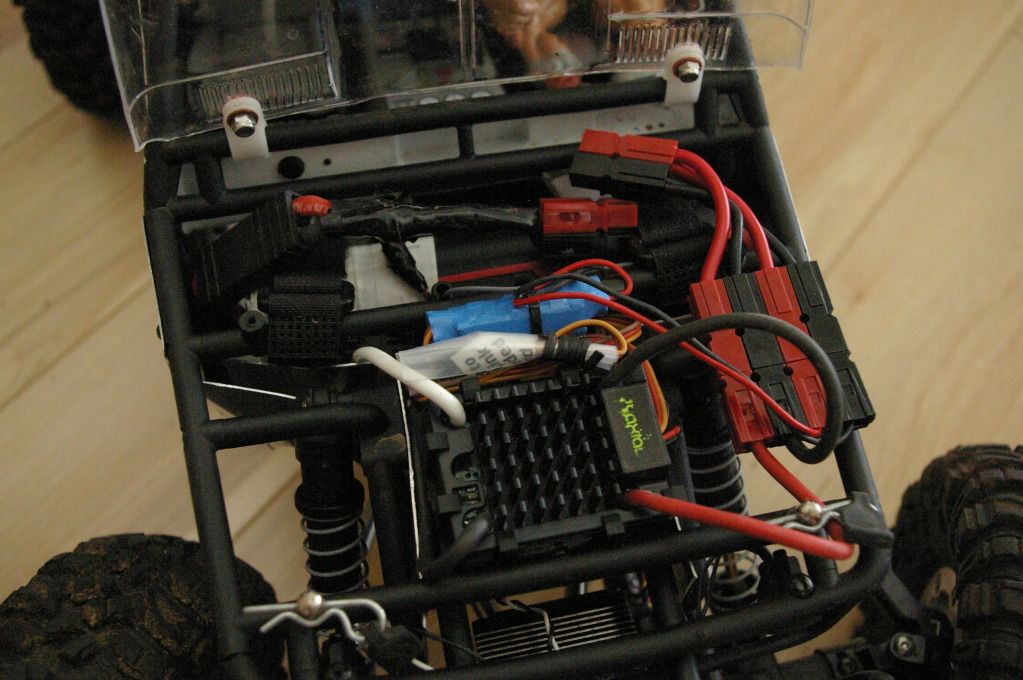 Under the Hood, all basic electronics squeezed to fit!
 Rear View, showing the space I've cleared for future electronics. I think the APM2 will just fit into the space between the shock mounts.
I'd like to be able to film FPV (and eventually drive FPV w/ same camera), with a camera mounted into the cabin of the vehicle. I've been looking at GoPro w/ AV out on a pan/tilt gimbal. Spacing will be tight, I may have to kick He-Man out of the driver's seat, but I think it'll fit inside. To do FPV with OSD I'd need the A/V cable for the GP and to add the various OSD/Tx stuff for that, and that's where the options are starting to get confusing.
I'd also like to be able to 'map' where I've been, even if I don't use any of the RTL/autopilot automatic driving stuff. What made me think of this was the rock-crawling competitions, I could map my own line and use the waypoint setting ability to mark where each gate is on the course.
I know the APM2 can do the auto-mapping (I've seen posts to that effect buried in here somewhere), but it's the various FPV/OSD combinations I'm wondering about. It would seem the 'easiest' way to get what I want, with a minimum of overlapping abilities, is APM2+minimosd, but I wouldn't mind some real-world confirmation and usage pointers for stuff like that. There are OSDs made for FPV that also function as a mini-autopilot, with their own GPS and RTL capabilities, but I'm not sure if there's a single all-in-one unit to rule them all or not.
So please, if you don't mind, I'd love to read opinion on this, how your experiences have worked out for you, pointers to other web-resources I may not have read already over the last few months. I'm sure I'm not the only noob with these questions. ;)
In the end, I'll probably attempt a total-awareness vehicle, driving around tracking everything, mapping wifi, maybe even terrain mapping, but I'm trying to limit myself and start small, instead of jumping into the deep end with both feet and ending up over-my-head and drowning-in-bits!
Also I've been lurking here long enough I thought I should at least introduce myself and my ride: ;)
Hi Everyone,
I'm working over some LANC controllers since few months. LANC is the camera control protocol by Sony and most of Sony, Canon and Panasonic cameras using this protocol to control the camera features by a cable remote.
I'm designing LANC RF links and other LANC products for video production market.
My new product is a RC LANC controller over servo lines and it is currently in production.
It is supporting Zoom(In-Out) and Rec(start-stop) functions.
Please share your idea about this product. It is useful or not? Need extra features? for drones?
Thanks
Melih