All Posts (11086)

Sort by

GigE and USB3 module for FLIR TAU2

FLIR TAU2 is very common used LWIR thermal imaging sensor in the area of UAV industry. That sensor offer fully radiometrics signal, but FLIR TAU2 standard output is only a analog video signal. This is a little frustrating: FLIR TAU2 could also be used as a high-quality thermal imaging camera, but there is a lack of digital output, the possibility of data storage and, above all, the software for the processing of measured data.

This is why Workswell offering USB3 and GigE modules for FLIR TAU2 are designed to be integrated easily into extension systems or to be connected to a PC. The modules are compatible with all FLIR TAU2 9Hz/30Hz sensors (TAU2 640, TAU2 320/336, TAU2 160/162/168) and enable easy access to sensors data, their controls, and administration. FLIR TAU2 is operated and powered via a USB3 or a GigE interface by means of a Hirose 50-pin connector. The whole internal electronic content is protected by an aluminium case.

The video above shows that creating a thermal imaging camera (with USB3 or GigE output) using our adapter is very simple and fast. The video also shows a connection of Workswell CorePlayer software that has all the common features for working with radiometric data, including for example a temperature profile, etc. This software is always included in a standard package.

More informations about modules are online: https://www.workswell-thermal-camera.com/our-products/usb3-gige-modules-flir-tau2-sensors/
Read more…
3D Robotics

3689728045?profile=original

Really interesting technique from Reuben Wu of the band Ladytron, who uses a 3DR Solo carrying bright lights to illuminate landscapes in ways that otherwise wouldn't be possible. 

From the article:

Reuben Wu, Chicago-based artist and member of the electronic music band Ladytron, is currently exploring interesting ways technology can be used for innovative creative expression. Reuben has long wanted to test drone technology to create lighting effects for his imagery. Combining his Fiilex AL250 and 3DR Solo drone Phase One XF camera system, Reuben photographs nocturnal landscapes and adds light using multiple exposures. His end project “Lux Noctis” is a visual diary of halo mountaintops and other awe-inspiring landscapes. Alongside his photography work, Reuben is also the synthesizer player for Ladytron, which was formed in 1999.

Read more…

The UDB5mini is now available from Octopilot!

3689727987?profile=original

The UAV Dev Board was an early entry to the DIY autopilot world, designed by Bill Premerlani along with SparkFun.  The hardware went through 5 revisions over the years to incorporate better and better sensors, with the 5th generation, the UDB5, serving pilots and developers well for a long time, along with the companion firmware project MatrixPilot.  But eventually, SparkFun stopped selling the UDB5, and the MatrixPilot community needed a new hardware supplier.

Meanwhile, I've been wanting to fly my autopilot code in smaller and smaller planes, so I decided the time was right to finally design and build my miniaturized UDB5 board.  After lots of prototyping and testing, and starting up my own little web shop, I'm now selling UDB5mini autopilots over at Octopilot Electronics.  (Thanks to MacroFab for building these boards!)

Here are photos of some example UDB5mini-based builds, including my 24" Bonsai mini flying wing, complete with 2.4GHz FPV with MatrixPilot's native OSD, long range radio, and 2-way telemetry, Pete Hollands' self-pitch-stabilizing Multiplex Flying Fox, and Pete's tiny, autonomous Sonic Mini.  For the Bonsai build, I cut away the strips of PCB containing the mounting holes to make the board even smaller. 

3689728027?profile=original

3689728114?profile=original

3689728159?profile=original

If you haven't flown with MatrixPilot before, here are some compelling reasons to give it a try:

• Programmable flight plans using a LOGO-based flight language, complete with conditional branching.  People have built their own thermaling programs, smart RTH, and all sorts of fun flight patterns.

• Solid, but minimalist hardware and firmware design keeps things simple, stable, and small.

• Developer-friendly codebase allows using MatrixPilot's libraries to easily build your own projects, like a self balancing robot, autonomous sailboat, model rocket stabilization unit, etc.

• It's all open source and open hardware!

Read more…

3689729677?profile=original

If you have a promising startup in the navigation and drone industry, you will likely be interested in and eligible for a Drone Innovation Start-up Contest powered by KryptoLabs, offering a chance to win $500,000 investment.


The top 5 finalist will get a round-trip for two team members from their home country to Abu Dhabi in order to pitch for the $500,000 and they will have the ability to enroll in KryptoLabs virtual incubator program. Krypto Labs is an all-in-one business incubator, accelerator and co-working space for start-ups and individuals from anywhere in the world. The incubator, associated with Abu Dhabi Financial Group (ADFG), aims to help early-stage startups take their idea to the market and they plan to invest between $50.000 to $6M into 100 startups within the next 3 years.


If the Drone Innovation Start-up Contest sounds like a good fit for you, please apply using this link: https://kryptolabs.com/contest/. The deadline is April 8th.


Feel free to be in touch if you have any questions.


Best wishes,

Xenia Dolovova

xenia@kryptolabs.com

contest@kryptolabs.com

Read more…
3D Robotics

Indoor positioning with OpenMV cam

A cool project from Kaz Kojima uses an OpenMV cam to track a drone, like a poor man's Vicon system:

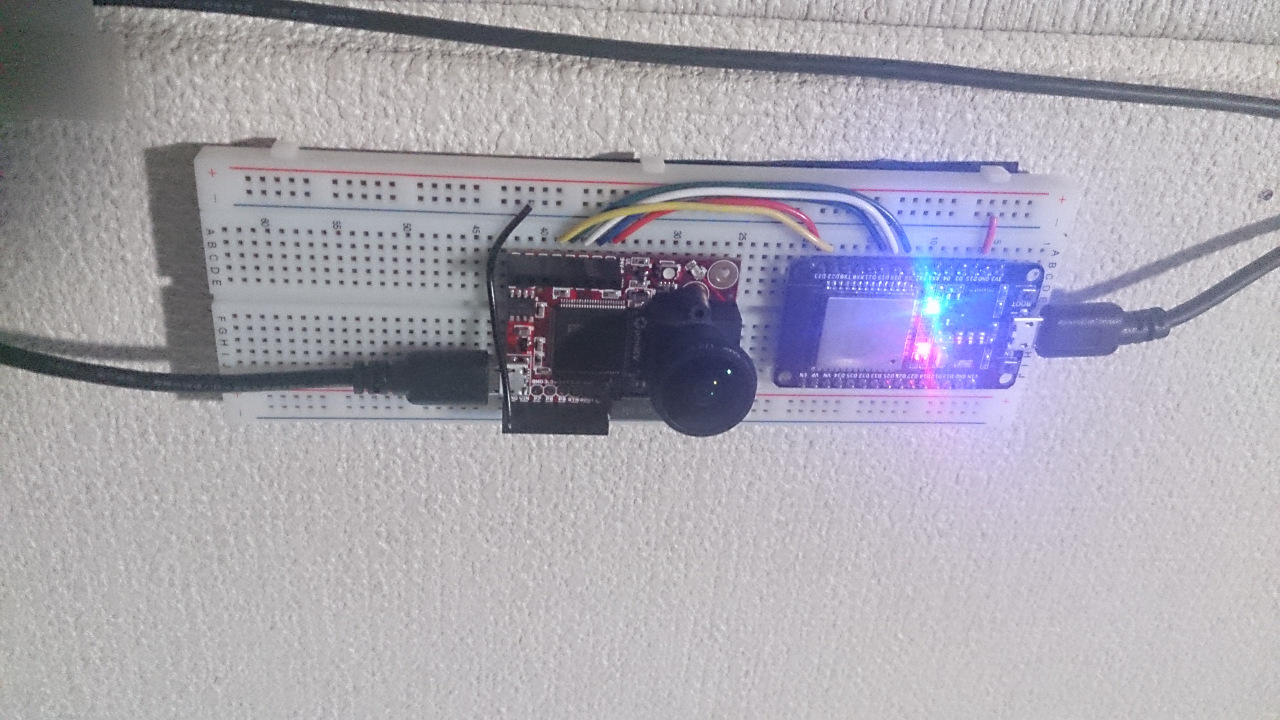
openMV+ESP32

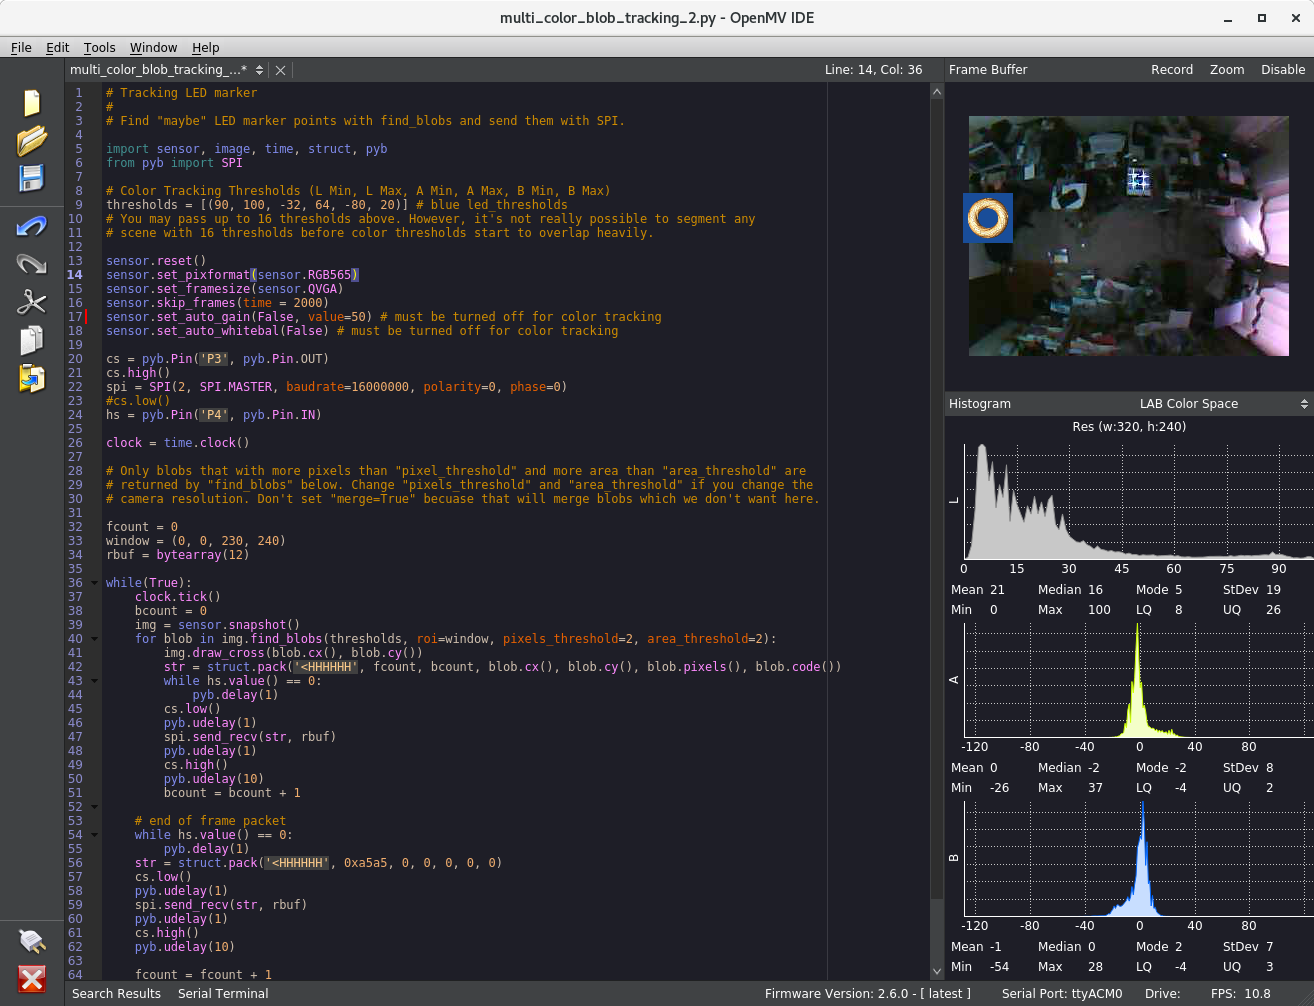
Screen shot of opemMV IDE

led tracker

I've tried to make a simple and budget local positioning system with openMV cam for the indoor flight of tiny copter. Looks not so good precision but not so bad as a Poor Man's system. A LOITER and LAND flight test with my hachidori copter is here:

A test flight

where only throttle work is done.

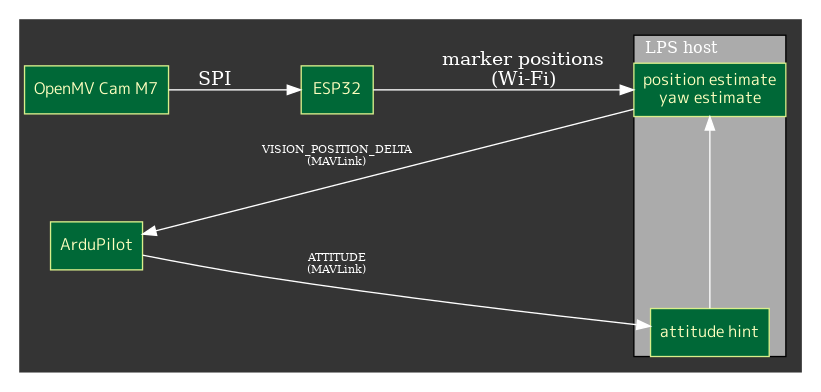
System is simple

figure

OpenMV cam with fish-eye lens has been set at the ceiling and it tracks LED markers mounted on the copter. The tracking data is sent to the host PC via ESP32 connected to openMV cam as a SPI slave device. The host PC also connects to the telemetry port of ArduCopter and is getting ATTITUDE packets and estimates the position and heading with the visual markers and ATTITUDE information.

The result of estimations are sent back to the telemetry port with VISION_POSITION_DELTA packets.

Currently, openMV data rate is 40-50fps, ATTITUDE rate 20Hz and VISION_POSITION_DELTA rate is same with cam.

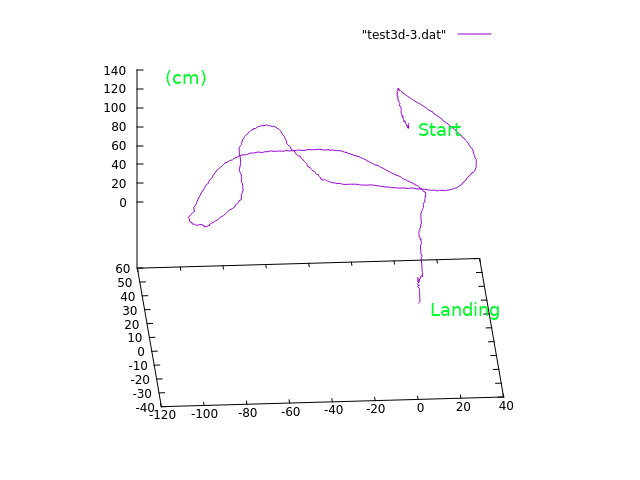
The coordinate of marker on image sensor is converted to the 3D direction from cam and the height is estimated with the distance of markers and the attitude. I'm using geometric algebra in very primitive way to compute them. Kalman filter is applied for smoothing. Here is a test result of 3D positions got when moving the copter by hand.

3D spur

visual yaw estimation

Unfortunately yaw angles based on the compass of the copter are too unreliable in my case. The copter uses coreless motors which can easily break compass measuring and there are many other problematic magnetic sources in my room. The visual yaw estimation is used instead.

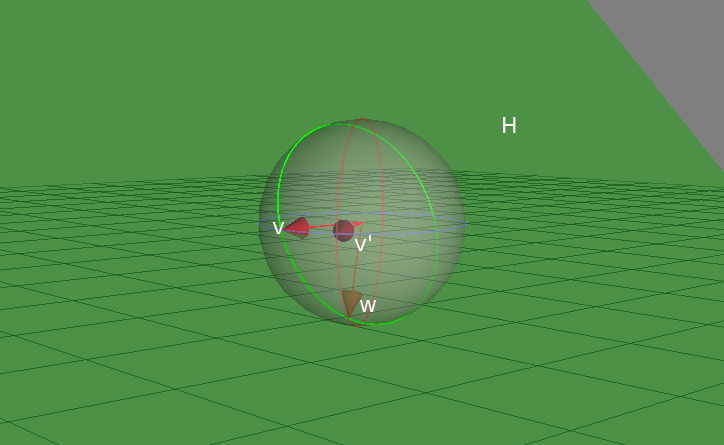
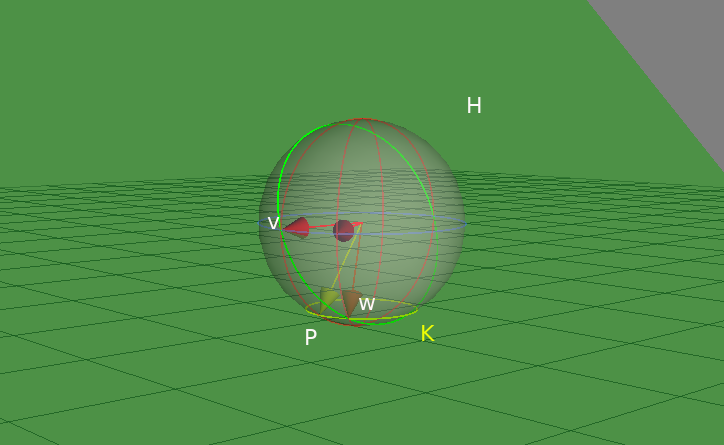
When the pitch angle isn't zero, the direction seen from cam and the real horizontal direction differs. The figure below represents this situation:

headings

where w is the real heading vector and v is the vector can be seen as the horizontal direction from cam. w = (v' rotated with pitch angle) and H is a plane including v, w and cam. A simple geometric algebra computation helps again.

headings

This figure shows that computation in geometric algebra. Essentially, vector w can be obtained as the one of the point pair which is the "meet" of the yellow circle K and the green plane H. The corresponding program is fairly straightforward. See host program for details. Of course, rotation matrices or spherical angles can be used for that computation.

All programs for openMV, ESP32 and the host PC are in my github, though they are experimental.

Happy Hacking,

Read more…

Eagle Eye-10IE is a 3-axis high stabilized gimbal with EO(electro-optical) and IR(infrared) sensors for drone inspection,surveillance,search and rescue applications.The 10X zoom camera provides 1080P 60FPS full HD video streaming and up to 120X zoom capability,which will enable you to capture every detail in the air.While the thermal camera allows you to detect targets in the night or low visibile conditions,and provides you with priceless information when you are carrying out missions like inspecting or monitoring objects.High-performance 3-axis gimbal is developed based on FOC(field-oriented control) technology,which will give you crystal clear video footage.

Eagle Eye-10IE is using the most advanced tracking technology,and it works on both daylight sensor and thermal sensor,with which you can track targets freely during daytime and night time.How it works: put the object you want to track in the screen,move the cursor to the object and lock it via controller,and then the camera will track it automatically.

Another big feature for Eagle Eye-10IE is that the gimbal will geotag the video streaming and photos,also gimbal Yaw/Pitch angle,height,time information will be displayed on camera OSD,this is really important when you are conducting missions like rescue and search.

Eagle Eye-10IE provides an outstanding wiring hub design for RC receiver and video output port,which makes wiring pretty easily.Also the gimbal offers 2 smart speed modes:FAST speed and LOW speed.Fast speed mode is used for small zooming range,which makes the gimbal control sensitive and quick.LOW speed mode is used for large zoom range,will enable you to target the object more accurately.

Specification
1) Weight:879grams(cameras included)
2) 1/2.9 inch 2MP CMOS sensor
3) 10X optical zoom,12X digital zoom,1080P/60 HDMI output for video downlink
4) 1080P/30 H.264 video recorded for on-board TF card
5) Thermal camera:640*480,25HZ,19mm lens,2X/4X digital zooming,radiometric(optional)
6) Auto object tracking function
7) Geotagging,gimbal Yaw/Pitch angle info,height,time will be displayed
7) PWM control and serial command control
8) Convenient wiring hub for RC receiver and video output
9) 3-aixs high stabilized gimbal system
10) Adjustable control speed: SLOW speed for large zoom range,accurate.FAST speed for small zoom range,sensitive and quick.
11) One key back to home position

Product link:http://www.yangdaonline.com/eagle-eye-10ie-10x-eo-ir-dual-sensor-drone-zoom-camera-with-tracking-and-geotagging/

Product photos

3689725757?profile=original

3689725803?profile=original

3689725664?profile=original

Read more…

3689727974?profile=original

At Terabee we did some intensive experiments with TeraRanger Tower and Pixhawk running ArduCopter. The purpose of the experiment was to explore the obstacle avoidance indoors using rangefinders only.

In our setup we used TeraRanger Tower with 8 sensors (in a separate test we used 4 sensors in a + configuration. It worked flawlessly) and a single TeraRanger Evo looking down as an altimeter (without GPS the obstacle avoidance works in altitude hold mode).

One of the things we learned is that AVOID_DIST_MAX parameter has the minimum value of 3.0 meters for a reason. When we forced the value to 1.5 meters we crashed into a wall, twice. Our best guess is that the aircraft didn’t have enough time and control authority to move away from the wall (we allowed the obstacle avoidance to request up to 5 degrees lean angle).

We are really happy with the results of our experiments and we are really excited to see ArduPilot growing further. We would like to thank the ArduPilot dev team for their fabulous work!

If you would like to know more about our testing of indoor avoidance, here is a much longer writeup containing all the technical details I could think of.

If you have any questions about our setup then I’m always happy to help!

Read more…

Skydiddy startup

Really impressive demos from Skydio in Redwood City. Quad copter startups have been hit or miss & it looks like the same pile of plastic scrap that every startup besides Apple produces, but what they showed here was exactly what I wanted to do for years, with ground vehicles. It looks like it could really navigate most of the mobs I have had to navigate manually. They showed it briefly flying in front of the athlete, despite not having prior information about where the athlete was going. The flight time is undoubtedly very short & the $2500 is almost 1 month of rent.  As a $2500 consumer quad copter, it has no chance, but it would have a chance as a kit allowing developers to add autonomy to ground vehicles.


They're the 1st to consolidate a lot of the bits of research that were done in the vicon rooms for the last 10 years, into a complete product. They emphasized the demo of the fixed wing flying in a parking garage.  It's the 1st time anyone has shown the NVidia TX1 doing anything besides raising its stock price.


Not sure how well it would translate to a ground vehicle, because a ground vehicle needs to stay on a certain path. Prior knowledge of roughly where the athlete was going & where the path was might allow it to do the job. Suspect GPS has not improved enough to stay on a path without some other input.


It wouldn't translate well to a Casey Neistat application. His interest is manely panoramas & very stable long shots. Skydiddy is aimed at very close, jerky closeups. He would complain about the motion being too jerky.


The mane development is not 4 but 13 cameras, not edge detection, chroma keying, sonar, or lidar, but depth mapping from parallax & optical flow alone. The cameras may be high speed HD. It takes an immense amount of power to combine 13 cameras into a very detailed 3D map. The ability to plan a route several trees into the future is another area which requires specialization in algorithm design.


You can't get a startup funded without mentioning AI somewhere, but they probably only use it for recognizing the subject to track rather than the obstacle avoidance. It apparently does a much better job than SURF, the hero algorithm of 5 years ago & now obsolete.


Read more…

Thermal imaging camera for gas detection

Under certain circumstances, infra-red cameras are highly suitable for detecting gas escapes and the presence of gas in the air. They can be also helpful during tests on improving environmental safety. A thermal camera can detect greenhouse gases in the air, as well as gas leaks, which are hazardous to the environment and can threaten human health.

Not every thermal imaging camera is able to detect gases. That feature is avaible only for MWIR (midle wave infra red, ie. 2 to 5 micrometers) cameras with very high sensitivity. For that aplication, it is not possible to use standard LWIR (long wave infrared, ie 8 to 14 micrometers) thermal cameras like Workswell WIRIS or FLIR TAU 2. And this is why we are using for Workswell GIS 320 cooled MWIR sensor - InSb type.

Workswell GIS 320

The Workswell GIS 320 (gas imaging system) thermal camera is the ideal solution for the unmanned air vehicles (drones/UAV systems) localization and detection of leaks of hazardous gases the option of standard communication with the environment through a CAN bus or PWM inputs. Of course, the thermal camera can record measured data, including GPS coordinates and the on-line HDMI transfer of the image to the side of the pilot.

3689727806?profile=original

3689727876?profile=original

Detected gases

Benzene, Ethanol, Ethylbenzene, Heptane, Hexane, Isoprene, Methanol, MEK, MIBK, Octane, Pentane, 1-Pentane, Toluene, Xylene, Butane, Ethane, Methane, Propane, Ethylene, Propylene plus hundreds of other hydrocarbons, Volatile Organic Compounds (VOC) and much more (ask for more detauls).

Price

Price of that thermal imaging camera start about 60 000 EUR. End price depend on configuration.

More informations

More informations are avaible online: https://www.workswell-thermal-camera.com/gis-gas-imaging-system-for-drones/

Read more…

Using Intel Aero with UgCS

3689727820?profile=original

Intel Aero is a cool little drone for developers that can be configured for various tasks and applications.

Due to it's versatility it's also possible to use it with UgCS. In this guide we will explain how.

1. Install latest firmware on vehicle. We did our tests on version 1.6.1. Prepare vehicle to flight according vehicle manual and make some flights in manual mode with RC to make sure everything works ok.

2. Install UgCS with "Support PX4 Vehicles" option selected.

3689727910?profile=original

3. We will connect UgCS to vehicle via WiFi AP provided by Aero. So first of all we need to connect our computer to Aero WiFi.  Next, go to vsm-px4.conf file in your UgCS configuration folder and change udp_in local port setting to 14550. 14550 - is the port where IA broadcasts heartbeats and telemetry.

# UDP ports which will listen for incoming mavlink messages.
connection.udp_in.1.local_port = 14550

After config changing (re)start UgCS. You should see your Intel Aero as a common PX4 vehicle.


3689727953?profile=original

You can now create\upload routes to Intel Aero and use it as common PX4 vehicle in UgCS.

3689727833?profile=original

Video setup

Firmware version 1.6.1 provides video streaming capabilities with Camera Streaming Daemon (CSD) which is automatically started on board of IA.

So IA has 5 video streams which we can try to display with help of UgCS Video Service. To do this you should add the following lines to vstreamer.conf:

vstreamer.inputstream.0=IA-RGB;rtsp://192.168.8.1:8554/video13;60;
vstreamer.inputstream.1=IA-DEPTH;rtsp://192.168.8.1:8554/rsdepth;60;
vstreamer.inputstream.2=IA-IR1;rtsp://192.168.8.1:8554/rsir;60;
vstreamer.inputstream.3=IA-IR2;rtsp://192.168.8.1:8554/rsir2;60;
vstreamer.inputstream.4=IA-BOTTOM;rtsp://192.168.8.1:8554/bottom;60;

3689727915?profile=original

If you have any further questions about connecting Intel Aero to UgCS, feel free to leave them in the comments below.

Get the newest version of UgCS from our site here: http://www.ugcs.com

Safe flights,
UgCS Team

Read more…

3689727744?profile=original

In-flight monitoring of total battery voltage and individual cell voltage is important for accurately estimating flight time. Monitoring the cell voltages during flight and operating load conditions help to predict battery health and cell degradation. 
We designed a battery monitor board to interface with pixhawk to read the cell voltages of flight battery. We will be doing a 50 piece production run of the boards in the second week of march,2018. Anyone interested in the board, please PM me.
Currently available battery monitors drain over 20mA and will drain the battery if left connected and very few monitors currently support over 6 cells. 
The specs for our monitor are:
Max cell count: 10

Active current drain: <5mA
Total sleep current: < 20uA
Sleep current drain per cell: <1uA

Interface with autopilot: i2c , UART (will implement other protocols if there is interest)

cleardot.gif
Pics of first version monitor

3689727799?profile=original

3689727541?profile=original

Read more…

The use of drones in agriculture is the future. Heavy lift drones capable of crop dusting and drones equipped with multispectral sensors will change the way in which farming is done.

With greater refinements in drone technology and implementation, we will see the agricultural drone sector take off. According to Global Markets Insight Inc., the Agriculture Drones Market will be valued at $1 billion by 2024.

How are drones being used for farming? Check this Infographic from Dronefly:


Police Drones
Infographic Provided by Dronefly.com

Read more…
3D Robotics

Training a drone using OpenAI gym and ROS

3689727678?profile=original

From this post by Ricardo Tellez:

OpenAI has released the Gym, a toolkit for developing and comparing reinforcement learning (RL) algorithms. That toolkit is a huge opportunity for speeding up the progress in the creation of better reinforcement algorithms, since it provides an easy way of comparing them, on the same conditions, independently of where the algorithm is executed.

The toolkit is mainly aimed at the creation of RL algorithms for a general abstract agent. Here, we are interested in applying it to the control of robots (of course!). Specifically, we are interested in ROS based robots. That is why, in this post we describe how to apply the OpenAI Gym to the control of a drone that runs with ROS

Let’s see an example of training.

The drone training example

In this example, we are going to train a ROS based drone to be able to go to a location of the space moving as low as possible (may be to avoid being detected),  but avoiding  obstacles in its way.

For developing the algorithm we are going to use the ROS Development Studio (RDS). That is an environment that allows to program with ROS and its simulations with a web browser, without having to install anything  on the computer. So we have  all the  required packages for ROS and OpenAI Gym and Gazebo simulations already installed.

Read on for the full instructions

Read more…