All Posts (11086)

Sort by

Today we decided to finally get out of the office and go fly !
I wanted to test a new pack which has been sitting on my desk for a while, a 14.8V 4s4p 24400mAh. 

This is a different type of lipo , with a energy density of 262 Wh/kg. 

Simply, this battery has an energy density which is x 1.62 of regular lipo (160 Wh/kg), which can help you get long flight time.  This GEB even beats the  VERY expensive Maxamps battery, which is 180 Wh/kg.  Ok, so the Maxamps can handle a few more C's. But if you are going for long flight time, then the GEB is for you !

The downside of this different battery chemistry is that the discharge rate is only 1C/2C maximum. You must take this into account when planning to use this battery. For example: a 3s1p 6100 battery should not be discharged at higher than 12.2A. A 4s4p 24400mAh battery should not be discharged at higher than 48.8A. A three second burst at 3C is supposed to be OK. If you discharge any lipo above its maximum discharge rate, it will instantly become damage and will never deliver the same performance as new.

So, with that in mind.. 

I grabbed a 680Pro by Tarot which I had laying around and threw on a Pixhawk on it. A quick auto tune and I was flying, albeit not very well- sorry Pixhawk you need more tuning. 


Since I only have 6S capable  speed controllers ,there was no possibility to go up to 8S. That will be by next test flight. 


The current needed to hover was about 30A, this is safe the battery pack I was using.

Pack was hot after the flight , but under 60 * C for sure. 


My plan is now to do a couple of more flights like this. I need to know if the battery will keep its capacity (performance) over multiple discharge cycles at 1.25C (30A).  I am concerned about the voltage sag which was at about 15% of capacity.  Battery getting hot is never good, either. 

Btw, loiter worked at the office, but drifted at the beach. I didn't debug it, but I guess I should just look at the logs. Flew in STABILIZE.


This flying day got me fired up to build a wing for the elusive 100km badge.. Actually, I think a 100 km flight with be piece of cake with a fixed wing.

If I can make  RVJET cruise at 50W @ 60km/h.... well, lets just say I might be going fishing to Bimini (200 km trip)

I will start with 14x5.5 CF multi rotor  prop and 380 kV , 22.2V .  We will need more pitch, but 5.5 is all I have atm. 

3689582641?profile=original

3s2p 6100 22.2V shown.  I will put more batteries , no worries. :)

3689583003?profile=original

SunnySky 3508 - 380kV


Here comes the plug, you can buy these batteries at RangeVideo. I know a lot of UAV guys have been looking for them.
If you need something with higher discharge rate (30C), I suggest to check the new 16Ah cells from Gens Ace.
they are 180Wh/kg plus the batteries themselves are very nicely assembled; aluminum radiator sheet over top and bottom, plenty of foam on the ends to protect the cells, overall I was impressed. You can use  single 6s 16000mAh pack on an S800. Probably 13-14 minute flight times with and NEX5 Zenmuse.
1. RV Power = Gens Ace cells
2. RV Endurance = GEB cells


3689583029?profile=original

Lastly, the video from this morning.

https://www.youtube.com/watch?v=BDP6EHtCAuQ

Read more…

A twoview 3D reconstruction

3689582628?profile=originalClick for big!

In the last post just two days ago, I talked about the fundamental matrix and a homography which allowed 2D images to be warped in such a way that they overlap. That technique works a bit better if you take the photos from the same perspective point (more like a tripod looking around), because there will be less perspective distortion.

In this post, I'm discussing a bit more how 3D reconstructions are made. Using some photos from the same dataset as before, it will become apparent what good features are and how these eventually result in good or bad data. I'll try to upload them at maximum resolution so you can zoom in a bit this time. Warning, they're pretty big, 8000x3000. I hope it maintains the original size.

3689582875?profile=originalThis is a picture demonstrating the inliers for the fundamental matrix solution of this image combination. In the previous post I discussed how algorithms like SIFT and SURF recognize features on the basis of local gradients. In this image you should be able to see exactly how these 200 features are recognized and what a good feature is. As you can see, areas that have poor local gradients aren't matched easily, my algorithm prunes these very early. Features that are really excellent and unique are shadows on the ground. That's because they are flat areas so their gradients don't change and the sun through the leaves creates irregular shapes that are good matches at full scale, but also increasing scales as happens in these feature recognition algorithms. The irregular rooftop is also a great source for features. It's easy to see some more global areas that probably did match, but don't stand out as very strong keypoints.  What does this mean?  It's important to select the right time of day for taking pictures!  Hard cast shadows with strong sun may cause local gradients to disappear, a very low sun with soft shadows may not emit enough light for a suitable shutter time and with the sun right above your head the shadows may be minimal. It's a great area for research on what defines good shadows for perfect 3D reconstructions.

So how did I get from this image to the one above, where the points are 3D triangulated? Through the fundamental matrix we find the essential matrix if we have a camera that's calibrated (focal length and image center point). From there, the camera projection matrix P is derived for each image. That camera projection matrix describes a rotation and translation from one camera to the other in 3D space. The information it used to derive that is a list of normalized 2D coordinates from both images (our pixel matches!). Normalized means: radial distortion removed.

From here, things are starting to become simple. Knowing the orientation of cameras in 3D space (in this simple "2 camera virtual world"), then we can triangulate the matched 2D points in each image, basically a projection of a 3D point, to derive the X,Y,Z coordinate of that 3D point itself.

It's important to mention here that the actual position of that 3D point in this system is highly determined by the distance between the cameras. Unfortunately we don't know that yet, so the scale at this moment is arbitrary. For applications like stereo vision this distance *is* known, that's why triangulated points in such machines can derive pretty accurate depth information. In our case, we could scale our P matrix according to our GPS 'guesses'.

This is only a two-view solution. Through a process called "registration" though it's possible to incorporate more cameras in this simple 3D space because a lot of these cameras are associated through other image combination analysis. You'd apply the same process over and over again, every time creating more and more points and of course filtering similar points. Each 3D point in such algorithms usually has a list describing the cameras and the 2D point index corresponding to that 3D point, which is useful for refining the solution.

About refining... what I did not discuss here is bundle adjustment, smoothing and point filtering. You can see outliers in my solution and probably there's a bit of point jitter on surfaces that should be planar. There are techniques that can be applied to remove unwanted points automatically (mostly statistical analysis methods), smooth the point cloud and larger scale adjustments that sweep through your entire solution to reduce the overall error and derive the best fit by manipulating the constraints that you imposed during the construction. For example, you could relax constraints for a camera that had a very poor HDOP, whereas one with a strong HDOP/VDOP at the time could have a more stringent constraint. In the process of finding a better solution, this eventually leads to a model that doesn't converge so much to the best "average", but one that leans more to known correct measurements and has a low emphasis on possibly bad information that looks good.

Read more…
Moderator

Trappy, this one's for you!

Jeff Bezos at Amazon hasn't done it. Nor has Fred Smith at FedEx or Scott Davis at UPS. No American CEO has persuaded Washington to relax its chokehold on commercial drone use in the United States. But this month a 29-year-old Austrian entrepreneur living here in Asia broke Washington's drone monopoly, winning a court case that may clear the way for drones to deliver packages to your doorstep.

The Drone That Shot Down the Feds

How a 29-year-old Austrian buzzed the Statue of Liberty, built a business, and beat U.S. regulators in court.

Read more…

3689582777?profile=originalA number of people on this site are using their vehicles for aerial mapping. There are tools available for image stitching, which basically produces a rough idea about what the terrain looks like from above. Image stitching does not compensate for perspective and usually contains lots of artifacts. The reason why some older tools don't really work that well is because they rely on older algorithms for image matching which are not as scale or rotation invariant.

For example, have a look at the image below:

3689582614?profile=originalHere we see two images that have been matched together using a "SIFT" algorithm. That algorithm is scale and rotation invariant, which means images that are slightly different in scale, are rotated in any direction can still be matched together reasonably well. In this example, it's easy to see it also deals with changes in luminosity very well. These algorithms look at local luminosity gradients (not actual values), so they detect places where you have very specific, irregular changes, but changes that are consistent between images. This makes large, uninteresting areas invisible to this algorithm (as there are no local gradients there). The shadow edge is pretty regular and never matched. Have a look at which features the algorithm detected instead and matched to the paired image to understand what makes a good feature. For an indepth read, this guy explains this really well: http://www.aishack.in/2010/05/sift-scale-invariant-feature-transform/

Now here's the reason why it's important: if you understand how this algorithm works, you can also get a better understanding how to shoot your images and what to prevent to get good matches. For algorithms like these, organic, flat areas are great. However, trees aren't that great because leaves occlude specific gradients when you change position over them. In other words, if you fly 10 meters further, the way a 16x16 pixel area looked has changed considerably due to wind and what is visible through the leaves: your gradients change completely! That's why such areas need photos taken closer together to be able to get features in the biomass, otherwise they'll end up flat or blobby.

The second image shows the matching pairs of features after the fundamental matrix was established. The fundamental matrix establishes an epipolar relationship between two images. That means that a point in one image is related to another point in the image which must be located somewhere along a line. This makes finding the feature in the other image easier. When you have a camera model, it also becomes possible to triangulate these points to real world geometry.

The image at the top wasn't created with the fundamental matrix, it was created using a "homography matrix". This matrix defines how the two images as planar surfaces are related to one another.  So it describes a 2D geometric transform that should be applied to minimize the error between these two images. You can use this to to stitch images, but also for things like "augmented reality", where a 3D camera is matched to your real camera depending on how a 2D marker is matched in the view.

Want to play around with this yourself?  I found a very nice Java library, probably easier to use than opencv, with some really clear examples:

http://boofcv.org/index.php?title=Example_Image_Stitching

http://boofcv.org/index.php?title=Example_Fundamental_Matrix

This code is already halfway towards a panorama stitcher. If you calibrated your camera, then you can use the parameters to work on the undistorted images in this case. I don't recommend undistorting images prior to 3D reconstructions because it also distorts pixels and therefore impacts on how features are matched. In the 3D reconstruction pipeline there is a camera model with calibrated parameters, so features do get transformed correctly through that more accurate model.

If you want to georeference your work, have a look here:

http://www.digital-geography.com/qgis-tutorial-i-how-to-georeference-a-map/

Read more…
3D Robotics

Control a fleet of drones with Salesforce

3689582749?profile=originalThis is a very cool hack by Reid Carlberg, using two Parrot AR.Drones, three Raspberry Pis and the Salesforce1 Mobile App. See the whole post for the code 

Let’s say — hypothetically —  your VP of Drone Fleet Operations just asked you to help her handle drone management, route planning, payload optimization and more. What do you do? Well, there’s a few approaches to tackling the problem. Approach #1 is all about controlling drones using the Salesforce1 Mobile app. That’s what I’m going to talk about today. Note that all of this is done with a free Developer Edition and a little code.

Although I won’t cover it here, there’s also a mildly entertaining yet entirely impractical YouTube artifact documenting my adventures at ThingMonk where together with the excellent Darach Ennis we were able to launch a quadcopter using a coffeepot.

Equipment & Architecture

Let’s start by looking at the equipment you’ll need. The first thing is a quadcopter or two.  I used the Parrot AR Drone 2.0 available at pretty much every retailer worth their weight in salt. The Parrot is great for a lot of reasons, but first and foremost is that it has a great API. Where you have an API, great things are possible, right? Now, the Parrot is also a toy, so you production minded folks will probably want to upgrade to something more robust.

ardrone

The way the AR Drone works out of the box is that it creates a WiFi hotspot. You then connect your controlling device to that AR Drone hotspot and operate it. Parrot sets you up with an app that runs on either an iOS or Android device. I’ve controlled them from both platforms and it works great. The default AR Drone configuration requires one controller per drone, and it requires that controller to be on the WiFi network provided by the drone. If you have two drones, they are isolated from each other by their network connections and there’s no interaction.  

ardrone.standardconfig

In order for this to work with Salesforce, and in order to control multiple drones at the same time, we have to somehow unify these devices, which using the out of the box configuration means the controller needs to bridge multiple networks. My goto local interface box is typically the Raspberry Pi, and, fortunately, the Raspberry Pi is capable of supporting multiple network interfaces, which means it can also handle multiple network addresses. There are a few ways you could configure this, but I chose to use a single Raspberry Pi as a bridge between Salesforce and two other Raspberry Pi’s which connect to the AR Drones.  It looks a little like this:

ARDRone.Salesforce.v2

Now all you need is an app to handle the interface to the AR Drone. There are a lot of great ways to do this, and for this example I have used CylonJS and theirARDrone driver.  (You might remember Cylon JS from the Dreamforce Connected Device Lab.  They do tons of great stuff in the robotics world and have cool libraries for JavaScript, Ruby and Go.)

Control via the Streaming API Pattern

My first approach on this project is to use the familiar Streaming API  Pattern. (SeeControlling Philips Hue from Salesforce1 for another example, or get started with areally simple streaming API example.) The Drone Gateway connects to Salesforce, listens to a Streaming API Push Topic and then forwards those instructions to a device as soon as they’re received.

On the Salesforce side of the house, we have to create a simple way to generate listenable data. This is easier than it sounds. The first thing we want is an sObject to store the data in. I’m re-using an existing object pattern I’ve used for other message driven work, I call it “Drone Message.”  The two key pieces of data it stores are the Address and Message. You can see in the screen capture that this one is setting the “land” message to “D2″.

Drone_Message__DRONE-00143___salesforce_com_-_Developer_Edition-2

You can of course use the default UI to create the records, but that then requires you to know addresses and message codes. Since code handles those kind of details better than my brain does, I created a simple Apex class to create these records.

And now all I need is a little Visualforce code to extend this out to the UI layer. Note that this Visualforce page is tied to the Apex code above using the controller attribute.

Now you need to make this Visualforce page available for mobile apps, create a tab for it and finally customize your mobile navigation options.  These are all just a few clicks, so check out the links if you’ve never done it before — pretty easy. Out in the world of humans, this renders as a very simple page, the same one that you saw in the video clip above.

DroneControllerInterface-one

Now that we have a quick and easy way to create listenable messages, let’s take a quick look at the Drone Gateway that’s doing this listening. This is a pattern I’ve re-used a few times, so you might be familiar with it. The gateway authenticates, begins listening to a Streaming API Push Topic, and then handles whatever it receives.  I chose to write this in Node.js and the code is pretty simple. The connect to Salesforce is detailed in the Philips Hue article, so I’ll just show you how it handles the message. Note the “address” and “message” arguments.

Now, you will have no doubt noticed that the above code is doing nothing more than making a call to a webserver. When I was testing, I decided that an http based interface would also be fun, so I created a small server that simply responds to two URLs: start and stop. You can see that these map to the CylonJS commands for “takeoff” and “land”.

And there you have it. The start to finish message flow now looks like this:

  1. User presses takeoff on their mobile device.
  2. Salesforce1 inserts a Drone Message object for takeoff.
  3. Streaming API picks up the new records, forwards to listeners.
  4. The Node.js based Drone Gateway catches the new record, and sends it to the right address.
  5. The Node.js based Drone Server sends the specific command to the AR Drone.

Code notes and links:

My command center for the video shoot looks a bit more complicated, but it follows the diagrams above.  Note the three Raspberry Pi’s and two network hubs on the lower left.

Control-Multiple-AR-Drones-from-Salesforce1.jpg

Wrap Up

As you can see from the video, it’s pretty easy to get the drones to follow some simple instructions. The primary challenge with this method is the inherent lag between when an instruction is issued and when it gets to the drone.  This lag depends on a huge number of factors — Internet connection, gateway device performance, Streaming API performance, etc — but the end result is the same.  A drone moving at 5-6 meters per second will be in a completely different place by the time it responds to a delayed command.

An interesting experiment that raises a lot of questions for me.  First and foremost, what is the best way to spread device intelligence out among the components of a system?  Which is to say, what kind of work should Salesforce play in this kind of complicated interaction?  My overall feeling is that this, while interesting, is lower level than truly practical today.

Read more…

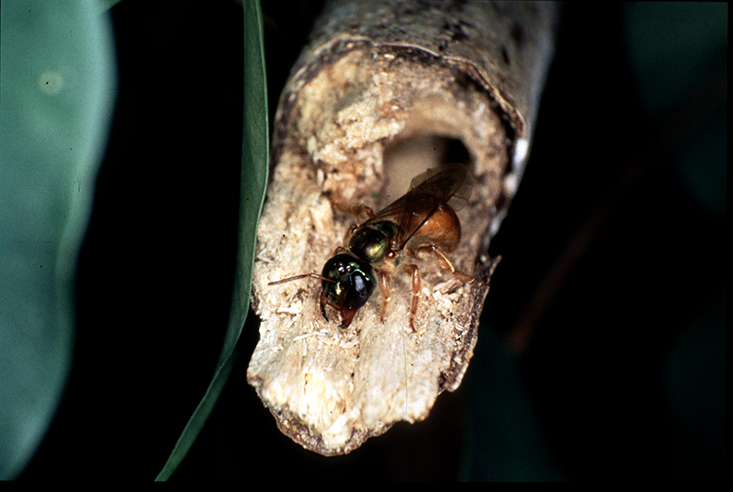
2832_2bc8ae25856bc2a6a1333d1331a3b7a6.png(Image of Megalopta Genalis by Michael Pfaff, linked from Nautilus article)

How would you like your drone to use vision to hover, see obstacles, and otherwise navigate, but do so at night in the presence of very little light? Research on nocturnal insects will (in my opinion) give us ideas on how to make this possible.

A recent article in Nautilus describes the research being performed by Lund University Professor Eric Warrant on Megalopta Genalis, a bee that lives in the Central American rainforest and does it's foraging after sunset and before sunrise when light levels are low enough to keep most other insects grounded, but just barely adequate for the Megalopta to perform all requisite bee navigation tasks. This includes hovering, avoiding collisions with other obstacles, visually recognizing it's nest, and navigating out and back to it's nest by recognizing illumination openings in the branches above. Deep in the rainforest the light levels are much lower than out in the open- Megalopta seems able to perform these tasks when the light levels are as low as two or three photons per ommatidia (compound eye element) per second!

Professor Warrant and his group theorize that the Megalopta's vision system uses "pooling" neurons that combine the acquired photons from groups of ommatidia to obtain the benefit of higher photon rates, a trick similar to how some camera systems extend their ability to operate in low light levels. In fact, I believe even the PX4flow does this to some extent when indoors. The "math" behind this trick is sound, but what is missing is hard neurophysiological evidence of this in the Megalopta, which Prof. Warrant and his colleagues are tying to obtain. As the article suggests, this work is sponsored in part by the US Air Force.

You have to consider the sheer difference between the environment of Megalopta and the daytime environments in which we normally fly. On a sunny day, the PX4flow sensor probably acquires around 1 trillion photons per second. Indoors, that probably drops to about 10 billion photons per second. Now Megalopta has just under 10,000 ommatidia, so at 2 to 3 photons per ommatidia per second it experiences around 30,000 photons per second. That is a difference of up to seven orders of magnitude, which is even more dramatic when you consider that Megalopta's 30k photons are acquired omnidirectionally, and not just over a narrow field of view looking down.

Read more…
Developer

Rise of the clones

Rise of the Clones (APM2.x series)

http://creativecommons.org/licenses/by-sa/3.0/

3689582754?profile=original

http://creativecommons.org/licenses/by-sa/3.0/legalcode

The name 3DR, 3D Robotics, and ArduPilot are trademarks of 3D Robotics.  

The design is Open Source and licensed under the Creative Commons and GPL v3 license.

3689582721?profile=original

A misconception is out there that cloning the Ardupilot is not liked.

This is not right, there are a few companies that make Ardupilot gear, and who give back to the community, either in support of developers, or simply adding improvements and Publishing the results for all to see.

What are not appreciated are those who take, but do not give. Who either simply take the Schematics and PCB drawings, directly use these, make equipment, and do not offer support channels or worse, those who make derivatives, and do not feed back to the community.

Recently Hobby king released the HKPilot mini, a welcome derivative to the APM series of boards, this is great news, but there is a catch.  Hobby King did not want to release the drawings.

Here is an email exchange that I have had with them regarding this issue.(please note I have been corrected, the copyright is owned by 3DRobotics)


Me Mar 11 11:47:

Where are the design files for this product? it is Open Hardware, you must publish your design files. This product is copyrighted to DIYDRONES*, and is licensed under the Open hardware licence. This requires you to publish the Eagle drawings.
Under the licence, any derived product MUST be published with the SAME open hardware licence.

Howard T., Mar 14 10:39:

Hello Philip,

Thank you for raising this matter to our attention. For us to help you with your inquiry, we will escalate this matter to our Product Specialist for further assistance. Rest assured that your concern will be addressed shortly. Thank you for your patience and understanding.

Regards,

Howard
HobbyKing Support Team


Ian, Mar 14 18:20:

Hi philip , 
Thanks for contacting the HobbyKing Support Team.

You may contact DIYDRONES for the design schematics. We are not the owner therefore we cannot supply you with the design

Thanks for emailing support. 
If you have any other questions, please let me know. 
Best Regards. 
Ian 
HobbyKing Product Specialist 

 After other exchanges, including posts on the product page they posted the following.


   Proficnc 11 points - 11/03/2014

   design files please

      HobbyKing_Admin 

      Eagle CAD files will be uploaded shortly in compliance with the user agreement

      proficnc  11 points

      Thankyou :)

Which was great…. Except they did not post the files.

After another day of many people sending support requests, finally they sent an Altium file (Just PCB, and with exploded polygons).  This File was a modification of the Altium file I had posted on DIY Drones of an early 2.5 revision (mistakes included J ) which does appear to be the board that they have built.

But the problem? According to the licence, they MUST abide by the licence.

  • ShareAlike — If you remix, transform, or build upon the material, you must distribute your contributions under the same license as the original.
  • Attribution — You must give appropriate credit, provide a link to the license, andindicate if changes were made. You may do so in any reasonable manner, but not in any way that suggests the licensor endorses you or your use.

So that means that Altium is OK, as that is what they used. But they MUST include the FULL design file. That is Schematic, Lib files, everything needed for others to go straight into production with this file, and it should have this license clearly marked, and it should show it is a derived work.


* The name 3DR, 3D Robotics, and ArduPilot are Trademarks of 3D Robotics.  

The design is Open Source and licensed under the Creative Commons and GPL v3 license.

The Pixhawk / PX-4 has the open Hardware licence, please see the link below for details...

http://www.oshwa.org/definition/

1. Documentation

The hardware must be released with documentation including design files, and must allow modification and distribution of the design files. Where documentation is not furnished with the physical product, there must be a well-publicized means of obtaining this documentation for no more than a reasonable reproduction cost, preferably downloading via the Internet without charge. The documentation must include design files in the preferred format for making changes, for example the native file format of a CAD program. Deliberately obfuscated design files are not allowed. Intermediate forms analogous to compiled computer code — such as printer-ready copper artwork from a CAD program — are not allowed as substitutes. The license may require that the design files are provided in fully-documented, open format(s).

ARSOV RC HAS RELEASED THEIR DRAWINGS. CHECKOUT THEIR GITHUB :)

If you do not wish to release your drawings, then you must start with a clean slate, the reality is, if it is compatible with APM/PX4/Pixhawk, it is most likely a derivative. (Exceptions would be TauLabs/OpenPilot; APM code will run on their boards, but only after significant modification to the code)

Why is this important?

DIYDrones is a community where people with a common interest share their ideas, and inventiveness. It is important that the work done by those in the Development process is recognized for its worth. When someone comes along and taps into that knowledge, makes a gain from that, and does not return to the community, it takes away from why we are all here.

I have heard people say “I do not want to open source my product based on APM, because people will copy it…..” the reality is, without the open nature of the project, this person would be unable to economically design their project in the first place, so feeding back to the community is a small price to pay.

For those interested, have a look at the git-hub repositories, there are a number of hardware suppliers supported by the code base, and the development team, these manufacturers get direct support from the whole team, because they are OPEN with their code additions, and also with their hardware.

When purchasing hardware, consider this,

  1. does the company you are purchasing from directly support the product?
  2. does the company seek to improve on the product, and release this information for the community to use?
  3. do profits from the sale of the product go towards creating better outcomes for the community in the longer term?
  4. does the company have quality control?
  5. does the company have engineering on hand to help with your log analysis?

This Blog will be moderated. All posts will require approval. 

Read more…

DJI's new entry level Naza, The M lite.

Test Flight Video

I don't know how many of you fly with DJI's naza, With me coming for just using the kk2.5 this was quite the the upgrade and was price pretty well! Next time I will of course buy the APM2.6 or maybe even the pixhawk. For now I'm using the M lite for aerial video.

ONBOARD Flight footage (RAW)

as you can see I still have some vibrations I need to work out.


Here are some of the futures that are great to take advantage of.

Read more…

freeOPV

The polymer solar cell was envisioned many years ago as a low cost flexible PV technology made using fast printing processes, simple machinery and abundant materials. At the turn of the millennium there was a lot of hope that the vision would become reality and this spawned a massive surge in the scientific literature with ever increasing performance and marvels of processability, yet the polymer solar cell remained elusive and the few examples of available OPV have all been far from representing the vision and promises in terms of cost, abundance and fast processing.

I believe that to be true to the art, the polymer solar cell has to be adherent to the vision and especially it must be made available to anyone interested in it. For this reason my group developed the freeOPV modules that are freely available to anybody with a fundamental, academic or scholar interest. The philosophy and spirit is that it should be free without ties and I encourage students, school children, nerds, gizmos, colleagues, companies etc. to make use of this special offer to study, posses, claim, reverse engineer, copy, and use these OPV modules that have been created to propagate OPV and hopefully enable us to reach the objective of supplying the globe with energy from OPV in the future, OPV that are true to the art and original vision of OPV.


The freeOPV modules are (according to my view) far from the mark when it comes to power conversion efficiency but pretty close when it comes to stability, manufacturing speed, cost and abundance of elements. The aim is thus to supply you with the most recent development and the freeOPV module is thus meant to serve as an available benchmark to everybody and anybody irrespective of their origin or interest. freeOPV is what today can be prepared in huge numbers and large area with consistent performance. freeOPV is to me also an experiment of who is interested, what do the interested person do with it, where does it end up, and how efficiently can it be distributed. The cost of a freeOPV module is very low, in fact shipping is significantly higher in cost than the module itself including all handling and preparation for dispatch. It is my sincere hope that you will help me propagate the polymer solar cell and do feel free to share any results, we have to work together on this and learn from it, I have done the majority of my part and hope that you will take my offer an also honor it with feedback, good or bad, remember I am a scientist and to me any results are of interest regardless of their nature.


So go to this link and claim your freeOPV solar cell module.


Frederik C. Krebs

Read more…

3689582559?profile=original

The Agribotix team is in New Zealand, flying our UAVs over Tasman Glacier to help researchers at Victoria University of Wellington make a digital elevation model of the glacier. Today, we flew the twin boom Sky Hunter over 100km in transects across the glacier. We've mounted a downward facing camera in the fuselage, which takes photos every 3 seconds. Using these photos, and programs such as Agisoft Photoscan Pro, we can construct an accurate 3D model of the glacial surface, useful for a variety of research applications, including estimates of glacier velocity and the change in glacier volume over time.

Read more about our flights today, and check out our progress at: Glacier Flights

Read more…

Are Quadcopters Legal?

In response to booming popularity, many people have been seeking information about the legality of using unmanned remote-controlled aircraft. The FAA lumps this kind of aircraft under the general classification of UAV (Unmanned Aerial Vehicle), or UAS (Unmanned Aerial Systems). It's a broad category that includes everything from the Predator drone to the DJI Phantom quadcopter. Unfortunately, there's next to nothing I can tell you at the moment. Very few laws explicitly address UAVs, and those that do are dated, clearly meant for vehicles with the size, mass, and capability close to that of manned aircraft. Hobbyist and consumer RC aircraft and their photo- and video-oriented derivatives, like the Phantom, aren't explicitly addressed, apart from a few guidelines.

Disclaimer: This article should not be taken as legal advice. Rather, this article merely reflects the views of its author. Please consult with an attorney to determine what, if any, legal requirements or restrictions apply to the use of UAVs in your area.

As far as the FAA goes, here is what I can tell you:

  • Don't fly a UAV within FAA controlled airspace without FAA approval—approval that you won't get
  • Don't use a UAV for commercial purposes without FAA approval—again, approval you won't get (an assertion that's currently being challenged)
  • Keep your aircraft within visual range at all times, regardless of the available BVR (Beyond Visual Range) systems

Otherwise, there is no direct legislation on the books that I can find. Even the maximum altitude at which one is allowed to operate is not clearly defined (see below). This is all about to change, though. The Obama Administration set a deadline of this fall for the drafting of new legislation that will specifically regulate the use of UAVs, especially multi-rotor helicopters. This legislation will go into effect in the beginning of 2015.

But where does that leave us for the remainder of 2014?

What Changed?

Before attempting to answer that, we should consider why this legislation is being pushed through now. RC enthusiasts have been operating small-scale unmanned aircraft for decades, and many of the new aerial-camera platforms like the Phantom are apparently just adaptations of existing RC systems that are being rebranded as flying camera support. In my opinion, there are two factors:

  • The explosion in popularly of UAVs outside the previously niche RC community
  • Inexpensive flight control systems that make consumer multi-rotor helicopters possible

Arguably, the two are interrelated. In the past, RC aircraft were more commonly fixed-wing, meaning they required a sizable area to take off and land. And the VTOL systems (Vertical-Take-Off-and-Landing, i.e., helicopters) that did exist where very difficult to fly. Inexpensive, computerized flight controllers have made it comparatively easy to fly multi-rotor systems. Because they are VTOL-capable, and relatively compact, they can be deployed essentially anywhere, and in the hands of a skilled pilot, they can be maneuvered nearly anywhere.

Because today's UAVs can be flown with varying degrees of autopilot assistance, from nearly full autopilot (for craft with GPS) to full "agility" modes that disable virtually all safeties, these new multi-rotors have attracted users with a much broader range of flying experience. More people are using them, and more people are using them without applying common sense. Greater maneuverability means more small UAVs in the air, with more being used in unexpected contexts. Because of this explosion, the government has recognized that this technology needs to be formally addressed, not to mention the growing desire on the part of businesses, such as Amazon, to put UAVs to commercial use without going through the current, monolithic FAA-approval hoopla.

What is FAA Airspace?


For Illustration only: FAA-designated airspace classes and their respective ranges

If you're reading this article in the United States, you are within the FAA's airspace. Seriously. There's a widely held belief that below a certain altitude, one is outside FAA jurisdiction—some say below 400 feet, others say below 700 feet. Either way, this is a canard. FAA jurisdiction starts at the ground and extends to the edge of space. Most likely, FAA jurisdiction is being confused with FAA-"controlled" airspace.

"FAA jurisdiction starts at the ground and extends to the edge of space."

What is FAA-controlled airspace? Essentially, it is airspace in which regular, full-scale manned aircraft operate. Because 400 feet is considered below the safety floor for most types of manned aircraft (helicopters in urban environments notwithstanding) it's generally permissible to fly model aircraft and other non-commercial UAVs up to this altitude as long as visual contact is maintained. There are exceptions, notably near airports. The controlled airspace around airports is divided into classes by the FAA, and how these are divided will vary depending on geographical and other factors. However, a good rule of thumb is to assume that all airspace within three miles of an airport, starting at sea level, is controlled, and that operating UAVs without explicit FAA approval is prohibited. This means that it's effectively illegal to operate a UAV almost anywhere in what one might consider metro New York City, because there are three major airports, including Newark.

Newark International Airport

Commercial Use

Technically, the FAA doesn't forbid the commercial use of UAVs, they just require FAA approval. Only two UAS aircraft models have been approved for commercial use: the Boeing Insitu ScanEagle and the Aerovironment Puma, and only for deployment in the Arctic. These are the kind of operations the FAA hand in mind when they drafted the law—large aircraft that come close to manned vehicles in terms of size capabilities, as well as the damage they could do following a collision. A twelve-ounce quadcopter was clearly not what they were thinking of when the law was passed.

This hasn't stopped the FAA from doing its best to block the commercial use of consumer-grade UAVs. Perhaps the most famous case applies to a Minnesota brewery that was using a DJI F550 to deliver beer to ice fishers. Many are under the impression that the FAA acted outside of its jurisdiction here; however, as noted above, all airspace is enforced by the FAA, and the prohibition against unauthorized commercial use does not include qualifications about a minimum operational altitude.

The FAA oversees and regulates airspace for thousands of aircraft simultaneously.

In another case, the FAA ruling has been challenged. On March 6, 2014, NTSB Administrative Law Judge Patrick Geraghty ruled that the FAA law does not ban the commercial use of drones. This follows a lawsuit against Swiss UAV operator Raphael Pirker, after he allegedly flew his craft recklessly over the University of Virginia's campus while recording a video he had been hired to make. The ruling would seemingly open the skies to  commercial UAV flights. However, as this article goes to press, the FAA is appealing the ruling. So, we will just have to wait and see what happens.

Until we know the outcome of this case, it's safe to assume that commercial flying is still illegal—unless spending time in court attempting to establish a legal precedent is something you want to do.

Non-UAV Laws that may Apply

At least, until 2015, you are more likely to be prosecuted under other laws rather than FAA or UAV-specific legislation, such as:

  • Reckless endangerment
  • Invasion of privacy
  • Obstruction of police/emergency services duties
  • Noise ordinance violation
  • Littering

Of those, invasion of privacy and reckless endangerment, for obvious reasons, will likely serve as the most common basis for lawsuits and prosecution against UAV operators. However, one could envision an imaginative prosecutor coming up with less obvious grounds to build a case, such as fining an operator for littering, in a case where the UAV crashed in a public area and was abandoned by the pilot. Therefore, one shouldn't assume that just because UAVs represent something of a new legal frontier that one will be immune from any form of legal action.

Privacy

Because more and more UAVs have cameras built in or support the attachment of cameras, privacy and UAV use is becoming a hot topic. Apart from reckless endangerment, privacy could well become a major basis for prosecution or lawsuits against UAV operators. For now, normal privacy laws would seem to apply to image and audio capture from UAVs in general. That is to say, for the most part, one is allowed to record or photograph in contexts where there is no "reasonable" expectation of privacy.

In a park, or on a city street, for example, there is no "reasonable" expectation of privacy, nor is there generally a legal basis to make an invasion of privacy claim, since one is in what is understood to be a public place. The same may even apply to parts of private property "normally" visible from public space, such as a front yard visible from the street. On the other hand, recording the interior of a home or private building is illegal, even if the camera is placed outside. Additionally, exterior spaces on private property, possibly a backyard not normally visible from the street, are quite often, like the interior of a home, considered spaces where one has a reasonable expectation of privacy under the law. What this means for UVA operators is that flying over, say, someone's backyard and recording video or photos stands a good chance of qualifying as an invasion of privacy and should be avoided. This is true even where there is no direct over-flight; in other words, where there is no question of trespassing, but the camera is still able to capture images from parts of the property where reasonable expectation of privacy holds.

Will laws change in this regard? My guess is, as legislation evolves, privacy laws will become stricter as they relate to UAVs than they are in general. For now, most users seem to be innocent, shooting video for the sheer enjoyment. However, it's only a matter of time before we start seeing the technology used by private investigators and others as surveillance tools. Although currently restricted, it's also likely we will see their increased use by law enforcement as well as private security, and again it will be interesting to learn how the privacy debate pans out.

Air Rights over Private Property

The question of air rights as it relates to UAVs is relatively novel since manned aircraft operate thousands of feet above populated areas, far too high to be considered trespassing. Air rights in the sense of, say, hoisting a boom over a neighbor's property are well-defined, and such an action, it's safe to assume, would indeed constitute trespassing. Some may be tempted to assume that since UAVs operate in a sort of middle ground, below the elevations at which manned aircraft normally operate, yet potentially above the reach of ground-based apparatuses such as a cherry pickers, they are somehow exempt. While this may, to some extent, be arguable for larger, commercial-grade UAVs that come closer to manned aircraft in capability (if they ever get legalized), it hardly seems like a good thing to risk in the case of a quadcopter or other consumer UAV. Consumer UAVs don't have the range and are too unreliable—many, if they lose signal, will automatically land wherever they are, or will fly at a fixed, low elevation back to a home point. But even if consumer craft were more capable, the requirement that they have to be kept within visual range (see below) effectively limits how high they can be flown.

In other words, even though there may be a slight gray area as concerns UAVs, one would still be extremely foolish to operate over someone else's private property without permission. In a small town in Colorado, famously, there is even an attempt to make it legal to shoot down UAVs flying over private property. This may not pass—my guess is it won't—but even so, safer means of disabling intrusive aircraft may still be found, and the operator may still be charged with trespassing.

Beyond Visual Range (BVR)

"You are required to maintain visual contact with your aircraft at all times."

BVR flying is currently forbidden by the FAA, and also goes against AMA (Academy of Model Aeronautics) and other guidelines. In other words, you are required to maintain visual contact with your aircraft at all times. This is true even if the vehicle is equipped with an FPV (First Person View) camera system, or is capable of flying along a pre-configured autopilot course. This rule applies regardless of the range of the transmitter, which, in some cases, can be several miles, under the right conditions.

Since the size of the aircraft and local visibility can vary, there currently isn't a set distance as to how far away a UVA can be from the pilot. Simply put, the pilot needs to be able to see the UAV, and steer it clear of other aircraft and buildings.

Since BVR systems no longer require the Pentagon's budget to purchase, I would expect to see a lot of pressure to change this law, or otherwise nullify the FAA's assertion. My guess is BVR will get approval for commercial applications, perhaps including Amazon's proposed drone-delivery scheme. This will be contingent on FAA certification of the aircraft model being used, as well as some sort of licensing requirement on the part of the operator. I am not as optimistic that we will see the FAA's blessing for consumer use of BVR, even though many UAV makers are already promoting BVR systems.

Who Enforces FAA Laws?

Normally, the FAA uses its own agents, and has its own enforcement mechanism. At least in theory, normal police can arrest you or otherwise enforce FAA legislation. With the widespread public use of UAVs, I would expect this to change. Along with new provisions for consumer UAVs will come provisions granting local law enforcement justification over non-FAA controlled airspace. Either that, or we can expect to see complementary state or local laws that grant local law enforcement authority over the relevant portion of the airspace on top of any FAA legislation. For FAA-controlled airspace, I would expect things to stay more or less as they are. Unless civilian BVR flying is legalized, I would expect UAVs to remain largely excluded from operating in these zones.

Local RC Clubs: An Invaluable Resource

The best piece of advice I can give right now for anyone who's concerned about legalities is to consult a local RC club in your area. In the US, the best place to look is the Academy of Model Aeronautics, or AMA. Not only can they point you toward RC clubs in your area, they provide a wealth of resources for RC pilots and also offer liability insurance that will cover you for up to two million dollars in damages, provided you operate within the safety guidelines they set.

It's not just for legal issues. RC clubs provide beginners with an invaluable community of support. Members have the experience to tell you where it's safe to fly, what pitfalls you may encounter, and they can even provide training, as well as troubleshooting assistance. 

Summary

With the caveat that there are always expectations, and that you should consult with clubs and fliers in your local area, the basic guidelines for flying legally (and safely) can summarized thus:

  • Don't fly above 400'.
  • Don't fly at any elevation within 3 miles of an airport.
  • Don't fly around areas where VTOLs (helicopters) operate.
  • Keep your aircraft within visual range.
  • Don't fly over crowds.
  • Don't record video or take photos in contexts where there is an "expectation of privacy."
  • Treat the air over private property as private property.
  • Follow the safely guidelines set forth by the AMA, even those that are not legally enforced.
  • Don't use your UAV for what the FAA might deem as a commercial purpose.

Though specific legislation is coming, it's more than likely that all but the last of these guidelines will still be valid after 2015. For the most part, it just boils down to following common sense. The laws are really there to decide what to do in cases where people willfully or negligently choose not to follow common sense.

After 2015

As noted, the main change will be the formal ratification of laws that enforce common-sense guidelines already established within the RC community. We will also likely see the legalization of commercial UAV uses, probably requiring some form of FAA or other government agency licensing or registration.

One hopes that the new laws will take into account the wide range of types of UAVs, and not lump everything from a Hubsan X4, which weighs just ounces and nearly fits in your pocket, to a Boeing Phantom Eye, which has a 150-foot wingspan and can carry a 450-pound payload. Ideally, consumer UAVs probably shouldn't fall under FAA legislation at all, beyond a provision that they don't interfere with manned aircraft. Any other legislation regarding their uses, such as invasion of privacy or endangering the public, seems to me to fall outside the FAA's jurisdiction. Other forms of federal legislation may apply, and for things like risks to the public, it probably makes sense for laws to be crafted at the city level, or perhaps regional level. Clearly, the risks associated with UAV operation in New York City are very different from those in small towns in Colorado.

Read more…
MR60

3689582242?profile=original

How to optimize the choice of your UAV's radio frequencies


1. Introduction


As we make our UAV fly we use multiple radio frequency bands for different uses : RC control of the craft, eventual telemetry band, eventual video downlink band (FPV or camera monitoring), GPS.

An issue we have all already encountered are interferences between used radio frequencies.

So how could we try to optimize, in a simple manner, the choice of our UAV's various radio frequencies (rc control, telem, FPV, ...) ?


2. Basic radio wave principles background


Radio waves are sinusoidal signals or a combination thereof. Any radio signal can be reconstructed by an addition of sine waves of various amplitudes and frequencies. Alternatively there are mathematical functions we can use to decompose (analyze) an apparently very complex signal in a number of pure sine waves (of various amplitudes and frequencies), so as for example to extract from the lot those who have the largest amplitude. 

The point is that a radio signal is never a pure sine wave propagating on a unique single frequency.

Here come the "harmonics".

Every radio emission does not only emit on its base frequency but also on a number of "harmonics". Harmonics are radio waves propagating at a multiple frequency of the base frequency. The following figure, copied from the amateur radio wiki, illustrates what harmonics are:

3689582178?profile=original

(if you'd like more info google "radio frequency harmonics" to find the radio amateur's wiki site)


The issue with harmonics is that they are not on your mind when you decide to use channel 5 of your FPV transmitter. You selected channel 5 on your FPV Tx because it seems to be apparently far enough from all the other frequencies you have on your drone; so it should be right ? guess what : not good enough.

Because of the "upstream" harmonics you might still suffer from interferences that will impact your RC control range, disturb your GPS reception (bad HDOP) and or create lines and interferences in your video downlink.

The most annoying harmonics are mostly the ones resulting from the emission of a lower base frequency having an impact on higher base frequencies. An "impact" means that an harmonic's frequency is too close to another base frequency we want to use.


3. And so what ?


So it becomes quite a burden in practice to define for example which FPV Tx channel should I best use, because thanks to these harmonics we can't simply compare the base frequencies of rc control, telemetry, FPV, GPS. We must also consider all of their harmonics !

Don't worry, except if you're a genius,  you should normally not be able to compute which FPV channel is best, just like that, on top of your head.

So we need either to write down on paper all of the upstream harmonics of all the base frequencies and then compare all of these values manually to find what is the optimum frequency combination.

The best combination is the set of (base) frequencies that maximize the frequency distances (in mhz) between not only these base frequencies themselves but also all of their (upstream) harmonics.

You might ask : up to which harmonics should we compute ? 3rd ? 4th ? 5th ? Well that depends on your base frequencies. For example, if you use very high frequencies such as a FPV 5.8Ghz band, then you will have to compute the harmonics of your 900Mhz telemetry link up to the 8th order.


4. A tentative tool


I tried tonight to produce a simple excel calculation tool (there was nothing on TV) that will automate the computation of which is the best choice for your FPV channel, in function of your defined RC control, telemetry and GPS base frequencies.

I chose the FPV channel as the variable to optimize in the equation, because in practice this is the only radio component on your drone for which you can choose different channels (GPS is fixed, Telemetry is quasi fixed, RC control is fixed in its frequency hopping band).


This is a screenshot of the excel tool :

3689582408?profile=original

You enter your own frequeny data in function of your configuration : the yellow cells are the cells where you enter your data.  All frequencies are expressed in Mhz.

You get the ability to enter up to 10 frequencies to analyze (to choose from).

The "Results" frame shows you a color coded computation result for each of the 10 frequencies :

-Green means the best frequencies,

-Orange means it is ok but not optimal (there are other frequencies which are better to use),

-Red means a bad frequency to use because it interferes with another radio component on your UAV.


Optional parameters allow you to define two things:

-Minimimum wished frequency distance (in Mhz) : this is the minimum amount of frequency distance between two frequencies that is required to avoid interferences (100 mhz by default).

-Max capping value for distance calculation : this is an internal computation parameter, just leave it at 100.


I tried this method (manually until this tool) for myself to choose my FPV freq among the 9 available channels and could observe indeed a clear improvement on my GPS HDOP stability (I often had an issue that my 1.3Ghz band FPV would disturb the GPS HDOP). I am curious if this method/tool could also improve your own setup; in any case let the community know what your improvement results are !


You can download the excel tool here: HDFreqoptimisationV1.zip


Any suggestion for improvements welcome,


Hope it will help,

Cheers,

Hugues


Read more…

Another FAA Incident

3689582228?profile=originalThe FAA is crying foul at a Major League Baseball team. The Washington Nationals used a drone to take pictures of the team during spring training. Problem is they didn’t get permission. And commercial drone use is banned.

“We didn’t get it cleared, but we don’t get our pop flies cleared either and those go higher than this thing did,” a team official told the Associated Press.

Read more…

Testing X8 configuration without two propellers

Yesterday I had a few tests with our Tiger Shark in Octa Quad configuration.

The tests were made to see how the copter would cope the loss of one or two propellers.

http://youtu.be/Tc6N0DbBT7M


Obviously the test was in a ideal condition where the propeller just loosens and falls off the Octo.

The test was done by removing first 1 propeller, then two propellers spinning in opposite and same direction.


Without 1 propeller the copter flew as it had all the propellers. There was no feeling of something wrong. It took off and landed easily.


Taking off two propellers spinning in the same direction (lower front left and lower back right) resulted in a copter that in take-off yawed a little. Once the I term build up, it was perfectly straight. It was a little unstable due to the fact that two arms were "stronger" than the others, but generally it was perfectly stable even with some wind.


http://youtu.be/QIeawL1K244


Taking off two propellers spinning in same direction (lower front left and right) resulted in a copter trying to move forward with quite a pace. I took a little pitch back to keep it still, but the overall stability was amazing.....


X8 will not take the loss of two propellers on the same arm, that would result in a crash, unless the recent algorithm gets published and then implemented in ACM code. :)


The code is based on APM:Copter 3.1.2 but runs on VRBRAIN.

Propellers are 13x5 T-motors on the upper and Graupner 13x8 on the lower.

Motors are 3508-700KV with 10Ah 4S battery.

Total weight was about 3.0 Kg.


Thanks to VirtualRobotix.it for the frame and the electronics, and thanks to the APM:Copter dev team that allowed us to fork and use their code, that is progressing fastest than speed light!


Cheers,

Emile


Read more…

3689582141?profile=original

3689582268?profile=original


 I am using my APM 2.6 as a "smart" data logger for a vintage rail dragster which i am on the team for as their  "engineer".  I have some experience using the APM with RC planes and quadcopters and decided this would be a good way to get some velocity and acceleration data with the benefit of gps location thrown in.  it's nice to get IMU and GPS accel and velocity data both.  we used the device on 15Mar14 for the first time and i overwhelmed the log storage capacity of the APM so i am looking at ways to either increase that or reduce the number of parameters that are saved. 3689582295?profile=original

I would like to limit the parameters being save to what i need or be able to turn the logging on or off using the MAVLINK telemetry.  any suggestions would be greatly appreciated.

thanks

dennis


Read more…

Payloader gets its first field test

At last, I was able to get the payloader into the field today! A good day for it too - moderate breeze, so a good test of 3.1.2 loiter as well. It flew great - the hex barely even noticed the weight, and Nicadrones magnet worked perfectly with a sub kilo load - was able to sling it about no problem.

So spent a couple of packs doing practise runs (only a few were filmed), but it's becoming obvious that to deliver payloads, you need a very clear technique - for one, you need to be near to target ground level - 2-3 metres being ideal. Any higher and you will be off target, or worse - damage the contents. And to deliver it with precision, you *definitely* need a board cam and an FPV switcher! Once I get my DVR replaced, I'll do a shot from the two onboard board cameras, so you can see what I mean

But so far - it's coming together well. Next prototype will have the full length strengthening bar to make the light and board cam easier to use - while better, it still bounces a bit. The other option is to strip the light down to it's component parts - of the 180g it weights, most of that is the metal case.

I'm also not happy with the light itself - I'll post the second dark video from the stabilised spotlight. Yes, it works, but it's not good enough for me. I want better stability, more range (it only has about 70' range of travel in tilt), and the light itself is not good enough - one bright spot, and weak edges. I want a more even beam.

Onwards to the next prototype and full auto testing! Next test - full APM auto mission with waypoint payload drop. Also and increase in weight to 1.5kg.

Read more…