All Posts (11086)

Sort by
3D Robotics

3689523961?profile=original

From IEEE Spectrum:

Just a few weeks ago, IEEE Spectrum wrote about an artificial compound insect eye that was developed by a group of researchers based in the United States. Not to be outdone, a group from EPFL in Switzerland has announced their own artificial compound insect eye, and we got a hands-on a few weeks ago in Lausanne.

Generally, we like to make camera systems that work like our eyeballs do. And that's fine. But in a lot of ways, human eyeballs are terrible. The most successful class of animals ever, the arthropods, have gotten along just fine with compound eyes for a very long time, and the most sophisticated eyes of any animal are of the compound variety (belonging to our friend the mantis shrimp).

So obviously, compound eyes have something going for them, which is why researchers in general (and roboticists specifically) are so keen on developing their own versions. The eye to come out of EPFL this week is unique because it offers a huge insect-like field of view, very fast performance under all sorts of lighting conditions, and most notably, it's mechanically flexible: at just 1 mm thin, you can bend it into different shapes.

We got a look at this thing a couple weeks ago while we were visiting Dario Floreano's lab at EPFL, and it's totally cool:

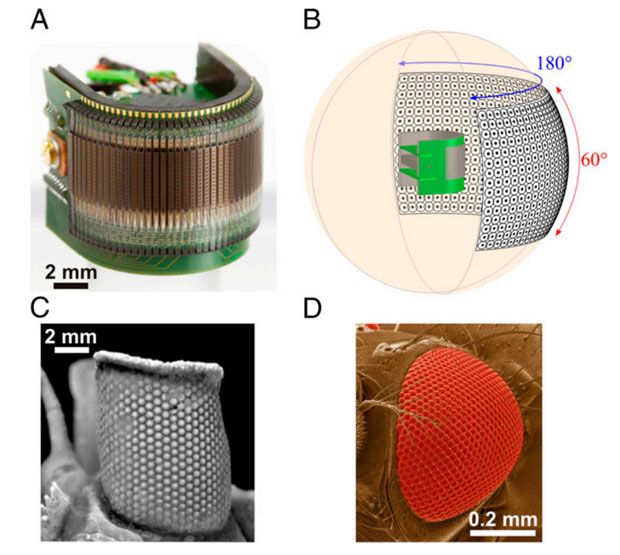
It's amazing how the use of this flexible substrate enables sensors that are not just bio-inspired, but in fact end up nearly identical to the types of compound eyes that you find on everything from flies to trilobites. Here's a figure from the paper showing a comparison:

Image C shows the eye from an extinct species of trilobite, while Image D shows the eye from a fruit fly. Both the real and artificial eyes offer a horizontal field of view of 180 degrees, and they consist of a similar number of pixels. However, the artificial eye is significantly faster, operating at up to 300 hertz, while a fruit fly only updates at 100 hertz. Take that, nature!

It's important to note that these aren't the sort of cameras that you'd want to use to take pictures. What they're best at is sensing movement, or to be more specific, sensing changes in the intensity of light generated by motion. It doesn't sound like much (and it doesn't look like much, either), but it's how bugs navigate and avoid obstacles, and as anyone who's ever tried to swat a fly can attest to, it works rather well. It also works indoors, outdoors, in bright sun, and in shade (or even moonlight), and has no trouble adapting to abrupt transitions between any of these states, which is something that conventional cameras are lousy at.

Here's a video of the system in action, which gives a good idea of what an optic flow sensor "sees" and why it works so well for insects:

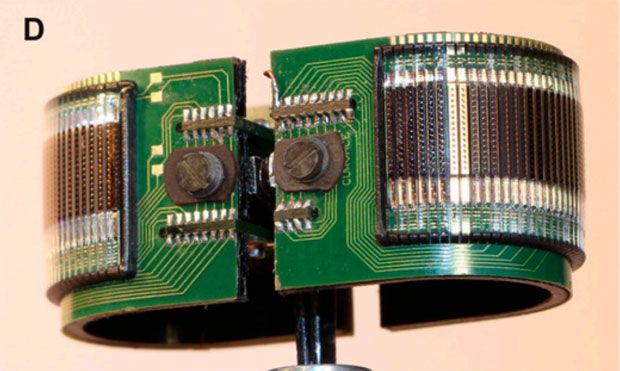
Clearly, there are many advantages that these kinds of sensors can bring to robotics, especially in the context of lightweight aerial platforms. And there's no reason to stop at just one of 'em, either: put a couple CurvACE sensors together and all of a sudden you have a 360 degree panoramic sensor system the size of a couple of quarters:

Freaky. And awesome.

Going forward, we expect to see this tech integrated into robots, and there's also the potential for it to show up in lots of other applications. If it can be made inexpensively enough, we could end up with something like "imaging tape" that could be integrated into smart clothing, to provide a self-contained way of detecting distances to objects. Why? Because why not, that's why. But seriously, flexible sensors like these have the potential to enable all sorts of new applications that have been impossible until now, and we're excited to see what happens.

"Miniature Curved Artificial Compound Eyes," by Dario Floreano, Ramon Pericet-Camara, Stéphane Viollet, Franck Ruffier, Andreas Brückner, Robert Leitel, Wolfgang Buss, Mohsine Menouni, Fabien Expert, Raphaël Juston, Michal Karol Dobrzynski, Geraud L’Eplattenier, Fabian Recktenwald, Hanspeter A. Mallot, and Nicolas Franceschini, was published today inProceedings of National Academy of Sciences.

Special thanks to Dario Floreano and Ramon Pericet-Camara for showing us these eyes at EPFL.

[ CurvACE ]

Read more…
Venturing Forward: The Sky’s Not the Limit for UAV Enthusiasts
By: Kevin Solar of DIYDrones.com (DIY Drones News Journalist)
 

We live in a uniquely dynamic age influenced heavily by technological advances surging in every direction. It’s a time to look around, reassess ourselves and focus our energy and potential towards greater influence over things to come. If you’re an individual with an interest and passion for ‘drones’ that fly, it’s a time to gaze upwards and realize that even the sky… is no longer the ‘limit’ it was once thought to be. Instead, the sky has become a boundless ‘proving zone’ for what is possible, now and in the near future. For UAV enthusiasts, at any level of expertise, it’s a time for ‘venturing forward’.

The expanding world of Unmanned Arial Vehicles is filled with new realities, problems, demands and opportunities. It’s a great time to take advantage of the moment and get personally involved in a new and challenging venture, or perhaps rekindle interest in something that you’ve neglected, or put off for a while. Taking action now can also provide numerous health benefits, both physical and mental, that may pay big dividends for years to come. Personal involvement in active hobbies, like creating and flying UAVs, can play an important role in a person's overall perspective and well-being, often by increasing creativity, self-esteem, and sense of accomplishment. 

Whether looking to immerse yourself in a new hobby, explore the possibilities of a cutting-edge career, or experience… firsthand, the surging evolution in remote controlled aircraft… the DIY Drones community provides an ‘open-source emporium’ of innovation and information specific to the needs of those interested in becoming more involved with autonomous, or pilotless flight.

After several months of research and observation on the outside edge of a few web forums devoted to UAV technologies, I finally decided to venture forward and join in on the experience of designing, building and flying my own multi-rotor aircraft. By doing so I’ll be putting myself in an environment where I’ll learn something new and challenging, while offering my experience, skills and creative abilities to others in the process.

As a newbie, entering the world of UAVs, it’s easy to feel excited, nervous and… at times, overwhelmed by the scope and speed with which advances are currently taking place. After all, the goal here is not simply to build, or buy and fly the traditional RC airplane that your grandpop enjoyed years ago. Rather, a major objective at DIY Drones is to focus on the quest to interact collaboratively, to help bring about the safe and efficient integration of structural, electronic and critical system processes, thereby guiding amateurs like myself, to a point where our home-built creations become capable of carrying out specific tasks during autonomous flight!

That’s right! The aircraft engineered by members of the DIY Drones community are being developed and programmed to fly and perform on their own. Just imagine… your homemade, ‘Aerial Robot’ making its way across that limitless sky, performing tasks without real-time, pilot intervention! How cool is that? Quite honestly… it’s amazing! It borders on mind-boggling to say the least. However, if you have the passion, skills, personality, and dedication to learn the complexities of this unique pursuit, your involvement can be very rewarding!

So, aside from all the tools, cash, time and project components necessary to build say… a typical Multi-Rotor style UAV… here’s a partial list of things you probably already have, but might need to sharpen, or dust off in order to get started, or restarted as an active UAVer at DIY Drones.

Obviously… these items are not required, but you’ll likely benefit by possessing some of the following:

- A willingness to be actively involved in the DIY Drones community.

- A supportive spouse and/or partner, especially one who loves UAVs.

- An ability to build things from scratch and fix things that get broken.

- A thick wallet, a financial budget, a good set of tools and a place to use them.

- A familiarity with fire extinguishers and first-aid kits.

- An investment portfolio heavy on manufacturers of zip ties.

- A functional recollection of the philosophy associated with Murphy’s Law.

- A huge dose of common sense and a Swiss Army knife in your pocket.

- A steady temperament, control over frustration and ability to laugh at yourself.

- An inquisitive mindset and a passion for discovery and adventure.

- An optimistic point-of-view backed by a healthy grasp of reality.

- An aptitude for following a set of directions printed in your native language.

cleardot.gif

- A talent for analyzing data and learning from the results.

- A propensity to reexamine basic assumptions and seek broader perspectives.

- An intuitive sense of what is correct and/or appropriate in a given situation.

- An ability to accept constructive criticism, and the tact to offer it to others.

- A determination to except failure as a stepping-stone towards future success.

- A self disciplined work ethic and a healthy respect for team dynamics.

- A problem-solving, creative, out-of-the-box method of thinking and processing.

- A desire to get things right, tempered by the ability to admit when you’re wrong.

- A capacity to learn by reading the experiences and ideas expressed by others.

- A set of communication skills to share what you know, via text and video.

- An affinity for synthesis of information and close attention to critical details.

- An ability to maintain focus and persevere in the face of disaster.

- An aptitude for audio-visual discrimination and strong eye-hand coordination.

- A tendency to assist folks in need and a will to bounce back from adversity.

- A focus geared towards pushing beyond limits, yet knowing when to take pause.

- A desire for fun and a determination to set high standards of accomplishment.

- An interest in lifelong learning and a passion for sharing knowledge with others.

- A true appreciation of the Laws of Gravity and a realization that crashes happen.

What makes this hobby so enjoyable and rewarding is, that while we all come from different walks of life, the deep common denominator is our passion for tinkering with and improving upon the capabilities and performance of our flying machines.

For those who have been active UAVers for years, the newbies will certainly be looking your way for guidance and knowledge over the long haul. For others who may have chosen to ‘lurk’ on the periphery simply to glean knowledge unobtrusively, the influx of additional hobbyists may provide opportunities to establish new relationships, or even revive friendships forged, long ago, via the blog posts and comments that continue to form the backbone of this community.

Most hobbyists tend to enjoy things more when they are provided the opportunity to share experiences with other like-minded individuals. The trials and tribulations of amateur UAVers offer a very compelling reason to stay connected to folks with similar interests and aspirations.

Hobbies which require expertise tend to be more satisfying to participants. That’s especially true for UAVers, because the expertise required to design, build, program and fly a Multi-Rotor, for example, demands a very high level of commitment. In turn, it’s that commitment that often results in a higher level of engagement and enjoyment.

What better way to stay active and enrich your life than by doing something you seriously enjoy? Increased involvement in things like the DIY Drones community could well be your prescription for a healthier, more satisfying future. It’s sure to engage you physically and mentally on multiple levels.

Of course, hauling your gear to that far away field to launch, follow, and/or retrieve your craft, certainly qualifies the effort as physical activity. Okay… maybe it’s no triathlon, but it’s certainly not uncommon to find yourself walking, jogging, climbing and at times, frantically searching the countryside for a fly-away, or downed UAV. Although not always planned or expected… the frequency of such occurrences most likely provides a physical benefit to those involved. Your initial intention, as a UAVer, may not have been to keep physically and mentally active, or to reduce stress in pursuit of a sense of accomplishment, but as many can surely attest, those outcomes are often a beneficial result.

From a hobby perspective, I often think of my DIY Drones involvement on three levels. The first level provides a diversion, or temporary escape from the stressful things in life. Plain and simple… UAVing can help me pass the time. The second level reflects a passion that engages me in something I truly enjoy. The third level relates to something that links to a sense of purpose. I suspect we all need that at times. Personally, when I sum it all up, being a UAVer is ideal for me, because it affords a powerful combination of all three levels.

My new hobby and my involvement with DIY Drones has become important and rewarding, especially because it has opened a unique ‘portal’ through which I am able to connect with others involved in the same meaningful endeavor. It’s a pursuit that allows me the freedom to fly! And… since flight is my passion, venturing forward into the limitless sky, not only helps me to pass the time, it makes me unaware that time is passing.

__________________________________________________________________________________

3689523893?profile=original3689523923?profile=original


  Links to Websites used to gather information for the Newscast Video:

Read more…

3689523841?profile=original

From TechCrunch:

DroneDeploy is a web-based drone control and management platform. (Let that last sentence serve as a friendly reminder that we live in the friggin’ future.) Their goal is to be compatible with as many different popular drones as possible, providing their owners with things like:

  • Browser-based drone control
  • Fleet management/tracking, with electronic filing of the required paperwork
  • Data logging
  • Automatic flight regulation assistance. Not allowed to fly drones after midnight in a certain region? DroneDeploy will remind you.
  • Automated log analysis that will help identify things like a motor that’s about to fail.
  • Expandability, by way of an App Store of sorts. Want all of those pictures your drone can take to be stitched together into one big panoramic map view? They’ve got an app for that.

3689523795?profile=original

3689523872?profile=original

Read more…

Hero 3 with interchangeable lens mount

3689523853?profile=original

My dream has come true: a GoPro with interchangeable mounts.

Thanks to Radiant Images and View Factor Studios, this now exists!

I was talking to the Drone Dudes at Maker Faire and saw this camera amongst all their other awesome gear. It is a sweet little piece of kit.

--------------------------------------------------------------------------------

The groundbreaking Novo digital cinema camera, available exclusively at Radiant Images, is the ideal solution for cinematographers who are enamored by the capabilities of the GoPro Hero3 but held back by the Hero3’s cinematic limitations.

The Novo, developed and engineered by View Factor Studio in collaboration with Radiant Images, is a completely re-engineered GoPro Hero3 making it a much smaller and more robust cinema camera with the flexibility to allow more creative choices.

Key new enhancements include a C-mount lens system with adjustable back-focus which allows for extreme macro shooting. As well as exposure control capabilities that open up a wide-range of artistic possibilities for cinematographers and camera operators. An internal CPU interfaced to the camera permits users to disable the auto exposure feature and then adjust the aperture manually via the lens. This feature gives a cinematographer the control to set a desired exposure and stops. 

The lightweight aluminum housing itself is 20% thinner than the GoPro Hero3 and includes three 1/4-20 and two 10-32 mounting points. Also, four buttons on the front (REC, PWR, WiFi & AUX) are assignable to several functions depending on the application. The Aux button turns the auto exposure on/off, but in the near future will also be utilized for other functions, such as digital zoom, a tool to check critical focus.

The Novo offers more robust features while retaining all of the key functionality and accessories of the GoPro Hero3, such as the LCD touch screen, power backpack and WiFi connectivity for wireless camera control.

The Novo addresses the needs of cinematographers without compromising the power and versatility of the most advanced GoPro ever. 

Like the GoPro Hero3: Black Edition, the Novo is capable of capturing cinema-quality video at 2x the resolution frame rate of previous models while delivering twice the performance in low light. – 1440p 48fps, 1080p 60 fps and 720p 120 fps video and 12MP photos at a rate of 30 photos per second, plus the ultra-high resolution 2.7KP-30 fps and 4KP-15 fps video modes.

Radiant Images offers rental packages that include the Novo, custom geared C-Mount lenses and all the required accessories.

Read more…

Joe and Justin give the Maker Faire 2013 crowd a demo of their new heavy-lift 12-rotor creation -- including an example of flying with only six motors operational. The downwash from this monster could be used for clearing leaves off the lawn or removing snow from the driveway, in addition to keeping a large camera aloft.

Read more…
100KM

Techpod + APM 2.5 test flight

Hey everyone,

 Got a little free time to get out to the field and do some flying yesterday. got a chance to engage the APM and see what it would do.

techpod_flight_kml_5_19.jpg?w=726

I was able to try out stabilize and RTH modes. both worked pretty well. Had problems with the OSD and after the first flight, I was getting glitches from the right aileron servo. I could not track down the problem so I packed up and went home. I was happy with the flight and the APM however.

Here is the parameter file. techpod_perams.param

this is the tlog file frome the flight 2013-05-19%2017-23-52.tlog

Read more…

3 axis Camera Gimble connections.

NEW APM 2.5 Pin out and Wire Diagram And Camera Gimble explanation
CAMERA_APM2.jpgHey guys i recently got the APM 2.5, when looking at the pins, I saw A0 - A11 Pins werent being used and i did not know what they were for so i was googling and found a PDF that stated

A0- Sonar/ Ultrasonic A1- Voltage Sensor – Attopilot
A2-Current Sensor – Attopilot
A3- Optical Flow Sensor
A4-Motor LED
A5-Motor LED / Buzzer
A6-Motor LED
A7-Motor LED
A8-Motor LED / Analogue RSSI
A9-Camera Shutterhttp://speedtester.bsnl.co.in/
A10-Camera Roll

Link to Gimble explanation in google
http://code.google.com/p/arducopter/wiki/AC2_Camera

So After researching for some time, I have found that for a camera gimble A10 is roll and A11 is pich but there was no explanation of were Pan is connected (YAW).So I i dug some more and found some consensus to the following :
Currently Mission Planner shows that we have 3 axis so would be good to update that. I suspect (haven't check the code) that PAN goes to A9 but that is just a guess.
Anyway, I lack one wiki page on those extra outputs, what can be connected to them. So we have A11, A10 (and A9?) for gimbal, A1 and A2 for AttoPilot? current/voltage sensor:.

3689523695?profile=original

Assembly_APM25.jpg

So after my post was denied several times as being " a request for assistance" let me rephrase, What is your guys experience, have you tried A9  and it worked or not, what other solutions have you tried?

Here is more info: http://copter.ardupilot.com/wiki/camera-mount/

Read more…

Mapping Mission Ride Along

Here's my 1st mapping test flight with a Skyhunter twin-boom pusher. Im running Arduplane 2.73. Mapping camera is a Canon s95 running an intervalometer script via chdk. Its suspended from a single axis gimbal that keeps the camera pointing down regardless of aircraft bank angle. Video shot from a GoPro 3 Black Edition.

It took 120 photos during the 10 minute flight, and stitched with PT GUI. I need to refine my grid spacing and polygon locations relative to the target area, and intervalometer timing. The generated map is a little rough, but its a great start.

 I gave up on using the APM trigger at 3m from waypoint function as I couldn't get it to work and there's just no documentation on it.

 3689523624?profile=original3689523679?profile=original

Read more…
Moderator

 
When Richard Van As, a master carpenter in Johannesburg, South Africa, decided to make a set of mechanical fingers, it wasn’t just for fun. He’d lost four of the fingers on his right hand in an unfortunate work accident. For a tradesman like Rich, having a disabled hand is a big professional detriment, so Richard decided on the day of his the incident that he would use the tools available to him to remedy his situation. Watch the inspiring video above to hear how Richard’s project, Robohand, is changing lives with patience, spirit, and a MakerBot Replicator 2.


Getting Started

MakerBot heard about the Robohand project in January 2013. Richard had been trading ideas with Ivan Owen, a collaborator in Washington State, for several months. Ivan used his prior experience with mechanical prop hands to make design suggestions, while Richard attempted to replicate the designs in his workshop.

Robohand_quote

The process was taking weeks and months per cycle. For us here at MakerBot, that was too much wasted time. We knew our 3D printer, the MakerBot Replicator 2, could take this important work to new heights. We saw their collaboration and the work they were doing as groundbreaking, and we asked Ivan and Richard to accept a donation from us: a MakerBot Replicator 2 for each of them, one in Washington, and another in South Africa.

If the tool was useful to them, we hoped they would share their work on Thingiverse.com for the world to download. It turns out the MakerBots were incredibly useful, and the guys have followed through on their promise. Just hours after they received their packages from us here in Brooklyn, the two collaborators were sharing files back and forth, testing the design in one place and doing another iteration on the other side of the world. Richard says it took the prototyping process down from weeks to just 20 minutes.

But that’s only half the story.

Giving A Hand

Robohand has grown far beyond the goal of making a set of fingers just for Richard. When the power of desktop 3D printing and MakerBot entered the picture, Richard began to realize how quickly he could refine a design for other people who have lost their fingers, or who were born without fingers. After posting his own story, he received emails and Facebook messages from parents whose children were candidates for a Robohand of their own. One of these children was five-year-old Liam.

The condition Amniotic Band Syndrome is poorly understood, but the effects of it are pretty clear. Children are often born without extremities, especially fingers and toes, when fibrous bands in the womb prevent these parts from developing normally. It’s this condition that caused Liam to be born with no fingers on his right hand. The cost of purchasing a traditional prosthesis was far too much for the family, especially since Liam is a young and fast growing boy who would outgrow a prosthesis in a few months.


Liam was given a Robohand just days after Richard and Ivan received their MakerBots in January, 2013, and he has already been fitted for his second. The word spread, and other kids in the Johannesburg area like Liam with Amniotic Band Syndrome have received their own Robohands, sized just for them. The files, including the assembly instructions, have been posted online at Thingiverse, and they have been downloaded over 3,800 times by people around the globe.

What Is A Robohand?

A Robohand is a set of mechanical fingers that open and close to grasp things based on the motion of the wrist. When the wrist folds and contracts, the cables attaching the fingers to the base structure cause the fingers to curl. Nearly all the parts of a Robohand are 3D printed on MakerBot Replicator 2 Desktop 3D printers.

Ivan, who played a big part in the initial design stages of Robohand, says he studied the anatomy of crab legs and human fingers to get the basic muscle and tendon structure. The result is a simple assembly that Richard believes anyone can make themselves. While a full set of prosthetic fingers may cost thousands of dollars, all of the Robohand parts that are made on the MakerBot Replicator 2 add up to roughly a few dollars in material cost, with the total mechanical hand costing around $150 (USD).

Who Needs A Robohand?

Amniotic Band Syndrome affects 1 in 1,200 live births.

About 80% of cases of Amniotic Band Syndrome involve the loss or malformation of fingers and hands.

Finger amputations are the most common amputation in the US, accounting for over 90% of all amputations, according to various reports.

How Do I Get A Robohand?

Robohand was not imagined as a service or a product. Instead, Richard has shared the design files and instructions for creating a Robohand on Thingiverse so that people around the world can download, customize, print, and assemble Robohands for themselves or for others.

So far, we’ve heard stories of Robohands being made for children and adults in the US, Canada, and Thailand. Are you a MakerBot owner who can give this incredible gift to someone in your community?

Get Involved

There’s still a lot to be done. Richard has given hands-on help to a few of the people within his reach, but Robohand needs your help in order to get to the people who need it most.

● Want to spread the word? Share this video with your friends on Twitter or Facebook.
● Looking to to support the cause? Check out Robohand’s Indiegogo campaign.
● Are you an occupational therapist or prosthetist? Leave a comment below!

Make a Robohand

The design files and assembly instructions for Robohand can be found on Thingiverse.

Robohand’s creators would like to empower others around the world to use their files and create and print in 3D Robohands of their own, and they are not in the mechanical hand business. They created Robohand out of the goodness of their heart. Now it’s time to provide the files to the world and see what other good can come from them!

Robohand uses the following tools to make their mechanical hands:

● MakerBot Replicator 2 Desktop 3D Printer
● MakerBot PLA Filament
● Stainless steel hardware
● Thermo-forming orthoplastic
● Elastic bands
● Nylon cable

The full bill of materials is listed here.


Original blog post : http://www.makerbot.com/blog/2013/05/07/robohand/

Read more…
Moderator

3689523380?profile=original


3689523460?profile=original

3689523331?profile=original


Dear Friends,

after one week of work to first sample of electronics , we are ready with workspace enviroment for developer that want join our team.

Electronic Specification: 

In VR Gimbal We decide to use this kind of electronic parts  :

  • as micro we use STM32F1 64 pin.
  • 1 MPU6000 + HMC5883 for Z axis Direct Drive CAM using i2c bus.
  • 1 MPU6000 on spi bus. for Roll and Pitch cam.
  • EEPROM for storage the parameter of gimbal.
  • 3 ST Driver for manage 3 Brushless Motors with 9 Hardware PWM Output.
  • 1 input for Ublox GPS.
  • 4 PPM Radio Input or 1 PPMSUM radio input until 8 channel or more.
  • 1 Telemetry port for mavlink control.


As developer enviroment we use VR Ide Universal (based on eclipse) compatible with VRBRAIN and MP32 board now also with VR GIMBAL.

The developer lib and hal at the begin will be compatible with our APM_LIB ported to STM32F1 library the same used on MP32F1 board. 

That support all the APM library available and arduino language sintax .


In our code we decide to port on VR Gimbal :

  • AP_COMMON
  • AP_VAR
  • AP_InertialSensor
  • AP_IMU
  • AP_Camera
  • AP_Mount
  • Mavlink


and other utility yet available on our standard F1 package ... 


We would develop also a utility for manage the board on pc and on android smartphone.


If you are interest to join our work in developing stage will be a special price for you of 75 euro for 3 axis control board + 15 euro for IMU  (at the moment is available only 20 board) .


Your name will be in the list of developer of this project. The code will be opensource as other in this great community ... the support in development and donation are welcome .

For more info about the project contact me at info@virtualrobotix.com

In our roadmap the first  stable version of code will be available in 1 month. 

In the next week will be available the enviroment , with hal and library , then starting to implement the code functionality for manage the first opensource 32 bit 3 axis direct drive.

I hope that you like our project and join us in development.

In VR Lab mecatronix group are working hard and is yet available a good gimbal for GOPRO


3689523485?profile=original


3689523556?profile=original


3689523589?profile=original

3689523511?profile=original


And also is coming Gimbal for pro and semi pro camera.

I hope that you like our work :)

for more info and join us : http://www.virtualrobotix.com/group/vr-gimbal-user-group?xg_source=activity 

Best

Roberto Navoni

Read more…

Google Investing in Drone Tech


Google-logo1.jpg?width=320

Echoing a company belief in autonomous systems, clever algorithms, and replacing fallible humans with smart machines, Google's venture capital arm announced yesterday that it is investing $10.7 million in a company that makes drone brains.

osFlexQuad.jpg

AirWare's osFlexQuad

Full story at Popular Science

And also reported here: TechCrunch

Google has some history with UAVs - presumably for mapping. As well as considerable work in autonomous cars. $10.7M is pretty much a rounding error to Google Ventures, but it is an interesting bet for them.

Md4-200.jpg

An MD-200 Quadrotor Two years ago Google purchased one of these quadrotors from German manufacturer Microdrones wikimedia commons

Read more…

3689522926?profile=original

In true DIY form I am using as much readily available material as possible. 3/4" oak frame, lego parts, etc. I am on the lookout for landing gear materials (small diameter PVC with small caster wheels maybe? Hmmm.).


3689523041?profile=original

I am still building and tuning, so please excuse the loose wiring. When I am done tuning, I will neaten things up. Notice the flanker lego pads for future expansion and additonal equipment (FPV).


3689522991?profile=original

This is a picture of the "undercarriage" where the lego battery holder is located. Everything to this point is glued and screwed.


3689523067?profile=original

Lego battery connector epoxied to battery.


3689522951?profile=original

The lego battery holder base is epoxied and screwed to the frame. I have not only epoxied the lego battery connector to the battery but I will also zip tie the battery to the lego battery holder base for redundancy.


3689523083?profile=original

Voltage alarm "legoed" to frame. Receiver is also "legoed" to frame below the KK2 board and power distribution board both of which are secured to lego base with nylon screws.


I hope to be done tuning this weekend. Please watch for the maiden voyage coming soon on video.


Joe

Read more…

New prop mounts

3689521535?profile=original

Now standard on the 850Kv AC2830 motors, or as replacement kit.

Bill Bonney recently made a blog post about these -- including a how-to on replacing the shaft. 

I just checked the runout on a couple of these and found no more than .004"

Please note that the prop should go on first so that it fits down over the unthreaded shoulder of the shaft. This provides a slop-free fit on the shaft. The spacer goes on top of the prop, followed by the cap nut. 

Alan and I were talking this over today, and realized that the spacers are not needed at all. The prop nuts have enough internal depth to seat on the prop directly without bottoming out on the top of the shaft (NOTE: if your prop hubs are thinner than the 6.5mm APCs then you may need the spacer). One less part to fiddle with and a little less rotating weight!

Read more…

Anything you want mixing

I would like to introduce the community to a mixer method used to fly complex aircraft in manual, fly-by-wire and autonomous modes.

3689522958?profile=original

The main challenges of mixing are:

  • Flexibility to do anything you want.
  • Easy to use and prevents mistakes
  • Fly-by-wire capable.
  • Field programmable
  • Easily expandable
  • Failsafe compatible

Fly by wire needs control inputs from your transmitter.  Imagine if your tx mixes together elevator and aileron for a delta wing.  If the autopilot looks at a servo channel, it has no idea if you are commanding pitch or roll.  This means that the transmitter can’t do any of the mixing.  All mixing must be after the autopilot.

You can now choose to have one mixer for AP and one for manual or one combined mixer for both.  Maintaining one complex mixer is difficult but two would be asking for problems.  With one mixer, the mixer must be placed after the failsafe.

When setting up mixers for a complex aircraft, the number of mixer settings is enormous.   For a full wing, there are at least four controls that mix into four channels. Each mix has between three and five mix points with some mixers being conditional on state.  That is around 100 parameters for the wing alone.  A live connected GUI is needed to make home setup and field tuning possible.

Experimenting with different mixer setups is part of tuning the aircraft for different flight phases.  The user may wish to add and remove different mixer functions.  The type of mixer function should be easy to change and it must be easy to add different functions to the system.  This needs a GUI that automatically adapts to new functions and support for automatic code generation.

For the past year I have been flying a mixer that solves these problems. The toolchain consists of automated code generators and a gui with live mavlink communication.  The flexibility has meant that I can accurately tune the settings, certainly beyond the level my radio can.  Without the live GUI, the setup time would be far too long and critical field trims impossible.

This implementation is far from perfect. The key problem is that mixer settings are a one-way communication.  There is no way to verify what settings are inside the mixer.  There is no way to make sure that different versions are synchronized.  These are the reasons that this toolchain has not been promoted for general use.

In the long term I would like to see a system that solves these problems.  My thoughts are for something like the mavlink parameters discovery. There may be other ways to improve this.  I am open to suggestions if anyone is interested.

For an overview of the project, visit the wiki here:

https://code.google.com/p/pyfedit/wiki/HowToEdit

Note that the latest version is mavproxy based compared to the standalone version in the wiki.

Some credit must go to Paul G.  One of the key ideas he gave me was how to safely mix manual and autopilot commands to enable smooth autopilot override.

Read more…

Thirty Days (#12): Freeing Fozzie

3689522897?profile=original

3689523022?profile=original

After Brandon (3DR's Applications Engineer) rescued "Fozzie" from an undisclosed lab at UC Berkeley, the getaway car proved to be barely sufficient. We kept the angle of attack well into zero-lift angles, and the little Mazda stayed on the ground.

Read more…

First Flight of Hangar 18 F2

Hangar 18 had a very successful first flight of the new F2 prototype on 14 May.  3689522862?profile=original

3689522843?profile=original

3689522786?profile=original

The new plane has shoulder wing design with the wing mounted on a pylon on top of the fuselage. The wing houses all of the electronics with the exception of the ESC and motor leaving the full length of the fuselage open for payload and batteries. A new payload pod system was developed for the F2 that allows full access to two payload pods via 4 screws in the nose and tail. The wing bolts on to the top of the plane and can be broken down into three pieces or made as a single piece wing. More information will be added to the Hangar 18 website this week.


Read more…