3DR's Presidente meets with President Obama.
3DR's Presidente meets with President Obama.
I tested the Return to Home function of the Multiwii board using the default parameters. I didn't change the P, I or D of the gyros, acc, mag or any other sensor.
As you can see, the flight is not perfect since it's not tuned and it was windy but the tricopter returns to the inital position indeed. Usually RTH is activated when the signal from the TX is lost (multirotor out of control), it's a great funcionality.
Flight controller used: Crius AIO Pro
GPS: CN-06 v2
This is the wing condor 78 "equipped with autopilot APM 2.5 and firmware 2.72 with take off weight of 10.3 lbs.
2.72 firmware improvements are very good at navigation, I have tested the x5 and the condor with excellent results, thanks to the development team for this development.
For more information visit
My TMR-FC Flight Controller
- Frame
- Controller
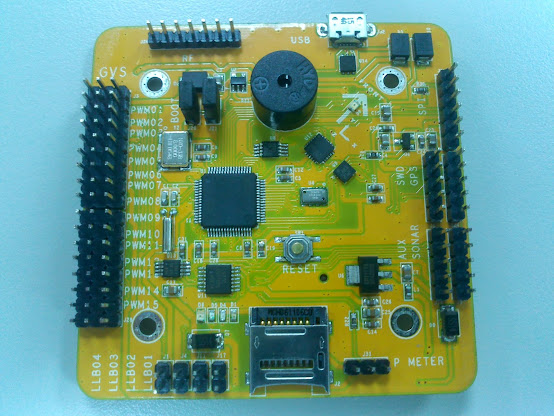

- Introductions
1. User Guide :
2. Sechematic :
3. Gerber :
4. Software :
The software is Porting from "PX4".
https://github.com/cctsao1008/TMR
- Hardware Features
1. MCU :
STM32f405RG
2. AHRS :
MPU6050, HMC5883, MS5611
3. Features :
12 channels PWM output, one PPM input and one Futaba S.BUS input,
Built-in 10 DOF, 5 LEDs ( controlled by PCA9533/9536), GPS port ( UART / I2C),
Auxiliary SPI and GPIO, RF port (APC230 or BT), LiPo Voltage measure via ADC,
Beeper for tone alarm, SWD port, SONAR, USB VCP and MSC, Micro SD ( can be read via USB),
Light Bar LED control, Internal FLASH EEPROM emulation using sector 1, 2 and 3 ( 16KB x 3 ),
RTC ( power keep by 3V CR1220 )
....... etc
4. Stress Test VB scripts :
Auto re-boot loop test, tone alarm loop test, ..... etc
5. Support PX4 Qupgrade tool :
- Tests :
---------------------------------------
- Boot Log :
---------------------------------------
reboot
ABCDF
nsh_romfsetc: nsh > romfs_img_len 0xFF52F09C
nsh_romfsetc: nsh > Mounting ROMFS filesystem at target=/etc with source=/dev/ram0
[boot] Initializing (HRT) 1...
[boot] Initializing (CPU) 2...
[boot] Initializing (DMA) 3...
[boot] Initializing pca953x driver
[PCA953X] on I2C bus 2 at 0x62
[TMRFC_LED] led_off, led = 0x338
[TMRFC_LED] led_off, led = 0x332
[TMRFC_LED] led_on, led = 0x334
[boot] Initializing soft SPI for the MMC/SD slot
[boot] Successfully initialized soft SPI for the MMC/SD slot
[boot] Binding soft SPI device to MMC/SD slot 0
[boot] Successfuly bound Soft SPI device to MMC/SD slot 0
[boot] Initializing SPI3
[init] MODE = autostart
[init] Looking for microSD...
[init] Card mounted at /fs/microsd
[init] tone_alarm start
[init] Reading /fs/microsd/etc/rc.txt
Detecting on board sensors on I2C bus(I2C2) ......
( 0x62 ) Have PCA9533DP
( 0x41 ) Have PCA9536DP
( 0x69 ) Have MPU6050
Set MPU6050 auxiliary I2C bus to bypass mode......
Detecting sensors on MPU6050 auxiliary I2C bus......
( 0x1e ) Have HMC5883L
( 0x77 ) Have MS5611
i2c: Done
[init] Start the ORB
[uorb] ready
ramtron: RAMTRON not enabled, skipping.
param: selected parameter default file /fs/microsd/params
[init] param load /fs/microsd/params
param: end of parameters
[init] Start mavlink ( 57600 /dev/ttyS1 )
mavlink: MAVLink v1.0 serial interface starting...
mavlink: DOWNLINK MODE
mavlink: UART is /dev/ttyS1, baudrate is 57600
[init] Start commander
commander: starting
commander: No RGB LED found
[fcservo] default PWM output device
<fcservo> MODE_NONE
[fcservo] starting
<fcservo> adjusted actuator update interval to 100ms
FC driver (no PWM) started
[init] Start sensors >> need to implement
[init] Start one of the estimators ( attitude_estimator_ekf ) >> wait for MPU6050 driver ready !!
[init] Start GPS >> need to implement
NuttShell (NSH)
nsh> eeprom test
---------------------------------------------------------------------------------------
RM0090 Table 5. Flash module organization (STM32F40x and STM32F41x)
---------------------------------------------------------------------------------------
[DEBUG]Check_Sector_Erased (845):SS = 0x08000000, SE = 0x08003FFF, COUNT = 0x00000001
[DEBUG]internal_flash_test (986):Check_Sector_Erased 0 (DATA)
---------------------------------------------------------------------------------------
[DEBUG]Check_Sector_Erased (845):SS = 0x08004000, SE = 0x08007FFF, COUNT = 0x00000001
[DEBUG]internal_flash_test (988):Check_Sector_Erased 1 (DATA)
---------------------------------------------------------------------------------------
[DEBUG]Check_Sector_Erased (845):SS = 0x08008000, SE = 0x0800BFFF, COUNT = 0x00004000
[DEBUG]internal_flash_test (990):Check_Sector_Erased 2 (ERASED)
---------------------------------------------------------------------------------------
[DEBUG]Check_Sector_Erased (845):SS = 0x0800C000, SE = 0x0800FFFF, COUNT = 0x00000001
[DEBUG]internal_flash_test (992):Check_Sector_Erased 3 (DATA)
---------------------------------------------------------------------------------------
[DEBUG]Check_Sector_Erased (845):SS = 0x08010000, SE = 0x0801FFFF, COUNT = 0x00000001
[DEBUG]internal_flash_test (994):Check_Sector_Erased 4 (DATA)
---------------------------------------------------------------------------------------
[DEBUG]Check_Sector_Erased (845):SS = 0x08020000, SE = 0x0803FFFF, COUNT = 0x00000001
[DEBUG]internal_flash_test (996):Check_Sector_Erased 5 (DATA)
---------------------------------------------------------------------------------------
[DEBUG]Check_Sector_Erased (845):SS = 0x08040000, SE = 0x0805FFFF, COUNT = 0x00000001
[DEBUG]internal_flash_test (998):Check_Sector_Erased 6 (DATA)
---------------------------------------------------------------------------------------
[DEBUG]Check_Sector_Erased (845):SS = 0x08060000, SE = 0x0807FFFF, COUNT = 0x00000001
[DEBUG]internal_flash_test (1000):Check_Sector_Erased 7 (DATA)
---------------------------------------------------------------------------------------
[DEBUG]Check_Sector_Erased (845):SS = 0x08080000, SE = 0x0809FFFF, COUNT = 0x00000001
[DEBUG]internal_flash_test (1002):Check_Sector_Erased 8 (DATA)
---------------------------------------------------------------------------------------
[DEBUG]Check_Sector_Erased (845):SS = 0x080A0000, SE = 0x080BFFFF, COUNT = 0x00000001
[DEBUG]internal_flash_test (1004):Check_Sector_Erased 9 (DATA)
---------------------------------------------------------------------------------------
[DEBUG]Check_Sector_Erased (845):SS = 0x080C0000, SE = 0x080DFFFF, COUNT = 0x00000001
[DEBUG]internal_flash_test (1006):Check_Sector_Erased 10 (DATA)
---------------------------------------------------------------------------------------
[DEBUG]Check_Sector_Erased (845):SS = 0x080E0000, SE = 0x080FFFFF, COUNT = 0x00000001
[DEBUG]internal_flash_test (1008):Check_Sector_Erased 11 (DATA)
---------------------------------------------------------------------------------------
[DEBUG]internal_flash_test (1011):Warning !! This test will destroy the data stored on sector 1 and 2 !
[DEBUG]internal_flash_test (1014):1)sched_lock....
[DEBUG]internal_flash_test (1018):2)FLASH_Unlock....
[DEBUG]internal_flash_test (1022):3)EE_Init....
[DEBUG]EE_Init (146):EE_Init
[DEBUG]EE_Init (330):EE_Init >> VALID_PAGE
[DEBUG]EE_Init (345):EE_Init >> ERASED
[DEBUG]EE_Init (347):EE_Init >> FLASH_EraseSector 1
[DEBUG]Check_Sector_Erased (845):SS = 0x08008000, SE = 0x0800BFFF, COUNT = 0x00004000
[DEBUG]EE_Init (355):Page 1 blank, skip to erase it.
[DEBUG]internal_flash_test (1025):4)FLASH_Lock....
[DEBUG]internal_flash_test (1029):5)sched_unlock....
nsh>
---------------------------------------
-log for DJI F450 :
---------------------------------------
ABCDF
nsh_romfsetc: nsh > romfs_img_len 0x80B7DC8
nsh_romfsetc: nsh > Mounting ROMFS filesystem at target=/etc with source=/dev/ram0
[boot] Initializing HRT Callout Interface
[boot] Initializing CPU Load Estimation
[boot] Initializing Serial DMA
[boot] Initializing PCA9533 and PCA9536
[PCA953X] on I2C bus 2 at 0x62
[TMRFC_LED] led_off, led = 0x338
[TMRFC_LED] led_off, led = 0x332
[TMRFC_LED] led_on, led = 0x334
[boot] Initializing soft SPI for the MMC/SD slot
[boot] Successfully initialized soft SPI for the MMC/SD slot
[boot] Binding soft SPI device to MMC/SD slot 0
[boot] Successfuly bound Soft SPI device to MMC/SD slot 0
[boot] Initializing SPI3
[init] MODE = autostart
[init] Looking for microSD...
[init] Card mounted at /fs/microsd
[init] tone_alarm start
[init] Reading /fs/microsd/etc/rc.txt
sercon: Registering CDC/ACM serial driver
uart_register: Registering /dev/ttyACM0
sercon: Successfully registered the CDC/ACM serial driver
[init] eeprom
eeprom: mounted EEPROM at /eeprom
param: end of parameters
sercon:: ERROR: Already connected
[init] Start the ORB
[uorb] ready
param: selected parameter default file /fs/microsd/params
[init] param load /fs/microsd/params
param: end of parameters
Try to get an USB console
nshterm [12:100]
11: + SYS_AUTOSTART: equal
Load .. 11_dji_f450
[init] TMRFC v1 on DJI F450
MAV_TYPE: curr: 1 -> new: 2
nsh: px4io: command not found
mavlink: MAVLink v1.0 serial interface starting...
mavlink: DOWNLINK MODE
mavlink: UART is /dev/ttyS2, baudrate is 57600
[fcservo] default PWM output device
<fcservo> MODE_12PWM
<fcservo> set_pwm_rate 0 50 50
[fcservo] starting
<fcservo> adjusted actuator update interval to 20ms
<fcservo> MIXERIOCRESET
<fcservo> MIXERIOCLOADBUF
<fcservo> new MixerGroup
<fcservo> set_pwm_rate 0 50 400
<fcservo> set_pwm_rate fff 50 400
<fcservo> adjusted actuator update interval to 2ms
[uorb] already loaded
uORB started
ADC
<adc> init done
[MPU6050] on I2C bus 2 at 0x69
[MPU6050] Ready.
[HMC5883] on I2C bus 2 at 0x1e
[HMC5883] Ready.
[MS5611_I2C] on I2C bus 2 at 0x77
[MS5611] Ready.
[sensors] Initializing..
sensors_task: using system accel
sensors_task: using system gyro
sensors_task: mag cal status changed
preflight_check [38:100]
commander: starting
commander: No RGB LED found
sdlog2: logging to directory: /fs/microsd/sess003
sdlog2: log buffer size: 16384 bytes.
[gps] starting
[gps] failed to open serial port: /dev/ttyS3 err: 2
Extended Kalman Filter Attitude Estimator initialized..
position_estimator_inav: started.
multirotor_att_control: starting
multirotor_pos_control: start
multirotor_pos_control: started
sdlog2: start logging.
sdlog2_writer: logging to: /fs/microsd/sess003/log001.bin.
position_estimator_inav: init baro: alt = 45.242
position_estimator_inav: main loop started.
From GizMag (hawk attack is at 1:50 in the above video):
Researchers from the University of Maryland have built a new micro air vehicle dubbed Robo Raven that's such a convincing flyer, it's been attacked by a local hawk during testing. Though numerous other robotic birds have successfully taken to the skies in recent years, including Festo's visually stunning SmartBird, this featherless mechanical marvel is capable of impressive complex aerobatic maneuvers thanks to completely programmable wings that can flap independently of each other.
Dr. Satyandra K Gupta says that if eight years of building experimental robot flappers has taught him anything, it's that "designing and building robotic birds is hard, despite the apparent simplicity of the idea – flap wings to generate thrust to propel forward and use the moving air to generate lift to stay afloat."
The professor of mechanical engineering at the University of Maryland's A. James Clark School of Engineering had his first flight success in 2007, in collaboration with faculty colleague Dr. Hugh Bruck and a team of students. Three more models were built in the years that followed, including one called Big Bird that had jointed wings. The last one carried a video camera to document its flight and was launched from a modified ARL Lynchbot ground vehicle. It was robust enough to fly in winds up to 10 mph (16 km/h).
A lack of simulation tools meant that the researchers had to rely on trial and error testing, and what looked promising on paper didn't always make for a good flyer. Design flaws came at a high price and often ended in catastrophic crashes, with team members literally having to pick up the pieces and start again. Even successes brought their own problems to the table, in the shape of a local hawk that felt convinced enough (or at least threatened enough) to attack the robotic birds while they were in the air, and tear them to shreds.
Though Gupta and Bruck were able to build machines that could fly, only simple flapping motions were achieved due to both wings being driven by a single motor. An attempt to recreate the kind of precision wing control that makes their real-world feathered cousins such compelling viewing for everyone from curious children to dedicated twitchers was not successful, and the project was shelved.
This time last year, the researchers decided to try again. As the end of April 2013 approached, students Eli Barnett, John Gerdes, Johannes Kempny, Ariel Perez-Rosado, and Luke Roberts made a breakthrough.
Robo Raven uses two programmable actuators that can be electronically synchronized to coordinate motion between the two wings. The new design required more power to operate, though, and a microcontroller had to be added. This resulted in a heavier bird, and one that proved too weighty for flight. The design team laser cut and 3D printed lightweight polymer components in an effort to get weight down, but it was still not light enough. The answer was threefold.
First, numerous motion profiles were created so that the wings always achieved an optimal lift and thrust balance. Then a method of measuring aerodynamic forces during the flapping cycle was developed that allowed for rapid evaluation of various wing designs, before finally selecting the best fit for the job. Lastly, the system was optimized to make sure that everything worked together as efficiently as possible.
As well as sporting wings that can beat independently of each other, Robo Raven can be programmed with any number of motion patterns, allowing it to perform impressive aerobatics like back flips, dives and rolls, and breathtaking turns.
In fact, the robotic bird proved so realistic that not only did it get attacked by a territorial hawk (at 1:49 in the video below), but other birds began to follow as it motored round the test site.
Gupta says that much study and many developments lie ahead, and he hopes Robo Raven will inspire others to choose robotic bird creation as their hobby.
I recently acquired some new prop adapters from 3DR. see http://store.3drobotics.com/products/propeller-fastener-and-shaft-kit-for-blue-moto-1
They require you to replace the motor drive shaft which is simple but not uncomplicated task. To help anybody who wants to do the same I have created an Instructable (see http://www.instructables.com/id/How-to-change-the-drive-shaft-on-your-Quadcopter-R/ ) with the use of minimal tools.
I look forward to comments on how I can improve it.
Thanks :-)
Here is a short video presentation of my Skywalker X8 UAV using 3g broadband internet for video and telemetry.
Onboard my X8 i have this ZTE MF60 3g/Wifi router which handles the communication for the APM2.5 and the Raspberry Pi model B. I didn't wanna use the Dronecell because i will place the load away from the APM2.5. I could have put a 3g USB adapter in my Raspberry Pi as well, but the Pi have more than enough to do transcoding the video-stream, so i use a Cisco Wifi USB adapter in my Pi to communicate with the 3g router and GCS.
The telemetry from my APM2.5 is sent to a Serial 2 Wifi converter which then is connected via Wifi to the 3g router. I then connect to my APM2.5 using TCP from Mission Planner.
The Raspberry Pi are using VLC Player for Linux to transcode the videostream from the Microsoft Lifecam webcamera to a resolution of 352x288 at 500kbit/s and 10 fps. If you want to use the same solution just change the hostname and port to you needs in the command below. I use Dynamic DNS (client configured in my Raspbery Pi) since mye 3g router gets a dynamic IP adress on every new connection.
Command in the Pi for starting videostream:
"sudo -u pi vlc-wrapper -I dummy -vvv v4l2:///dev/video0 :v4l2-width=352 :v4l2-height=288 :v4l2-fps=10 :sout='#transcode{vcodec=MJPG,vb=500,fps=10,scale=1,width=352,height=288,acodec=none}:std{mux=ts,access=udp{ttl=10},dst=mydyndnshostname.domain.no:2000}' :sout-all :sout-keep"
At my GCS i start VLC using this command in a .CMD file to recieve the video from the X8 and re-stream it to the Mission Planner:
"C:\Program Files (x86)\VideoLAN\VLC\vlc.exe" udp://@226.0.1.150:2000 --sout=#transcode{vcodec=MJPG,vb=500,fps=10,scale=1,width=352,height=288,acodec=none}:duplicate{dst=http{mux=mpjpeg,dst=:8080/},dst=display} :sout-all :sout-keep
In Mission Planner you just enter "http://localhost:8080" in the "SET MJPEG Source" when right-clicking the Hud. I have a 6GB per month dataplan in my 3g router and my calculations says that this can give me more than 52 hours of videostream. My sim card is a non-firewalled APN.
For now everything is powered from a MaxAmps 11000mah LIPO This is a high capasity battery and the weight is only 825gram. My plan is to have 2 of those in my X8 for a really long range flight.
Right now i'm using a Sanwa 35mHz radio, but i waiting for my Turnigy 9XR and 433mHz modules from Hobbyking. I don't use 2.4gHz because of the 2.4gHz in my 3g router.
Very profound:
Links to articles:
9-inch copter lands in arms of Ohio court statue
&
A thoughtful piece from Slate, pointing out that much of the fevered imagination about domestic drones (I'm as guilty of that as anyone) mirrors what was predicted about helicopters when they were introduced in the 1940s.
The only place where I would disagree with the author is in his conclusion, where he seems to fail to realize that because drones are unmanned, they are essentially computers in the sky and thus are falling in price at Moore's Law. Helicopters, by dint of their pilots and the safety and mechanical systems required to carry humans, never got cheap. Drones are already cheap and will get cheaper yet.
Excerpt:
There is a peculiar alignment of intellectual motivation among drones’ most ardent proponents—the people who are selling them—and their ardent foes in the civil libertarian and pacifist communities. Both believe that a sky crowded with drones is a realistic possibility, either to be desired or feared, and both overstate the significance of drones. One hears little about the danger of government officials, eager to get ahold of the latest gadgets, carelessly spending money on drones that actually aren’t as useful as they claim to be.
In some ways the current fever over drones resembles discussions of the helicopter in the middle of World War II. Early helicopters had been built before the war, but the technology came of age when Igor Sikorsky began building large numbers of them for the American military during the war. As Samuel Solomon, the president of Northeast Airlines, told the Associated Press in 1943, “The helicopter has tremendous possibilities.” Solomon prophesied air taxi services in which helicopters picked up businessmen on a rooftop in Boston and dropped them off “on the roof of an office in downtown New York.” Helicopters would also be used for express air-mail services, he said.
Of course, none of this came to pass, for one simple reason: Helicopters could do all of these things, but they could not do them cheaply or efficiently enough to displace other technologies. In war zones, where getting from place to place is dangerous and moving quickly is necessary, helicopters have become ubiquitous. Similarly, drones are widely used on battlefields (overt and covert) because of the unique capabilities they bring. But these capabilities are not cheap.
The analogy to helicopters appears to break down at one crucial point: It is possible, today and in the near future, to make small, cheap drones. But these small drones have more in common with model aircraft, which have thrived as a niche hobby for years, than they do with the Predators of Afghanistan and Yemen.
Endurance is a crucial question here. Small, cheap drones’ ability to remain in the air for long periods of time will not dramatically improve in the near future. This is because their endurance is limited by the ability to store energy, an area in which technological leaps are unlikely. Larger drones are large for a reason—they can carry enough fuel to stay aloft for long periods, and the complicated sensor packages they carry can be minimized only so much. Because few see them up close, we tend to mentally underestimate the difference between a Global Hawk, which weighs as much as a tractor-trailer; a Predator, which weighs as much as a small car; and the hobbyist-sized drones that are widely available.
Conclusion:
There is no doubt that the helicopter plays an important role in shaping today’s world. Offshore oil rigs would be difficult to run without them; they often get severely wounded individuals to a hospital more quickly than any other method; they allow the rich to go skiing in places that are otherwise inaccessible. But helicopters are not everywhere, delivering the mail and serving as taxis. They are where it makes economic sense for them to be.
The same will be true of drones half a century from now, when they will have matured as a technology. Drones will no doubt play a larger role than they do today. But they will not fill the skies any more than helicopters have.
Very stable vídeo with the octocopter, even without a gimbal!
I've got a little bit of wobbles at some moments but this happened because the GoPro wasn't very well attached to the frame, I have some unbalanced motors and I'm using Hobbyking cheap propellers.
Can't wait to test it with good ones (APC, Graupner ....)
I may have found my next toy. About a year ago, elsewhere on the internet, I predicted RTF sub-$200 FPV quads would soon hit the market, and the hobby would really take off, no pun intended. Recently, I wrote about the Walkera Ladybird FPV RTF quad, which broke that $200 mark (by a penny, depending on where you purchase). Not letting grass grow under their feet, Walkera has pulled in a sub $100 FPV quad. Let me give you a moment to digest that.
OK, now, here is the catch. The Walkera QR W100 requires you to own an iPhone, or other iDevice. To get the price below $90, Walkera has pushed some of the work off to a WiFi connected phone, using it as a controller, and a video screen for the feed. In short, they have built a smaller, cheaper AR Drone, but with a nice feature I will mention in a moment.
From my research, and a couple inquiries, I have determined that this quad has three axis accelerometers, and three axis gyros. With these sensors, the quad can be set up as a rock solid, self-righting flyer, or it can be switched into a performance mode with those features turned down, or even off. The iPhone app is supposed to allow the camera to be viewed and recorded in HD, but I sometimes think the true meaning of HD gets lost in translation somewhere over the Pacific. The video quality will remain to be seen. Now, for the added bonus. The QR W100 can be flown with either the phone, or a Walkera DEVO controller. This means an actual RC controller can be used with this quad, and the iDevice used only as a video screen. The lower end DEVO 4 runs about $20 bucks new, and could possibly be found cheaper if someone has one lying around from a beginner helicopter or quad.
So, for the princely sum of $110, you can have an FPV quad with an actual controller, assuming you own an iDevice. And, unfortunately, that caveat is very important, for now. Currently there is no app for Android. I asked. One is said to be in the works, but I wouldn't buy one on the hopes the Android version is in the near future. While I have an Android phone for my personal use, I have a company issued iPhone I might give this a try with. Also, as with the AR, the possibility exists for a WiFi interface on laptops. This would be amazing, and open some interesting possibilities. I would love to see Walkera go this route themselves, although I imagine someone will work on a solution either way.
I hope to get my hands on one of these to review in the near future. Maybe I will sell a little plasma to get it on the quick boat from China. ;) If anyone else has experience with this quad, feel free to share your feedback.
I recently upgraded from my trusty old Turnigy 9X to a shiny new Turnigy 9XR, and had to figure out the channel mixing for it to work with my APM.
There are a few resources on the internet on how to do this (including here on diydrones), but non specifically for the 9XR.
I managed to set my transmitter and APM up such that I have 3 separate switches.
(Of course you can re-assign the modes to anything you like. But this arrangement works well for me!)
You then have to connect receiver CH6 to APM CH5 for arducopter (or APM CH8 for arduplane). And connect receiver CH7 to APM CH7 for arducopter (I don't believe arduplane has an assignable CH7 for RTL mode, although it ought to have).
Hope this helps someone!
-LPK, ConservationDrones.org
The great Robots Podcast is especially worth listening to this week. From the description:
Robots: Controlled Flight of Insect-sized Robots - mp3
In this episode we hear from researchers at the Harvard Microrobotics Lababout the Science paper published today reporting on the first controlled flight of an insect-sized robot. The amazing high-speed video below shows the robot taking off, hovering in place and steering left and right. This work is part of theRobobees project that aims to make swarms of insect robots. You can read our full coverage on Robohub.
Kevin Ma, Pakpong Chirarattananon and Sawyer Fuller
Kevin Ma and Pakpong Chirarattananon are graduate student researcher at the Harvard Microrobotics Lab working with Prof. Robert Wood (listen to Wood’s podcast here). Kevin studies the design and manufacturing of very small-scale robots while Pakpong’s work focuses on flight control strategies for flapping wing robots. Sawyer Fuller is a postdoctoral researcher with experience in the control and sensing of biological and robotic flies.
Hello, my name is Jordi. I'm currently a high school senior, but I will be graduating in a few weeks, after which I will be attending university with a major in Electrical Engineering. I've been a long-time follower of the diydrones community and have made a few posts in the past. In August of last year I made a blog post entitled "Introducing Glowduino!". I had created a board that was designed to control multicolored LEDs on various unmanned vehicles. I ordered the boards and assembled them, but made the stupid mistake of using a TQFP ATMega328 and not including an ICSP header. I had known this would be a problem, so I also designed some small breakout boards for programming. I simply pressed the chip onto the board to program it, and then soldered it to the Glowduino. Once everything was assembled I plugged it in and...it didn't work. After a good deal of searching I realized that I had accidentally flashed the wrong Arduino bootloader to the chip. I was using a 16Mhz crystal, yet I flashed a 8Mhz crystal-less bootloader. I don't have a hot-air rework station, and desoldering it didn't work so well (believe me, I tried). With the board bricked and my hopes dashed, I put the project aside to focus on school work.
A month or two ago I decided to come back to the project and see if I could at least get it into a working state. I designed and ordered some breakouts for the various chips that are used on the project and began breadboarding the design (I know I know, I should have done that first :)) and writing some code. I soon realized that the entire concept behind Glowduino might be more successful if the system were more modular. This got me looking into viable Arduino-compatible microcontrollers, and I soon came across the Arduino Micro. While all of its features are very well suited to my needs, I didn't really like the form factor, among a few other small things. For these reasons I decided to set out to create a 'better' Arduino Micro. I barely changed anything from the original design. The only changes I made were to include higher capacity regulators and to shrink the size of the board. I shrank the width by 0.1" and the length by 0.3". This meant that instead of having two rows of 17 pins it now has two rows of 16, and they are 0.5 inches apart (1 row closer together on a breadboard). I also rearranged the order of the pins to better match the larger Arduino Uno and Leonardo pinouts. All this came with a price, however, and no matter how hard I tried I simply could not route the board on two layers.
I only have the free version of Cadsoft's Eagle which only allows the creation of 2-layer boards. I had heard of Kicad and it sounds awesome, but after weeks of trying to migrate all my libraries and design files over to it I realized that I would be forced to stay with Eagle for the time being. After laying this project on the shelf for a bit I remembered that I had a friend who owned the full professional Eagle software. I asked him if I could use it and he agreed, and after a long bit of routing, ripping up, and re-routing I had a 100% routed 4-layer board that could be purchased from OSHPark. This time, however, I didn't immediately order the boards. Instead, I bought an ATMega32u4 and breakout from Futurlec and set to work breadboarding the project. I have made all the necessary connections and I am currently trying to get my usbasp to talk to the chip so that I can flash a bootloader. I haven't made too much progress on this front yet, tho, as AP Tests are coming up, final projects for my classes are due soon, and I am acting in my school's current musical.
In the above photos, the purple board is a breakout for the TLC5947. It is larger than my final Arduino clone will be :)
With the completion of this new microcontroller the Glowduino has been turned into a 'shield' for it. The idea is that the system will be super modular, with the option for more 'shields' in the future. In fact, it would be almost trivial to create an adapter for using preexisting Arduino shields with this microcontroller. Users could have the option of only installing one shield on each vehicle and simply plugging the microcontroller into whichever one they wish to use. Additionally, expansion boards could be designed that extend the Glowduino's capabilities, such as the ability to control EL wire or LED matrixes (thank you Jonathan Lederer!).
I know I will at least make a few of these boards for my friends and I, but this is where I would like some feedback. Is this a good idea? Would you buy it? What ideas do you have for something you could do with it? Is there anything you'd like to see? What is a reasonable price-point? I'm completely into open-sourcing everything, so the design files, schematics, bill of materials etc. will all be released completely once the project is finished. I will be updating my flickr (which is currently quite sparse) with photos soon, here's the link: Flickr Photostream. I would love to be able to actually build these in the future, and I very much appreciate your feedback. Thank you!
By MBONGISENI NDZIMANDZE
MBABANE – Private Investigator Hunter Shongwe has been arrested for using a spy aircraft without a valid licence or permit.
The gadget operates as a ‘floating’ camera and takes pictures of people and places without raising suspicion. The owner of such an aircraft operates it using a hand held remote control.
Shongwe was arrested by police officers from the Hhohho Serious Crimes Unit (Lukhozi) on Tuesday afternoon.
He is alleged to have contravened the Regulations of Aviation in that he operated the aircraft without having obtained a licence.
Police Public Relations Officer Superintendent Wendy Hleta confirmed Shongwe’s arrest.
She said Shongwe is expected to appear before court today. Information gathered is that he is currently kept at the Mbabane Police Station.
According to the Swaziland Civil Aviation Authority (SWACAA) Act of 2009, all people who need to fly an aircraft for whatever purpose are supposed to obtain a licence from SWACAA. This is the same gadget which Shongwe once alleged had gone missing while flying in the direction of Somhlolo National Stadium where members of the League of Churches were arriving for the Easter services.
The small aircraft was allegedly on a mission to record everything that was happening at the stadium and surrounding areas during the services. In a previous interview with the Times SUNDAY, Shongwe said that the spy aircraft was worth E20 000.
Parachute for x8
This is the description of a parachute system for x8 skywalker wing. I decided to upload this video because there were many questions about how the system worked. I hope this video answers many of your questions for x8 users.
This is the News Team for DIYDrones.com! We are just getting things set up so please be patient with us during the first couple weeks. We're looking for amateur journalists who are interested in writing Drone News Articles that will be published on the front page on a daily basis. If you're currently in college for journalism it will be an awesome thing to be able to put on your resume! Also if this team is successful enough we are lined up to get our articles put in a few newspaper outlets in the Tech Section!!!
If you're interested in joining The News Team please let me know!
(More goals will be added once the "Short Term Goals" are met)
Short Term Goals:
Intermediate Goals:
Long Term Goals:
I've been using Multiwii but i wanted to test MegaPirate, so i uploaded the code and probably i'll never come back to Multiwii :D
Very stable flight with a homemade Octo with Crius AIO Pro. Testing Altitude Hold, Loiter (AltHold and Position Hold) and Return to Launch, great performance! I tuned the PIDs for Rate Roll, Rate Pitch and Stabilize Pitch, all other PIDs are default.
No software stabilization used in the vídeo.
I carried a GoPro and the video recorded by the octo was very stable! :)
If you have a Crius AIO Pro, I highly recommend MegaPirate!
From the team's page:
The Industrial Design senior class is working on a project in collaboration with the Geography and Archeology departments to commercialize remote sensing UAVs (unmanned aerial vehicles) for surveying terrain. We've broken down the different aspects of the project to allow every student to be involved in the process. There are four groups; user experience, packaging, launch & recovery and documentation.
Some more pics:
From the IndieGogo project, which has already passed its $3,500 goal:
DroneShield: A low-cost, easy-to-use device that alerts you to nearby drones.
DroneShield is a device that detects the presence of nearby drones (including RC helicopters, quadrotors, etc) and issues alerts via email, sms, and/or a flashing light. The goal is to help preserve your privacy from low-cost remote-control air vehicles with video cameras.
The DroneShield team consists of makers, engineers, and developers collaborating on a device that can detect small drones well before you can hear them. We have a collaboration website atwww.droneshield.org with links to free software and hardware specifications. Free software and hardware specifications are free to download for do-it-yourself-ers. We also sell assembled devices at-cost.
How Does It Work?
DroneShield has a microphone that listens for sounds of drones. Each DroneShield contains a database of common drone acoustic signatures to reduce false alarms (IE ignores lawn mowers and leaf blowers) and in many cases the type of drone is also included in the alert.
Technical Specifications
Our initial target platform is the Raspberry Pi. Other components include a microphone, power supply plugs (also works with a micro-USB battery pack, not included). Wifi connectivity is required for email and SMS alerts. Signature database updates can be downloaded and updated via the RPi SD card.
What’s the Plan?
The goal of this campaign is to create a low-cost device that will help protect privacy against RC helicopters with video cameras; we already have a working prototype running on a laptop. This campaign will port that code to a small low-cost hardware platform that you can plug in and forget about. If you like you can periodically update the signatures of the drones we scan for, or even contribute your own signatures to the database.
Our goal is to port our existing code and database to the Raspberry Pi platform and bundle that with peripherals into a stand-alone product that can be operational right out of the box with absolutely no technical knowledge needed. The funds will be used to buy hardware in bulk (reducing prices) and the developers will donate their time to assemble the hardware and port the code. 50 units are needed to get the first price break in bulk discounts for many of our components.
We hope that there will be enough interest to justify further development to reduce costs in future generations; we believe ultimately we could get the cost down to the $20-range at scale. Future plans could include moving to an open-source 'sourceforge' type development environment and teaming with 3rd party hardware makers. We could also envision a smart-phone based platform for portable applications.
Qualifications
Our team has over 20 years of combined experience working on science and engineering projects including machine learning and acoustic signal processing. We have advanced degrees in engineering and computer science, including MIT and UMD graduates, and a proven track record of finishing projects on time and within budget for our customers.


