All Posts (11086)

Sort by

3689482872?profile=original

Following on from Tridge’s article (here), this article focuses on the bottle drop malfunction in CanberraUAV’s flight at the UAV Outback Challenge 2012.

The aim is to show the evidence and theories about why/how the bottle came off, with an emphasis on post-flight analysis on the flight logs. This will hopefully assist other users and developers in analysing their own flights.

What we know

  • Takeoff was at 13:43 (local time)
  • We entered the search area at 13:46
  • The bottle sensor showed “dropped” at 13:53
  • Over the next couple of minutes, our speed dropped to 50%
  • Exited the search area at 14:33
  • We landed back at the airport at 14:35
  • The UAV looked like this after landing:
  • 3689482736?profile=originalThe bottle was found in a field in the search area in 1 piece, undamaged.

It was obvious that the bottle had come off mid-flight. The parachute became tangled in the propeller. There was a large chip in the propeller that indicated a large collision with it, possibly from the bottle (note the propeller was brand new at the start of the competition).

As for any investigation, the aim is to review the events and data leading up to the event of interest. Fortunately, we have full flight logs (here). They were captured via MAVProxy. The analysis was performed using the Mavlink examples.

Analysis          

We had our bottle drop sensor (digital microswitch) connected to the voltage sensor on the APM.

Considering the speed drop after the bottle drop, a reasonable theory was that bottle “hung around” (possible caught on the tail) for a while, adding drag to the UAV. However, the throttle compensation needed to maintain cruise speed was needed throughout the entire flight after the bottle drop. This indicates a permanent effect – possibly engine damage.

Let’s take a look at that:

mavgraph.py flight.log VFR_HUD.airspeed VFR_HUD.groundspeed SYS_STATUS.voltage_battery:2

(The “:2” tells mavgraph to use the right-hand axis for the aforementioned variable)

3689482872?profile=originalSo, we have the speed scale (m/s) of the left and microswitch voltage (mV) on the right.

This graph shows us the speed did definitely go down at around 13:56, several minutes after the bottle drop sensor showed dropped. Thus there was some time between the bottle coming off and the engine being affected.

Also of interest is the “almost drops” 5 times before the final drop. This could indicate that the microswitch was rapidly switching on/off for ~15 seconds on a number of occasions. Possibly the bottle was already loose and was rolling off the sensor.


The question is why the bottle was rolling off the sensor at these times. There seemed to be a possible relation to groundspeed though.

So, let’s have a look at what direction the UAV was flying in:

mavgraph.py flight.log VFR_HUD.heading SYS_STATUS.voltage_battery:2

3689482792?profile=originalThis shows quite clearly that each time the UAV did a 90 degree turn, the bottle rolled off it’s sensor.

We can also look at the UAV’s roll and pitch:

mavgraph.py flight.log ‘degrees(ATTITUDE.roll)’ ‘degrees(ATTITUDE.pitch)’ SYS_STATUS.voltage_battery:2

(note roll and pitch are logged in radians. Mavgraph can do the conversion though, and any other basic maths)

3689482903?profile=originalEach time the UAV rolled, the bottle slipped a bit on the sensor. Maybe it was a bit loose?

As for the final drop, it would be possible that this would have imparted a large force of the UAV – if it was a sudden, forceful event (such as the propeller initially getting fouled with the parachute). So let’s take a look at the accelerometers and gyros for any evidence of this:

mavgraph.py flight.log RAW_IMU.xacc RAW_IMU.yacc RAW_IMU.zacc SYS_STATUS.voltage_battery:2

3689482894?profile=originalmavgraph.py flight.log ‘degrees(ATTITUDE.rollspeed) ‘degrees(ATTITUDE.pitchspeed)’ ‘degrees(ATTITUDE.yawspeed)’ SYS_STATUS.voltage_battery:2

3689482963?profile=originalNope, nothing significant - no sudden large forces.

Thus the event would have not been particularly violent. It was most likely spread over some time.

Conclusions

Thus, given that:

  • The bottle coming off the UAV was not particularly violent
  • The UAV started slowing down a few minutes after the bottle came off
  • The bottle was starting to let loose during turns, when the UAV was rolling at ~60 degrees
  • The bottle itself show no signs of damage (thus was not caught in the propeller)


It is our best guess that:

  1. Some string from the parachute came loose during flight
  2. The rolls that the UAV was experiencing during turns may have moved the bottle assembly enough to let the string loose
  3. Once the string was extended far enough back, it got fouled in the propeller
  4. The bottle got partially ripped off – enough to trip the sensor, but not enough to completely release from the UAV
  5. The force of this let the parachute string slip freely around the propeller
  6. After several minutes, the propeller caught the string again, ripping off the bottle for good. As it came off, the rest of the parachute string caught on the engine block, damaging it
  7. As a result of this damage, the engine could not maintain speed at the given throttle level.
  8. The UAV continued slowing down until the Ground Station commanded a ~20% throttle increase.


And that’s how you analyse an incident with your UAV/drone:

  • Look at the physical evidence
  • Look at the flight logs for any unusual readings
  • Look for links (i.e. occurred at the same time) between different data variables and the physical evidence
  • Develop a timeline of events, with a focus on why one event led to another event and so forth until you reach the incident in question
  • Come up with the most likely, logical explanation for the incident.


Note: a full list of all the MAVlink datafields collected in a standard log is here. Note not all autopilots use all the datafields. Some may be blank.
Read more…

OpenBee Telemetry Traffic Test

Hi everyone, 

Another blog post about OpenBee :)

Everyone asking about telemetry speed but i didnt answer this questions because of nature of RF telemetry.
RF telemetry speed depends more than one thing. I just take this video for showing unidirectional communication limits. 
The limit depends FSK modulation frequency and RF bandwidth. We can increase the limit but range reduces.

As you can see on the video, OpenBee handling %47.7 of 115200 baud without any problem. I guess 5500 bytes per seconds (55.000bps) is enough for most of telemetry project :)


I'm using firmware v1.01 on this video, we can add MAVLINK packers and other useful codes. 

Please feel free for any question and request. 

Cheers

Melih
 

Read more…
Distributor

Introducing the AeroDrone MR4

3689481913?profile=original


Today we are pleased to announce the AeroDrone MR4 Quadrotor Platform!

The AeroDrone MR4 is a rigid, lightweight and aerodynamically efficient quadrotor design that not only looks great, but has the performance to match. This platform is the evolutionary result of rigorous engineering design, development, and testing conducted in-house at our facility in Melbourne, Australia. Utilizing the amazing APM Autopilot, the MR4 frame has been extensively field tested in order to assure high-end performance when used in any flight mode. The core of the MR4 is covered by the hard ABS Case which has been designed not only to protect the on-board electronics but to make it look great as well. The MR4 platform comprises of strategically placed inbuilt sensor bays, has been designed with high ground clearance (14.5cm) to accommodate a payload of up to 500 grams, and is capable of flying for over 15 minutes. The frame is built entirely out of recyclable materials (like polycarbonate and aluminium), ensuring that the environmental impact of the MR4 is kept to a minimum over the lifetime of the product.

3689481834?profile=original

We are selling three different kit versions;

  • Frame Kit
  • Frame Kit + Propulsion Pack
  • Full Kit

as well as an RTF package.

Take a look around our newly designed website to find out more about the MR4. We would love to hear your thoughts on the product and look forward to helping you get flying with this amazing system.

If you have any questions or comments you can post them below or send us an email at support@baskindustries.com and we'll do our best to help.


We would also like to thank all those who contribute to the wonderful ArduPilot project. Your amazing skills coupled with 3DRs fantastic hardware has produced what we think is the worlds best autopilot for its price. The MR4 has been built around it. Keep up the great work, you're an inspiration to all of us.

Read more…

UHF Spectrum Analyzer with OpenBee

Hi Guys,

OpenBee modules ready and in stocks today. I just tested Dennis Frie's spectrum analyzer firmware and software over OpenBee. It is working perfect!. The original code a part of OpenLRS RC Receivers and OpenBee using same RF module and pinouts with OpenLRS project, this is why the code working without any problem. :)

In this video, I'm using 1W UHF radio on 459.075Mhz, and analyzer scanning 455-465Mhz band.

You can download the codes (Telemetry and Spectrum Analyzer) and software from OpenBee repository 

And upload into OpenBee easily

Here is the details of Dennis Frie's Spectrum Analyser project:
http://www.rcgroups.com/forums/showthread.php?t=1617297

And OpenBee product page: 
http://www.flytron.com/open-source-hardwares/210-openbee-100mw-telemetry-module.html

Please share your comments with us

Thanks

Melih


Read more…

GoPro 3 Has Arrived !

3689482814?profile=original


Key Benefits


  • Wearable, mountable design
  • Immersive, wide angle capture of your favorite activities
  • Professional quality HD video & 12MP photos
  • Built-in Wi-Fi enables remote control via included Wi-Fi Remote or live video preview and remote control on smartphones and tablets running the free GoPro app.
  • Rugged housing is waterproof to 197’/60M and captures sharp images above and below water
  • Compatible with all GoPro mounts for attaching to gear, body, helmets, vehicles and more
  • Compatible with LCD Touch BacPac™ and second generation Battery BacPac™
  • Backwards compatible with older generation BacPacs™
  • New advanced camera settings: Looping video, Continuous Photo, Manual White Balance control, Protune Mode, allows to shoot photos while recording video and more.

Key Specs


    • Professional 4K Cinema 15 fps / 2.7K cinema 30 fps / 1440p 48 fps / 1080p 60 fps / 960p 100 fps /720p 120 fps and more video capture
    • 12MP photo capture with 30 fps burst
    • Wi-Fi Built-In
    • Wi-Fi Remote Compatible (included)
    • GoPro App Compatible (FREE)
    • 197’/ 60m Waterproof Housing*
    • Assorted mounts and hardware included for attaching to helmets, gear and more
  • 3689482839?profile=original


Read more…
3D Robotics

MAKE Magazine visits 3D Robotics Tijuana

3689482550?profile=original

MAKE Magazine founder Dale Dougherty just posted on his visit to the 3D Robotics/uDrones factory in Tijuana. He also spoke at the Tijuana Innovadora conference that I'll be speaking at tomorrow. Other speaker today included Jason Short, one of the core ArduCopter devlopers, and Mark Hatch, CEO of TechShop. 


Hit the link above for the whole post, but here are some pictures from it. Above: ArduCopter quads (top) and hexa (bottom) ready for shipping.

3689482752?profile=original

TJ operations direction Guillermo ("Gigio") Romero (center) and some of the production team

3689482721?profile=original

Jason Short checks out his new black APM 2.5 board!

3689482689?profile=original

Special black APM2.5 boards (signifies that it was made on the new 3DR pick-and-place line in TJ)

Read more…
3D Robotics

ROS interface for PX4Flow board

3689482525?profile=original

The PX4Flow smart camera board will be released in a few weeks (designed by ETH, manufactured by 3D Robotics). There will be a ROS library to drive it, along with the PX4 libraries, Lionel Heng from the ETH Computer Vision and Geometry site announced on the ROS news site: 

I would like to submit a new repository for indexing: https://github.com/cvg/px-ros-pkg

This repository currently contains a ROS package for interfacing to the soon-to-be-released PX4Flow optical flow board (coming soon from 3D Robotics). We have plans to add a ROS interface to the PX4FMU autopilot, and software for MAV autonomy as showcased in our recent IROS paper (http://www.cvg.ethz.ch/MAV ) in the coming weeks ahead.

Best Regards, Lionel Heng

http://www.ros.org/news/2012/10/from-lionel-heng-of-the.html

Read more…

How To Create APM Wall Charts (ArduPilot Diagram)

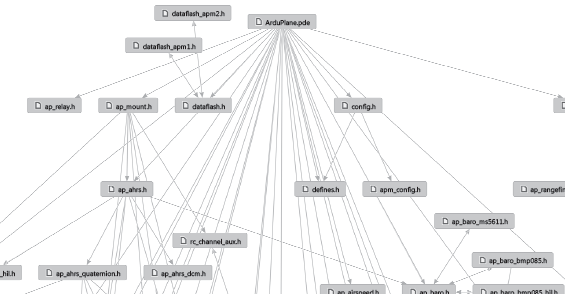
This WallChart.pdf is a first draft of an idea to provide diagrams of the relationships between the different modules of any Arduino drone project that new users can stick on the wall.

ArduPilotWallChartThumb.png

The pdf shows a map of how the various parts of the ArduPilot program interlink. You will see that currently the code diagram is very busy. How could all this information be presented in a more structured manner in a single snap-shot?

How to Create Your Own Code Diagrams - ArduPilot Example

If you have Window XP or Windows 7 then you can easily create your own code diagrams using the Arduino plugin for Microsoft Visual Studio Professional . 

The plugin is free, you can read how to get a free legal copy of Visual Studio Professional from here.

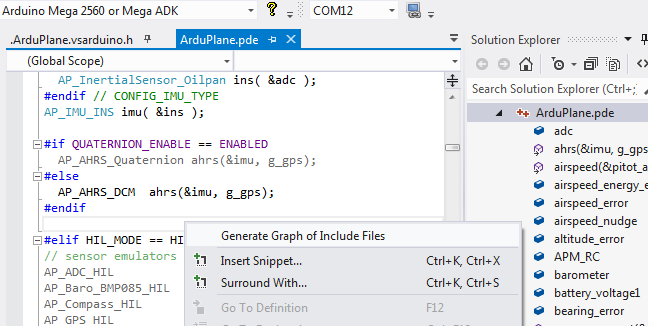
1. Open ArduPilot.pde or (.ino) in Visual Studio and right click anywhere in the code.

HowToGenerateGraphOfArduinoIncludeFilesInVisualStudio.png


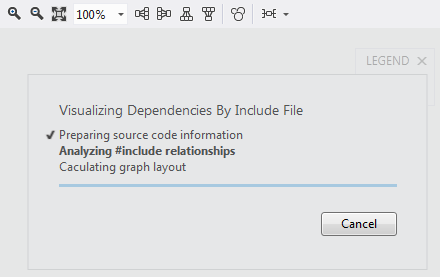
2. Visual Studio will open a new code window containing the diagram explorer tool. Progress will display while the code diagram is being automatically created.

ArduinoForVisualStudioGenerateDiagramProcessingVisualizations.png


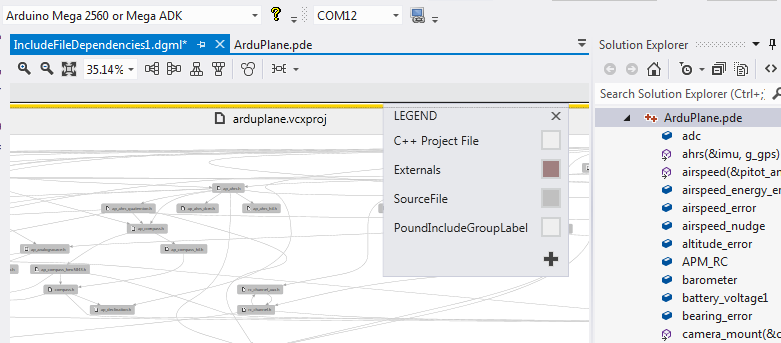
3. The code diagram will automatically appear when the visualization is complete. If required, you can edit the diagram, change the layout and remove items by using the mouse or diagram toolbar controls

ArduinoForVisualStudioGenerateDiagramTool.png

About Arduino Compatibility in Visual Studio 

Visual Studio is a simple installation and provides 100% Arduino compatible compile and upload combined with intellisense and code explorer tools.

If you are unsure how easy the plugin is to use then you can read what users have to say in the What do you think section of our forum. If you have been using the plugin for a while then please then please support the product by joining the forum.

Read more…
Developer

Announcing jD-Simplex frames and new prices

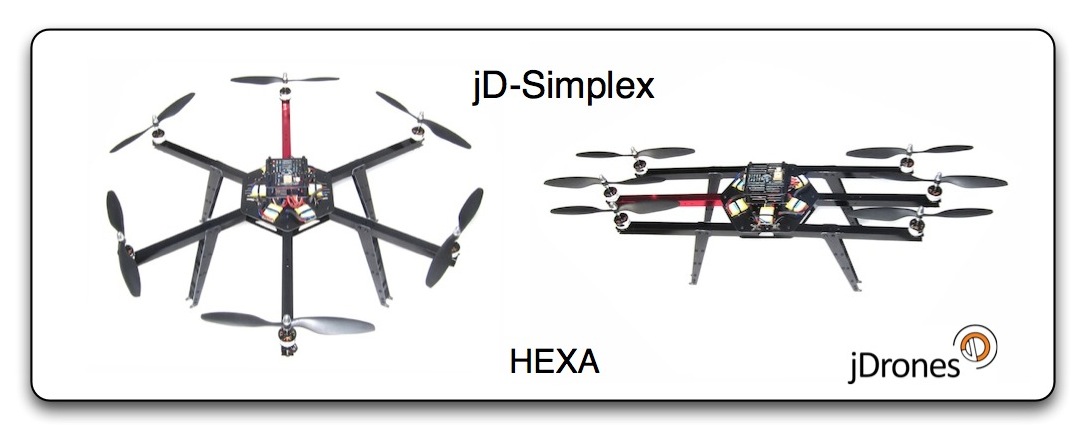
jD-Simplex_Frames_HEXA.jpg?width=500

jDrones: jD-Simplex frame series are available now

Another line of ArduCopter frames from jDrones is now available.Frames uses many of the parts that are already widely used on current ArduCopter frames. 

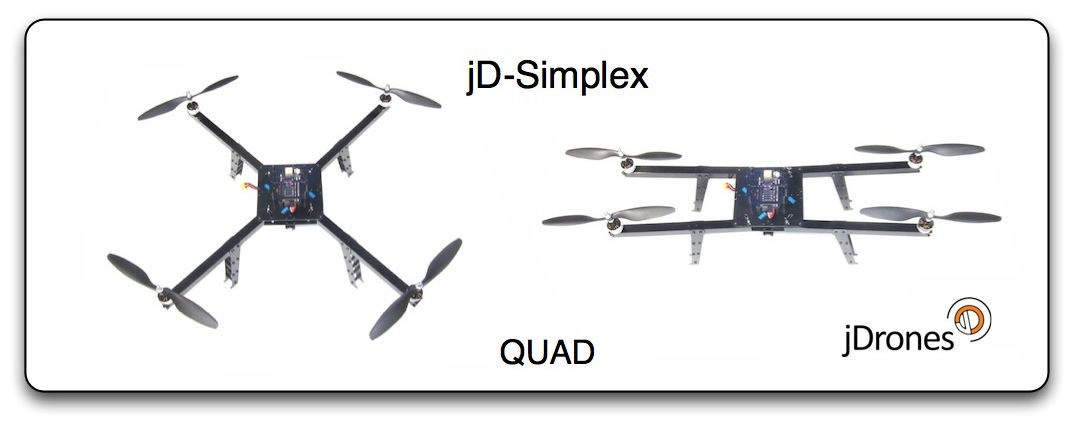
All frames are fully foldable for easy transportation. Currently there are Quad and Hexa frames ready and more is coming shortly. 

You can fold frames open and arms will lock to their open position and secure them with easy to use lock nuts.

Frames can be directly used with following flight controllers: APM 1.4, APM2, APM2.5, KK-MultiCopter, MultiWii and AutoQuad. 

While new revisions are coming, we will keep parts for old revision in stock. Shipping has already started.

jD-Simplex_Frames_Quad.jpg?width=500

jD-Simplex Quad Rev.A, Empty Frame KIT 68.90 USD

jD-Simples Quad Rev.A, No flight controller KIT, 223.90 USD

jD-Simplex Quad Rev.A, With flight controller KIT (APM) 439.90 USD

jD-Simplex_Frames_HEXA.jpg?width=500

jD-Simplex Hexa Rev.A, Empty frame KIT 99.90 USD

jD-Simplex Hexa Rev.A, No flight controller KIT 329.90 USD

jD-Simplex Hexa Rev.A, With flight controller KIT (APM) 539.90 USD

Read more…

Arduino mode switch for Arduplane / arducopter


P5162318.jpg?height=300&width=400


HK 6ch v2 mixer settings

config_radio.jpg?height=294&width=400

cable for TX configuration from PC this
utility DigitalRadio
configure chanel to range1000-2000 ms.

modes_tune.jpg


psb and skin

modesw.jpg

schematic


modesw-sh.gif


Arduino code

/*
s1 - s5 & LEDS connected to analog pins 1-5
its numbers from 14 to 18
 

*/
 
#define AnalogOut 10 // PWM out
 
int SelBtn = 14; // default
int BtnLevels[19];
 

void setup()
{
 
Serial.begin(9600);

//5 of 6 modes

BtnLevels[14] = 0; // 1 button
BtnLevels[15] = 84;
BtnLevels[16] = 127;
BtnLevels[17] = 169;
BtnLevels[18] = 255; // 5 button
 
 
//force pwm
TCCR1B = 0x01;
delay(100); 
 
pinMode(SelBtn, OUTPUT);
digitalWrite(SelBtn,0);
analogWrite (AnalogOut, BtnLevels[SelBtn]);
 
}
void loop()
{
ScanBtns();
delay(10);
}
 

void ScanBtns()
{
for  (int i=14; i <= 18; i++)
     ScanBtn(i);
}
 

void ScanBtn(int ScanPin)
{
if (SelBtn != ScanPin) 
{
pinMode(ScanPin, INPUT);
 
if (digitalRead(ScanPin)==0)
  {
      SelBtn = ScanPin;
      unsetOther(ScanPin);
      while (digitalRead(ScanPin)==0); // hold scaning until relise button
      pinMode(ScanPin, OUTPUT);
      digitalWrite(ScanPin,LOW);
 

  }
}
}


void unsetOther(int excludePin)
{
for  (int i=14; i <= 18; i++)
    {
    if (i != excludePin)
        pinMode(i, INPUT);
        digitalWrite(i,HIGH); 
    } 
 
analogWrite (AnalogOut, BtnLevels[excludePin]);
Serial.println(BtnLevels[excludePin]);  
}


TX  Hobby King 2.4Ghz 6Ch  :
inside.jpg?height=300&width=400


rtl2.jpg?height=300&width=400


stab.jpg?height=300&width=400


PSB Layout & chematic download
Read more…
3D Robotics

3689482449?profile=original

Congratulations to OJørgen, who was the 30,000th member of DIY Drones! This is a big milestone for us, so I wanted to celebrate with a prize for the lucky user, a $100 gift certificate at the DIY Drones store. (OJorgen, check your inbox!)

There were at 1.4 million page views this month, tied for our record. It took us 33 days to get this latest 1,000 members--we're averaging about one new member every 45 minutes.

Thanks as always to all the community members who make this growth possible, and especially the moderators who approve membership applications and blog posts and otherwise answer questions and keep things ticking here. We've got about 60 moderators now, but if anyone would like to join this group, please PM me. If you've been here for a while and have been participating, you'll fit in great.

Read more…
Developer

3689482320?profile=original

Introducing the Issue and the solution:

We've talked about FRSky's CPPM signal on this other post that compares it with a standard PPM signal. The issue is that originally FRSky's CPPM runs at 18 milliseconds. That short period has no space enough for 8 channels plus a proper sync pulse.

After carrying that issue to FRSKY, Jani came up with two FRSky's beta firmwares running CPPM at a 27 milliseconds period. We did test it at the DIYDrones Dev Team and it seems to work pretty fine.

Some guys at that old post were expressing their worries about the 37Hz update speed from the new custom firmware. However, keep in mind that probably you will not see any difference. Mainly if you aren't a crazily fast acrobatic pilot. Furthermore, our focus here is on drones. A good example is the Mission Planner that uses only 20Hz for joystick control.

Well, now those beta firmwares became official: There are custom firmwares for the receivers D8R-XP and D4R-II on their BetaTestSection. The links are now on FRSKY's download area. (Thanks Vladmir for the heads up).

D8R-XP_CPPM_27ms

D4R-II_CPPM_27mS

About the Updating process:

Inside of each update zip file there is a PDF explaining how to update your receiver. I'll not describe it here because it's pointless.

Reading their manual you'll see that an FRSky USB cable is necessary. That adapter is a TTL level "USB to RS232" one.

But what's the difference from that adapter and a common "USB to Serial TTL" one? There is just a single difference: the signal is inverted. FRSky's adapter uses the RS232 logic but not an usual RS232 high voltage level that would vary from -25V to +25V. Though the receiver's serial input has internally not just an inverter but also has a RS232-to-TTL voltage level shifter as shown on the diagram bellow (from FRSky's Two Way System Manual):

3689482264?profile=original

How to use an FTDI cable:

When I received the first beta firmware some improvisation was needed because I had no the required FRSky's adapter.

I've used my FTDI 3.3V cable with a little trick and it did work perfectly! All I did was configuring the cable to work with inverted input and output signals. ;)

Here goes how you can make that too (at your own risk):

First you need this powerful tool who did the magic: The "FT_PROG" from FTDI Utilities. It runs from a folder and doesn't need to be installed.

The first thing you'll gonna do is attach your FTDI cable and select "Scan and Parse" from "Devices" menu.

3689482381?profile=original

After finding the adapter the screen will be like this:

3689482282?profile=original

Now you'll navigate at the "Device Tree" selecting the "Hardware Specific" node for checking the proper options that will invert TXD and RXD (output and input of FTDI cable).

3689482333?profile=original

Now click on the "flash icon" as shown below:

3689482406?profile=original

On the programming screen click on the button "Program" and watch the status bar until it finish.

3689482287?profile=original

That's it! After the steps above you have a TTL inverted FTDI cable.

It's reversible, of course. You just need to follow the same steps but this time deselecting the inverting check-boxes.

You'll just need to use some jumper cables. The receiver can be powered  by the 5V output from the FTDI cable.

Remember of crossing the connection between your FTDI cable and the receiver input:

FTDI_TXD (orange) goes on the Receiver_RXD.

FTDI_RXD (yellow) goes on the Receiver_TXD.

If you'll flash your receiver... good look! =)

Please, add comments telling us about your experience on it.

Read more…
Developer

ArduCAM OSD v2.0 - Update your MinimOSD!

3689482239?profile=original


Good news!

The beauty of this community is on the collaboration. This new firmware proves it.
I have the pleasure of announcing that "ArduCAM OSD" and "MinimOSD-Extra" teams are now working together to make MinimOSD better and better.
I've been planning this fusion with Gábor Zóltan and Pedro Santos and we've started a nice friendship.
We spend the latest days merging and retouching everything to improve your experience with the new firmware. The Wiki was also updated for matching the new resources.

3689482188?profile=original


What's up?

You'll se all those awesome improvements from MinimOSD-Extra as well as improvements we made together.
The latest one is the new auto detection and updating of the EEPROM mapping .
From now on both OSD Firmware and ArduCAM OSD Config Tool will share the same internal signature.
So, both will detect the need for an EEPROM remapping preventing from loading or saving truncated data.
After a firmware upgrading the OSD Config Tool will detect an outdated mapping updating it automatically.
If you update your firmware by other way, the new firmware will alert you on screen and the Config Tool will repair automatically before you load anything from the EEPROM.

Update your MinimOSD right now. The most important: Have fun!

Important NOTES:

  • After install the new "ArduCAM OSD Config Tool" remember that you need to update the Character Set. A new one is available on the install folder. From now on it will be always there as "OSD_Charset.mcm". 
  • Both sides of the MinimOSD need to be powered during a Character Set updating. Max7456's internal memory is really picky about voltage level during a charset update.

Download it from here:

http://code.google.com/p/arducam-osd/downloads/list

Read more…
3D Robotics

3689482176?profile=originalIf you're in the Bay Area and looking for a great place to take the kids this week, the East Bay Mini Maker Faire is a delight. For the second year in a row, we're going to be doing a drones presentation at 11:00am, and Mark Harrison will be doing ArduCopter demos at the front grass area of the school afterwards. Details here. 

Read more…

Nodecopter.js and Parrot AR Drone

3689482307?profile=original

NodeCopter.js was a full day event where 60 developers got together into 20 teams of 3.

Each team received one Parrot AR Drone 2.0 and spend the day programming (JavaScript) and playing with it. At the end of the day, each team got to present their work to the other attendees.

As we (well, most of us probably) already know the AR Drone is an affordable, yet surprisingly capable quadcopter. The drone itself runs a proprietary firmware that can be controlled via WiFi using the official FreeFlight mobile app (available for iOS and Android).

Unlike the firmware, the client protocol is open, and Parrot publishes an SDK (signup required to download) including a good amount of documentation and C code. Their target audience seems to be mobile developers who can use this SDK to create games and other apps for people to have more fun with their drones.

However, the protocol can also be used to receive video and sensor data, enabling developers to write autonomous programs for the upcoming robot revolution.

This module is still under heavy development, so please don't be suprised if you find some functionality missing or undocumented.

However, the documented parts are tested and should work well for most parts.

For more information, I suggest you to go to http://nodecopter.com/ as a starting point.

Read more…
Developer

Teensy 3.0

3689481942?profile=original

Just a heads-up that Teensy my favorite small form factor Arduino compatible board, just got a solid upgrade with the 32bit ARM Cortex-M4 48mhz based Teensy 3.0. The Teensy 2.0 has pretty much been my bread and butter board for homegrown experiments (and some work related ones also). Looking forward to playing with the capabilities of the new one. The creator also aims to keep Arduino compatibility with the new ARM chip, if you don't want to talk directly to the hardware.

More information about the Teensy 3.0 should become available once the Kickstarter pre-order is completed and the Teensy 3.0 becomes official in the PJRC.com store.

But a quick highlight of the specification are:

  • 32 bit ARM Cortex-M4 48 MHz CPU (M4 = DSP extensions)
  • 128K Flash Memory, 16K RAM, 2K EEPROM
  • 14* High Resolution Analog Inputs (13 bits usable, 16 bit hardware)
  • 34* Digital I/O Pins (10 shared with analog)
  • 10 PWM outputs
  • 8 Timers for intervals/delays, separate from PWM
  • USB with dedicated DMA memory transfers
  • 3 UARTs (serial ports)
  • SPI, I2C, I2S, IR modulator
  • I2S (for high quality audio interface)
  • Real Time Clock (with user-added 32.768 crystal and battery)
  • 4 general purpose DMA channels (separate from USB)
  • Touch Sensor Inputs

Read more…
3D Robotics

3689482004?profile=originalThe brilliant Alexis Madrigal at the Atlantic has a great and historically fascinating piece on the fuzzy legal question regarding drones and privacy. Short form: the laws are vague, vary from place to place and nobody really knows what the rules are until they're tested in the courts. Precedents go all the way back to the first hot-air balloons!

It's really worth reading the whole thing, but here's one sample quote:

"This idea of a reasonable expectation of privacy has always been accepted as the standard and the interface of that privacy right and emerging UAV technology is fascinating," Ravitch said. "There is not an answer. The best we can do is arrive at laws and practices of the then-existing sensibilities of the population."

Read more…