All Posts (14049)

Sort by
3D Robotics

New UAV game for Google Earth

geoception.jpg

The Google Earth blog reports:

Over the years we've seen quite a few games that use Google Earth as their platform including gems such as ShipsGoogle Earth War and the GE Flight Simulator. Now a new game is in development and it appears to have a ton of potential: Geoception.

Here's a brief description of the game from the developer, Satyen Sarhad:

In a nutshell, you command and control a fleet of combat drones to provide local and regional security, eventually taking over the whole world. My aim is to make the game readily skinnable so arbitrary models from 3DWarehouse can be dropped into the game to replace the existing model assets. I have great hopes for this gaming platform, although (as you know), there are technical issues with achieving a decent frame rate in newer, out-of-process-plugin browsers. Nonetheless, I stuck with development and put together a limited game demo (that plays best in Firefox 3.6) that lets you fly UAVs around any city in the world, and shoot at various targets to earn XP:

They've produced a trailer for the game, and it looks quite impressive:

Read more…

ArduPilotMega V2.0 Green

$T2eC16dHJGkE9no8iPO!BQSC99jBk!~~60_57.JPG?width=400

Green doesn't mean that this version is lower power consumition, it is the board color in that series of clones of our ArduPilot

http://www.ebay.com/itm/ArduPilot-Mega-V2-0-Fully-Assembled-Module-Kit-With-GPS-/280942797078?pt=LH_DefaultDomain_0&hash=item41697ee116

http://www.ebay.com/itm/AMP2-For-ArduPilot-Mega-V2-0-Assembled-Board-Gyro-Compass-Accelerometer-/170906343508?pt=LH_DefaultDomain_0&hash=item27cacfd854

http://www.ebay.com/itm/AMP2-For-ArduPilot-Mega-V2-0-Assembled-Board-GPS-Gyro-Compass-Accelerometer-/170906343476?pt=LH_DefaultDomain_0&hash=item27cacfd834

I have a question: Do you think it's safe to buy one of this versions?

Best regards,

     Miguel.

Read more…
Developer

Steps toward ESC feedback using SimonK

Most of the pro multicopter set-ups have feedback from the ESCs so the controller knows the status of the motors.  This is useful for all kinds of reason including:

    1. debugging the causes of crashes - the controller could log when a motor has stopped running.

    2. allows faster and better reaction to a motor failure perhaps saving you from a crash at least for hexas and octas.

    3. automatic generation of a linear thrust curve which makes life easier for the attitude controllers.


As a first step towards trying to make that functionality available for the hobby/diy market I've managed to hack a hobbyking RedBrick50Amp and load it with a modified SimonK firmware so that it sends back timing information using the SPI bus to an APM2.  This modified SimonK firmware is in my clone in the spi_feedback2 branch and the changes were pretty minor as you can see here.


Here's a picture of the set-up:

3689479418?profile=original


Now, it's really a first step, there are a few issues:

    - It only works on the RedBrick50Amp because that's one of the few ESCs that is not using the SPI bus's slave select pin to control one of the FETs also you can see I needed to do some careful soldering to attach a pin directly onto the Atmega8.  To make it available to all we'd need specially manufactured ESCs.

    - Using the SPI bus would mean a lot of wires to the APM2.  5 wires from each ESC (mosi, miso, reset, slave select, clock) and 4 wires + 1 wire per esc on the APM2 side.  I might look into trying to use I2C instead which would be just 2 wires per ESC.

    - the feedback is the timing (in nanoseconds?) from when the ESC last switched the polarity of power to one of the wires.  So the feedback is non-linear..you get very accurate feedback when it's moving slowly, but lose accuracy as it gets to the high end of it's range.


Still, a step in the right direction I think.  All feedback and advice welcome!

Read more…

Project Power Wheels - Ardurover endeavor.

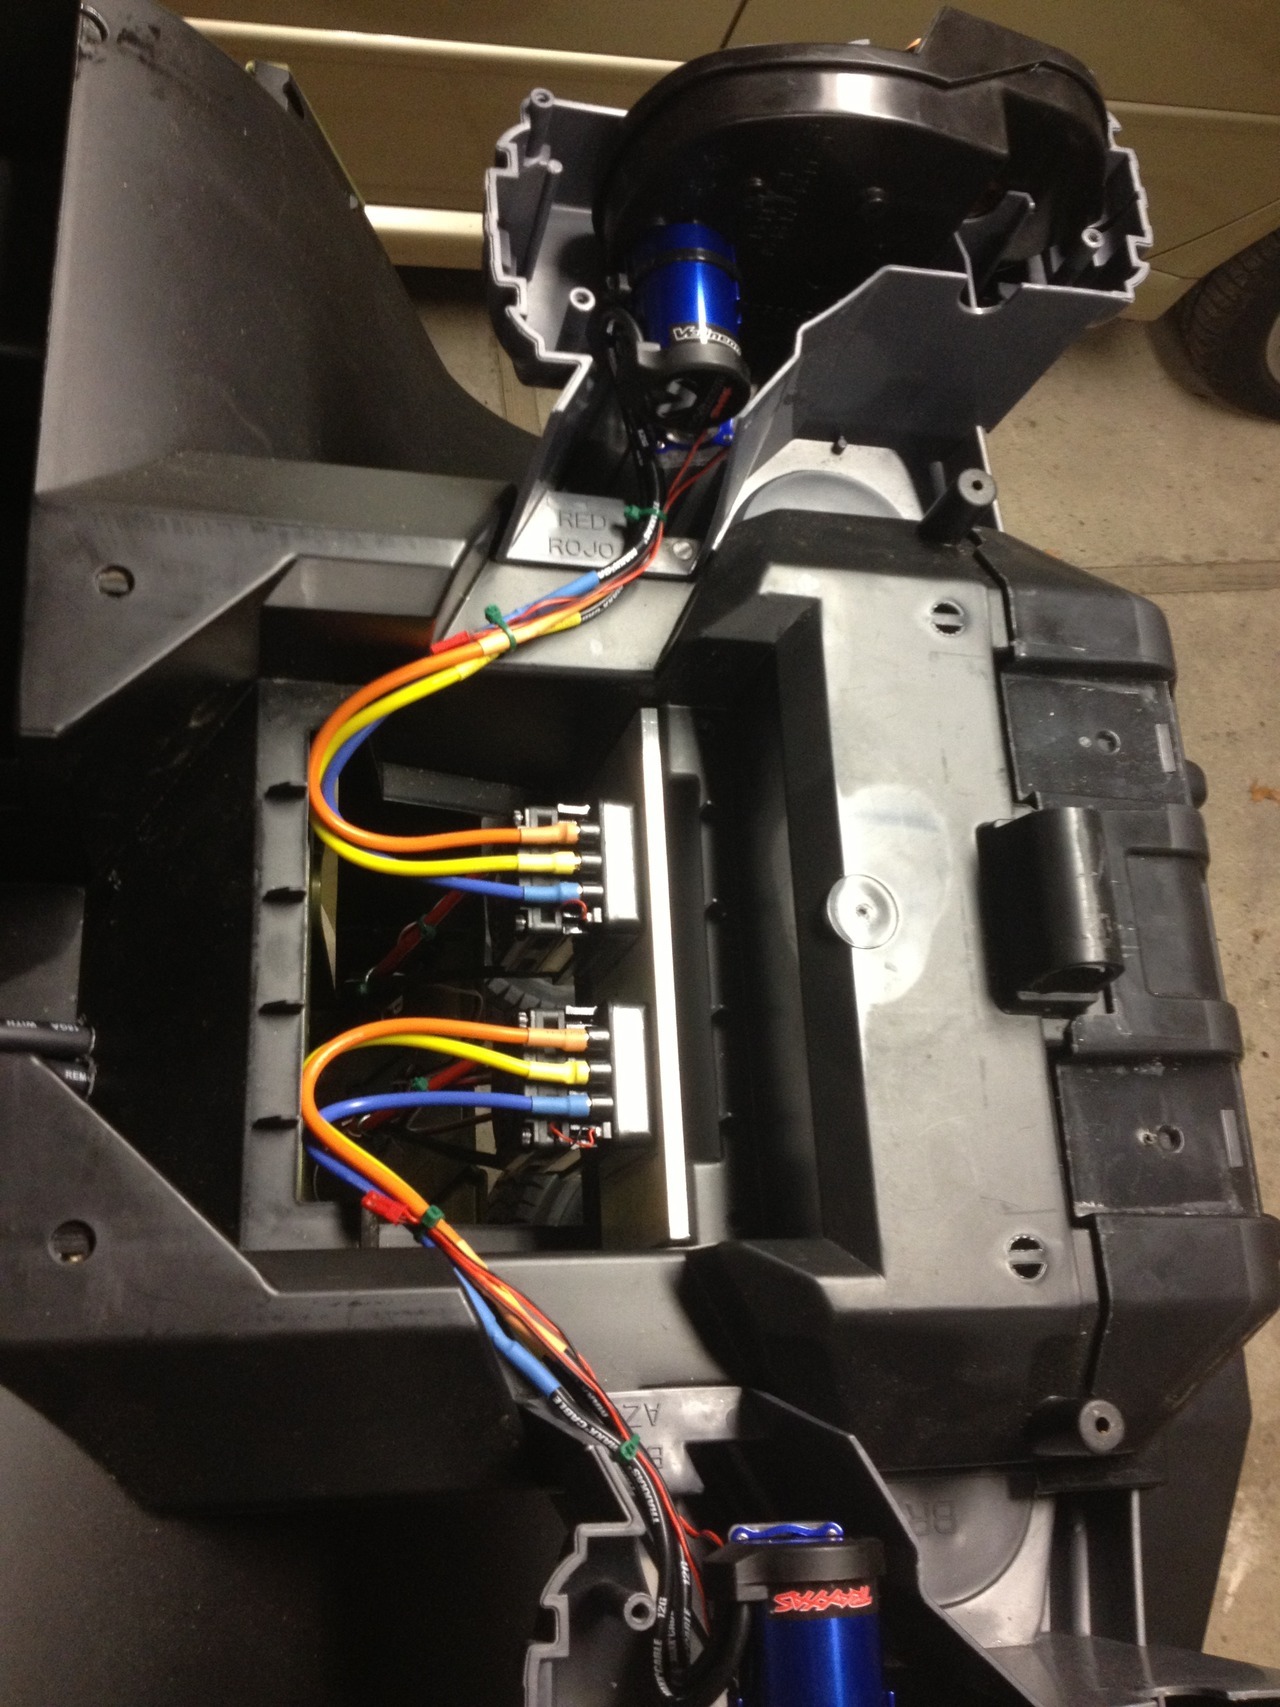
For the month my father-in-law and I have been working on a Power Wheels conversion to RC+Rover+Drive by wire.   I have an 18 month old son and we wanted to build something he could enjoy before he can physically control the vehicle by himself.   So far we have been focusing on the mechanical+drivetrain aspects of the build, but last night I finally got it to a point where we are ready to use the APM2.5 with ardurover code.  

tumblr_manfhouN8I1rgpsuzo1_1280.jpg?width=480

I am going to be heavily modifying the ardurover code to support local "drive by wire" via analog inputs. The steering wheel assembly now drives a 10k ETI pot, and the throttle controls a linear motion 10k pot (pictures will be posted on the blog shortly).  I would really like to hear some suggestions as to where I should implement the output channel insertion code. I have a few ideas after reading over the current codebase, but would obviously like to implement this in a way that a) can be reused by other people, b) fits within the code guidelines as defined by primary ardupilot developers.


My project blog is here at: http://projectable.me I would love to hear some feedback on this.

Read more…

Italian Drone helps police to unveil marijuana farm!

Here is a fresh news from Italy, a drone startup called ItalDron, located in Ravenna (Italy), helped police forces to unveil a undercovered marijuana farm near the town. It's the same company which provided AP coverage during last May' central Italy earthquake. Now It's going viral through social networks and blogs!

here's some news coverage:

http://www.tmnews.it/web/sezioni/video/20120926_video_10173979.shtml

http://it.euronews.com/flashnews/1670068-droni-antisisma-scovano-vivaio-cannabis/

here's their FB page: 

http://www.facebook.com/italdron

Read more…
Developer

Ardustation MegaUSB project - Developers help needed

1B.jpg?width=400

I got hold of a Arduino Mega ADK clone , which has a MAX 3421E USB host interface hardwired on the board. Due to some recent code changes, I can now use it with the USB Host Shield library. I have been successful in interfacing Logitech joystick to it and am getting readings on the joystick axes :)

With the arrival of ardustation-ii and ardustation-mega, integration of joystick control using the Mavlink R/C override function could be easily accomplished and easy control like a R/C controller could be achieved without lugging a laptop around.

Presently, the example HID joystick code that comes with the USB Host shield library gives hexadecimal numbers with changes to the joystick axes. I'd like to combine this with Ardustation and a 3DR radio for a small GCS with joystick control.

I am not that good a coder, so I need some developers like Tridge to help me out. I have all the hardware, and just need help in coding. I could help in troubleshooting all code on my side with the H/W. Alternatively you can just buy a USB host shield(cumbersome) and attach it to a Arduino. I checked out Mavlink page and the Mission Planner development wiki, but not much info on the R/C override.

I only need a Xbee 'air' adapter and a 12x6 LCD (not available in India)or a GLCD for the full ardustation setup for testing. If anybody has any old/extra, please PM me.

If you want to help/support this project and think you would be benefited by it, just leave a comment below with your opinion :)

Kabir

Read more…

552447_412847665419033_1298063388_n.jpg?width=720


As part of a plan of action to launch a non profit club, the Amateur Autonomous Vehicles Association (AAVA), I am putting together a short (20-30 minute) lecture on what is going on in the amateur autonomous vehicles world to be given at the University of Texas at Arlington campus (UTA) next week.  AAVA will ultimately sponsor autonomous vehicle competitions in the Dallas/Fort Worth area to include college students and individuals. 

UTA has an AV lab that annually funds aerial and ground based unmanned vehicles and has master degrees in AV so I offered to give this short lecture to the local interest group there. 

I wanted to take this opportunity to reach out to the largest AV community I know of to ask for suggestions on topics as well as pictures, statistics, opinions and any other information this community feels is important to give to young college students looking for something fun to do with their lives.  Any ideas would be most appreciated and I will post the final lecture in case anyone else wishes to use it in the same manner.

I wish to cover, briefly, laws as they currently stand, types of vehicles we decide to build, cost, dangers, what equipment is available, who does this kind of thing as well as any other topic you guys can come up with.

As an aside, if anyone is willing to bring their UAV, multicoptor, submarine, blimp etc to let students see and talk about it with them (show and tell!), please send me a message and I'll help that happen.


Read more…
3D Robotics

Tutorial explains the fundamentals of an IMU

3689479405?profile=original

From Hackaday:

An Inertial Measurement Unit is most often found in self-balancing robots and quadcopters, providing enough high-speed sensor data to keep up with the effects of gravity.  He previously used some all-in-one IMU devices in school which did most of the work for him. But he wanted to grind down and look at what each sensor spits out and how those measurements are used. The first installment deals with the accelerometer, using its data to calculate pitch and roll. For these demonstrations [Anilm3] is using this ADXL345 sensor board, an Arduino, and some processing sketches for testing.

Whenever working with sensors you need to take noise into consideration. The post shows how to implement a low-pass filter in the code which will help smooth out the readings. The filtered data is then fed to a couple of mostly-painless formulas which calculate the movement of the accelerometer in degrees. The demonstration sketch is mapped to a 3D cube to give you an idea of how accurate the accelerometer is. There’s a little bit of lag which would let a self-balancing robot have a nasty fall. The solution to this issue will be discussed in upcoming parts of the series. The next installment tackles the gyroscope sensor.

Read more…

3689479390?profile=originalWe are glad to announce the release of a micro navigation and control module to serve as an autopilot for UAVs/MAVs. NavStik is one of the smallest and most powerful such platforms available with open-source RTOS based software/drivers that can be used for a variety of applications related to mobile robotics.

This module is intended for use by researchers and hobbyists. All the firmware and drivers are available in open-source to help users start building their applications, quickly.

Key features of this module are:

  • 3-axis Accelerometer
  • 3-axis Gyroscope
  • 3-axis Magnetometer
  • Barometer (Static Pressure Sensor)
  • GPS
  • Temperature Sensors for Temperature Compensation of Sensor Data
  • Cortex M4 Based Microcontroller (STM32F4: 32 bit, 168 MHz)
  • Onboard SPI Flash with 16 Mb Memory
  • Connectors for Interface Board (required for power and interface to external world)
  • Connectors for Gumstix Overo® (optional - available from Gumstix; for power intensive applications)
  • Connector for GPS Antenna (optional; required for GPS applications)
  • Differential Pressure Sensor (optional; for air-speed estimation)
  • Power Regulators and Switches (for programatically controlling power to subsections)

Interface board (IvyPRO) provides following additional features:

  • 12 PWM channels: In/Out Reconfigurable
  • Micro-SD Card Support
  • Telemetry Port (UART)
  • 2 Full-Speed USB Ports (one can be used for firmware upload)
  • Port for Spektrum Receiver (UART)
  • Gumstix Overo® UART and USB (2 nos) ports
  • Debug Port (for connection to IvyGS for JTAG debugging and console)
  • Onboard current measurement
  • Battery voltage monitor
  • Efficient DC-DC converter for wide input voltage range (4.5 V - 14 V)
  • Automatic power switching between USB and Battery
  • ESD and short-circuit protection

The ground-station board (IvyGS) connects to the interface board using the debug cable, and provides these functions:

  • JTAG debugging
  • NavStik console
  • Overo® console
  • Telemetry port for GCS (UART)

A suitable interface board may be selected based on the application. A debugging (JTAG) and ground-control-station board (with telemetry interface and console) is also available. For more details please checkout the community portal: http://www.navstik.org. Limited boards are now available and can be ordered from the NavStik store: http://www.navstik.com.

We look forward to feedback from the research and hobbyist community on NavStik and how would they want it to evolve. Please do leave your comments below or write to us at info@navstik.org.

Read more…
Developer

3689479322?profile=original

[ Update at the end ]

You bought a brand new FRSky with 8 channel and a promise of a helpful PPM Sum output.

Be warned that you cannot use this with 8 channels. Only 6 channels could be used with some risks (only 5 for real safety). [Note #1 at the end] It's really disappointing.

Yes. FRSky's CPPM signal has a BIG problem: It has a period of only 18 milliseconds. What does that means? Here we go:

A PPM Sum signal usually has a period of 20ms. As each channel uses up to 2ms so you need 16ms to fully accommodate the data from 8 channels (8 * 2 = 16ms).

Now comes an important element: the Sync Pulse. It needs to be wider than all other ones  to indicate the start of a new PPM train. Any 8 channels system based on a 20ms has room for a 4ms pulse (16 + 4 = 20ms). Even with all the channels at 100% a system like that still gives you a perfect sync pulse.


3689479069?profile=original

That's the BIG problem with FRSKy CPPM. If you start using some switches and knobs you are pretty much risking to lose the sync on your autopilot. Because the sync pulse is squeezed until having the same size of any channel.


3689479378?profile=original

I hope they can fix that with a firmware update sooner, because I believe it's not acceptable.

Until that, you cannot use it on your autopilot without risks. [Note #1 below]

[ NOTE #1 ]

This is far away from the ideal, but there is a cheat to eliminate the risks when using just 6 channels by suppressing CH7 and CH8 from CPPM.

At least on a ER9X or ERSky9X radios there is this way:
By changing your model's setup to use a Proto PPM 6CH it will not output CH7 and CH8.
(The frame space (300uSec) though is just ignored. I did not see any changes.)
3689479086?profile=originalI've verified on Oscope. It works!!! The CPPM was outputed from RX without CH7 and CH8.
Is still a shame and disappointing using just 6 from 8 channels. But that seems to eliminate the risk.

[ NOTE #2 ]

Jani, from jDrones took this issue to FRSky's GM/CEO and got a response from them. They are now baking a solution to release a new firmware. Probably the new CPPM frame period would be 27ms (the next available number dictated by the hardware's clock division).

[ UPDATE ]

Yesterday (28th September)  Jani came up with a beta firmware from FRSky. It does output CPPM frames at 27ms. So far we have some positive feedback from DIYDrones dev team's tests. I'll not update this post anymore. A new post instead will show some results followed by a mini updating tutorial for those CPPM capable receivers. Stay tuned! ;)

[ UPDATE ]

This post shows how to fix it.

--Sandro

Read more…

Quading Vacation (no wheels included)


Quading Vacation (no wheels included)
I recently had a 5 day vacation in the foothills of Alberta Canada and took advantage of the great weather to fly my quad. I was able to make 20 flights in 4 different locations. All locations were very remote. The video includes a failsafe RTL when I try to go to far and loose my radio signal. With winter around the corner it was great to have such an opportunity. 
I hope you enjoy
Equipment
jDrones X1 Frame
JDrones AC2830-358, 850Kv
jDrones 20 Amp ESCs
10"/45 propellers
Turnigy nano-tech 3300mah
ArduPilot Mega 2.25 ????(read)
Arducopter 2.7.3
Xbee 900 Telemetry
jDrones MiniOSD
5.8Ghz Video Transmitter with  circularly polarized antenna  3 lobe
Gopro Hero2
Diversity Duo receiver with circularly polarized antenna 4 lobe and a 3 Turn Helical Antenna
Spectrum DX7s radio
APM 2.25
Since new I have had continuing problems with the data flash card not being recognized. I final remounted the daughter board and permanently soldered the interconnection, then I removed the SD card slot and permanently soldered the SD card in place. I kept the SD insertion switch and soldered it closed. Since this mod I have never had any problems with the card. I was forced to repair the USB connector that became intermittent a month ago. I did this by using an old Blackberry charging station to add the female pigtail USB cable that is permanently mounted to the CCT.
Thanks to the development team for their work on Arducopter project. My quad (with all its modifications) operated flawlessly during this trip. 
Emile L.
 

3689479208?profile=original3689479304?profile=original3689479223?profile=original3689479248?profile=original

Read more…
100KM

Twinstar fpv lost and found by girls.

Ever wondered what happens to your lost drone or plane while you are searching for it ?

Had to make an emergency landing with my fpv twinstar because it lost a propeller.  While I was searching for it, 2 girls found the plane, and their conversation was recorded by the still operational HD camera.  I was quite amazed by their technical insight and conclusions !

Enjoy !

Read more…

X8 + APM 2.5 - Setup Photos

3689479110?profile=original

I've received a number of requests to show the detail inside the X8 that we've been trialing.  So here we go with some photo's of my terribly messy cabling, and configuration.  Hopefully the next one will be nice and tidy.

Most equipment is attached to the foam using velcro (aka hook and loop) that is stuck onto the equipment and then velcro'ed down.  I like this method as I can remove and move around equipment without damaging the equipment or the a/c.

The APM has some additional sticky foam on the bottom of it before the velcro was applied.  The intent here was to provide some vibration separation for the gyro's.

Below you can see where the batteries are placed.

3689479152?profile=original

3689479119?profile=original

In the above photo you can see the X8 from the front and top.  You can see the 3DR telemetry radio half way down on the right hand side of the photograph.

3689479178?profile=originalHere you can see the pan/tilt mechanism, with the KX181 camera attached along with the cloverleaf "Fat Shark" antenna.

3689479144?profile=originalThe above picture is the video transmitter mounted on the foam behind the pan/tilt.  The antenna connection pokes out the top.  The velcro (hook and loop) that you can see is used to hold the batteries in place.  One flight battery (4S 3000mAH) and one "systems" battery (4S 1200mAH).  I get around an hour of service out of the systems battery and around 20-30 minutes out of the flight battery depending upon the task.

3689479110?profile=originalThe above photo shows from bottom in clockwise direction, my futaba 8 channel receiver, the uBlox receiver and the APM 2.5.  This is mounted in the immediate belly of the A/C as you remove the top.

3689479270?profile=original

In the above photo you can see the speed controller for the motor at the rear of the A/C.

I hope all that detail shows everyone what they were asking about.  You'll have to excuse my terrible cabling as we put it together a bit slap'dash.  The next build will be much more interesting.

Coming up in the next few day's I'll post some video footage, and also some more details about our first gimbal enabled camera flights.

Read more…
Moderator

Autonomous Vision-based Flight through a Forest

From the description of the youtube movie,
"An AR Drone flies autonomously through a forest using only its camera to avoid trees. The Drone is first flown by a human pilot and subsequently learns to imitate the pilot and avoid obstacles on its own.
Research done at the Robotics Institute of Carnegie Mellon University. Funded by ONR through BIRD MURI."

Read more…

Aeromapper UAV + APM 2.5 + Geotagging now available

3689478951?profile=original

A couple months ago we announced the Aeromapper UAV: a versatile all-composite, low cost UAV mainly aimed for mapping applications, but also being used as a multipurpose UAV platform for its great versatility, performance and great internal volume for different payloads.

It is offered in 3 different options: as a kit, as a RTF with all the basic electronics and components installed, and now as a RTF UAV (autopilot and camera   installed). You can customize each option as well.

The Aeromapper RTF UAV (Option "C") comes with ArduPilot Mega 2.5 installed and ready, and a great mapping camera: the Casio Exilim H20G with   Hybrid GPS.

It's probably one of the best camera options for UAV mapping since it has a GPS   that even works when it loses link with satellites. Motion sensors inside the camera calculates the position even if there`s not a clear view of the sky (three-way   accelerometer and a three-way direction sensor). So it know its position even inside buildings.   Additionally, it features a 14 Megapixel sensor, amazingly long lasting battery, 10x zoom lens, 360 degree panorama feature and many more excellent functions.  

The camera is included with the Aeromapper UAV, installed and ready to use with an interface to shoot images automatically every X seconds (depending on the Option you choose on our website), but it is also sold separately HERE in case you  want just the camera. So if you already have a UAV that is made of composites or doesn't allow a clear view of the sky and you want to tag your images with great precision, go ahead and order the camera from our website.

The Aeromapper UAV is also unique in that it offers a simple and effective   solution that protects the camera and electronics from dirt coming into the payload bay during landing, with a servo activated door on the camera opening (See video HERE).   It is amazing to see how many expensive UAVs are offered in the market and   lack such a basic and important feature. The Aeromapper solves that, still   having a very attractive price (under $4,5K including everything, ready to fly!). As a airframe kit is available for under $1K. It`s probably the best value UAV among composite - high performance UAVs.

We have the goal to  make of the Aeromapper UAV   the best-selling UAV for mapping and No.1 UAV platform for multipurpose applications. We`ll keep improving it, adapting it, adding accesories and payloads and one of our priorities is to offer you the best combination of product and customer support after sale.


More information at our website www.aeromao.com, or email us at info@aeromao.com.

Email us at info@aeromao.com to receive updates!

Read more…

Landing Gear

3689478776?profile=original

The first line in the flight manual should read: "You will crash".

The stock landing gear on my 3DR hexacopter are fine for experienced pilots, but while learning to fly, you will crash.  At the very least you will make hard landings.

I removed the surviving polycarbon landing gear and replaced them with much more forgiving parts.

3689478845?profile=original

3689478748?profile=original

I Ty-wrapped three 1/2-inch foam pipe insulators purchased at our local home improvement store.  Then I cut the top of three Easton 9-inch practice balls and shoved them into the "T".  While this photo doesn't show it, one of the Ty-Wraps goes through the ball to help keep it secure on the insulator "T".

Do not try to use the hard plastic Whiffle balls from Target or Wal Mart.  They are not flexible and difficult to work with. The Easton practice balls are pliable and can be cut with scissors.

Note also that I painted the outboard balls black and left the "forward" ball in its native fluorescent green.  This really helps with my orientation of the copter in flight.

These are temporary while I learn to fly proficiently.  The balls are in the direct down-wash of the propellers and have to be contributing to my yaw problem.  I suspect that this is because the training wheels are on the arms for all of the CCW props, and the CW props are not similarly compromised.

I plan to soon add a camera gimbal, and the balls are too low to the ground, so another solution has to be engineered.

Read more…

Next Generation of Ground Station

3689478926?profile=original

Since I entered into the drone world I've had a problem with the concept of taking my laptop out into the field with me, but as a new (hopeless) pilot I would often like to know more about what's happening with my hexa as it's flying.  To solve this issue I got myself an Ardustation, only to find that it didn't have all the information on it that I was looking for, and the text screen, while great in sunlight left something to be desired...

So, I have started work on what I'd consider the 'Next Generation' of Ardustation, it's based on an Arduino 2560, and a 3.2" TFT Touchscreen...

I've included a GPS for local positioning and future (very near) "Follow Me" functionality, my plan is to pack as much functionality into the unit as I can so that out in the field we can all have a ground station that is more robust than a laptop but just as functional.

so far I have functions to change the mode, a basic HUD (this is limited by the processing power of the 2560 & bandwidth of the display interface), a Flight map, and some debugging code to view the data that is being received over the Xbee.


It should be mentioned that I've lifted some of the code from the Ardustation 2 software, but it has been largely modified by myself to collect more data and simplify program flow.

Let me know what you think?!  if there is enough interest in the project I will publish the code, parts list, and a concise 'how to' on constructing the unit.

Read more…
3D Robotics

Robotboat on Kickstarter

3689479034?profile=originalYou can't buy one, but you can back what seems like a very interesting project: to help build a vehcile that could set an autonomous sailing world record. Eighteen days to go and they're at $30,000 towards a $80,000 goal.

From the Kickstarter listing

Our boats have completed hundreds of hours of fully autonomous navigation and traversed hundreds of kilometers on the water.

We've proved a robust sailing algorithm.  In the GPS trace below you can see the boat complete upwind tacking maneuvers without human control.

We've completed the Robotboat Mark VI design.  We're going to build it like a surfboard; it will be incredibly strong and be capable of being rolled in waves indefinitely.

Read more…

The micro USB connector on the APM boards is extremely fragile and easily damaged.

My solution was to insert a Micro USB to Mini USB adapter to the copter:

3689479014?profile=originalThis way, I just use any Mini USB while on the ground or bench, and leave the adapter cable on the copter.

Here's an example:

Female-Micro-Adapter-Cable

Do not try to use a similar appearing charger adapter.  They typically lack the data wires.

On the other hand, I do use a USB charger to power the APM without connecting the LiPo.  This lets me safely communicate with the APM over the 3DRadio.

Read more…