All Posts (11086)

Sort by
3D Robotics

Unmanned heli lands on a moving trailer

From Robots.net:

In preparation for the upcoming real sea-trials, Boeing’s unmanned helicopter (based on a modified MD530F ‘little bird’) successfully landed on a moving platform towed by a truck. The project is under contract by the French armaments agency (DGA) and major partners are DCNS and Thales. Both French companies are modifying the system for its new more demanding role and next year, sea trials will be conducted over a French frigate. It is worth noticing that this particular system is not only derived from a manned system but it can be optionally piloted with a various levels of autonomy thus speeding up the development and simplifying many complex procedures that usually fully unmanned systems have. (via Ares blog)

Read more…
3D Robotics

DIY Drones in new MAKE Kit Guide

3689433397?profile=originalMake Magazine has a great new special issue on kits, which includes an interview with me on all the lessons on what not to do that I learned in the early days of DIY Drones (before we started 3D Robotics to do it right). 


Here's a short excerpt from the long interview and article: 


What tipped your decision to sell UAV kits, rather than just share designs?

Three or four years ago I built the Blimpduino. I had the idea that you could have an autonomous blimp that would fly around in schools, and it would be great for teaching kids about robotics.So we designed the board, and we put the Eagle files up, and said here’s a link to SparkFun’s BatchPCB, here’s the parts list to buy from Mouser and Digi-Key, and here are the instructions for putting it all together.That’s when we realized it was too hard — people just weren’t going to do it. We had to build the board for people.I made about three boards and said, “I’m never doing that again.” So we got a contract manufacturer, and found out that you really have to order at scale to get pricing. We got the money together to buy 500 boards — you have to make a leap of faith, take some capital risk to get the volume. It was a little scary.Then we realized that sourcing the other parts is also hard. Regular folks have no experience in it. I spent a ridiculous amount of time learning the economics of mylar balloons. The learning curve is steep and expensive.Kitting it was the only way to really get it into people’s hands.


What did it take to make that first kit?

The blimp envelope, the laser-cut parts, the motors— it was the same process sourcing these. We had to work with Chinese manufacturers through Alibaba to get the motors. It took months to get all the boxes of components. This meant volume ordering from a dozen different suppliers, getting samples, building test boards — all before we could sell the first kit.Eventually we got all the parts, got the boards built and tested, the firmware loaded, labels printed, and at that point I bribed the children for $1 an hour. We labeled all the parts and set up an assembly line on the dining room table. I was doing quality control,but in the end, despite all our efforts, about half the kits were missing a part. I spent months sending out extra Lego parts or motors to people. I think it’s cute that a 5-year-old forgot to put in a part, but the customer might not be as charmed.

 

3689433423?profile=original

Read more…
3D Robotics

AeroVironment Hummingbird on the cover of Time

3689433260?profile=originalFrom a Time blog post on the photographer: 

New York photographer Jamie Chung spent two and a half weeks shooting the Hummingbird—among a handful of other inventions, including the artificial leaf and a $100,000 razor—for the annual Invention Issue. “It was inspirational,” Chung says of the project. “Meeting the inventors was the best part. They’re totally comfortable with their nerddom, but so am I, so we had a lot of fun together.”

AeroVironment lead engineer Matt Keennon brought the Hummingbird to Chung’s studio, where the photographer shot it in several positions. The remote-controlled device weighs just 0.66 ounces, allowing it to go where humans can’t, be it spying or scouting out safe spots in combat zones. “It’s crazy to think something so pretty is used for something so dangerous,” Chung said. Indeed, who knew the canary in the coal mine would turn out to be a Hummingbird?


3689433087?profile=original


(Via BoingBoing)

Read more…
3D Robotics

"Drone Journalism Arrives"


The New York Times has picked up on the theme we were discussing last week, of amateurs using UAVs (or FPV aircraft) to monitor police activity at protests. 


An important point raised in the article:

Despite the quality of the images, though, RoboKopter might not see a rush of orders from newsrooms just yet.

One reason is that while there is no doubt that similar aerial videos of the Occupy Wall Street protests would have gotten widespread airplay on American television this week, it is unlikely that the New York Police Department, which closed the airspace above Lower Manhattan during Tuesday’s raid, would have taken kindly to a flock of drone journalists.


Read more…
3D Robotics

3689433149?profile=original

Wave glider robots await launch from San Francisco in this first expedition blog post in Google Earth.


From the Google Earth blog:

Join a journey of discovery virtually in Google Earth, as Liquid Robotics launches four wave-powered robotic gliders to cross the Pacific ocean in their Pacific Crossing (PacX) Challenge Expedition. The wave gliders are attempting to set a new world record for the longest distance ever attempted by an unmanned vehicle and will be collecting data about the Pacific ocean for use by scientists and students back on dry land. These R2D2s of the sea will cross 25,000 miles over 300 days and collect over 2 million data points, helping build the record of oceanic knowledge.

To follow the wave gliders in Google Earth, download the expedition KML file or open the PacX Gallery page and click on the ship icon. You will be able to read updates from scientists sharing the latest robotic observations, from wave height in storms to weather measurements like barometric pressure, wind speed and air temperature. The ship icon will represent the location of the wave gliders, starting in the San Francisco bay.

Read more…
Developer

DIY Drones T3 racing in Venice

What's going on here? This is a "Virtual Venice UAV race". It's based on the DIYDrones T3 figure of 8 competition.

The screncast's purpose is to show how pilots can potentially fly their planes in different parts of the world, and then have their geo position and time base altered so that they end up racing side by side in Google Earth.

My spoken commentary is complete fiction. I just wanted to create the human emotions that a race meet, can engender. (I actually flew the same planes somewhere near Reading in the UK on two different days).

Now, using the latest flight analyzer, any group of MatrixPilot's can have a race together, although they may actually be on opposite sides of the world. In the future, all MAVLink compatible UAVs shoud be able to do this as well. (Someone still has to develop the software).


diydrones.com/​profiles/​blogs/​restarting-the-t3-contest-now-with-copters

code.google.com/​p/​gentlenav/​

Read more…

ArduCopter Quad Carbon Frame DIY Build

3689433053?profile=original
Hi there,

my first post here :) Just want to share this build log of my first DIY quadcopter frame in carbon fiber.

Setup

- APM with GPS and Magnetometer
- 25cm Arms
- 54cm from Motor to Motor
- 18Amp HobbyWing ESC
- 750kv Motors
- 10x4.5 Props
- Turnigy nanotech 2200mha 25-50c

Extras

- HobbyKing camera with mount
- Fatshark 5.8Ghz 100mw video transmiter

Weight

- 640gr only the frame, motors and escs
- 980gr Total with the Video transmitter (not in the pictures)

Is this a good weight for this frame size and config?

About the build

I used CF 1.5mm sheet and CF tubes with 13mm diameter, to mount the motors i drilled the holes directly in the CF tube and used some plastic prop adapters to reduce vibrations. I also used some thin double side foam between the arms and top plate this way the arms will not be in direct contact with the CF plate, don't know if it helps or not. To hold the APM board the the frame i used the same double sided foam, i used 2 pieces on top of each other to give it a bit more height.

I intend to use this frame at first for some FPV, i used 8mm CF square tubes to make a camera mount, it looks pretty cool :)

I could save some grams in the wiring, but in this first step i decided to keep the wires in its original length for later changes, right now its a mess of wires between the 2 main center plates.  

Some things i noticed after the build and 2 short test flights:

I thought that it was a good idea to drill the holes in the CF tubes and mount motors directly on it, actually the tubes can handle the screws even very tighten, they didn't crack, but its hard to get perfect hole alignment without proper tools. I used an aluminum profile 15x15mm, inside diameter was 13mm exactly the outer diameter of the CF tubes, i easily drilled the holes in the aluminum profile to serve as guide and inserted the CF tubes inside. It worked pretty well, but the inclination was not so good, it's hardly noticed but motors have some minimum inclination.

I'm afraid this inclination error will affect the stability, anyone has something to say about this? I'm thinking in changing the arms to aluminum square profiles or get some mounts like Heli tail booms, it would be easy to adjust inclination.

I didn't tune PID's yet, so first flights were a bit unstable, also i wonder if having the plates stacks too high can affect the stability as well.

Also the arms look nice when short close to the motors, but will be a problem if it crashes, and i'm sure it will :(

Here are some pics of the build, Cheers!


3689432990?profile=original3689433058?profile=original3689433111?profile=original3689433029?profile=original3689433124?profile=original3689433050?profile=original

4935bc088dd24b61907b6d9e03b42d5a?width=750f67b1e78aa8742698d0518acd057bf15?width=750d977816e32af4515a8ee0ae2aa8699c5?width=750e2bbfd202d2848a897dc87740954bad7?width=7507f51b57e4c434d89b4aa6521dd6b7445?width=750516413354d064f1e83b45e1b437e4524?width=7501fe4bc99f1e14c96a9626fb79a0f0451?width=750aeb599adcd0b406285eeaf7fb8f5e012?width=750

Read more…
3D Robotics

Visualize your PCBs in SketchUp

3689432928?profile=originalHackaday brings news of a cool and easy way to visualize your PCBs, which is a weak point in Eagle:

"It's a software package called EagleUp that will import your Eagle CAD PCB designs into Google SketchUp. It bridges the gap between the two using the open source image processing software ImageMagick.

As you can see above, you’ll end up with a beautifully rendered 3D model of your hardware. This is a wonderful way to make sure that your enclosure designs are going to work without needing to wait for the PCBs to arrive from the fab house. It is available for Windows, OSX and Linux (although the last time we tried to run Sketchup under Wine nothing good came of it — perhaps it’s time to try again).

In [Karl's] case, he’s working on an Arduino compatible board based around the Xmega. He mentions that EagleUp is a great way to get an idea of how component placement will end up, and to see if the silk screen layer is going to turn out well or not. Here’s a link to one of his test designs."

Read more…

Like Water Off A Duck's (or Pigeon's) Back!

​One of the criticisms of the Pigeon Post system I've heard multiple times is the problem of rain and other adverse weather will have on the electronic systems and on the Smart Cases.  

Now I'm not an materials expert or an electrical engineer but looking at this product demo video, I think I might have just found a solution.*  Ladies and Gentlemen, I give you NeverWet:


One question I have about this super-hydrophobic wonder spray is how easy is it to remove?  Is there a anti-superhydrophobic cleaning solution?  

So who will be the first to use this stuff on their UAV and test it out in the rain?


* Yes I know this doesn't solve the wind problem but I'll get to that another time.

Originally posted over on the Pigeon Post Blog: http://pigeonpostco.squarespace.com/blog/2011/11/16/like-water-off-a-ducks-or-pigeons-back.html

Read more…
Developer

3689432775?profile=originalHi there! Finally you can pre-order the ArduIMU V3 here.. You can find more info abut it in my last post here. 

The final version of the board for full production is here, I'm expecting to start shipping them this Friday or Monday. 

We are still working on documentation and giving the final cosmetic touches to the example code to have it ready before you have one in your hands and at the same time we are shipping samples to developers to do a full DCM integration.


From now on our new color will purple! All our new products will feature a Lilypad style look! 


(Note: this is a stand-alone IMU, and is not designed to be a replacement for the "Oilpan" IMU shield of ArduPilot Mega.)

Read more…

RC Avatar-like twin rotor heli from flite test


What do you think about that? It is similar in concept with the helicopters from the movie Avatar, it uses differential thrust and independent tilt for each rotor. It doesn't look very stable but this looks like a very primitive prototype. Maybe it has the potential for something quite cool.

Read more…
Developer

Qu8k: 121,000ft in 92 seconds

3689432614?profile=original

Now this is a new meaning for "get high" (...and fast).

"Qu8k" from Derek Deville's is an terrific rocket project. On Setember 30,2011 the Qu8k was launched from the Black Rock Desert in Nevada.

The platform includes: 2 timers, 4 GPS, 1 Accelerometer and 1 Cosmic Ray Detector.

All the captured HD 1080p images you'll see are really cool. It was filmed by three cameras aboard (2 GoPro and 1 FlipHD) and many others on the ground, attached to the launch tower, etc.

From the construction to the power at the launch time, all is very exciting.

Here goes the link: https://www.youtube.com/watch?v=rvDqoxMUroA

Enjoy it!

Read more…

ArmQuad V12


Hi,

 I built a  V shaped with 12 motor and coaxial prop 
I know that the V shape is patented by Asctec.
This is a test only for learning purpose.

Is based on Coridium ARMmite pro controller.

Motor: keda 50-20s with 8x4.5 prop

Gyro ITG3200, Acc BMA180, Lipo 5000 mAh


Read more…
3D Robotics

Colorado radio program on civilian UAV use

3689432498?profile=original

Good 30-min program with a set of interviews with people doing everything from bird monitoring to search and rescue in Colorado. Aircraft range from a 4ft Cessna model to a Draganflier. Includes some interesting observations on crazy regulatory barriers (calling a control tower many miles away to say that you'll be operating a model heli at 10ft in the woods) and privacy laws (they need a search warrant to fly over someone's back yard).

Here's the description:

"There’s a lot of technology we depend on that came from the military. The Internet’s probably the best known. GPS, too. And satellites. The next big technology transfer could be unmanned aircraft. Planes with no pilots inside. The military flies a lot of these so-called drones in Iraq and Afghanistan. But in the United States, civilians aren’t really allowed to fly unmanned planes. There are a few exceptions, two of them here in Colorado. In Mesa County, a helicopter the size of a microwave does detective work. And the San Luis Valley, a small plane counts wildlife. More on that shortly. First, a chat with CPR’s Zachary Barr. He just got back from the first conference of Coloradans who build and design unmanned vehicles for air, certainly, but land and sea, too. Zac reports that people in this industry believe it has a bright future, but it would be even more promising if government regulators would loosen regulations."

Read more…

Building a Hexa ArduCopter

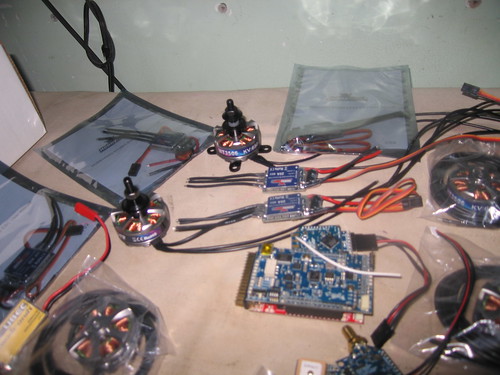
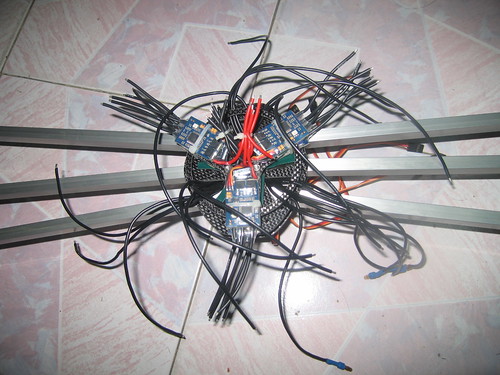
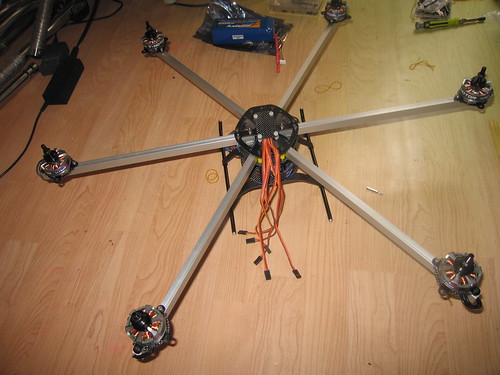
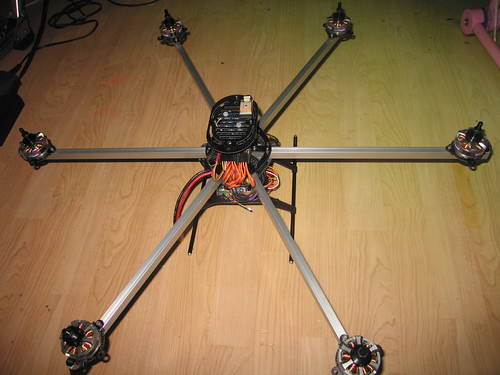
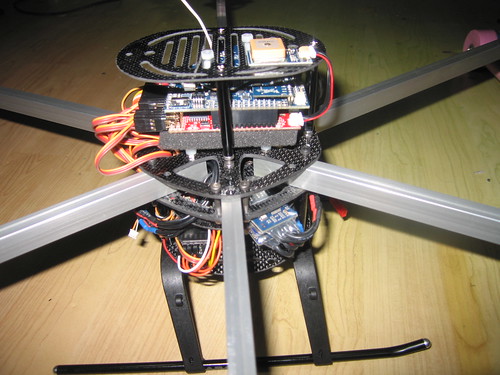
After getting the board from 3D Robotics, motor from RCtigermotor, ESCs from HK... some stuff from Flytron as well.. I started to build:

1. Materials

6329124616_0851ee5164.jpg


6328371885_7e92562582.jpg

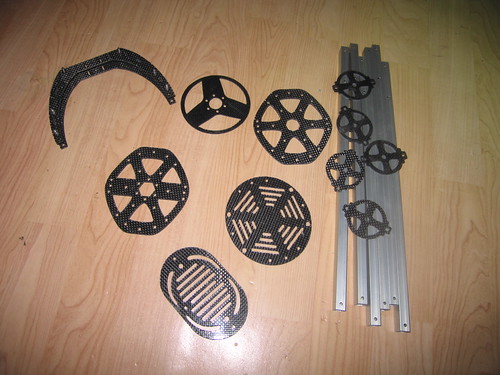
Frames: DIY CNC Fiber Carbon + Alu 10x15mm x 340mm long

6331347227_cbc9d09582.jpg

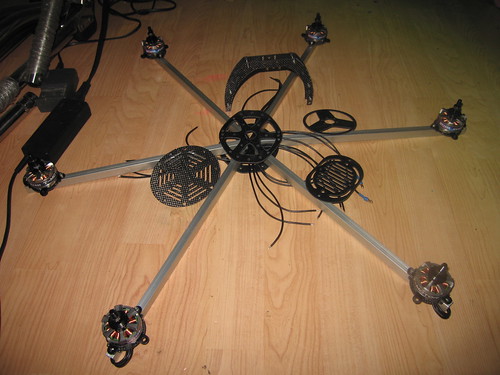
assembled motor to the arms:

6331348783_9583dcd76e.jpg

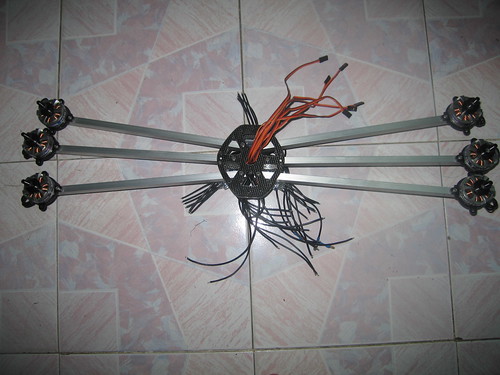
with ESCs:

6334779686_5c153020f9.jpg

6334780354_db10b8b57f.jpg

with landing, the FC one is too weak and I could not use it. I used landing of Heli5006337443968_5c168ed701.jpg

with ArduCopter control

6336690989_56cfcf7c1e.jpg

The other view:

6337446352_b04468b084.jpg

foldable:

6341777445_cb3a6a1415.jpg

Read more…
Moderator

Dear Friend,

I'm happy to present my last creation :


Original blog post : http://www.virtualrobotix.com/profiles/blogs/virtualrobotix-telemetry-board

This telemetry board use AVR 644P as micro controller the code is developed in C++ using some Arduino library. Great Thanks to Sandro Benigno for OSD routine , and other people that are working on OSD code and other opensource library that I use in my new product.


The Board

  • ATmega644P 20 Mhz with Arduino bootloader
  • MAX7456 monochrome on-screen display
  • Serial that support Jeti RTX telemetry data link.
  • I2C that support Aurora9 RTX telemetry channel (work in progress).
  • GPRS Module for long range comunication that using tcp/ip channel . (option)
  • Serial port that support Mavlink protocol for interconnect board that use that kind of protocol as Arducopter(32) , Arduplane ecc ecc.
  • Is possible to customize the protocol for interrconnection with Mikrokopter , Multiwii or Aeroquad platform and also other platform that you like if you have documentation of comunication protocol.

Is possible to recive the telemetry as overlay of video during the flight or on your prefered Jeti or Aurora radio. Other interface will be implement also on futaba and graupner radio.

All the data available on the quad is visible by telemetry option , we are also working on realtime setting of parameter during the fly directly for example jeti box.

As option is possible to mount GPRS module so you can interconnect your ground station by gprs so in case of lost your quad you can try to found it using long range telemetry module.


The price will be define in the next week and depend of option that you want.

Any kind of suggestions is welcome.

Best

Roberto

Read more…

My "indestructible" quadcopter Build

This is the result of my "indestructable" quadcopter design blog.

3689432534?profile=originalI dont know how well it crashes it yet but after 2 test flights, it flies very well! I need to do some PID tuning as the arms are quite short. They are 450 size heli tail booms that I cut for no other reason but to make the quad smaller and see what happens. Any PID tuning recommendations for shorter arms?


On to the nitty gritty. All the carbon fibre is 1mm thick. It was cut with a jigsaw using a fine metal blade and it works really well. The motor mounts are made of 4mm perspex and were cut using a hole saw. The landing gear is also 4mm perspex cut with a jigsaw and bent with a mini blow torch. I never realized how strong perspex actually is till I started messing around with offcuts! its unbreakable! under huge stress it just folds but never breaks in 2.


The total mass without battery is 630g and with 2200mAh battery 828g. I actually have no idea if this is light or heavy for a quad?


Price:

2x 100mm x 300mm x 1mm carbon fibre: $10.79ea

4 x 450 heli carbon fibre tail boom: $2.40ea

Screws, nuts, bolts: $8.00 nylon screws are quite pricey!

Perspex 300mm x 300mm x 4mm sheet: $10.00


Total: $50.00 Not Bad =)

IMAG0316.jpg

IMAG0314.jpgIMAG0311.jpgIMAG0307.jpgIMAG0312.jpg

Read more…