Posted by Mark Harrison on September 6, 2011 at 12:50pm
An interesting photo essay "Chasing Nature" which shows several flying projects inspired by bugs and birds. Not much detail, but enough context to allow googling of the original project pages. This picture is captioned:
Instead of working to build and control robotic insects, Michel Maharbiz and collaborators at the University of California, Berkeley, hijacked the real thing. This six-centimeter-long flower beetle is fitted with electronics that stimulate its brain and flight muscles. Signals delivered by radio waves command its flight. Maharbiz is working on miniaturizing the electronics to control smaller insects, such as houseflies.
This project has been started in october 2010 and its purpose is to build a full autonomous Thermal Hunter Glider which is able to fly for a long duration in an area defined by a radius, a ceiling and a minimal altitude. The glider uses thermal soaring and dynamic soaring methods commonly used by full scale gliders during cross country soaring competitions.
During a full autonomous flight defined by a flight plan, the glider is able to optimize itself the onboard power using the energy gained by the updrafts during its thermal hunting process. For safety reasons, the glider can use its electrical engine to sustain the minimal altitude required.In the video, you will see some samples of the test flights during the phase 2 of the Thermopilot project. The glider is fully stabilized by the Thermopilot software.
During the Phase 2 of the project, the firmware has been tested in flight with an ArduPilot/ArduIMU board (firmware ThermoPilot v2.9.x JLN version). The ThermoPilot (phase 3) will use an ArduPilot MEGA 2560 and a bigger glider. The setup has been successfully tested on the MAJA drone in May 2011. The ThermoPilot will be able to learn and optimize itself the thermal upwards areas during its thermal hunting...
The ThermoPilot firmware has been tested in High Mountains in July 2011 (Savoie, French Alps): Ridge Soaring tests flights done in high wind conditions. It has also been tested in the fields in August 2011 (Auvergne, France): Thermal Soaring tests flights in various weather conditions.
Posted by Jason Short on September 4, 2011 at 12:00pm
Just got back from testing the latest version. I'm having great luck with it.
Improved alt hold: Look for about twice the accuracy for altitude hold than the previous 2.0.40 preview. It's really good and the motors don't pulse as hard as they did before.
Loiter looks great and has the wind compensation turned on now by default. It wasn't enabled before.
RTL is running very smooth. Circle mode needs some work. Installing this will cause you to go through an initial setup process using the CLI. Be sure to setup your radio, level, enable the compass, set declination and enable sonar, etc.
Feedback is appreciated.
Note: This version is no longer compatible with the Mission Planner. Some internals have changed. I'll work with Michael Oborne to get it connected and updatable through the Planner.
Today I'm test sonar my Arducopter in ALT Hold Mode. I use USB HUD cable (Have Shield) connect to Pitot port IMU and receive signal from AN (pin 3) the Sonar. It perfect not noise in test.
Posted by malcolm churn on September 3, 2011 at 4:08pm
Firstly thanks to Jason for his New Alpha code. 2.0.40. Randy for all the help and Martin who keeps supplying tea
The new control laws that he has implemented work really well. The oscillations have virtually disappeared in stabilise, and Loiter held for over 8 mins with only very slow drift, had to bring the heli back to the start point twice.
I think i need to adjust the I value to get a few more degree's to fight the wind.
Also needed to wait until the GPS got as many sats as possible for the most stable hold.
I set the APM_config.h file so that Loiter had a manual throttle (collective Pitch on trad heli). I added this as well to lessen the lean of the heli. Although i might be wrong and it could be for something completely different.
//////////////////////////////////////////////////////////////////////////////// Autopilot control limits////
changed this too as the Trad Heli would not fly well in this mode
#define ALT_HOLD_RP ROLL_PITCH_SIMPLE to ROLL_PITCH_STABLE
Next is to try Loiter and ALT_HOLD together.
WE also shot some video of martin flying after a rebuild that took us 2 hrs, we decided to close the throttle. One motor didnt fire and we it hit the floor hard. This video is the rebuilt quad really impressed with how quick it was. we had another problem. Watch the vid :)
In this video, I am using a UMI, a sonar for altitude, and a wii-remote camera. The wii-remote camera is a very small camera that is included in the wii-remote.
The wii-remote camera gives directly the 2D coordinates of the IR spots in the image. It's interface is I2C. This is really a great sensor!
On my UAV, the wii-remote camera looks under.
I put IR LEDs on the floor.
I have put some lenses on this wii-remote camera, because the field of view was too narrow.
I still plan to make my drone navigate autonomously in an indoor environment, with several IR spots put on the floor.
For french-speeking people, you can see all the work that I have done on this web-site.
I spend a gorgeous morning at the field with Jason Short testing code and tuning PIDs. He was focusing on ArduCopter 2.0.40 and I was just dialing in the PIDs for the HobbyKing Bixler, which is our current recommended platform for beginners.
I think I've got them pretty close, so I've posted the config file in the manual here with the rest of the config files for standard aircraft. Just load it in the Mission Planner and write it to APM, and you're ready to go.
Posted by Jason Short on September 1, 2011 at 6:30pm
I've been away on vacation for the last week and a half, but I was able to port Arducopter to Flash and do some simulations. This has helped me rewrite the navigation control laws, simple mode, and Loiter to all use a streamlined set of control loops. This not only has saved code space, but the end result is a quad that flies like it's on rails.
Loiter and WP navigation are now the same code and use a rate based solution from the GPS. The heading and ground speed values are parsed into X(long) and Y(lat) components. This gives me a far more accurate estimation of position than just using the Mediatek's lat and long outputs. The controller takes the position error, desired speed, and minimum speed and outputs pitch and roll commands. I've noticed a marked improvement in Loiter hold. Basically it's glued to one spot. I'll need to do more testing in windy conditions, so stay tuned.
Altitude hold uses the same controller design and manages the speed of altitude change. Landing and altitude changes are much more controlled and I've not seen the quad loose altitude on RTL like it did in the past.
The Throttle, Roll/Pitch, and Yaw control loops have all be separated to give you the option of redefining any of the modes. In the zip file below, Alt hold has been redefined (in APM_Config,h) to use SIMPLE mode for Roll/Pitch. Loiter has been redefined to use Manual throttle.
The Flash based simulator uses nearly identical code to Arducopter. Here's the work in progress of the sim:
The code itself is available for download here and is considered alpha to me. WP's are being tested tomorrow. Only RTL, SIMPLE, ALT HOLD have been tested so far. Crosstrack correction is currently disabled. Everything should work, but be careful. Anything could happen. I've only crashed 4 times today ;)
Posted by Jeff Taylor on September 1, 2011 at 3:28pm
Today we're making the first shipment of ArduCopter 3DR quads. When you receive your quad, check the product page for build instructions - I'll be adding it today. And don't be confused that you have a few too many parts. We decided to try to beat Murphy's law by including a few extra parts in each kit - an extra main frame, stack up, arm and leg.
There are still a few in stock right now. We'll get the next shipment of arms in a few days and after there will be plenty to go around!
Posted by oejang aja on September 1, 2011 at 5:30am
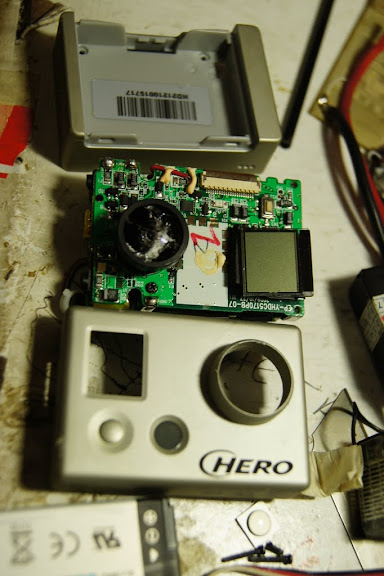
Go pro is very popular among the FPV pilot or UAVS builder, but not everyone like the fish eye extreme wide lense. Some people choose to buy an extra housing while other replace the standard lense with gopro flat lense. Based on our experince If you want a flat lense on Go Pro, no need to buy extra housing or a new lense... just crush your go Pro in to wall... !!!.
Few days a go our plane crash while testing auto pilot, the plane hit a stadium wall quite hard.. and unfortunately we put our GoPro on the front of the plane. The camera (without) housing hit the wall directly and the lens crack. This is what the lens look like after...
What suprise us.... the Gopro lense consist of few layer. It seems that each layer magnify the image and made it wider. In our case the lense is broken except the last layer... and after removing the broken layer we found that the last layer is a flat lense... and its working.
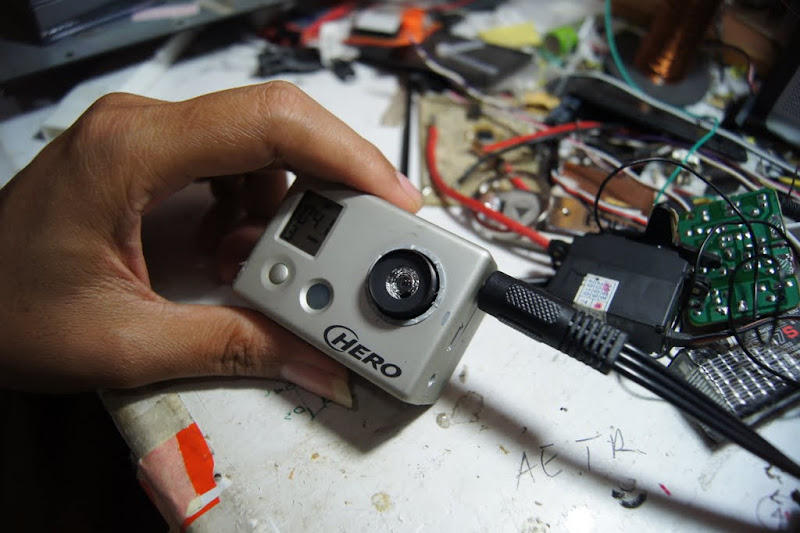
Here the image of the lens.... (the monitor is white and black), yes its flat... and more narrow angle..
Corius... we do some experiment, we replace the lens with used pocket camera lens.. and it works... !!
the image is good, but since the material is plastic its not sharp... i think if we use high quality glass lens the result will be great.... I'm curious if go pro also work with SLR lenses :D
Conclusion
* Dont throw away your old broken camera... the lens might be useful
* If you broke your gopro lens check again... does it broken to the bottom or just the first layer
* if you want flat and narrow image... no need to buy a new lens.. just hit your plane to the wall like we did :D
UPDATE
the modified lens work great underwater, just turn to get fix focus (the focus is diffrent betwen up and underwater) *thx to mas thoha
writer : oejang, amateur pilot the tech guy : masthoha
For the last week i have successfully flown my Twinstar with the APM. Everything was tuned and i had developed a good routine for setting things up in the field before flying. Yesterday the plan was to test a long endurance flight (25 min) that also used the relay to reset the XBee to keep the telemetry link for the entire flight.
But this is what happened...
The Twinstar comes with a small PCB that houses connectors for the motors and ESCs. The motor connectors are constructed in a way that they can't be connected the wrong way, but you can accidentally connect plus to minus and vice versa anyway which i found out... the connectors touched for just a split second, but that seemed to be enough to brick my APM. Mission Planner will not talk to it any more. The Arduino IDE doesn't like it either... I don't think the Mega 1280 is that sencitive, and i will investigate that further.
Fortunately i had a spare APM lying around... Some rewiring and a firmware upgrade and I was good to go. Almost...
I needed to recalibrate my radio for the new APM and ran in to all sorts of trouble. When i finally got everything in order i just wanted to do a last test of everything before flying.
It turns out that my ESCs needs a lower PWM than what my radio could give them (Without trimmint the throttle down... ) to keep the motors still. When i connected the ESC the motors spun up, one propeller hit the canopy and sent my xBee for a flight on it's own. Fortunately the xBee survied and i only need to replace one propeller.
Lessons to learned:
* Replace stock power connector on the Twinstar!
* Save your APM settings regularly. If you need to replace or reflash it you will need this file. Otherwise you need to start all over with the tuning process.
* Recalibrate radio after firmware uipgrade. Don't rely on the settings in your stored settings file.
Well i guess it's part of the hobby. New props are on their way and this gives me a reason to order a APM with the Mega 256 Kb chip.
If you want to have a go at the MP32 from www.virtualrobotix.com, take advantage of the powerful 32bit ST ARM Cortex-M3 processor and would like to use your OILPAN with the great software the DIYDrones developres are developing, this is a small guide to get things started.
It will cover the biggest steps to configure the hardware and firmware.
Roberto has done a very good job, and since he lacks a bit in end user documentation (well that's tipical for almost every developer!!) I decided to give him a little help.
The code is ported form the 2.0.39 AC2 firmware and is is up-to-date with recent enhancemets. The planner will work just fine (at the time of writing 1.0.54)
The above is a video made by Roberto itself explaining setup for both the VRIMU and the OILPAN.
Before you can use the AC32 firmware you MUST solder two pin headers on the connectors shown below. You then need to short them in order to upload new firmware and fly! (you can use an old motherboard jumper plug to short the connector so you would be able to reuse your OILPAN on the old ATMEGA)
You also need a bind plug to put the MP32 in firmware upload mode(see later...). Or you can use one female-female cable like the ones posted above.
First download and install software and drivers
Download the latest VRIDE Framework. At the moment it is the 0.0.4.5.7 link here VRIDE.0.0.4.5.7 unzip it and place it in a folder like C:\MP32
You need to install drivers for your USB to serial adapter from here
You need to install DFU drivers for your MP32 board. You can find the drivers in the C:\MP32\drivers\mapleDrv\dfu\ folder of the VRIDE just downloaded.
Download the specifically modified firmware for the OILPAN from here OILPAN firmware. Unzip and overwrite the libraries folder in your C:\MP32 folder and the ACopter32 folder under the C:\MP32\Firmware\ folder
Installing the Mediatek GPS (DIYDrones)
At the time of writing only the Mediatek GPS from DIYDrones with firmware 1.6 is fully tested. The GPS needs to be attached directly on the MP32 board. To do this there are several ways. What I chose was to get a GPS cable adapter like the ones DIYDrones store sells and cut off one end that I solder directly on the board. You could also solder connector pins on both the MP32 and the GPS board and use a 4 wire cable.
This is a picture to explain what I did:
The 1st and last wire of the cable are not used, so you can cut them off. This is the schema on how to connect them:
MP32
Cable Wire # / Pin
GPS Adapter Circuit Board
JP19-2 (GND)
(2)
(GND)
JP19-4 (5V)
(5)
(5V)
JP19-6 (Ser4 Tx)
(4)
(IN)
JP19-8 (Ser4 Rx)
(3)
(OUT)
This is where you will find the JPs on the board:
A picture shows were you can find the connectors:
Compiling and uploading the firmware
Configuring the VRIde
VRIDE is the "32bit version of Arduino". Is based on the LeafLabs? Maple IDE and uses a language much similar to the Arduino framework.
Once your hardware i ready and your drivers are finally set up you can start to open the vrobotix-ide.exe and in File-->Preferences choose the folder where you unzipped the VRIDE rar (eg. c:\MP32)
Then choose from the menu File-->sketchbook the Firmware-->Acopter32 sketch like in the Arduino framework.
This is your new firmware ready to be uploaded. But before we can continue we have to check and modify a few parameters in the code.
Modifying the code before the upload process
To let the compiler know you are using the OILPAN and not the VRIMU we need to make a few changes in the code. Nothing too difficult.Future developements will not require you to make all this modification, so keep up for the news! So follow these steps:
Locate the libraries folder in your C:\MP32 folder and open with a text editor like Notepad++ the following files:
AP_ADC\AP_ADC_ADS7844.cpp: be sure to comment out the #define VRIMU so the line would be //#define VRIMU like this:
//#define VRIMU
If you have the old compass HMC5843 you have to open the file AP_Compass\AP_Compass_HMC5843.cpp and add a new line at the end of the defines: #define HMC5843 otherwise if you have the most recent mag, leave as it is.
Open the file AP_IMU\AP_IMU_Oilpan.cpp and comment out the //#define VRIMU and //#define VRMIMUIDG5000 line and add (if not present the line #define IMUOILPAN:
Open the file AP_IMU\AP_IMU_Oilpan.h and do the same of before: comment out the //#define VRMIMUIDG5000 and add if not present the line #define IMUOILPAN:
Now Plug the Bind Plug or one female-female jumper cable into the second input from the left of the MP32 (Called JP4_7, JP6_7 and corresponding to the 7th input of the old ATMega). Pins 1 and 3 must be connected toghether (The signal and ground pins)
This is used tu put your MP32 in firmware upload mode. When in this mode (and board powered) you will see a green led blinking on the MP32 board. This means you can start the upload process.
Plug the USB cable directly into the MP32 USB port. This is used as a power source and as a communication port.
Like the Arduino IDE, before uploading the firmware check that the code compiles correctly by clicking the Verify button. If code compiles, you can click on the Upload to board button.
Wait for the completed upload message in the VRIDE message window.
Setting up the firmware for first use
Once the code has been uploaded you will be able to interact with it using the USB-->serial adapter shown above, you have to connect the adapter to the Telemetry port on the OILPAN. To get into the CLI you will not have to switch the slider. This mode is disabled!
You need to use a Hyper Terminal to get to connect to the CLI the first time. This can be found in Windows XP in START-->All Programs-->Accessories-->Communications-->Hyper Terminal. For Windows7 and Vista you need to download the Hyper Terminal program from here:http://www.megaupload.com/?d=J31857IQ. This is the original Windows XP program.
So now that you have the USB-->Serial connected to the telemetry port and Hyper Terminal connected to the COM, power up the MP32 using for example the usb port on it. As soon as you connect you will see a message saying to press S to enter interactive mode. You have five seconds to press S after boot up. This will let you in the CLI mode. Use the the SETUP-->Reset to reset the parameters, configure your radio, level, calibrate ESC as you will do in old ATMEGA chip.
The ERASE function is not necessary.
Using the Planner to finish configuration
Once you have done first configuration, you will be able to connect to the MP32 using the AC2 planner found here
For all the rest you can use the the Arducopter Wiki which will guide you through the rest of the setup.
Frames supported by the code:
Quad X mode
Quad + mode
Hexa X mode
Hexa + mode
Features actually not supported by the code:
sonar is not implemented
camera mount stabilization is not working
All the rest should be working! This is still BETA so use at your own risk, and please report any issues to the Issues list in the Multipilot32 google code project.
Hobbyking today released on their website na OSD System Combo which contains a main board, power module, USB/GPS/IR/TEMP Modules with a Remote.
From their website:
The HobbyKing OSD Combo is a quick and easy way to add a wealth of on screen information to your FPV system. With GPS coordinates, airspeed, voltmeter, temperature, and many more display functions this OSD unit will make a great addition to any FPV setup at a fraction of the cost of other GPS OSD systems currently available. It even includes an IR sensor and remote control for wireless function control.
An excellent new feature of this system is the "home direction" indicator which works as follows: "If more than 10KM/H or equivalent in MPH speed is measured by the GPS for not less than half of a second, the system will switch the operating mode from “Landed” mode to “Taken-Off” mode. The system will always compare between the current position coordinate and the position measured in “Landed” mode, and calculate the “Home Direction”, hence advises the pilot where the plane took off referencing to the current flying heading. If you are lost during the flight, you may always fly back to the take-off location by the referencing of home direction arrow."
OSD Display Features: Timer Date Temperature Power battery voltage Power battery gauge Power battery current Power battery consumed energy GPS status Position Coordinate Main Sea Level Altitude Compass Direction heading Home direction Relative altitude Altitude scale Climb rate Maximum altitude reached Distance to home Speed scale Speed reading Auxiliary voltage status Horizontal datum Flight recorder status
Specifications: Weight: Main board - 17g / Power module - 23g Dimensions: Main board - 60x18x34 / Power module - 57x13x31
Edit: This seems to be the Apached OSD from AEORC. A manual can be found here
Price is US$ 56.94, but if you stay for about 30 seconds on that page, you will be offered to buy it for US$ 53.87 (can be different depending on your membership level)
"We finally flew our first thermal camera flight yesterday afternoon. About 10 seconds after launch my co pilot looked at the screen and said something like, "We now have our very own predator drone""
As is customary and traditional, we celebrate every new 1,000 members here and share the traffic stats. We're now at 18,000 registered members. We had another month of more than a million page views. It just took us six weeks to get this latest 1,000 members, which is the fastest growth we've ever seen--we're averaging about one new member per hour. We expected the usual summer slowdown as usual, but there was no sign of it this year. Drones are hot!
Thanks as always to all the community members who make this growth possible, and especially the moderators who approve membership applications and blog posts and otherwise answer questions and keep things ticking here. We've got about 40 moderators now, but if anyone would like to join this group, please PM me. If you've been here for a while and have been participating, you'll fit in great!
Posted by Jason Short on August 30, 2011 at 10:30am
This is a simulation I'm working on to improve the Altitude hold and change control laws. I have identical code from Arducopter running in Flash as OO Javascript so I can ensure the behavior is the same as the real thing. I sampled data from the barometer to introduce identical noise into each copter's solution. This allows me to test PID and other tricks side by side and see how the copter will behave. The copter itself is a simple physics equation and should be fairly accurate.
The Hover value is in your logs when you switch to Alt Hold. You should see it with the mode switch name. Mine was 495 which is the equivalent of 49.5% throttle. A lower value has a profound effect on the flight so play around with that.
The A copter is the current control solution. The B and C copters are Pi->Pi rate based solutions and are identical. You can adjust PID setting to pit the two against each other.
The scale on the left is meters. The Sonar is active and the mix is identical to the current AC2 solution.
This new code is in testing and will be available next week in 2.0.40b
Posted by Troy Reabe on August 30, 2011 at 10:00am
This is a cool video and writeup I found on Adafruit.com:
Here's the Adafruit writeup:
"A micro camera is installed onboard an r/c plane F-16. The camera transmit live the video to ground and I wear video goggle to fly the plane in real time like if I was in the cockpit. The camera replace the head of the pilot and the movement of the cam is control by the movement of my head on ground via a head mount gyroscope (head tracker)
The whole system cost me around $1500 including the plane. But it is many hours of hand made modifcation. You can start with simpler video system that cost around $500 and install it on your own r/c plane. Search for FPV on the web for more info about my hobby…"
Posted by Gary Mortimer on August 30, 2011 at 7:30am
“With more than four years of customer funding behind it, our new Shrike VTOL unmanned aircraft systemis designed to address the need for a small, light-weight hovering aircraft that delivers unique surveillance and intelligence capability not provided by current solutions. Not only does Shrike VTOL hover for more than 40 minutes with a high resolution video camera, but its innovative design also allows for the transmission of several hours of live video as a remotely emplaced perch and stare sensor,” said Tom Herring, senior vice president and general manager of AeroVironment’s UAS business segment. “This new solution adds an important set of new capabilities to our existing and battle-proven family of small unmanned aircraft systems that are saving lives in theater today.”