All Posts (14049)

Sort by
Developer

DEVEL: Power distribution development

jDrones_4ESC_PowerDistribution_Top_0223_sml.JPG?width=500

Development: New power distribution board

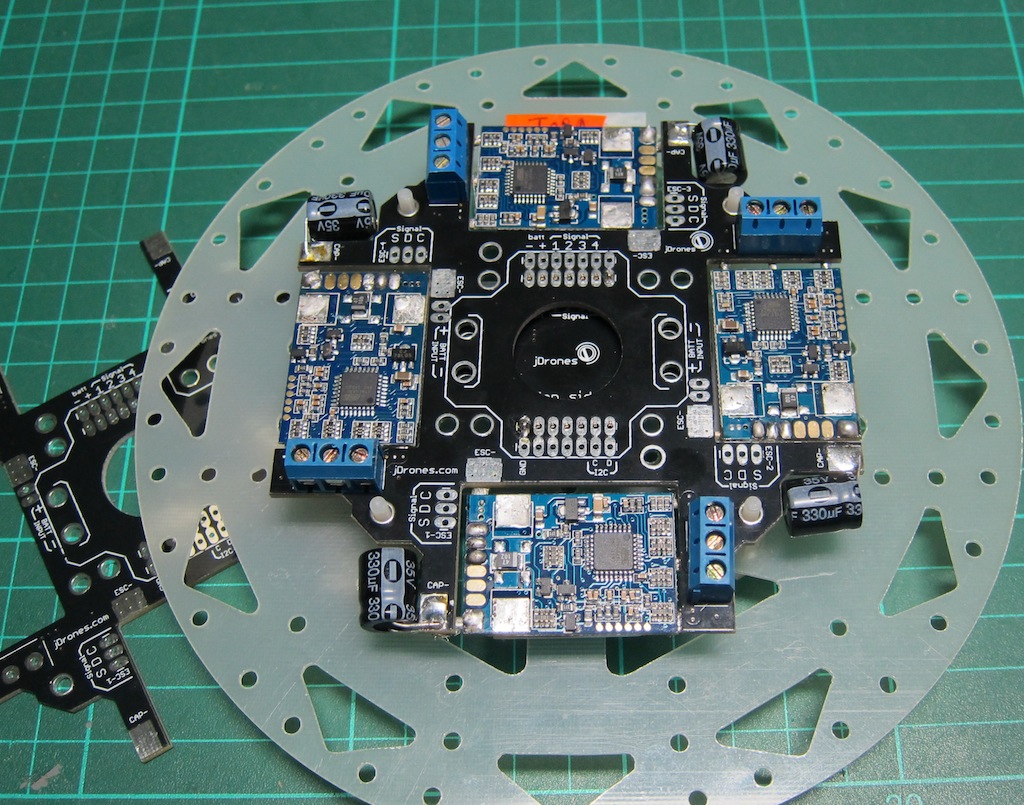
Some of you might already seen this board on Open-source ESC development post several days ago and some not. As many of you have been requesting and talking about new type of Power distribution board we went ahead and created first version of it. 

We would like to have your comments on it, how would you like to see it and to which way to develop?

Currently we only have 4 ESC version of it but this version is designed in way that you can easily stack them to create combinations of 3-12 ESCs while one layer has max of 4 ESCs.

It can also carry a carrier boards for external uBECs and IOBoards and OSD boards.

It supports PWM, I2C, CAN and UART ESCs 

We can also include current sensors for it if/when needed.

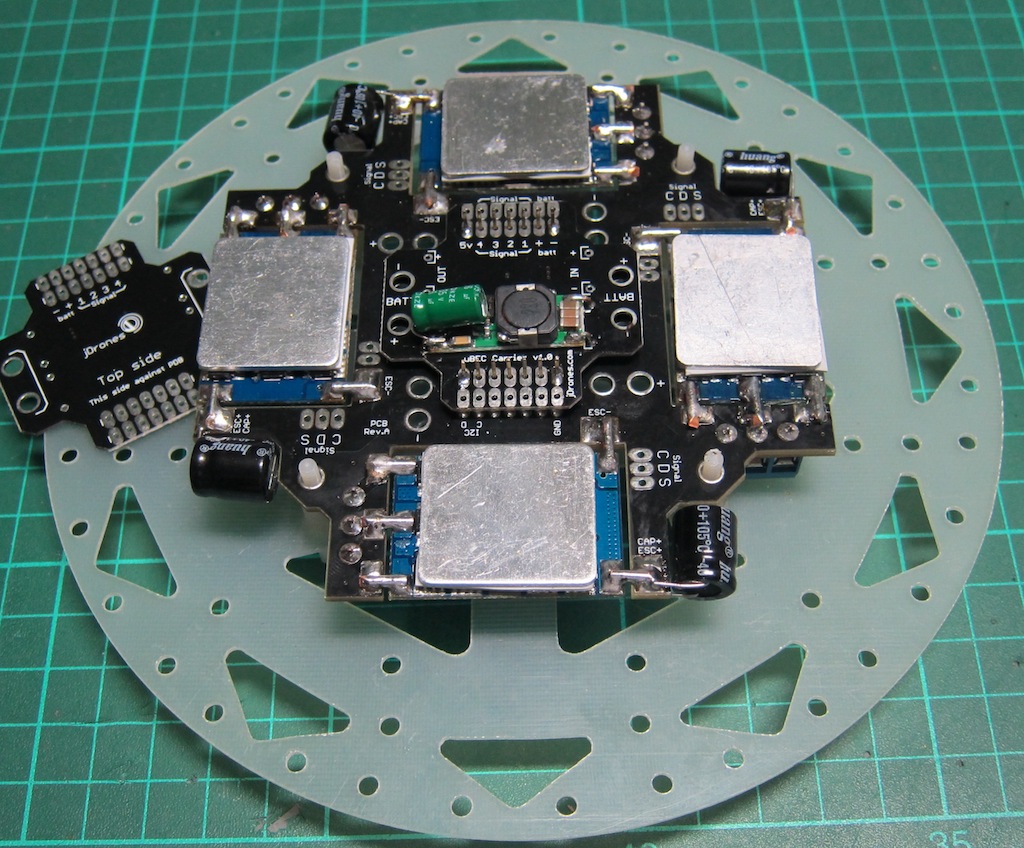
Bottom picture of it, exposes uBEC carrier board under main board:

jDrones_4ESC_PowerDistribution_Bottom_0225_sml.JPG?width=500

We have now 10 test boards available for public use. If you want and really need one, let us know. But remember, you need to have good reason why YOU would be a good candidate for testing it. So if you just want it but don't want to really test and give feedback on it, don't bother.

You can send request via our contact page or send a PM in here to me. 

Receivers will be informed in person by email.

Technical details:

- Custom 4 layer PCB

- 70 AMP capacity

- Support all ESCs smaller than 25 x 37mm

- Fits on all Original ArduCopter frames / Holing

- Support for 2 uBECs via carrier board

- PWM, I2C, CAN, UART support

- Terminal blocks for easy cable assembly

- Stackable

Let the imagination flow...

--jani

Read more…

Hexacopter Build and Flight Video

I've been working on a hexacopter project for the last few months and finally got it completed and flying.  Specs for my hexa are listed below.  It has been a fun project and I am impressed with the Ardupilot 2.0 Board & Arducopter Software thus far.  Special thanks to all the people that have contributed to the arducopter wiki as the information and comments there helped immensely as I was getting my hexa together.  I just flew my first fully autonomous flights (takeoff, nav point, landing) this weekend and although I was pretty nervous to have the board making all the decisions the testing turned out well.  I'm still getting used to some of the mission planning specifics but have been having fun learning.

Frame: 0.063" Garolite-G10/FR4 cut on Phlatprinter3

Booms: 16mm OD aluminum
Boom Blocks: quadframe.us 16mm boom blocks
Flight Control: ArduPilotMega 2.0 Board & Case
Software: Arducopter 2.7.1
External GPS: uBlox LEA-6
Sonar: MB1200 XL-MaxSonar-EZ0 Ultrasonic Range Finder
APM Telemetry: 3DR Radio Telemetry Kit - 433 MHz
Motors: 6x Tiger MT-2216 900kV
ESC: 6x eRC "Rapid Drive" 25A Brushless ESC
Battery: 3s-5000mAh
TX: Flysky 9x w/ ER9X firmware with Frsky DJT Module & FLD-02
RX: Frsky D4R-II RX using CPPM

Weight with battery, no camera = approx 1.7 kg


Read more…
3D Robotics

3689474146?profile=originalYou've probably noticed that Michael Oborne seems to be improving and enhancing the Mission Planner every day, judging by the frequent autoupdates. And you wouldn't be far off from the truth! We don't post a changelog with every update (it's too many to keep up with), but if you're curious, you can always see them in the repository changes lists

Michael recently posted on some of the more significant ones on the dev list, so I thought it would be helpful to repost them here, for a wider audience:

Mission Planner 1.2.7 enhancements:

    1. added the ability to open the flight planner tab on the flight data screen. Right click the map > flight planner.
    2. changes to grid mode to add inter waypoint, waypoints, also implemented new algo, plan on keeping both for a while.
    3. added ability to specify a separate antenna tracker location. used to assume it was at home.
    4. ground alt is now shown on the altitude tape on the hud. brown overlay
    5. modified the guided mode altitude selection, it now remembers the last alt used so its just a right click and it will do it.
    6. slowly moving all flight planner option to the right click menu, to free up screen real estate, linked to 1.
    7. closer to AP and AC release will need to update the AP_Mount tab to work correctly since the last set of changes.
    8. Same as 7 for the AP_Limits
    9. There has been some work done for running the planner on Mac, there are still a few issue however.
 
and just a few tips
 
1. you can modify whats displayed on the Quick tab by double clicking the item.
2. you can change the max speed shown on the speed gauge by double clicking it.
3. you can double click the name of any tab in the config screen and it will popout, so you can use it from any of the other screens ie pids.
4. you can upload ardurover from the firmware tab with Control-R
Read more…
3D Robotics

3689474467?profile=original

From Hackaday:

When [Matt] started building his multirotor helicopter, he was far too involved with building his craft than worrying about small details like how to actually control his helicopter. Everything worked out in the end, though, thanks to his homebrew RC setup built out of a USB joystick and a few XBees.

After a few initial revisions and a lot of chatting on a multirotor IRC room, [Matt] stumbled across the idea of using pulse-position modulation for his radio control setup.

After a few more revisions, [Matt] settled on using an Arduino Pro Mini for his flight computer, paired with a WiFly module. By putting his multicopter into Ad-hoc mode, he can connect to the copter with his laptop via WiFi and send commands without the need for a second XBee.

Now, whenever [Matt] wants to fly his multicopter, he plugs the WiFly module into his MultiWii board, connects his laptop to the copter, and runs a small Python script. It may not be easier than buying a nice Futaba transmitter, but [Matt] can easily expand his setup as the capabilities of his copter fleet

Read more…

Flying over the beautiful Mayacamas Ranch in Calistoga CA, CineStar 8, CS360 with the radian stab system, NEX7, 16mm with ND filter.


Aerial Video: Ziv Marom, zminteractive.com
Special thanks to ayacamasranch.com team for their hospitality and realocate.org, more videos coming soon! ;)

Read more…

3689474411?profile=original

The UAV is a combination of a plane and helicopter. Therefore it is capable of hovering and vertical take off/landing, just like a helicopter but it can also tilt forward to achieve horizontal flight the same as an airplane. This is done in order to maximize the distance and the speed of such an aircraft.

https://www.youtube.com/watch?v=oHYZf7xRWrY&feature=youtu.be

Read more…

3689474353?profile=original


It was a busy weekend. One of my earliest concerns with this project was the lack of an ON/OFF switch that could handle the current of the system and that would not look like something from an old junk box. I wanted it to be easy to use, easy to access (translate: no where near the propellors), and completely remove the battery supply in the event of an unfortunate event.

Enter the Schumacher ArmSafe Arming Kit.

This kit comes with 10 gauge wire and the hardware for nice installation. I didn't use the wire supplied but used 13 gauge wire from my LHS.

After measuring the wire paths and checking the sexes of the required connections (I have EC3 on the PDU and battery), my sketch was turned into a harness.


3689474368?profile=original


After some razor saw work with my favorite plywood, some light drilling, tapping, and other fabricating, the harness was installed on a side deck next to the APM2.


3689474129?profile=original


The home brew camera mount was pulled from a camera pistol grip project from last year and adapted to the arming deck. Behold the complete installation!

3689474320?profile=original


A view with my Philips Qvida pocket camcorder installed...

3689474345?profile=original


This weekend was also spent running down the battery on the Arducopter multiple times. The tether system is working fine. One flight effort was at my friend John's house lauching off his lawn. That was a different experience because the interaction of the grass tugged at the legs causing a different type of compensation for hovering. At times I had to abort due to hanging on the grass and tipping too far over.

Another funny thing to watch were leaves and bugs that happened to be sucked into the down draft. Think leaf mulcher.

I am presenting a program on drones/UAVs at the Anderson Radio Club meeting this Thursday night. John helped me edit some of my video and some he shot into a short movie to present at the meeting. The activities director wants to intro the program with a clip from one of the Mission Impossible movies where a drone is used in an action packed scene. Talk about riding the hype curve...


Read more…

25420.jpgThis is a new product that Hobbyking is selling. It more or less resembles (IMHO) the AR.Drone frame. The motors are place in the center of the arms and the propellers are protected by EPP foam rings.

The 450mm width is measured motor shaft to motor shaft. The actual size of the frame is 835mm which makes it quite big.

To complete this quadcopter you will need 4 motors and 8-10 inch propellers, 4 esc's, a quadcopter control board and a 3S 1300-1800 mah Battery. I think even a bigger battery should work.

The frame is yours for US$ 22.49

More information on the Hobbyking site: http://www.hobbyking.com/hobbyking/store/uh_viewItem.asp?idProduct=25420&aff=5361

Read more…

Oregon Star Party Aerial Video from my Quad

IMG_0248.JPG

Hi all, I put on my Astronomy hat for the last week, we had a wonderful time with very dark skies at Oregon Star Party (OSP) this year. 

I brought my Quad, and made a couple of hours of aerial video.  I trimmed it to 14 minutes or so, here it is:

Read more…
3D Robotics

Quadcopter used as weed sprayer

3689474302?profile=originalFrom the Science Network of Western Australia:

A REVOLUTIONARY homemade unmanned aerial vehicle is being used by the Department of Food and Agriculture in Albany to help eradicate a noxious weed threatening local bushland.

The “quadcopter” enables weed control workers to carry out “search and destroy” missions on Sydney Golden Wattle trees that are difficult or impossible to reach by conventional means.

Unknown in Albany before the early 1980s, the wattle is now at plague proportions and will have overrun more than 20 per cent of native bushland by 2020 if left unchecked.

The invention is the brainchild of department senior research officer John Moore, who designed and built it over 18 months.

Mr Moore used readily-available, inexpensive high-tech gadgetry and computer components to create the quadcopter for about $1000, a tiny investment when compared to commercial equivalents that can cost up to $30,000.

Popular among aviation hobbyists, the quadcopter has been around for some time.

What makes Mr Moore’s version unique is the way it has been set up to not only locate small stands or individual weeds, but to photograph them and then spray them with weed killer.

(Via Hackaday)

Read more…
3D Robotics

3689474098?profile=originalFrom BoingBoing, news of a new organization that uses some of the same open source principles we use here, but for manned aircraft:

"MakerPlane is an open source aviation organization which will enable people to build and fly their own safe, high quality, reasonable cost plane using advanced personal manufacturing equipment such as CNC mills and 3D printers. The project will also include open source avionics software to enable state-of-the-art digital flight instruments and display capabilities. Basically we are designing an aircraft that can be built on a CNC mill at home, or at a makerspace which is easy to assemble and quick to build. The plans and instructions will be available for free to anyone that wants them!"

MakerPlane is an open source aviation project which will enable people to build and fly their own safe, high quality, reasonable cost plane using advanced personal manufacturing equipment such as CNC mills and 3D printers. The project will also include open source avionics software to enable state-of-the-art digital flight instruments and display capabilities.

Basically we are designing an aircraft that can be built on a computer controlled mill at home, or at a makerspace which is easy to assemble and quick to build. The plans and instructions will be available for free to anyone that wants them!

Read more…

3689474041?profile=original

I've started flying a lot of FPV recently, and I noticed that my Fat Shark Base glasses were getting quite hot after just minutes of use. Using my lab's handheld thermal infrared camera, I took some photos of the goggles and my quad after a few minutes in the air partially to try and troubleshoot the heat problem but mostly just for fun.

The goggles appear to have melted in one spot and "heat shrunk" (see above)

IR image confirms the source of heat is in the same place:

3689474069?profile=originalHas anyone else experienced this? I assume it's a voltage regulator in there but haven't opened them yet.

Here are some thermal snaps of my quad:

3689474166?profile=original

The bright white in the front / center is a 900mhz video transmitter and HoryzonHD camera circuit board (camera itself is below decks)

Read more…

Testing platform for multicopters

DSCN3083.JPG

I've been developing a hexacopter with a new code, using the Arducopter libreries.
As a testing work bench, I've been using a platform like the pictures above.

DSCN3085.JPGDSCN2978.JPGDSCN3086.JPGDSCN3087.JPGDSCN3168.JPG

In this way you can test it safety without any accident or crashes with material loss.
The hexacopter can move with in the 3 axis and have 3 potenciometers to know the exactly position.

Here you can see it working in the video:

min,

0.00 description.
0.33 Yaw control.
1.01 Pitch & roll control.
2.05 Vibrations.


I dont know what will be the differents between the simulator and the real flight. have anyone any suggestion or idea??

During my tests i've found many vibrations while it is working at high speed... I hope it will disappear in the air. does anyone know why??


I'm using the ArduPilotMega 1.4 board.

While testing i have found a lot of noise with the roll Axis. Here are the graphics of a test.

(legend: red=accel, black=gyro, cyan and gren=motors speed)
Ptich axis:
3689474108?profile=original

Roll axis:3689474224?profile=original

Due to roll gyro has a strange behaviour I recorded the data without any moving in the starting position without motors, here are the plots:
(legend: red=accel, black=gyro, cyan and gren=motors speed)

Pitch axis:
3689474244?profile=original

Roll axis:

3689474185?profile=original
Maeby my gyroscope is not correct... ( bought it in September). I dont understand why the accel.y correspond with gyro.x and viceversa... and gyro.y has opposite sign than accel.x


my code, mainly is:

[declarations]

[read radio]

         imu.update();
                accel = imu.get_accel();
                gyro =  imu.get_gyro();

     pitch    =  accel.y;
         roll     =  accel.x;

         giroPitch=  gyro.x;
         giroRoll =  gyro.y;


[discrete filters for accel]

          pitchSum +=errorPitch;             //integral
          rollSum += errorRoll;             //integral

errorPitch=yref-pitchFilter;
errorRoll=xref-rollFilter;

//FRONT      RED           
valor[1] = throttle + 1.0* (KpR*errorRoll   - KdR*giroRollFilter   + KiR*rollSum);
valor[5] = throttle + 0.5* (KpR*errorRoll   - KdR*giroRollFilter   + KiR*rollSum) -0.866* (KpP*errorPitch +KdP*giroPitchFilter + KiP*pitchSum);
valor[4] = throttle + 0.5* (KpR*errorRoll   - KdR*giroRollFilter   + KiR*rollSum) +0.866* (KpP*errorPitch +KdP*giroPitchFilter + KiP*pitchSum);
//BACK  BLACK
valor[2] = throttle - 1.0* (KpR*errorRoll   - KdR*giroRollFilter   + KiR*rollSum);
valor[3] = throttle - 0.5* (KpR*errorRoll   - KdR*giroRollFilter   + KiR*rollSum)  -0.866* (KpP*errorPitch +KdP*giroPitchFilter + KiP*pitchSum);
valor[6] = throttle - 0.5* (KpR*errorRoll   - KdR*giroRollFilter   + KiR*rollSum)  +0.866* (KpP*errorPitch +KdP*giroPitchFilter + KiP*pitchSum);
                 
//     CONTROL DEL YAW
valor[1] +=kyaw*yaw;
valor[3] +=kyaw*yaw;
valor[6] +=kyaw*yaw;
                                           
valor[2] -=kyaw*yaw;
valor[4] -=kyaw*yaw;
valor[5] -=kyaw*yaw;

[constrain]


for(int8_t i=1;i<=6;i++){    
                      APM_RC.OutputCh(i,0 );  //valor[i]
                                                  
                       }

[sent data]

Any commentary is welcome!!! :)
Regards. Alberto.

Original post: www.dieBotReise.blogspot.com

Read more…
Moderator

Skylark Dianmu OSD with RTH

2012070314234955781.jpgThis looks rather nice, the Dianmu system only has RTL (return to launch) whereas the Standard system has that plus waypoint ability. (http://www.skylarkfpv.com/en/), RCGroups thread here. Video on the thread or one sample below.

A friend is in the market for a Stabilization/OSD/RTL system and while so far I've been advocating ArduPlane & APM2, he's not very computer savvy, wants as few bugs as possible and wants something as close to plug-n-play as possible and so I am considering recommending this:I like the way all the setup is through the OSD displayed on the screen.

Dianmu is US$198, (more here) Standard is US$298. (more here)

Features below:

T2uGJrXiJNXXXXXXXX_%21%21265677212.jpgOne video sample: https://www.youtube.com/watch?v=EdMJbYRcQVs

Read more…

Ever seen 20.000 people waving at a quad?


Hold your fire! it did not fly over them. ;-)


This weekend we had the XVI International half marathon of Rio with a beautifull day, gorgeous location and 20.000 runners. As I am not into running, I thought it would be a great opportunity to experiment the potential of covering a big event from the privileged birds eye view of a multicopter and it surpassed my expectations!


On top of the nice images, I was really surprised to see the positive crowd reaction and interaction with the quad. They did not feel concerned or threathened by it - after all, it is smal, quiet and never flew above their heads. Instead, they were really excited as if they were playing with it and saluting it. I could even get the audio from their cheers over the noise of the props wash!


I am flying a XA x650 frame / Naza FC+GPS / Jdrones gimbal / Gopro. No post stabilization on this cut! Amazing what a $50 gimbal can do, despite some wind. Got to be really gentle on the sticks though. Gabriel2584 is flying a F450/Naza/Gopro/self-made gimbal. He had some servo jittering problem that required post stabilization.


Let me know your thoughts!

Cheers,

Read more…
3D Robotics

Centeye optical flow copters on TechCrunch!

3689474027?profile=original
Our friend Geoff Barrows, who has been working with us on his great optical flow boards, just got covered by TechCrunch! UPDATE: They've disabled the cool video for embedding, but you can see it here

When we first wandered up to the suburban split-level that houses Centeye Inc., we were a bit confused. Could this be the place where a mad roboticist was building tiny robots with insect eyes and brains that could interact with their environment? We rang the doorbell and weren’t disappointed.

Founded by Geoffrey Barrows, Centeye is dedicated to computer vision. They make little electronic eyes that are cheap to reproduce and “see” only a few thousand pixels. He has a staff of two engineers who work with him on designing and building chips and has just released the open source Arudeye board, a tiny Arduino board with camera built-in.

Barrows does everything from his basement. Recent advances in fabrication allow him and his staff to design chips on a computer at home and then send the plans to manufacturers in Asia. They can then mass produce their eyes, driving down the cost per unit to a few dollars. They don’t need a big lab because everything is done remotely.

Their robots are actually proofs-of-concept but they’re really cool. The little helicopters use Centeye eyes to remain stationary in space and other models can avoid objects as they move. Because each eye takes in a small part of the scene, not much computing power is needed to process each bit of input. Like insects, the brain doesn’t have to work very hard to get a lot done.

Centeye has contracts with DARPA but is trying to commercialize their hardware with the Arduino offerings. It’s fascinating to see makers in their own habitat and even more exciting to see them make cool stuff in the oddest of places. Check out the video for more information and you can watch all of our TC Makers episodes here

Read more…

We started having problems keeping all the wires we were using for our ground station organized and safe, so we designed and built a power management module using car accessory electronics and other home and model parts. It took over three weeks to go through the process, but we're hoping it will reduce the chances of damage and speed up the set up time when we fly each morning.

Read more…

Quadcopter Park Flight with video...

I took the quad out the a nearby park for a more extensive flight.

All went very well, got 10+ minutes of great video.  The quad was carrying a 5000mAh battery and my Contour video camera.  I still am having difficulty identifying the orientation of the quad when it's quite a ways off, you can tell in the video where I am trying to establish which way a given control will move it.


Alignment of the video camera was poor, it was a last minute strap-down with velcro and zip-ties.  I'm working on a more practical undercarriage for the quad that would allow me to better mount/balance the battery and the camer.  This should also allow me to clean up the video, keeping the aircraft out of the frame as well as ensuring that the video is oriented squarely.  As you can see in the video, I've got the camera tilted a bit.


Enjoy.


https://www.youtube.com/watch?v=qZ7Yuoo_8p0

Read more…