All Posts (14048)

Sort by

Crashing the Nova, Racing the Raptor


Welcome Nick to the show!


This week we tried to compare the Nova's max speed to the Raptor, however a radio Tx/Rx failure occurred during the Nova's takeoff, causing a massive crash that nearly destroyed the Nova. Never use a 5 year old cheap Tx/Rx on your handmade custom airplane.


We then tried to get a max airspeed for the Raptor, however our airspeed sensor continually gave suspect readings. We decided to go back to the drawing board to consider what we should do next.


A tough week, but it was a lot of fun having Nick on the show.


More to come!


-Trent


Main Camera: Panasonic HDC-TM900K


--Raptor--

Battery: 20C 2.2Ah Sky http://www.hobbypartz.com/77p-sl2200-3s1p-20c-3333.html

Servos: T-Pro 9G http://www.hobbypartz.com/topromisesg9.html

Motor: Optima 450 2220-1800KV http://www.hobbypartz.com/75m55-optima450-2220-1800kv-2.html

ESC: Exceed RC Proton 30A http://www.hobbypartz.com/07e04-proton-30a.htmlProp: http://www3.towerhobbies.com/cgi-bin/wti0001p?&I=LXZL07


--Nova--

Battery: http://www.hobbypartz.com/77p-sl4400-3s1p-30c-3333.htmlidProduct=6306

Servos: http://www.hobbypartz.com/topromisesg9.html

Motor: http://www.hobbypartz.com/75m42-optima450-2220-950kv.html

ESC: http://www.hobbyking.com/hobbyking/store/uh_viewItem.asp?idProduct=13429

Prop: http://www.hobbyking.com/hobbyking/store/uh_viewItem.asp?idproduct=5437

Read more…

RC Car with Arduino nano and a TB6612FNG

Hello guys,

this is my first post on this blog and I'd like to give some information about my new personal project. How you read on the title, the project is a RC CAR with Arduino nano that is controlled by TB6612FNG.

The final project will be a RC CAR controlled by Arduino nano and a few sensors, the big goal is to create a car that I can setup a route and it should be cleaver enough to avoid the obstacles from point A to point B.

I don't like to use the Ardupilot because I want to be proud of myself and create all the AI by myself :)

Tonight I just soldered the driver shield to the main motor and then I tested it.

Items:

http://www.sparkfun.com/products/11113

http://www.sparkfun.com/products/9457

http://www.amazon.co.uk/gp/product/B002GOHOA2/ref=oh_o00_s00_i00_details

The next items that I should to buy:

http://www.sparkfun.com/products/8130 or http://www.sparkfun.com/products/10616

http://www.sparkfun.com/products/10472

2x http://www.trossenrobotics.com/parallax-ping-ultrasonic-range-sensor.aspx

2x servos

This is my personal blog where I am going to publish the other projects with Arduino: http://projectsmax246.blogspot.co.uk/

Read more…
3D Robotics

New 3DR boxes are in!

3689453053?profile=original

One of our priorities as 3D Robotics grows is to improve the customer experience in everything from product design and documentation to packaging. You'll see a bunch of new efforts in this direction over the next few months, ranging from a branding/design overhaul of the storefront to a new platform for our documentation that should be easier to use and better looking than the current wiki. We're also going to start shipping APM in a professionally designed enclosure, which we'll preview next week. 

Here's just one small example: our new boxes!  I think this is the first public use of our new logo, too. We particularly like the Easter egg of the rudder replacing the dot of the i ;-)

Read more…
3D Robotics

3689452959?profile=originalOne of the APM features the dev teams have been working hardest on is improved compass calibration. Magnetometers are a tricky thing to get right because there are at least three kinds of variation: 1) each sensor is different, 2) the Earth's magnetic field varies around the planet (Declination), 3) The "hard iron" magnetic interference of each aircraft is different, and even that varies in flight when the motors are going. 

Right now we have three different kinds of calibration you can use: 

  1. Auto calibration. You do nothing, and the code figures out all the offsets and declination by comparing the compass readings with the GPS and IMU readings over time in flight. Pro: no user effort. Con: it takes a few minutes of flying to get right, so the compass is inaccurate at first launch.
  2. Manual calibration in the Mission Planner. This is the screen on the Configuration screen, where you can enter your Declination and then press the "Calibration" button and move and rotate your aircraft around for 30 seconds while it records the data and does some math to calibrate the sensor. Pro: works. Con: it's a little awkward, especially for big aircraft. Also doesn't reflect the magnetic interference that can occur when the motors are going in flight.3689452984?profile=original
  3. Replay a flight log. This is a very cool option, shown above, where you can just replay a flight log (.tlog) and the code will compare the GPS and IMU readings with the compass reading and make the necessary corrections. Pro: works great. Con: must have already flown, will be messed up if you load a .tlog file where you didn't actually fly. 

It's interesting to see how others do this. In the video below, from the radio program Marketplace, you can see (at 1:20) how Foxconn calibrates the magnetometer in an iPad. It's basically the same as our Method 2, but highly automated:

Read more…

3689452832?profile=original

Although we’re several years away in terms of regulation and technology for making drones a feasible, low-cost platform for television news, the television news industry has started to talk about using drones to enhance coverage.

Myself, along with Matt Waite of Nebraska’s Drone Journalism lab, were recently interviewed by the television news trade journal TV Technology. It briefly mentions DroneJournalism.org and our (unfortunately now departed) JournoDrone One (pictured above).

Tom Butts, the writer of the piece and the editor in chief of the TV Technology magazine, focuses mainly on drones as a cheap alternative to helicopters. He also draws attention to how ethical or technical mishaps with drone technology could slow or prevent the adoption of drone technology in the TV broadcasting industry.

Here's the first graphs:

For TV news crews, operating an “eye in the sky” means hundreds of thousands of dollars per year in aircraft maintenance and fuel costs. Using choppers also comes with inherent risks that have resulted in numerous accidents over the years.


As stations look to sve money while reducing safety concerns, some in thenews business are beginning to examine the use of unmanned aerial vehicles to obtain highly valuable news coverage from above. While it’s a relatively new concept for journalists, the technology of “drone journalism” is familiar and extremely cost-effective when compared to traditional aircraft.


In essence, drone journalism involves the use of remote-controlled small aircraft outfitted with cameras to acquire footage from the air. What defines “aircraft” could be anything from a toy helicopter purchased at the local mall to more sophisticated devices, and the camera could be a typical point-and-shoot to a more expensive DSLR with video capabilities.


There’s just one problem. The use of such devices is illegal in the United States – for now, at least. Last month, as part of its latest budget, Congress gave the Federal Aviation Administration until 2015 to develop a set of rules and guidelines authorizing the commercial use of such remote-controlled unmanned aerial devices. And several researchers and entrepreneurs are exploring the technical – and perhaps even more important – ethical uses of these drones.


The remainder of the article is here:

http://www.nxtbook.com/nxtbooks/newbay/tvt_20120411/index.php#/70

Read more…

QuadCopter_aluminium_alloy_airframe_A550_16.jpg

Quadrocopter aluminium alloy airframe

Materials: Aluminum tube + Glass fiber

Size: <> 550mm diameter.

Net Weight: <> 380g

Flying Weight: <> 1000g

Propellers: 8-10”

Description: Small, lightweight but really sturdy Quadrocopter Airframe.

Motors, propellers, battery:

Quadrocopter Airframe is prepared for typical motors with <>19mm mounting hole distance.

Arms are long enought for 10” propellers, but 8” propeller with a little faster

motor 2208~2216(1000~1200kv) are big enought.

Space for LiPo acc is easy fit 2200 LiPo or bigger.

Typical flying time is 10-15min (with 2200mAh LiPo, depending of flying style).

The specifications and designs are subject to be changed without prior notice for futher improvement.


QuadCopter_aluminium_alloy_airframe_A550_01.jpg

QuadCopter_aluminium_alloy_airframe_A550_02.jpg

QuadCopter_aluminium_alloy_airframe_A550_03.jpg

QuadCopter_aluminium_alloy_airframe_A550_04.jpg

QuadCopter_aluminium_alloy_airframe_A550_05.jpg

QuadCopter_aluminium_alloy_airframe_A550_06.jpg

QuadCopter_aluminium_alloy_airframe_A550_07.jpg

QuadCopter_aluminium_alloy_airframe_A550_08.jpg

QuadCopter_aluminium_alloy_airframe_A550_09.jpg

QuadCopter_aluminium_alloy_airframe_A550_10.jpg

QuadCopter_aluminium_alloy_airframe_A550_11.jpg

QuadCopter_aluminium_alloy_airframe_A550_12.jpg

QuadCopter_aluminium_alloy_airframe_A550_13.jpg

QuadCopter_aluminium_alloy_airframe_A550_14.jpg

QuadCopter_aluminium_alloy_airframe_A550_15.jpg

QuadCopter_aluminium_alloy_airframe_A550_16.jpgQuadCopter_aluminium_alloy_airframe_A550_17.jpg

Read more…
Moderator

3689452911?profile=original

I can't believe just how wrong  John Villasenor can be, I guess he figured one of us would mention this here and it would drive his blog posts wild at Scientific American.

He completely misses the real definitions of UAS its not about having an autopilot onboard. What worries me more is that Mr Villasenor is asked to speak about UAS to other grown ups. There is a huge gap between the reality of UAS and what CSI tells us.

John is a member here so he can perhaps chip in and explain his definitions.

From the FAA Interim Guidance http://www.faa.gov/about/office_org/headquarters_offices/ato/service_units/systemops/aaim/organizations/uas/coa/faq/media/uas_guidance08-01.pdf

Unmanned Aircraft: A device used or intended to be used for flight in the air that has no onboard pilot. This includes all classes of airplanes, helicopters, airships, and translational lift aircraft that have no onboard pilot. Unmanned aircraft are understood to include only those aircraft controllable in three axes and therefore, exclude traditional balloons

Here is an excerpt from the Scientific American blog.

What is a "first person view" unmanned aircraft? Is it a drone?

http://blogs.scientificamerican.com/guest-blog/2012/04/12/what-is-a-drone-anyway/#comment-4952

A first-person view (FPV) aircraft has a front-facing video camera and transmits real-time video to an operator on the ground. The operator looks at the image on a computer screen, sees the view as if he or she were sitting in the cockpit, and flies the plane accordingly.

While “UAV” is a general term for (non model aircraft) unmanned aircraft, FPV refers to the subset of such aircraft that are flown by a remote pilot using the image transmitted from an on-board camera. Unmanned aircraft guided exclusively by GPS or on-board computer analysis of imagery are UAVs, but they aren’t first-person view UAVs.

Until now, most FPV aircraft have been operated by the military, using technologies that make it possible to fly the aircraft beyond the line of sight of the pilot. However, use of FPV aircraft in non-military settings is certain to increase with the recent enactment of a new U.S. aviation law that will open U.S. airspace to many types of unmanned aircraft in the coming years. FPV aircraft are likely to be subject to very conservative FAA rules regarding domestic non-line-of-sight operation to minimize potential safety concerns. For example, if the communication link between the pilot and the aircraft fails, then there are obvious challenges involved in bringing the aircraft back to the ground without endangering other aircraft or people on the ground.

Is an FPV aircraft a drone? Under the strictest definition of drone, it isn’t, since it is flown under the control of a human operator. However, when flown beyond the line of sight, an FPV aircraft would be characterized by many people as a drone, despite the significant skill that might be involved in flying it. This is because the definition of drone can be difficult or impossible for an observer to apply. After all, how can someone who sees an unmanned aircraft maneuvering without any evidence of a nearby pilot know whether it is autonomous or remotely piloted? From the observer’s standpoint, it’s not unreasonable to consider it a drone.

Read more…
Developer

3689452760?profile=original

Do you know about the Internet Of Things?

Dragino MS12 is a wifi/linux enabled appliance for MCU projects. It uses the awesome OpenWrt.

The goal of the Dragino is to solve the connectivity problem and greatly enhance micro-controller products. So, it has an internal bus for a dedicated micro-controller board which defines the platform that would interact with the physical world.

So, Seeedstudio added an Arduino based daughter board inside it and came with "Dragrove".

"Dragrove is an open source based generic gateway for internet of things. It combines Dragino (Easy Internet Access, powerful CPU, Linux system), Arduino compatible interface board (monitoring and controlling the physical world), and RF networks like X-Bee. "

3689452853?profile=original3689452871?profile=original

3689452810?profile=original

The term "Grove" on the illustration above is related to a product family with dozens of sensors and other modules for easy prototyping. BTW... I've proudly designed the logo. =)

3689452781?profile=originalAt first look it sounds a nice product.
I don't need to think too much to find some cool applications for it. What do you think about?

Read more…

DJI Flamewheel F450 frame

564964_424520060897445_100000183651096_26000401_2028107693_n.jpg

Here is my newly built DJI Flamewheel F450 frame bought in goodluckbuy.com...

I was thinking to attach my APM2 on this quad or just let it fly with the FreeFlight Controller that came with.
I am still looking for battery packs to power this quad any suggestions will be much appreciated.
and still waiting for the availability of the Turnigy 9X in hobbyking or any variants of it that can be flashed/modded

all comments are welcome may it be from quad vets or new in the hobby
will be fitting this out with gopro and fpv or if it can carry a casio exelim z130 or my nokia N900

Unboxing:

522303_423773234305461_100000183651096_25998620_1235336738_n.jpg

534546_423773584305426_100000183651096_25998621_2086190843_n.jpg

Assembled and Wire management:

574687_424519530897498_100000183651096_26000400_204086419_n.jpg


525585_424520447564073_100000183651096_26000402_86442337_n.jpg

551903_424522660897185_100000183651096_26000407_120148836_n.jpg

543194_424522827563835_100000183651096_26000408_856103810_n.jpg

558623_424523244230460_100000183651096_26000412_914217246_n.jpg

545806_424523430897108_100000183651096_26000413_1026239909_n.jpg

380668_424523590897092_100000183651096_26000416_497665207_n.jpg

531160_424523770897074_100000183651096_26000417_249441641_n.jpg

292656_424524000897051_100000183651096_26000418_526665543_n.jpg

306664_424524087563709_100000183651096_26000419_2086347844_n.jpg

APM2 on DJI Flamewheel frame

540462_424520980897353_100000183651096_26000403_1837752484_n.jpg

562274_424521934230591_100000183651096_26000405_54095141_n.jpg

Read more…
Developer

DIY Drones Take on Silicon Valley

3689452595?profile=original

DIY Drones Take on Silicon Valley

Amateur drone makers are sending their do-it-yourself creations up into the skies of Silicon Valley. WSJ's Andy Jordan reports from San Francisco on the stunning footage they're capturing.


http://online.wsj.com/article/SB10001424052702303299604577326301981308414.html


This is the story I shot video footage for. Andreas Oesterer and Mark Harrison are featured.


And here is the full flight video:

Read more…

17369971_BG1.jpgAnyone know whose drone this is? It must have a fancy camera for $75k.

http://www.hawaiinewsnow.com/story/17369971/exclusive-state-dot-admits-mistake-with-unsuable-drone-aircraft

excerpt:

The state Department of Transportation's Harbors Division has been unable to use an unmanned drone aircraft purchased with $75,000 in federal grant money to provide security at Honolulu Harbor because it falls within restricted airspace near Honolulu International Airport.

Read more…
3D Robotics

Lego Mindstorms IMU available

3689452703?profile=original

I'm a big fan of Lego Mindstorms as an entry point for robotics and physical computing and even got my start in UAVs with it. 

Here's the most UAV-friendly sensor yet for Mindstorms ($85): 

The CruizCore® XG1300L is a digital fully self-contained MEMS gyroscope and accelerometer. It is compatible with the Lego® Mindstorms NXT kit. 
It includes a signal processing unit that estimates and compensates for the most significant errors that affect gyroscopes, providing an output with minimum error. For convenience, the CruizCore® XG1300L internally integrates the gyroscope output in order to compute the angle. The angle value can be used directly as the heading measurement in navigation applications.
The CruizCore®XG1300L includes a three-axis accelerometer that provides calibrated accelerometer output. The accelerometer can be used to compute tilt angles, detect robot collisions, or to determine changes in velocity.
The CruizCore® XG1300L communicates with the Lego® Mindstorms NXT through the I2C bus. It implements a communication protocol compatible with Lego® NXT, and users can use their favorite programing tools to communicate with this device. 


The sensor outputs from the CruizCore® XG1300L are near-free of errors and can be used immediately in applications.

Read more…

Gruesome APM2 Easter Accident

3689452565?profile=originalIt took the King's Horses 2 hours to arrive (bad neighborhood) and then the King's Men took another 3 hours to remove him from the pins.  Mr. Egg is listed in Stable Condition at the St. Humpty Dumpty Hospital.


Could NOT help myself...I had to post it :)

Read more…
3D Robotics

Another great post from Hackaday. This is very similar to the technique we now use in ArduPlane/ArduCopter. 

We don’t have much personal experience with DOF hardware, but this Arduino library which reads and compensates for three-axis magnetometer and accelerometer datalooks very impressive. It should work for existing hardware, but there’s also a demo design using a Honeywell HMC5883L compass and a Freescale MMA8453Q accelerometer which you can build yourself. 

What’s so special about this library? Watch the video above (use 720p in fullscreen to get the full effect) and you’ll see three different scatter plots of the output data. The image above is a capture of the third example, which is using the hard iron offset and accelerometer compensation. That is to say, metal on and around the board is accounted for, as well as the physical orientation of the device. Even if you have no prior experience with this type of hardware it’s easy to see the usefulness of this kind of software compensation.

3689452679?profile=original

Read more…

The LED lights

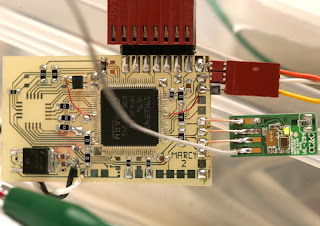
marcy2_15.jpg


Finally got the LED to light up.  There was a lot of printing every register read & write to compare with the kernel driver.  The mane differences were because this board was being reset by every microcontroller reset, while reloading the kernel module didn't reset its board.

After trying many random things, a further problem with the stm32 USB stack was revealed.  The board wasn't taking up all the register writes with CTRL_STATUS_IN bypassed.  The only workaround that worked, after many random ideas, was reading back every write.  It's slow, but better than nothing.

As predicted, the STM32 USB driver continued to give problems. There's a sequence in USBH_HandleControl when sending data to the device on the config endpoint:

CTRL_SETUP -> CTRL_SETUP_WAIT -> CTRL_DATA_OUT -> CTRL_DATA_OUT_WAIT ->
CTRL_STATUS_IN -> CTRL_STATUS_IN_WAIT

which locks up in CTRL_STATUS_IN_WAIT.  Another 2 days yielded a workaround in skipping CTRL_STATUS_IN -> CTRL_STATUS_IN_WAIT & it works well enough.

Starting a new platform is always long & hard.  Compiled sections of the rtl8192cu driver both by porting it to Marcy 2 & by porting a fake Linux back end to Marcy 2.  That showed it was much easier to make a fake Linux back end.  You can make a subset of the Linux headers & keep the driver mostly intact.  
This makes it easier to change drivers.  Porting the driver itself is a huge effort directed at just 1 piece of hardware.  The version changes between kernels are a lot smaller than porting new drivers.
  So the driver came to 177kb, that would take an eternity to upload on JTAG, & the flash needed wear leveling, so a bootloader was required.  The increasing complexity brought up the idea of Arduino for ARM again, but we all know how long democratic software projects take to finish & it still remains vaporware.  It would be quite a big step to write our own Arduino front end for ARM.
  The battle of the bootloader led to a painful weight concession.  To be any use for consumers, the bootloader needed to be on different pins than JTAG, so the hardware was analogous to Arduino.  Arduino was moving towards a USB debugger on different pins than JTAG.


That meant still another header was needed for a UART to debug the bootloader on the USB, so what was the point of having USB on the microcontroller for debugging?  The idea of having the debugging output go through a USB serial port running on the same microcontroller also meant it disconnected every time the microcontroller rebooted.

The whole idea of a USB debugger sounded more like a selling point than something anyone would use.    You need a UART that's always connected when the microcontroller reboots & which can debug the microcontroller's bootloader, which only a separate FDTI chip or dongle can do.  You can't really work on a microcontroller with just a USB cable.
  That led this evolution to just a UART in addition to the JTAG, & no USB bootloader.  As for the reset pins, apparently Arduinos require the user to manually reset or connect an extra pin to the FTDI DTR pin.  We'd still need the user to touch the JTAG reset pin for that.

Read more…