All Posts (11086)

Sort by

3689703640?profile=originalAs a Professional Aerial Photographer, lately I have been noticing a growing number of questionable drone photographs being used in the local press, and lets be honest , have probably been taken illegally and in contravention of the CAA guidelines for drone use. I am talking about photographs such as a bird’s eye views of the centre of London, or a bird’s eye view of a church in a town centre, overhead videos of Liverpool town centre, that sort of thing. You are probably wondering how the pictures where taken, in fact we as professional aerial photographers are wondering the very same thing.

In my own home town, we have had the local press publish stills from videos and links to youtube videos that have clearly been taken illegally. By Illegal I mean they have been taken by an enthusiastic amateur photographer with a drone, and then they have been published in the newspaper. there are, as I see it at least two issues with this.

1. The newspaper in printing the photograph are in some ways complicit in the taking of the illegal photograph by allowing it to be printed without checking on the photographer’s credentials.

2. This fuels the illegal uses of drones, and fires the aim to get more and more “risqué” pictures.

This sort of, turning a blind eye as to the authenticity of the photograph, by the press is at best a “little disappointing” from a professional’s aerial photographer standpoint.  All too often we see Drones being flown to overlook people’s gardens, all too often they are being flown too close to airports, being flown in such a way that they scare livestock, you know the sorts of things, all to get that “special image”. With Christmas around the corner things will only get worse as the market explodes with drones being bought as the “Christmas toy to have”. Even a modestly prices UAV now is capable of being flown way out of the sight of its owner and potentially into the path of a plane. Surely the press have a duty, as well as the Drone industry, to collectively educate the public. The Drone Manufacturers put a leaflet into every purchased Drone highlighting “The Drone Code” as issued by the CAA. Perhaps they, the press and manufacturers, should also pay for some infomercials or print some informative articles in the local and national press prior to the Christmas rush highlighting the dangers of operating drones. Any intervention from the Professional aerial photographer against an over enthusiastic and miss guided amateur will, and can only be interpreted as sour grapes on the amateurs part so self regulation will not work in my opinion, although we do have a duty to report the worst offenders to the police. I say this as my experience of being known in the area as a professional drone operator, has led to people accusing me of overflying their gardens or their piece of land. Taunts of “I saw you the other day flying over that house”, when in fact it was another amateur drone operator breaking the rules.

Manufacturers also need to stop making ill guided claims that “their Drone will fly X” number of kilometres away from the base unit”, this is really unhelpful in educating the public as to what they can and cannot do with their Drones. As Professional Aerial Photographers we have all seen YouTube and its full of videos of people doing distance tests, in doing the distance test they are breaking the “Drone code” as the drone will be well out of sight during most of the test. By way of example of these cavalier claims the new Mavic drone launched this month by DJI as part of their selling points a line in their spec sheet says” New OcuSync transmission system offers up to 4.3 miles of transmission range”. Some people may see this as a challenge and not just a flight statistic.

My fear for this industry is that, unless the public are educated they will continue to ignore the rules and regulations, as this industry is predominately unregulated. It will take nothing short of a disaster for the governing bodies to wake up and pay attention, by then it will be too late for our industry. Maybe we as professional drone operators should self-police it in the interest of our businesses, but that raises all kinds of other issues as previously mentioned. The fact remains that something has to be done to safeguard the future of our businesses, after all we have made a sizeable investment to just get started as a Professional aerial photographer, and “I kinda like the job”, long may it succeed !!

Drone View Ltd

http://www.droneviewuk.co.uk

Read more…

Shift : The new generation of drone controller

The first drone that can be controlled by just one hand, this is very original.

One Hand Control System… It is unfamiliar and somewhat doubtful..

But, when I flied the drone, Shift, I was surprised by this new technology.


I am sure you already have experienced difficulties of controlling a drone with two hands; also it is even more difficult for beginners to learn. In order to solve this issue, the new startup company, ‘this is_engineering’ developed the new drone that can be controlled in more intuitive ways.


Once you just put this special ring on your thumb, you can control the drone with your thumb. The drone follows as your thumb’s movement. Even you can calibrate the drone controller for your own comfort.


I think this is awesome, but we still have to see how durable the drone would be after few try outs.

Read more…
3D Robotics

demo gif

The blue line is what the model thinks it should do, the green line is what I actually did when a human was steering it.

From Hackaday, a great project showing how to create a self-driving R/C car that can follow a complex road pattern without human intervention. It uses TensorFlow running on an Intel processor onboard. Click through to read more about the importance of polarizing filters and how to implement TensorFlow.

Unexpectedly they have eschewed the many ARM-based boards as the brains of the unit, instead going for an Intel NUC mini-PC powered by a Core i5 as the brains of the unit. It’s powered by a laptop battery bank, and takes input from a webcam. Direction and throttle can be computed by the NUC and sent to an Arduino which handles the car control. There is also a radio control channel allowing the car to be switched from autonomous to human controlled to emergency stop modes.

They go into detail on the polarizing and neutral density filters they used with their webcam, something that may make interesting reading for anyone interested in machine vision. All their code is open source, and can be found linked from their write-up. Meanwhile the video below the break shows their machine on their test circuit, completing it with varying levels of success.

Read more…
3D Robotics

Just a few years ago, this was PhD-level stuff at Stanford, and now you can do at home for $100. These are awesome times for robotics. From Lukas Biewald at O'Reilly:

Object recognition is one of the most exciting areas in machine learning right now. Computers have been able to recognize objects like faces or cats reliably for quite a while, but recognizing arbitrary objects within a larger image has been the Holy Grail of artificial intelligence. Maybe the real surprise is that human brains recognize objects so well. We effortlessly convert photons bouncing off objects at slightly different frequencies into a spectacularly rich set of information about the world around us. Machine learning still struggles with these simple tasks, but in the past few years, it’s gotten much better.

Deep learning and a large public training data set called ImageNet has made an impressive amount of progress toward object recognition.TensorFlow is a well-known framework that makes it very easy to implement deep learning algorithms on a variety of architectures. TensorFlow is especially good at taking advantage of GPUs, which in turn are also very good at running deep learning algorithms.

Building my robot

I wanted to build a robot that could recognize objects. Years of experience building computer programs and doing test-driven development have turned me into a menace working on physical projects. In the real world, testing your buggy device can burn down your house, or at least fry your motor and force you to wait a couple of days for replacement parts to arrive.

Architecture of the object-recognizing robotFigure 1. Architecture of the object-recognizing robot. Image courtesy of Lukas Biewald.

The new third generation Raspberry Pi is perfect for this kind of project. It costs $36 on Amazon.com and has WiFi, a quad core CPU, and a gigabyte of RAM. A $6 microSD card can load Raspberian, which is basically Debian. See Figure 1 for an overview of how all the components worked together, and see Figure 2 for a photo of the Pi.

Raspberry PiFigure 2. Raspberry Pi running in my garage. Image courtesy of Lukas Biewald.

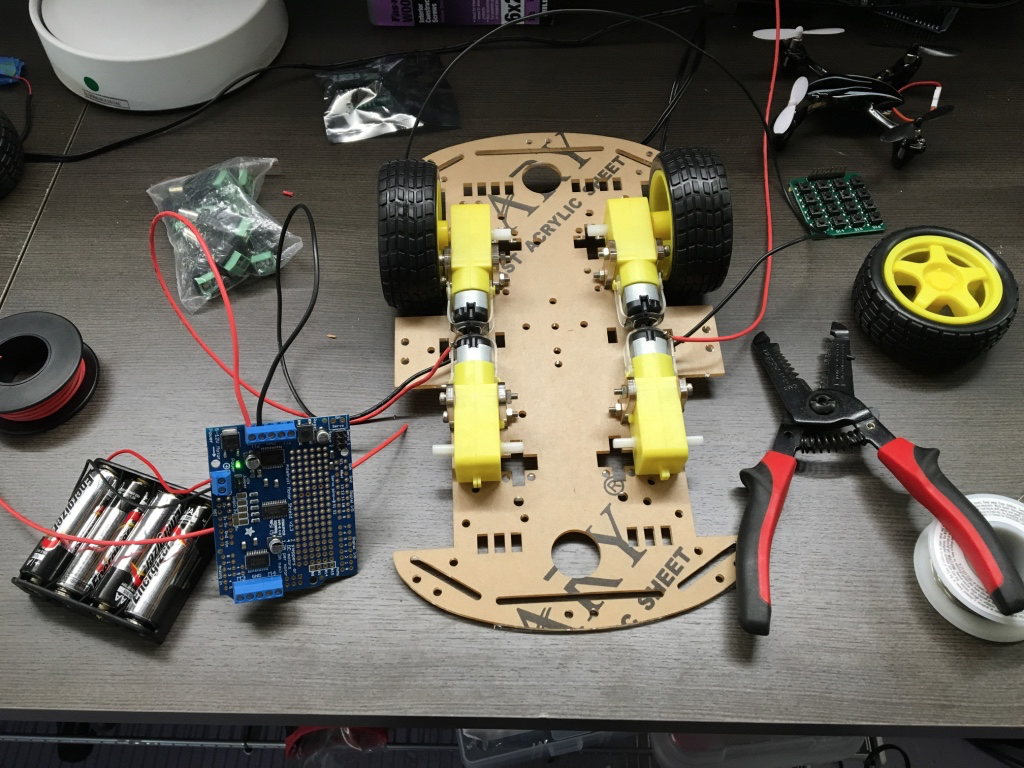
I love the cheap robot chassis that Sain Smart makes for around $11. The chassis turns by spinning the wheels at different speeds, which works surprisingly well (see Figure 3).

Robot chassisFigure 3. Robot chassis. Image courtesy of Lukas Biewald.

The one place I spent more money when cheaper options were available is the Adafruit motor hat (see Figure 4). The DC motors run at a higher current than the Raspberry Pi can provide, so a separate controller is necessary, and the Adafruit motor hat is super convenient. Using the motor hat required a tiny bit of soldering, but the hardware is extremely forgiving, and Adafruit provides a nice library and tutorial to control the motors over i2C. Initially, I used cheaper motor controllers, but I accidentally fried my Pi, so I decided to order a better quality replacement.

Raspberry Pi with motor hat and cameraFigure 4. Raspberry Pi with motor hat and camera. Image courtesy of Lukas Biewald.

A $15 camera attaches right into the Raspberry Pi and provides a real-time video feed I can use to recognize objects. There are tons of awesome cameras available. I like the infrared cameras that offer night vision.

The Raspberry Pi needs about 2 amps of current, but 3 amps is safer with the speaker we’re going to plug into it. iPhone battery chargers work awesomely for this task. Small chargers don’t actually output enough amps and can cause problems, but the Lumsing power bank works great and costs $18.

A couple of HC-SR04 sonar sensors help the robot avoid crashing into things—you can buy five for $11.

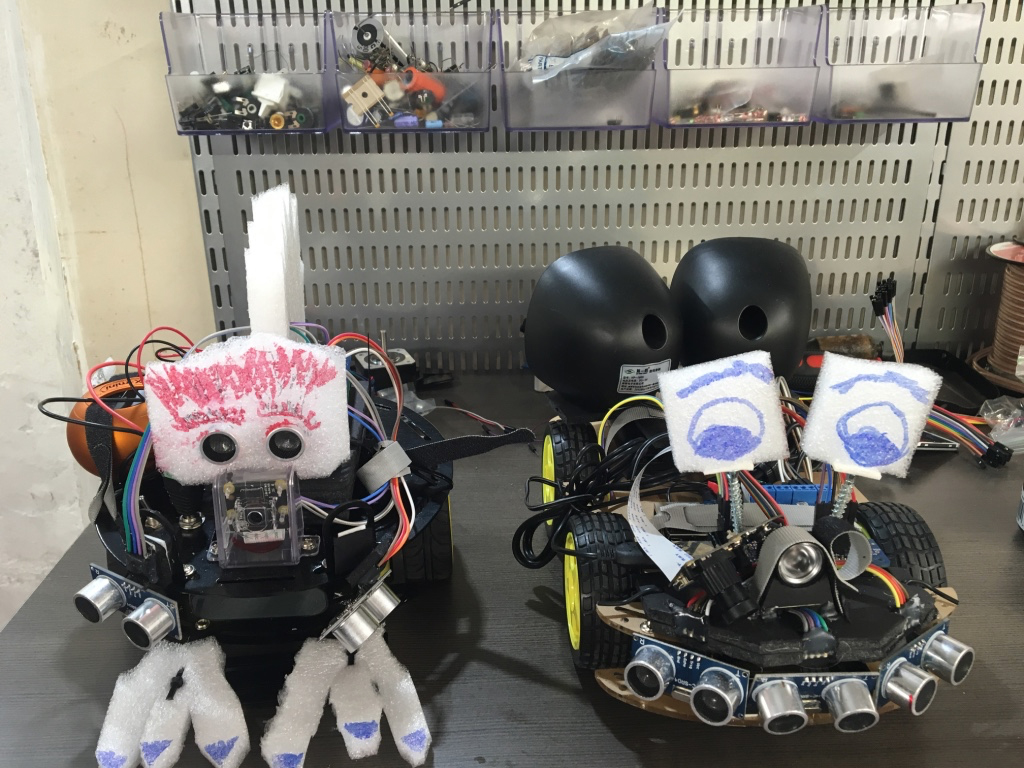
I added the cheapest USB speakers I could find, and used a bunch of zip ties, hot glue, and foam board to keep everything together. As an added bonus, I cut up some of the packaging materials the electronics came with and drew on them to give the robots some personality. I should note here that I actually built two robots (see Figure 5) because I was experimenting with different chassis, cameras, sonar placement, software, and so forth, and ended up buying enough parts for two versions.

My 4WD robot and her 2WD older brotherFigure 5. My 4WD robot (right) and his 2WD older sister. Image courtesy of Lukas Biewald.

Once the robot is assembled, it’s time to make it smart. There are a milliontutorials for getting started with a Raspberry Pi online. If you’ve used Linux, everything should be very familiar.

For streaming the camera, the RPi Cam Web interface works great. It’s super configurable and by default puts the latest image from the camera in a RAM disk at /dev/shm/mjpeg/cam.jpg.

If you want to stream the camera data to a webpage (very useful for debugging), you can install Nginx, an extremely fast open source webserver/proxy. I configured Nginx to pass requests for the camera image directly to the file location and everything else to my webserver.

http {    server {       location / {             proxy_pass http://unix:/home/pi/drive.sock;          }             location /cam.jpg {                 root /dev/shm/mjpeg;          }    } } 

I then built a simple Python webserver to spin the wheels of the robot based on keyboard commands that made for a nifty remote control car.

As a side note, it’s fun to play with the sonar and the driving system to build a car that can maneuver around obstacles.

Programming my robot

Finally, it’s time to install TensorFlow. There are a couple of ways to do the installation, but TensorFlow actually comes with a makefile that lets you build it right on the system. The steps take a few hours and have quite a few dependencies, but they worked great for me.

TensorFlow comes with a prebuilt model called “inception” that performs object recognition. You can follow the tutorial to get it running.

Running tensorflow/contrib/pi_examples/label_image/gen/bin/label_image on an image from the camera will output the top five guesses. The model works surprisingly well on a wide range of inputs, but it’s clearly missing an accurate “prior,” or a sense of what things it’s likely to see, and there are quite a lot of objects missing from the training data. For example, it consistently recognizes my laptop, even at funny angles, but if I point it at my basket of loose wires it consistently decides that it’s looking at a toaster. If the camera is blocked and it gets a dark or blurry image it usually decides that it’s looking at nematodes—clearly an artifact of the data it was trained on.

Robot plugged inFigure 6. Robot plugged into my keyboard and monitor. Image courtesy of Lukas Biewald.

Finally, I connected the output to the Flite open source software package that does text to speech, so the robot can tell everyone what it’s seeing (see Figure 6).

Testing my robot

Here are my two homemade robots running deep learning to do object recognition.

Final thoughts

From 2003 to 2005, I worked in the Stanford Robotics lab, where the robots cost hundreds of thousands of dollars and couldn’t perform object recognition nearly as well as my robots. I’m excited to put this software on my drone and never have to look for my keys again.

I’d also like to acknowledge all the people that helped with this fun project. My neighbors, Chris Van Dyke and Shruti Gandhi, helped give the robot a friendly personality. My friend, Ed McCullough, dramatically improved the hardware design and taught me the value of hot glue and foam board. Pete Warden, who works at Google, helped get TensorFlow compiling properly on the Raspberry Pi and provided amazing customer support.

Article image: Eye of Providence. (source: Bureau of Engraving and Printing on Wikimedia Commons).
Read more…

In the video, you can see some records for our industrial inspection that we made with Workswell WIRIS, thermal imaging system for drones.

1. Flat roof inspection (penetrating moisture)
Thermal camera can see thermal difference between a dry place and place with penetrating moisture.

The physics behind the issue of thermal image inspection of problems related to the moisture is based on the fact that the dry part of the roof (not affected by moisture)  is cooled and heated slower than the wet part of the roof insulation. Thermal image inspection using a thermal camera during or after sunset (where the roof has been heated throughout the whole time) identifies the moist areas because the dry parts of the roof cool slower than the wet places, which have a higher thermal capacity.

More informations about that application.


2. Cement kiln inspection
There is a risk of overheating, which can cause serious damage to the kiln shell.

3. Flere and residual gas burner inspection

The main goal of that measurement is obviously measure maximum temperature.


4. Pipeline inspection

Due to the risk of losses caused by defects in the piping system, it must be regularly and carefully checked. Unfortunately, it is usually in practice that there is a higher probability of damage to the pipeline; it is more difficult to check it. Pipeline systems are often located underground or run for many kilometres where access roads are restricted, the surrounding nature is not attained and access to pipelines is incredibly difficult or impossible. It is not humanly possible to visually check everything and fitting built-in measuring systems (pressure meters, flow meters) is financially demanding and not too reliable because it does not cover all risky places. 

More informations about that application. 

Read more…

I have recently defended my PhD thesis titled "Distributed formation control for autonomous robots". Now I am wrapping up the results in the form of videos. Here it is just one of these results.

In the following video I show how a single control law for a team of drones can achieve simultaneously a desired shape, orientation and translational motion. By single I mean no cascade or different controllers. In fact it is just a single line of code.

The required information is very minimal. The drones can work in their own frames of coordinates, they do not need to share (communication) information, and they only interact locally with their neighbors but still achieve a global goal.

All the mathematical stuff, proofs, algorithm, etc can be found in the manuscript of the thesis. 

Sorry for the resolution of the video, but I was running four instances of X-Plane at the same time in my computer xD.

Read more…

5 Tips for Evaluating Online Drone Data Services

3689702027?profile=original

Choosing the right service means choosing a trusted business partner

THE FACTS:

In early 2014, it was easy to see that drones themselves (the aircraft) would quickly become commoditized and their value would come not from what they could do but from the data they collect. In a piece titled “Drones Revolution Means Big Data Cloud Services,” I wrote:

Cloud-based services are the future. You can buy a decent image-capture drone off the shelf for about $1,200 US, but that doesn’t make you an image information specialist. The first thing you need to realize is that flying a drone and taking pictures is merely the first step in the data collection process. Images need to be corrected, calibrated, processed, stored, and evaluated. For precision agriculture and mapping, data quality and post-processing are critical to getting real value from the images.

My conclusion back then was:

This is the future of small drones, and I suspect as their use and applications increase, small and medium business niche service providers will flourish.  And as they flourish these firms will differentiate themselves based on processing speed and the salience of their insights. Certainly the use of a cloud-based in-memory computing platform to accelerate analytics, processes, and predictive capabilities will be foundational to that differentiation.

So here we are in 2016, and Part 107 pilots are flourishing, but needing to differentiate – and success will come in part from the services offered the customer. 

The good news is the current wave of development and innovation in online drone data services is focused on mapping and analytic solutions that drone business service providers can use to help customers solve real world problems – problems like infrastructure decay, crop yields, stockpile inaccuracies, improper construction sequencing, mining site logistics, etc. With so many choices, it can seem hard to know which one you should use. What advantage does one have over another? Unfortunately, the answers are not simple.  A lot depends on your business model, your target market, what functions you need, and quite frankly how much you are willing to spend.  With that in mind, I’ll outline below some simple criteria to help you evaluate the various web-based mapping and imaging services for drones.

THE PLAYERS:

This lists most (but not all) major cloud-based drone data service providers that are (mostly) drone agnostic:

Continue reading here: http://droneanalyst.com/2016/10/08/5-tips-for-evaluating-online-drone-data-services/

Read more…

result.gif

I have recently been to a conference where there was a common tool for everyone, the Kalman filter. The point is that I was a bit shocked when I saw that many people there see some of its steps as black magic.

I decided to write a (yet another) detailed guide about the Kalman filter. In particular, I have tried to be rigorous enough with the math but trying at the same time to explain with plain words what is going on at every single step. Therefore, after reading it, it should be easy (hopefully) to others to understand and implement a Kalman filter in its simplest version, the Discrete Linear one.

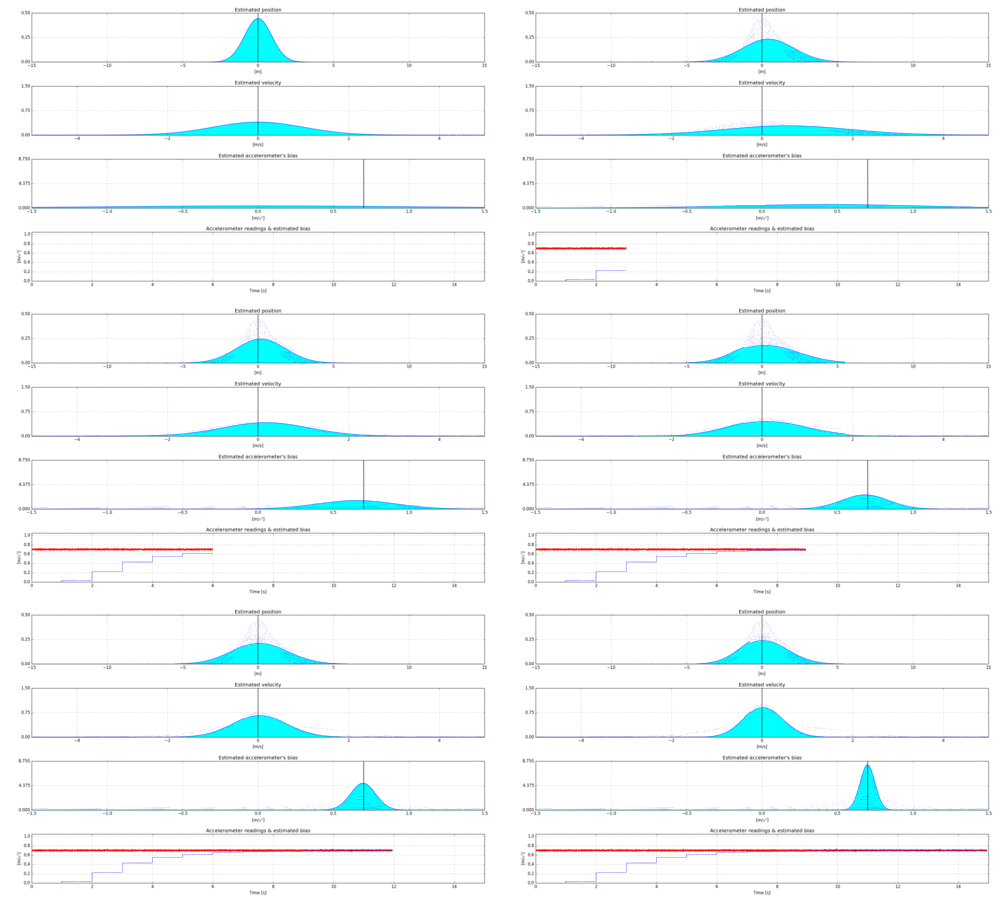
An example about how to calibrate the accelerometers or gyroscopes of an IMU is considered as an illustration throughout the guide. In fact, I have written a small Python script and generated some animations in order to be more illustrative. The aim of the example, together with the guide, is to understand why in the following figure, the states of position, velocity and accelerometer's bias converge around the true values.

You can find the guide in the following link from my blog http://dobratech.com/courses/kalman-filtering-for-drones/

Read more…

Hackflight Teensycopter

3689701996?profile=original

This video  shows the maiden flight of my new brushed quadrotor, a “totally DIY" project using my own C++
firmware  (Multiwii clone with hardware abstraction), 3DFly
3D-printed frame, and, best of all, a 32-bit brushed-motor flight controller that I built from a Teensy 3.2 board. Why build your own brushed flight controller, instead of using one of the many excellent commercial FCs available today?

Apart from the educational value and satisfaction of building something yourself, I was frustrated by the the limited signal pinout on the commercial off-the-shelf (COTS) boards. Inspired by the work of  Geof Barrows with the Crazyflie platform, I wanted to be able to connect an I2C or SPI sensor to my brushed flight controller, while still using a standard R/C transmitter / receiver. Like many others, I am also drawn to the Teensy/Arduino platform because of the enormous variety of code libraries available for it. By the time you hear about a new sensor, there's likely already Arduino support for it. Finally, I had spent a significant amount of time developing my own hardware-independent C++ firmware , which I already had working with COTS flight controllers on a brushless-motor quad, a brushed quad, and even a DIY simulator. So I was reluctant to buy into another open-source project like the (admittedly awesome-looking) Crazyflie, with its own firmware, radio, base-station software, etc.

The photo below shows one of my earlier attempt to build an FC using a Teensy board and a standard MPU6050 Inertial Measurement Unit (gyro/accelerometer) breakout board. It's obviously much too big for a brushed copter,and I had such poor results using it on one of my brushless vehicles that I gave up, and returned to trying out COTS solutions.

3689701918?profile=original

Then I stumbled across the Pesky Products store on Tindie. Not only was there a cutting-edge IMU shield (with  magnetometer and barometer) suitable for mounting on a Teensy; there was also a shield for turning PWM signals into  rushed DC-motor voltages. Thirty-six bucks and a few days later, I had them in my shop. I soldered pin sockets on the Teensy and pin headers onto the two shields, then soldered a female 1.25mm micro JST connector to each of the four motor through-hole pads on the motor shield. For battery power I cannibalized the power cable on an old Hubsan X4, soldering female jumpers onto the ends (though I subsequently discovered that you can get even these cables on Amazon!) This allowed me to use the standard set of 8.5mm motors and 3.7V battery for this vehicle.

I modified the Pesky Products IMU code to work with my firmware, and then used my own Arduino PWM input library to access the radio signals on my FrSky VD5M receiver. To flash the firmware and test the motors and the receiver signals, I made up a no-power USB cable following the “Option #2: Cut the Red Wire” directions for the Teensy (No, the RED wire!!!)  Several iterations of modify/flash/test later, it was up and flying.

Although the all-DIY quad has about the same gross weight (60g) as the equivalent vehicle with a COTS board, the DIY version is much bulkier. It also doesn't take advantage of the awesome FrSky-compatible micro PPM receiver that I prefer for indoor vehicles; so, instead of one signal wire from the receiver, I need four (or five, for the auxiliary switch). So now that I have a flying prototype, my next steps are:

  1. Get another Teensy, IMU, and DC motor board and mount them together directly with pin headers for a much flatter profile.

  2. Get the micro RX working with an existing Arduino PPM library. I nearly got it working with this library, but I was doing something wrong, because when I powered up the motors, the throttle and yaw signals would swap values with each other intermittently (Yipes!)

One I've done that, I'll do a proper build post, then start comparing flight times and current draw against a COTS board. No data on that yet, but my impression is that the DIY board flies maybe a half or a third as long on the same battery. (I've also ordered a compatible battery  with twice the charge, which should improve things – and this time I ordered the one with the correct polarity!)

Meanwhile, the firmware is on github if you want to look it over.

Read more…

Geoscan UAVs at Intergeo 2016

3689702008?profile=original
Discover our latest innovations and meet our experts at Intergeo 2016 in Hamburg

We invite you to see GeoScan's newest multirotor and improved fixed-wing drones as well as solutions for precision agriculture, mining, power transmission line monitoring and geodesy. Learn about our new software designed to manage NDVI and its derivatives. Check out our state of the art aerial magnetometric sensor, with the measurement range from 20 000 nT to 100 000 nT. Discover our unique technology of power transmission line monitoring and new features in 3D modeling based on UAV surveying.

Find us at Booth F3.046, Hall A3 from October 11 to October 13.

Intergeo is the world’s leading conference trade fair for geodesy, geoinformation and land management. With over half a million event website users and over 16,000 visitors from 92 countries at Intergeo itself, it is one of the key platforms for industry dialogue around the world.

Read more…
3D Robotics

3689701687?profile=originalFrom The Verge:

Verizon will soon start offering data plans for drones, allowing pilots to connect their devices to the telecom's network to stream video and transmit other data to a computer or smartphone on the ground. The plans will start at 1GB for $25 a month and 10GB for $80 a month, according to The Wall Street Journal. While media transmission is one obvious use case, having working LTE mobile chips on drones could also in the future help companies pilot them remotely. Verizon says it expects commercial operations to be particularly interested in its drone data plans, including industries like energy, agriculture, and nature and wildlife preservation. Verizon will also test drones as aerial cell towers to patch holes in its network coverage.

The company is calling its new drone business Airborne LTE Operations (ALO) and hopes unmanned aerial vehicles could provide a revenue stream when FAA regulations are more lenient and piloting becomes a more mainstream commercial and hobbyist activity.

AT&T is also gearing up to test drones on its LTE 4G network, which are powered by Qualcomm's Snapdragon Flight platform. 

Read more…
3D Robotics

3DR's Rise and Fall

3689701889?profile=original

Tough Market

“We exited hardware and we exited consumer partly because it was a tough market,” he said. “DJI is an amazing company and lots of people got pounded.

“It was just brutal.”

"We’re a Silicon Valley company and we’re supposed to be doing software and there are Chinese companies that are supposed to be doing hardware.”

Can't say I agree with some of these statements, but alas, this has all played out already. Other interesting tidbits relating to a previously proposed acquisition by DJI are also in the article.

Describes one of the last chapters of the 3DR history book fairly accurately though.

Link: http://www.forbes.com/sites/ryanmac/2016/10/05/3d-robotics-solo-crash-chris-anderson

Read more…
3D Robotics

3689701866?profile=originalWhat DIY Drones were a half-decade ago, DIY autonomous cars are now. I'm part of the Self Racing Cars group in the SF Bay Area, who are building and racing autonomous vehicles from 1/10th scale to go-karts to full-size cars (Ford Fusion is the go-to vehicle, since it's the cheapest car that's fully drive-by-wire and can easily be made autonomous).

Above is the autonomous go-kart that Autodesk CEO Carl Bass and I built, with autonomy provide by a Pixhawk and the APM:Rover code, plus custom computer vision processing on a RaspberryPi.  (The gorilla is for ballast -- and looks)

If you're in the Bay Area, you can join the Meetup group here. First hackathon/meetup is on Oct 30 in Berkeley. 

Read more…

Pivotwing VTOL airframe update

3689701818?profile=original

Hey everyone, I think we all can agree it has been an eventful year.  It has been almost a year since I posted a concept I was working on here, and some of you were kind enough to let me know what you thought.  I have continued tinkering with this idea, and was hoping I could get another round of comments and criticism from anyone who has a minute to spare.  If you have any insights on this I really would like to hear them, even if they are less than optimistic...

Thanks!

3689701801?profile=original

3689701835?profile=original

There is a little more info about this concept here: Pivotwing.com

Read more…

3689701670?profile=original

LightWare Optoelectronics is proud to share with you some preliminary data on their new miniature laser range finder modules, the LW20 and the SF20 OEM version. These modules will be available later this year and as part of our program of supporting the DIY market we will be offering the OEM module to individual customers as well. The prices will be announced at the time of the official launch ;).


Introduction:

The LW20 and SF20 miniature laser rangefinders offer high performance in a very small form factor. The LW20 is a sealed unit designed to withstand water splashes and dust whilst the SF20 is a lightweight, open frame unit ideal for OEM integration. Both units can measure more than 100 m in sunlit conditions and can measure down to almost zero distance. These professional grade sensors take up to 678 readings per second and provide distances to both the first and last signals with each measurement. The laser beam is encoded so that units can be aimed at the same target without interfering with each other, enabling multiple redundancy and allowing for many UAVs to operate safely in the same area. Serial or I2C communications ports provide a comprehensive suite of commands and the unit can be switched into power saving mode when not in use. 


Features:

  • Very small size
  • Choose either a water and dust resistant unit (LW20) or a lightweight open frame module (SF20)
  • Weight of less than 10 g for the SF20 
  • Water and dust resistant to IP67 for the LW20
  • Long measuring range beyond 100 m
  • High speed readings up to 678 per second
  • First and last signals measured with each reading
  • Encoded laser pulses for multiple systems
  • Serial or I2C interfaces compatible with 3.3 V or 5 V systems
  • Low power consumption with power saving mode


Applications:

  • Distance measurement
  • Laser altimeters for small or large UAVs
  • High reliability systems using redundant sensors
  • Scanning laser systems for mapping or obstacle sensing


Specifications:

Model number                                               LW20                  SF20
Maximum range [m / ft]                               110 / 360             110 / 360
Minimum range                                              ~ 0                      ~ 0
Maximum update rate [rps]                           678                      678
Resolution [cm]                                               1                          1
Accuracy [cm]                                                ±5                        ±5
Weight [g / oz]                                            20 / 0.7                 10 / 0.35
Dimensions [mm]                                      20 x 30 x 35          20 x 30 x 32
Housing material                                       Aluminium             open frame
IP rating                                                         IP67                       --
Operating temperature [C]                         -20 .. +60               -20 .. +60
Power supply [V]                                        5 ± 0.5                   5 ± 0.5
Operating / standby current [mA]              170 / 45                  170 / 45


Notes:
1. Maximum range is measured against a stationary, large white target in full sunlight at 84 readings per second

2. Maximum operating temperature depends on suitable airflow or heat sink

LightWare Optoelectronics (Pty) Ltd  is an ISO9001 certified manufacturer of laser products for UAVs, industrial, aircraft and other applications. The attached information is subject to change without notice.

Read more…

PD-1 fixed-wing airframe test

Hello Everyone!

Wanted to share with you guys a video of our 3.2 meters wingspan PD-1 airframe test. We did it quite some time ago, but I thought that it still may be interested. We do all kind of tests to our products and this is one of the final ones. Performed by professionals - don't try this at home! :D

Enjoy, comment, subscribe! :)

Read more…
3D Robotics

A drone with insect-inspired folding wings

From Robohub:

When designing robots to help in the search for victims after a natural disaster, a number of features are important: robustness, long battery life and ease of transport. With this latest constraint in mind, a team from Floreano Lab, EPFL and NCCR Robotics will present their new drone with insect-inspired folding wings at IROS 2016.

What makes these wings different to previous solutions is the origami techniques used to produce it, creating the perfect folding structure. First, the research team looked for examples from nature which exhibit folding patterns with a high size reduction and one degree of freedom to fold the wing with single and intuitive movement in a short amount of time. Coleopterans (beetles) were found to not only have the perfect wings, but also control wing deployment from the base of the wing, making them easier to artificially replicate.

Through prototyping and modelling, the original coleopteran blueprints were adapted and updated. The artificial crease pattern achieves a significant size reduction. In the stowed configuration the wingspan is 43% and the surface is 26% of the respective dimensions in the deployed configuration. Despite the complexity of the patterns, the wing has a single degree of freedom and can be folded using only one simple movement.

Finding the crease pattern was only one of the issues that the research team hoped to solve. When using paper for origami, the thickness is negligible, however, when creating a wing, a thicker material must be employed in order to sustain the stresses created during flight. The thicker material is accounted for by creating a 3D folding pattern with tiles of different thickness. The addition of compliant and bistable folds made of pre-stretched latex ensures maximum durability and a smooth deployment.

The presented wings are 26g in weight, with dimensions of 115 x 215 x 40 mm when folded and 200 x 500 x 16 mm when deployed, giving 160 cm2 surface area and 989 cm3 volume when folded and 620 cm2 surface area and 1600 cm3 when deployed. The resulting drone has been tested against a comparable rigid wing in a wind-tunnel, and showed only marginally less good performance when considering lift/drag values.

The ability to create a lightweight, durable drone that is capable of being easily transported and quickly deployed moves us not only closer to commonplace use of robots in locating victims after natural disasters, but also in land and space exploration, aeronautics and civil inspections.

Read more…