All Posts (11086)

Sort by

3689694473?profile=original

Hi all,

I wrote an article on our blog that outlines how people of different qualifications can become licensed under the new Part 107, as well as best practices to most easily follow its requirements once licensed. I've copied and pasted the article below.

With all the great and comprehensive content already online, I did my best to be different by offering direct and practical advice for operators. 

Original source here: https://blog.nvdrones.com/tips-tricks-for-becoming-licensed-and-operating-safely-under-faa-part-107-3537acf22925#.vckuf6tau

On June 21st, 2016, the FAA officially released Part 107, which is deemed as a set of “operational rules for routine commercial use of small drones.” While Part 107 is less restrictive for commercial drone operators than its predecessor, the Section 333 Exemption, it is also more clearly defined and enforceable by law enforcement agencies. As such, drone operators are well-advised to follow requirements as best they can.

What are the takeaways of this blog post?

1) A consolidated list of online resources that explain more about Part 107

2) An explanation of how drone operators of different qualifications can become licensed under Part 107

3) A list of tips on how drone operators can most easily follow the requirements of Part 107.

Note 1: Thank you to our drone lawyer adviser, Jeffrey Antonelli, for being a contributor to this post. If you ever need a drone lawyer (as suggested at the end of the post), he’s your guy!

Note 2: None of the content of this article may be considered legal advice. Consult a qualified attorney to discuss your particular circumstances.

There are a plethora of online resources that are already available and more are bound to spring up soon. I’ve listed a few below and will continue to update as new resources become available.

How Do I Get Licensed?

There are 4 main categories you’ll most likely find yourself in:

1. I have previously obtained a Section 333 Exemption from the FAA

2. I don’t have a Section 333 Exemption but I’m an actively licensed Part 61 certificated pilot

3. I don’t have a Section 333 Exemption and I’m also not an actively licensed pilot

4. I applied for a Section 333 Exemption but didn’t officially receive it before Part 107 was released

Depending on what category you’ve found yourself in I’ve outlined how you can obtain your drone pilot’s license below:

Category 1: I already have a 333 exemption

Your 333 exemption still applies until it expires 2 years from when it was issued. So, you don’t necessarily need to rush to get licensed under Part 107 to continue your operations. 333 exemptions are still particularly useful when it comes to operations that aren’t covered under Part 107, such as night-time operations — if you have been approved to conduct them.

If you already have a 333 exemption, chances are that you’re an actively licensed pilot. See the section below how actively licensed pilots can become licensed.

Category 2: I don’t have a 333 exemption but I’m an actively licensed pilot

If you are an actively licensed pilot who was trained under Part 61 regulations, you will be able to take an online course to become drone-licensed instead of needing to take an in-person, written, exam at an FAA-approved knowledge testing center. You can also bypass the TSA-background check that non-pilots who must go through Part 107 will have to wait for.

Here is the online course/exam that Part 61 certificate holders can take in order to become drone-licensed.

The best part about being a Part 61-licensed pilot taking the online course? You can avoid the potential backlog that may spring up for Part 107 licenses.

Category 3: I don’t have a 333 exemption and I’m also not an actively licensed pilot

Some of the best and safest drone pilots aren’t manned pilots. It’s awesome that they now can fly drones commercially. However, non-pilots will have a slightly higher barrier to entry than those who are already licensed pilots.

Non-pilots will need to take an in-person, written exam, at an FAA-approved knowledge testing center. These in-person exams are expected to be implemented by the beginning of September. Here is a complete list of FAA-approved centers where in-person exams will take place.

According to the Drone Girl, the test will be split up into 12 major areas:

1. Applicable regulations relating to small unmanned aircraft system rating privileges, limitations, and flight operation

2. Airspace classification and operating requirements, and flight restrictions affecting small unmanned aircraft operation

3. Aviation weather sources and effects of weather on small unmanned aircraft performance

4. Small unmanned aircraft loading and performance

5. Emergency procedures

6. Crew resource management

7. Radio communication procedures

8. Determining the performance of small unmanned aircraft

9. Physiological effects of drugs and alcohol

10. Aeronautical decision-making and judgment

11. Airport operations

12. Maintenance and pre-flight inspection procedures

The test is largely comprised of questions similar to manned aviation as well as ones specific to drones sprinkled throughout (such as “Small unmanned aircraft loading and performance”). The FAA will allow you 3 hours to take the test and estimates that it will take 20 hours to prepare for the test.

In addition to taking the test at an in-person center, you will also need to wait for a TSA-background check before you can receive a license. From the Part 107 summary, “The FAA anticipates that it will be able to issue a temporary remote pilot certificate within 10 business days after receiving a completed remote pilot certificate application.”

Category 4: I applied for a Section 333 Exemption but didn’t officially receive it before Part 107 was released

The FAA will be sorting these into three tiers. Tier 1 will be for exemption requests that will fall entirely under 107. These will be closed out and the FAA will take no further action. Tier 2 will be requests for night operations, BVLOS operations, etc. and will be put into the new waiver program. Tier 3 will be requests to operate over 55 pounds and other items that are not waivable under Part 107. These will be kept in the 333 program.

Pro tip: Be wary of safety schools or other organizations who claim to prepare you for the Part 107 test and/or will allow you to “buy” the Part 107 license

This is not to say that all flight safety schools are bad — there will be many that are knowledgeable and can provide legitimate value-adding services for you as a commercial operator. However, be smart about it. Here are some questions you should be asking to vet quality organizations:

  • Do you currently offer manned aircraft education under Part 61? Note: Just because an organization knows manned aviation does not necessarily mean they are knowledgeable about drones. But, it at least means they know airspace regulations well
  • Why are you qualified to run this school?
  • What do you know about drones specifically? How long have you been flying or teaching drones?
  • How many students have you taught in the past? Do they have reviews that I can look at?
  • What is your student pass rate for the exam?

How Can I Protect Myself Once I’m Licensed?

Part 107 is noticeably broad in its wording, especially when it comes to best practices for “safe” flying. However, this does not mean operators do not need to follow strict guidelines and requirements. Think of it like how you serve your clients — they may not tell you how to meet the requirements they give you, but you better meet them no matter what. While there is a decent amount of broad wording in Part 107, you better be able to prove that you did your best to meet its requirements in the case that there’s an accident.

Approach every flight with the mindset of, “If there is an accident on this flight, can I prove that I was doing my best to fly safely?”

With Part 107’s broad approach to safety, it is largely left up to you to make many important safety decisions. Two big ones are:

Is my drone safe to fly in its current condition? Are the weather conditions safe enough for me to fly?

If you can objectively convince yourself that, “yes, I am doing everything in my power to make sure my next flight is a safe one,” then you put yourself in a great position to protect yourself in the worst-case scenario. However, that’s only half the battle — you might be able to convince yourself, but in the case of an accident you’re going to have to convince the FAA. There’s only way you’re going to be able to do that.

Continuously Document Why You Feel You’re Flying Safely

Often times documentation is one of those things where you don’t really need it until you really, really, really need it. Now that the FAA has “codified” Part 107, it gives them teeth to enforce the regulations they didn’t previously have. Flying safely is half the battle and using documentation to prove that you’re flying safely is the other half.

Pilots must “make available to the FAA, upon request, the small UAS for inspection or testing, and any associated documents/records required to be kept under the rule.”

Part 107 states that pilots must “make available to the FAA, upon request, the small UAS for inspection or testing, and any associated documents/records required to be kept under the rule.” This means that at any point, a local police officer or FAA official can ask to see your flying documentation. Here are a few ways you can document what you’re doing.

Create, standardize, and perform pre-flight checklists for every flight

As part of the documentation requirements, Part 107 states that drone operators must “conduct a preflight inspection, to include specific aircraft and control station systems checks, to ensure the small UAS is in a condition for safe operation.” A sample pre-flight checklist is located here:http://www.suasnews.com/2016/06/part-107-pre-flight-checklist/

Pre-flight checklists are a great way to prove that you checked that your drone was airworthy before you took off.

The pre-flight checklist is loosely related to the “airworthiness” portion of Part 107. Unlike airplanes, there is no certification of airworthiness required for your drone. However, you should be able to prove why you feel your drone is “airworthy” (i.e. safe) to fly before every flight. Pre-flight checklists are a great way to prove that you checked that your drone was airworthy before you took off.

If you can prove that 1) your pre-flight checklist is a reliable indicator that your drone is airworthy, and 2) you consistently conduct the pre-flight checklist for every flight, it will make it much easier to prove that you did your due diligence in ensuring your drone was airworthy in the event of the worst-case scenario.

Log Weather and Other Field Conditions to Prove You’re Aware of Your Surroundings

In addition to proving that your equipment is safe to fly, it is equally important to prove that the conditions you are flying in are safe. Part 107 requires at least 3 miles of visibility, which you can check using your local weather report. While not required, it’s also a good idea to log other types of weather conditions. You can reference our past blog post what types of weather conditions can affect your drone’s performance.

Temporary Flight Restrictions (TFR’s) — Check Them When You’re Out in The Field, As Well As When You’re in the Office

Planning No Fly Zones ahead of time will help you to notify airports in advance where needed (a requirement in Part 107). However, planning ahead will not necessarily prepare you for Temporary Flight Restrictions when you’re out in the field, and it’s these TFR’s that can get you in the most amount of trouble.

Be sure to use applications like AirMap to check for TFR’s directly before you fly. AirMap currently has a web and iOS app, as well as an Android version coming soon. While not extremely common, TFR’s can change from minute-to-minute, and you don’t want to find yourself in the wrong place at the wrong time. AirMap also displays controlled airspaces, which is great because flights in controlled airspace require air traffic control authorization.

You can also visit the FAA TFR website at http://tfr.faa.gov/tfr2/list.html to make sure you’re up-to-date with the Temporary Flight Restrictions.

Have a drone lawyer in your Rolodex and refer to them in the worst-case scenario

Accidents can happen no matter how careful you are. And, if an accident does happen, it may or may not be your fault — sometimes s*** just happens. No matter what, you should never “give yourself up” by divulging information about the accident before consulting with your drone lawyer first. You have a right to an attorney and it is in your best interest to exercise it.

It’s Time to Rejoice. Drone Pilots Now Know the Rules of the Game and Can Proceed Accordingly.

Prior to the release of Part 107, the US commercial drone industry has been mired by confusing, unclear, and sometimes unreasonable regulations. While Part 107 is not completely comprehensive for all types of operations, it is difficult to argue against it being a giant step in the right direction for drones to be integrated into the National Airspace. In order to keep moving in that direction, it is the responsibility of nationwide drone pilots to prove that drone operations can be conducted in a safe and professional manner — the future of the commercial industry depends on it.

Read more…
Developer

RIP: Lester Haines

3689694583?profile=original

I have sad news to share.


Lester Haines Register Special Projects Bureau chief and head of the LOHAN mission passed away on Monday 13. June 2016 aged just 55.

http://www.theregister.co.uk/2016/06/16/lester_haines_obituary/

Our community has lost a visionary and an amazing human being.
To work with him was a blast and a fascinating adventure.

Thanks mate, it was a great experience.  
You left far too early and you will be missed.

Let's all raise a glass to Lester!

Read more…
3D Robotics

Real-time data analysis tool for PX4

3689694190?profile=originalMAVGAnalysis is a new tool from the PX4 team to give real-time data analytics without overcomplicating a GCS. From the repository:

This JavaFx based tool enables PX4 Users to record and analyse data published via UDP during flight or based on PX4Logs. It is not intended to replace the QGC. Runnable on OS X, Ubuntu and Windows.

Any feedback, comments and contributions are very welcome.

Status: Last updated 23/06/2016

Features:

  • Realtime data acquisition (50ms sampling)
  • Timechart annotated by messages (in 10secs framing)
  • Trigger recording manually or by selectable flight-mode/state changes
  • Choosable stop-recording delay
  • Display of key-figures during and after recording (with 'Replay')
  • Display of basic vehicle information (online), like mode, battery status, messages and sensor availability
  • XY Analysis for selected key-figures
  • MAVLink inspector
  • Easy to use parameter editor
  • Map viewer of global position and raw gps data with option to record path (cached)
  • Import of selected key-figures from PX4Log (file or last log from device via WiFi)
  • Save and load of collected data
  • FrSky Taranis USB supported in SITL
  • Low latency MJPEG based video stream display based on uv4l (recording and replay in preparation)

Requirements:

  • requires Java 8 JRE
  • A companion proxy (either MAVComm or MAVROS, not required for PIXRacer)
  • Video streaming requires uv4l running on companion

How to build on OSX(other platforms may need adjustments inbuild.xml):

How to start (all platforms):

  • Goto directory /dist

  • Start either UDP with java -jar MAVGAnalysis.jar --peerAddress=172.168.178.1

    (PX4 standard ports used, replace IP with yours)

    or java -jar MAVGAnalysis.jar --peerAddress=127.0.0.1 for SITL (jMAVSim)

    or just java -jar MAVGAnalysis.jarfor a basic demo. ​

  • Open demo_data.mgc, import PX4Log file or collect data directly from your vehicle
  • For video (mjpeg), setup uv4l at port 8080 on your companion with : ​ uv4l --auto-video_nr --sched-rr --mem-lock --driver uvc --server-option '--port=8080'

How to deploy on OSX:

  • Modify build.xml to adjust peer property.
  • Run ant_deploy

Limitations:

  • Limited to one device (MAVLink-ID '1')
  • Currently does not support USB or any serial connection (should be easy to add, so feel free to implement it)
  • PX4Log keyfigure mapping not complete (let me know, which I should add)

Note for developers:

MAVGAnalysis depends heavily on https://github.com/ecmnet/MAVComm for MAVLink parsing. ​

3689694522?profile=original3689694553?profile=original3689694548?profile=original

Read more…

Hello all, 

just wanted to share this quick video demo we shot yesterday that shows how easy it is to use GlobalARC to stream live flight video to our online portal.  

What is GlobalARC?


GlobalARC is a cloud based platform that allows real-time data and video link with autonomous robots anywhere in the world. It is also a great management tool for any UAV operation where you can keep track of your vehicles, accessories and personnel. Feel free to check it out at www.globalarc.us.


How does it work?


Our platform connects directly to your autopilot and puts it "on the grid". You can then access it online when you log-in anywhere in the world. It let's you plan missions, deploy drones and watch live video feed online. There is a small wireless device involved that acts as a bridge between the drone and the platform. Here is a demo video with our XL Pro using GlobalARC to stream video online.

The future of this technology


Future potential of GlobalARC technology is enormous, as it will enable completely autonomous UAV operations from unlimited distance with a command center in the cloud. Companies will be able to deploy and manage self-charging, autonomous drones anywhere on the planet and receive live video and real-time data. Imagine completely autonomous drones in agriculture, search and rescue or inspection industries that can be routinely deployed from company offices half a world away to provide crucial data on regular bases.

3689694421?profile=original


What you need to use it with the Pixhawk


There are two ways you can connect the GlobarARC device to your autopilot - a usb cable or Bluetooth. We favor Bluetooth connection because it's impervious to vibration, however you do need to add a small BT connection board and plug it in the telemetry port.


Please let us know if you'd like to try this with your APM or Pixhawk! In the meantime we are going to be working on adding more autopilots to the mix. Right now we also support Naze32 and MultiWii.


Best,
Your Easy Aerial Team

Read more…
3D Robotics

3689694243?profile=original

AP-Manager is a board available now that allows switching between two Pixhawks or APM autopilots:

3689694167?profile=original

Product Description

The requirements for the operation of unmanned aircrafts in commercial and semi-professional purposes have changed fundamentally in the past years in Europe and worldwide. ( FAA ) The regulations will get even more strictly in the future.

Depending on the application, the weight, the purpose, the situation, the flight area, spectators and some more reasons, SAFETY is becoming increasingly important.

Single point of failure and redundancy became the keywords for permissions and certifications from authorities and insurances.

Among other parts inside a system, redundancy of the autopilot system is meanwhile mandatory to follow the rules. Especially multicopters are very instable in their flight characteristics when it comes to malfunction of the stabilization system.

We therefore developed a redundancy circuit board which is an automatic monitoring and controlling bridge between two independent running autopilot systems, a mutual protection in case of malfunction in an autopilot system. Even if both autopilots fail (power supply, freezing controller…), the forwarding of the control signals for a manual flight of the aircraft, Delta or Helicopter is guaranteed.

This system also offers the possibility to switch manually between two different autopilot systems to test different software and sensor setups. Another benefit of the AP-Manager is that only one telemetry module is needed to monitor data of both autopilot systems (except for DJI autopilots, here you need two downlinks, from each autopilot seperate).

AP-Manager is a safe attendant for flying and testing of your unmanned aircraft.

Read more…

[DRONE.BO WORKSHOP]

3689694011?profile=original

Like as @rmackay9 Randy Mackay, @tridge Andrew Tridgell, @magicrubTom Pittenger, @lucasdemarchi Lucas De Marchi, @priseborough Paul Riseborough, @jberaud Julien Beraud and others APM developers, we have started on last year a workshop in the universities called "TD3" and it will work together with "Ardupilot Team & Communication" purposes.

In workshop "TD3" we are introducing the UAV flight system, APM API Structure and use; and APM Flight System how it's work.

We are very greatful to meet APM Team and helping us to introducing APM Flight System and APIs in our workshops here in many universities, UTEPSA (City: Santa Cruz de la Sierra), UEB (City: Santa Cruz de la Sierra), UPDS (City: Tarija) and UAP (City: Pando).

Greentings from Santa Cruz, Bolivia.

Drone.bo Team.

Follow us too at http://www.ardupilot.org and http://www.dronecode.org

3689694038?profile=original

3689693939?profile=original

3689694067?profile=original

3689694117?profile=original

3689694144?profile=original

3689694092?profile=original

Read more…
3D Robotics

3689694272?profile=original

From the National Geographic Society:

As a kid, National Geographic Young Explorer grantee Dominique Meyer was torn between becoming a firefighter or an archaeologist. Though his dislike for a high school history teacher led him away from archaeology and toward physics, Dominique re-entered the field as a student at the University of California, San Diego, when he was asked to help pilot autonomous drones for archaeological expeditions in Guatemala and Mexico. This work introduced him to Dominique Rissolo, Ph.D., and motivated Meyer to apply for a National Geographic Young Explorer Grant.

In September 2015, Meyer and expedition team member Rissolo embarked on an expedition to the Mexican state of Quintana Roo. Just a four-hour drive from the chaise lounges and frozen cocktails of Cancún resorts, the Southeastern Mexican state is home to dozens of ancient Maya settlements. Believing that more, never-before-documented settlements might exist in the area, Meyer and Rissolo, along with other members of the Center of Interdisciplinary Science for Art, Architecture and Archaeology (CISA3), began research in Quintana Roo. Their goal was to understand the overall distribution of Maya sites across the Yucatán Peninsula.

7f595994-9c10-416a-8f14-fd16f9fa419b.jpg?width=750

Dominique Rissolo uses a handheld GPS receiver to guide him through the forest of Quintana Roo to anomalies identified via drone- and satellite-based remote sensing imagery.

PHOTOGRAPH BY VERA SMIRNOVA

To survey Quintana Roo, the team used low-cost, autonomous fixed-wing drones. Unlike helicopter drones, which can only fly for 30 minutes at a time, fixed-wing drones have flight times of several hours. This meant the team was able to get substantial footage from fewer flights at a lower cost. Using infrared, LIDAR, and visible light, the drones gathered data that the team then correlated with satellite imagery in order to create a 3D digital elevation model.

From the digital elevation model, the team was able to pinpoint where “anomalies” exist in the landscape and target those as likely sites for undocumented Maya settlements. This approach allowed them to target the most promising areas without wasting time or resources. Their method paid off as they discovered three never-before-documented sites, two of which contained pyramids and small artifacts.

This expedition also proved that the advantages of drone technology stretch beyond reducing time and cost. In Rissolo’s words, “drones are a catalyst for collaboration.” Using drones in archaeological research has brought engineers, with the required technical skills, and archaeologists together in a new way. Rissolo believes that this collaboration benefits both fields and results in more people involved in the mission of conserving cultural heritage.

6e362cd8-c77f-402b-8060-da5c75caad36.JPG?width=750

Dominique Meyer prepares to launch a fixed-wing drone at the Maya site of Conil.

PHOTOGRAPH BY VERA SMIRNOVA

However, at the same time that drone technology has improved and become more accessible (thanks in part to 3D printers), it has also become more closely regulated by the Federal Aviation Administration. Increased regulations and restrictions threaten to disrupt the progress being made across scientific fields through drone technology.

For everyday explorers interested in using drones, Meyer cautions that “while drones are ideal platforms to collect certain types of data, they will unfortunately not solve all problems.” He recommends viewing drones as just one “tool within a toolbox,” meant to complement other methods for collecting data.

Read more…

USG-301 gimbal with Sony Full HD camera

Hello everyone,

Here is another video of our USG-301 3-axis gyro-stibilized gimbal with integrated Sony EV7500 Full HD camera with 30x optical zoom. All camera features, such as anti-fog, electronic stabilization, colour enhancement, etc. could be controlled though our gimbal, you can easily assign any button on your RC to control those features. Video out is HD-SDI or HDMI, control signals are S.BUS or PPM, so it is compatible with Pixhawk, Autopilot and most of popular flight controllers out there on the market. 

For this particular video we used Tarot frame multi-rotor drone with Amimon Connex video link and Blackmagic Video Assist monitor to record the footage. Enjoy. :) 

Read more…

We're really excited to announce a new ArduSub/Pixhawk controlled underwater underwater vehicle, the BlueROV2. The 6-thruster vectored configuration, coupled with strong static stability, provides a vehicle that is smooth and stable, yet highly maneuverable. The BlueROV2 provides the capabilities of a high-end mini-ROV at the price of the most basic commercial ROVs. It can reach depths of 100m and is highly expandable for new sensors, payloads, and capabilities.

3689693991?profile=original

We've spent the last six months working hard on ArduSub and contributing to QGroundControl to make the ArduPilot platform work well for subsea vehicles. It's come a long way in that time and we think it's got a bright future ahead.

The BlueROV2 comes as a partially-assembled kit (essentially ARF) and it can be completed in 4-8 hours. The setup is very straightforward and almost identical to ArduCopter!

3689693900?profile=original

The BlueROV2 is available for reservations with no money down today. Kits will begin shipping in August. Reserve yours today and please share if you know anyone who may be interested!

Reserve one now: BlueROV2 Product Page Link

Thanks for checking it out!

- Rusty @ Blue Robotics

Read more…
Moderator

FAA-Puma1.jpg?resize=300%2C163

Part 107 lives, the starting gun has fired.

Today, the Department of Transportation’s Federal Aviation Administration has finalized the first operational rules for routine commercial use of small unmanned aircraft systems (UAS or “drones”), opening pathways towards fully integrating UAS into the nation’s airspace. These new regulations work to harness new innovations safely, to spur job growth, advance critical scientific research and save lives.

“We are part of a new era in aviation, and the potential for unmanned aircraft will make it safer and easier to do certain jobs, gather information, and deploy disaster relief,” said U.S. Transportation Secretary Anthony Foxx. “We look forward to working with the aviation community to support innovation, while maintaining our standards as the safest and most complex airspace in the world.”

According to industry estimates, the rule could generate more than $82 billion for the U.S. economy and create more than 100,000 new jobs over the next 10 years.

The new rule, which takes effect in late August, offers safety regulations for unmanned aircraft drones weighing less than 55 pounds that are conducting non-hobbyist operations.

Of course we all knew this was coming today, welll sort of knew.

http://www.suasnews.com/2016/06/faa-releases-full-part-107-small-uas-rule/

Read more…

Workswell WIRIS - unboxing and first flight

Workswell WIRIS thermal imaging system for unmanned aircraft is a compact system that combines thermal camera,  digital camera and a control unit in one case. For our customers, we prepared short unboxing video that is shortly explaining package content, setup and first flight.

Package contents:

Workswell WIRIS thermal imaging system
Your chosen lens
Calibration certificate
USB Flash drive 32Gb
HDMI cable
Servo connectors (PWM)
Power supply cable
Software “Workswell CorePlayer” licence
Software “Workswell ThermoFormat” licence
Hard transport case

For more info about Workswell WIRIS, please visit - http://www.drone-thermal-camera.com/

Contact: info@workswell.eu 

Read more…

UgCS 2.9 Is Now Live

3689693845?profile=original
It’s been long in the making, but it’s finally here. UgCS has released a new version of its ground station software - UgCS 2.9 which features a ton of improvements and new features.

A feature often requested by the users - possibility of planning area scan missions by manually entering the altitude - is finally here. One of the biggest changes you'll notice is that the Area Scan tool is now divided into two separate tools - Area Scan and Photogrammetry tool. The Photogrammetry tool allows to plan area scan missions with a specific GSD. Meanwhile the Area Scan tool now allows scanning an area with either using AMSL or AGL altitudes.

Battery capacity is the main limiting factor for drones. UgCS has taken a step around this issue. Now it is possible to fly longer missions with UgCS by exchanging the battery. This is now possible because now you can restart the mission from any specific waypoint. This new features makes aerial mapping of large areas easier and more convenient than ever.

Another notable change is that the support for two new drones has been added. DJI Phantom 4 and Matrice 100 are now supported in UgCS. Furthermore, experimental support for GeoTiff file import as map overlays and joystick control for Ardupilot and DJI has been added.

Take a look at what`s inside UgCS 2.9:

Get UgCS 2.9 here: www.ugcs.com

Safe flights,
UgCS Team

Read more…
100KM

image_coverage

Here at team West Coast UAV we've been hard at work integrating all the different requirements for the 2016 Medical Express Challenge to be held in Queensland, Australia later this year. One of the key requirements is to accurate locate poor old Joe.

We know Joe is within 100m of his reported location, and he will be wearing his trusty blue jeans. Our approach is to take an image of the entire area from an altitude of 250 metres. Once Joe is identified we can then using the aircraft’s known position and attitude we can determine his exact location.

Our imaging system is responsible for finding Joe’s location to within 10 metre accuracy. This must be done quickly and with potentially limited bandwidth (as low as 3Kbit a second) which has led us to refining and developing a number of novel solutions.

Just as important. is a streamlined workflow to minimise the time from initial image capture to landing waypoint upload. For this we have developed an integrated web browser solution that interfaces with the many components involved in imaging and locating Joe.

webgui
Read more…
Developer

3689693879?profile=original

Do you think that you got what we are looking for?? 

Do you want to make ArduPilot even greater that we are now?!? If you do, read more:

ArduPilot.ORG is looking great minds and great designs for our upcoming fun merchandise. T-Shirts, Keychains, Mugs, Jumpers and so on.. Take out our your sketch books and let the ideas flow..

What would you like to carry with you to your flying field?!? Post it on our merch topic and your idea could end on peoples hands around the world. 

Check out more at:

http://discuss.ardupilot.org/t/ardupilot-t-shirts-keyc…/9750

Read more…

Arducopter Parachute Testing

Strapped lots of cameras to our 900mm Hex, then popped the chute for the first time in the air.

No landing in soft stuff, no perfect conditions (nasty squalls coming through!), we wanted to see what would happen in the real world!

Pixhawk running Arducopter 3.3, X68 with a Fruity Chute

Big thanks to the development team!

Enjoy! 

www.x-craft.co.nz

Read more…

I wanted to share my experience with capturing and processing NDVI imagery for agricultural health indexing.  A preview of the end result:

snagit7.jpg?width=750

First let me list some of the hardware being used so you don't have to scroll through this post to find it all!

Equipment:

3DR Iris+

Canon SX260HS (Modified with Event38 Near Infra-Red Filter)

Camera Mount from IMP Concepts

CHDK installed on the Canon Camera (Instructions)

IMG_1590.JPG?width=750

Background:

I have wanted to get into crop health in a more serious manner for some time now, so I ordered a Canon SX260 and installed the NIR filter from Event38.  There is a great write up on how to do this modification yourself HERE.  I also went through the process of installing the Canon Hack Development Kit (CHDK) which includes a critical script called the 'Intervalometer' which lets you set the camera to automatically take photos every X number of seconds.

Note:  You can also use a cable directly from the flight controller on the drone to the camera and let the mission "trigger" the taking of the photos.  I didn't do that, but I know others have been successful with getting that to work. 

So, I am ready to plan a mission, capture some data, and then post process into some beautiful NDVI images and hopefully give some valuable agricultural information back to the owner/grower.  

Mission Planning:

For this, I simply used Mission Planner.  I think everyone is already familiar with this but in case you aren't, Get It Here.  The great part of Mission Planner was the ability to draw an area of interest, select my desired flight altitude and camera platform, and let Mission Planner generate a flight survey for me!  Sure there may need to be some adjustments, but its a really great starting point!

Create a Polygon:

3689693798?profile=original

Open Auto Waypoint > Survey Tool:

3689693588?profile=original

Select options for the Survey:

3689693692?profile=original

This lets me adjust the overlap, look at my camera footprints, and a few other really useful options for making a mission plan that fit my needs.

Flying!:

The next step was to pick a day with cooperative weather and actually go fly!  So I planned the mission(s) for collection to target a 100m altitude and was set up for the camera to capture images every 3 seconds.  These turned out to be good settings all around and I probably wont change too much about this for future collections.  

Everything worked great and after all of my collection flights were over (I flew 4 total flights to collect over 114 acres), it was time to get to work processing the imagery.

Data Processing:

That term sounds so boring, but in fact this was probably the most interesting part!  I decided to use the online service which is provided by Event38 called the Drone Data Management System (DDMS).  If you haven't used this, I can highly recommend it.  It worked great.....not perfect.....but still pretty great!

3689693812?profile=original

I can upload my missions (basically point to all of my collected images) and tell the service to process my imagery to provide results like Orthomosaics or even the NDVI imagery or 3D .obj files which can be used for modeling the actual terrain.  If you want to learn more, just check out the website, but I found the service to work great.

CONS:

  • It sometimes took several hours to process my data and give me a link to download my completed Orthomosaic
  • Limits each "Mission" to only 200 images at a time (so I had to split my images into several "Missions")

PROS:

  • It is FREE!  Well, at least you can do some level of processing each month for free right now
  • It is really easy and the interface is intuitive
  • Help is very responsive!  I had an issue with one mission, asked a question through the online portal and had an answer emailed to me in minutes

Note:  I have also used the Pix4D Mapper Pro product (and really like it as well!) and as a comparison, the results from Pix4D generally lined up better (more on that in a minute), but for just Orthomosaic generation, I couldn't see too much of an advantage there.  Of course there are some really great tools built into Pix4D Mapper to adjust Ground Control Points and some other features, so this comparison is really just focused on the generation of an Orthomosaic product from supplied images.  

Data Adjustments & Refinements:

Of course the first thing I wanted to do with my Orthoimage was overlay it into my visualization tool of choice (everyone's will likely be different).  What I immediately noticed was that my imagery didn't quite line up with the underlying Bing Maps or Google Maps base layer.  

So, I brought the Orthoimage into QGIS to make some adjustments and also apply my own NDVI false coloring.  If you aren't familiar with QGIS, it is basically an open source Geospatial Tool Kit.  Find out more about it and/or download it HERE.

The GeoReferencer Plugin was useful for me to make any adjustments to the alignment of the image:

3689693601?profile=original

 And then applying the False Color scale to reflect the NDVI calculation was done with the Raster Calculator as seen here:

3689693863?profile=original

This is basically calculator that allows me to take information about the image in all the collected bands and apply a formula to it.  In this case it is the traditional NDVI formula:

(NIR - Visible)/(NIR + Visible)

For my camera and it's modification, this was (band1 - band3) / (band1 + band3) as seen above, because the removal of the IR filter and the installation of the filter from Event38 allows the NIR light to be captured in the "red" band and the filtered visible light to be captured in the "blue" band of the traditional RGB (band1, band2, band3) sensor on the camera.

 I can apply that raster calculation and output the resulting image.   That resulting image will only be "singleband" at that point and I can then choose how to color the values to reflect my needs.

You can see the result here!

3689693907?profile=original

And of course a zoomed in view of a portion of the image:

snagit8.jpg?width=750

And some comparisons between the base imagery, raw camera output, and the NDVI results:

snagit9.jpg?width=750

snagit10.jpg?width=750

snagit11.jpg?width=750

This particular field is growing corn and it is early in the season so the plants were probably less than 6 inches or so tall.  So I expected to get more red/black colors as it was mostly still soil with small rows of corn showing up as more yellow.  I will survey again as the season progresses!

I am very pleased with the results and the workflow wasn't as difficult and time-consuming as I had originally anticipated.  There were a few details that can easily trip you up, but for the most part it was a relatively straight-forward activity.

I hope this helps others looking into the same type of activities!

Read more…
3D Robotics

0*GtDjpnkzzMbTyAqT.jpg

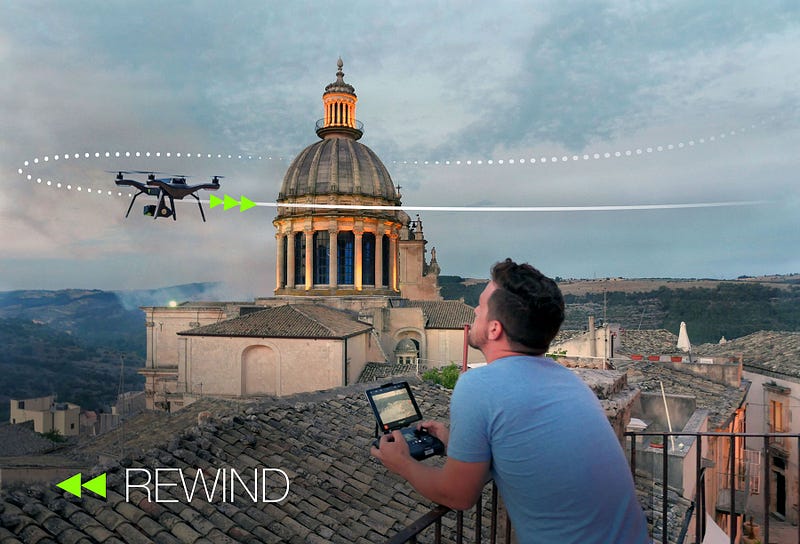
Rewind and Return to Me

With the press of a button, Solo will retrace its exact path for the last 60 feet of your flight (this distance will be user-definable in the app) to ensure it avoids obstacles on its way back home. And with the new “return to me” feature, Solo will come home to wherever you stand with your controller and mobile device.

Meet the new Smart Shots — Zipline and Pano0*uig3ZMHDBUcKC8e1.jpg

Zipline + Spot Lock

Set an infinite cable in any direction, just by pushing a button. Fly up and down this line, controlling speed and direction as well as the camera. Zipline also has a “spot lock” feature, which works like an Orbit point of focus, but instead of flying in a circle you’re flying in a straight line. Set your zipline, look at something, press spot lock and Solo keeps the camera fixed on it while Solo passes, for a dramatic flyby.

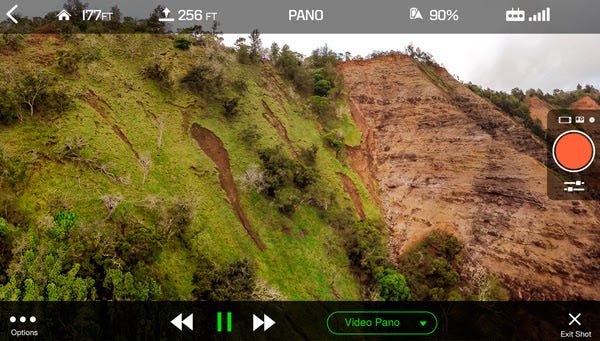
Pano

The perfect aerial panorama. Set up your shot, and Solo automatically pans and snaps the right photos at the right time, for cylindrical, spherical (“little world”) or video panos.

Augmented Reality

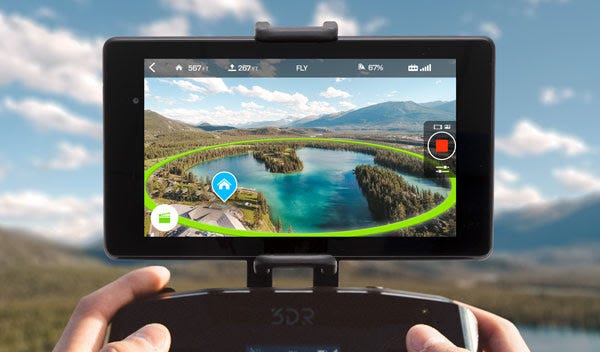
0*22tyAUubZbBYJPt8.jpg

The Solo app will overlay visuals in real time on your mobile screen. You can see your home point, or make sure your Orbit point of focus is exactly where you want it to be before you fly your Smart Shot.

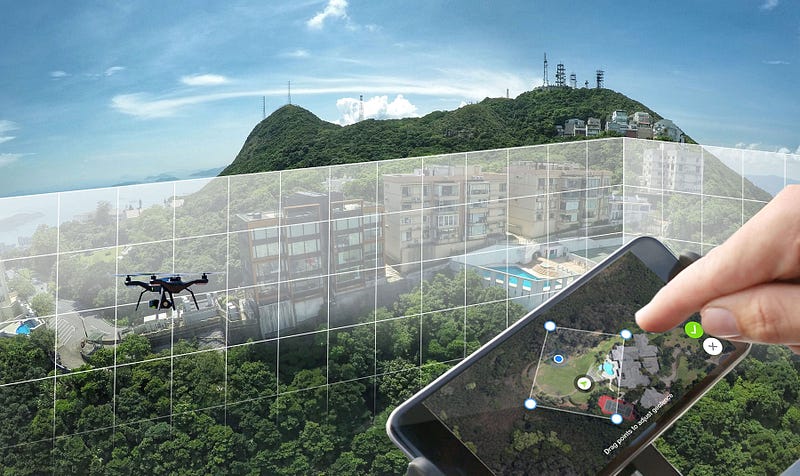
Custom Geofencing0*QPTO-BTran1irz1Y.jpg

Define a virtual fence around Solo at any time in flight. You create this virtual “safety net” by setting four points on your satellite view, which creates an area around Solo that the drone can’t leave. Set your fence before taking off, or set and adjust its location while flying, allowing you to easily block off nearby obstacles or entire areas at any time.

Read more…

Precis-BX305 Static RTK Results Released

3689693766?profile=original

If you have any problem about this figure, please make your comment or drop us a line to sales@tersus-gnss.com

If you would like to get technical specification and user guides of our RTK boards, click here.

Hi all,

Following the video “RTK centimeter accuracy road test with IMU”, below you can find a static RTK positioning result figure to demonstrate the Precis-BX305 product performance. The figure shows the real-time positioning results with radio data link and here is short description.

Receiver: a pair of Precis-X305 boards
Location: Roof of building
Time span: 1 hour
Baseline length: about 5m
Solution type: real-time solution

Read more…