All Posts (11086)

Sort by

And they say smoking is bad

3689644750?profile=original

Technology is often driven by request and demand, and while the drone community is growing rapidly, the number of people trying to quit smoking is probably a bit bigger. Along comes the E-Cigarette and with it, comes a demand for high current high capacity batteries - at low prices. I recently stumbled across such batteries (EFest 18650) that promised a 35A constant discharge and a capacity of 2500 mAh for as little as 6$ a piece in a shop that sells E-cigarettes and E-juice.

That sounded good, and while I don't smoke, I thought it would be fun to put two in my delta wing and see what it did to my flight time compared to my normal 2 cell 1300mAH lipo.

I charged the batteries using my lipo balancer and made sure they charged to the nominal 4.2 volts. I then constructed a small pack using a cheap holder for such batteries. The connectors and wires in the holder were, let's just say not that good, so I replaced them with something thicker to make sure no voltage drop was induced by poor quality.

3689644991?profile=original

I normally fly the delta with a small 1300 mAh lipo 2 cell, and at low cruising speed i usually get approx. 18-20 minutes of flight time.

I started out with my normal lipo, and got 18 minutes and 50 seconds worth of flight.

Then I exchanged the pack for the EFest 18650 battery pack. With a promised 2500 mAh capacity, I expected to get at least 50% longer flight time (accounting for the approx 30 grams extra weight of these batteries).

3689645025?profile=original

Sadly, I only got 15 minutes and 16 seconds! Thats worse than the half capacity 1300 mAh lipo!

I'm not the first to try out 18650 type batteries - mygeekshow.com made a nice test some time back - so why was I not getting same results?

After a recharge, I discharged the batteries and measured the capacity - I got 2040 mAh when discharging at 0.5 C, not 2500 as advertised. Further more it turned out that due to the low internal resistance of the batteries, the more power you draw, the more effect is lost as heat in the batteries - so at and amp draw of approximately 3-4, you end up only getting 1000 mAh of power - hence actually getting shorter flight times than a much smaller lipo.

I guess the lesson learned here is that these types of batteries are best in parallel, where the amp draw is distributed between several batteries AND you get what you pay for :-) For now I thing I'll stick to my lipos...

Most posts here are success stories and it's always very inspiring to read what others have accomplished - I would certainly love some feedback from others who've had experiences - good or bad - in using these types of batteries.

Read more…

Solara%2050%20drone.jpg

Andy Cox, formerly of Acsenta, now with Facebook, will talk about the role of STEM education in his career, and how drone technology can help bring about new changes in education. 

Cox spent several years working on high altitude drone systems, and will now partner with Facebook on their new high altitude drones. 

For more information, or to buy tickets please go to www.nua.io ;

Read more…

468825032.jpg

The Federal Aviation Administration has been rather stingy when it comes to giving companies the OK to test, let alone employ, drones. After getting permission this week, AIG joins State Farm and USAA as insurance providers with exemptions that allow them to use the UAVs to perform tasks that are risky to regular folks -- things like roof inspections after a major storm. In addition to keeping its inspectors safe, the company says drones will speed up the claims process, which means its customers will, in theory, get paid faster. "UAVs can help accelerate surveys of disaster areas with high resolution images for faster claims handling, risk assessment, and payments," the news release explains. "They can also quickly and safely reach areas that could be dangerous or inaccessible for manual inspection, and they provide richer information about properties, structures, and claim events."

The FAA's exemption also allows AIG to expand its drone research here in the States, after previous flight tests were conducted in New Zealand. For the UAVs to really become useful in these scenarios, the government will have to ease restrictions -- specifically the requirement that the pilot keep the vehicle in sight. If you'll recall, the FAA recently granted Amazon permission to conduct tests and is working with CNN on research for media use. While the current rules may be prohibitive, it's clear that the Administration is willing to update its regulations as the technology becomes even more pervasive.

[Image credit: George Rose/Getty Images]

source: 

http://www.engadget.com/2015/04/09/aig-faa-approval-insurance-drones/

more: 

http://www.theverge.com/2015/4/9/8377035/aig-drones-uav-faa-replace-inspectors

http://www.aig.com/press-releases_3171_438003.html

Read more…

https://youtu.be/Ax3bgPncAzY

Hello all,

3689644913?profile=original

we made some good progress and pushed out version 2.5, (actually it has been shipping for a few weeks)

The main change is that we only use Alnico magnets now and instead of magnetizing those fully in either direction go from full magnetization to completely demagnetize.

The advantage is a reduced air gab and shorter magnetic path length resulting in improved holding force.

It was a little tricky to find the ‘0’ point, or just how much of an external magnetic field needs to be applied to demagnetized the magnets but not more. Eventually we found a solution, magnetize them in alternative directions repeatedly while decreasing the amplitude of the field. This all happens in less than 1 second.


Git repository for Parts Drawing PCB Masks Pic12F source code

Datasheet

Schematics and PCB files 

Purchase

Read more…
Distributor

DJI Phantom 3 Released!

dji-phantom-3-banner1.jpg

I am surprised no-one else has beat me to this,but the DJI phantom 3 has been released and is not as expensive as you might think when considering that is packs the same tech as the DJI inspire 1 (such as lightbridge and the indoor vision sensors)

Today DJI has announced the new Phantom 3 quadcopter which is released in two flavors, the Phantom 3 Advanced, and the Phantom 3 Professional

4c53d3f666e0f69a.jpg

With the previous DJI Phantom releases, DJI have usualy have one version in each phantom series as the budget option with no integrated camera, but today there was no mention of this as the naming of the phantom 3 Pro and Advanced leaves some scope for a camera-less version so you can use other third party gimbals or cameras such as a gopro.

Apart from the new fancy 4K camera the other neat features (inherited from the DJI Inspire) include a indoor optic flow sensor for indoor flight, and a ne GPS receiver that supports GLONASS like the new walkera drones. But my favourite feature is the integrated of the DJI lightbridge system built into the DJI phantom 3 allowing you to stream 720p video back home to your android or IOS device.

d0273437ba96007a.png

In terms of the 4K camera, some thought has gone into this, with a f/2.8 shooter now has a 94-degree fixed field of view which is narrower than the DJI Phantom 2 Vision + which means your videos and pictures will not be distorted with the fish eye effect. Furthermore the narrow field of view means that you are less likely to get any props or legs in the video when banking at extreme angles. Also you have more control over the camera allowing you to adjust things like ISO, Exposure, shutter speed and color filters etc..

dji-phantom-3-fly.jpg

dji-phantom-3-camera1.jpg

dji-phantom-3-lightbridge.jpg

dji-phantom-3-optic-flow.jpg

dji-phantom-3-controller.jpg

Read more…

Maybe we can land on a moving car in our next demo. :)

IR-LOCK is a developing precision landing system for multi-rotors, which is expected to enable high levels of automation in UAS. Imagine autonomously landing on a small charging station, or autonomously performing inspections at very specific points on infrastructure or facilities. In our prototype testing, landing accuracy of 5-30cm has been achieved. 

Since the system uses an IR Beacon, it is not hindered by low lighting conditions or even complete darkness. And the beacon modulation is designed to accommodate extremely bright conditions. Overall, the beacon detection has proven to be very reliable, which is obviously important in this application (we don't want to autonomously land on your dog/cat). 

A Precision Landing Development Kit will be made available soon. The controls code will be provided so you can easily integrate the system into your UAS (based on ArduCopter 3.2.1). Preliminary details are here: 

http://precisionlanding.irlock.com/?page_id=4310

Please do not hesitate to ask questions. We definitely appreciate the support and feedback from the DIYDRONES community. 

Best,

Thomas

Read more…

APM Planner 2.0.17 (Stable Release)

3689644630?profile=original

What happened to 2.0.16? I messed up, and that release got lost… but no worries we’re back with 2.0.17!

There have been a multitude of changes and improvements from 2.0.15, one of the big ones being Graphing.

Graphing Changes:

Loading of TLogs directly instead of having to replay them to view graphs
Added ERR,EV,MODE graphing
Loaded Graphs can now filter by message types
Graphs are now loaded in their own window, allowing multiple graphs to be open at once.
Loaded graph logs can now be exported as KML

Mission Changes:

WPNAV_RADIUS now correctly works.
Waypoints now have a default altitude and radius
Added support for Continue and Change Altitude waypoitns
Preflight Calibration Dialog in the Actions Widget

Serial Comms:

Updated mavlink to a new version as of 12/15/2014
Pulling the USB cable while connected is handled more gracefully

Misc:

Misc stylesheet improvements to make AP2 look better in both indoor and outdoor modes.
Addition of RC Transmitter 1/2/3/4 modes to Radio Calibration view

And a *whole* lot more.

As always, prebuild binaries are available on ardupilot.com's download page, and please discuss issues or feature requests on the Ardupilot forums for APM Planner 2.0

Read more…

3689644609?profile=original

The Naval Oceanographic Office (NAVO) has spent 16 years developing the Pure File Magic Area Based Editor (PFMABE) software suite to edit the huge volumes of lidar and sonar data they collect every year. In accordance with 17 USC 105, copyright protection is not available to any work of the US government. Originally developed to run on RedHat OS with network distributed storage, it has been migrated to Windows 7. This software, and accompanying source code (Win & Linux), has been released to the public domain at pfmabe.software, free for download with registration.

The Area Based Editor is a software tool that enables visualization and editing of hydrographic, bathymetric, and/or topographic data and simultaneous display of imagery data either as an over/underlay or in a separate viewer.   

Visit here. 

http://shoals.sam.usace.army.mil/PFMABE.aspx

Torent File

magnet:?xt=urn:btih:0f76f9cb970aaa105843230c556cda28b7418369&dn=PFMABE&tr=udp%3A%2F%2Fopen.demonii.com%3A1337&tr=udp%3A%2F%2Ftracker.coppersurfer.tk%3A6969&tr=udp%3A%2F%2Ftracker.leechers-paradise.org%3A6969

Read more…
3D Robotics

3689644546?profile=original

We've been using optical flow boards for a long time, and you'll soon see it become standard equipment on 3DR gear, but that's just for simple functions such as "station-keeping" without GPS and improved landing and terrain following. But this can go a lot further, into full navigation, the way bees and other insects use it. The Economist writes on the latest research on bio-inspired drone guidance. Excerpt:

The computer, whether terrestrial or airborne, extracts from the incoming images features salient to optic flow. In particular, it identifies objects’ edges and tracks them from frame to frame. This way, it can work out how quickly the drone is approaching something and, if a collision is likely, how the drone’s path needs to shift to avert it. It then uses this information to change the pitch of the rotors.

That sounds easy in principle, but collision-avoidance, especially when what is to be avoided is moving as well, requires good manoeuvring skills. This is where the flies and the moths come in. Adjusted for size, blowflies are better at manoeuvring than any fighter aircraft yet built. Hawk moths are superb at hovering. Both insects use the same method: they combine vision with an inertial guidance system.

Inertial guidance relies on measuring the position of something that, because of its inertia, resists following the object it is part of. Man-made systems use gyroscopes. Moths use their antennae. Flies use a pair of tiny organs called halteres that have evolved from the animals’ hind wings and are shaped like balls on sticks.

Several groups of researchers are looking into insect inertial guidance. Those studying blowflies are based in London. Those studying moths are based in Baltimore. The London group, led by Holger Krapp of Imperial College, has used micro-electrodes to follow the insects’ nerve impulses, and high-speed photography and computed tomography (an advanced form of X-raying) to follow the movements of their external body parts and their muscles. That, with the addition of a bit of computer modelling, has shown them how dipteran inertial guidance works.

Flies do it using input from hundreds—possibly thousands—of sensors. These are the elements of their compound eyes, and also the many cells at the bases of their halteres. The signals from these, it turns out, do not have to pass through the brain to be processed. Instead, they act as a series of reflexes controlling the insect’s speed, attitude and heading directly. That is the opposite of most approaches to engineering drone avionics. But it suggests that true drone manoeuvrability might be better created without trying to imitate the functions of a brain. Dr Krapp’s colleague Mirko Kovac is now attempting to do this.

One way manoeuvrability might be engineered into a drone’s airframe is shown by the work on hawk moths. These insects, when hovering over flowers to drink nectar from them, employ a similar control system to flies—though in this case information from their antennae substitutes for that which flies get from their halteres. Hawk moths are being studied independently by two groups at Johns Hopkins University—one led by Rajat Mittal and the other by Noah Cowan. They have found that the moths hold their heads and thoraxes steady with respect to a flower by making minute changes to the orientation of their abdomens.

Dr Cowan, indeed, has gone further than mere analysis. He has used knowledge garnered about how moths hover to fit a drone with the equivalent of an abdomen. The drone’s battery pack hangs beneath it, and is fitted with servo motors that adjust its position in the way that a moth moves its abdomen. That stabilises the drone in mid air.

At Harvard, meanwhile, Robert Wood has taken a different approach to the problem of hovering. Though referred to as microdrones, quadcopters and their kin are usually tens of centimetres across. Dr Wood’s drones really are micro. They measure 3cm from wingtip to wingtip. Moreover, their wings flap like those of real insects, rather than rotating.

Dr Wood has built simple eyes into his drones, and these act like occelli, which are small eye spots that insects use to take bearings on the sun or the moon, so that they can fly at a constant angle to these distant light sources and thus maintain a straight course. (Confusion of the ocelli is thought to be the reason moths circle bright artificial lights at night.)

Dr Wood’s artificial eyes are pyramid-shaped and have a photosensor on each face. They are thus able, like real ocelli, to track the sun. Dr Wood has not yet translated that ability into an on-board navigation system, but it should not be too hard to do so—so long, of course, as his drones do not come across any candles.

Read more…

3689644567?profile=original

The above picture was done with Skycatch online processing.

With the different cloud processing out there for maps I have tried several of them with different results and wanted to write what I have experienced. I ran a data set through mapsmadeeasy.com with and without GCPs.  I have had great success with dronemapper, dronedeploy, without GCPs. When I ran the same set of photos through mapsmadeeasy.com without GCPs the whole map was offset. At first it didnt bother me because I wasnt using them for surveying (just a complete aerial overview) but the more I thought about it I started to question why the offset. Eample map without GCPs Why did the data set work on the other programs but not theirs? I had flown the flight with GCPs  so I decided to go back and run it again and this time input the GCP data. I had 5 GCPs during this flight. This time the results were very different. Same map with GCPs

Same data set ran through Skycatch's online processing with GCPs Tylertown-road with GCPs.pdf notice the difference.

From my experience with cloud based processing

If you don't need to share a example map online and just need the basic files dronemapper comes in at the top for accuracy without a subscription (pay as you go) 

Ease of use Dronedeploy comes in as number one but it adds extra hardware to the UAV and it has a monthly fee. with that fee you get excellent results without GCPs but still have the option to use them. You also have the availability to share example maps to potential customers online. 

For mapsmadeeasy it comes in in between the two for ease of use. You can pay as you go small maps are free and you have a lot more options for file outputs. If you are wanting it to look professional be sure to process it with GCPs and have at least 5 to reference.

http://www.wingsoftech.com/

Read more…

3689644091?profile=original

One of Workswell parners developed gimbal for Thermal Vision Pro system, which is compatible with several type of drone. The gimbal has its own electronics and is ready to be mounted without any further preparation and settings. It comes completelyready and prepared to be used with the remote control for the gimbal (two manoperations). There is a possibility to implement one man operation as well.


3689644487?profile=original

The gimbal can be used with LIPO 4S battery, however it is recommended to use the power from the main batteries of the drone up to LIPO S6 (batteries up to 12S can be implemented, please advise with Workswell). Gimbal has its own power convertor set up to support the gimbal and Thermal Vision system without the danger of overvoltage.


3689644412?profile=original

You know how useful is drone with camera. But imagine how more useful is drone with both: camera and thermal camera! We are a sixth sense for your drone.


Feel free to follow us on Twitter.

Learn more about our thermal imaging system.

Read more…

3689644455?profile=original

As reported by Bard College's Center for the Study of the Drone: 

"On Thursday March 19, the Smithsonian’s National Air and Space Museum, home to such iconic aircraft as the Enola Gay, the Spirit of St. Louis, the SR-71 Blackbird (which travelled from Los Angeles to its final home in D.C. in 1 hour, 4 minutes, and 20 seconds), and the Space Shuttle Discovery, took delivery of something much, much smaller: a DJI Phantom I quadcopter drone. And not just any Phantom, to be sure. It was our Phantom I. That is, it was owned and operated by the Center for the Study of the Drone for its educational programs at Bard College. Though only a fraction of the size of most of the famous aircraft at the NASM, the Phantom I represents a moment in aviation history that is, by some measures, no less significant."

Full article here.

Read more…

3689644366?profile=original

From an account on Twitter we found a post about a fire on a plane because of a drone! Wait, what? So it appears a DJI Inspire 1 caught fire in the overhead compartment, we do not know the cause of the fire but looks like a moderate one. Glad it happened on the ground and not the air! The attendants quickly put out the fire and removed the craft and its owner!

10995945_10153118894707770_4389235578055884414_n-1.jpg

11054342_10153118894787770_7621444729946267077_n.jpg

source:

http://dronefriend.com/2015/03/16/dji-inspire-1-catches-fire-on-passanger-plane/#

Read more…

DIY RC Controller

SAM_0002_zps81fmqong.jpg

Hi all,


This past winter I built a new machine for doing more professional aerial photography. I got a 3 axis gimbal for my Sony NEX 5. I decided that to take full advantage of the gimbal, a second operator would be beneficial. My main RC transmitter, a DX7S, lacks the channels, and programmability to control all of the gimbal functions the way I wanted.


Instead of buying another cheap transmitter for gimbal duty, I decided to make one. This would give me the ultimate in flexability.


Reasoning behind the project:

1. My DX7 is out of channels to support flying, gimbal and camera shutter duty.

2. I want a second person to have their own transmitter. I want to fly, and I want them to operate the gimbal and camera. I have the NEX5 HDMI to analog converter, so I can switch between sony view and a frame mounted camera for FPV. I plan on adding a second FPV system so we can both watch our feeds seperately.

3. The IR shutter control I am using for the sony requires that video stop / start be tied to a momentary switch. Building my own controller and doing the code myself, I can make sure this is implimented properly and fires the shutter properly.

4. I want to be able to hand my gimbal controller to anyone and explain how it works in 30 seconds. To the complete noob, handing them a fancy RC transmitter with switches and knobs all over it can be intimidating. I can make my own stream lined controller that is very simple.

5. I want an all in 1 solution. I planned to include 915 mhz telemetry with bluetooth bridge to my smart phone in the case. I also wanted to have my phone mount to it. I hate carrying around all these seperate little gadgets.


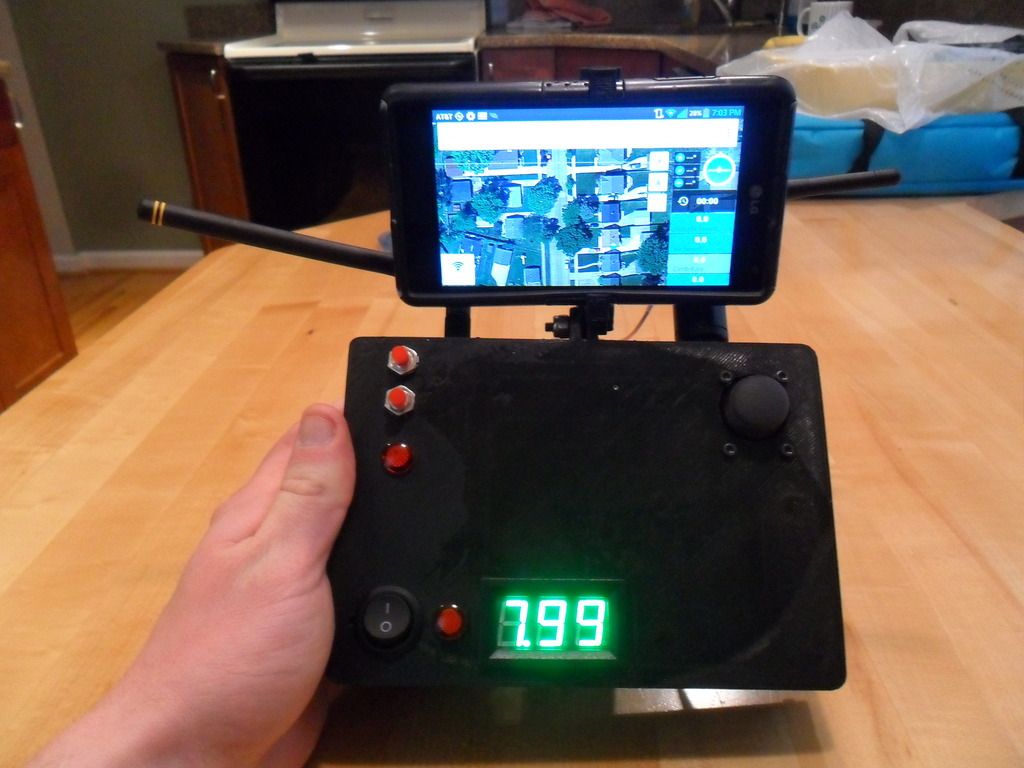
Here is my first pass at it. I still have work to do on the code to get it working. An arduino Uno formats the PPM signals to the Spektrum module. All is powered from a 2S lipo.


CAM00568_zpszi0flg2j.jpg

Not the prettiest inside, but it works. I used a multirotor power distribution board incase I add functions later and need to supply them power. It also had 12V and 5V regulators built in, which come in handy.


CAM00563_zps6fkqgfb5.jpg

Read more…
3D Robotics

A very interesting proof of concept on the integration of Pixhawk-powered drones with the Hollywood-standard Maya software. This point is to both integrate real drone video with CG and ultimately export Maya camera paths as drone waypoint missions, as shown in the PaperDrone project. From the post:

Joe Lewis, Isaac Partouche and Jon Farhat demonstrate single camera optical tracking with a freely operated quad-rotor. No tracking markers, lights or encoders. In this test, none of the position and angular data from the craft was used. Further tests will show how we can write the SolidTrack data back to the Autopilot, a Pixhawk in this case, providing feedback for centimeter-level positional accuracy and a twentieth of a degree rotational resolution! All from a single video camera! Stay tuned…

Read more…

DIY blimp crowdfunding

3689644293?profile=original

Hello DIY enthusiasts!

Andreas Burkart and his team "Windreiter" are starting a crowdfunding campaign for a DIY blimp, the silent_runner. I flew one myself some time ago and it was really a lot of fun. Being a blimp this aircraft is inherently safe. It is simply not able to crash on the ground and break anything. And with a Mobius camera fixed underneath you suddenly get 1 h of in flight video recording!

At the moment the campaign is in its starting phase, in which they have to build a fan base of at least 50 fans in order to start the funding. Please support them by clicking on "Fan werden" (become fan). It will not cost you anything!

silent_runner on startnext

Unfortunately the video below is in German as the crowdfunding platform startnext is from Germany. However they are also shipping international and if you have any questions, I will be happy to answer.

silent_runner video

Read more…

3689644026?profile=original

Taking the images
To take the images for your own map, you`re going to need a copter compatible with UgCS and a camera. If the copter is equipped with a camera trigger, it can be triggered through UgCS, if not, the camera needs to be set to take an image every few seconds.

UgCS can be downloaded at www.ugcs.com


We used 3DR Iris+ equipped with a GoPro Hero 3 camera. The GoPro was set to take a picture every 2 seconds. The camera was pointing downwards at a 90 degree angle.


1)    Create a mission in UgCS with a few waypoints. We created a mission with 5 waypoints at an altitude of 30 m. Each waypoint has a wait action for 15 seconds to allow the camera to take a picture. Also, since the camera is taking a picture every 2 seconds, multiple pictures at the same location help you to better understand which images are taken at which waypoints.
3689644062?profile=originalPlease note that each waypoint has coordinates in the form of 55.1234567 and 22.1234567. Unless your camera is equipped with the function of geotagging images, please take note of the coordinates for each of the waypoint images, they are later going to be used during processing.


2)    Press Calculate route button and upload the route to the vehicle and let it fly the route with the camera taking images


3)    Upload the images into your computer, look through them and find which images were taken at which waypoints. In the end after deleting unnecessary images and we had 5 waypoints our image folder looked like this:

3689643997?profile=original
Please note that the step 3 can be made a lot easier if the copter is equipped with a camera trigger. Camera Trigger action can simply be added to each waypoint in UgCS and thus each image automatically is taken at each waypoint and scripts used to combine coordinates from telemetry with pictures.


Processing the images
To combine the images into a single image we are going to use Pix4D software.
Please note that Pro account is needed to export the finished project from Pix4D. You can either buy the Pro license, rent it or use a Pro trial version for now.

Sign up and download Pix4D from www.pix4d.com

After downloading, install it on your computer and open it.
1)    The following screen will appear

3689644047?profile=original
2)    Click New Project, enter a name for your project (in our case it is going to be called Spilve) and click Next.


3)    In the next screen add the images you have taken previously and click Next


4)    In the next screen you are going to have to add the GPS coordinates and the altitude at which the image was taken to each of the images. In the example below the coordinates and altitude have been added to the first waypoint out of five. You need to add them to at least 3 waypoints, but preferably add to all.

3689644116?profile=original5)    Click Next and click Finish. That should take you to following screen:

3689644141?profile=original6)    Now go to Process --> Options --> DSM and Orthomosaic tab
In this tab make sure that Google Maps Tiles and KML and Mapbox Tiles are checked. After that click Ok and the Options window will close.

3689644171?profile=original7)    In the bottom of the screen click the Start button to start processing the images. This might take some time depending on number of images. After it is done a Quality Report window will open. You can take a look at the results and close it. The main screen in Pix4D should now look like this3689644216?profile=original

Uploading the project to Mapbox
Right now our project file is stored locally in our computer. We are going to upload it using a service called Mapbox to access it in UgCS.
1)    Go to www.mapbox.com and sign up
2)    After signing up, open up Pix4D and go to Process-->Mapbox-->Upload
3)    A browser window will appear asking you to log into Mapbox. Enter your credentials and the upload will start.
Please note that Mapbox free account is limited to 100MB.
4)    After the upload has finished, go to www.mapbox.com  
5)    From the menu, click Projects3689644192?profile=original6)    Click New Project
Under Style choose Transparent
Click Data
Click Menu
Click Layers3689644076?profile=original7)    Click Add layers3689644229?profile=original8)    On the Add layers window that opens, click the layer that is generated by Pix4Dmapper and it is already uploaded under the layers.

9)    Close the Add layers window.

10)    The layer has been added. Click on it to see the map.3689644201?profile=original11)    Click Save to save your project
 
12)    Click Project

13)    Find and copy the Share link. Copy it to a notepad or similar text editor, where you can edit the link.
The link should look something like this:
https://a.tiles.mapbox.com/v4/ugcs.la43c7jo/page.html?access_token=pk.eyJ1IjoidWdjcyIsImEiOiJSVVlod2k4In0.hQpshSVvhrlQ87gYyJzhOw#17/56.97785/24.07378
The link needs to be adjusted to work with UgCS. Replace https with http and /page.html with .json
The finished link should look something like this:
http://a.tiles.mapbox.com/v4/ugcs.la43c7jo.json?access_token=pk.eyJ1IjoidWdjcyIsImEiOiJSVVlod2k4In0.hQpshSVvhrlQ87gYyJzhOw#17/56.97785/24.07378
 

Adding the map to UgCS
Now lets add a map overlay from the project we created in Mapbox to UgCS.
1)    Open UgCS Client
2)    Go to Menu-->Configuration-->Map providers-->Add
3)    Enter a Name for the map provider, it can be any name you like, we are going to call it Mapbox layer
4)    In Type select MB tileJSON
5)    In URL enter the link you created in the previous section. In our case it is:
http://a.tiles.mapbox.com/v4/ugcs.la43c7jo.json?access_token=pk.eyJ1IjoidWdjcyIsImEiOiJSVVlod2k4In0.hQpshSVvhrlQ87gYyJzhOw#17/56.97785/24.07378
6)     Click Save

3689644240?profile=original7)    Exit the menu and go to UgCS map
 
8)    In the right upper side of the screen click the button to see the dropdown menu for overlay map tile providers and select the one you just created3689644268?profile=original9)    The end result should look like this:3689644026?profile=original


Congratulations, you have now successfully added a Mapbox overlay created by you to UgCS!

Read more…
Moderator

Loan-Drone-Prototype-3.jpg?width=400

Stealing a march on Amazon, Lending Club is testing cash delivery via drone.

"The Loan Drone would provide two things that borrowers love: speed and cold hard cash. While getting a transfer into your bank account is nice, getting a wad of $100 bills delivered to your doorstep in less than 60 minutes is very compelling."


Observant readers may recognize Long time DIY Drones member Andreas Oesterer's handiwork involved!

http://www.lendacademy.com/lending-club-testing-loan-drones

Read more…