All Posts (11086)

Sort by
Distributor

3689599003?profile=original


Hey guys and girls, I was approached by Numan Films to see if there was interest in participating in a new TV/Internet show around drones... 


Check out the casting call below and get in touch with them directly. I really think it could be fun! 
Full disclaimer they approached me and as of now I have no affiliation with them, just helping them out to get some visibility as they are Canadian.   But I may submit an entry to be a judge or technical person on the show... would be nice!  

Nüman Films is an award-winning production film and television company.

CASTING CALL:

Drone Enthusiasts

Are you passionate about building and flying drones?

Do you have skills that other pilots would envy?

Do you wish you were on TV?

Then we’re looking for you!

We’re casting for a TV series in development and we’re looking for drone

hobbyists between the ages of 18 and 45.

If you’re chosen for the series, your costs will be covered. Drones will be

built. Dogfights will ensue. Battles will be hard-won. Rewards will be earned.

Please send a short video to introduce yourself and tell us why you love

DRONES to dronescasting@gmail.com.

Read more…

My article on Humanitarian Drones/UAV's:

Dai partnerzone
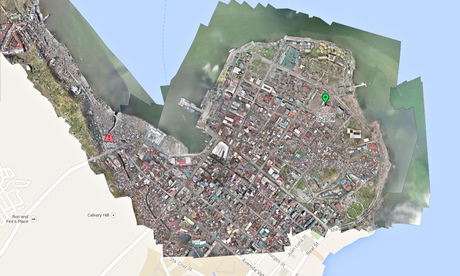
Lawmakers need to ensure their new regulations do not run counter to the humanitarian imperative. Photograph: CorePhil/DSI

Unmanned aerial vehicles (UAVs) capture images faster, cheaper, and at a far higher resolution than satellite imagery. And as John DeRiggi speculates in "Drones for Development?" these attributes will likely lead to a host of applications in development work. In the humanitarian field that future is already upon us — so we need to take a rights-based approach to advance the discussion, improve coordination of UAV flights, and to promote regulation that will ensure safety while supporting innovation.

Read more

Read more…

Community Drones In Borneo

3689598857?profile=originalDear all,

We would like to report our progress in using drones (what we call "community drones") to support community mapping (customary forest etc.) and community struggle for their land. As some of you have probably heard or been informed that rapid land use change has been happening in Borneo due to various large scale activities [i.e. oil palm plantations, mining and logging]. These activities has partly been the driving forces of deforestation which is happening in Indonesia. However, deforestation is not the only "problem" we are tackling and interested at solving. One of the fundamental problems is the dispossession of local community members (indigenous people if you like) from their land without their consent. 

The above picture is developed from around 80 pictures taken by Canon SX 260 HS, stitched with Microsoft ICE. This picture shows the dried lake [it was still a lake some 3 years ago] turned into oil palm plantation which has caused severe environmental degradation [lost of fishing ground, dried peatland thus more green house gasses emission and social problems]. With the above picture, we are going to support the community members to have their land back and to obtain back their rights to manage their land. The tricopter was able to fly for about 18 minutes [from take off to landing] at the altitude of 250 meters above the ground. We use the 1000 kv brushless motor with 10x5 propellers and 5,000 mAh 3S battery and 30 Amp. ESC. We use APM 2.6 and arducopter as flight controller and Mission Planner at the ground station. With this configuration, we are able to map around 30 Hectares of an area. 

We just finish building another Tricopter with 360 kv brushless motor with 17" propellers and have it tested today bringing Canon S100 camera with 5000 mAh, 4S lipo battery and 18 Amp. ESCs. We are able to fly for 38 minutes. We hope to do mapping customary forest in Papua by tomorrow and expecting larger area coverage.Hope this is useful for some of you and we are looking forward to some inputs and exchange of experiences as well as to learn from you all.

Thanks and best regards,

Community Drones Team


Read more…

signal.png

Very cool project using RasPi as a transmitter for controlling RC toys.  The dev employed an impressive brute-force method [script + webcam] to identify command codes.

From HackADay:  

An interesting trick you can do with a a fast CPU and a GPIO pin mapped directly to memory is an FM transmitter. Just toggle a pin on and off fast enough, and you have a crude and kludgy transmitter. [Brandon] saw a few builds that turned a Raspberry Pi into an FM radio transmitter and realized a lot of toy remote control cars use a frequency in the same range a Pi can transmit at. It’s not much of a leap to realize the Pi can control these remote control cars using only a length of wire attached to a GPIO pin.

The original hack that turned a Pi GPIO pin into an FM transmitter mapped a GPIO pin to memory, cycled through that memory at about 100 MHz, and added a fractional divider to slightly adjust the frequency, turning it into an FM transmitter. Cheap RC cars usually listen for radio signals at 27 and 49 MHz. It doesn’t take much to realize commanding RC cars with a Pi is possible.

The only problem with this idea is that most RC cars use pulse modulation. For an RC transmitter to send the command for ‘forward’, a synchronization pulse is sent, then a series of pulses and pauses. The frequency doesn’t change at all, something the originally FM code doesn’t do. [Brandon] realized that if he just moved the frequency up to something the RC car wasn’t listening to, that would register as a zero.

All that was left was to figure out the command codes for his RC truck. For this, [Brandon] decided brute force would be the best option. Armed with a script and a webcam, he cycled through all possible combinations until the webcam detected a moving truck. Subtlety brilliant, if you ask us. Of course more complex commands required an oscilloscope, but now [Brandon] has a git full of all the code to control a cheap RC car with a Pi.

Read more…
3D Robotics

3689598929?profile=originalFrom The Rappler, a Phillipines news source. [UPDATE: Matthew Cua, one of the team members, reports in the comments that the team has been released and is now safe: 

This report is true, and I am the team leader who's team got captured, I was off site when it happened

Anyway, we are safe and in good spirits. No one was injured except our drones :( ....

We were there to take photos of newly planted trees by the Department of Environment and Natural Resources of the Philippines. When we explained what we are doing, and showed them what we took , they released us. 

If the US weren't using drones for war , us researchers won't be placed in the line of fire :( . But we cleared things out and with coordination with everyone we will continue to fly to monitor the newly planted trees for the reformation of forests in the Philippines .

Right now our guys are resting and will be continuing our environmental work in the other parts of the Philippines.]

From the press report:

DAVAO CITY, Philippines – For violating revolutionary policies against surveillance, 4 private contractors and their driver were seized by New People’s Army (NPA) guerrillas in Compostela Valley on Friday, May 30, a communist leader said.

The captives, identified as Ken Wong, Chrisandro Favela, Tim Sabino, Nico Lasaca, and driver Jonas Loredo, were nabbed in Barangay New Leyte, Maco, at around 2 in the afternoon while allegedly operating drones in the area.

NPA Comval Davao Gulf Sub Regional Command spokesperson Daniel Ibarra said their initial investigation shows that the Sky Eye UAV was hired by the Department of Environment and Natural Resources for its so-called greening program.

Experts consider drones as standard mapping equipment.

“The 4 personnel were conducting mapping thru aerial surveillance using drones that have high definition cameras and videos. The company’s owners are Matt Cua and Carlos Ezekiel. They started last year and have already visited Bislig, Kapalong, Monkayo, Montevista, Polomolok, Tacloban, Panay, and Aparri areas,” Ibarra said.

“In culpable violation of the policy of the People’s Democratic Government for bringing in of surveillance gadgets, for undertaking reconnaissance of base guerrillas of the New People’s Army and, thus, abetting the enemy’s counter-revolutionary campaign against the revolutionary forces and environmental plunder, the NPA ComVal Davao Gulf Subregional Command detained 4 personnel belonging to the Sky Eye UAV services,” Ibarra added.

Ibarra said confiscated from the captives were surveillance equipment including one sky surfer drone, two multi-rotor drones, two laptops, and one GPS.

The NPA said the “anti-logging aerial reconnaissance” is just a ploy to intensify the operations of large-scale and foreign mining corporations and to step up intelligence operations against the revolutionary movement in Mindanao.

“The motives of Sky Eye’s reconnaissance are suspicious, considering that Maco is not a hotspot for logging as its forests are largely denuded and its mountains mainly mineral-rich. It would appear that Sky Eye is mainly protecting, if not linked towards the big mining operations in Maco and mountain boundaries of Pantukan and Mabini, areas under the control of foreign large scale mining concessionaires Apex Mining and St Augustine Mining Corp,” Ibarra said.

Ibarra said the NPA has a strict policy against the use of drones as this may be used both for surveillance and attacks.

“The UAVs are not only surveillance gadgets but are also weapons for aerial attacks and strikes, designed and used by US imperialism. Most well-known among drones is the Predator and the Reaper, which have carried out assassinations and massacres in the Middle East, Asia and North Africa. Thousands of civilians have been killed by these drone air strikes.,” Ibarra said.

Ibarra shared that this is not the first time that drones flew in the skies of Mindanao.

“In May 2008, 4 US soldiers manned a tactical command post of the 1003rd Brigade of the AFP in Barangay Ngan, Compostela, Compostela Valley, as the AFP launched a 10th ID-wide military operation. The US troops were spotted operating a UAV. Similar-looking gadgets were found in Paquibato and Marilog districts in Davao City last year,” Ibarra accused.

Despite the alleged violations of the contractors, Ibarra said the NPA will release them but with a condition.

“The NPA will release the captive drone personnel on condition that the Sky Eye will stop its surveillance and intelligence activities in the areas of People’s Democratic Government. The NPA, likewise, urges civilian entities to desist from pursuing defense of large-scale mining and environmental plunder, and to cease performing counter-revolutionary intelligence activities against the revolutionary movement,” Ibarra said.
Read more…

3689598776?profile=original

Propellers are to a multirotor what tyres are to a car - a key component. Because of this, it pays to get good quality props especially for those who are into aerial video.

That being said, you can't beat carbon fiber props for rigidity, and you can't beat RCTimer propellers for price.

Prop balancing may sound like a simple exercise, however there is a bit of technique involved if you want to ensure a reliable result.

Below details my experiences and lessons learned while balancing and finishing 8 x 12x4.7" carbon fiber propellers.

Here is a picture to help understand terms used below...

3689598701?profile=original

Things you need:

  1. Propellers
  2. A prop balancer
  3. Metal sand paper: 500, 800 and 1000 grit.
  4. Pure Beeswax
  5. Lint free cloth (an old t-shirt works)
  6. Rubber gloves

Safety:

Carbon fiber dust is dangerous and does not break down inside of your body! Take all prautions! Also, the blades can be sharp so please be very careful at all times, not just when they are spinning. 

Things to be aware of:

  • The first thought I had of sanding I my new carbon fiber props was painful. I thought I would ruin the prop completely! However after much research I saw that many professionals were using the sanding method. Sanding is a much more permanent, simple and effective method than using tape or dealing with clear spray paints... so lets get that mental block out of the way!

  • Get a balanced prop balancer, as silly as this may sound there is nothing more frustrating then using an unbalanced prop balancer. A brand I hear recommended more often than most is the DuBro balancer.

  • Check your propellers 'track'. That means checking whether your prop tips follow the same path while they are spinning. You can do this by marking here the blade as it spins and seeing how close the other blade is to that mark. Ideally the two blades should pass at exactly the same mark.

  • Don't bother being a perfectionist. Absolute balance is not critical because static props (such as are used on multirotors) no matter how balanced, all suffer from vibrations in forward flight. That includes maintaining a hover in the wind, perfect balance and near perfect balance will make negligible difference.

Step one:

Take a carbon fiber prop and put it into your balancer of choice. Note the direction that the prop tends toward. The heavy side needs sanding... our aim is to get the prop sitting horizontal.

Note that the faster the prop falls the more it needs to be sanded.

Step two:

Using your roughest grit metal sand paper, sand either the front or back of the blade toward the tip. Taking off material here will have a better effect than near the hub.

Step Three:

Put the blade back on the balancer and see if there has been any improvement.

Step Four:

Depending on how much material needs to be removed, work your way up the grits until you finish at 1000 grit. At this point your props should be perfectly horizontal.

Step Five:

Time to balance the hubs... hold your prop vertical and note which side of the hub the prop falls toward.

There are two ways you can balance the hub...

  1. By adding some weight to the light side of the hub using glue.
  2. By sanding the trailing or leading edges of your prop until a balance is achieved.

Please note when using method two not to change the airfoil too much. You can do this by sanding with the shape of the blade edge.

Step Six:

Wash off any carbon dust from your props under a running tap.

Step Seven:

Take your balanced props and rub beeswax over the entire surface area. Using a lint free cloth, polish the prop to a mirror finish. It may take some effort to get the wax moving under the cloth.

Here is a before shot:

3689598812?profile=original

And After:

3689598913?profile=original

If you have any tips of your own please share them below!

Jethro Hazelhurst.

Read more…

Tricopter Airplane - (VTOL) Kickstarter

3689598725?profile=original

It's about that time to do another Kickstarter project. With your help, I'd like to find out how well this aircraft will perform. In return, you will get info on how to build your own version depending on the reward level you choose. This is a hybrid of a tricopter and flying wing. Its a built up structure made from mainly Dollar Tree foam. The idea is to have all three motor tilt up for hover takeoff and landings and have them point horizontally for forward flight.

Idea of how the vertical takeoff and landing will work...

This airframe has already completed forward flight tests. The following video is of its maiden flight...

If you would like to see this project funded and have your own info on how this aircraft is built, you can following the below Kickstarter link. Thanks for checking it out.

https://www.kickstarter.com/projects/284642627/tricopter-airplane-diy-info

Read more…

The announcement was made in Montreal where they debuted a zero-emissions electric deomonstration car powered by the aluminum-air battery at the Circuit Gilles-Villeneuve ahead of the Canadian Grand Prix.

MONTREAL— Alcoa Ltd. and Israeli firm Phinergy are working together to commercialize an aluminum-air battery they claim can extend the range of an electric vehicle by about 1,600 kilometres.

According to Phinergy, the aluminum-air battery technology can also be applied to stationary applications like generators, and defence applications like mobile housing and unmanned vehicles.

Link

Read more…
Moderator

Dear Friends,

02 / 06 / 2014 

After one month of work the stable firmware for VRBrain micro is ready . We fly a lot in manual and automatic , we are preparing a video and specific blog post about VRX250 the drone platform using for doing test on VRBrain micro  5 all work fine and we are happy to have a good revision of code for user that join us in pre order campaign . We start to deliver first batch of boards in 2 weeks . The good news is that now is possible to upload the firmware to VR Brain micro 5 using standard Mission Planner application. Thanks to Michael and all VR Lab team for doing a good Job around this task.

09 / 05 / 2014

today we finish to test first prototype of micro brain , this is the video of first power on , all work fine , we check all onboard sensor : IMU , BAROMETER  . Check eeprom for parameter storage and SD card. Serial port , and usb interface . All work fine :) Check also new bootloader and our mission planner fork with VRBrain support all work perfect . Diego our Electronic Designer doing a great work no error until now :)

Finish the test of all subsystem : Magnetomer , GPS , RC IN PPMSUM and RC OUT and all work fine . See the video .

These are the specification : 

CPU STM32F4 VR OS based on NuttX kernel 7.1 

1 EEPROM or FRAM device for parameter storage. 

IMU MPU6000 SPI.

MSIC Barometer 10 cm resolution.  

8 PPM Radio RC Input .

8 PWM ESC - SERVO Output.

1 SBUS Radio Input compatible with Futaba SBUS and Spektrum ,too

1 SBUS Servo Output.

SD Card Reader until 64 Gbyte.

1 RGB LED 

2 LED Output 

1 Buzzer Output 

On board telemetry module availabe at 433 / 868 mhz. (option) 

connector for external 3DR/VR GPS + MAGNETOMETER

dimension : 3.2 x 3.2 .

weight : 10 gr

3689592857?profile=original

Price is 99 euro the board pre order is open the mass production start in 1 week when finish the test of first production batch .

more info about status of the product  on the store: http://www.virtualrobotix.it/index.php/en/shop/autopilot/vrbrainmicro51-detail

APM Copter , Plane , Rover Firmware available and fully tested by our devteam.

official blog post : http://www.virtualrobotix.com/profiles/blogs/vr-micro-brain-5-1-is-alive-first-power-up-and-os-check-up-fantas

for more info send a mail to info@virtualrobotix.com

Best

Roberto 

Read more…

3689598752?profile=original

Press Release – FAA to Consider Exemptions for Commercial UAS Movie and TV Production

For Immediate Release

June 2, 2014
Contact: Les Dorr, Jr. or Alison Duquette 
Phone: (202) 267-3883

Seven Companies Petition to Fly Unmanned Aircraft before Rulemaking is Complete


WASHINGTON –The U.S. Department of Transportation’s Federal Aviation Administration today announced that seven aerial photo and video production companies have asked for regulatory exemptions that would allow the film and television industry to use unmanned aircraft systems (UAS) with FAA approval for the first time.  

If the exemption requests are granted, there could be tangible economic benefits as the agency begins to address the demand for commercial UAS operations. However, all the associated safety issues must be carefully considered to make sure any hazards are appropriately mitigated. The petitioner must still obtain operational approval from the FAA.

The Motion Picture Association of America facilitated the exemption requests on behalf of their membership. The firms that filed the petitions are all independent aerial cinematography professionals who collectively developed the exemption requests as a requirement to satisfy the safety and public interest concerns of the FAA, MPAA and the public at large.

The FAA has been working for several months to implement the provisions of Section 333 of the FAA Modernization and Reform Act of 2012 and move forward with UAS integration before proposing a small UAS rule. Companies from three industries besides film production have approached the FAA and are also considering filing exemption requests.  These industries include precision agriculture, power line and pipeline inspection, and oil and gas flare stack inspection.

The firms are asking the agency to grant exemptions from regulations that address general flight rules, pilot certificate requirements, manuals, maintenance and equipment mandates.  They are also asking for relief from airworthiness certification requirements as allowed under Section 333. Under that section of the law, certain airworthiness requirements can be waived to let specific UAS fly safely in narrowly-defined, controlled, low-risk situations.

To receive the exemptions, the firms must show that their UAS operations will not adversely affect safety, or provide at least an equal level of safety to the rules from which they seek the exemption.  They would also need to show why granting the exemption would be in the public interest. 

Currently, Certificates of Waiver or Authorization are available to public entities that want to fly a UAS in civil airspace. Common uses today include law enforcement, firefighting, border patrol, disaster relief, search and rescue, military training, and other government operational missions. Commercial operations are authorized on a case-by-case basis. A commercial flight requires a certified aircraft, a licensed pilot and operating approval. The exemption process under Section 333 provides an additional avenue for commercial UAS operations.

You can view the film & TV production company petitions at www.regulations.gov

For more information on the FAA and UAS, go to http://www.faa.gov/about/initiatives/uas/

Read more…

NAVIO Autopilot for Raspberry Pi is on Indiegogo!

Emlid team proudly announces the start of pre-order campaign for Navio - autopilot shield for Raspberry Pi. That means that you can get a Navio for yourself at a very attractive price. Please visit Navio page at Indiegogo and watch our video. If you would like to support our project, please help us spread information about Navio.

Navio features:

  • MPU9250 - 9DOF IMU
  • MS5611  - Baro
  • U-blox NEO7-M / NEO6-T - GPS 
  • PCA9685 - 13xPWM 
  • ADS1115  - 4xADC
  • PPM/S.Bus input
  • DF13 SPI, UART, I2C
  • RGB led 

Best regards,

Emlid team

emlid.com

Indiegogo Navio

Read more…
3D Robotics

3689598288?profile=original

There's a very interesting new research paper from Texas A&M, who studied public reactions to small UAVs after the university did a performance of Shakespeare's Midsummer's Night Dream with drones (an AirRobot AR-100 quadcopter and some little Blade RC helis) at the fairies.  Smithsonian Magazine reports:

Brittany A. Duncan, a doctoral candidate at the university, and her faculty adviser, a professor of computer science and engineering named Robin R. Murphy, were on the team providing technical support for the micro-helicopters and the AirRobot quadcopter-style drone that were used to represent Shakespeare’s fairies. In rehearsals, the actors tended to behave as if the AirRobot—roughly the diameter of a large pizza, with four exposed rotors—were as safe as the fist-size micro-helicopters. So Murphy urged them to think of the AirRobot as “the flying weedwacker of death.” But when audiences also displayed a high level of comfort, she began to wonder whether small drones “are just not scary to people.”
...

In a new study, Duncan and Murphy found that people don’t perceive some drones as invasive at all—which might be a problem, the researchers argue. The subjects’ heart rates failed to register anxiety even when an AirRobot approached just two feet away at roughly head height. That was surprising, because most previous experiments by other researchers showed that people tended to react to earthbound robots by maintaining a personal space of three feet or more, much as with another human. Also contrary to expectation, the test subjects were inclined not to treat the airspace under the drone as if it were occupied. Instead, they reacted as if the drone were roughly as threatening as Tinker Bell.

Why would people steer clear of a robot on the ground but let a flying contraption buzz their heads? Duncan speculates that most of the predators in our evolutionary past would have approached at ground level, not head height. Perhaps small drones bypass our usual defensive response because of a certain birdlike disconnect from terra firma.


Read more…

Zero-PIDs Tuner for Multirotors

This topic is about PID auto tuning algorithm that can tune your Quadcopter from PIDs ZERO as a start value.

Introduction

       Adjusting PIDs is a problem for many of Quadcopter’ pilots, it would be nice to get your quadcopter to adjust PIDs for itself. I made some investigation in this area, and found many complex algorithms that are related to Adaptive PIDs, and Fuzzy Logic. Although my background is engineering but I don’t like complex math when you can make simple solutions :)

        I started with multiwii version 2.3, I chose it because its code is not that complex, while it has many GUI tools and debug facilities to trace, and it has one of the largest community that can test and verify the results. Anyway I have developed a new mode that I called G_TUNE, which enables quadcopter to calculate flyable PIDs values for ACRO mode. i.e. PIDs for GYRO.

How to Use

       G_Tune mode starts by resetting all Gyro' PIDs for Roll, Pitch & Yaw to Zero’s.  Then pilot needs to takeoff !!  yes it will take off as the algorithm will start instantly to correct errors and update PIDs parameters accordingly. Pilot should try not to make aggressive maneuvers. That is because the error in multiwii is calculated as (RC_Stick - Gyroreading) as stick position acts as rotation speed target i.e. the target rpm, so moving stick suddenly generates false errors.

        The algorithm mainly works as our human eye. what you do is that if you find your quad tilt you give thrust to motor to adjust this tilt. 


      Below is the state machine for the new mode.

3689598273?profile=original

    1- As we can see from above state diagram, You need to disarm your quadcopter, then you switch to G_Tune mode. once you do that all PIDs will be Zero and you can test that by switch back to ACRO mode again and try to fly "be careful as you have no control because all PIDs are ZERO"

  2- You can then switch back to G_TUNE the arm your quadcopter. Try to fly carefully, do not make aggressive moves, your quadcopter should fly reasonably stable.

  3- Now switch to GYRO mode in AIR to stop updating the values. dont try to land first. 

  4- Now fly again in ACRO mode and this time it will fly. 

The algorithm was able to generate the following PIDs values for ACRO mode:

3689598162?profile=original


Both values in the two screen shots flythe quadcopter
3689598145?profile=original

Caution

 1- This is a test mode that I tested only on my quadcopter with Simonk ESC, 10x4.5 props and Turnigy 1100 KV. It should work on other configuration, but I have not try it myself.

 2- Moving ELE & ALE sticks just before changing from G_TUNE to ACRO mode could corrupt the values, so please try to fly as stable as possible and switch to ACRO while sticks are almost released for best results.

 3- Switching back from GYRO to G_Tune mode in AIR could be dangerous -however the correction is very fast and it normally works- because PIDs are reset to ZEROs in AIR.


Read more…

3689598052?profile=original

If you bought the cheap magnetomter module like HMC5883L you can not use it without calibration. Measurement of magnetic field will be subjected to distortion. There are two categories of these distortions: the hard iron distortions and the soft iron distortions. The hard iron errors refer to the presence of magnetic fields around the sensor (magnets, power supply wires) and are related to measurement offset errors, while the soft iron errors refer to the presence of ferromagnetic materials around the sensor, which skew the density of the Earth's magnetic field locally and are related to scaling offset errors. You can read more information about these distortions here.

In other words, to get the correct magnetometer data you should get the calibrated magnetometer data. One of the ways to resolve this problem: you should apply the bias to the vector of the non calibrated magnetometer data (X, Y, Z coordinates) and then multiply the transformation matrix by this resulting vector:

3689598033?profile=originalPicture 1

In this case the magnetometer calibration is the process of getting the transformation matrix and the bias. To get these data you can use the MagMaster program.

You can download MagMaster here.

Example of using the MagMaster

Hardware:

Software:

  • MagMaster (placed in MagMaster folder)
  • MagViewer (placed in MagMaster folder)

Firmware:

  • Arduino Sketch (placed in MagMaster folder)

3689598066?profile=originalPicture 2

3689598042?profile=originalPicture 3

3689598079?profile=originalPicture 4

Connect the magnetometer module to the arduino board via I2C bus (picture 4). Upload the arduino sketch to the arduino board (see "Arduino_Code" folder in the "MagMaster" folder). This arduino sketch requires the HMC5883L library, copy the folder "HMC5883L" (placed in "Arduino_Code" folder)  to the folder "C:\Program Files\Arduino\libraries".

Then run the MagViewer.exe, select the serial port of the arduino board (the boud rate of the seraial port should be 9600 bps) and click "Run MagViewer". Now you can see the coordinates of the magnetometer data vector in 3D space on a real time (picture 5, video 1, 2). These data are not calibrated yet.

3689597980?profile=originalPicture 5

Video 1

Video 2

If you see the points of the magnetometer vector coordinates in 3D space the arduino board and the PC connection works right.

Now close the MagViewer window and run the MagMaster.exe (picture 6). Select the serial port of the arduino board. The green strings X, Y, Z will indicates the coordinates of the magnetometer vector.

3689598100?profile=originalPicture 6

Place the magnetometer module as shown on the picture 8.1 and click "Point 0" button of the "Axis X+" groupbox. For the placement of the module you can use the wooden bar or the paper box (picture 7). If you can not connect your magnetometer device to PC then you can use any other way to get to know the magnetometer data. You can enter these data in the program manually.

3689598052?profile=originalPicture 7

Place the magnetometer as shown on the picture 8.2 and click "Point 180" button of the "Axis X+" groupbox and so on. You should do in the following way:

  • Picture 8.1: "Point 0", "Axis X+"
  • Picture 8.2: "Point 180", "Axis X+"
  • Picture 8.3: "Point 0", "Axis X-"
  • Picture 8.4: "Point 180", "Axis X-"
  • Picture 8.5: "Point 0", "Axis Y+"
  • Picture 8.6: "Point 180", "Axis Y+"
  • Picture 8.7: "Point 0", "Axis Y-"
  • Picture 8.8: "Point 180", "Axis Y-"
  • Picture 8.9: "Point 0", "Axis Z+"
  • Picture 8.10: "Point 180", "Axis Z+"
  • Picture 8.11: "Point 0", "Axis Z-"
  • Picture 8.12: "Point 180", "Axis Z-"

3689598213?profile=originalPicture 8

You should fill the table. After that click "Calculate Transformation Matrix and Bias" and get the required matrix and bias (picture 9).

3689598116?profile=originalPicture 9

The transformation matrix and the bias are got. Now you can calculate the calibrated magnetometer data in your device on a real time with using the matrix and the bias as shown on picture 1. The example of the arduino sketch of using this calculation you can find in the "Arduino_Test_Results" folder.

You can apply the sphere radius stabilization algorithm to your program (use for it the Arduino_Radius_Stabilization folder placed in MagMaster folder).

The calibrated magnetometer vector coordinates in 3D space with the radius stabilization shown on the picture 10 and video 3, 4.

3689598230?profile=originalPicture 10

Video 3

Video 4

Using of the arduino is only example, you can easy adopt the arduino code for any other system and use the MagMaster program with it.

Read more…

3689598376?profile=original

Nothing fabulous in today's update; I found myself troubleshooting a couple APMs that connect, but respond with the dreaded "Failed to Boot MPU6000 5 Times" error.

NOTICE:

6/3/2014 - Updated MPU6000, MS5611-01BA in above Diagram. Uploaded updated diagrams as promised.

In the course of this work, I found the APM_v252_Release schematic to be a bit counter-intuitive due to poor arrangement of the pinouts, particularly around the TXB0104 Level Translators. So I made updated schematic.pngs for the two TXB104s at the DataFlash and MPU/Pressure locations so that their pinouts reflect the actual layout of the IC being used; I've also made a complete schematic with those updates. I have not changed the circuit or attempted to resolve any design issues; I've only rearranged the appearance of the diagram.

When I used to do this for a living, it was a matter of pride to make sure your schematic reflected the pinout of the actual part being used; nowadays we just let the computer do all that. It doesn't care that the pinouts are out of sequence; it just tries to make the neatest diagram possible.

This makes it a lot easier for actual errors to slip past the vetting process; they aren't nearly so glaring when your brain is already trying to deal with a jumbled mess due to out-of-sequence pinouts.

So if you're troubleshooting failures in these areas, hopefully this will help... I may find myself attacking the other IC pinouts in those areas as well; if I do, I'll update here with those revised schematics.

Please feel free to double check my work against the original and let me know if you find any errors; a second set of eyeballs often catches something originally missed.

Peace!

mnem
*Revisionated*

APM_v252_MPU-Pressure%20%2B%20TXB0104.png

APM_v252_DataFlash%20%2B%20TXB0104.png

APM_v252_Updated_With_TXB0104_s.png

APM_v252_RELEASE.png

Updated Diagrams:

APM_v252_MPU-Pressure%20%2B%20TXB0104%20Rev2.jpg

APM_v252_Updated_With_TXB0104_s_%2B_MPU6000.png

Read more…
3D Robotics

3689597921?profile=original

From Engineering and Technology Magazine, a short piece on a cool project using APM 2.6 and a modified Skywalker X8:

A group of Loughborough University students have devised a ‘swarm’ system using smart unmanned aerial vehicles (UAVs) that could be the future for mountain search and rescue.

The 13 undergraduates were challenged to design and develop a UAV capable of finding a person in a search and rescue mission for a group project as part of their final year aeronautical MEng degree.

The swarm system uses up to ten UAVs operating together, flying at about 50-55 mph, to search an area of 12 square miles using GPS. Each has an infrared camera and they can ‘talk’ to each other. So as long as one is in range of base they can all communicate with the rescue team.

The students developed an image processing code that enables the cameras to detect human beings. However, due to the time constraints of a seven-month project, the images can only be downloaded and processed after the UAVs have returned to base.

The next stage is to do this in real time and the lecturers want a group in the next academic year to continue the work, developing a system which is potentially cheaper than using helicopters and quicker than rescuers on quad bikes.

Here's a bit more from the video description:

Undergraduates of Loughborough University have to do a Group Design Project as part of their final year Aeronautical MEng degree. This year, with the help of Simon Howroyd a PhD student at the University, one of the groups were challenged to design and develop a UAV capable of searching for a person, in a Search and Rescue (SAR) mission. The team known as "Overwatch" have heavily modified a Skywalker X8 and used APM2.6 to create a stable camera platform capable of flying search missions.The project goes beyond the typical hobbyist modelling approach and features heavy theoretical design and analysis including Computational Fluid Dynamics to assess the aerodynamics, backed up by wind tunnel testing. They have also done structural modelling to ensure a stiff structure in unforgiving weather conditions such as storms in mountainous areas which are hard to reach by rescuers en foot.It is relatively short project, only spanning around 7 months, with all the undergraduates having no prior knowledge of UAVs or RC aircraft, so the learning curve has been steep! Factor this alongside working with unusual materials in this field such as Styrofoam and expanded polyolefin (EPO) and you have a great project to vastly improve the employability of the students in industry after graduation.May 2014 sees the project come to a conclusion with a presentation and report due. Of particular interest the output of the system is a GPS location and photo of the person to be rescued. This is achieved by utilising a standard search pattern and onboard image processing of camera frames where Matlab code (recompiled as C code and uploaded onto a BeagleBone) makes decisions as to the probability of the subject being found in each frame.

Read more…
3D Robotics

3689597862?profile=originalPlanet Money, the fantastic NPR radio show/podcast, did a must-listen show called "Who Owns the Air" on the debate over who has jurisdiction over drones, and at what altitude. It sounds like the "floor" of the FAA jurisdiction is 83 feet, and perhaps even 500 feet. Excerpt from the text summary:

It's a question that goes back to the Middle Ages, to a Latin phrase that translates to "he owns the soil owns up to the heavens." In England, this phrase was the law of the land for centuries, and it worked well when disputes involved simple things like overhanging tree branches and lopsided buildings.

But once hot air balloons and airplanes came into the picture, things got a lot more complicated. In 1926, Congress created what we now call the FAA, and declared that the air above 500 feet is the public domain. But what about the air below that?

Thomas Causby was a chicken farmer in North Carolina who lived near a tiny airport. During World War II, the Army took over the airport, and suddenly big military planes were flying over Causby's chicken coops all the time. The planes scared Causby's chickens. They flew into the walls of the coop and died.

Causby sued the government, and the case went all the way to the Supreme Court. In the end, the court sided with Causby, ruling that landowners own the sky above their homes up to at least 83 feet.

But the decision still left a gap. If the air above 500 feet is public property, and the air below 83 feet is private property, what about the space in between?

This is the territory that entrepreneurs dreaming of drones have their eyes on.

Cy Brown, for example, wants to use drones to tackle the problem of feral wild pigs. In Louisiana, where Brown lives, feral pigs run around wrecking crops, causing problems for farmers.

Brown's idea was to use drones to track the pigs and then relay their locations to hunters in the fields who could kill the pigs. He tested it out, and it worked. Farmers liked it. Even the U.S. Department of Agriculture wanted to copy it.

But when I called Cy last month to ask if he'd take me hunting, he said no. His drone had been grounded. When I asked why, he referred me to his lawyer.

Cy's lawyer told me that the FAA has been sending out cease-and-desist letters to commercial drone pilots all over the country, threatening big fines for flying little drones. The FAA says that, for safety reasons, it is regulating the airspace between 83 and 500 feet.

Drone pilots are fighting this in court, trying to reclaim that airspace.

Picture from a previous Atlantic piece on this issue, which is also worth reading. 

Read more…