All Posts (11086)

Sort by

Temporary DiyDrones Forum Search Engine

Click Here to Go to the Diy Drones Forum Search Engine

This is just a temporary search engine for the Diy Drones Forums that I built until Ning 3.0 fixes our current forum search engine.  The DiyDrones.com Forum search engine should be fixed soon so this is just a temp fix if your interested in my search engine.

3689551271?profile=original

Read more…

3689551284?profile=original

a four rotor quad copter needs all four engines/props to be functioning to fly - if either a prop or motor fails the air vehicle rolls in the direction of that engine due to the change in the center of lift and it tumbles out of the sky like a rock.  one potential solution to this condition would be to cycle the opposite prop to control the roll but with stop/reverse time it takes to go from lift to negative lift makes that a non-starter.  another solution would be to kill the rotor opposite the failed motor,  lose yaw control, spin like a top, and descend at whatever rate that your weight would cause at about 1/2 the lift the vehicle might need to maintain altitude;  this solution is better than crashing upside down but probably would still result in a high rate descent and a very hard landing.  this proposed device shifts the CG toward the new center of lift from the three functioning engines and gives these engines some control over pitch, yaw, AND ROLL.

3689551407?profile=original 

  
so, how does it work?  if an engine failure on a quad occurs, the flight control computer (a human couldn't do this quickly enough) would issue a command to cut the rubber bands at the red radio controlled solenoids of all but the one that would pull the battery away from the dead engine.  because of the planform of the battery the design rotates it as it moves if it needs to move in the direction that aligns with it's long side.  the resultant CG shift would hopefully be enough to allow the three remaining engines to maintain a level orientation and perhaps limp back to a graceful emergency landing;  worst case would be to descend at whatever rate that 3/4 of your lift would allow depending on the air vehicle weight.   the drawings currently are for an 11.5"x11.5"x0.5" frame which would move the battery CG approximately 5";  a smaller frame would also work but not move the CG as much.  The battery movement results in a significant CG shift in the direction of the new center of lift.
 
The color codes on the pictures are -
  
orange - plate and track for movement in one direction
blue - plate and track for movement in a direction 90 deg from the first plate
yellow - components of the rubber band assembly (red actuators)
green - traveling center post and tray with gearing to turn battery if necessary
pink - wire paths to be used as necessary
 

if you see a basic flaw in this or have any suggestions i really would appreciate your input.
 
timmy

Read more…

Aluminum uniframe quad.

3689551196?profile=originalhttp://diydrones.com/photo/simplistic-aluminum-uni-frame-quad

in a quest for weight reduction

its now key to remove unnecessary bits and pieces from a quad frame that is just to overly complex

if anyone remember my last post of

http://diydrones.com/profiles/blogs/flight-of-the-external-hdd

the 2kg AUW

its like putting a multirotor on a weight loss program in some sense.

this call for a complete design change.

size 450

AUW 1.35Kg

frame only 410g

the only screws/bolts used are the ones holding the motors in. the rest of the frame is one solid piece

landing gear clearance is enough to put a small camera under

nice hard shell contains electronics and battery sits on the upper deck.


at least I don't have to worry about a few loose screws on the frame.

just update video

no problem at all , its even more stable with this layout. the arms act like leaf-springs dampening vibrations

Read more…

Democratizing The High Ground

The quadcopter in the video is the Hubsan H107c v2, which is an HD camera quad not much bigger than a cellphone, and costs only $80. I have one of these on order after playing with the standard definition version, and finding it fun, but somewhat lacking in video resolution. While many on here will consider this quadcopter a toy, I consider it to be a step towards democratizing the high ground. Let me explain.

While this quadcopter does not have features found in higher end devices, it is able to fly, record HD video, and fit into a persons pocket. Think about that for a minute. Even a decade ago, that would be technology only dreamed about by all but the richest of governments. And, it wouldn't be cheap for those richest governments, let alone the average person. Now, for less than a hundred dollars, anyone can pick one of these up.

What does this mean? It means that almost anyone can carry one of these almost anywhere, and record HD video from above. Sure, it is not the highest of quality, but it is definitely good enough for video sharing sites, social media, and even news broadcasts. Citizen journalism is becoming more and more accepted by media outlets. Imagine the possibilities which open up for a citizen journalist with a pocket-able, "chopper cam."

We have recently seen the use of UAS in documenting protests, and natural disasters, among other things. The systems used in these instances had their benefits, and drawbacks. Benefits include the ability to carry higher quality video equipment, and a certain level of flight autonomy. One of the biggest drawbacks, as I see it, is size. In the instance of the protest situation, the quadcopter was able to be shot down by police. Certainly a smaller quadcopter would be harder to bring down. In the case of the disaster scene, someone had to take the time to pack their gear up, go find a place to launch and land, and then begin flying. Imagine if someone could throw their aerial camera in a pocket and go, and the launch and landing pad was their hand. In both instances, a less expensive platform would also be a benefit, due to it being virtually expendable. If the situation changes, a person could literally drop the controller and go, with very little financial loss. Finally, in any situation, these quadcopters are safer than a larger system. Even a 350 size quad dropping on, or running into a person can cause damage. A micro quad would be barely felt if dropped on you, and the blades don't even carry enough force to break skin. Believe me, I know.

So, while the Hubsan H107c is a very sophisticated toy, it may also be a glimpse of the future.

Read more…

Lian Pin Koh (ConservationDrones.org) and Brenden Duffy (FlightRiot.com) went on a trip to Barro Colorado Island, Panama, upon the invitation of Dr. Helene Muller-Landau from the Smithsonian Tropical Research Institute. We brought two units of 3DRobotics-based UAVs to the field station and trained a team of researchers on their use for ecological research.

Read more…

APM 2.5 in the Philippines - Part 1


Since a long time I do fly airplanes together with an APM 2.5 for safety and RTL feature.

Now, back in February I started to fly quad copters and "tested" a lot of different FC. However my favorite one is still the APM since the code is open source and it is easy to program new stuff that I use for aerial filming.

In April I went to the Philippines and came across some beautiful places like you saw in the video.

Hope you enjoyed it! Remember, this is only the first Part there will be more coming. So pls subscribe so you don’t miss the following parts!


A big thank you goes to all the developers of the APM soft and hardware, I really like it, its awesome!


Andy

Read more…
Developer

HeavyDuty Antenna tracker

3689551220?profile=original

Time to start build next version of antenna trackers. As antennas are getting bigger and bigger we planned to make one heavyduty antenna tracker that can turn 2kg antenna clusters. 

Basic tech:

  • 360 yaw with 1 degree accuracy
  • -5 - 90 degree tilt control 
  • Accelerometer measurement for X/Y and Z axis
  • Compass for accurate "heading" measurement
  • LCD display and control keyboards for generic configuration
  • DC motor control for both Yaw and Tilt axis 
  • Standalone battery supply, with 3-4S battery

Initial plan is to make one tracker with strong DC motors, future versions might have stepping motors. Main difference between stepping and DC motors is that steppers needs to have constant current running on their coils to keep it not moving and when you run from batteries that can be a problematic. So DC motor with gearboxes were chosen to the task.

Also to speed up development belt/pulley system was chosen to turn things

3689550942?profile=original

Tilt axis will have small IMU to measure tilt axis angles. Later it can be used to measure level of whole antenna tracker system. Yaw will be measured with small compass board. 

Software to run motors and IMU is already working and how we are doing mechatronics for whole system.

Base electronics will be based on ArduStation mega and jD-IOBoard.

Tracker listens MAVLink data and calculates from that it's yaw heading and antenna tilt angles. 

Do we have support for Mission Planner type connection has not yet been decided but allowing direct telemetry modem and/or USB connection would not be bad idea either. 

Regards,

Jani / jDrones

Read more…
Moderator

The new forums need YOU!

3689551146?profile=original

By now everybody must be aware of the excellent new wiki's that the team has been putting hours of work into and really doing a fine job of it. You might have also seen the Community drop down menu at the top of the page at http://www.ardupilot.com under that you will see a links to here and APM Forum, this is where our forums will migrate to over time. 

Stefan has done an excellent job of improving the functionality of the forums, making it less spammy in the process.

Its attracting questions from wiki users now and as such we need some more of the experts that hang out here to be on hand to help new users there.

The platform that this website uses is about to undergo a major change and this will give us an opportunity to make this site a little more curated with the best of peoples builds and ideas getting more attention. 

So come on over to the new forums and lend a hand. 


Read more…

3689551157?profile=originalWhy did I wait so long to go to Triple Tree Aerodrome? The facility is fantastic and literally a gem less than a hour from my house.

I brought my two Arducopter quads and spent a huge amount of time letting folk hold them, and pour over the details. There was so many folk wanting to talk about them, I did no flying! Multirotors were present but none on the flight line while I was there today. The Instructables Wide-Body Quad (foreground) drew numerous questions simply because the build materials were something everyone that picked it up could identify with. More than once I heard, 'I could build one of these!' I sent many folk off with my card, email address, DIYDrones URL, and Instructables URL. Most folk had not heard of 3DR or either of the URL. Outreach (marketing) seems to be a common activity for me.

This was more of a scouting trip of me and my traveling partner (that's his sailplane before the P-51). He got to see more aircraft than he knew existed. I got to talk with many great people and we both plan to fly when we go back to TTA.

Next time I will be sure to put on more sunscreen than I did. It stings when I smile but it is a good feeling.

Read more…

Laser Rangefinder Flights tests in Namibia

                                                          SF02 Laser Rangefinder Flight tests:

3689551066?profile=original

I recently purchased three of the SP02 Laser Rangefinders from Laserman, and have fitted one to one of our SurVoyeur mk-II planes. I had intended to fly earlier this week, but was beset with PC hard disc failures so spent a few unpleasant day resurrecting PC's...

Anyway, back on line and we flew today with excellent results.

The rangefinder was fitted in a housing and mounted in the internal bay of the aircraft, with the lenses looking out the fuselage underside. Here are some pictures:

3689550922?profile=original

            Rangefinder lenses from under fuselage

3689551032?profile=original

3689551081?profile=original


Rangefinder connected to autopilot

Rangefinder fitted internal to Fuselage

3689551103?profile=original

Fuselage under view with rangefinder lenses and ultrasound ranger visible.

3689551098?profile=original

The Plot below shows the SF02 rangefinder plotted against Baro Alt ( as a function of height above ground) and the Ultrasound rangefinder)

IMU-Height is Baro_height above ground

LRF Height is the SF02 height , active from 30 meters AGL only.

Ultrasound is the Ultrasound sensor height AGL, active from 6 meters AGL only

The SF02 performs very well. The terrain was soft desert sand, with patches of very coarse gravel, interspersed with desert brush and bushes.

At the price , this is a brilliant piece of equipment, and cannot be beat!

We are working at replacing the Ultrasound sensor with the SF02, which will allow vastly improved autoland, completely eliminating any destabilization due to errors and differences in baro-alt and actual height above ground when starting the landing flare.

Thank You Laserman!

Joe

The Nampilot

3689551115?profile=original


Read more…
Moderator

This video is doing by our VRGimbal user VR Gimbal with Sony 3D HXRNX3D1U ( 720 gr) in handeld mode

This is a video using complete VRGimbal with Panasonic GH2

..and this is another video of the same copter (in HD)

3689538773?profile=original

3689538638?profile=original3689538790?profile=original3689538730?profile=original

Dear Friends,

These are specification of our : VR Gimbal :

Micro Controller is STM32F1 at 72 mhz.

3 Axis Brushless Direct Drive gimbal :

  • Roll (MOT1)
  • Pitch (MOT2)
  • Yaw (MOT3)

For each channel we have 3 high power pwm 5 Amp output .

I2C IMU that support 3 axis . It is on camera module , so we can know exactly the position of camera and control in realtime the 3 Brushless motors. MPU6050 (6 DOF) + HMC5883 (3 DOF)

1 USB port.

1 Serial port that support mavlink protocol.

1 Power module that support until 3S battery.

4 Radio RC Input for :

  • Control ROLL Setup.
  • Control Pitch Setup.
  • Control YAW Setup.
  • IR control repeater.

4 Analog Input 0-3.3v

1 IR Out , so is pssible to control a remote camera by its ir receiver.

On new revision 2.0 we add :

  • customizable push buton.
  • support for motors ampere monitor for each motors.
  • Very intuitive Firmware update tools.
  • Simple and powerfull VR Gui for VR Gimbal configuration.
  • Serial driver on USB port.
  • A complete and updated wiki repository with media gallery with last video from our user.


In this video is possible see the utility available for measure the current used by different kind of motors. This feature is very usefull for evaluate the specification of motors.


Is available a new tools for firmware update you can found more detail here :

https://vrgimbal.wordpress.com/quick-start-guide/firmware-upgrade/

We release a Major release 1.0.9 we add a lot of new functionality and full support of pan stabilization with 1 IMU sensor or two sensor .

rev 1.0.9

  • Experimental Stabilize mode on Yaw (good with small pitch values)
  • Experimental Follow mode on Yaw (need motor steps calibration and PID reconfiguration)
  • Experimental support for second IMU for precise Yaw measurement (contact us for more info)
  • Added support for analog/digital input (like joysticks and buttons) to be used in alternative to RC:
    • configure channel 100 to 105 to use analog input 1 to 6;
    • use the “JYC” serial command and follow the instructions to calibrate the inputs.


rev 1.0.5

  • Completed PID mode on Roll and Pitch, with support of RC commands.
  • Manual (RC) mode (to be used on Yaw for now) working but requires improvement.
  • USB serial support (see vers. 1.04)

more info is available here :

http://vrgimbal.wordpress.com/download/vrgimbal-1-09/

The firmware is opensource the repo is available here :

http://code.google.com/p/vrgimbal/

So if you want to join in development you are welcome .


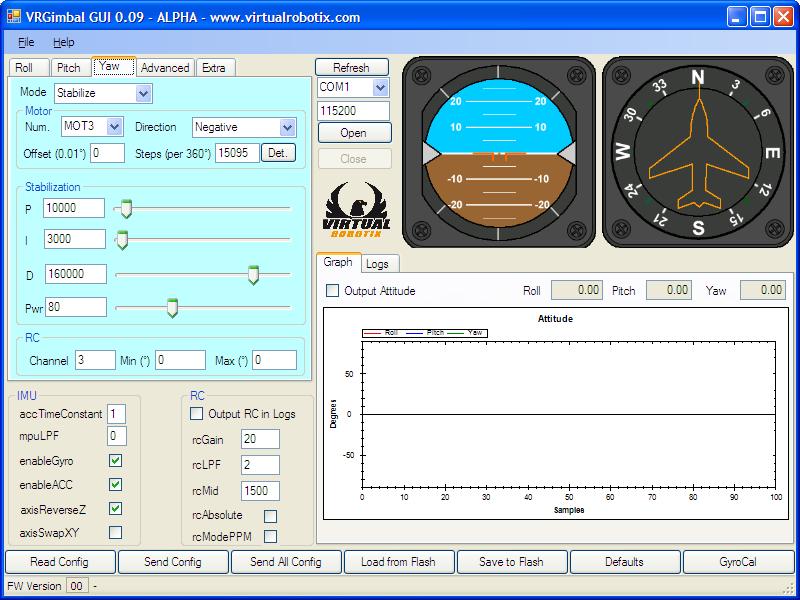
This is a screenshot of VR Gimbal Gui developed using .net technology, so could be work also using mono on mac and linux , test on that platform is welcome ,you can connect directly by usb to VR Gimbal or by radio link as 3dr module , blueetooth or other ttl wireles adapter :

We Upgrade also the VRGui with new functionality , slider full support of Pan axis and Full Frame.


vrgimbalgui_109.jpg?w=918&h=687

With VRGimbal is possible to control this kind of gimbal ;

Handheld and Air Drone Gimbal 2-3axis Entry level gopro gimbal.

Handheld and Air Drone Gimbal 2-3axis Heavy dslr gimbal.


This is an example of video doing by our user of VRGimbal on heavy dslr gimbal :

This is official thread in virtualrobotix community is here join us for have more info and support :

http://www.virtualrobotix.com/group/vr-gimbal-user-group?xg_source=activity

For  more info or for order  VR Gimbal 2.0 board send a mail to : info@virtualrobotix.com

We can also support our user in custom development on oem - odm gimbal hardware or firmware contact us for more detail.

Official blog post : http://www.virtualrobotix.com/profiles/blogs/vr-gimbal-2-0-3-axis-32bit-direct-drive-gimbal-hardware-major-fir


Read more…

DIY 3 Axis 360° Rotaion Brushless Gimbal

3689550897?profile=original

I just spotted on RCTimer's new items page a new brushless motor for gimbals - GBM5208-SR.

What's good about it is that instead of normal shaft it has a tube shaft with a 12.7mm hole, they include a Slip Ring of the same size with it, this makes it easy to rotate 360° in all axis, for most people 360° rotation on the yaw should be enough. Also, due to the big shaft/tube size, i suppose the motor should be stronger, with a shaft like this and those big bearings applying direct weight to the motor should be no problem.

I already build a 3 axis gimbal for my Canon EOS M with the 4114 motors, now it's time to start prototyping Version 2.

My plans are to make it rotate in all 3 axis using the slip rings, they have 12 wires, which is enough for my project.

Here are some details:

Pitch Axis:

IMU - 4 wires
IR Remote Switch - 3 wires
Video Out - 2 wires

- Sharing GND and 5V it will be reduced to 6 wires only.

Roll Axis:

Pitch Motor - 3 wires
IMU + IR + VID - 6 wires

- So i use 6 wires for the IMU, IR and VID, i still have 6 wires left for the pitch motor, the slip ring is rated at 2A per wire, with the 6 wires i'll connect them in pairs to the motor, which i believe should give enough power to the motor.

Yaw Axis:

- This axis will hold the Controller Board and an Sbus Decoder. I don't want to add more weight so i'll use power from Aircraft main Lipo.
- With the Sbus decoder i will only need to pass 4 wires to the aircraft, which are GND, 12V POWER, VIDEO, SBUS SIGNAL. 2 wires for Sbus and Video, which leaves 10 wires, 5 wires for GND and another 5 for 12V should be ok i think.
- Yaw Motor and Roll Motor don't need the slip ring, since their leads are in the same axis, so i just can connect them directly to the Controller Board.

I can't wait to start this project, what do you guys think? Cheers!

Read more…
Developer

Shenzhen Hobby EXPO 2013

jDrones_Shenzhen_Sep2013_IMG_0138.jpg?width=550
Shenzhen Model EXPO 2013 gates

China Hobby EXPO is growing. Normally they have Hobby EXPO in Beijing and Shanghai, this year there were new Hobby EXPO started at Shenzhen where most of electronics comes for whole world.

As this year we were too busy to visit Beijing expo, jDrones only visited Shenzhen EXPO to check out latest happenings.

jDrones_Shenzhen_Sep2013_IMG_0118.jpg?width=550
Overall view of EXPO 2013

Shenzhen Hobby EXPO was a lot smaller than normal Hobby EXPOs at Beijing. There were around 60 companies presenting their products. A lot of RC toy helicopters/cars/planes, servos and all other material for RC hobby needs.

Compared to last year Beijing EXPO that jDrones went, this expo did not have so much multicopters. There were several companies selling those.

jDrones_Shenzhen_Sep2013_IMG_0122.jpg?width=550
Zero Tech Quad

Zero Tech had most advanced systems and also biggest booth. Their copters looks similar to DJI but are not. Autopilots that they seem to use is either Feijy or their own creations.

jDrones_Shenzhen_Sep2013_IMG_0124.jpg?width=550
Zero Tech Octo with Brushless gimbal

One of their Monster OCTO copters. It had camera gimbal really similar to ZenMUSE. Also they had 2 GPS installed on their system, why?? They say that it is for redundancy.

jDrones_Shenzhen_Sep2013_IMG_0127.jpg?width=550
Airplanes at EXPO

Some really nice looking airplanes. Finish of planes is getting better and better on China factories.


jDrones_Shenzhen_Sep2013_IMG_0131.jpg?width=550

We also met John from Asia Tech Drones who makes those really nice looking Cyclops UAV airplane frames. Their composite plane looks really good. We already started to plan deeper Co-Working between ATC and jDrones so stay tuned for that. And I hope to get my hands on those planes as soon as possible.

jDrones_Shenzhen_Sep2013_IMG_0136.jpg?width=550
Camo CF sheets

A lot of new Carbon Fiber products has emerged in last 1 year. On 2012 there were only few companies providing CF products but now more and more are coming. Also some really interesting color choices are available like these CAMO CF sheets on the shelfs.

jDrones_Shenzhen_Sep2013_IMG_0135.jpg?width=550
Jani and CAMO Girls

And when selling good looking CAMO/CF materials... Girls are also pretty and they insisted to have picture with handsome western man :)

Let's see what they have to offer on next EXPO. Till then.. fly hard and be safe

Jani / jDrones


Read more…
3D Robotics

Announcing the next era at 3D Robotics


3689485855?profile=originalYou may have seen the news that 3D Robotics has just announced a $30 million Series B investment, led by some blue-chip VC firms, including Foundry and True (investors in MakerBot and other open source companies such as WordPress/Automattic). You can see Foundry's announcement post here.

This is our second funding round (the Series A was November last year), and each round reflects a new era of the company. Because 3DR started in this community, which I created one weekend six years ago, I wanted to take a moment to talk a little about our evolution as a company and what it means for users, developers and the community as a whole. 

Our first phase as a company (2009) was led by my co-founder, Jordi Munoz, and it looked like this:

3689550687?profile=originalJordi hand-soldering original ArduPilot shields

3689550760?profile=originalMy kids packing up Blimpduino kits at the dining room table

Jordi then built up a proper manufacturing operation, taking it to this by 2012:

3689550692?profile=original

At this point 3D Robotics was still selling mostly electronics, essentially bare boards and "bags of parts" kits, much like our role models at Sparkfun and Adafruit.  But it was clear that the industry was growing up and was ready to go more mainstream. So on the basis of that and our progress so far, we raised our Series A round in December 2012 and I came onboard as CEO nine months ago. 

Our mission over the past nine months has been to professionalize the company and our products, and although that's far from done we've made a lot of progress. On the company side, this meant new websites, ecommerce systems, improvements in customer support (still a work in progress but we've shortened response times and moved to Zendesk to track issues better), and most importantly, the opening of our big new manufacturing facility in Tijuana.

3689550786?profile=original

On the community side, we've sponsored the software dev teams, the documentation teams and the community management teams here, on the new ArduPilot.com documentation sites and on the GitHub dev repository. 3DR just sells the "atoms" (the hardware) while this open source community creates and gives away the "bits" (the software), but as a company we've worked hard to support the community in every way we can to encourage a healthy community/company partnership. (We're modeled after WordPress/Automattic in this respect).

We owe a huge debt of gratitude to the hundreds of developers, editors, moderators, beta testers and other volunteers who have created such an extraordinary thing here: the software teams, the documentation teams and everywhere else where the open innovation model has worked so well to serve a community of nearly 44,000 members. Our commitment is to use our funding to help make this community even better, by investing more in the open innovation model. As we have from the start, we'll continue doing what we can to help people here help each other, following the lead of open source models from Linux to Adafruit and our original mentors at Arduino. 

On the product side, the last year has seen the development (with ETH) of our next-gen autopilot, Pixhawk, and the consumer-friendly Iris autonomous quadcopter designed for tablet/phone use, and a suite of software that will be announced soon as part of the Iris Consumer Edition. 

That brings us to our third phase, which starts now: not just creating drones, but putting them to work. This means finding new applications for aerial robotics by creating entire systems, from the cloud to tablets/phones to communications systems to more sophisticated aircraft systems and payloads. From Agriculture to Hollywood, this is where the real opportunity lies. 

I feel we're like the PC industry in 1983. As an industry, we've come close to taking drones from industrial equipment or hobbyist gear (from the mainframes to the Apple II of the late 70s) to the first Macintosh, making them consumer friendly and easy to use. Now that drones are not just for the technically sophisticated anymore, it's time to find out what they can really do, by putting them in the hands of regular people, from GoPro owners to farmers, and see how they use "anywhere, anytime access to the skies" to discover new applications and markets, much as we did with computers after the original IBM PC and the Mac.

In short, this is just the beginning. I couldn't be more thrilled to embark on our next chapter. 

Read more…
Moderator

 by 

SAN DIEGO, Calif., Sept. 26, 2013 — 3D Robotics, the leading open Unmanned Aerial Vehicle (UAV) company, today announced a $30 million Series B financing round. The round was co-led by Foundry Group, a new investor, and existing investor True Ventures, along with participation from existing investors O’Reilly AlphaTech Ventures and SK Ventures. As part of this round,  Jason Mendelson of Foundry Group will join the 3D Robotics board of directors.

This round of funding augments a late-2012 Series A round led by True Ventures and O’Reilly AlphaTech Ventures. It will enable 3D Robotics to mainstream aerial robotics and surveying, making advanced UAV technology affordable and easy to use for its worldwide customer base of businesses and individuals. Working with its large community of users and open source developers, 3D Robotics has created the industry’s leading open UAV platform, APM, and is now extending that to a new generation of autopilots, software and ready-to-fly multicopter and fixed-wing UAVs.

As part of this funding round 3D Robotics will expand its development and deployment of advanced UAV applications, with a focus on agricultural crop mapping and other commercial aerial survey technology. “The opportunity to bring ‘big data’ to agriculture through low-cost automated aerial crop surveys could be a game-changer for both farming and the UAV industry alike,” said Chris Anderson, CEO of 3D Robotics. “Adding UAVs to the precision agriculture toolkit of a 21st Century farmer gives them the power to use imaging data to not only increase yield, but decrease water use and the chemical load in both food and environment.”

Starting in 2015, AUVSI, the UAV industry trade group, estimates that the first three years of integration of commercial drones into the national airspace will create more than 70,000 jobs in the United States with an economic impact of more than $13.6 billion.  International prospects are much larger.  ”We’re building out a world-wide sales, service and support model that will help us build long-term relationships with local resellers that can in-turn support their local community requirements for mapping and imaging,” said John Cherbini, 3D Robotics VP of Sales.

3D Robotics also recently announced Iris, the company’s first ready-to-fly, fully-autonomous quadcopter for the consumer market.  The lightweight vehicle can conduct hands-off missions and record high definition aerial video, bringing pro-level UAV features at an unprecedented sub-$1,000 price. Iris is now shipping to developers, with consumer sales to begin in November.

In conjunction with Iris, 3D Robotics has extended its exclusive relationship with the PX4 team at the Swiss Federal Institute of Technology (ETH), one of the world’s leading UAV research institutions. In collaboration with ETH, 3D Robotics has announced its most powerful autopilot to date, Pixhawk, which will ship in October.  Pixhawk is a new 32-bit open autopilot platform designed for improved ease of use and reliability while offering unprecedented safety features compared to existing solutions.

3D Robotics’ mission is to deliver reliable, easy-to-use autonomous navigation and sensing solutions to customers using land, sea or air based vehicles.  3D Robotics’ open UAV technology, which is in use by tens of thousands of customers already, delivers pro-level aerial robotics features at consumer-level prices to bring UAV applications to mainstream markets.

3D Robotics is a privately-held North American company with offices in Berkeley, San Diego and Tijuana, Mexico.

For more information on the company visit: http://www.3drobotics.com

Read more…
Developer

RTAFA 2013, UAV Challenge

Royal Thai Airforce, Aerial Vehicle Challenge 2013

On this year 2013 Royal Thai AirForce Academy is celebrating their 60 years celebration, to honor this celebration, the first UAV Contest was set-up by RTAFA here in Thailand.

It was a thrilling 3 days at Royal Thai AirForce base September this year. Thailands first UAV Contest was finally real. As it was initiated by AirForce Academy and aimed for other Academies, commercial operators and manufacturers like jDrones were not allowed to participate on the challenge it self but jDrones were one of the supporters of this happening along with Royal Thai AirForce.

There were total 8 applicants, only 6 teams were ready to fight over the 2013 UAV Challenge trophies when 3-day competition started. On first two days consisted mainly of final build, presentations to the military officials and test flights on competition area. Last way was day of competition.

2 of the teams were from local AirForce Academy and 4 other teams came from universities surrounding Bangkok area. Local teams used their own autopilot and software. Outside universities all had APM platform in various ways and installations.

Discussion of Future UAVs, Jani & AirForce Generals
Discussion about the Future of small UAVs, Jani & AirForce Generals

Jani from jDrones and Royal Thai AIrForce Generals discussed long about the current development status on UAVs and also the UAVs on participating contest. Some of officials we met during contest have already seen how well jDrones UAVs work and they were really thrilled to see and compare how Academic driven systems can compete against commercial systems and commercial developers.  jDrones is here to stay.

In overall message from military is clear, military is seeking easy to use and expandable UAVs for their every day needs.

UAV Contest Final run with high-ranking officials.
UAV Contest Final run with high-ranking Generals.


The Mission:

Flight mission had 3 main tasks:

  • Fly 100m circle at 60meters altitude, 2 laps (O)
  • Take photos from 6 waypoint locations (1-6)
  • Drop small 50gr payload as close as possible of the target (T)

Flying area was rather small and challenging for this type UAV Contests but small makes it even more interesting. And also when planes can handle small tight turns, bigger turns is generally a lot easier.

Flying area was around 500 x 500m box (Red box) and pilots were not allowed to cross that border. If you did, you get points penalty from every second outside of the box.

2013 UAV Contest site and waypoints

Missions had 5 sections that every operator had to do on same order

  1. Takeoff, fully automatic or manually. fully automatic gave more points
  2. Fly 2 laps of 100m circle around O waypoint
  3. Fly all 6 waypoint cordinates in order and have pictures on waypoint locations
  4. Drop small bag full of Maizen flour to target (T)
  5. Landing, automatic landing gives extra points

You had to repeat mission in 5 minutes after first run was done.

All UAV Operators were able to plan their own missions as long as you fulfilled main 5 sections in correct order. Some of the mission that we saw had close to 40 waypoints. Why? We are still wondering that. Hopefully on later recap with university people we will find out from them why they choose to have so many waypoints on their missions.


Jani talking with RTAFA team 1


jDrones staff looking all teams


RTAFA Team preparing


Flying wing tuning
Final tuning for Flying wing


Girl power
Girl power. Unfortunately they had minor accident during 2nd takeoff.


Topwing trainer that flew really nice
Topwing trainer that flew really nice. Preparing for runs


Winning team, RTAFA 1
2nd plane, RTAFA 2
2nd plane, RTAFA 2


3rd place
3rd place and 4th , they had two planes. Big plane group had 3rd place, wing 4th

Both RTAFA teams had their own electronics and software running. Rest of the teams had various APM installations.

This year University teams tried to be on their own while RTAFA had several consultants helping them on making their planes finely tuned. This boost was clearly seen on challenge outcome.

Another thing we noticed during competition was overall readiness of the teams. RTAFA planes were really nice build. No loose wires or electronics, everything were installed properly and in nice manner. Other University teams still have some path ahead to learn how to install their flight electronics as most of them used fiberglass tape and similar "not so good" ways.

In overall this UAV contest was really good starting ground and I am sure that next year level will be more even between teams and now all teams have base-level to compare.

Happy Winner Nr.1 and jDrones trophy enevelope
Happy Winner Nr.1 and jDrones trophy envelope


Till next challenging event....

Jani / jDrones

Read more…