All Posts (14049)

Sort by
100KM

Tarot T810 build log

3689530762?profile=original

I have been searching high and low for a good affordable large hexa system, with the main objective to lift 500gr (camera, FPV transmitter, etc) for as long as possible, and have the video stabilized. 

The S800 looked ok, but due to some issues around the boom flexibility and cost, I ditched that idea. The Carbon Core, Steadidrone H6X also looked very nice, but once again cost played a big role.

So, I stumbled across the Tarot T810, for $330 I got the frame. I needed to add some extras for folding landing gear (not retract) and the camera rail mount which was not included.

I'm doing a build log to not only "hopefully" help someone out there, but also have a place to get some input from the community in getting the max flight time. The Hexa will be used for local security missions and possibly also help in the Rhino Poaching crises we're facing in South Africa.

My system:

  • Tarot T810 Frame
  • Sunnysky 4112S 400kv
  • 40 Turnigy Plush
  • 15X4.7" props
  • APM (of course!) - Looking forward to a maiden flight on AC3rc6
  • Martinez gimbal controller
  • Brushless Gimbal
  • Gens Ace 6S 5500Mah X 2
  • Estimated AUW including gimbal and camera - 5.3kg

The frame went together nicely, only issue I had was the hole in one of the landing gear braces was skew, I just drilled it straight with a bigger drill bit.

Here is a view of the frame in it's folded position. It folds nice and small - about 900mm in length

3689530701?profile=original

Here are the motors I'm planning to use, hopefully I get my flight time. Powerrrr! Notice the ESC mounting plates under the motor mount.

3689530780?profile=original

I like the prop attachment.

3689530864?profile=original

I also like the way the booms lock in place with a dovetail clamp, very secure.

3689530798?profile=original

Here is a shot of the little power distribution "lugs" - I just soldered all the power wires in place with huge amounts of solder.

3689530881?profile=original

I'm planning to install the ESC's under the motors, I have read about some scare stories on RCGroups about this idea, but I have never personally had problems with this.

I am however a little concerned about the wire gauge for power - using 16AWG to the motors and 12AWG to the battery. I'll do a full power test to see if they heat up, and by how much. 

I'm wating for my ESC's to arrive, and will continue the log once they're here!

Read more…
3D Robotics

dragonfly1.jpg

One of the best ways to design micro-UAVs is to emulate insects. But figuring out how insects navigate and fly is hard, unless you can monitor their neurons in action. Scientists have now figured out how to do that. A fascinating piece from my alma mater, Wired:

The brain of a dragonfly has to do some serious calculations — and fast — if it hopes to nab a mosquito or midge in midair. It has to predict the trajectory of its prey, plot a course to intersect it, then make adjustments on the fly to counteract any evasive maneuvers. Neuroscientist Anthony Leonardo created the tiny dragonfly backpack above to study how circuits of neurons do these computations.

The backpack weighs 40 milligrams, about as much as a couple grains of sand, equal to just 10 percent of the dragonfly’s weight. Electrodes inserted into the dragonfly’s body and brain record the electrical activity of neurons, and a custom-made chip amplifies the signals and transmits them wirelessly to a nearby computer.

One of the trickiest design challenges was how to power the chip without adding so much mass that the insects couldn’t get off the ground, says Leonardo, who’s based at Howard Hughes Medical Institute’s Janelia Farm Research Campus in Ashburn, Virginia.

He and collaborators at Duke University and Intan Technologies came up with a clever solution based on the same technology found in the RFID key card access system used in many office buildings. There, a reader, usually a small pad next to a door, emits radio waves to create a magnetic field. When a key card gets close enough to the reader, the magnetic field induces a current that powers a chip inside the card, enabling it to transmit a code to unlock the door.

The two long antennae on the dragonfly backpack harvest radio waves and power the chip in a similar way. Eliminating the need for a battery on the backpack was the key to keeping the weight down.

Dragonfly flight arena. Photo: Anthony Leonardo, Janelia Farm Research Campus / HHMI

Getting dragonflies to hunt inside the lab turned out to be a little tricky too, Leonardo says. In a plain white room, the insects exhaust themselves trying to escape. So the team installed turf on the floor, installed a small pond, and covered the walls with a scene that evokes a springtime meadow.

In their experiments, the researchers release fruit flies and watch the dragonflies take off from a perch and catch them. Eighteen high-speed infrared video cameras positioned around the room capture every move as a dragonfly closes in on its prey and launches its body upwards, curling its hairy legs inward to form a sort of basket trap (see video below).

As the dragonfly hunts, the backpack captures the firing of neurons Leonardo thinks play a crucial role in guiding it towards its prey. “We know a lot about their anatomy,” he said. “They gather input from visual parts of the brain and send axons down to the motor neurons that move the wings.”

The question that fascinates Leonardo is how those neurons and others transform information about the visual scene into a plan of action, and how they continuously update the plan as the dragonfly and its prey move through space. All animals do this type of transformation, from a center fielder running down a fly ball to a lion running down a gazelle. But a neuroscientist can’t exactly study those situations in the lab.

“The dragonfly is a convenient and beautiful and elegant means to an end,” Leonardo said.

Read more…

3689530732?profile=original

Dr. Darryl Jenkins, author of the recent AUVSI report on the Economic Impact of Drones, spoke last week with the DC Area Drone User Group about business opportunities using drone technology. The report notes that drones will help create more than 70,000 new American jobs and stimulate $13.6 billion in economic activity during the first three years following their integration into U.S. skies. However, during his talk Dr. Jenkins stated that, according to new models he is developing, these numbers significantly underestimated the economic impact of drones for the U.S. economy.

Dr. Jenkins also suggested that it was insurance companies, and not government regulation, which would have the biggest impact on what businesses would develop around UAVs. Without insurance it is impossible to get VC funding or bank loans, and without financing it is very difficult to grow a business, so access to insurance is foundational in creating a strong business ecosystem for growing UAV enterprises. 

Dr. Jenkins also noted that insurance company policies may be able to encourage respect for privacy by simply stating that anyone using their drones to invade someone’s privacy would lose their insurance coverage. Therefore if a tabloid outlet or private investigator was found trying to illegally film celebrities sunbathing at home they would lost their insurance and thus their access to capital. This would create strong disincentives to misuse these platforms.

To view the slides Dr Jenkins presentation please click on this link. The DC Area Drone User Group is a member of the Drone User Group Network, an association of community groups that seek to promote the use of flying robots for community service, artistic, entrepreneurial, and recreational purposes. If you are interested in starting a Drone User Group in your area, please contact us at info@dcdrone.org .


Read more…

DIY Drones at 40,000 Members!

3689530550?profile=original

It's customary and a tradition that we celebrate every new 1,000 members here and share the traffic stats. This time it's 40,000!!!!

There were 2 million page views in the last month! (we get around 62,000 pageviews a day on average). It took us just 25 days to get this latest 1,000 members--we're averaging one new member every 35 minutes.

Thanks as always to all the community members who make this growth possible, and especially the moderators who approve blog posts and otherwise answer questions and keep things ticking here.

Best Wishes,

Joshua Johnson - (Assistant Administrator)

3689530584?profile=original3689530643?profile=original3689530664?profile=original

3689530589?profile=original

3689530704?profile=original

3689530649?profile=original

3689530674?profile=original

3689530721?profile=original

Read more…
Developer

Getting ready for Arducopter 3.0

3689530563?profile=original

I flew AC 3.0 (rc5) at Sparkfun which required me to rethink my vibration dampening strategy. In other words I had to go from no strategy to something very robust. If you want to fly 3.0 in any AP mode you'll need to consider at least some of these methods. Once upgraded, my copter was able to hold a 1 foot loiter box with the crappiest RCTimer props/motors they sell without issue.

Here was my shopping list:

http://www.rangevideo.com/accessories/vibration-mount.html

http://hobbyking.com/hobbyking/store/__8999__peel_n_stick_foam_tape_10x5inch_4mm_thick.html

http://hobbyking.com/hobbyking/store/__26457__Anti_Vibration_foam_Orange_Latex_190mm_x_140mm_x_6mm.html

http://store.3drobotics.com/products/m3-vibration-damper

I attached the latex foam to the vibration mount with super glue which worked nicely. Adding the dollar coins with super glue under the floating vibration mount also worked well.

Even with motors vibrating so much that they looked burry, it still held a great loiter. 

Jason

Read more…

I set up three 3k circles around my field to test range and how the Raptor would perform during an actual travel environment, and it performed very, very well. A perfect flight. You may see at the end I realize that my RTL altitude was set to zero, but luckily I was quick enough to set a guided mode until I could manually return it home. 

Awesome stuff! Thank you DIYD!

Read more…

Flymanta Avatar on a Football Ground.

Here is the FlyManta AVATAR movie shoot made this week-end with a 2 axes Direct Drive Brushless. I was at Cité Universitaire in PARIS where i live. (A kind of Big Campus for foreign people. All nationality is represented here)

FlyManta particularity is the YAW movment made with 2 Servomotors on front Arms.

The Yaw command is the same than a normal Tricopter, i just change a bit the code to send this command to 2 differents outputs.( you could use a Y cable too to do that).

I've made a full photo album of the construction here : https://www.facebook.com/media/set/?set=a.10200561968160143.195432.1486931539&type=1&l=1fe6997c69

it's a public link that you can share guys.

Fast is the main advantage of the Yaw made by twisting the arms, i'm using liitle servomotor but the weakness is the center plastic pinion wheel. So using a metal one is better.

I've remarked that the Yaw on a simple Tricopter is not flat... because of the inclinaison of the back motor.

I'm using GO PRO2 and the RC Timer Direct Drive Gimbal (a bit heavy !!) a carbon one will be better to enhance my flight time. (7 mn with a 1494 gram Tricoptere)

The Batterie is 2650 mAh (300 grams)

Flight Mode is HORIZON a mix between ACRO and STABLE (ANGLE), Acc influence is lowered with angle.

Hope you like it Guys !

FlyMantaFoot from patrice rancé on Vimeo.

Read more…

PhotoHigher H4 Quad

New PhotoHigher H4 UAS frame

3689530429?profile=original

The weather over the weekend was pretty shody in Auckland so i put the time in to finish a new build using the brand new Photohiger H4 UAS frame with custom, motors and props, she flies awesome sounds like a swarm of mosquito.

Some pics

3689530377?profile=original

3689530444?profile=original

3689530392?profile=original

3689530503?profile=original

3689530608?profile=original

Origionaly designed to use a Naza M, but this one is sporting a APM 2.5 and has since had the GPS added, I will be adding the FPV gear soon and take it thru its paces....

Video to Follow.

Read more…
Moderator

3DR Quad - Speed and Lift Test

Hey all,

UAV Test Flight - Speed and Lift from David Anders on Vimeo.

Yesterday a group of us headed out for our regular Melbourne catch-up.  This time I was out to test just how fast I could get my 3DR quad to move and then how much weight it could carry.

The aim was to get to 100 km/h and lift as much weight as possible. 

Let's just say that it did unfortunately fall well short of the 100 km/h (by about a third), but my target was a very optimistic figure. (: 

The lift capability though was somewhat surprising as you'll see in the video.  The first lift test was also the first time I'd tried to lift a ~1.2 kg pendulum with my quad, so it's an interesting take off.

I was using my older SD camera because of its' zoom so apologies for the video quality - It's a little stretched vertically for some reason. 

I have put a fair bit of detail in the video, but please let me know if you want to know anything further about the specs, weather or the day in general.

Hopefully you find the tests interesting.

Cheers,
David.

Read more…

APM enhances Father's day

3689530285?profile=originalIn FBW mode, the APM turns almost any plane into a perfect trainer. My two older daughters (9 and 7) were able to confidently circle over the Berkeley marina. Despite the 10-15 knot winds the Bixler2 behaved very docile and controllable. I had them completely ignore throttle and only focus only on the aileron.

I was amazed on how stress-free the flights turned out. After a few minutes of practice I felt confident enough to stop watching the plane and take some pictures of the young pilots.

Besides getting cold from the wind they enjoyed it and want to come back out to the field with me. I'm thinking to let them practice a few times in FBW (to get used of the correction when the plane flies against you) and eventually graduate them to stabilized mode.

3689530107?profile=originalHard to spot the plane, but it is there ;)

3689530312?profile=original

Read more…


Used the APM, Raptor and 900mhz 100mw 3DR telemetry to enjoy an awesome autonomous flight. I tested waypoints, guided mode, changed altitude and other awesome telem/mission planner features. Can't wait for more! Great job DIYD...


Raptor Details: http://www.mygeekshow.com/theairplanes/Raptor.html
USA Trip Details: http://www.mygeekshow.com/usatrip/

Read more…
flighttrack5_c.jpg
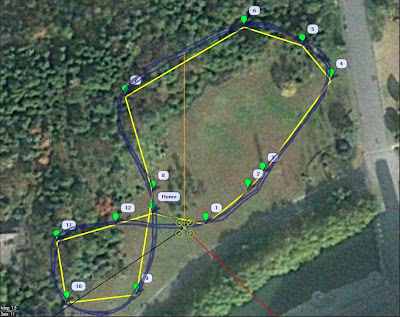
Figure 1: Mission Planner waypoints and telemetry track after 3 spline circuits


I wanted my ArduCopter to fly smooth continuous curves between waypoints for some nicer aerial video, so I coded up this SplineNav class. Each spline segment is a cubic polynomial curve defined in 3D space, with 1st and 2nd derivatives continuous wherever two segments meet at a waypoint. This gives a nice smooth transition between curve segments during flight (Figure 1). It also saves time and battery, since abrupt speed and direction changes are avoided.

3D_track.jpg
Figure 2: Autopilot logged track after 3 spline circuits


The SplineNav class, like CIRCLE mode, calls the loiter controller, which is what allows it to precisely control position along the curve using GPS and inertial navigation (thanks to the brand new ArduCopter 3.0 firmware). Unlike CIRCLE mode, in SplineNav the autopilot takes full control of setting altitude as well, so it can fly complex 3D curves. However, it also references your WPNAV_SPEED, WPNAV_SPEED_DN, and WPNAV_SPEED_UP parameter settings to avoid flying too fast, or climbing or descending too quickly.

For this video I wanted a slightly more wild ride, so I increased my WPNAV_SPEED_DN to 250 cm/s, and WPNAV_SPEED_UP to 350 cm/s. I left WPNAV_SPEED at 500 cm/s for now, but will try increasing it later. Figure 2 shows the 3D track in Google Earth. If you reduce these UP/DN speed parameters you will get the same 3D track for these waypoints, but at the steep up and down locations SplineNav will reduce its travel speed along the 3D curve.


Video

I shot this SplineNav demonstration video with my ArduPhantom. The GoPro is mounted on a Hummer 2-axis brushless gimbal designed for DJI Phantom.

Source Code

Here's the source code for developers and brave testers to test and suggest fixes and improvements. There's a .PDE file and an .H file, both of which go in your ArduCopter 3.0 sketch folder:

SplineNav.h
SplineNav.pde

Follow the directions in the SplineNav Readme to make the ArduCopter 3.0 code call SplineNav. Then compile with the special ArduPilot version of the Arduino IDE, and upload to your copter. Set your waypoints with Mission Planner, or with the channel 7 switch, and go test out SplineNav.


Warnings

Make sure your loiter is rock solid before you test, because SplineNav relies on the loiter controller. Also, the first time you test a new set of waypoints, you should probably keep WPNAV_SPEED low, perhaps just 200 cm/s or so. That way you'll have enough time to take over control in case the spline curve intersects any solid objects!
Read more…

Reddit Summer 2013 Multicopter Competition

3689530221?profile=original

Reddit is hosting a 2013 summer multicopter competition below is the information provided by Reddit which you can find here

Submissions will begin June 12th and ending August 12th.

You are encouraged you post on /r/multicopter, but you MUST post your submission to /r/MulticopterContest13.
After the submissions are over, we'll pick the top 10% based on upvotes and hold a poll. Prizes are awarded across the board, meaning there is no first for every category.
If your craft can meet the requirements of some prizes are awarded automatically, others require the best or more out performing craft to be awarded the higher prizes.

Things are still changing so keep updated!

Competitions

  • Heavy Lift
  • Endurance
  • Crazy Builds
  • Least Expensive Multicopter (capable of 1kg lift)
  • Community Vote: Best FPV Video
  • Community Vote: Best Build Log

Classes

  • Featherweight: AUW <500g, 4 or less rotors
  • Normal: AUW 500g-2.5kg, 3-6 rotors
  • Pro: AUW 2.5kg-4kg, 3-6 rotors
  • Heavyweight: AUW 2.5kg+, 6+ rotors, 4S Minimum
  • AOV (All Other Vehicles): bi-rotors, variable pitch, etc, etc.

Prizes

  • 1st DJI F450 ARF Kit (Frame, motors, ESC's)
  • 2nd MultiWii 328P Flight Controller w/FTDI & DSM2 Port
  • 3rd Infrared Remote Shutter Controller for Sony, Nikon, or Canon Cameras
  • 4th 1/3-inch SONY CCD Video Camera (NTSC or PAL)
  • 5th On-Board Lipoly Low Voltage Alarm 2s~3s
  • A Class LED Strip with JST Connector 200mm (Yellow, Blue, green, White, or Red)

Read more…

3689530089?profile=original

Prepping for Flight

 I'd like to introduce SolarSight II, a long endurance solar powered UAV designed and developed by University of Michigan students in conjunction with MIT's Lincoln Laboratory. Over the past two years we've gone through a multi-phase project and are nearing completion with the delivery of an aircraft with a target endurance of 18+ hours. Moving toward this goal we've had a lot of work contributed from our members, electrical, mechanical, and aerospace alike.

The solution we've settled on is a 3.3 m span conventional configuration glider with a GaAs solar array (220 Emcore ATJ cells), Li-ion batteries (6s 10p 3100/3400 mAh), and a high efficiency brushless drive-train (Lehner-Motoren).
3689530260?profile=original

SolidWorks Rendering of Airframe


We've recently begun the flight test process with our most current airframe, which has been targeted for weight reduction and an optimized power system in order to achieve our endurance goals. This has been accelerated through the use of the APM 2.5 allowing data collection and various flight modes.


3689530239?profile=original

We're looking forward to flying with our full solar array in the coming weeks.

Project Webpage: http://solarbubbles.engin.umich.edu/~solarbubbles/index-2.html

RCGrous Webpage: http://www.rcgroups.com/forums/showthread.php?t=1839301


Phase II Aircraft Test Flights

Phase I Aircraft Wing Tip Cam (please feel free to skip to 1:00...)

Thanks for checking out our project,

Brian

Read more…