Having heard the EasyStar puzzle fit wings come loose (but not fall out or anything wierd) being the cause for magnet help I figured getting it done now would be easier. The same technique for the chassis was used to fit the magnets in each wing. 10mm drill bit pushed into foam Scapel cut along marked line Poke out foam inside line CA glue magnet in place NOTE.. CA glue is fast drying so make sure you get your magnets the right way round before glueing otherwise you will be stuffed.
Here is documentation that I made for the ArduCopter Beta Frame as well as thoughts and a short flight test video. All of the pictures can be clicked on for full-resolution and the videos are in 1080p.
Assembly:
Open Bag #1 and take out 1 of the Main Frame boards. You'll also need 4 of the M3 x 25mm Male-Female Nylon Spacers and 4 of the M3 x 6mm Nylon screws that are in Bag #9. The main frame is supposed to support both '+' and 'X' configurations. Take each of the spacers and put them over the hole closest to the center of the three holes near the outside edge of the Main Frame board with the female side down. Secure each one with a screw from the bottom of the board. The spacers should NOT be installed over where the aluminum arms will be which depends on if you have a '+' or 'X' configuration. Now, take 4 - M3 x 20mm steel screws out of Bag #9 and place them through the innermost hole. These will end up going through your aluminum arms, so place them accordingly. In anticipation of installing the Power Distribution Board and to make it easier for ourselves when we do, it is best to install the spacers right now. Open Bag #3 and take out the 4 - M3 x 12mm Male-Female Nylon spacers and the 4 - M3 Nylon Nuts. Place the spacers through the innermost holes with the female side up that are not being used by the steel screws. These spacers should line up with the longer spacers already installed. Secure them from the bottom side of the board with a nut.
Now, remove the second Main Frame board and line it up with the first one. These two boards will sandwich the aluminum arms. Take out the 8 - M3 x 20mm Nylon Screws and 8 - M3 Nylon Nuts from Bag #9. Two of the nylon screws will be on either side of an aluminum arm and the steel screw will pass through the arm. Place the nylon screws through both Main Frame boards in the outermost holes of where your arms will be. Place a nut just barely on the other end; we will tighten it later.
Now, choose the size of aluminum arm you want to use. If you look at it, you should an elongated hole on both ends. Find the side where the hole is furthest from the end of the arm. This is the side that should face up and the end that your motor will mount to. The motor mount parts are located in Bag #7 and #8. The upper part of the motor mount is the larger piece. Take a M3 x 25mm Steel screw and place a steel washer followed by a nylon washer on it. Push it through the lower motor mount, the aluminum arm, and the upper motor mount. Take your 16/19 mm spacing motor and line it up with the holes on the end of the upper motor mount and the steel screw you just put it. Tighten the steel screw and use the mounting screws that came with your motor for the remaining three holes. Find 2 - M3 x 25mm plastic screws and nuts and place them through the remaining holes of the motor mount. These should press the motor mount pieces tightly to the aluminum arm and brace both sides of the arm. Do this for all four of the arms.
Slide each aluminum arm between the nylon screws of the Main Frame boards and pass the steel screw through them. Secure the steel screws on the bottom with the 4 - M3 x 10mm Female-Female Nylon Spacers found in Bag #4 and tighten the nylon screws so that the Main Frame boards are snug with the aluminum arms.
Take out the Battery Mounting Plate and the 4 - M3 x 6mm Nylon Screws from Bag #4 along with the velcro battery strap from Bag #9. Thread the velcro strap through the batter mounting plate ensuring that you have the correct side of the strap so that it will stick to itself. Make sure the recessed screw holes are also on that side.
Line the screw holes up with the nylon spacers on the bottom of the Main Frame board taking note of which direction you'll want the battery to be. In my 'X' configuration, I want the length of the battery to be facing straight forward and aft. Secure it with the 4 nylon screws.
Now, look at the Power Distribution PCB found in Bag #3. I didn't bother with using the PCB to route the signal cables of the ESCs because my cables are long enough to reach the APM directly. Notice there are 3 distinct trace areas on the PCB. The largest one in the middle is the positive and the two others are negative. Since the negative areas are not connected, we will bridge them together in two places with the 18 AWG cable included in Bag #3. Pass those through the bottom side of the PCB. The positive and negative cables from each ESC and from the battery need to be soldered on. Also place an additional solder layer of about 0.8 mm thickness on the traces. In my case, since this is a prototype, I want to be able to easily swap out parts like motors and ESCs. So, instead of soldering my ESCs directly to the PCB, I have EC3 connectors soldered on and I am not mounting the cabling inside of the arms.
Place the PCB into the 12mm nylon spacers and secure it with 4 - M3 x 6mm Nylon Screws from Bag #3.
Now, take out a carrier board from Bag #1. I used some nylon screws from the extra parts bag to mount my ArduPilot Mega board. Normally, you should mount the board so that the edges are parallel with the side of the carrier board, but mine is mounted at a 45 degree angle. I'll explain later in my thoughts section. Keep in mind when attaching your board that the edge opposite the right-angle headers must be the front of the Arducopter.
Place the IMU shield on top of the APM.
Take the second carrier board and attach the magnetometer (if you have one) as well as the receiver from your transmitter. If you take a look at the magnetometer, there are two arrows labeled 'x' and 'y'. The coordinate frame for aircraft designates the x-axis out the nose and the y-axis out the right wing. So, in the Arducopter, the x-axis should be pointing to the front and the y-axis to the right.
A velcro sticker is supplied in Bag #9 for mounting the receiver, but you may not be able to use it. I later found out the velcro adds too much thickness to the point where the protective dome doesn't fit, so I have mine secured instead with zip ties.
Place the carrier board that has the APM and IMU on top of the 25 mm Nylon spacers already on your frame. Take the other 4 - M3 x 25mm Male-Female Nylon spacers out of Bag #9 and screw them on top of those. Place the second carrier board with your magnetometer and receiver on top of those spacers and secure with a M3 nylon nut.
All of the parts for the protective dome and landing gear are in bags #5 and #6. The upper and lower dome center have elongated slots in them that the protective dome arches slide into. Secure with 2 - M3 x 20mm Plastic screws and two M3 plastic nuts. The top carrier plate will have more room if you hold the dome centers with the nuts being placed on top and the screw head on the bottom. Two extra nuts are included for both sides of the dome center, but I don't think they are necessary as the dome arches are supporting it.
If you look at the end of the arches, notice that there is material removed from one side of it between the 3 screw holes. This is the side that is against the aluminum arm.
The Landing Gear Fins also have material removed on one side and they attach with 3 - M3 x 20mm Plastic Screws and Nuts. Keep the nuts loose until all of the landing fins are on so that you can center the entire Protective Dome on the Arducopter. Once it is centered, tighten the nuts. (Some people may find it easier to attach the Protective Dome Arches and Landing Fins to the aluminum arms and then snap the Dome Centers in place)
The GPS is placed in the top dome and is secured with a zip tie.
Thoughts:
When I initially received the box containing the ArduCopter Beta Frame via EMS Express from Jani, I was surprised how small it was. Upon opening it, everything was neatly packed. There was an 8 1/2" by 11" piece of paper with a parts list and letter on it along with individual bags containing parts and two sets of aluminum arms (21.5 cm or 28 cm) wrapped in padded foam. I set about putting it together even though there were no instructions available. It definitely helped that the bags were grouped together into ones such as 'Battery Mount'. That way, I at least knew which sizes of screws and spacers belonged to each component. Like my Power Distribution PCB video, I filmed myself putting it together; although it wasn't always correct or in the optimal order as I would discover later. I might post that video later.
I'm using 12 x 3.8 APC props and decided to go with the longer of the two sets of included arms at 28 cm. All of the holes were drilled precisely and I didn't have any problems with alignment. However, I had a fair number of quality problems with the plastic nuts. I don't know if it was because the threads were crooked or what, but quite a few of the nuts wouldn't go onto the screws farther than the initial bit. Flipping around the nut didn't help. Thankfully, Jani included a 'Beta Spares' packet that provided enough spares to cover the ones that didn't work.
One of the problems I had was with Bag #8. As you can see in the diagram below, the parts list didn't match the parts I received and the parts received weren't all the parts I needed to mount the motors. The innermost screw on each motor is a steel screw that goes through both motor mounts, the aluminum arm, and into the motor. Only one of these screws was included for the entire frame. None were included in the Beta Spares bag, so I went and bought some at a local hardware store. The motor mounts themselves are a fantastic design. I love not having to use the 'plus' motor mounts and the spot for an LED to slide into is a nice touch. I thought there was supposed to be a cover for the LEDs that keep them pressed in their slot. If there is, some longer plastic screws will be needed to pass through the extra thickness.
Another problem I had was with '+' versus 'X' configuration. It is supposed to allow for both, but I don't see how to mount the carrier boards for the 'X' configuration and maintain the same structural support and ease of mounting the APM+IMU. Ideally, an edge of the carrier boards faces the direction of flight so that there are no spacers in the way of mounting the APM+IMU and so there is nothing blocking the I/O ports of the APM. With the '+' configuration, it works, but with the 'X', you're either faced with mounting the point of the carrier board facing the direction of flight like I've done on mine, or mount it the other way. The problem with the other way is that the Aluminum arms are there. I could increase the distance between the main carrier boards to allow a screw head to fit between the top carrier board and the aluminum arm, but then it doesn't benefit structurally from having the main frame board being pressed against both sides of the aluminum arm. Another option would be to drill an extra hole all the way through the aluminum arm. With the corner facing my direction of flight, I have everything mounted, but it is not perfect and some of the I/O ports are blocked. Another thing is accessing the APM+IMU. It is difficult to access things like SW1 for data logging.
A velcro sticker was included for mounting the receiver (I have the one that comes with the Turnigy 9x) to the top carrier board, but the velcro added too much thickness so that the receiver couldn't fit underneath the dome center. I just used cable ties because they didn't add as much thickness although they are still pressing against the dome center. The dome arches were a little hard to snap into the dome centers. Maybe increasing the notch that faces upwards would provide a better lock. There really isn't a reason the top one has to be flush with the upper dome center. The bottom one is nice being flush so that it doesn't restrict mounting on the top carrier board. I would definitely like to see some longer landing fins and maybe an optional protective dome that protects all of the electronics instead of just protective arches. With my 4900 mAH battery, there is only about an inch of ground clearance for the battery. Combine that margin with a soft lawn and the small surface area of the landing fins, the fins slip into the ground and the battery may take a hit on the landing. So, I'd like to see options for longer landing fins and some to permit a camera to be mounted beneath the frame. I imaged the battery mount is perfect for about a 2200 mAH battery, but my 4900 mAH might be about the limit of what it can mount.
Could traces be added on the bottom side of the Power Distribution PCB to connect the negative sides? That way, two of the wires wouldn't be needed to jumper them. My view of this frame is to be bundled together with the electronics, motors, etc, to make a complete kit and make it easy for people to know what to buy and put together. Every little bit of wire and soldering that can be avoided would make it easier for people. I didn't even solder the connectors for the signals of the ESCs because my cables are long enough to reach the APM. Is there a benefit to routing them to the PCB and then adding an extra cable to the APM? It just seems like more complications and wire to me. Also, could some holes be added for the (+) and (-) of the ESC to connect to instead of just mounting them flat across the top trace?
A foldable frame would make it easy for transportation. I think this was designed for it and I see how removing one of the nylon screws bracing an aluminum arm on the Main Frame would allow for the arm to pivot around the steel screw, but wouldn't the Protective Dome also have to be removed to make it fold? Maybe we can find a way that would make it a quick process, but still be structurally sound in flight.
I just mounted my ESCs on the outside of the arms since this is a prototype anyways. I have Turnigy Plush 30A and I would need an extension to be able to mount the ESC on the main frame and get the cables through the arms because the cables on the ESCs aren't long enough.
These thoughts were all intended as constructive criticism. I am impressed by the design, weight, and especially the motor mounts. Great job on the frame Jani! I'd like to continue working with you guys to improve ArduCopter!
My whole flying setup weighs 2.85 lb = 1.293 kg. This is with Turnigy 2217 motors, Turnigy Plush 30A ESCs, and a 4900 mAH LiPo Battery
Coming from a JP Zagi I wanted dual channel ailerons (achieved via elevons) but I wanted to still be able to remove my wings easily. Having seen lots of aileron mods I decided I knew where the leads would come out on mine and began my grooving. Grooved for the wires soon revealed the connector to be 3x thicker than the wire so a bigger groove was fashioned for the side for a snug fit. Now although pushing in a connector meant it did not move (snug groove cutting) pulling the connector out meant it pulled out a bit. CA glue to the rescue.
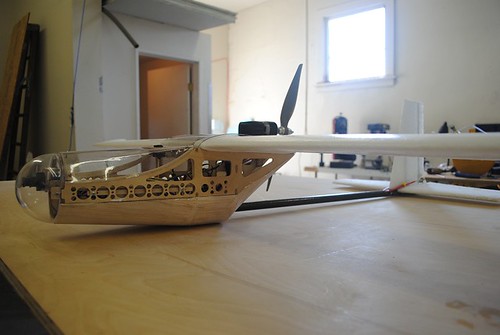
Now the major bodgery has been done I added the propeller (7x4 from previous) and noticed I was 5mm to big for the plane but as it has work my me so well in the passed I though I'd just mod it in. Using the poke and trim method I created a groove for the blade to fit through. Tolerance is pretty high in lateral movement but only 1mm to the bottom of the groove (so if it grows it will catch :D)
The R617FS receiver is for the 2.4GHz Futaba 6EX transmitter and so "requires" a 90° position to function. So with the elevator channel being used for elevons (in the wings) the servo hole on the side of the chassis is redundant, that hole shall take my receiver. After holding it up to the chassis I realised the only sensible way to sit it was upside down, allowing the servo leads to go straight into the chassis body and one antenna to run along the elevator rod groove. I trimmed out the servo hole to accept the receiver and added a small groove to take the other antenna up to the wing surface (maintaining the 90°).
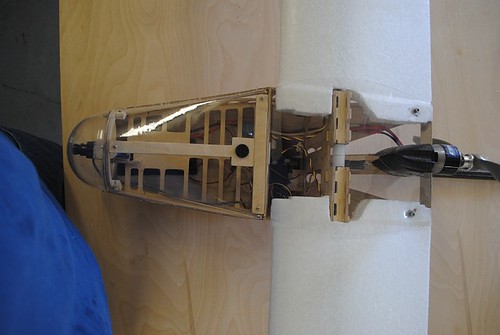
Cramming the ESC, LiPO and motor in the back compartment space isn't easy given the short space so I gave it a look, placed everything where it could go and the problem became apparent. Leads would have to be cut as if they were not the LiPO could be in the nose so I decided to trim back the leads on the cheapest bit, the eTronix. Trimmed to a sensible length I found the battery leads were still too long so trimmed them again. I used gold connectors and heat shrink to connect and seal them.
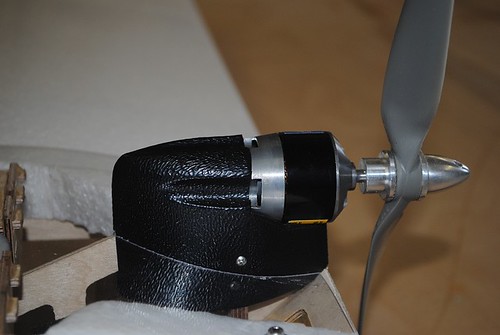
The Hacker A30-16M is 38mm in diameter and so does not fit in the tiny hole for the Permax400. The idea was simple enough, make room and make it stable. Looking at the hole I would need to enlarge made me realise that enlarging it would need the kind of delicacy that I simply couldn't achieve with any sort of implement (machine or otherwise). So I carefully trimmed of sections to try and make it look nice as well as fit but that did not work until I got right down. I followed the curve of the motor inlet and the straight edge on the inside of the motor mount until they met to create a semicircular pit for the motor. I marked up the front of a CD jewel case for drilling the mounting holes (using the metal motor mount supplied). I then put a 1" masking tape strip on the jewel case centered over the mounting holes. I used a soldering iron to burn along the edges of the masking tape. By now I had a rectangular plastic piece with holes in it. I attached this to the motor with the screws supplied and used the soldering iron the curve the upper edges. I later used the soldering iron to "trim" the rectangle to fit above the magnet mounting point. The only thing left was to cut a little valley to CA glue the mount into so I used masking tape to help the motor where I wanted it and cut out a valley. Once done I pressed the halves of the chassis together enough to create an impression and did the valley cut for the opposite side. Pants I forgot the wires another valley was cut to fit the wire just in front of the mount cut and after the CA glue had dried. Again both halves received the cuts (for balance and ease).
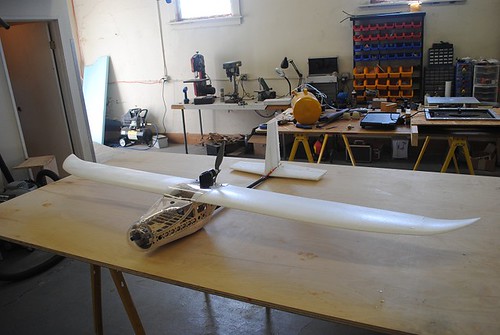
Having previous kit I want to use the EasyStar in standard trim was not gonna cut it so modifications were needed. I will document each modification in single posts (hopefully) so others know what not to do.
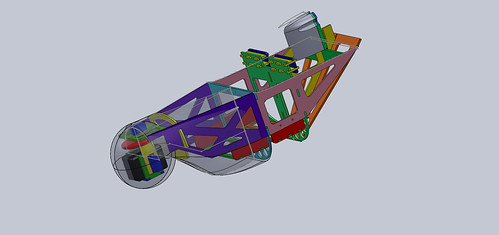
The chassis/airframe holds the majority of the parts so that is obviously the main focus of my effort. To go into the chassis I have a Hacker A30-16M motor, an eTronix 40A ESC, a 2200mAH 3S LiPO, a Futaba R617FS receiver, rudder servo and all the cables.
My first problem was the chassis being glued. If you cannot reach it you cannot fix/replace it. Neodynium magnets are mentally strong and the chassis has plenty of mounting points for glue so why not "convert" them to magnet holes. Using a drill bit of the appropriate size I purchased against the foam to leave a visible mark then with a scapel (yes a surgical scapel, exacto knife will do though) I simply cut along the line and poked out the foam in the middle. Picture below shows first few holes done and chassis cuts for battery and ESC.
Edit: Picture is of completed magnet installation not build installation (2 magnets) Read more…3D Robotics
An advanced fly-by-wire system capable of landing grossly damaged unmanned aircraft—demonstrated on video saving a plane missing 80 percent of one wing—is key to solving one of unmanned flight’s biggest problems
Wing EjectedA shrunken F/A-18 target drone equipped with a new, advanced fly-by-wire system was able to return home safely after losing up to 80% of one wing.Rockwell Collins
Posted by Roy Morgan on September 1, 2010 at 2:33pm
Since initially deciding on using a netduino for a tricopter, one of the first concerns I had was over performance with it running on the .Net micro framework with regards to sensor reads, since it was mentioned by others that similar boards were slow to read. So now I've got my hands on one I decided to run an actual test on it. Although no sensors were actually connected the values read were actual reads (just the floating voltage of the pins from background noise), so no real difference from actually having a sensor outputting a voltage. Initial results are very promising:
Four analog pins read, Two digital read, Two digital set, and two pwm (servo) values set, per loop.
With the debugger attached (so running even slower) each loop was completed in 2 milliseconds - 5000 iterations (reading and setting) took around 9 to 10 seconds! about 500 iterations per second.
This leads me to believe there shouldn't be any problems with the netduino in this regard at all.
Here's the very very quickly hacked up code I used for the test:
var axisX = new AnalogInput(Pins.GPIO_PIN_A0);
var axisY = new AnalogInput(Pins.GPIO_PIN_A1);
var axisZ = new AnalogInput(Pins.GPIO_PIN_A2);
var IrFloorSensor = new AnalogInput(Pins.GPIO_PIN_A3);
var out1 = new OutputPort(Pins.GPIO_PIN_D1, false);
var out2 = new OutputPort(Pins.GPIO_PIN_D12, false);
var in1 = new InputPort(Pins.GPIO_PIN_D2, false, Port.ResistorMode.Disabled);
var in2 = new InputPort(Pins.GPIO_PIN_D4, false, Port.ResistorMode.PullUp);
Dear Friends Oneof the problems in achieving the autopilot as Multipilot Arduimu or is to be able to debug the more advanced features such as stabilization, navigation waypoints and return to home without losing or damaging the aircraft that are used to perform experiments respecting the law.
One technology to make this kind of testing is certainly thesimulator using the autopilot hardware connected to a PC running a software as Physic Engine .
The little airplane is able to withstand rough conditions thanks to three aeroservoelastic trim tabs, which are located on the trailing edges of the wings and tail. When the plane is hit by wind gusts, the tabs perform rapid high-frequency shape changes, to counteract the effects of the wind. The technology is not unlike the shape-changing trailing edge flaps currently being developed to protect wind turbines from destructive gusts. Combined with several other features, such as a special aerofoil profile optimized for high lift at low speeds, the result is a remarkably steady aircraft.
Posted by Ben Levitt on August 31, 2010 at 10:01pm
We've been working hard to make MatrixPilot ever more modular, and to test this modularization, I thought it would be fun to build a LOGO-like mission planning language as a plug-in replacement for the existing waypoints module.
After a few evenings of playing, I ended up with something that actually feels pretty useful. All the logo basics are there: HOME, RT, LT, FD, BK, REPEAT, etc. You can also set specific locations (like traditional waypoints), set altitude, and set and toggle flags like whether to fly inverted. You can also toggle between controlling the plane, and controlling the camera target. More info on the language here.
The above image is from a simulation of the following UDB LOGO program running in XPlane using MatrixPilot's HIL Simulation.
// 10-pointed star with an external loop at each point
REPEAT(10)
// One leg of the star
FD(2000)
// Turn 180 + 72 degrees over the course of 18 small segments
my activity on this site has been low for the past year as i have been up to my ears with starting a business and developing a few products for us to sell . I would encourage anyone reading this to take a good long look at my profile so as to understand my background and my history with the diydrones community .
As most are aware , the only true constant in life is change . However the rate of change would appear to be on the uprise . most of us at this point either have lost our jobs or at least know someone who has . This in turn has a ripple effect on the economy , not just as a whole but an individuals economy . The effects of the present state of the economy have been effecting the world of open source . this can be demonstrated very easily by noting Blogs such as Chris's "update on product availability " , the disappearance of projects such as open pilot (I've been trying to contact the team with no success and the latest activity was back in June . if anyone has more info please let me know.). Lets face it , its hard to develop complicated machinery with no capital.
the future of open source autopilots are not guaranteed . as with everything in life open source autopilots are going to have to change or die . OSAP (open source autopilots) have been facing many problems from all sides .
These include but not limited to government regulations , inter-OSAP competition , bad economy , "race to the bottom" mentality , "open source = no $" mentality , no single self regulation entity (AMA for UAVs),and many other fears and misconception held by the public at large and OSAP developers.
The question at hand is this : how can OSAPs change so as not to die ?
I believe the answer is to draw from the strengths that both "open source" and "commercial" auto pilots enjoy
#1 co-operation . as individuals we will be broken one by one , If we join forces we can be unstoppable
#2 commercial viability . the most successful open source projects have commercial applications . no income = no output.
#3 self regulation . Ive been told directly from FAA officials and can be read here ARC.pdf . we have to self regulate or the government will be stepping in .
#4 we , as a whole , need to stop making decisions based on fear . logic yes , fear no
If you are flying a UAV DevBoard in a plane without ailerons, you should be interested in a recent revision to MatrixPilot that will tighten the turns in waypoint mode, without overshoot. The above picture is the track of a portion of a test flight in an EasyStar. The control mode was switched from stabilized mode to waypoint mode with the EasyStar flying away from the first waypoint. So the controls performed a tight (less than 15 meter radius) "snap-turn", with very little overshoot.
Up until now, the only way to prevent turning overshoot with MatrixPilot was to use a large value for the yaw damping parameter. Although that certainly prevented overshoot, it made the turns very wide. The latest revision prevents overshoot, while still enabling tight turns.
The revision is rather simple: an optional negative feedback term equal to a gain times the roll has been added to the rudder control. The effect is to reduce the steering time constant. It is equivalent to controlling the roll rather than the yaw rate. It is something that has been on my list to do for a long time, I finally got around to it. Rana and Sid have been using this feature unofficially for some time, they encouraged me to add it. Also, there have been posts from time to time from other authors recommending roll-based steering. MatrixPilot has always used roll-based steering with ailerons, but until now, for mostly historical reasons, it used yaw-based steering with rudder.
The new parameter is ROLLKP_RUDDER in the options.h file of MatrixPilot. It is now available in MatrixPilot2.5 in the branches directory, or in the "developers" version in the project main trunk, or as a version 2.5.1 zip file. If you want to try it out, to start with set ROLLKP_RUDDER to the same value as YAWKP_RUDDER. For an EasyStar, set them both to 0.15, and set YAWKD_RUDDER to 0. For now, leave "dead-reckoning" and "cross-tracking" turned off, I am working on improving the performance of both of those. Right now they are not performing up to their potential.
The following is a portion of the track during a test with an EasyStar in which ROLLKP_RUDDER was deliberately set to 0, with YAWKP_RUDDER = 0.15, and a modest value of YAWKD_RUDDER (I forgot what it was.) to show what happens without rudder-roll stabilization. Note the large amount of slowly decaying overshoot after the snap turns.
So, if you are using MatrixPilot in a plane without ailerons, I highly recommend trying this new feature, it should improve waypoint performance.
Posted by RolandS888 on August 30, 2010 at 11:30pm
Here's a copy of our Deliverable 2 video that we presented for entry into the 2010 UAV Outback Challenge.
We are using a Penguin-B UAV airframe from UAVFactory(.com) its a very stable platform and as seen in the video it is flying at an AUW of 15kg (~30lb) and tootling along at 1/3rd throttle.
Thought some of you might find it interesting....enjoy.
Spotted at the DefCon hacker conference this year, the ArduPilot-powered WiFi Aerial Surveillance Platform (WASP), basically a UAV with WiFi sniffing capability. It flies until it finds an open WiFi access point and then loiters over it. Here's a video interview with the creators at the conference:


