All Posts (11086)

Sort by
3D Robotics

Lifeguard drone goes from concept to prototype

3689559491?profile=originalYou may have seen the rendered concept video of a life-preserver dropping drone from this Iranian team before. Now they've built a real prototype. From Gizmag:

Over the course of four days in August of this year, the Pars development team visited the Caspian Sea to conduct a battery of tests on its brand new prototype. The location was chosen in part for its proximity to the RTS lab, but also because it's been the site of several tragic drownings in the past few years, including an incident that took the lives of six students this past summer. Among other attributes, the team tested the Pars' stability during flight, the accuracy of the life preserver release mechanism, and the bot's performance in both day and nighttime conditions. According to the researchers at RTS Labs, the prototype bot met their expectations perfectly.

The Pars was able to fly for 10 minutes at a top speed of 10 m/s (22.4 mph) before needing to recharge. This gives it a maximum range of 4.5 km (2.8 miles), making it ideal for emergencies occurring along coastlines and near ships at sea. It also proved to have a distinct advantage over its flesh and blood counterparts, since it can bypass treacherous waters with ease.

When conducting a trial rescue mission, the drone was able to reach a target 75 m (246 ft) away and drop its payload in about 22 seconds, while a human lifeguard took 91 seconds to swim to the same location. During testing at night, the Pars was also able to illuminate targets on the ground and make itself more visible to its controller on land using several bright LEDs.

RTS Lab has pointed out that the drone's fast speed combined with a capacity for several life preservers means it could attend to multiple people in one trip. With its built-in GPS, it can even be programmed to fly to a certain area, dispense life preservers to anyone in danger, and then automatically return to its base. Of course, the aerial bot won't be able to pull anyone to safety just yet, but it could be sent out ahead of rescue crews to provide some initial aid. The researchers are also hoping it could give emergency teams a birds-eye view of the situation and help them plot a safe path to where they need to go.

With such an important job on its shoulders, RTS Lab wants to make sure that the Pars functions as well as possible before attempting to distribute it internationally. The company hopes to refine its current design based on these trials and possibly add some more features, though it is still looking for further funding to make this possible.

Besides increasing its speed and range, the group has considered redesigning the drone so it can land on the water in an emergency and outfitting it with an artificial intelligence that processes images and sound to locate people in trouble. Presumably, if they receive the necessary funding, the designers may also construct an off-shore landing platform for multiple Pars drones, which was outlined in the original concept.

Read more…
3D Robotics

Another cool hack of a toy quadcopter

3689559518?profile=originalFrom Hackaday:

Building your own quadcopter is an expensive and delicate ordeal. Only after you navigate a slew of different project builds do you feel confident enough to start buying parts, and the investment may not be worth your effort if your goal is to jump right into some hacking. Fortunately, [Dzl] has a shortcut for us; he reverse engineered the communication protocol for a cheap toy quadcopter to work with an Arduino.

The cheap toy in question is this one from Hobbyking, which you can see flying around intheir product demonstration video. [Dzl] cracked open the accompanying control handset to discover which transceiver it used, then found the relevant datasheet and worked out all the pin configuration involved in the SPI communication. Flying data is transmitted as 8 byte packets sent every 20 mS, controlling the throttle, yaw, pitch and roll.

[Dzl] took the build a step further, writing an Arduino library (direct Dropbox download link) that should catch you up to speed and allow you to skip straight to the fun part: hacking and experimenting! See his quick video after the break, then convince yourself you need a quadcopter by watching this one save its creator, [Paul], the trouble of walking his son to the bus stop.

Read more…
3D Robotics

3689559473?profile=originalGreat news from the UK tech news site, The Register, which is conducting an ambitious project to create and launch their own space plane, guided by APM. The latest trial, involving dropping the autonomous glider from a balloon at 30,000m (101,000 ft), worked great.

In some highly encouraging news for the Low Orbit Helium Assisted Navigator (LOHAN) team, a Texan high-flyer recently used the ArduPilot Mega (APM) 2.6 to guide a glider back to base from a heady 30,780m (101,000ft).


Larry Grater's North Texas Near Space 4 (NTNS 4) aircraft hit around 790km/h in an "extended dive" before levelling out at roughly 16,460m, after which it "hit all waypoints and loitered down over the landing location". Larry then took control and landed the plane manually via First Person View (FPV), as the insert later in this video shows:

Tremendous stuff. AS LOHAN fans know, we've got a 3D Robotics APM 2.6 for ourVulture 2 spaceplane...

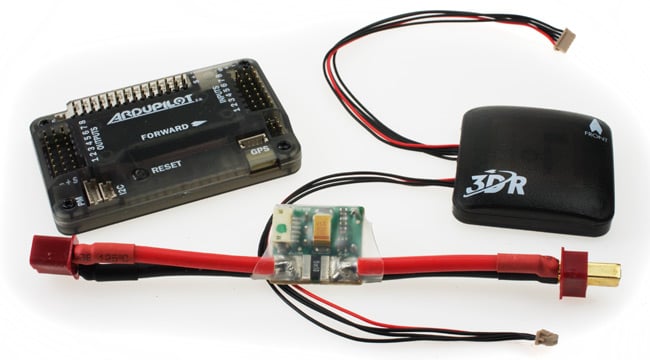
The Ardupilot Mega 2.6, with GPS unit and power supply

..and here it is temporarily bodged into the aircraft for servo testing purposes:

The APM mounted in the Vulture 2

Many of you have cautioned that getting the autopilot working properly is a extremely tricky business, especially since we have a supersonic, rocket-powered phase for our mission.

Agreeably, we were recently contacted by ArduPilot (the fixed-wing APM flavour) lead developer Andrew Tridgell - of Samba and Oz UAV Challenge fame - who put us in touch with Larry.


Read more…

Post-typhoon aerial video on CNN


 http://us.cnn.com/video/data/2.0/video/world/2013/11/18/philippines-drone-camera-penhaul.cnn.html?c=homepage-t
 

They didn't specify what type of copter is being used, but from the shadow it looks like a TBS Discovery style. It won't be long before the novelty of getting video from a UAV is not the headline of the story, and the story itself can be the focus.

These guys need to clean the condensation out of the lens, BTW!

Read more…

Everest Gliding Gimbal Project

3689559335?profile=original


Hello,

Are the gimbals limited to drones, handy or those that are close to the ground? I would say no.

This topic, which now I briefly describe, took me about two Months. The most important thing is that our glider pilot Sebastian Kawa, a multiple world champion in gliding, yesterday went with a Team to the Himalayas Mountains to make the world's first glider flight over Mount Everest. The glider has its own drive rotary engine for stand-alone start to a ceiling of 2000 m. The rest of the height he will have to reach by sail and thermal climbing. Project was prepared for couple years, they had a lack of proper camera stabilization, which I’ve designed and handmade. This Gimbal is designed for gliders and difficult high mountains environments:

Gimbal rotates 340 degrees and 170 in Yaw Pitch.

After analyzing all the factors that prevail during the flight at an altitude of about 8000 m reached new criteria:

1 Temperature -60C

2 Jet Stream blowing 200 to 350 km / h

3 Aerodynamics gimbal adapted to such speed

4 Battery disabilities and their resistance to low temperatures

And many others result from the above.


I’ve designed aero dynamical gimbal shape for GoPro 3+ on the board. Gimbal position is adjusted from remote panel equipped with LCD and controll sticks. 2.4Ghz provides Video streaming and 800MHz RC.

Whole devices and GoPro are charged from the main LiJon battery located in the device. There was no question of pulling cables, so everything acts autonomously.


The first tests in the air we did at the beginning of October, we found that Yaw power was too small. After increasing motors power, we could operate with gimbal at 120km/h, after next tests and appending additional gear we reached 150km/h with full operational it’s 20km/h more than average cruise speed.


Batteries, I found LiJon currently working at temperatures from -60 to +60 , 4000mAh . To simplify the process of charging I put protection against overcharge and discharge for each cells below targets. This is not a balancer, but enough not to damage the battery during a long flight when the batteries become depleted below a critical voltage.


All electronic controller components were chosen at a range up to +/-50C . Powered by Yaw I’ve set higher power to treat the coil of the Yaw motor it as a heater. The stabilization temperature lacked the time, but I think that's enough.


All of the structures are made from CF to reduce weight with maximum strength.


Here is a short video of the flight test. Keep your fingers crossed for flight over the Himalayas our most known glider world champion.

Read more…

Internet over 3DRRadio

3689559329?profile=original


It is horribly impractical, but works with enough glue.


No idea what motivated this, but once you get obsessed with a communication problem, nothing can stop you.  It might be the hope of getting very long range or the desire of unemployed programmers to remember they can still write programs.


Wifi isn't really wireless because the range is useless. The phone company is worthless because it's extremely expensive.  Everyone dreams of running PPP on a private, long range serial port radio that can reach for miles.


A serial port radio like the XBee, 3DRRadio, or CC1101 can potentially give real wireless range, but has issues. IP requires full duplex asynchronous communication. Hook up your PPP connection directly to a 3DRRadio & it won't go anywhere.  Without constant rebroadcasting & just relying on TDM for full duplex, it goes nowhere.  The packet loss is too high & TDM gets completely jammed.


The best results from serial port radios have come from filling the entire bandwidth at the highest bitrate with repeated packets & hoping some data makes it through.  The fastest full duplex has come from constantly broadcasting beacons & waiting for replies, regardless of data usage.  To improve matters, the download packet size is 5x bigger than the upload packet size.


It's not an efficient algorithm & it doesn't reach the theoretical maximum bandwidth, but it's practical.  The algorithm would ideally be on the radio module instead of the host computer, but having it on the host allows the radio modules to be interchanged.


The idea is to have a sliding window of packets constantly rebroadcasting until they all get ACKs.  Ideally, the error checking is done on the radio module, so the entire packet doesn't need to be sent over the serial port before sending an ACK.


The bandwidth is too low to have the ideal header.  A 1 byte sequence number needs to make due instead of the 4 byte sequence number in TCP.  Having only 1 byte for the sequence number makes it ugly.  A single error will throw off the sequence numbers & lock it up.  The windowing algorithm is horrible & kludgy, but works.


The CRC checking on the stock 3DRRadio firmware was not effective.  Even with forward error correction,  a lot of errors got through.  So you had to wait for the entire packet to transfer over the serial port before doing your own CRC calculation & sending the ACK.  The xbee had effective error checking on the module, which made it faster.


Without ECC, at 230400 baud, the 3DRRadio downloaded 2kbytes/sec. With ECC, it was under 1000 bytes/sec.  The TDM algorithm & the frequency hopping slowed it way down.


The xbee at 115200 did 3.5kbytes/sec.  It was a series 1 XBee with 100mW power but only 115200 bits/sec.


Both modules seemed to have the same range.  They were well beyond wifi range, even with crummy wire antennas.  The 3DRRadio seemed to gradually lower in bandwidth with increasing distance, while the XBee was all or nothing.


If the 3DRRadio had a way to replicate the XBee without any frequency hopping or TDM, it would scream.  It would probably hit 7kbytes/sec.  Thus began the SiK firmware hacking.


Comment out most of tdm.c, most of packet.c, disable the broken check_code.py script & you can get the fastest 2 way communication out of it.  A bit more hacking & it did effective CRC rejection before sending on the serial port. The CRC encoding was still done on the host. It also properly framed the full duplex packets.  The firmware CRC rejection got it another 300 bytes/sec on the upload speed.


That got 6700bytes/sec download speed & 1400 bytes/sec upload speed, 3x faster than the stock firmware.  It could actually load some web pages, with enough patience.


Would say even in its intended application as a telemetry radio, it could do better by saturating the bandwidth with repeats.


Some testing after all that development was pretty disappointing.  The urban apartment complex range was 150ft.  It was much farther than wifi, but so slow using it to load any web pages was barely survivable.  It would be useful with the ancient email client Pine or a phone app, but the modern web based gmail was hopelessly slow.


The better option is still a waveguide antenna on a standard wifi router.  The wifi standards have just been optimized to get the most TCP/IP performance out of the available power.
Read more…

DiyDronesNews.com Buy & Sell Drones Page

What's up DiyDrones.com?!  I recently created a page on my website DiyDronesNews.com named "Buy & Sell Drones".  Below I am going to provide people with a form to fill out if you want your Ebay page or other online market account featured on the Buy & Sell Page.  I know there are a lot of people out there who buy and sell drones on ebay and other online marketplaces.  Their is a Buy, Sell, Trade page on Diy Drones somewhere but it's hard to locate and you can't integrate ebay channels into the page.  If you like drones you could even consider buying model planes, buying APM 2.5's, and selling RTF UAV Models on ebay.  There's a market out there already for things like that!  If you're a company or individual who sells R/C Models, autopilots, and/or R/C electronics on an online marketplace feel free to fill out the form and I can integrate your account for whatever website on the Buy & Sell page for as long as you want.

You can contact me via DiyDrones or Email: JoshuaAllenJohnson@gmail.com

(Please send me your Form via DiyDrones or my email!)

(If you use Ebay Fill out the form below)

  1. Ebay Channel Name:
  2. Contact Email:
  3. Duration you want your profile on the Buy & Sell page?
  4. Is your Ebay Profile affiliated with a company or  do you use your profile for personal use?:

(If you use a different type of market fill out the form below)

  1. What Online Marketplace do you use?:
  2. What's name of the profile?:
  3. Contact Email:
  4. Duration you want your profile on the Buy & Sell page?:
Read more…

3D Robotics Y6 Post Flight and Build Review

The final installment of the 3DR Y6 Build Fly & Review.


Quick overview of 3D Robotics Y6 build and tips to make your build go smoother.

Main Tips-

1. Route motor cables through side of boom. This keeps the wires protected in case of a crash.

2. Use the APM with side entry pins as the top entry model makes it difficult to route wires under top deck.

3. Play close attention to the orientation of the top and bottom decks when assembling as the holes need to be in the right configuration.

4. Always check your motor/prop direction BEFORE installing props. Failure to do so could lead to personal injury or damage to your aircraft.

Overall this is a fantastic multirotor. With the ability to fly autonomously via tablet, laptop or Phone, redundancy of 6 motors and lower price compared to other like hexacopters.

KIT available here- http://store.3drobotics.com/products/...

Read more…

Scale CAD models of APM & FPV related hardware

3689559268?profile=original

Hi Guys,

I have created a number of extra scale models to aid me in the design process.  Links to design files (skp) are below for use by all.  From left to right:

1. RFD900 (Sample kindly provided by Seppo for modelling purposes - and delivered overnight.. just fantastic)

2. MinimOSD

3. DIY 5.8Ghz VTX (I can post eagle files if anyone wishes to use this)

4. 3DR Power Module

5. Arduino Pro Mini

6. Turnigy 6A ESC (stripped and with 5V linear regulator removed)

7. APM 2.5 (posted previously, available in wiki)

Enjoy!!!

Read more…
3D Robotics

This concept from Sandia National Labs could be used for stealth one-way missions. From Wired:

Thus far, Sandia has built and conducted limited testing on conceptual hardware, designating it a “mature concept.” Next on the list is to secure funding for the prototype and approach industry partners to turn the concept into reality.

Multi-Modal Vehicle does have its limitations. Because it sheds parts and material as it transforms from one mode to another, recovery is almost impossible — making every mission an expensive one-way trip.

Read more…

Workhorse quad - upgraded to 1.1

3689559152?profile=original

Well it's been a year since I built my first quad (selecting APM, naturally), and I've decided to do a bit of an upgrade in the off season, as is the tradition. There were four objectives to the exercise:

- better reliability

- simplify

- reduce weight

- improve performance

1. Better reliability

- added 40A ESC's, giving me 15A overhead (formally 30A on a 25A max draw)

- replaced 5V BEC with a 5.5V, after getting occasion chirp from spektrum telemetry about low volts.

- Re-wired the PDB and the ESC's for better RF

- replaced 1 motor that sounded less than optimal

- ESC's now uprated (if you can "uprate "to HobbyKing...:-)) and outboard for cooling and better security

2. Simplicity

- number of battery circuits reduced from 3 to one. New 5.5V and 12V BEC's used

- Unnecessary LED's dumped. Only retained 4 for orientation on the odd occasion I don't FPV. But they are braincube's and *very* bright! Here is the controller:

3689558886?profile=original

- Labelled everything

3. Reduce weight.

- Reduced battery circuits from 3 to 1.

- EzOSD replaced with minimOSD. Also in picture: an FPV camer switcher and the Telemetry junction box.

3689559162?profile=original- LED circuits dumped

- Spektrum telemtry TM1000 dumped

- GPS finder dumped

- Leg components replaced with Carbon Fibre

And did it work? Starting weight: 3.65kg. End weight: 3.62kg. lol. However, if I'd stayed with the quadframe brushless (just refused to tune with a martinez board!) and dumbed the Braincube as well, I would have saved over 200g.

4. Performance

Ok, a big subject...

- Moongel replaced with zeal. Unfortunately vibes actually went up! I now hit the +/-5 "safe" limits in high power flight and maneuvers. However, it does seem to respond to very small commands much better; the zeal is firmer than moongel so I might expect that.

- PID's retuned after 3.0.1, to increase YAW control, and to decrease pitch/roll (only by 7%) to improve video footage. It still handles well, but it's now more "Transit" than "Cosworth" (for our american cousins, this translates to: "it's more light truck than corvette").

- 6S Current sensor added. Means Compassmot can be run in CURRENT not THROTTLE. Flight noticably more accurate, especially in RTL, Loiter.

- Higher GPS pole added. Compassmot reduced from 4% to 1%.

- Quadframe gimbal replaced with RCTimer, and video quality immediately improved. Quadframe brushless gimbal just refused to take a tune, and never performed well.

- Radio diversity added via Orangerx 800 (DSMX) + 2 sats. Each with a 30cm cable. One mounted far out under one arm, one as far down on the leg as possible. It's not perfect, but better than before. Radio now much more reliable regardless of orientation. No more scary moments...

3689559179?profile=originalVideo TX moved to as far down the legs as possible. Range has improved from 350m to well over 600 with 600mw tx + ibcrazy omni's. Will be pushing out further, as I now have an ibcrazy 5 turn helical to play with as well. Also to come: 1/4 wavelength 433mhz antenna's for long range telemetry. How bad is it? It cuts out before the video does...

3689559141?profile=originalGimbal has had 2 upgrades. I replaced the battery plate with my own design, and I'm happy with that. So happy I'm selling it to anyone who wants one. Also replaced the balls with stiffer ones. I still get a tiny bit of jitter in pitch, but I might need to look at my rx feed into the martinez; it might be noisy.

3689559205?profile=originalAnd finally, dumped the 420 line camera, and went with the 650 line from Security Camera 2000 (the one everyone goes for!). Along with some new low light lenses. Works so much better. Just a pity I can't get minimOSD to overlay on the feed for some reason; works ok on the Gopro feed!

3689559303?profile=original

What's everyone else got planned this winter?
Read more…

Using a FrSKY Taranis X9D, we have been mixing different switches for 7 flight modes. RTL on a ONE-Switch Return Home and 6 other flight modes for Arducopter. Today, we are sharing with you Part 3 of the series of videos we made on how to add the sound files to each flight mode and more. We had several field testers and we use a standard of 10 tracks on the field.  In addition, 2 more system sounds for battery warning.  We have included the sound files we used. You can download the zip file at www.dronemission.com

You will need to complete the 6 Custom Switches from the previous tutorial, in order to assign the sound tracks.
Previously, Part 2: diydrones.com-blogs-part2

3689558734?profile=original


The Talking Taranis Experience:


Read more…

3DR Y6 MultiCopter Maiden Flight and Review

Quick first flight video.

PROS- 

Complete Kit

Open source Hardware/Software

Large community and support

CONS-

Manual could be updated with assembly diagrams and better clarification.  Some pics and instructions conflict with company website.

Everything has it's place except power distribution board, which leads to next issue.

Very hard to manage all cables and ESC's.

Still a lot of DIY tweaking needed to make fly right.

Would love to see other builders photos of how you managed cabling and/or ARF kit photos.

Pictured below is my Y6 before first flight.

3689559114?profile=original

Read more…

APM RSSI 3.3V input

3689559023?profile=original

For some time I wanted to add ability to provide RSSI from FrSky receiver to APM.

RSSI_PIN parameter works fine for that however some of receivers such as mine FrSky D8R-XP outputs 0 - 3.3 V. For that purpose I've added new param and called it RSSI_RANGE.
This was also issue requested before: https://github.com/diydrones/ardupilot/issues/648
After voltage rescaling it works. rxrssi is shown in scale 0-100.

And added ability to rescale in params:

3689558933?profile=original

Here few pictures:

3689559042?profile=original


I've used 4.7k resistor and 10uF capacitor to filter pulse signal coming from receiver's RSSI output.

3689558942?profile=original

3689559057?profile=original

Hope this helps anyone.


Lukasz

Read more…
Developer

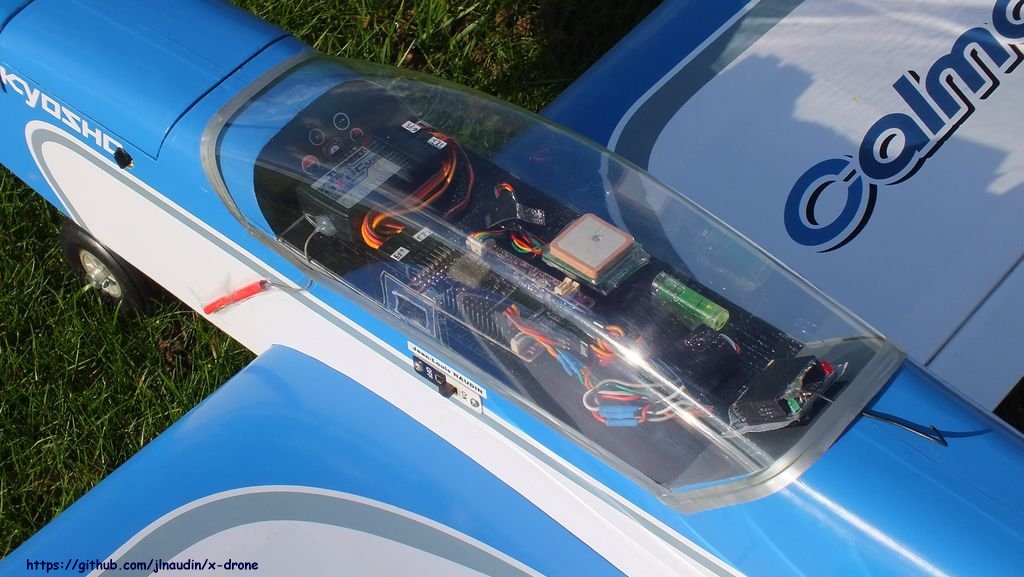
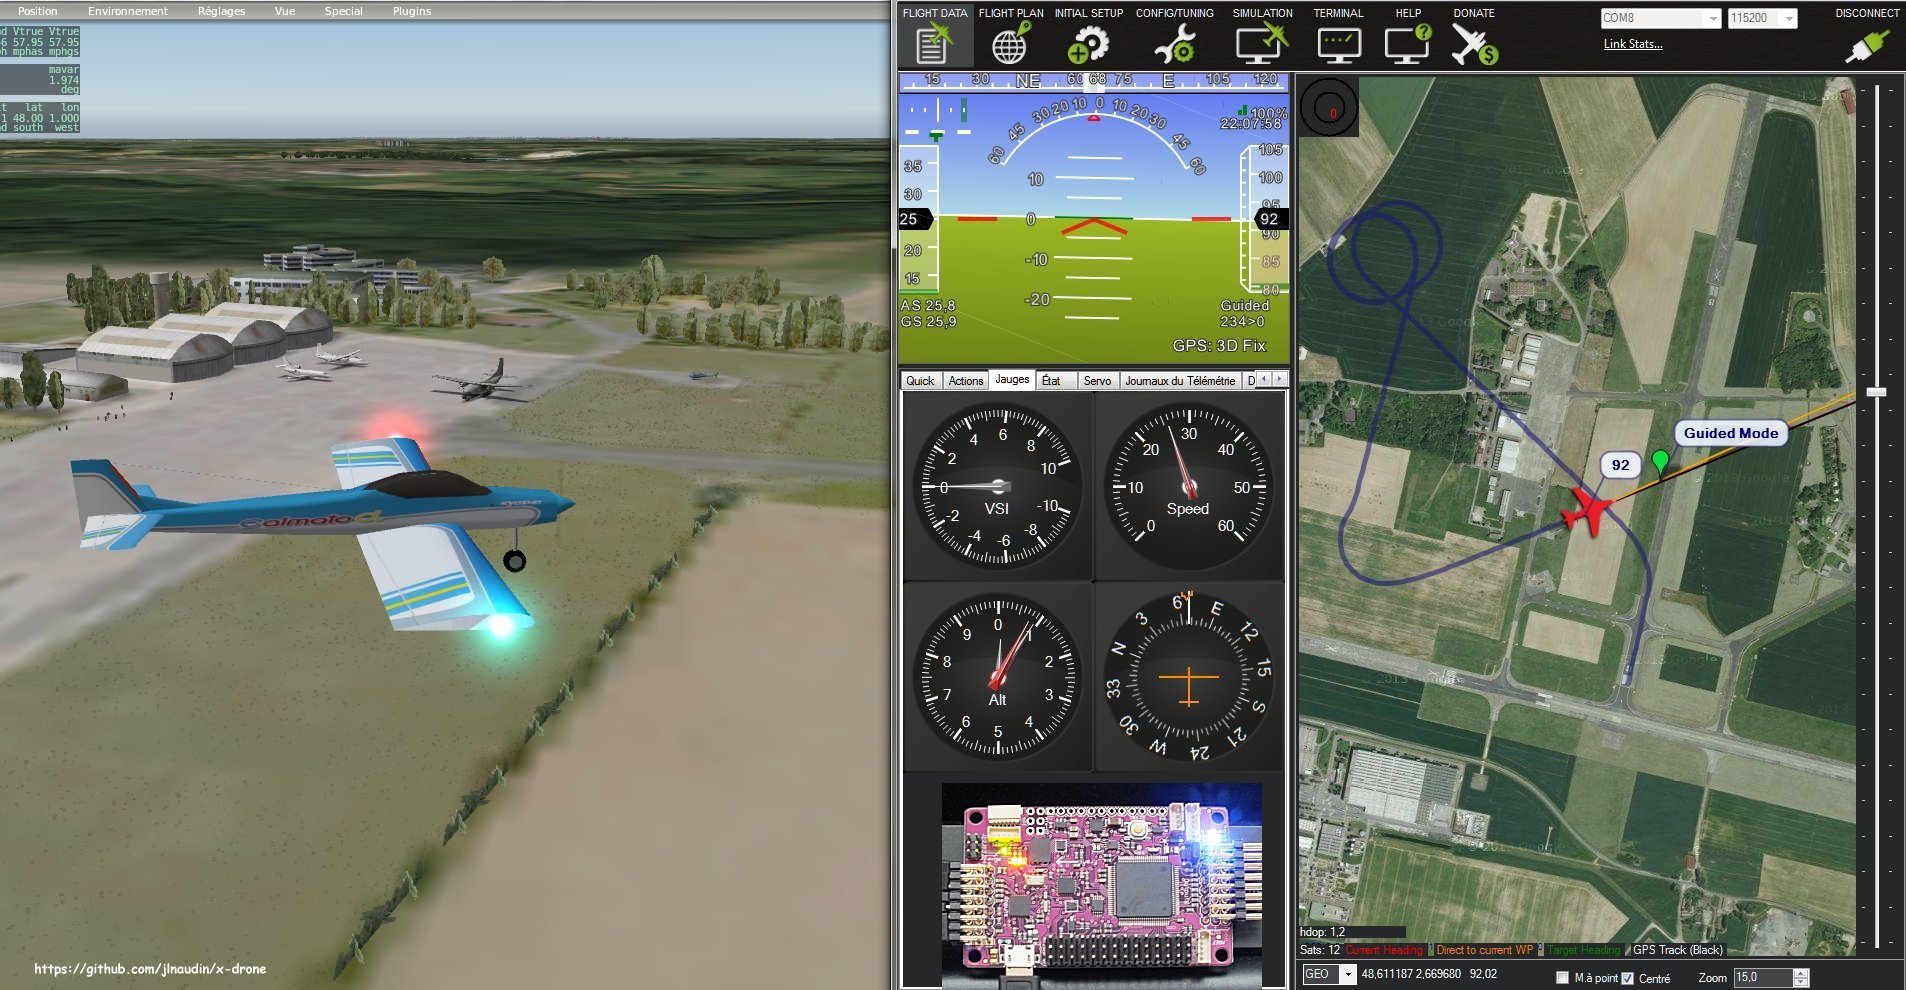
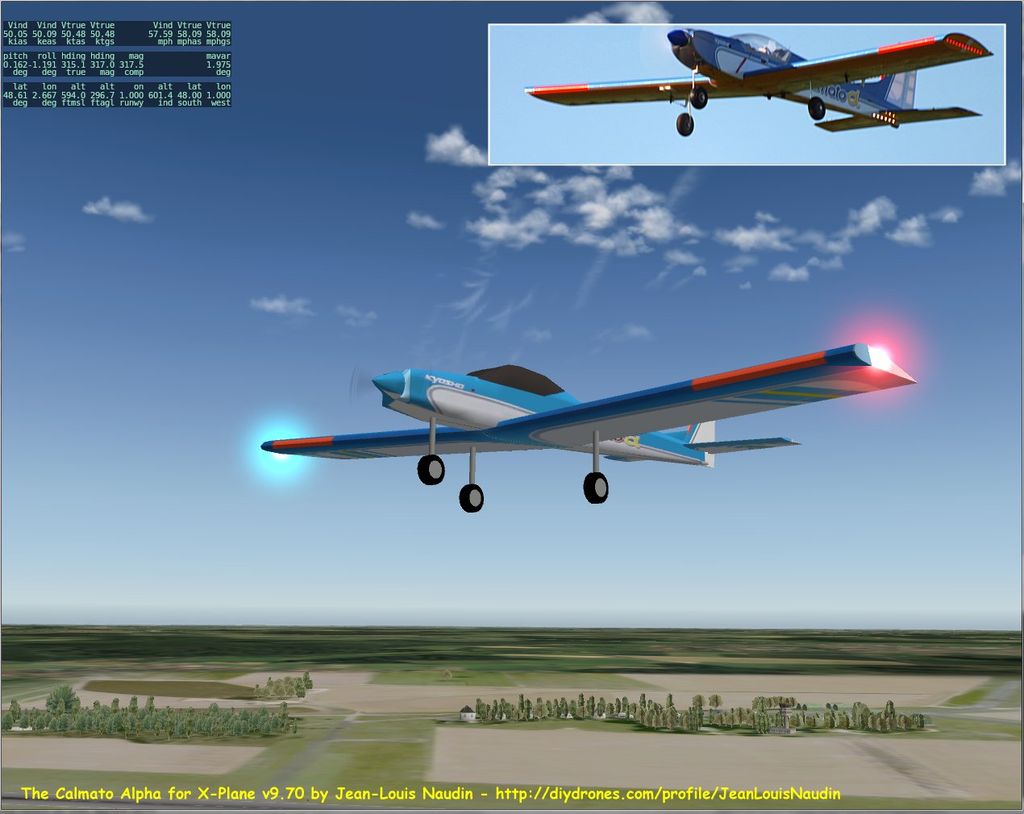
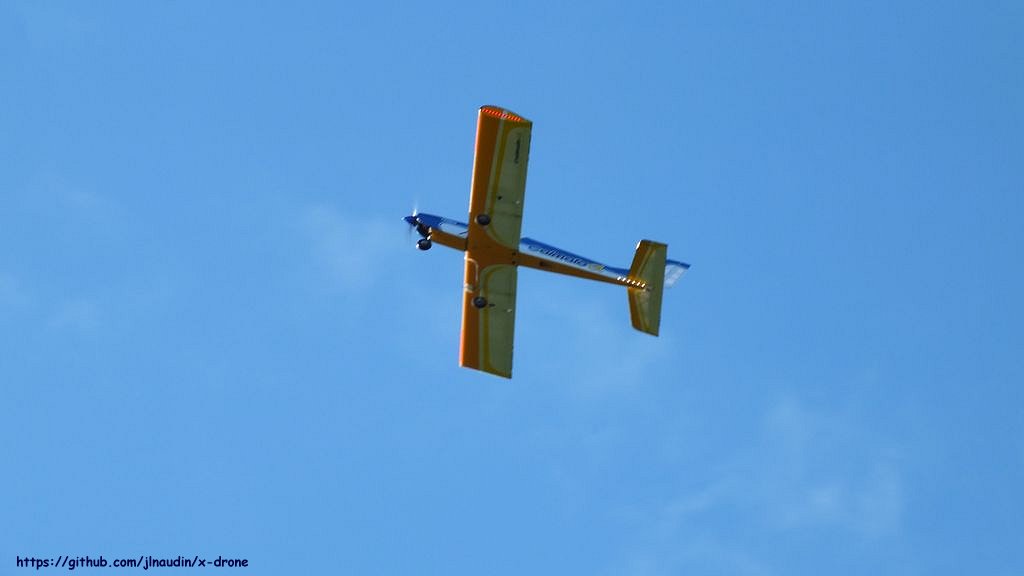
Here a video of a Calmato Alpha 40, an electric powered airplane, fully piloted by the ArduPlane v2.73-xp1 and tested successfully in flight and in HIL (Hardware In the Loop) simulation on the x-Plane v9.70 simulator.
calmato_real_mode2.jpg?width=640
calmato_real_mode1.jpg?width=640
Flying setup:
- Calmato Alpha 40 (Kyosho) EP
- xPower 800 Watts brushless motor (Kv670)
- propeller 10x6 APC-E
- Lipo batterie 5S 5000mAh Turnigy for the propulsion
- ArduFlyer v2.5.2 IMU board (an APM v2.5 clone)
- firmware ArduPlane v2.73-xp1 (enhanced by JLN)
- GPS Crius CN-06 V2
- Airspeed sensor MVXP 7002DP
- Lipo 3S 2200 mAh for the avionics
- uBec 3A, 5V
calmato_hil_mode2.jpg?width=640
calmato_hil_mode1.jpg?width=640
HIL simulation mode:
- Xplane v9.70
- Mission Planner v1.2.86
- the Calmato Alpha 40 RC model for x-Plane by JLN
- ArduFlyer v2.5.2 IMU board (an APM v2.5 clone)
- firmware ArduPlane v2.73-xp1 (enhanced by JLN)
calmato_real_mode4.jpg?width=640

More infos at: diydrones.com/profile/JeanLouisNaudin
GitHub: github.com/jlnaudin/x-drone

Read more…
3D Robotics

3689558699?profile=originalEvan Ackerman at IEEE Spectrum reports on new research that suggests that a large central rotor (like a helicopter) combined with with three smaller control rotors is a more effecient use of four motors than the conventional quadcopter configuration. They call it a "Triquad":

As cool as quadrotors are, in most cases they're simply not as good as helicopters. Because of the way they're designed (with four small rotors instead of one big one), they're less powerful, less efficient, and less maneuverable. The power and efficiency issues come from the fact that one big rotor generates more lift per aircraft footprint than four small rotors, and as for maneuverability, a helicopter that can alter rotor pitch instantly will always outmaneuver a quadrotor that can only control blade speed. Seriously, try doing this with a quadrotor.

So, the thing that quadrotors have going for them is that they're simple. Helicopters have complex main rotor heads, with shafts and bearings and linkages all over the place, while quadrotors just have four motors and that's it. The University of Queensland researchers came up with a "Y4" configuration that aims to take all the good bits of helicopters and make them as simple as quadrotors. I'm just going to start calling this new design a triquad. Keep in mind that this is still a quadrotor: it just had things shifted around a little bit.

Almost all of the triquad's lift comes from its big main fixed-pitch rotor, located at the center of the "Y" (pictured below). The three little fixed-pitch rotors in the "Y" configuration are angled (at a fixed 45 degrees) to provide counter-torque (which they do slightly more efficiently than a helicopter tail rotor) along with pitch and roll control. Here's how the control works:

Crunching numbers suggested that the triquad would have an increase in performance (in terms of flight time) of about 25 percent over a standard quadrotor configuration. The researchers, being researchers, decided that the only fair way to test this hypothesis was through experimentation, so they built a triquad and a traditional quadrotor that were as identical as possible:
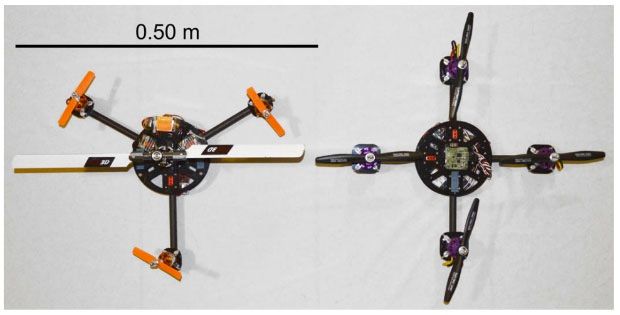
They had the same mass, the same footprint, the same mass devoted to actuators, the same chassis, the same arms, the same batteries, and the same flight controller. The researchers explained that the standard "control" quadrotor had an optimized design, while the triquad was not optimized at all (because its design was constrained to keep it as similar as possible to the control quadrotor). This gave the control aircraft an advantage in power of about 9 percent.

Even with this disadvantage in power and a suboptimal design, the average current draw during hover was over 15 percent higher for the control quad, which translates into a 15 percent increase in flight time for the triquad design. The researchers think that with some tweaking, that theoretically calculated 25 percent increase should be achievable.

"Towards a More Efficient Quadrotor Configuration," by Scott Driessens andPaul E. I. Pounds from the University of Queensland, was presented last week at IROS 2013 in Tokyo, Japan.

[ University of Queensland ]

Read more…