All Posts (11086)

Sort by

DIY Samsung Trigger for APM

20130618_153028

In this post I’ll describe how to make your own cable to trigger the Samsung mirrorless cameras NX20, NX210 and NX1000. We’ll be using an ArduPilot Mega 2.5 to do the triggering but you can use any Arduino or even a soldered push button.

What you’ll need:

Some USB devices use what’s known as OTG or On the Go cables to determine master/slave status of each device. The resistance between the ground pin and the ID pin determine how the device responds – most OTG cables just short these pins which wont work for us, so avoid OTG cables if you’re recycling a USB plug. We’ll use a 68k resistor so the camera identifies our cable as a remote shutter. The design we’re going for is shown below in an Eagle schematic for clarity.

nx1000shuttersch

The problem here is that it’s not so easy to get at pin 4 of most micro USB plugs. If you buy one from Digikey you’ll see it’s no problem but if you’re trying to recycle a plug from a spare micro USB cable, it can be quite challenging. I’ve done it  and it’s possible but can be very frustrating and not all plugs even have pin 4 exposed!

First pull all your parts together and identify pins 5 and 4 on your USB plug. On this one, pin 1 is on the far right with the USB plug facing up.

20130618_153325


Then add a bit of solder to pins 5 and 4 to get them ready for the resistor.

20130618_153708


This step isn’t as hard as it sounds – with the soldering iron in one hand and tweezers in the other, pick up the resistor and get it onto pins 5 and 4 where it actually touches both pins – it fits almost perfectly in this position using this USB plug. Now melt some of the solder that is already on Pin 5 (or Pin 4, depending on how you’re holding it), just enough so that it makes a solid joint and holds the resistor in place. Then flip it over and add more solder to the other pin. Don’t spend too long on that one or it will heat up the other side and the resistor will fall off.

USBPlug


Easier than you thought, right? Make sure both ends have strong joints and plenty of solder, being careful not to get it too hot and let it melt off the other side. Now grab the servo cable and cut off the female end. Splice out the ground and signal wires. You can also cut back the power wire now.

20130618_153942


Add some solder to these wire ends to prepare them to be attached to the USB connector. Make sure there’s a bit extra so you can make the joint without a third hand for applying solder. According to the schematic, we have to attach ground (black wire) to Pin 5.

20130618_154103


..And then attach the signal (white) wire to Pin 3.

20130618_154244


Now before we do anything else, hook it up to your camera and make sure it works by shorting out the white and black wires – I use my tweezers on the exposed metal pins to do this easily.

20130618_154801

Make sure it actually takes a picture and doesn’t just focus. If you solder the signal wire to Pin 2 instead of Pin 3 it will only focus the lens, not take the picture. Now all these wires are pretty close to each other and over time with mechanical stress they could end up shorting. To prevent that, add a dab of hot glue between the connections to keep them spaced for good.

20130618_155317


Finally, wrap it up with heatshrink!

20130618_155630


Now you can trigger the camera shutter simply by supplying a low pulse to the servo wire plugged into an Arduino. If you’re looking to take aerial photographs using ArduPilot, then the rest is done for you. Just visit the Event 38 Downloads page and download the Aphex firmware and parameter file. This firmware puts out the correct pulse on pin A7 in the row of auxiliary pins on the side of APM approximately every 2.4 seconds. If you want to change the timing or have it respond to R/C input instead feel free to checkout and modify our source code from Github branch AC2.9.1b_NX.

Read more…
3D Robotics

3689530912?profile=originalMAVLink-compatible, which means it works with QGroundControl. All details here. Coverage from Engadget:

Starting next week, Parrot will be offering up those new add-ons it announced way back at CES. The "black box" Flight Recorder has been priced at $130, adding the ability to save flight data and GPS information from runs, which can be viewed in 3D through AR.Drone Academy maps. The device plugs into the quadcopter's USB port, bringing 4GB of storage that can also be used to save up to two hours of HD video. The Recorder also lets users perform simple piloting maneuvers via smartphone and tablet. The high density battery, meanwhile, has been priced at $70, bringing 18 minutes of flight time to the 'copter. Both are available now through Parrot's store.

On the software side, the $3.99 2.0 piloting app brings Director Mode to the flier, giving users more control over the video they shoot with their drone, including editing and picture settings like white balance and saturation. Parrot's offering the Rescue Mode update for free, meanwhile, with random shake and over balance settings to help rescue your drone from quadcopter-eating trees.

Full press release here:

Parrot AR.Drone 2.0: Flying further, faster, higher!

In June, Parrot offers AR.Drone 2.0 fans' to experience even more astonishing flights:

• Flights displayed on 3D, video storage and GPS localization thanks to the new Flight Recorder module;

• Access to Director Mode feature for filming the world from the sky like a pro;

• Increased flight time by 50 percent thanks to a new High Density Battery.

With new features and accessories, beginner and expert pilots will benefit from the most advanced technology and limitless flights!

Flight Recorder: The black box...

As black boxes are standard on commercial aircrafts, Parrot AR.Drone 2.0 will now have the option to utilize the new Flight Recorder system, which can save flight data and GPS-localized information.

When plugged into the Parrot AR.Drone 2.0, this module can accurately (+/- 2 meters) save the exact position of the quadricopter throughout each flight.

The collected data can be viewed in 3D and can be analyzed through the AR.Drone Academy maps.

Equipped with a 4GB Flash memory; Flight Recorder also can record approximately two hours of HD video. This content can be easily shared with the AR.Drone community via the AR.Drone Academy.

Flight Recorder provides access to two additional unique features:

• « Click & Go » Piloting Mode

Thanks to the Flight Recorder module, the pilot and its quadricopter and geolocalized on a map. One click on the piloting smartphone or tablet screen and pilot defines a destination. After adjusting the flight altitude and speed, the Parrot AR.Drone 2.0 will reach the selected destination (depending on Wi-Fi range).

• « Return Home » feature

One click on the Home button and the Parrot AR.Drone 2.0 goes back to its original departure location.

For expert pilots:

The Flight Recorder module is compatible with MAVLink Open Source communication protocol and can be used with QGround Control solution for defining flight routes.

Also, team at the Delft University of Technology integrated the open source high end autopilot software, paparazzi, in the AR.Drone hardware. There is no need to change the AR.Drone hardware but only to plug in the Parrot Flight Recorder. Next step is to have a laptop with paparazzi on it, to connect the laptop Wi-Fi to the AR.Drone, to launch paparazzi and to click on « compile » so that the software will be put on the AR.Drone. You're now ready to fly!

Video: https://www.youtube.com/embed/oX423smmPEc?autoplay=1

Wiki Page: http://paparazzi.enac.fr/wiki/AR_Drone_2/getting_started

Flight Recorder is available on www.parrotshopping.com and at select stores.

List of point of sales: www.parrot.com

Price: $129.95 USD

For immediate release Paris, June 17, 2013

Director Mode: Film like a pro!

Pilots equipped with an iPhone®, iPad® or iPod touch® can benefit from the Director Mode feature, which is available through the Parrot AR.Drone 2.0 piloting app.

This feature gives pilots the opportunity to create smooth videos using nine pre-registered movements (forward/backward travelling, panoramic, crane, etc.) allowing them to modify speed before or during flight.
• Camera settings

Director Mode feature offers a number of different camera settings, including: white balance, saturation, exposure, etc.

• Post-production settings

To achieve a clear view from the sky, Director Mode offers advanced video settings. While watching a previously recorded AR.Drone 2.0 video, a graph highlighting image vibrations is displayed on the smartphone or tablet piloting screen. The pilot can then select sequences to post-production edit for improving image stability.

• Sequences edits

Is your video from the Parrot AR.Drone 2.0 too long? Sequences not interesting enough? Pilots can easily select sequences to keep or delete in just a few clicks. The software also can edit sequences to create a new video.

All videos can be shared from the piloting app on YouTube, Facebook or the AR.Drone Academy.

Director Mode: $3.99 USD

*The piloting app must be up-to-date to download Director Mode and is currently available on the App Store℠ (Android™ version will be available in September).

High Density Battery: Fly more...

Thanks to the new High Density Lithium-Polymer battery, available as an optional accessory, Parrot AR.Drone 2.0 can fly non-stop for 18 minutes!

The High Density Battery is available on www.parrotshopping.com and in select stores.

List of point of sales: www.parrot.com

Price: $69.95 USD

Bonus: 'Rescue Mode'

Due to piloting errors or bad weather conditions, Parrot AR.Drone 2.0 can get stuck in a tree or other obstacle. To recover the AR.Drone 2.0, pilots now have the option to select from two propeller movements (random shake or over balance) from the smartphone or tablet piloting device.

Rescue Mode is available for free after updating the AR.Drone piloting app in the App Store.

Watch Parrot AR.Drone 2.0 vides on YouTube.com/ardrone

Parrot AR.Drone 2.0 embodies the most advanced technologies, including ultra-robust and powerful engines. Technical specifications of this state-of-the-art technology can be found here.

Read more…

Engadget covers AVC 2013

From Engadget. This last paragraph really sums it up nicely:

And really, for all the prize money and ominous warning signs at the entrance, the AVC is ultimately a meeting space for hobbyists in what may some day become a much larger movement. It's a place to experiment, talk shop and occasionally crash along the way.

Read more…

PX4FLOW Position Hold Beta and Source Code Release

Our new video shows position hold (the position can be moved on the fly, so its actually full position control) using the PX4FMU autopilot plus PX4FLOW on the AR.Drone 2.0 frame. We have created a set of example apps to show how flow can be used for position control - these are however just textbook like examples, no bells and whistles, no complete sensor fusion and no attempt to max out on performance.

This post is also to announce the availability of the PX4FLOW open source firmware. We are only releasing it now since we wanted to do all restructuring necessary before we release it, so that any open source contribution won't be left behind because the structure changes dramatically. We invested a full person month into getting things clean, nice and simple, and we hope developers will appreciate the effort.

A quick guide is available here for early adopters / testers interested to fly this immediately. As for any beta releases, you will need to have the PX4 toolchain installed (installation guide).

Read more…
3D Robotics

3689530807?profile=original

From the University of Florida (via IEEE Spectrum). Note that they don't cost $250 yet (or are even available), but the researchers think they could cost that little someday if produced in volume):

Kamran Mohseni envisions a day when the unmanned vehicles in his laboratory at the University of Florida will swarm over, under and through hurricanes to help predict the strength and path of the storms.

The tiny, autonomous craft — some fly, others dart under the waves — can spy on hurricanes at close range without getting blown willy-nilly, while sensors onboard collect and send in real time the data scientists need to predict the intensity and trajectory of storms: pressure, temperature, humidity, location and time.

Mohseni said people always ask him how the miniature flying machines — just 6 inches long and about the weight of an iPod Nano — can take on one of the monster storms.

“Our vehicles don’t fight the hurricane; we use the hurricane to take us places,” said Mohseni, the W.P. Bushnell Endowed Professor in the department of mechanical and aerospace engineering and the department of electrical and computer engineering.

The aerial and underwater vehicles can be launched with commands from a laptop hundreds of miles from the eye of a hurricane. Mohseni and a team of graduate students use mathematical models to predict regions in the atmosphere and ocean that can give the vehicles a free ride toward their destination. Once in the vicinity, they can be powered off to wait for a particular current of wind or water. When they detect the current they need for navigation, they power back on, slip into the current, then power off again to conserve fuel as the current carries them to a target location.

In essence, they can go for a fact-gathering ride on hurricane winds and waters.

The devices are a departure from current technology, which uses hurricane reconnaissance aircraft to punch through a storm’s eye wall and release dropsondes, sensors that free-fall and might or might not collect helpful data. Underwater data are even more difficult to collect today, although just as important, considering that the warm, moist air on the ocean surface provides fuel for hurricanes.

Mohseni’s vehicles, even launched hundreds at a time, also reduce the cost of hurricane reconnaissance.

“If you want to blast through a hurricane, you have to build a bigger airplane,” Mohseni said. “[The military] asks for a Batman airplane, a super-duper aircraft that could do everything. But what if you lose one of these super-duper airplanes?

“We are going the opposite direction. We don’t have anything that is super duper. We have cheap sensors, but with a lot of them you can significantly increase the accuracy of your measurements,” said Mohseni, director of UF’s new Institute for Networked Autonomous Systems. “You get super duper on an aggregate level.”

The prototypes produced at the institute are about $250 apiece and are too small and lightweight to cause damage when they hit something, a big consideration in hurricane-force winds and waves. Mohseni does not use a landing strip to test the aerial vehicles; he just tells them to crash, picks them up and flies them again. The carbon fiber shell of the aerial vehicles is wafer-thin but resilient. With proper funding, Mohseni said, the vehicles could be tested in a real-world hurricane in two or three years.

In instances where many are lost — as in a hurricane — the data gained outweighs the cost of the lost vehicles, Mohseni said. Production costs would drop if the vehicles were mass-produced.

The vehicles also are smart. Mohseni developed a cooperative control algorithm that allows them to form a network and learn from the data they take in, for example, by adjusting their course when needed. This feature makes them useful for applications beyond hurricanes.

Extreme environments, such as the polar ice caps, are difficult and hazardous to measure with standard technology. Mohseni said heat transfer through polar ice between the ocean and the air goes almost completely unmeasured today but could be safely measured with the aerial vehicles, which can be launched from a laptop aboard a ship and send back climate data in real time.

Vehicles so tiny, powerful and smart would have been far-fetched even 10 years ago, Mohseni said, but advances in microfabrication, communications, computer processing and computation have led to sophisticated technology in small packages. Nevertheless, Mohseni also has drawn inspiration from seemingly less-sophisticated sources, such as jellyfish.

Mohseni had been studying fluid dynamics, working on propulsion, when a biologist mentioned that jellyfish navigate in much the same way as the mechanical system Mohseni wanted to develop. After studying jellyfish, cuttlefish and squid, Mohseni developed a mathematical model of their thrust and used that model to develop the motors for his underwater sensor vehicles. He now has small submarines capable of autonomous docking using technology mimicking jellyfish and squid, and the sea creatures are common fixtures in his laboratory.

“With biomimicry, learning from what nature does,” Mohseni said, “you just sort of get amazed.”

Read more…

A beginner's experience to the Copter world

My dad likes remote control cars. My brothers like remote control cars. I like them too. As a family, we grew up playing with train sets laid out on the family dinner table. As kids we also used to enjoy playing with a “Thunderloop Thriller AFX Slotcar Set” and making things out of Lego. The things that typical boys enjoyed playing with.

So where do I begin with this flying journey? How about this last Christmas. It was the year of… strangely enough remote control toys – yet again. Some years it’s been remote control 4WDs with over-sized tyres, other times, there have been noise making cars, or ones that only turn when you reverse them. Well, cheap infrared helicopters were in this Christmas. We flew them around, bounced them off walls, hit light fittings and dented couches until the batteries ran out, before we would charge them for 10 minutes, use the small charge stored in the capacitor and do it all again.

A few months ago I came across some quadcopters on the Internet. Mmmm… These looked like fun. I was so impressed that I looked on ebay and searched around and found a DJI Phantom Quadcopter for about $300 – well within budget. I thought, that looks like a good deal (because others of the same thing were over $600). As it turns out I got stitched up on eBay. But, PayPal came through for me in the end. (Thanks guys).

It’s a good thing it happened this way though. It started me on a journey to find out more about what these flying machines were really all about and the vast amount that are truly out there. I got my money back, and felt like I had received a bonus $300. Budget now doubled!

I write this not as someone who is an expert, but as someone who has gone from knowing nothing, to some who has watched videos, read up and who now knows a little more than the majority of my friends. Why is this so? Because none of my friends have a flying machine quite like I do.

It seemed to me there are several different types of flying machines around. To keep it simple, lets just use the word copter, as the generic term. There are several types of these copters around – all with a prefix to tell you how many propellers there are. I’m not going to be talking about planes, helicopters, wheeled devices or tanks as this hasn’t been the focus of my research.

So, the common ones are.

  • Tricopter – 3 blades
  • Quadracopter – 4 blades
  • Hexacopter – 6 Blades
  • Octocopter – 8 Blades

It took me a while to figure out, but the more blades you have – the greater lifting capacity you have – in a basic sense. I like photography and the odd hobby filming, so I thought a hexacopter would be a good start.

As I mentioned, there are many different types, and I’ll try and break it down a little. DIY open source kits which you put together yourself, or; closed source proprietary systems which are generally purchased in a ready to fly kit.

When I say drones/copters I’m not talking about military drones that cost a million dollars to fly, nor am I talking about a Cinestar 8 HL (or an Aus version), or the one used in a recent Top Gear Nile Special. I’m talking about a simple pro-sumer version with a minimum few features – such as GPS and waypoint controls. The ones you can get at a local electronic shop are the toy ones – these are not the ones I’m interested in.

The DJI unit I originally looked at is a proprietary system, though many people have modded them and done add-ons and hacked the frames to accomodate more things, but overall I felt these didn’t have the greater flexibility that their open source brothers have.

The OpenSource model however is a rather different beast. I somehow discovered it and found that there are many people out there all doing really cool things and I wanted to be a part of it. Why? Firstly, the OpenSource model is great because it’s a community collaborative thing, and updates are often regular. Secondly, the amount of people and active members I found at DIYDrones.com was massive. Theres’s a great source of material, and regular content.

There was a problem though. The more I looked at the different options, the more I got confused.

Many years ago, I remember looking at getting a satellite decoder box, because my house had a satellite dish on it. Why wouldn’t you? Free TV channels right? If you start looking up that kind of content of what to buy, how to find the right satellite you discover quickly that it’s a completely different language full of acronyms and words that are only in use in that field. Needless to say, I gave up.

Looking in to the world of these copters has been like that for me. I still don’t have a clue what half of the acronyms are that are dropped, and at the moment – I don’t really care. But, what I have found out, I’ve decided to share so that others won’t be confused like I was.

So, you want a flying copter but don’t know where to start? That was my position and you are not alone.

If you go down the DIY option, this image (source) (and many others like it) is probably one of the most helpful things you can have to understand the basics of what you need to get one working – at least of the electronics.
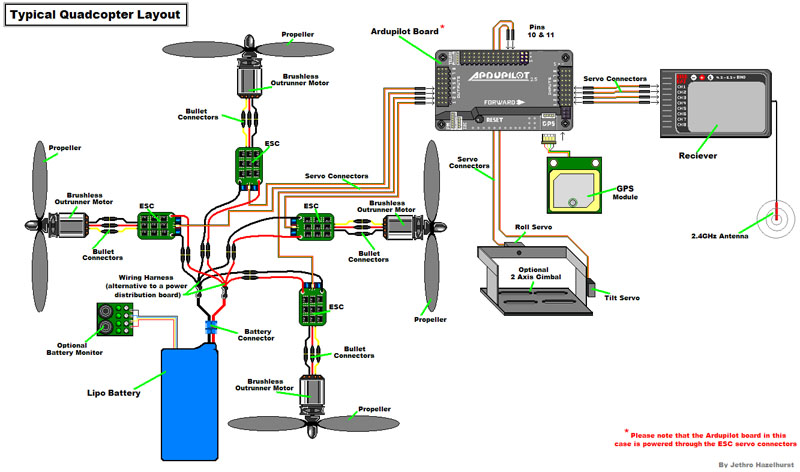
808846142_orig.jpg?width=800

Electronic Layout

Basically you need the following: (for a quadcopter)

  • 4 motors with blades
  • 4 Electronic speed controllers (ESC) for each of the motors
  • A battery
  • A radio receiver (and transmitter)
  • A “computer/brain” (I went with this leading model)
  • A frame and wires to hold it all together

Once I discovered this image, much of it made sense.

I looked at some of the stuff on HobbyKing (a website with many remote control items) and there were heaps of cheap options. I started looking at the frames. If I was going to have a copter, I wanted it to look good. The next problem was figuring out which models worked with what, how the ratings of motors worked, the size of the blades, the frame, the bla bla bla bla. I nearly gave up – again.

Instead, I started looking at kits that where ready to be built. This was more up my alley. The hard work was done, and I just had to put it together… As Jeremy Clarkson puts it “How hard could it be?” – yeah right…

I chose a Hexacopter from 3DRobotics with the full electronic kit. This saved me having to know what an ESC was, and what kind of rating a motor had. (I still don’t know what the specific motors are that they sent me. I just know they are blue and go really fast.)

The reason I chose to go with the OpenSource system, was community support There was software available, new firmware updates, it looked really good. I’d chosen the ArduPilot box and after searching on the DIYDrones website, I finally found what I was looking for. The final piece in the puzzle was all about batteries.

Do you remember when Linux first came out? I remember compiling kernels many years ago, and people saying, “Yeah, this is the future”. The future? Yeah…Whatever. Make it friendly and don’t make it crash on me. These days, it is much more stable and there are more than a few consumers using it.

This was where I found myself in the copter world; scratching my head and trying to figure out a bunch of information that everyone knew, or just assumed that was already known. This was probably one of the hardest things to understand. That and trolling through the massive amounts of forums posts. There was plenty of good help available however. My questions: Post 1. Post 2. Post 3

Now back to the batteries… If you are looking at buying a DIY drone, there are 2 things you aren’t told. Firstly, about a transmitter/receiver (and a charger) and secondly, what type of battery you will need.

The 3DR Hexacopter will easily handle/need a 3C 2200mAh 11.1V. What is all this? 3C means it has 3 cells. 3 parts of a battery that make up the 11.1 volts required. The 2200mAh value is how much power is in the battery for how long it will run. There is another value and that is how much punch it has, but a value of 30 will work fine. All up, a battery like this, you will get 7-8 minutes from it. (Yep, that’s all unfortunately). This is what they look like and the approximate price.

I’d like to say 2 things about when ordering parts from the Internet. My intention was to have a flying copter and be able to be proficient at flying so I can take aerial video. I made sure I ordered months in advance. The guys at 3DRobitics in the USA, I can not fault. I ordered on a Thursday/Friday night Australian time, and it arrived on the Tuesday. I also made an order from HobbyKing at the same time. I ordered batteries and a radio remote controller and receiver from them. I still haven’t received the package and it’s still sitting in Hong Kong (apparently) – and this was back in mid May, 2013. Now to be fair to them, it could be the mail service they use – SpeedPost.sg. Correct me if I’m wrong, and maybe my expectations are too high, but I would expect that when they say a package will be delivered within 3-6 days, that it will be.

You get what you pay for. If you want items, get them local or from trusted suppliers.

Needless to say, I discovered a nice little RC hobby shop up the road from me. They don’t specifically have much tri/quad/hex copter gear, however there is plenty of other equipment. They have batteries, chargers, transmitters and basically what I needed. I should have gone there in the first place. I’m a fan of supporting small businesses, especially specialty shops like this. Needless to say, the friendly staff are very helpful.
http://www.mildtowildrc.com.au/

On another note, I have found the story on 3DRobotics very interesting:
https://www.youtube.com/watch?v=n1E_CPxR3LA (watch the whole 5 videos)
https://www.youtube.com/watch?v=cwH7w1vOlIs (another one)

Part 2 of the building phase will come next.

Thanks! Let me know if this article has helped you in anyway.

Read more…
3D Robotics

dragonfly1.jpg

One of the best ways to design micro-UAVs is to emulate insects. But figuring out how insects navigate and fly is hard, unless you can monitor their neurons in action. Scientists have now figured out how to do that. A fascinating piece from my alma mater, Wired:

The brain of a dragonfly has to do some serious calculations — and fast — if it hopes to nab a mosquito or midge in midair. It has to predict the trajectory of its prey, plot a course to intersect it, then make adjustments on the fly to counteract any evasive maneuvers. Neuroscientist Anthony Leonardo created the tiny dragonfly backpack above to study how circuits of neurons do these computations.

The backpack weighs 40 milligrams, about as much as a couple grains of sand, equal to just 10 percent of the dragonfly’s weight. Electrodes inserted into the dragonfly’s body and brain record the electrical activity of neurons, and a custom-made chip amplifies the signals and transmits them wirelessly to a nearby computer.

One of the trickiest design challenges was how to power the chip without adding so much mass that the insects couldn’t get off the ground, says Leonardo, who’s based at Howard Hughes Medical Institute’s Janelia Farm Research Campus in Ashburn, Virginia.

He and collaborators at Duke University and Intan Technologies came up with a clever solution based on the same technology found in the RFID key card access system used in many office buildings. There, a reader, usually a small pad next to a door, emits radio waves to create a magnetic field. When a key card gets close enough to the reader, the magnetic field induces a current that powers a chip inside the card, enabling it to transmit a code to unlock the door.

The two long antennae on the dragonfly backpack harvest radio waves and power the chip in a similar way. Eliminating the need for a battery on the backpack was the key to keeping the weight down.

Dragonfly flight arena. Photo: Anthony Leonardo, Janelia Farm Research Campus / HHMI

Getting dragonflies to hunt inside the lab turned out to be a little tricky too, Leonardo says. In a plain white room, the insects exhaust themselves trying to escape. So the team installed turf on the floor, installed a small pond, and covered the walls with a scene that evokes a springtime meadow.

In their experiments, the researchers release fruit flies and watch the dragonflies take off from a perch and catch them. Eighteen high-speed infrared video cameras positioned around the room capture every move as a dragonfly closes in on its prey and launches its body upwards, curling its hairy legs inward to form a sort of basket trap (see video below).

As the dragonfly hunts, the backpack captures the firing of neurons Leonardo thinks play a crucial role in guiding it towards its prey. “We know a lot about their anatomy,” he said. “They gather input from visual parts of the brain and send axons down to the motor neurons that move the wings.”

The question that fascinates Leonardo is how those neurons and others transform information about the visual scene into a plan of action, and how they continuously update the plan as the dragonfly and its prey move through space. All animals do this type of transformation, from a center fielder running down a fly ball to a lion running down a gazelle. But a neuroscientist can’t exactly study those situations in the lab.

“The dragonfly is a convenient and beautiful and elegant means to an end,” Leonardo said.

Read more…

DIY Drones at 40,000 Members!

3689530550?profile=original

It's customary and a tradition that we celebrate every new 1,000 members here and share the traffic stats. This time it's 40,000!!!!

There were 2 million page views in the last month! (we get around 62,000 pageviews a day on average). It took us just 25 days to get this latest 1,000 members--we're averaging one new member every 35 minutes.

Thanks as always to all the community members who make this growth possible, and especially the moderators who approve blog posts and otherwise answer questions and keep things ticking here.

Best Wishes,

Joshua Johnson - (Assistant Administrator)

3689530584?profile=original3689530643?profile=original3689530664?profile=original

3689530589?profile=original

3689530704?profile=original

3689530649?profile=original

3689530674?profile=original

3689530721?profile=original

Read more…
Developer

Getting ready for Arducopter 3.0

3689530563?profile=original

I flew AC 3.0 (rc5) at Sparkfun which required me to rethink my vibration dampening strategy. In other words I had to go from no strategy to something very robust. If you want to fly 3.0 in any AP mode you'll need to consider at least some of these methods. Once upgraded, my copter was able to hold a 1 foot loiter box with the crappiest RCTimer props/motors they sell without issue.

Here was my shopping list:

http://www.rangevideo.com/accessories/vibration-mount.html

http://hobbyking.com/hobbyking/store/__8999__peel_n_stick_foam_tape_10x5inch_4mm_thick.html

http://hobbyking.com/hobbyking/store/__26457__Anti_Vibration_foam_Orange_Latex_190mm_x_140mm_x_6mm.html

http://store.3drobotics.com/products/m3-vibration-damper

I attached the latex foam to the vibration mount with super glue which worked nicely. Adding the dollar coins with super glue under the floating vibration mount also worked well.

Even with motors vibrating so much that they looked burry, it still held a great loiter. 

Jason

Read more…

Flymanta Avatar on a Football Ground.

Here is the FlyManta AVATAR movie shoot made this week-end with a 2 axes Direct Drive Brushless. I was at Cité Universitaire in PARIS where i live. (A kind of Big Campus for foreign people. All nationality is represented here)

FlyManta particularity is the YAW movment made with 2 Servomotors on front Arms.

The Yaw command is the same than a normal Tricopter, i just change a bit the code to send this command to 2 differents outputs.( you could use a Y cable too to do that).

I've made a full photo album of the construction here : https://www.facebook.com/media/set/?set=a.10200561968160143.195432.1486931539&type=1&l=1fe6997c69

it's a public link that you can share guys.

Fast is the main advantage of the Yaw made by twisting the arms, i'm using liitle servomotor but the weakness is the center plastic pinion wheel. So using a metal one is better.

I've remarked that the Yaw on a simple Tricopter is not flat... because of the inclinaison of the back motor.

I'm using GO PRO2 and the RC Timer Direct Drive Gimbal (a bit heavy !!) a carbon one will be better to enhance my flight time. (7 mn with a 1494 gram Tricoptere)

The Batterie is 2650 mAh (300 grams)

Flight Mode is HORIZON a mix between ACRO and STABLE (ANGLE), Acc influence is lowered with angle.

Hope you like it Guys !

FlyMantaFoot from patrice rancé on Vimeo.

Read more…

3689530089?profile=original

Prepping for Flight

 I'd like to introduce SolarSight II, a long endurance solar powered UAV designed and developed by University of Michigan students in conjunction with MIT's Lincoln Laboratory. Over the past two years we've gone through a multi-phase project and are nearing completion with the delivery of an aircraft with a target endurance of 18+ hours. Moving toward this goal we've had a lot of work contributed from our members, electrical, mechanical, and aerospace alike.

The solution we've settled on is a 3.3 m span conventional configuration glider with a GaAs solar array (220 Emcore ATJ cells), Li-ion batteries (6s 10p 3100/3400 mAh), and a high efficiency brushless drive-train (Lehner-Motoren).
3689530260?profile=original

SolidWorks Rendering of Airframe


We've recently begun the flight test process with our most current airframe, which has been targeted for weight reduction and an optimized power system in order to achieve our endurance goals. This has been accelerated through the use of the APM 2.5 allowing data collection and various flight modes.


3689530239?profile=original

We're looking forward to flying with our full solar array in the coming weeks.

Project Webpage: http://solarbubbles.engin.umich.edu/~solarbubbles/index-2.html

RCGrous Webpage: http://www.rcgroups.com/forums/showthread.php?t=1839301


Phase II Aircraft Test Flights

Phase I Aircraft Wing Tip Cam (please feel free to skip to 1:00...)

Thanks for checking out our project,

Brian

Read more…

AVC media

3689529296?profile=original

Alan and Sam, from 3DR, cool and confident in the Colorado sun.

3689529408?profile=original

Dave C. this years aerial challenge winner, cracking good times and smoking hot motors.

3689529433?profile=original

Justin and Joe, of 3DR, doing work.

APM swept the top five spots in aerial, and took first place in two of the rover categories: Tom Coyle in the middle-weight category and Jason Short in the exotic category with his APM Segway two-wheeler.

There is a ton of pictures and video to go through and edit, but I'll start posting things here as soon as they are ready. 

Read more…
3D Robotics

From Northeastern University. Anybody know what autopilot platform this was based on?

For their senior cap­stone project, North­eastern elec­trical engi­neering stu­dents Cameron Olean, Ben Leathe, Tim Hickson, Chase Hath­away, Dan Petrillo, and Andrew Barada, devel­oped TRAQ—an autonomous quad­copter that uses a unique four-​​element antenna array to locate and nav­i­gate to the source of a radio signal. The quadcopter’s poten­tial appli­ca­tions include dis­aster relief, sur­veil­lance, search-​​and-​​rescue, and stolen goods recovery. The quadcopter’s autonomous nature also enables mul­tiple crafts to coor­di­nate their move­ments and pro­vide greater loca­tion accu­racy. The team devel­oped TRAQ under the guid­ance of fac­ulty adviser Bahram Shafai.


Read more…

The main video quad is offline at the moment with a faulty speed controller. So I went out with the "trainer" instead, and velcro'ed the go-pro to that, purely to see how it went. It was never intended to carry video - all extra payload was to be battery. And you call tell...most of the shot is of my legs...:-(


Video shortened to meet youtube requirements (actual flight time was 21 mins at this leisurely pace), but I'm still having program issues with this one - *another* unrequested land - not even doing anything strenuous this time - and a refusal to obey full throttle commands after changing modes when near end of battery. APM or battery related? Hmmm. After 21 mins flight time, I still had 3.75v in the cells...


Nothing spectacular, video wise; this was more about me getting some "stick time" to improve the skills, specifically to keep it smooth and steady for when I start to think about doing video properly at some point in the future on the big quad.


Read more…