R2 gangs roamed the halls!
All Posts (14049)
Sort by
As is customary and traditional, we celebrate every new 1,000 members here and share the traffic stats. This time it's 39,000!
There were 2 million page views in the last month! (we get around 65,000 pageviews a day on average). It took us just 24 days to get this latest 1,000 members--we're averaging one new member every 35 minutes.
Thanks as always to all the community members who make this growth possible, and especially the moderators who approve blog posts and otherwise answer questions and keep things ticking here.
Best Wishes,
Joshua Johnson - (Assistant Administrator)
Here is how I got 6 modes out of my T9CAP 
Under AUX CH set CH 5 to Sw C
End points I set ch 5:GEAR to +/- 120%
Under Mix 1 Mix 2 Mix 3
MAS> GEAR GEAR GEAR
SLV> GEAR GEAR GEAR
LINK > ON (N/A) (N/A)
SW> D D D
POSI > UP DOWN NULL
L H
RATE > -100% -40% -31% +100% -40% -33%
OFFSET> -100% +100% 0%
Dear Friends,
our Flight Teams beta tester star to test a VR Copter Fly Cam configuration. This is the hexa copter used by our beta tester for doing this video :
The Hexa configuration use :
- VR Brain 4.0 as Flight Control
- Pulso Motor.
- 30 Amp ESC.
- 12 Graupner Propeller.
- Prototype Version of 2 Axis Direct Driver gimbal , for VR Gimbal 3 axis testing and developing.
For obtain good fly performance we use this kind of for solve the iusse vibration this is the result of vibration during the flight. It's very good :)
Our beta tester use acro mode during his first fly test and he's very happy of result have with VR Brain Flight controll.
http://www.virtualrobotix.com/page/vr-brain-v4-0
for more info about the status of the project join here :
http://www.virtualrobotix.com/group/vr-gimbal-user-group?xg_source=activity
At HAXLR8R’s demo day, ten hot hardware startups presented their products after completing a 15-week accelerator program in Shenzhen China. The program is designed to help entrepreneurs with innovative hardware concepts and prototypes and help turn them into commercial realities.
Yes! Hex is one of them! Here are some pitcures of the journey.After 3 months of madness! The next station, San Francisco!
Started learning English before boarding the plane.
The demo day was held at Autodesk.
Introducing Haxlr8r.
Pitching Hex to the investors.
Introducing Hex to the press.
The Haxlr8r folks.
To be continued...
Data Bus mbed baseboards are now available on Tindie as a fundraiser! I figured maybe some folks wanted to experiment with their own algorithms and want a head start on their 2014 AVC ground vehicle entry. :)
I ordered a very small run from OSHPark (hopefully they arrive before June 8, but if not oh well), but will order more as needed.
Features
- Three UART ports, one 3.3V, two 5V, series resistor protection
- Five I2C ports, all 3.3V
- ESC and steering Servo connector
- Dual wheel encoder port
- Port for 3 buttons (onboard UI)
- Onboard 5V regulator powered by ESC 6V BEC powers 5V UARTs
- Separate mbed supply rail to keep noise out of your GPS.
- Filtering / bypass caps
If there's enough interest I'll add some additional features.
This baseboard is in its fifth revision (version 4 was onboard when Data Bus took 3rd in the 2012 AVC).
Just get an mbed, load it up with my code ( and here), add an L3G4200D gyro, Venus or uBlox GPS, wheel encoders.
On Data Bus I run external power supplies, a separate encoder schmitt trigger board, a safety cutover so I can take control of the robot during testing, and I also run a Venus GPS, Pololu MinIMU-9 (for x axis gyro).
All the code is open source:
A few snap-shots of the action around our booth at Maker Faire Bay Area 2013. There are many more photos to sort through, but I wanted to share some now. The light was actually very poor inside the hall, not the best for photography.
From the top:
Brandon answers tough questions from a discerning customer; Brandon, Joe, and Justin; as a rule, kids asked the best questions and kept us on our toes; Andy was able to bring his family on Saturday, including his eight-year-old daughter who is a huge fan of flying robots; Carmen; John; Edna
As I already mentioned on the first page, mygoal was to construct a boat that could drive for at least 4 hours without charging while I could catch some fish :-). To reach that goal, my boat should weigh around 4 kg and the capacity of the batteries should be quite high. After a lot of searching in the internet, I decided to take LiFePo batteries, because they are supposed to have a gentle charging behaviour, they have a good Ah/kg value and you can buy them with a lot of Ah per cell. I finally got three of the Headway batteries put them into shrinking tubes and connected them to high quality cable and to a balancer cable. I also found a charger with a really good price that will charge and balance my batteries in the future with 6 ampere. All together I spend around 150€ on the energy system. I now have 15Ah with 11,1 Volts for a weight of 1,5 kg, which is very light in my opinion.
The motor was the next difficult part. How many turns per minute and what torque would I need for a propeller this size? I decided to buy two motors. One with a transmission of 1:6 and another one with a transmission of 1:11. A waterproof lid for easy and save access to the inside of the boat, a cheap digital 2,4 Hz 3-channel remote control, a motor controller for up to 15A and a steering servo made my boat ready for the first tests on the water to test the two motors with the different transmissions.
All the parts fit together perfectly and the radio controller worked great. I tested the boat in the bathtub first to see whether the stability was good enough for the test on the lake. It turned out, that the 1,5kg of the battery that I fixed to the bottom with hook and loop fastener, made the boat stable enough. I also checked the thrust of the boat in the small bathtub and the current consumption. At 11 volts, the 1:6 motor would take 1,9 ampere, with full thrust in stationary position (which is the worst case scenario). So the batteries would be able to supply the motor for more than 7 hours with full power, which was way better than expected. So the test on the lake could come.
On the lake near my home, the boat made a quite good performance. It was even stable in turns and the radio control worked perfectly. The speed was all right (around 4 km/h) for a long track via Ardupilot. But for a bit fun on the radio control, it could have been a bit faster though. So we didn’t build in the 1:11 transmission, and decided to buy the 1:2,5 transmission motor instead to test that one as well next time.
The long weekend brought my project a good step forward and in the next weeks, I will try to get the Ardupilot ready because in 4 weeks, I will be back in Sweden again, for the first real test.
I hope this project is interesting for some of you (even though it’s a boat and can’t fly ;-)) and if you like, I will share the future steps and the real test in Sweden of course.
Now my questions to those, who worked already with the Ardupilot and sounding:
- I have the first and old Ardupilot already at home but I really think about buying the new Ardupilot, because it seems to me, that the handling and software improved a lot and is way easier with the new one. Does anybody have experiences with the old Ardupilot? Is the high price of the new Ardupilot worth it?
- How can the Ardupilot share the GPS-data with my Arduino logger? I am ok in programming with the Arduino, but not an expert at all.
- Unfortunately, the software DrDepth is not available anymore :-(. Not free and not even to buy. Is there somebody out there, who knows how do get the trail version or where to buy the full version? I was playing around with the free version of UnderSee Explorer, which is easy to use. But the plots seem to be better with DrDepth.
In this blog I would like to share my experiences with my new project, an autonomous transducer boat, controlled by an Ardupilot.
After a long time of reading blogs, searching parts online and planning, I started my project. My plans are to build an Ardupilot controlled boat, which measures and logs the depths and the temperature along its path on remote lakes to be able to create depths and temperature plots of the lake.
The idea for the boat developed in my head after my last fishing trip to Sweden. I visit friends in a small village in south Sweden at least twice a year and I relax from work by fishing on the remote and calm lakes at that site. In the summer time, I am very successful in fishing and it’s very easy to catch several big fishes within a few hours. Since the lakes are frozen in winter, my friends and I tried to do some ice fishing but we didn’t catch a single fish even though we spend at least 7 days on the ice. We guess that we didn’t catch at the right spots because we have no idea, where the deep parts of the lakes are, and how the lakes look like underwater. After that unsuccessful vacation, I decided to build that boat so I won’t have to drive back home without a single catch.
Thanks to the two great blogs from Geir Andersen and Harald Molle:
http://letsmakerobots.com/node/21098
http://diydrones.com/profiles/blogs/ardupilot-goes-into-the-water
a lot of question regarding the sonar, the navigation and software were answered and my project could start. And these two blogs are the reason why I also share my experiences with you.
Right now, I work far away from home so I can only progress with the project every few weekends. I started 6 weeks ago with the most expensive and important part, the sonar. It took a long time to investigate, which sonar I could use and which sonar could communicate with my Arduino and after I finally accepted, that there is no way around spending at least 200€ for a good sonar, I bought the Intelliducer from Garmin and the communication between the Arduino and the sonar worked instantly. The most important thing about the transducer is that it’s a digital transducer that sends the information in NMEA 0183 language. The transducer is quite small, easy to include in the Boat, the resolution seems to be 0,1m (correct me if I’m wrong) and the maximum depths is over 300m. It also measures the temperature, which can be interesting for fishing as well.
The next stage of the project was the boat. I wanted to build a light and easy to realise boat, that is totally enclosed and waterproof. I also wanted it to be energy efficient and not too slow, so that the batteries would last at least for 4 hours and more than 10 km. I decided to use a torpedo design, since I could use cheap plastic pipes as the body. I only had to build the front and the rear part of the boat with fibre glass.
I could manufacture the positive Form with wood on the wood turner of my father.
After I produced a negative form around it by using bandages, I rinsed them with wax as a separator, and I started with the fibre glass. Even though the material of the negative mold seemed not to be the best for fibre glass I was happy with the results.
As propeller, I decided to use a kort nozzle from Graupner with 60mm diameter. In small speeds, the kort nozzle is supposed to be more efficient, and it also saves my propeller from rocks or other dangerous objects under water. For my boat with a diameter of 125mm the 60mm diameter of the propeller seems to be huge. But as an engineering student, I learned that a big but slow propeller is more efficient than a tiny but fast running one at the same speed. That was my progress for that long weekend and I was forced to take a break till last weekend, where I came home again.
In the first two stages, I invested around 300€ for the transducer and the boat body. The next stage would cost me another 300€ for the batteries and the rest of the electronic. The third most expensive part (after the transducer and the upcoming Ardupilot) is the battery. But will come on the next page.
This Blog is closed now from posting further comments as per the request.
Hmmm Now hobbyking is selling:
ArduPilot Mega V2.5 Flight Controller USB/GYRO/ACC/MAG/BARO
72 USD for the hobbyking APM 2.5 board
Are hobbyking selling this under license or is it a CN clone?
Can hobbyking use the name Ardupilot 2.5?
Some developments on 2.4GHz video link and 868MHz datalink antenna systems:
Measuring the 2.4GHz Antenna SWR
The Ground Tracking Antenna
This blog shows an integrated 868MHz xBEE datalink antenna and tranceiver and a 2.4GHz Video downlink antenna and transmitter as a single modular unit. Feed it 3.3volts and video as well as the autopilot datastream.
Also shown is a ground tracking antenna system. Two antenna are contained in the head - a multiturn 13dB gain helical antenna for the 2.4GHz video downlink, and a Diamond loop , over the ground plane, giving 8dB gain, for the 868MHz datalink. The antenna base contains a Lipo battery and fits onto a tripod. The base unit is then lined up with North, and the unit tracks the aircraft in flight using the A/C GPS position. Cable wind/unwind software is also implemented to allow the unit to unwind for example when flying circles around the GCS - this process follows a computed geometry to ensure minimum time pointed away from the A/C, and uses the aircraft flightplane to estimate the postion to slew to to start tracking again, if the link were lost.
We have just completed range tests, first with the aircraft mounted on a tall pole, on a high ridge in the desert here in Namibia. The aircraft was able to be rotated 360deg in azimuth and +- 25deg in elevation. Tests were conducted with the ground tracking antenna at 10km from the aircraft position.
Video TX power was 27dBM @ 2.432GHz, into the Skew Planar Wheel. Datalink TX was a 868MHz xBee Pro- range was tested at 25milliwat TX power ( can be set to 1mw, 25mw, 100mw, 200mw and 300mw - 1mw at 10km did not work)
Video was perfect picture with the aircraft at any azimuth or pitch angle ( combined) except for the Aircraft directly facing the ground antenna, at 0deg pitch - the A/C antenna is shielded by the avionics, the on-board IR gimballed IR camera, and the Lipo batteries. Tilting the A/C up or down 5 degrees brought the video back with perfect picture.
Datalink comms was constant with NO dropouts at 25mw bothe ends, regardless of the A/C attitude and azimuth heading. The aircraft was also fitted with 2.4meter carbon fibre covered wings - 315mm chord, and a carbon V tail ( very similar to my mk-I SurVoyeur A/C , only greater wings span and carbon wings.- see the SurVoyeur blogs..)
The Datalink antenna consists of two rings, spaced apart, and is a Slot Antenna, ie, the radiation takes place from the slot formed between the two rings. It is a narrow band antenna- not more than 20MHz bandwith for 1.3:1 SWR - at center frequency it is 1.05:1 SWR. The first rings were done in copper wire to determine the antenna factors, and then a PCB version made on the router, at various sizes, to determine the size reduction factors due to the PCB dielectric constant.
Wire Rings Versus PCB Versions
An Integrated model was then machined on the router - this module consists of the antena rings and is fitted with the xBee datalink module and serial interface electronics.
This module is later fitted with the Skew Planar Wheel 2.4GHz antenna, and with the video TX module.
The Skew Planar Wheel was constructed thus:
Pre-Cut element wires: Wires formed in a 'stretch' jig.
Wires Stretched and removed from jig
Wires Formed.
Coax End pieces about to be fitted
Coax End Pieces soldered to coax outer and inner
Antenna elements fitted to the mounting Jig and soldered to the coax ends
The 2.4GHz antenna is then fitted to the 868MHz module:
The Video Transmitter is fitted on the underside:
This assembly is then fitted into the antenna bay of the composite fuselage:
SWR measurements were taken in-situ to determine any de-tuning:
SWR AT 2.44GHz:: = 1.13:1
The ground tracking antenna basics follow:
This Consists of a base unit containing the Lipo Battery, the drive electronics, an azimuth servo drive and feedback mechanical system and a yoke carrying the antenna head. The antenna head contains the 2.4GHz helical antenna, the 868MHz datalink Diamond loop antenna, the Video receiver, the xBee datalink tranceiver, and the elevation servo with position feedback.
The Head unit closed: The base unit guts:
Azimuth Mechanics and feedback POT
The Helical and Diamond antenna in the head unit.
We then flew a max range test to see what a typicall max range might be - Video was lost at 39km, and datalink was still error free with 200milliwats at that range...Video was 'snow free' ( P4 signal) at 32km.
Joe
The Nampilot....
From IEEE Spectrum:
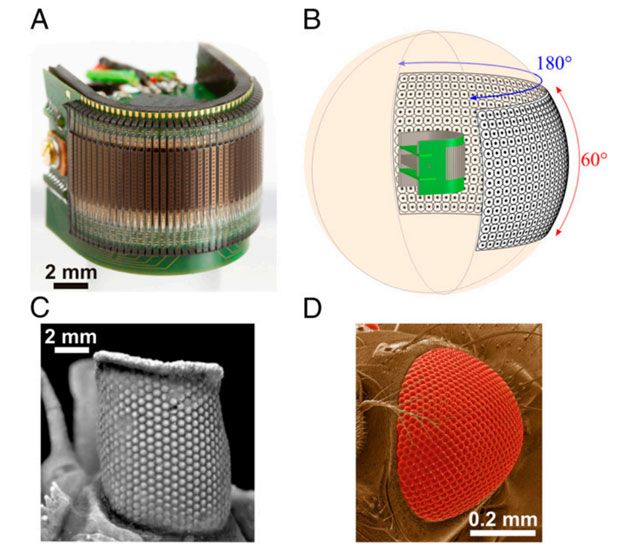
Just a few weeks ago, IEEE Spectrum wrote about an artificial compound insect eye that was developed by a group of researchers based in the United States. Not to be outdone, a group from EPFL in Switzerland has announced their own artificial compound insect eye, and we got a hands-on a few weeks ago in Lausanne.
Generally, we like to make camera systems that work like our eyeballs do. And that's fine. But in a lot of ways, human eyeballs are terrible. The most successful class of animals ever, the arthropods, have gotten along just fine with compound eyes for a very long time, and the most sophisticated eyes of any animal are of the compound variety (belonging to our friend the mantis shrimp).
So obviously, compound eyes have something going for them, which is why researchers in general (and roboticists specifically) are so keen on developing their own versions. The eye to come out of EPFL this week is unique because it offers a huge insect-like field of view, very fast performance under all sorts of lighting conditions, and most notably, it's mechanically flexible: at just 1 mm thin, you can bend it into different shapes.
We got a look at this thing a couple weeks ago while we were visiting Dario Floreano's lab at EPFL, and it's totally cool:
It's amazing how the use of this flexible substrate enables sensors that are not just bio-inspired, but in fact end up nearly identical to the types of compound eyes that you find on everything from flies to trilobites. Here's a figure from the paper showing a comparison:
Image C shows the eye from an extinct species of trilobite, while Image D shows the eye from a fruit fly. Both the real and artificial eyes offer a horizontal field of view of 180 degrees, and they consist of a similar number of pixels. However, the artificial eye is significantly faster, operating at up to 300 hertz, while a fruit fly only updates at 100 hertz. Take that, nature!
It's important to note that these aren't the sort of cameras that you'd want to use to take pictures. What they're best at is sensing movement, or to be more specific, sensing changes in the intensity of light generated by motion. It doesn't sound like much (and it doesn't look like much, either), but it's how bugs navigate and avoid obstacles, and as anyone who's ever tried to swat a fly can attest to, it works rather well. It also works indoors, outdoors, in bright sun, and in shade (or even moonlight), and has no trouble adapting to abrupt transitions between any of these states, which is something that conventional cameras are lousy at.
Here's a video of the system in action, which gives a good idea of what an optic flow sensor "sees" and why it works so well for insects:
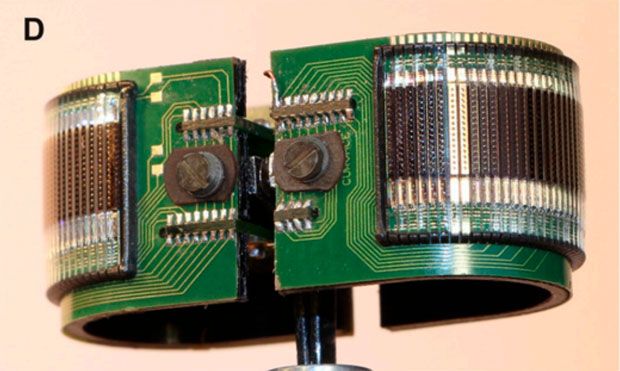
Clearly, there are many advantages that these kinds of sensors can bring to robotics, especially in the context of lightweight aerial platforms. And there's no reason to stop at just one of 'em, either: put a couple CurvACE sensors together and all of a sudden you have a 360 degree panoramic sensor system the size of a couple of quarters:
Freaky. And awesome.
Going forward, we expect to see this tech integrated into robots, and there's also the potential for it to show up in lots of other applications. If it can be made inexpensively enough, we could end up with something like "imaging tape" that could be integrated into smart clothing, to provide a self-contained way of detecting distances to objects. Why? Because why not, that's why. But seriously, flexible sensors like these have the potential to enable all sorts of new applications that have been impossible until now, and we're excited to see what happens.
"Miniature Curved Artificial Compound Eyes," by Dario Floreano, Ramon Pericet-Camara, Stéphane Viollet, Franck Ruffier, Andreas Brückner, Robert Leitel, Wolfgang Buss, Mohsine Menouni, Fabien Expert, Raphaël Juston, Michal Karol Dobrzynski, Geraud L’Eplattenier, Fabian Recktenwald, Hanspeter A. Mallot, and Nicolas Franceschini, was published today inProceedings of National Academy of Sciences.
Special thanks to Dario Floreano and Ramon Pericet-Camara for showing us these eyes at EPFL.
[ CurvACE ]

For a University Robotics class I completed a project that integrates ROS (Fuerte), an APM and a Kinect Sensor.
For some reason all the text that I had written was lost when I posted this. I didn't really say anything besides what I didn't already say here: https://code.google.com/p/icarus-uav-system/wiki/ROS_APM_KINECT
A member the other day asked how to program expo on the throttle channel to help with hover in stabilize mode. So I made this short video on how to do it.
How to Improve Throttle Response by adding Expo to your RC Transmitter Control from Bill Bonney on Vimeo.
or see it on YouTube http://youtu.be/s1sD0ynLr5o
Venturing Forward: The Sky’s Not the Limit for UAV Enthusiasts
By: Kevin Solar of DIYDrones.com (DIY Drones News Journalist)
We live in a uniquely dynamic age influenced heavily by technological advances surging in every direction. It’s a time to look around, reassess ourselves and focus our energy and potential towards greater influence over things to come. If you’re an individual with an interest and passion for ‘drones’ that fly, it’s a time to gaze upwards and realize that even the sky… is no longer the ‘limit’ it was once thought to be. Instead, the sky has become a boundless ‘proving zone’ for what is possible, now and in the near future. For UAV enthusiasts, at any level of expertise, it’s a time for ‘venturing forward’.
The expanding world of Unmanned Arial Vehicles is filled with new realities, problems, demands and opportunities. It’s a great time to take advantage of the moment and get personally involved in a new and challenging venture, or perhaps rekindle interest in something that you’ve neglected, or put off for a while. Taking action now can also provide numerous health benefits, both physical and mental, that may pay big dividends for years to come. Personal involvement in active hobbies, like creating and flying UAVs, can play an important role in a person's overall perspective and well-being, often by increasing creativity, self-esteem, and sense of accomplishment.
Whether looking to immerse yourself in a new hobby, explore the possibilities of a cutting-edge career, or experience… firsthand, the surging evolution in remote controlled aircraft… the DIY Drones community provides an ‘open-source emporium’ of innovation and information specific to the needs of those interested in becoming more involved with autonomous, or pilotless flight.
After several months of research and observation on the outside edge of a few web forums devoted to UAV technologies, I finally decided to venture forward and join in on the experience of designing, building and flying my own multi-rotor aircraft. By doing so I’ll be putting myself in an environment where I’ll learn something new and challenging, while offering my experience, skills and creative abilities to others in the process.
As a newbie, entering the world of UAVs, it’s easy to feel excited, nervous and… at times, overwhelmed by the scope and speed with which advances are currently taking place. After all, the goal here is not simply to build, or buy and fly the traditional RC airplane that your grandpop enjoyed years ago. Rather, a major objective at DIY Drones is to focus on the quest to interact collaboratively, to help bring about the safe and efficient integration of structural, electronic and critical system processes, thereby guiding amateurs like myself, to a point where our home-built creations become capable of carrying out specific tasks during autonomous flight!
That’s right! The aircraft engineered by members of the DIY Drones community are being developed and programmed to fly and perform on their own. Just imagine… your homemade, ‘Aerial Robot’ making its way across that limitless sky, performing tasks without real-time, pilot intervention! How cool is that? Quite honestly… it’s amazing! It borders on mind-boggling to say the least. However, if you have the passion, skills, personality, and dedication to learn the complexities of this unique pursuit, your involvement can be very rewarding!
So, aside from all the tools, cash, time and project components necessary to build say… a typical Multi-Rotor style UAV… here’s a partial list of things you probably already have, but might need to sharpen, or dust off in order to get started, or restarted as an active UAVer at DIY Drones.
Obviously… these items are not required, but you’ll likely benefit by possessing some of the following:
- A willingness to be actively involved in the DIY Drones community.
- A supportive spouse and/or partner, especially one who loves UAVs.
- An ability to build things from scratch and fix things that get broken.
- A thick wallet, a financial budget, a good set of tools and a place to use them.
- A familiarity with fire extinguishers and first-aid kits.
- An investment portfolio heavy on manufacturers of zip ties.
- A functional recollection of the philosophy associated with Murphy’s Law.
- A huge dose of common sense and a Swiss Army knife in your pocket.
- A steady temperament, control over frustration and ability to laugh at yourself.
- An inquisitive mindset and a passion for discovery and adventure.
- An optimistic point-of-view backed by a healthy grasp of reality.
- An aptitude for following a set of directions printed in your native language.

- A talent for analyzing data and learning from the results.
- A propensity to reexamine basic assumptions and seek broader perspectives.
- An intuitive sense of what is correct and/or appropriate in a given situation.
- An ability to accept constructive criticism, and the tact to offer it to others.
- A determination to except failure as a stepping-stone towards future success.
- A self disciplined work ethic and a healthy respect for team dynamics.
- A problem-solving, creative, out-of-the-box method of thinking and processing.
- A desire to get things right, tempered by the ability to admit when you’re wrong.
- A capacity to learn by reading the experiences and ideas expressed by others.
- A set of communication skills to share what you know, via text and video.
- An affinity for synthesis of information and close attention to critical details.
- An ability to maintain focus and persevere in the face of disaster.
- An aptitude for audio-visual discrimination and strong eye-hand coordination.
- A tendency to assist folks in need and a will to bounce back from adversity.
- A focus geared towards pushing beyond limits, yet knowing when to take pause.
- A desire for fun and a determination to set high standards of accomplishment.
- An interest in lifelong learning and a passion for sharing knowledge with others.
- A true appreciation of the Laws of Gravity and a realization that crashes happen.
What makes this hobby so enjoyable and rewarding is, that while we all come from different walks of life, the deep common denominator is our passion for tinkering with and improving upon the capabilities and performance of our flying machines.
For those who have been active UAVers for years, the newbies will certainly be looking your way for guidance and knowledge over the long haul. For others who may have chosen to ‘lurk’ on the periphery simply to glean knowledge unobtrusively, the influx of additional hobbyists may provide opportunities to establish new relationships, or even revive friendships forged, long ago, via the blog posts and comments that continue to form the backbone of this community.
Most hobbyists tend to enjoy things more when they are provided the opportunity to share experiences with other like-minded individuals. The trials and tribulations of amateur UAVers offer a very compelling reason to stay connected to folks with similar interests and aspirations.
Hobbies which require expertise tend to be more satisfying to participants. That’s especially true for UAVers, because the expertise required to design, build, program and fly a Multi-Rotor, for example, demands a very high level of commitment. In turn, it’s that commitment that often results in a higher level of engagement and enjoyment.
What better way to stay active and enrich your life than by doing something you seriously enjoy? Increased involvement in things like the DIY Drones community could well be your prescription for a healthier, more satisfying future. It’s sure to engage you physically and mentally on multiple levels.
Of course, hauling your gear to that far away field to launch, follow, and/or retrieve your craft, certainly qualifies the effort as physical activity. Okay… maybe it’s no triathlon, but it’s certainly not uncommon to find yourself walking, jogging, climbing and at times, frantically searching the countryside for a fly-away, or downed UAV. Although not always planned or expected… the frequency of such occurrences most likely provides a physical benefit to those involved. Your initial intention, as a UAVer, may not have been to keep physically and mentally active, or to reduce stress in pursuit of a sense of accomplishment, but as many can surely attest, those outcomes are often a beneficial result.
From a hobby perspective, I often think of my DIY Drones involvement on three levels. The first level provides a diversion, or temporary escape from the stressful things in life. Plain and simple… UAVing can help me pass the time. The second level reflects a passion that engages me in something I truly enjoy. The third level relates to something that links to a sense of purpose. I suspect we all need that at times. Personally, when I sum it all up, being a UAVer is ideal for me, because it affords a powerful combination of all three levels.
My new hobby and my involvement with DIY Drones has become important and rewarding, especially because it has opened a unique ‘portal’ through which I am able to connect with others involved in the same meaningful endeavor. It’s a pursuit that allows me the freedom to fly! And… since flight is my passion, venturing forward into the limitless sky, not only helps me to pass the time, it makes me unaware that time is passing.
__________________________________________________________________________________
Links to Websites used to gather information for the Newscast Video:
- http://www.suasnews.com/2013/05/22964/drone-aircraft-help-grand-forks-police-fight-crime/ (North Dakota FAA Drone Integration)
- http://diydrones.com/profiles/blogs/thirty-days-14-12-rotor-demo-at-maker-faire-2013 (6 Arm, 12 Motor/Prop Setup)
- http://diydrones.com/profiles/blogs/big-product-news (Y6 Conversion Kit Blog)
From TechCrunch:
DroneDeploy is a web-based drone control and management platform. (Let that last sentence serve as a friendly reminder that we live in the friggin’ future.) Their goal is to be compatible with as many different popular drones as possible, providing their owners with things like:
- Browser-based drone control
- Fleet management/tracking, with electronic filing of the required paperwork
- Data logging
- Automatic flight regulation assistance. Not allowed to fly drones after midnight in a certain region? DroneDeploy will remind you.
- Automated log analysis that will help identify things like a motor that’s about to fail.
- Expandability, by way of an App Store of sorts. Want all of those pictures your drone can take to be stitched together into one big panoramic map view? They’ve got an app for that.
My dream has come true: a GoPro with interchangeable mounts.
Thanks to Radiant Images and View Factor Studios, this now exists!
I was talking to the Drone Dudes at Maker Faire and saw this camera amongst all their other awesome gear. It is a sweet little piece of kit.
--------------------------------------------------------------------------------
The groundbreaking Novo digital cinema camera, available exclusively at Radiant Images, is the ideal solution for cinematographers who are enamored by the capabilities of the GoPro Hero3 but held back by the Hero3’s cinematic limitations.
The Novo, developed and engineered by View Factor Studio in collaboration with Radiant Images, is a completely re-engineered GoPro Hero3 making it a much smaller and more robust cinema camera with the flexibility to allow more creative choices.
Key new enhancements include a C-mount lens system with adjustable back-focus which allows for extreme macro shooting. As well as exposure control capabilities that open up a wide-range of artistic possibilities for cinematographers and camera operators. An internal CPU interfaced to the camera permits users to disable the auto exposure feature and then adjust the aperture manually via the lens. This feature gives a cinematographer the control to set a desired exposure and stops.
The lightweight aluminum housing itself is 20% thinner than the GoPro Hero3 and includes three 1/4-20 and two 10-32 mounting points. Also, four buttons on the front (REC, PWR, WiFi & AUX) are assignable to several functions depending on the application. The Aux button turns the auto exposure on/off, but in the near future will also be utilized for other functions, such as digital zoom, a tool to check critical focus.
The Novo offers more robust features while retaining all of the key functionality and accessories of the GoPro Hero3, such as the LCD touch screen, power backpack and WiFi connectivity for wireless camera control.
The Novo addresses the needs of cinematographers without compromising the power and versatility of the most advanced GoPro ever.
Like the GoPro Hero3: Black Edition, the Novo is capable of capturing cinema-quality video at 2x the resolution frame rate of previous models while delivering twice the performance in low light. – 1440p 48fps, 1080p 60 fps and 720p 120 fps video and 12MP photos at a rate of 30 photos per second, plus the ultra-high resolution 2.7KP-30 fps and 4KP-15 fps video modes.
Radiant Images offers rental packages that include the Novo, custom geared C-Mount lenses and all the required accessories.
Joe and Justin give the Maker Faire 2013 crowd a demo of their new heavy-lift 12-rotor creation -- including an example of flying with only six motors operational. The downwash from this monster could be used for clearing leaves off the lawn or removing snow from the driveway, in addition to keeping a large camera aloft.
Hey everyone,
Got a little free time to get out to the field and do some flying yesterday. got a chance to engage the APM and see what it would do.

I was able to try out stabilize and RTH modes. both worked pretty well. Had problems with the OSD and after the first flight, I was getting glitches from the right aileron servo. I could not track down the problem so I packed up and went home. I was happy with the flight and the APM however.
Here is the parameter file. techpod_perams.param
this is the tlog file frome the flight 2013-05-19%2017-23-52.tlog
The video below shows an Arduino Nano connected to an AD9835 breakout board, filmed by an 808 #16 mini-camera. It's cropped to remove my chaotic desktop if anyone notices that the resolution doesn't match the default for the 808 #16 cam.
(You might want to lower your audio settings before playing)
Well that's nice and all, but what's that noise?
The AD9835 is a sine wave generator and its output has been connected to the camera (replacing its mic).
So the noise in the video represents digital data, sent using Audio frequency-shift keying (AFSK) modulation at a rate of 300 bits per second.
More specifically it uses Bell 202 AFSK tones, where 1200/2200 Hz represents a mark and a space respectively.
It does remind me of the sweet noise my old US Robotics 14,400 modem used to make, but what's the purpose of all this other than the nostalgia?
Well, the data on the audio channel corresponds to MAVLink messages, wrapped inside High-Level Data Link Control (HDLC) frames. Since I currently have no real MAVLink flight controller, it's just three different messages containing dummy data (HEARTBEAT, BATTERY_STATUS and VFR_HUD) repeating in the video.
The end goal of this project is an environment which allows me to overlay flight data on the video when viewing flight recordings back at home.
So what's next for me?
- Populate the BATTERY_STATUS message with actual data from a FLVS-01 voltage sensor and test the current prototype in flight
- Get some hardware which includes an altimeter and a magnetometer
(to generate some more interesting MAVLink messages!) - Continue working on the OSD overlay for viewing videos
Ideas for the future:
- Test if the data rate can be increased (1200 bps?)
- Test if AFSK data can be reliably sent over standard FPV equipment (which I don't have)
- Make some reusable UI components for the Mavelous project (an open source browser-based GCS)
Hardware links:
Arduino Nano
Breakout Board for AD9835 Signal Generator (retired as of a couple of weeks ago)
808 #16 Camera
Software links: