Hangar 18 had a very successful first flight of the new F2 prototype on 14 May.
The new plane has shoulder wing design with the wing mounted on a pylon on top of the fuselage. The wing houses all of the electronics with the exception of the ESC and motor leaving the full length of the fuselage open for payload and batteries. A new payload pod system was developed for the F2 that allows full access to two payload pods via 4 screws in the nose and tail. The wing bolts on to the top of the plane and can be broken down into three pieces or made as a single piece wing. More information will be added to the Hangar 18 website this week.
The Fuji Mountain in Japan, the Dutch Windmills in Holland, Stonehenge in England, the African Savannah, the Niagara Falls, the Great Barrier Reef in Australia, the Yellowstone National Park in the United States, The Grand Canyon, the Cristo Redentor in Rio DE Janeiro, Brazil, the Pyramids in Egypt, the Hoover Dam in the United States…
DJI is hosting an aerial videography competition, aiming at collecting amazing aerial videos which are filmed in the open air with wonderful shots or footage using the professional DJI Spreading Wings S800+WooKong-M+Zenmuse Z15. The videos are expected to help people to see the world from a special perspective and to demonstrate the unique features of the selected filming site. We are not looking for videos of built-up areas or crowed places, i.e. please film responsibly and safely.
The videos submitted must be filmed by using the professional DJI Spreading Wings S800+WooKong-M+Zenmuse Z15.
Please be sure to read the relevant provisions of this competition before submitting your proposal, DJI reserves the right to expand the terms of the competition and the entrant automatically authorizes DJI to use the footage in any promotions or marketing activities worldwide for an indefinite period without restriction.
The video submitted must also include additional footage or photos showing the S800+WooKong-M+Zenmuse Z15 being used for this purpose.
The videos submitted must have no watermark or logo; however, at the end of the video a small logo is allowed with the precondition that there is no impact to the video content.
The authorized entrants shall contact and send the videos files (original footage from camera and video product for the competition) directly to DJI as the world premiere. To respect the originals the outstanding videos (awarded) and the author will be posted on the DJI website and DJI will promote it through all of the worldwide channels to spread the video and author’s information.
I added 6 high power leds on a Naza F550. Leds are controlled with a graupner mx-20 radio, with telemetry. User has the choice of a dozen of effects. A second switch can trigger white leds and/or laser oriented to ground.
Photography Drones: Robot Cameras Take to the Skies
These remote-controlled multi-rotor aircraft can capture amazing footage—and are fast becoming today’s must-have photo accessories
By Peter Kolonia on May 13, 2013
CHESTERTON WINDMILL Brit Paul Bunyard made this image in Warwick, England, by sending a GoPro 3 200 feet into the air in a four-prop DJI Phantom drone.
RADIO CONTROL UNIT With up to 12 channels that each control a separate flight or camera function, control consoles can be paired so that one person operates the multi-rotor with one, and a second operates the onboard camera with another. You can program the units to customize the placement of controls.
Low End The toy-like AR Parrot Drone 2.0 ($300) is controlled by iOS devices and hosts two on-board video cameras; one is HD and can send clips to the iOS device and share to online media sites. Mid-Market For about $700, a quadcopter like the DJI Phantom has advanced flight controls and options such as GPS positioning, gyroscopic stabilization, and a com-pact-camera mount. High End From $9,000 to $30,000, pro-quality multi-rotors like the Infinite Jib model shown are highly customized and can carry payloads from DSLRs to cinemagraphic equipment used for major motion pictures.
If you’ve noticed a sudden proliferation of photos and video taken from above—but seemingly from far too low to have been shot from a plane—chances are that you’re looking at images shot from a drone. High-end units are being used in sports photography, real estate, law enforcement, and even major motion pictures. Drones are some of the most exciting new photographic tools in recent history. And flying these multi-rotor, radio-controlled aircraft is almost as thrilling as the images they can produce. Why now? Recent advancements in flight controllers and aircraft stabilizers have made it possible for almost anyone to strap a decent camera into a drone, send it skyward for capture, and return it to earth in one piece (most of the time). Also known as multi-rotors, unmanned aerial vehicles (UAV), quadcopters, and octocopters, these relatively affordable aircraft deliver photography that was—up until now—impossible at any price. They’re able to fly outdoors, even in slight wind, and sometimes in confined indoor spaces, too. Multi-rotors can legally operate at heights up to 400 feet, and range in price from $300 to up to $30,000. Drones come in four-, six-, and eight-prop versions that can accept cameras ranging from compacts to high-end DSLRs. They’re powered by rechargeable batteries that provide between 6 and 15 minutes of flight time per charge, depending on the model and payload. Some are ready to fly out of the box, others require more at-home engineering. Their technology starts with the propellers and motors, which produce minimal vibration for steady video capture. Most are operated by sophisticated radio-control (RC) consoles with joysticks for setting altitude, direction, and speed. The Parrot AR Drone 2.0 is controlled by iOS apps on iPhones and iPads. Most airborne multi-rotors “know” their location by communicating with six or more GPS satellites. Yes, crashes happen. Many units, however, prevent or minimize damage by automatically returning to the site of liftoff when power drops or communication with the control console is compromised. TIPS Buyer Beware Before investing in a multi-rotor, check with online user forums to learn of the experiences others have had with the units that interest you. This product category—especially the low end—is still in its infancy. Try Flight Training To learn to fly a multi-rotor before taking your valuable camera aloft, experiment with an inexpensive unit such as the Blade mQX ($119, street). There’s even optional flight simulation software for it.
THIS ARTICLE IS FROM THE JUNE ISSUE OF POPULAR PHOTOGRAPHY, ON NEWSSTANDS NOW!
So I fired up the 3-D printer and heard some not so nice noises coming form the print head. After opening it I located a cooling fan for the printhead driver circuit had bearings going out (this seems to be a common theme lately). I was able to find a replacement at a local store and installed it. Then I got to printing the motor mounts and the arm mounts. The weight for each was reduced as much as possible by using shells with thin wall sections.
In the picture above is one of the two blocks together that will form a clamp that will be held in place with 4 machine screws to hold one of the 6 arms to the main support frame.
This is the small "cup" that will hold the motor on the end of each arm. I shaped it like a cup because I wanted to cover the small gap between the shell and lower plate of the motor to give some degree of dust shielding. The photo makes the shell look a bit thick but its fairly thin.
Here the parts saved in .STL format are placed on the 3D printer platten for printing, I placed the sides I expect to machine for fit and alignment down so the supports created during printing are not an issue.
And the parts were left to print overnight. The next step it to clean them up and get them ready for applying a ceramic shell to take the heat of the molten aluminum. I printed only two now to make sure my casting wall thickness is sufficient to fill when I do the first pour. Meanwhile I will go to work on the top plate for the hex that will contain all the antennas. It will be .090 thick aluminum with the entire center section thinned to about .030 thick to save weight. I wrote the G-code for the CNC Mill last night. More to come....
I wanted to share my experience to help & protect you all. No multicopter is worth personal damage & stitches.
Background
We have been building & testing ardu-based octa-V craft. Part of the challenge has been power usage / high amperage. Orginally we used 3S, but changed motors and went to 6S. Target being lower power losses to increase flight time & max power.
My BEC's man voltage was 3S so I used a separate battery to drive FC & Gimball system. 2 separate 6S batteries were used to drive motors.
What happend?
I tested OctaV on a field alone. On the 2nd flight the gimball (steered with Multiwii) had a tendency to drift. To reset the gimball 3S battery needs to be disconnected. I had already succesfully reseted the gimball once - with drivebatteries connected.
On the 2nd try octaV takes max power for a split second and flips backward. (seen on attaced video) One propeller hits my hand and another my feet. Situation was clear to me and I left OctaV as is and went to seek for medical assistance.
In the video
land
disconnect reciver battery -> gimbal levels
connect reciver battery -> craft shoots at me
A quite big wound was stitched on my hand and one tendon was partly torn & fixed. Recovery should be full after few weeks time.
Key learnings
FC can output at start / disconnect any signal to ESCs --> anything can happen. Arming does not prevent this - unarmed craft can start (as happend to me). 0.2 secs is enough.
Always start FC first, then connect drivebatteries
Always disconnevt drivebatteries first, then FC
Multicopters are very dangerous tools. If I continue with multicopters, a mechanical securing is required on startup & disconnect. Errors (hw, sw & user) will happen.
Tuning is dangerous. Untypical situations occur, shortcuts are applied. Be careful. Do not shortcut.
Here's a clip from the Korean Broadcasting System's "World Today" program on the state of civilian dronism in the USA. 3DRobotics, EastBay RC, and the Roswell Flight Crew make appearances. Protesters, law enforcement officers and lawyers weigh in with their opinions (bad, good, profitable, respectively).
It has come to my attention that people are not noticing this amazing app that is being produced for Android to give full missionplanner functionality and more using Mavlink to your UNMODIFIED android device
Features: Follow Me (If you device has GPS, you can set your plane or copter to follow me and it will circle or hover above your point or trail behind you as you run for it :)
Parameters (Droidplanner has a Parameters screen which allows you to correct your parameters in flight from your android device, no laptops to lug around!
Accelerometer Calibration Droidplanner has Horizon calibration to allow you to calibrate your copter in the field, which can be a life saver if you go miles to fly and find the horizon is off.)
Flightpath Planning Droidplanner Offers the ability to program your way points onto google maps with options for default altitude and more, it is very user friendly and works well!
Remote control Aircraft from app.(Thisapp has a very specialfeature whichallows you to Control your model from the app using a touch screen interface, this means if something went wrong and you could not use your controller, or you have a friend who wants to try flying but do not have a buddy system, you can use this feature to control your Model!)
Remote control Camera Gimble(A feature unique to Droid planner allows you to control a camera gimple plugged into the apm from the App, this means rather than buying two controllers or modifying your controller to add extra control for the camera, simply switch to camera control and you have full ability to adjust the camera position as you like.)
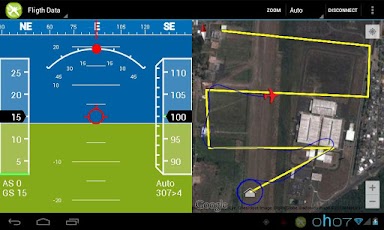
Live Horizonand Mapview withtelemetrydataSwitch to the flight data Tab and have full telemetry view with vocal alerts, Altitude Number of sattelites, position shown on map, Airspeed and ground speed, level and more.
These are some of the Prominent features of Droid planner, but there is so much more!.
If you want to know how to connect the MAVlink dongle to your android device it is very simple, you need to buy a chep usb to micro usb (depending on your device) adpater from somewhere like ebay or amazon, plug the one end into android device, the other into the MAV link and thats it!
3DR Hexacopter to Y6 conversion kits are now available for less than $50.
A Y6 design is able to withstand a single motor out scenario (see above), provides a more open and stable view for cameras, and doesn't weigh as much as a traditional Hex because it uses less parts. We've come a long way in the last couple of years...
Those of you who have been with us for a while will remember our original ArduCopter kits.
I bought one, as I know many of you did. Mine is now hanging on the wall; a reminder of something that fueled obsessions, and made me think of new possibilities in life. That spirit is in many of us here at 3D Robotics, and is clearly evident in this latest offering that we are able to provide our customers.
Joe, our primary flight-ops engineer in San Diego came to us one day with a Y6 that was converted from one of our existing Hexacopters. Within a few weeks the amazing design and production team at 3D Robotics had created an inexpensive, custom tailored kit to convert our existing Hexa into a Y6.
I've personally done the conversion, and it takes about an hour. It's very straightforward.
This is fantastic news, but it gets even better. Throughout our ongoing expansion we are highly focused on quality documentation and improving ease-of-use. In that vein, Alex--our new technical writer-- created an AWESOME set of instructions for the new Y6 conversion kit.
Not only do we have the kit, and instructions, but we also have a tuned parameter file to get you up and navigating smoothly to over 150 waypoints that APM supports out of the box.
This is a huge step forward for us as a company, and demonstrates our commitment to provide our customers with high-quality, easy-to-use universal autopilots and aircraft.
We hope all of you Hex fliers out there appreciate this kit as much as we do. All of our traditional hex aircraft have been or will shortly be converted to the Y6. It flies like a dream.
The ESD-safe flooring will be coated with a special wax. This works in conjunction with special booties on all the workers feet to keep electrical components happy and safe.
I keep asking myself why this cannot be done, and so far i have not found an answer i can believe. So i bought a commercial HD Video/Audio sender for home use and plugged in my gopro as a video source, and my flat screen TV as the player, and i connected up these devices and viola..! it worked. So my next thought what is the problem with making this work in a UAV , it is using 5.8Ghz it is cheap to buy, just need to hack it so the antenna is less directional, and we can then have HD in our goggles, or on our screen.
This would be far more preferable to me for a first time FPV flyer as the picture is so poor at 480x240 pixels, you can hardly see if your moving or not.
What do you all think? i know a more elegant solution would be nicer but for now it would work.
Make Magazine profiles Drone Dudes - a film making team with state of the copters, video equipment and a cusomtised van which allows them to work (and sleep) in the field.
Sorry if this is old news, have been following the blog for a long time and this is the first time a see a finished solution for saving your investment.
As a lot of newbies to delta wings often ask the question "Why is the mission planner not doing the necessary mixing for my servos to just work?" well for the stabilize the mission planner will work but not for manual and that is where the problem comes in because you need to lift of in manual and if your remote is not configured correctly your plane will just crash.
Lesson 1 : Never think inverting channels will fix anything.
If you mix your channels correctly life will brighten up, for delta wing mixing you have the following:
You will notice that you have CH1 and CH2 and there is 100%'s and +'s and -'s and its all very confusing and it gets more confusing once you notice that each channel has elevator and aileron defined.
ok lets start
You have channel 1 and 2 because you insert your servos into channel 1 and 2.
You have aileron and elevator because these 2 servos does both its called elevon.
The % defines how much the servo goes forward and backwards (in most cases you do not want 100% for that will strip the gears of cheap servos)
The 2 plus signs defines that there are two or more additional functionality to the channel
And the minus well both % can go positive or negative
Scenario 1 : Elevator and aileron moves up and down together no matter how I move the sticks
Solution : This because all of the % is either negative or positive only the elevator must be the same.
Scenario 2 :When I move the aileron stick left and right the elevons move independently up and down and when I move the elevator stick up and down the elevons move together up and down, but the when I move the elevator stick down the elevons move down where it should go up.
Solution : If both elevators is in a positive percentage move both elevators to a negative percentage and vise versa.
Scenario 3 : When I move the aileron stick to the left the left elevon down and the right elevon moves up.
Solution : Change the aileron % to the opposite polarity so if CH1 was negative %, change it to positive % and vise versa.
The following 2 points is very IMPORTANT.
The elevons needs reinforcement if it is made from epo foam but not too much it needs to be really flexible.
When you move the aileron and elevator to their max and the piano wire starts bending, your % on the mix is to much, tune it down till the piano wire does not bend any more.
A very quick look at the follow me mode in the SteadiDrone AGC (Android Ground Control) App and the SteadiDrone QU4D. Using the GPS system the drone is set to 'follow me' mode and the follows the gps position of the android device using the SteadiDrone AGC App, very cool stuff! More info and talk about this on our facebook page here https://www.facebook.com/groups/283605021770387/
Looking for failure is a bittersweet endeavor -- it goes against human nature to look for something that we don't want to find. Our in-house process improvements are bringing us closer and closer to the goal of zero failures. Some days everything we make is perfect, but when it's not, our job is to find the fault before it gets to the customer. These new gimbaled test jigs run every APM through a rigorous test cycle to validate its performance. In addition, we are constantly working on things like paste handling, material inspection, plus the addition of other super-bad-ass expensive machines that do stuff.
RFC post here. After more than one year of service, the MAVLink 1.0 spec needs an update to 1.1 to adjust for developments made on autopilot platforms (new messages) and to clarify and improve some aspects of the protocol. In contrast to the upgrade from 0.9 to 1.0 the intent is to make this a 100% compatible update, so that autopilots and ground control stations can benefit from the new functionality, but won't be left behind when not immediately upgrading.
This post is mostly directed at interested users and implementers and make the general public aware that protocol change proposals should be handed in now.
Please register for the mailing list in order to be able to post.


