Micro UAVs that have the ability to slip into tight spaces, including inside buildings, have wide ranging military and search and rescue applications. To reach their full potential, however, these UAVs are going to need to learn how to land in rougher areas that don't always have a horizontal surface to touch down on. One team of scientists has begun taking a huge step towards accomplishing just that by developing a quadcopter with a mechanism that allows it to land on walls or ceilings, stay for a while, and then take off again.
The landing mechanism makes use of the same dry adhesive used on the gecko-inspired Stickybot, combined with aligned tendons to allow the quadcopter to stick to most surfaces and remain in place. Once it hits a flat spot at any angle, the adhesives are deployed and the tendons tightened, creating enough surface friction to form a strong grip. The landing impact also compresses several springs and locks them down, so they can be triggered later to launch the aircraft away. As a bonus, this process doesn't deplete any extra power, since the quadcopter's own kinetic energy is used to both activate and release the landing mechanism.
It's hard not to picture a microphone-equipped UAV with this system flying into an open window and affixing itself underneath a desk, out of sight, but the ability to stick to walls and ceilings has applications other than spying. Landing on any surface would allow it to conserve power or take time to recharge an onboard battery, even when landing conditions aren't optimal. It would also be able to find better shelter from harsh weather or falling debris in a disaster zone.
The project is a joint effort between laboratories at Stanford, the University of Maryland, and MIT – all partly funded by the US Army Research Lab and the National Science Foundation. In fact, Stanford's Biomimetics and Dexterous Manipulation Lab had previously experimented with a similar perching mechanism for a fixed-wing aircraft as well as systems for the wall-climbing Stickybot, so this was a natural progression for the development team.
The video below only shows how a quadcopter can land on a smooth sheet of acrylic at an angle or upside down, but the team hopes to upgrade it to the point where it will attach to rough surfaces, fly away from a landing point, and even crawl along walls.
Then after a long selection and technical evaluation of platform doing on 3d cad , testing the frame with FEM simulation and then send the prototype to our maker company.
The next step is test on air. Inside we put our flight control platform VR Brain , 3DR Ublox GPS , 3DR radio telemetry module , VR ESC and VR Radio .
We are working hard on a lot of component and we'll be on air in one month .
The VR Copter design is from italy :)
This Copter is in a 550 category.
The weight of frame is around 330 gr.
Below support different configuration of payload ad in front will be available a revision of VR Copter with VR Direct Drive Gimbal that's coming ,too
The tile is removable , so if drone crash you can change the tail or in future will be different configuration available.
We are available also to customize the frame with your colors or texture on it . With our modular approach we haven't limit to customize our platform.
We need your help to understand if you like our new and innovative drone platform and what kind of feature do you like on it :)
We are searching farm in the world that have competitive price for production of this frame . We have two kind of version of project one for going in production with professional 3D printer. We are evaluation also to buy one . If someone have some suggestion about a good product at competitive price that's welcome :)
The other opportunity is to produce by molding technology process , but we need a good price for it :) In italy is not enough competitive price :)
if you can help us comment this post or contact us at info@virtualrobotix.com
I would like to present to you a new BL Gimbal designed and build by KamKop Systems. The gimbal is available as a D.I.Y. kit and it includes all the frame parts needed to build the gimbal to fit Sony NEX cameras with SEL-16F28 or SEL-P1650 lenses. The gimbal consists of 6 machined aluminum plates, 3 GFK plates, a camera screw and couple of 3 mm screws needed to mount all the parts together. The gimbal can be adjusted on all axes and allows the mounting of the camera in the centre of gravity. Through the adjustable camera plate, you can use the NEX camera either with the Sony SEL P1650 lens or the 16mm pancake lens. The MPU sensor and HDMI / composite converter can be mounted on the plate above the camera. The gimbal is designed for RCTimer 5010 / 0.21mm / 150T or iFlight GBM4008 motors and the the AlexMos Brushless Gimbal electronics. The final product will be black anodized and available by the end of next week for less than 200€ bucks. Total weight without motors: 234 gr. Mount plate drill holes : 1. 110 x 128 mm 2. 75 x 130 mm Preview pictures are available at KamKop Systems kamkop.de But as I mentioned the final product will be anodized black!
Since the TX is a 3V3 version I used a small low drop regulator to handle the 4.2V of the lipo. The range for the camera is from 3V to 6V so this one is powered straight from the battery. The cloverleaf antenna was build out of silver plated copper wire 1mm.
The results are quite ok, taking into account that the camera is not high spec. The goal of this setup was to have a cheap quad for learning FPV.
I wanted to carry my GoPro (with housing) in a plane but without expending too much, so I built it by myself, using foam, depron and barbecue sticks.
The fuselage was done with EPS foam 12g/dm3 (isopor P0, comum de papelaria). Wings, ailerons, elevator and rudder with depron 4mm. I used some barbecue sticks to strengthen wings and tail. To assemble everything i used hot glue and packing tape.
Even though it had some crashes during this video, the plane is intact! Nothing happened to it. It's very resistant!
It is not flying very well because the wing angle of attack is 0 and the wing was not attached very well. I've already done these improvements but i still have not done a new flight.
Wingspan: 1200mm Lenght: 1000mm Chord: 250mm Wing area: 30dm2 Wing weight: 252g Fuselage thickness: 70mm Fuselage weight (with motor, ESC, RX and servos): 468g Battery weight: 200g GoPro (with housing): 200g Total weight: 1120g Wing loading: 37,3g/dm2 (should use a bigger wing to have a slower flight)
This is the 2nd flight I've done with my homemade plane for carrying a GoPro. I advanced the CG a little bit and now it's flying much better, very smooth!
I still need to balance motor and prop.
Beautiful dusk, filmed with the homemade plane.
Some flybys, landings, panoramics ...
Changed the 2200kv motor + 6x4 prop to a 750kv motor + triblade 9x4.5: a little bit slower but prompt response when I add throttle and much better efficiency, almost double flight time (10min).
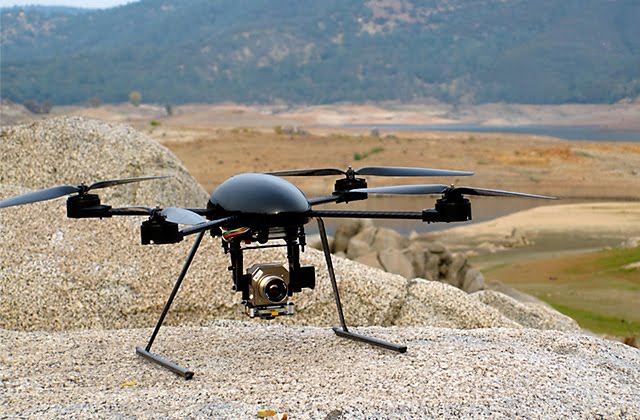
Mounties in Saskatchewan are crediting a high-tech drone for the rescue of a man who had walked away from his vehicle after a rollover crash and could not be found.
Sgt. Doug Green, who deployed the drone in the search, told CBC News the machine was built and designed by a Saskatoon company, Draganfly Innovations.
"It's a small little four-armed helicopter that has the capability of a camera or a FLIR [Forward Looking Infrared] or a low-light camera attachment that has a video link right back to the hand-held controller that I fly it with," Green explained. "I see exactly what the camera is looking at and I can control the camera up and down."
RCMP are trying out Saskatoon-made drones. A Dragan Flyer X4-ES was used to find an injured man who wandered away from a roll over crash.(Draganfly.com)
Green said the drone used a FLIR camera which detects heat from an object during Thursday morning's rescue.
He said that in most highway crashes, victims are found near to their vehicles or within about 200 metres.
In Thursday's case, Green said the man suffered a head injury and was disoriented.
"He just, instead of phoning right away, he wandered off and got lost in the dark," Green said, adding it was cold, the field had water in it and the wind was picking up. "He was wet and cold."
Green said the RCMP have been using the Dragan Flyer X4-ES for just over a year in a series of trials to determine how they might assist different elements of police work. Green was equipped with one for use in traffic analysis.
"We're still just trying out different platforms," he said, adding that five officers have obtained the necessary training and licences from aviation authorities to fly the devices.
It's amazing how quickly BLGs went from a novelty and costing thousands (zenmuse) to something you can get for $172 shipped!
I received my RCTimer Brushless Gimbal (BLG) and controller (Martinez v1) yesterday and of course had to try it immediately. Mark came over and helped with the build and documentation. The kit does not come with any instructions, so the RCGroups thread is the best source for build info.
Overall the quality of the RCTimer kit is not bad. There was one missing screw and a few things we had to alter to make it fit (see the build log link below for details). But the material is easy to work with. The default firmware and settings on the board seem to be pretty decent for a start. We initially had the IMU orientation and motor connections different, the result of that was shaking in the pitch axis. Once positioned and connected as shown above, it started to work fine without any parameter changes.
WASHINGTON – Stephen Rayleigh and Matt Lyon thought they were done with careers in drones after they left the Army in 2010 and enrolled at Embry-Riddle Aeronautical University in Prescott.
Until they met Professor Ray Bedard.
Rayleigh wanted to start a club that would build and fly drones; Bedard had wanted for years to launch drone classes. The club became a class in 2011, with the help of Lyon and Rayleigh’s expertise, and the class grew into a full-fledged drone minor that attracted 28 students when it launched at the school in August.
The minor aims to prepare students to build and fly unmanned aerial vehicles – UAVs, or drones – for a commercial market that doesn’t yet exist.
I put together a short video of Data Bus driving in autonomous mode in the rain. Hopefully I got the video in before the deadline. We'll see...
Data Bus is configured to drive between four waypoints outside my house at a much slower pace than during the 2012 AVC due to the much smaller area and the danger of collision with moving or stationary cars :)
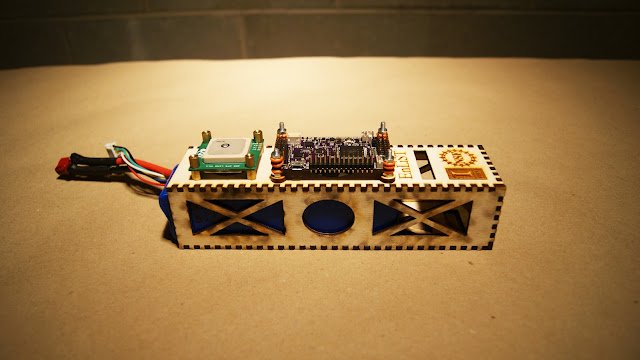
I'm very grateful to be in community that supports a laser-equipped Fab Lab. Lately I've been designing and fabricating custom components for my unmanned aircraft, especially components that are easily integrated into existing systems.
Above is a photo of one of my latest creations: a solution that houses a five or six-cell LiPo, an APM 2.5 autopilot with uBlox GPS, and potentially an RC receiver. Other features include vibration dampening via rubber o-rings, and slots to secure the module to the airframe via hook-and-loop straps. The material is 1/8th-inch birch.
Here's a custom acrylic (1/4-inch) mounting solution for the HeliPal Storm Drone quadrotor. Also makes use of 3mm rubber-o rings for vibration dampening. Not sure if it's the ideal material for this kind of structure, however, so I'm anxious to take it out for the first time.
Conventional quadrotors are what’s called underactuated robots, which means that they can move in more ways than they have independent control over. For example, they can happily yaw around to any angle you want while otherwise stationary, but if you ask them to pitch or roll, they can’t do it without also changing their position: if you try to roll a quadrotor left, the whole robot is going to fly left, and if you try to fly a quadrotor left, the whole robot is going to roll left.
This level of control turns the quadrotor into a fully-actuated robot: you have complete control over its position and orientation, and as the video shows, this lets the quadrotor do things that would otherwise be impossible for a conventional quadrotor without those tilting propellers.
There are tons of ways in which this new capability can be useful, but I’d say the most obvious one is for any quadrotor that carries a camera (which is pretty much all of them nowadays): instead of having to either rely on a static camera or invest in a complicated, heavy, and expensive gimbaled mount, you can now use the entire quadrotor as a pan and tilt camera platform.
Future work will improve the capabilities of this prototype (it’s called the “omnicopter”), and the researchers also plan to start experimenting with environmental interaction tasks that require orientation control, like using tools.
ResearchDrones and ConservationDrones recently went to Scotland to examine the potential of using drones for the conservation work of the Wildfowl and Wetlands Trust. The team went to the amazingly beautiful Caerlaverock wetland area to obtain images and footage of the wildlife and vegetation in the area. In the video you can see some of the footage and preliminary mosaics that were made from the photos taken during the flights.
Here is a video of Droidplanner +SmartAP flying a quad-copter without the use of a RC transmitter, video made by user Kirill.
The flight is made by using only a tablet, and I think that is impressive. The hardware used was a SmartAP, which handles all the hard work like landing. The UI is a tablet running Droidplanner (which is also compatible with Ardupilot).
If you want more info just post a comment, or go to the above links.
Hey everyone! This is our first post to DIY Drones, though we've been following this community for some time and have found the depth of knowledge here amazing! For the past few months we've been working on a unique GoPro gimbal design for the 3DR Hexa. We are now at a point at which we feel like we've made enough progress to share some of the results with this community and hopefully get some feedback.
About Us:
We are two guys, Jeff and David, with active careers in the broadcast industry. In addition to being enthusiasts of the UAV hobby, we see enormous potential for cost effective video production solutions. With news that the FAA will soon legislate commercial use, we've started investigating potential video production applications with our 3DR hexacopter. Read more about us here...
As many of you have experienced, we quickly ran headlong into the problem of vibration induced video distortion (better known as jello)! We tried several inexpensive gimbals on the market without much success. Obtaining a camera view that was unobstructed by the copter frame was also problematic.
So we decided to go DIY!
Gimbal Requirements:
Once we decided to design our own gimbal, we set down the main requirements that our prototype should meet.
Vibration isolation: Since our primary application will be production quality video, our main objective is to eliminate as much vibration related video distortion as possible. The video should not require post-processing to remove distortion.
An unobstructed view: The camera’s field of view needs to be completely unobstructed by the helicopter frame. No paying client will tolerate a landing gear or props in the shot, distracting from his or her product.
Plug and Play: Our gimbal system should directly attach to the 3DR frame without the need for additional drilling or modifications.
No Tuning: The gimbal should be balanced and centered relative to the 3DR Hexa frame, resulting in smooth flight without PID adjustments.
Affordable: Through the use of select materials and efficient design, we hope to achieve a reasonable production cost relative to the cost of the 3DR Hexa Kit.
Aesthetic Design: The gimbal needs to be well designed and professional looking. Something that looks cobbled together will not inspire client confidence in the quality of the final product.
The Story So Far...
With these requirements in mind, we set out upon the rocky road of development!
As any good project should, we started with a discovery and research phase where we investigated many different options and approaches. As mentioned above, we started by looking at basic gimbals that were already available. In all cases, we found that in order to achieve an unobstructed view, the gimbal needed to be mounted out on the arms of the hexacopter. Doing so would imbalance the copter, requiring it to be tuned at the software level. This placement also introduced more vibration into the gimbal.
We decided to tackle the vibration issue first, and then design a form that would meet our requirements. As we began researching ways to dampen vibration, we discovered that the three main factors involved are:
1) the weight of the supported object
2) the disturbing frequency (RPM)
3) rigidity of the structure isolated
We started out under the assumption that our gimbal would need to be heavy enough to create a static load within the deflection material, but not so heavy that it would overstress the material. So far we've found that it’s been difficult to find a sweet spot - one that is heavy enough to provide enough compression on the isolator, but not too heavy for the copter to lift.
At higher disturbing frequencies the required minimal thickness of the isolator can be reduced. Because the helicopter operates at variable disturbing frequencies, we determined that the thickness of our isolation material should be based upon the lowest disturbance RPM. Since our motors have a KV of 850 and operate at a maximum of 12 volts, the maximum RPM should be less than 10,200. Since hovering is usually achieved under 50% throttle, the low side of motor rotation for flight should be above 4000 revolutions per minute. For this reason we chose isolators with 5/16” thickness. This should provide us with isolation efficiency of 95% or better. More on the science of vibration reduction here: http://www.easyflex.in/pdff/latest/Vibration%20Isolation%20Theory.pdf
Once we had the vibration mounts, our goals, and the dimensions of the GoPro camera, we were ready to design our gimbal frame. We decided to go with an “H” frame that would be attached to the copters center and yet hold the GoPro carriage far enough in front of the copter to obtain an unobstructed view. Given the APMs native support of servos, we decided to steer away from brushless motors for now. We placed the roll servo in the center, and the pitch servo with additional ballast weight in the back to balance everything out.
Now that we had a form in mind, we needed to work out how to mount everything together. It quickly became apparent that the gimbal carriage would need to be firmly mounted, so that it did not add vibration, while being able to spin smoothly. The meant we would need ball bearing mountings. While looking for an affordable solution, Jeff came across ServoCity.com and found exactly what we were looking for.
Once the parts arrived in the mail, we bought some ⅛” X 1” aluminium strips and started cutting and drilling in our garages. We built the entire “H” frame and assembled all of the components. The gimbal had a very smooth movement on both the roll and pitch axis. The frame was rigid and solid, and protected the GoPro very well. It gave a clear and unobstructed view from the hexacopter
It just had one major problem, it was way too heavy! This gimbal rig was approaching 4.5 pounds and there was no way the hexacopter was going to be able to get off the ground, much less fly in the controlled and stable manner needed for video production.
We decided that we needed to reduce the weight as much as possible and this was going to require a high tech solution. David devised a calculator to help us determine optimal hole placement within the frame. Once we were comfortable with our layout we sent the design off for CNC routing.
How did it all work out? Check out the video and see for yourself. Please Note: there has been no post processing of the resulting GoPro video.
As you can see our first prototype is still too heavy. The good news is that our vibration isolation method seems to be effective based upon the limited amount of video we captured. That said, there is still work to be done! We've revised the design yet again, and our Mark II version parts should be arriving in the mail shortly.
Changes to the design include a much lighter chassis built from a thinner aluminum. After a few rigidity tests we believe we can reduce weight by using a 1/16” plate. We’ll also be removing as much metal as possible. The end result should look something like a skeleton relative to our current prototype. Another change will be the incorporation of the ability to modify the weight and thus the balance of the gimbal chassis. This will allow the gimbal to work with multiple GoPro versions and accessories. We will do this by adding several weighting compartments on the chassis. We are also planning on relocating the main battery to the rear of the gimbal to contribute to the weight needed for balance. This will further reduce the overall gimbal weight.
Here is the part where we need your help!
Since we only have one hexacopter for testing purposes, any recommendations regarding payload limitations would be appreciated.
We are interested in how much weight you have been able to successfully fly with?
What was the effect upon flight time?
Which frame were you using?
What motors, props, batteries, ESCs, etc. were used?
We are also interested in any additional methods you may have used for vibration isolation.
What was effective and what wasn't?
We are very determined and optimistic that we can successfully create a working system with these goals in mind (though we might have a few productive failures along the way). If you’re interested in reading more about our journey, we will be posting regularly on DIY drones and you can also follow our progress on our blog here: